HONDA CIVIC COUPE 1999 Manual PDF
Manufacturer: HONDA, Model Year: 1999, Model line: CIVIC COUPE, Model: HONDA CIVIC COUPE 1999Pages: 269, PDF Size: 2.42 MB
Page 71 of 269
Keys and Locks
LOCK (0) — You can insert or
remove the key only in this position.
To switch from ACCESSORY to LOCK, you must push the key inslightly as you turn it. If your car has
an automatic transmission, the shift
lever must also be in Park. The anti-
theft lock will lock the steering column when you remove the key.
If the front wheels are turned, theanti-theft lock may sometimes make
it difficult to turn the key fromLOCK to ACCESSORY. Firmly turn
the steering wheel to the left or to
the right as you turn the key. ACCESSORY (I) — In this position,
you can operate the audio systemand the accessory power socket.
ON (II) — This is the normal key
position when driving. All features
and accessories on the car are usable.
Several of the lights on the instru-
ment panel come on as a test when
you turn the ignition switch from
ACCESSORY to ON.
START (III) — Use this position
only to start the engine. The switch
returns to ON (II) when you let go of
the key.
You will hear a reminder beeper if you leave the key in the ignition switch in the LOCK (0) or
ACCESSORY (I) position and open the driver's door. Remove the key toturn off the beeper.
Door Locks
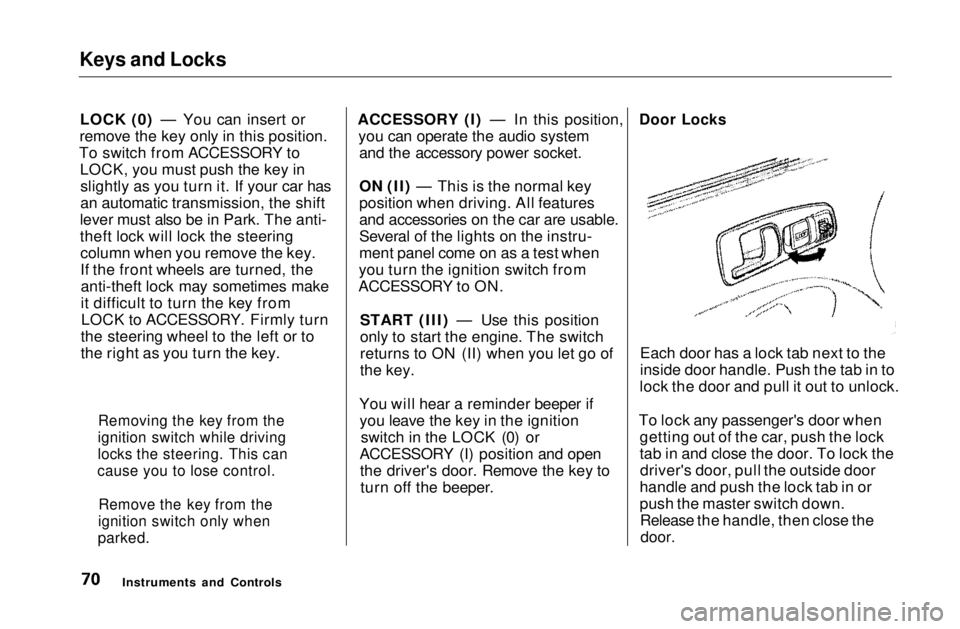
Each door has a lock tab next to the
inside door handle. Push the tab in to
lock the door and pull it out to unlock.
To lock any passenger's door when getting out of the car, push the lock
tab in and close the door. To lock thedriver's door, pull the outside door
handle and push the lock tab in or
push the master switch down. Release the handle, then close the
door.
Instruments and Controls
Removing the key from the
ignition switch while driving
locks the steering. This can
cause you to lose control.
Remove the key from the
ignition switch only when
parked.Main Menu Table of Contents s t
Page 72 of 269
Keys and Locks
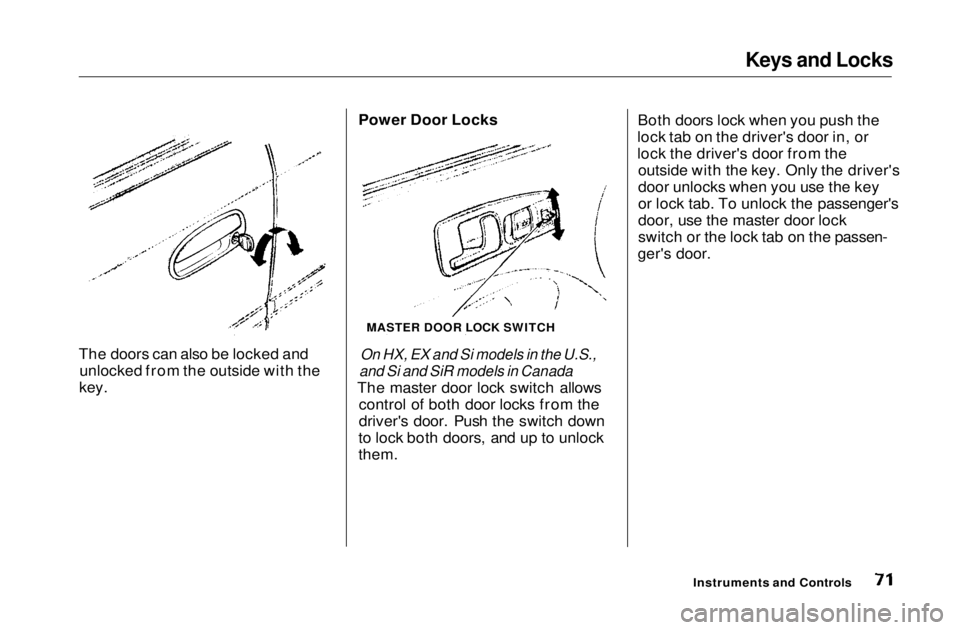
The doors can also be locked and unlocked from the outside with the
key. Power Door Locks
On HX, EX and Si models in the U.S.,
and Si and SiR models in Canada
The master door lock switch allows control of both door locks from the
driver's door. Push the switch down
to lock both doors, and up to unlock
them. Both doors lock when you push the
lock tab on the driver's door in, or
lock the driver's door from the outside with the key. Only the driver's
door unlocks when you use the key
or lock tab. To unlock the passenger's
door, use the master door lock
switch or the lock tab on the passen-
ger's door.
Instruments and Controls
MASTER DOOR LOCK SWITCHMain Menu Table of Contents s t
Page 73 of 269
Keys and Locks
On EX and Si models in the U. S.
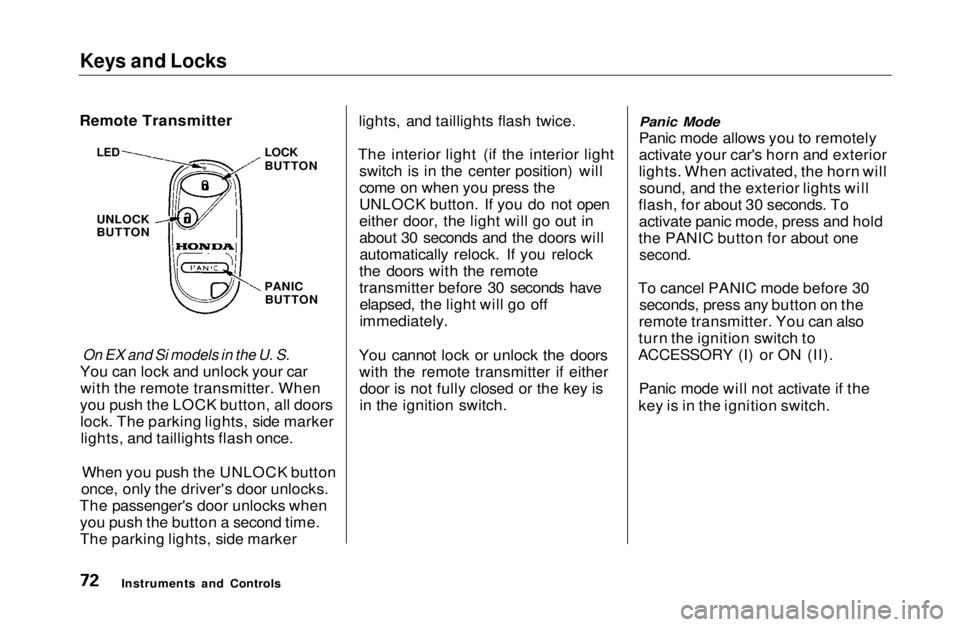
You can lock and unlock your car with the remote transmitter. When
you push the LOCK button, all doors lock. The parking lights, side markerlights, and taillights flash once.
When you push the UNLOCK button
once, only the driver's door unlocks.
The passenger's door unlocks when you push the button a second time.
The parking lights, side marker lights, and taillights flash twice.
The interior light (if the interior light switch is in the center position) will
come on when you press the
UNLOCK button. If you do not open
either door, the light will go out in
about 30 seconds and the doors willautomatically relock. If you relock
the doors with the remote
transmitter before 30 seconds have elapsed, the light will go off
immediately.
You cannot lock or unlock the doors with the remote transmitter if eitherdoor is not fully closed or the key is
in the ignition switch.
Panic Mode
Panic mode allows you to remotely
activate your car's horn and exterior
lights. When activated, the horn will sound, and the exterior lights will
flash, for about 30 seconds. To activate panic mode, press and hold
the PANIC button for about one
second.
To cancel PANIC mode before 30 seconds, press any button on the
remote transmitter. You can also
turn the ignition switch to
ACCESSORY (I) or ON (II).
Panic mode will not activate if the
key is in the ignition switch.
Instruments and Controls
Remote Transmitter
LOCK
BUTTON
LED
UNLOCK
BUTTON
PANICBUTTONMain Menu Table of Contents s t
Page 74 of 269
Keys and Locks
Replacing the Battery
When the remote transmitter's battery begins to get weak, it may
take several pushes on the button to
lock or unlock the doors, and the LED will get dim. Replace the
battery as soon as possible.
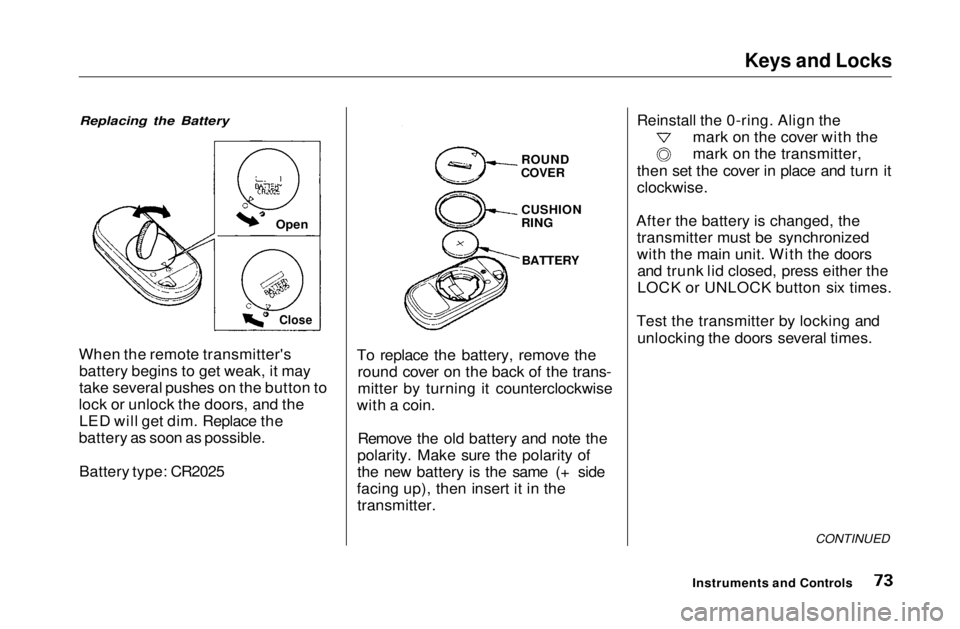
Battery type: CR2025 To replace the battery, remove the
round cover on the back of the trans-
mitter by turning it counterclockwise
with a coin.
Remove the old battery and note the
polarity. Make sure the polarity of
the new battery is the same (+ side
facing up), then insert it in the transmitter. Reinstall the 0-ring. Align the
mark on the cover with the
mark on the transmitter,
then set the cover in place and turn it
clockwise.
After the battery is changed, the transmitter must be synchronized
with the main unit. With the doorsand trunk lid closed, press either the
LOCK or UNLOCK button six times.
Test the transmitter by locking and unlocking the doors several times.
CONTINUED
Instruments and Controls
Open
Close
ROUND
COVER
CUSHION
RING
BATTERYMain Menu Table of Contents s t
Page 75 of 269

Keys
and Locks
Transmitter Care
Avoid severe shock to the trans- mitter, such as dropping or throwing
it. Also, protect it from extreme hot
or cold temperatures.
Clean the transmitter case with a
soft cloth. Do not use strong
cleaners or solvents that could harm
the case. Immersing the transmitter in any liquid will harm the trans-
mitter and cause it to not function
properly.
Use the ring on the transmitter to
attach it to your main key ring. You
could damage the transmitter if you
try to use its ring as a key ring. If you lose a transmitter, you will
need to have the replacement
programmed to your car's system by
your Honda dealer. Any other transmitters you have will also need
to be reprogrammed.
As required by the FCC: This device complies with Part 15 of the
FCC rules. Operation is subject to the
following two conditions: (1) This device
may not cause harmful interference, and (2) this device must accept any
interference received, including
interference that may cause undesired
operation.
This device complies with DOC
standards in Canada.
Changes or modifications not expressly
approved by the party responsible for compliance could void the user's
authority to operate the equipment.
Instruments and ControlsMain Menu Table of Contents s t
Page 76 of 269
Keys and Locks
Trunk
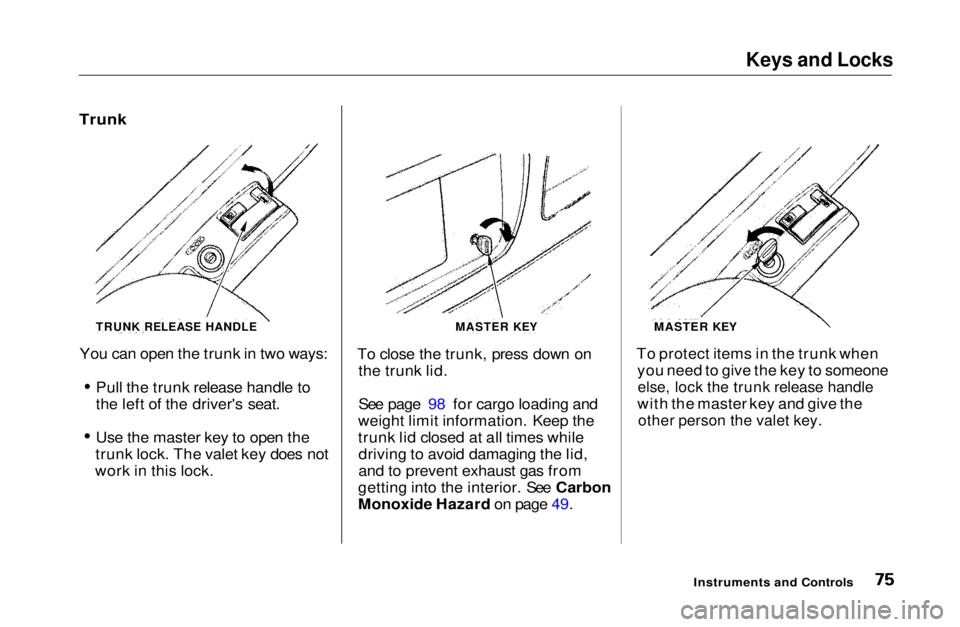
You can open the trunk in two ways: Pull the trunk release handle to
the left of the driver's seat.
Use the master key to open the
trunk lock. The valet key does not
work in this lock. To close the trunk, press down on
the trunk lid.
See page 98 for cargo loading and
weight limit information. Keep the
trunk lid closed at all times while driving to avoid damaging the lid,
and to prevent exhaust gas from
getting into the interior. See Carbon
Monoxide Hazard on page 49. To protect items in the trunk when
you need to give the key to someone
else, lock the trunk release handle
with the master key and give the
other person the valet key.
Instruments and Controls
TRUNK RELEASE HANDLE
MASTER KEY
MASTER KEYMain Menu Table of Contents s t
Page 77 of 269
Seat Adjustments
Front Seat Adjustments
See pages 12 — 13 for important safety
information and warnings about how to
properly position seats and seat-backs.
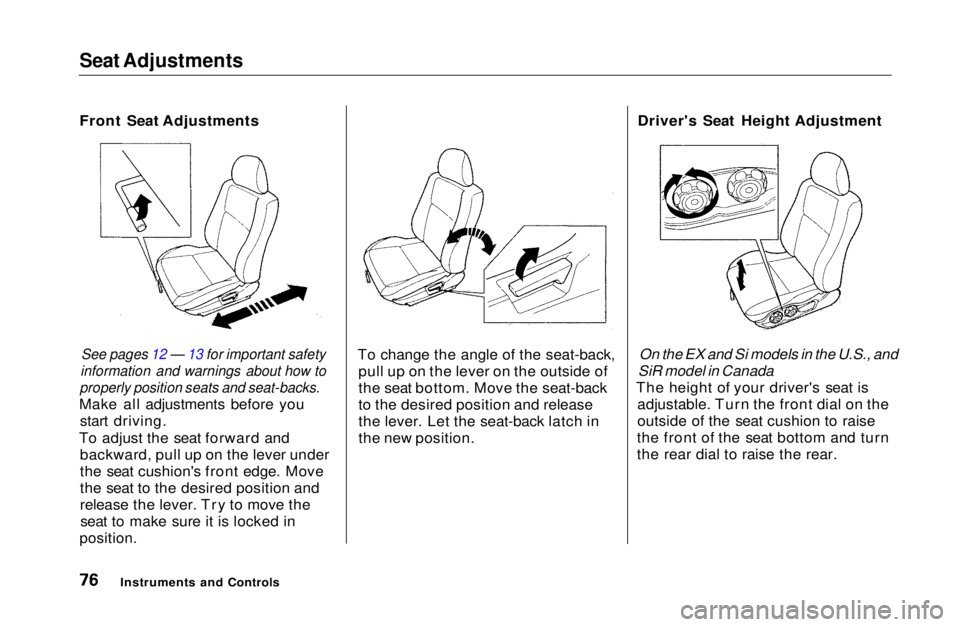
Make all adjustments before you start driving.
To adjust the seat forward and backward, pull up on the lever under
the seat cushion's front edge. Move
the seat to the desired position and
release the lever. Try to move theseat to make sure it is locked in
position.
To change the angle of the seat-back,
pull up on the lever on the outside of
the seat bottom. Move the seat-back
to the desired position and release
the lever. Let the seat-back latch in
the new position. Driver's Seat Height Adjustment
On the EX and Si models in the U.S., and
SiR model in Canada
The height of your driver's seat is adjustable. Turn the front dial on the
outside of the seat cushion to raise
the front of the seat bottom and turn
the rear dial to raise the rear.
Instruments and ControlsMain Menu Table of Contents s t
Page 78 of 269
Seat Adjustments
Rear Seat Access
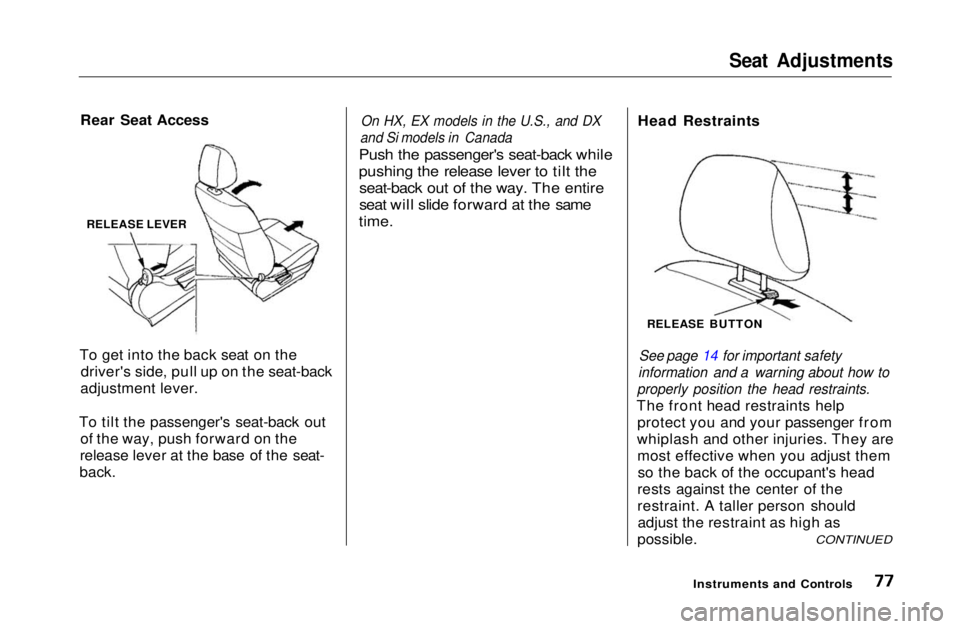
To get into the back seat on the driver's side, pull up on the seat-back
adjustment lever.
To tilt the passenger's seat-back out of the way, push forward on the
release lever at the base of the seat-
back.
On HX, EX models in the U.S., and DX
and Si models in Canada
Push the passenger's seat-back while
pushing the release lever to tilt the seat-back out of the way. The entire
seat will slide forward at the same
time.
Head Restraints
See page 14 for important safety
information and a warning about how to
properly position the head restraints.
The front head restraints help protect you and your passenger from
whiplash and other injuries. They are most effective when you adjust themso the back of the occupant's head
rests against the center of the
restraint. A taller person should adjust the restraint as high as
possible.
Instruments and Controls
CONTINUED
RELEASE LEVER
RELEASE BUTTONMain Menu Table of Contents s t
Page 79 of 269
Seat Adjustments, Folding Rear Seat
The front head restraints adjust for height. You need both hands to
adjust the restraint. Do not attempt
to adjust it while driving. To raise it, pull upward. To lower the restraint,
push the release button sideways and push the restraint down.
To remove a head restraint for cleaning or repair, pull it up as far as
it will go. Push the release button
and pull the restraint out of the seat-
back. Folding Rear Seat
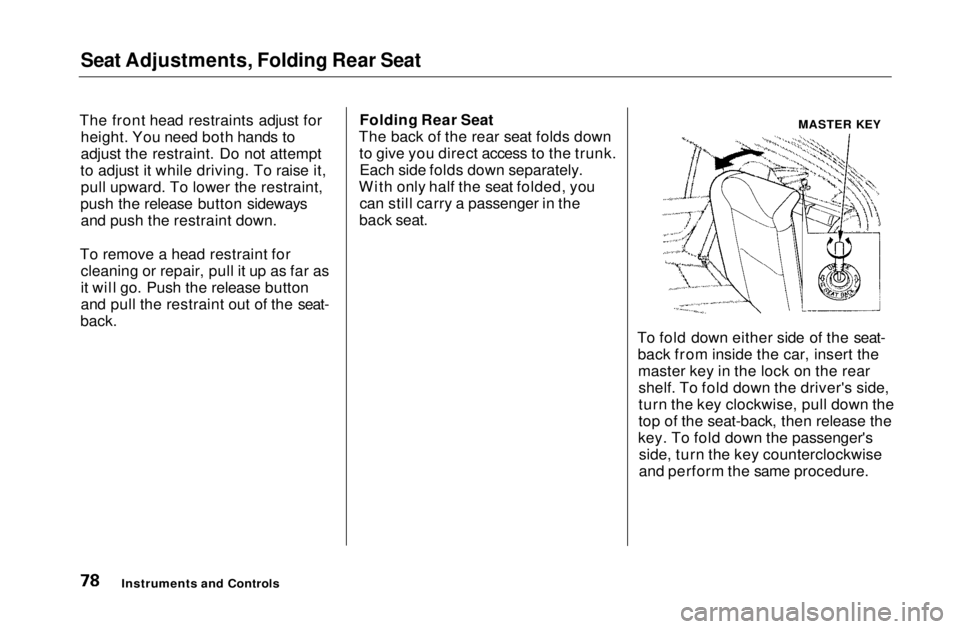
The back of the rear seat folds down to give you direct access to the trunk.Each side folds down separately.
With only half the seat folded, you can still carry a passenger in the
back seat.
To fold down either side of the seat-back from inside the car, insert themaster key in the lock on the rearshelf. To fold down the driver's side,
turn the key clockwise, pull down the
top of the seat-back, then release the
key. To fold down the passenger's side, turn the key counterclockwise
and perform the same procedure.
Instruments and Controls
MASTER KEYMain Menu Table of Contents s t
Page 80 of 269
Folding Rear Seat, Power Windows
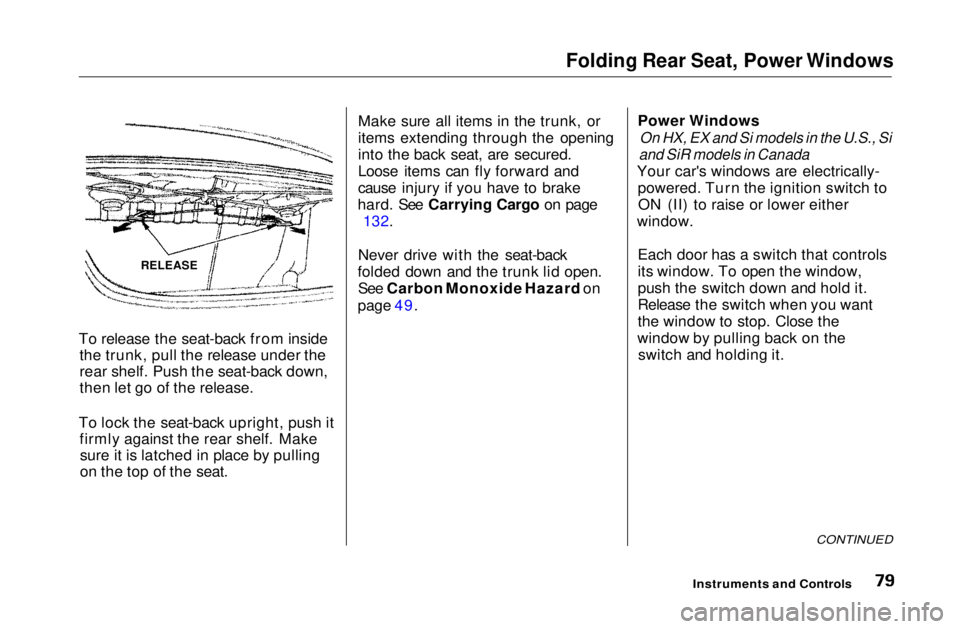
To release the seat-back from inside the trunk, pull the release under the
rear shelf. Push the seat-back down,
then let go of the release.
To lock the seat-back upright, push it firmly against the rear shelf. Makesure it is latched in place by pulling
on the top of the seat. Make sure all items in the trunk, or
items extending through the opening
into the back seat, are secured.
Loose items can fly forward and
cause injury if you have to brake
hard. See Carrying Cargo on page 132.
Never drive with the seat-back
folded down and the trunk lid open. See Carbon Monoxide Hazard on
page 49. Power Windows
On HX, EX and Si models in the U.S., Si
and SiR models in Canada
Your car's windows are electrically- powered. Turn the ignition switch toON (II) to raise or lower either
window.
Each door has a switch that controls
its window. To open the window,
push the switch down and hold it.
Release the switch when you want
the window to stop. Close the
window by pulling back on the switch and holding it.
CONTINUED
Instruments and Controls
RELEASEMain Menu Table of Contents s t