HONDA CR-V 2015 RM1, RM3, RM4 / 4.G Owners Manual
Manufacturer: HONDA, Model Year: 2015, Model line: CR-V, Model: HONDA CR-V 2015 RM1, RM3, RM4 / 4.GPages: 533, PDF Size: 24.82 MB
Page 471 of 533
470
uuChecking and Maintaining Tires uWear Indicators
Maintenance
Wear Indicators
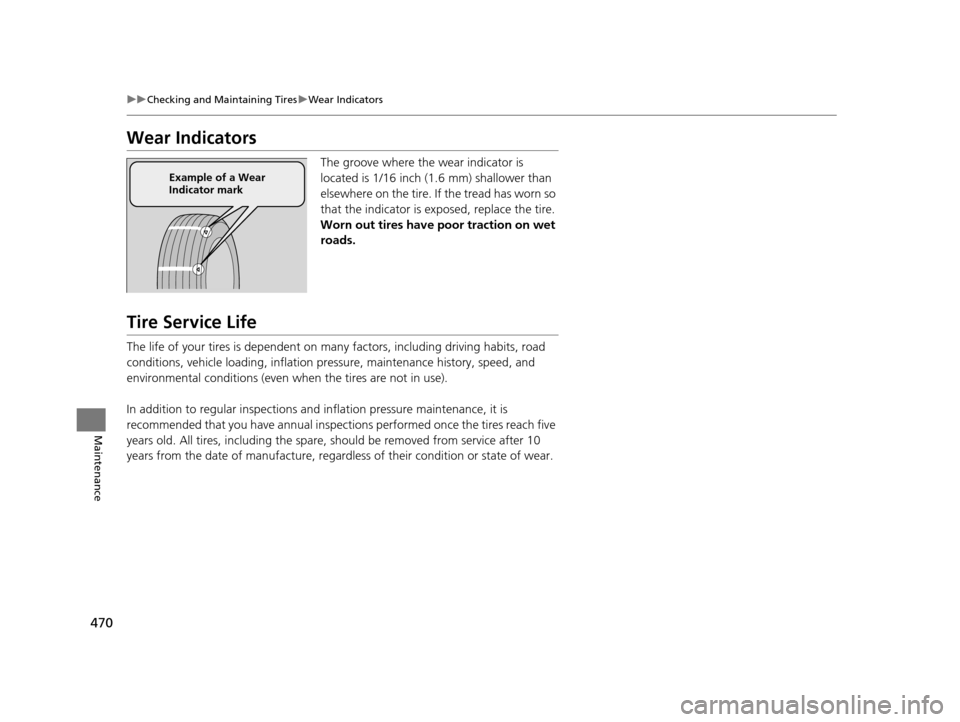
The groove where the wear indicator is
located is 1/16 inch (1.6 mm) shallower than
elsewhere on the tire. If the tread has worn so
that the indicator is ex posed, replace the tire.
Worn out tires have poor traction on wet
roads.
Tire Service Life
The life of your tires is dependent on many factors, including driving habits, road
conditions, vehicle loading, inflation pre ssure, maintenance history, speed, and
environmental conditions (even when the tires are not in use).
In addition to regular in spections and inflation pres sure maintenance, it is
recommended that you have annual inspecti ons performed once the tires reach five
years old. All tires, including the spare, should be removed from service after 10
years from the date of manufacture, regard less of their condition or state of wear.
Example of a Wear
Indicator mark
15 CR-V-31T0A6300.book 470 ページ 2015年2月2日 月曜日 午前10時35分
Page 472 of 533
471
uuChecking and Maintaining Tires uTire and Wheel Replacement
Maintenance
Tire and Wheel Replacement
Replace your tires with radials of the sa me size, load range, speed rating, and
maximum cold tire pressure rating (as shown on the tire’s sidewall). Using tires of a
different size or construction can caus e the ABS, vehicle stability assist (VSA®), hill
start assist, and the AWD
* system to work incorrectly.
It is best to replace all four tires at the same time. If that isn’t possible, replace the
front or rear tires in pairs.
Make sure that the wheel’s specificati ons match those of the original wheels.
If you replace a wheel, only use TPMS spec ified wheels approved for your vehicle.
1Tire and Wheel Replacement
3WARNING
Installing improper tires on your vehicle can
affect handling and stability. This can cause
a crash in which you can be seriously hurt or
killed.
Always use the size and type of tires
recommended in this owner’s manual.
* Not available on all models
15 CR-V-31T0A6300.book 471 ページ 2015年2月2日 月曜日 午前10時35分
Page 473 of 533
472
uuChecking and Maintaining Tires uTire Rotation
Maintenance
Tire Rotation
Rotating tires according to the maintena nce messages on the information display*/
multi-information display*/intelligent multi-information display (i-MID) helps to
distribute wear more evenly and increase tire life.
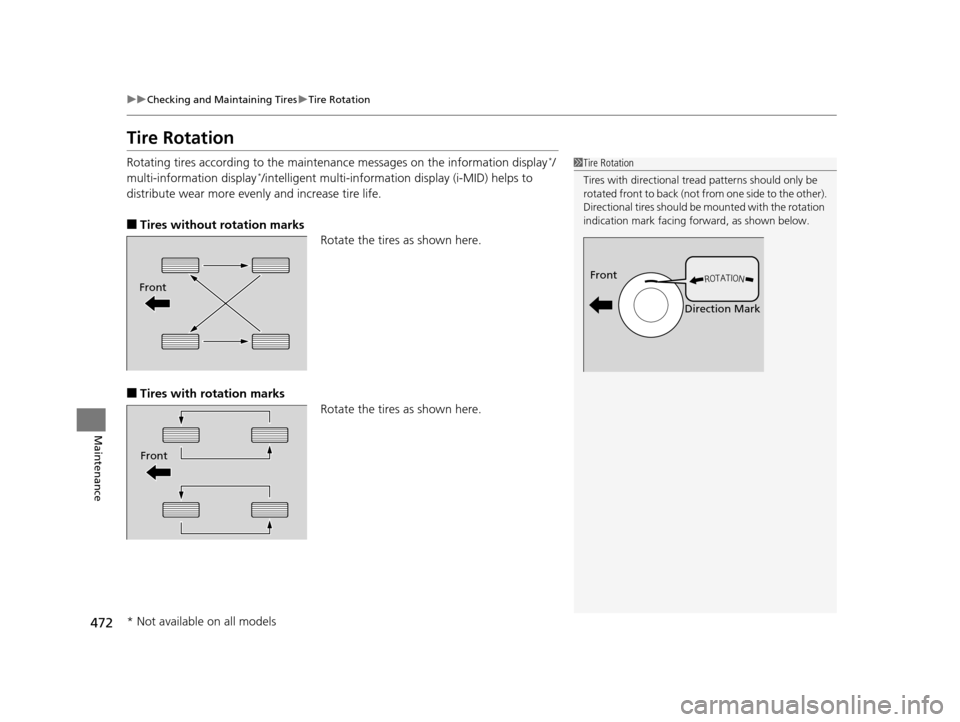
■Tires without rotation marks
Rotate the tires as shown here.
■Tires with rotation marks
Rotate the tires as shown here.
1Tire Rotation
Tires with directional trea d patterns should only be
rotated front to back (not fr om one side to the other).
Directional tires should be mounted with the rotation
indication mark facing forward, as shown below.
Front
Direction MarkFront
Front
* Not available on all models
15 CR-V-31T0A6300.book 472 ページ 2015年2月2日 月曜日 午前10時35分
Page 474 of 533
473
uuChecking and Maintaining Tires uWinter Tires
Maintenance
Winter Tires
If driving on snowy or frozen roads, mount all season marked “M+S” tires, snow
tires, or tire chains; reduce speed; and main tain sufficient distance between vehicles
when driving.
Be particularly careful wh en operating the steering wheel or brakes to prevent
skidding.
Use tire chains, snow tires, or all season tires when necessary or according to the law.
When mounting, refer to the following points.
For winter tires:
• Select the size and load ranges that are the same as the original tires.
• Mount the tires to all four wheels.
For tire chains:
• Install them on the front tires only.
• Because your vehicle has limited tire clea rance, we strongly recommend using the
chains listed below:
• Follow the chain manufactur er's instruction when installing. Mount them as
tightly as you can.
• Check that the chains do not touch the brake lines or suspension.
• Drive slowly.
Cable-type: SCC Radial Chain SC1042
Cable-type: SCC Radial Chain TC2111MM
1Winter Tires
NOTICE
Traction devices that are th e wrong size or improperly
installed can damage your vehicle's brake lines,
suspension, body, and wheels. Stop driving if they are
hitting any part of the vehicle.
When tire chains are mounted, follow the chain
manufacturer's instructi ons regarding vehicle
operational limits.
If your vehicle is equipp ed with summer tires, be
aware that these tires are not designed for winter
driving conditions. For more information, contact a
dealer.
3WARNING
Using the wrong chains, or not properly
installing chains, can damage the brake
lines and cause a crash in which you can be
seriously injured or killed.
Follow all instruction s in this owner's
manual regarding the selection and use of
tire chains.
Models with 215/70R16 tires
Models with 225/65R17 or P225/60R18 99H tires
15 CR-V-31T0A6300.book 473 ページ 2015年2月2日 月曜日 午前10時35分
Page 475 of 533
474
Maintenance
Battery
Checking the Battery
Check the battery condition monthly and check the terminals for corrosion.
If your vehicle's battery is disconnected or goes dead:
• The audio system is disabled.
2 Reactivating the audio system P. 210
•The clock resets.
2 Clock P. 128
•The navigation system* is disabled.
2 Refer to the navigation system manual
Charging the Battery
Disconnect both battery cables to prevent da maging your vehicle's electrical system.
Always disconnect the negative (–) cable first, and reconnect it last.
1 Battery
WARNING: Battery post, terminals,
and related accessories contain lead
and lead compounds.
Wash your hands after handling.
When you find corrosion, cl ean the battery terminals
by applying a baking powder and water solution.
Clean the terminals with a damp towel. Cloth/towel
dry the battery. Coat the terminals with grease to
help prevent future corrosion.
When replacing the battery, the replacement must be
of the same specifications.
Please consult a dealer for more information.
3WARNING
The battery gives off explosive hydrogen
gas during normal operation.
A spark or flame can cause the battery to
explode with enough force to kill or
seriously hurt you.
When conducting any battery
maintenance, wear prot ective clothing and
a face shield, or have a skilled technician do
it.
* Not available on all models
15 CR-V-31T0A6300.book 474 ページ 2015年2月2日 月曜日 午前10時35分
Page 476 of 533
475Continued
Maintenance
Remote Transmitter Care
Replacing the Button Battery
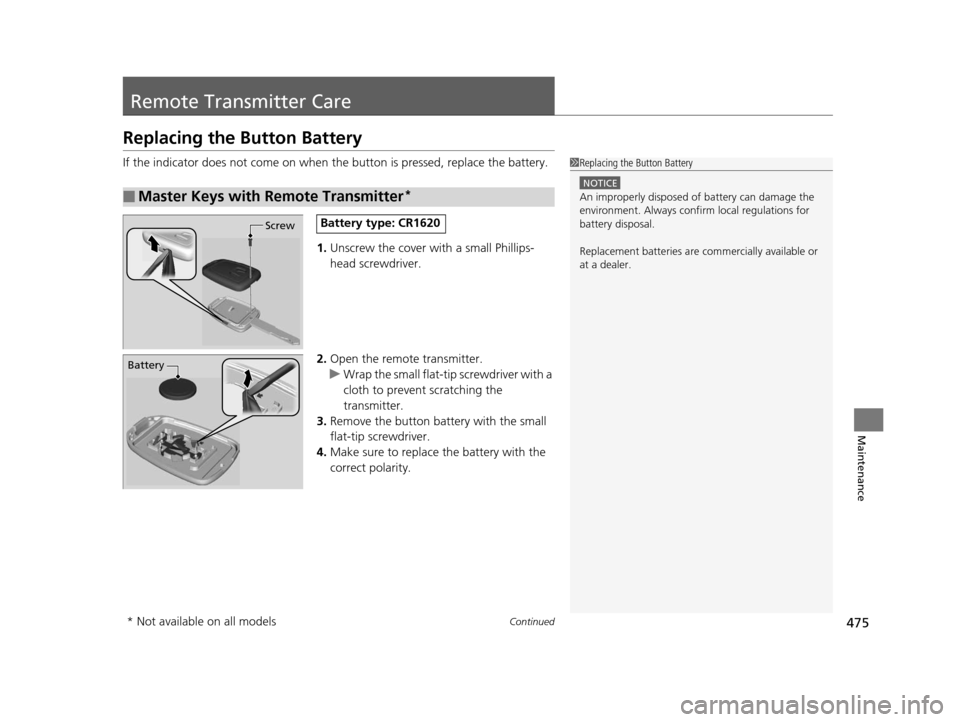
If the indicator does not come on when the button is pressed, replace the battery.
1. Unscrew the cover with a small Phillips-
head screwdriver.
2. Open the remote transmitter.
u Wrap the small flat-tip screwdriver with a
cloth to prevent scratching the
transmitter.
3. Remove the button battery with the small
flat-tip screwdriver.
4. Make sure to replace the battery with the
correct polarity.
■Master Keys with Remote Transmitter*
1Replacing the Button Battery
NOTICE
An improperly disposed of battery can damage the
environment. Always conf irm local regulations for
battery disposal.
Replacement batteries are commercially available or
at a dealer.
ScrewBattery type: CR1620
Battery
* Not available on all models
15 CR-V-31T0A6300.book 475 ページ 2015年2月2日 月曜日 午前10時35分
Page 477 of 533
476
uuRemote Transmitter Care uReplacing the Button Battery
Maintenance
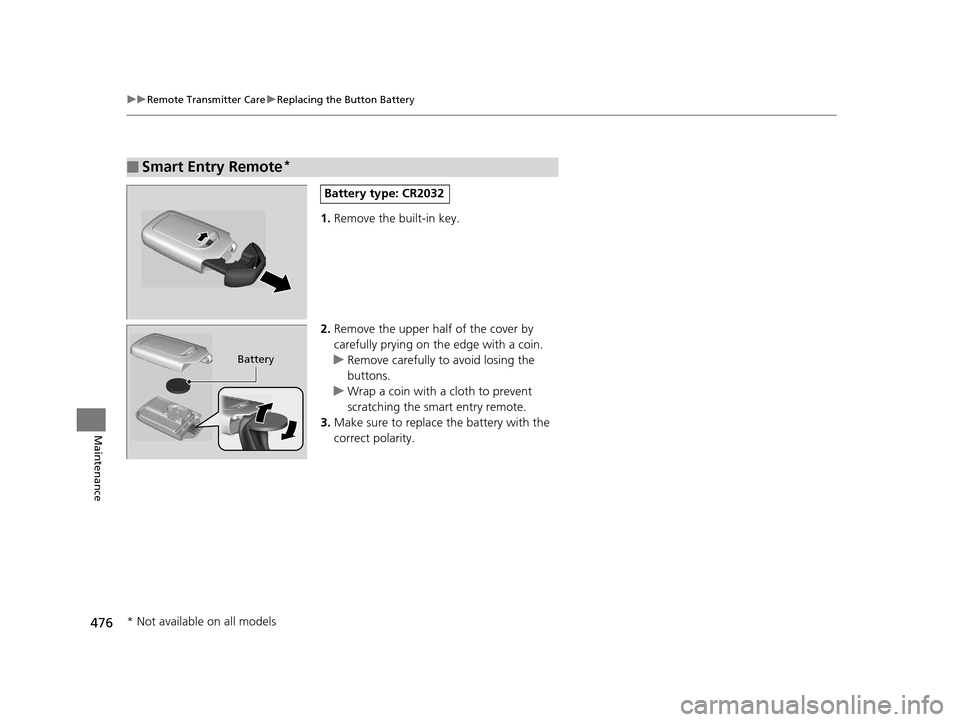
1. Remove the built-in key.
2. Remove the upper half of the cover by
carefully prying on the edge with a coin.
u Remove carefully to avoid losing the
buttons.
u Wrap a coin with a cloth to prevent
scratching the smart entry remote.
3. Make sure to replace the battery with the
correct polarity.
■Smart Entry Remote*
Battery type: CR2032
Battery
* Not available on all models
15 CR-V-31T0A6300.book 476 ページ 2015年2月2日 月曜日 午前10時35分
Page 478 of 533
477
Maintenance
Heating and Cooling System*/Climate Control System* Maintenance
Dust and Pollen Filter
The heating and cooling system*/climate control system* is equipped with a dust
and pollen filter that collects pollen, dust, and other debris in the air. The
Maintenance Minder
TM messages will let you know when to replace the filter.
We recommend that you replace the dust an d pollen filter sooner when using your
vehicle in areas with high concentrations of dust.
1 Dust and Pollen Filter
If the airflow from the heating and cooling system
*/
climate control system* deteriorates noticeably, and
the windows fog up easily, the filter may need to be
replaced. Please contact a dealer for replacement.
* Not available on all models
15 CR-V-31T0A6300.book 477 ページ 2015年2月2日 月曜日 午前10時35分
Page 479 of 533
478
Maintenance
Cleaning
Interior Care
Use a damp cloth with a mixture of mild detergent and warm water to remove dirt.
Use a clean cloth to remove detergent residue.
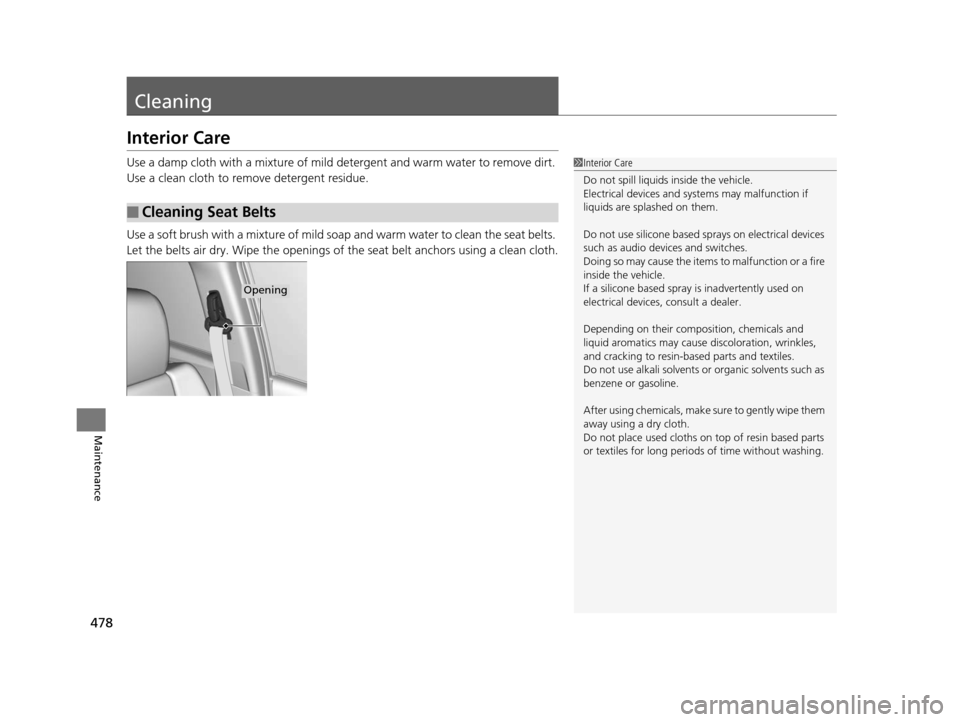
Use a soft brush with a mixture of mild soap and warm water to clean the seat belts.
Let the belts air dry. Wipe the openings of the seat belt anchors using a clean cloth.
■Cleaning Seat Belts
1 Interior Care
Do not spill liquids inside the vehicle.
Electrical devices and sy stems may malfunction if
liquids are splashed on them.
Do not use silicone based sprays on electrical devices
such as audio devices and switches.
Doing so may cause the items to malfunction or a fire
inside the vehicle.
If a silicone based spray is inadvertently used on
electrical devices, consult a dealer.
Depending on their compos ition, chemicals and
liquid aromatics may cause discoloration, wrinkles,
and cracking to resin-ba sed parts and textiles.
Do not use alkali solvents or organic solvents such as
benzene or gasoline.
After using chemical s, make sure to gently wipe them
away using a dry cloth.
Do not place used cloths on top of resin based parts
or textiles for long periods of time without washing.
Opening
15 CR-V-31T0A6300.book 478 ページ 2015年2月2日 月曜日 午前10時35分
Page 480 of 533
479
uuCleaning uInterior Care
Maintenance
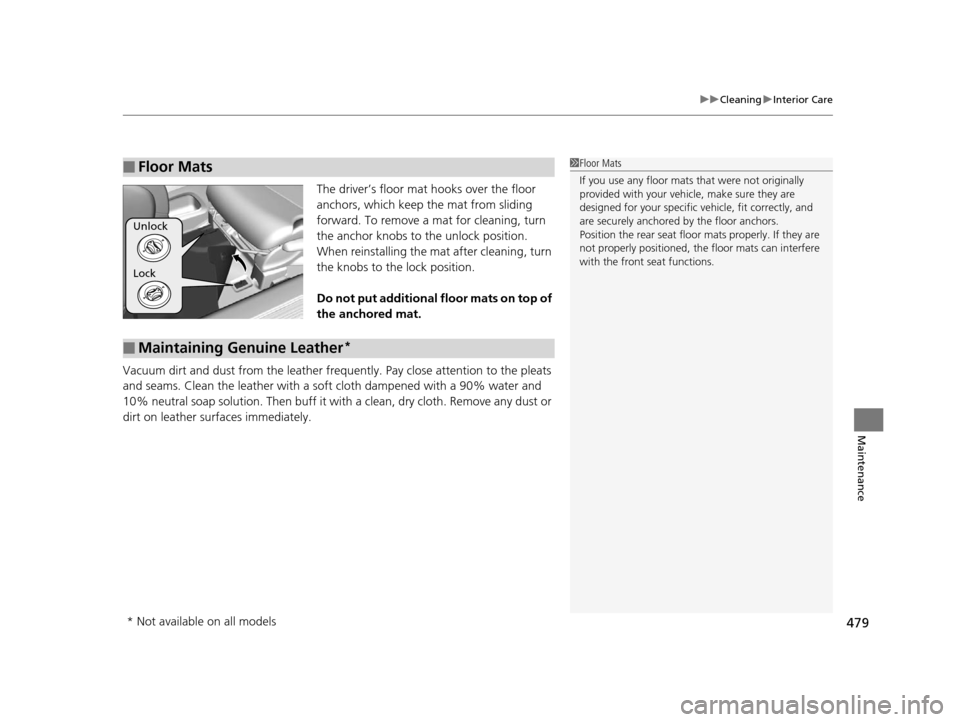
The driver’s floor mat hooks over the floor
anchors, which keep the mat from sliding
forward. To remove a mat for cleaning, turn
the anchor knobs to the unlock position.
When reinstalling the mat after cleaning, turn
the knobs to the lock position.
Do not put additional floor mats on top of
the anchored mat.
Vacuum dirt and dust from the leather frequ ently. Pay close attention to the pleats
and seams. Clean the leather with a so ft cloth dampened with a 90% water and
10% neutral soap solution. Then buff it with a clean, dry cloth. Remove any dust or
dirt on leather surfaces immediately.
■Floor Mats1 Floor Mats
If you use any floor mats that were not originally
provided with your vehicle, make sure they are
designed for your specific ve hicle, fit correctly, and
are securely anchored by the floor anchors.
Position the rear seat floor mats properly. If they are
not properly positioned, the floor mats can interfere
with the front seat functions.
Lock Unlock
■Maintaining Genuine Leather*
* Not available on all models
15 CR-V-31T0A6300.book 479 ページ 2015年2月2日 月曜日 午前10時35分