HONDA CR-Z 2011 1.G Owners Manual
Manufacturer: HONDA, Model Year: 2011, Model line: CR-Z, Model: HONDA CR-Z 2011 1.GPages: 333, PDF Size: 9.97 MB
Page 91 of 333
90
Instrument Panel
Gauges and Multi-Information Display Multi-Information Display
Customized Features
■
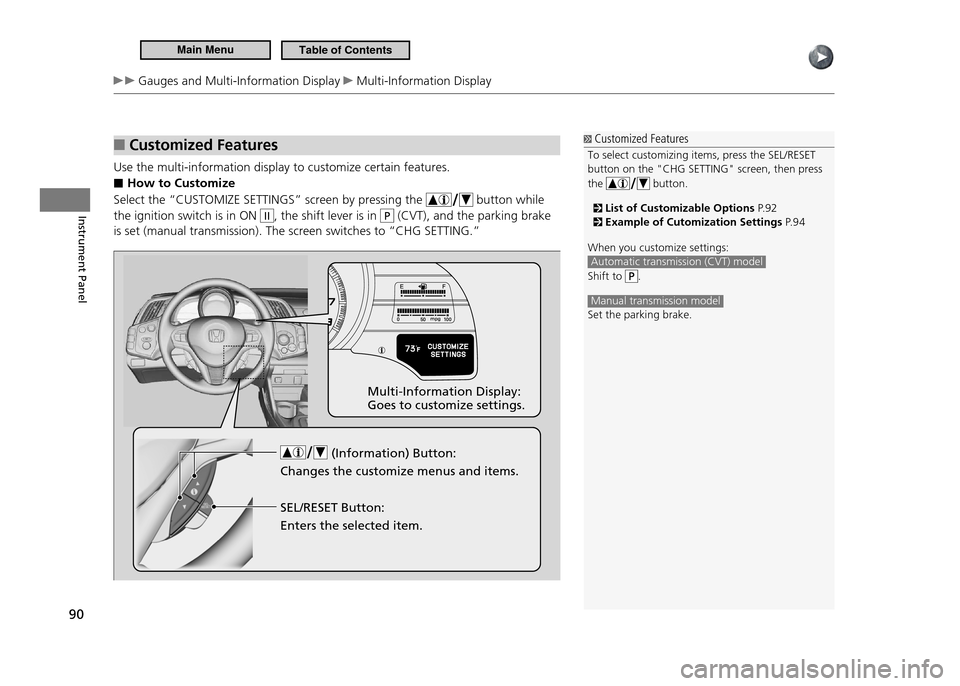
Use the multi-information display to customize certain features.
How to Customize
■
Select the “CUSTOMIZE SETTINGS” screen by pressing the
button while
the ignition switch is in ON
II, the shift lever is in P (CVT), and the parking brake
is set (manual transmission). The screen switches to “CHG SETTING.”
Customized Features
To select customizing items, press the SEL/RESET button on the "CHG SETTING" screen, then press the
button.
List of Customizable Options P. 9 2 Example of Cutomization Settings P. 9 4
When you customize settings:
Automatic transmission (CVT) model
Shift to .
Manual transmission model Set the parking brake.
(Information) Button:
Changes the customize menus and items. Multi-Information Display: Goes to customize settings.
SEL/RESET Button: Enters the selected item.
Main MenuTable of Contents
Page 92 of 333
91
Instrument Panel
Gauges and Multi-Information Display Multi-Information Display
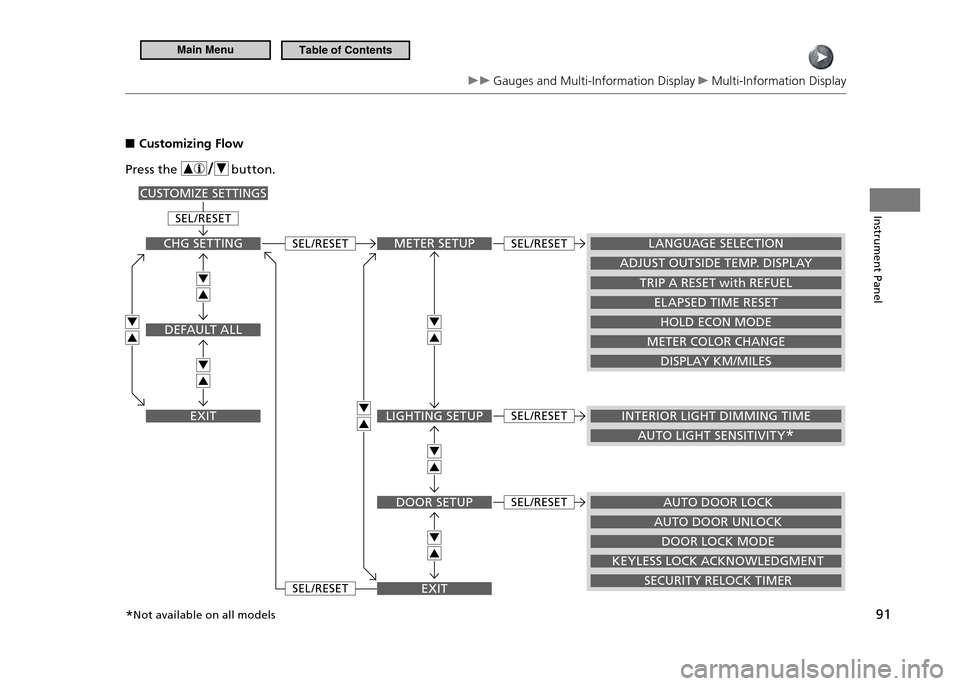
Customizing Flow
■
METE R SETUP
AU TO DOOR LOCK
INTERIOR LIGHT DIMMING TIME
AU TO LIGHT SENSITIVIT Y
*
LA NG UAGE SELE CTION
AD JUST OU TSIDE TE MP . DI SPLA Y
TRIP A RESE T with REFUEL
ELAP SED TIME RESE T
HOLD ECON MODE
METER COLOR CHANG E
DISPLAY KM/MILES
LIGHTING SETUP
DOOR SE TUP
EXIT
SEL/RESE T
SEL/RESE T
SEL/RESE T
SEL/RESE T
SEL/RESE T
SEL/RESE T
Pres s the button .
CHG SE TTING
DE FAUL T AL L
EX IT
CUSTOMIZE SETTINGS
DOOR LOCK MODE
KE YLESS LOCK ACKNOWL EDGMEN T
SE CURI TY RELO CK TIME R
AU
TO DOOR UN LOCK
*Not available on all models
Main MenuTable of Contents
Page 93 of 333
92
Instrument Panel
Gauges and Multi-Information Display Multi-Information Display
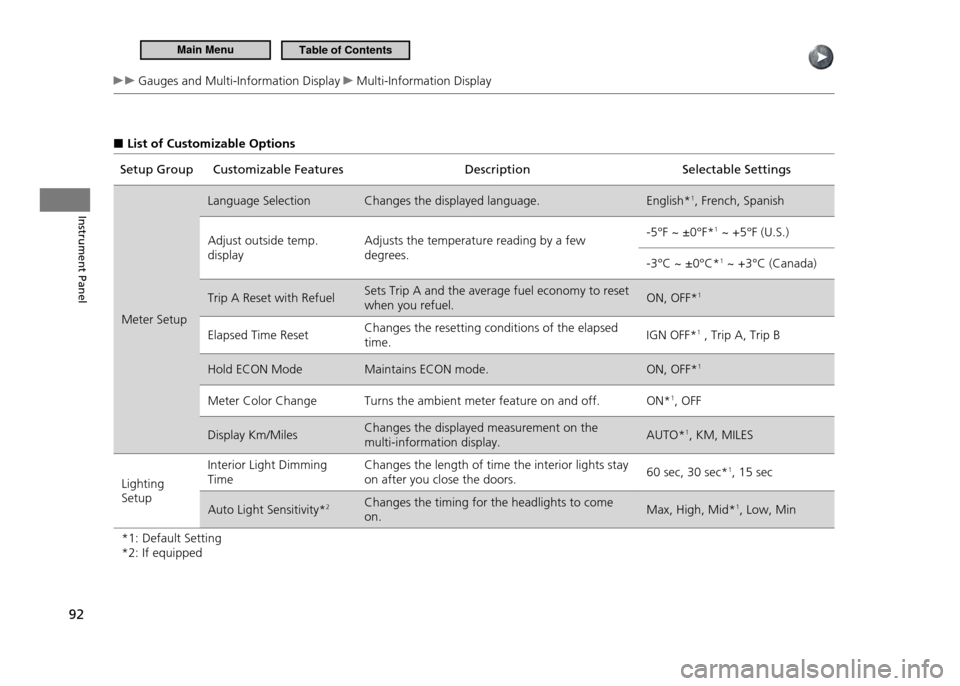
List of Customizable Options
■
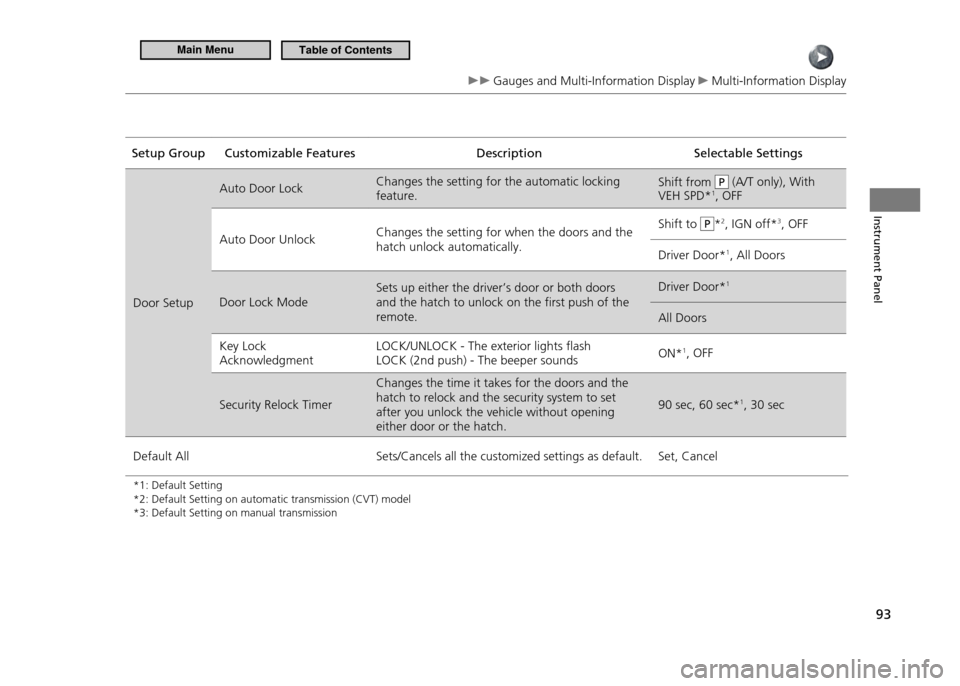
Setup Group Customizable Features Description Selectable Settings
Meter Setup Language Selection Changes the displayed language. English*
1
, French, Spanish
Adjust outside temp. display Adjusts the temperature reading by a few degrees. -5°F ~ ±0°F*
1
~ +5°F (U.S.)
-3°C ~ ±0°C* 1
~ +3°C (Canada)
Trip A Reset with Refuel Sets Trip A and the average fuel economy to reset when you refuel. ON, OFF*
1
Elapsed Time Reset Changes the resetting conditions of the elapsed time. IGN OFF*
1
, Trip A, Trip B
Hold ECON Mode Maintains ECON mode. ON, OFF* 1
Meter Color Change Turns the ambient meter feature on and off. ON* 1
, OFF
Display Km/Miles Changes the displayed measurement on the multi-information display. AUTO*
1
, KM, MILES
Lighting Setup Interior Light Dimming Time
Changes the length of time the interior lights stay on after you close the doors.
60 sec, 30 sec*
1
, 15 sec
Auto Light Sensitivity* 2
Changes the timing for the headlights to come on. Max, High, Mid*
1
, Low, Min
*1: Default Setting*2: If equipped
Main MenuTable of Contents
Page 94 of 333
93
Instrument Panel
Gauges and Multi-Information Display Multi-Information Display
Setup Group Customizable Features Description Selectable SettingsDoor Setup Auto Door Lock
Changes the setting for the automatic locking feature. Shift from
P (A/T only), With
VEH SPD* 1
, OFF
Auto Door Unlock Changes the setting for when the doors and the hatch unlock automatically. Shift to
P*
2
, IGN off* 3
, OFF
Driver Door* 1
, All Doors
Door Lock Mode Sets up either the driver’s door or both doors and the hatch to unlock on the first push of the remote. Driver Door*
1
All Doors
Key Lock Acknowledgment LOCK/UNLOCK - The exterior lights flash LOCK (2nd push) - The beeper sounds
ON*
1
, OFF
Security Relock Timer Changes the time it takes for the doors and the hatch to relock and the security system to set after you unlock the vehicle without opening either door or the hatch. 90 sec, 60 sec*
1
, 30 sec
Default All Sets/Cancels all the customized settings as default. Set, Cancel
*1: Default Setting *2: Default Setting on automatic transmission (CVT) model*3: Default Setting on manual transmission
Main MenuTable of Contents
Page 95 of 333
94
Instrument Panel
Gauges and Multi-Information Display Multi-Information Display
Example for Customizing Settings
■
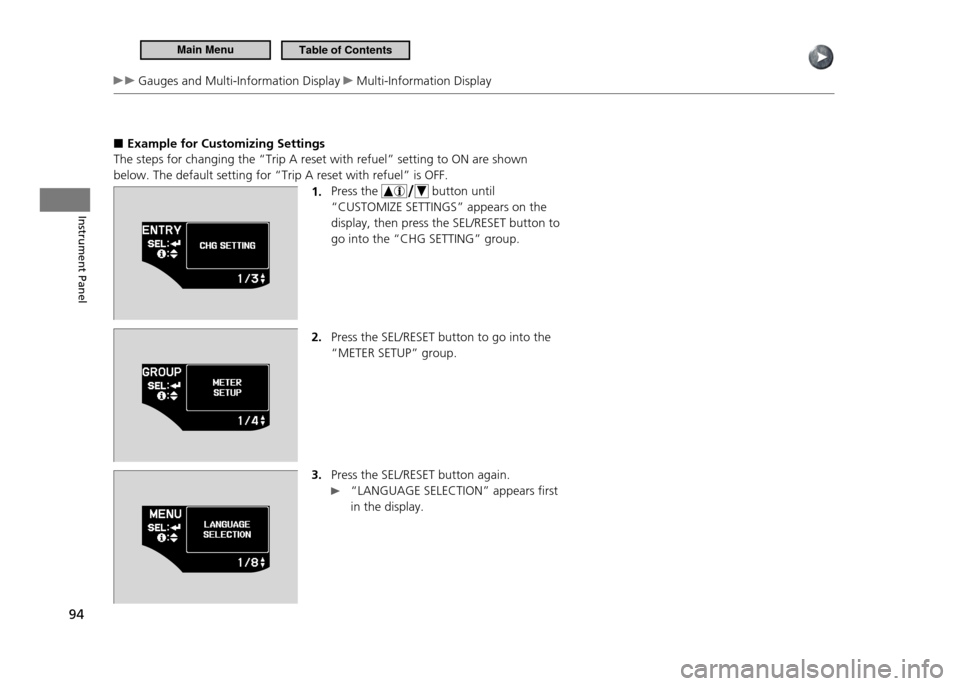
The steps for changing the “Trip A reset with refuel” setting to ON are shown below. The default setting for “Trip A reset with refuel” is OFF.
1. Press the
button until
“CUSTOMIZE SETTINGS” appears on the display, then press the SEL/RESET button to go into the “CHG SETTING” group.
2. Press the SEL/RESET button to go into the “METER SETUP” group.
3. Press the SEL/RESET button again.
“LANGUAGE SELECTION” appears first
in the display.
Main MenuTable of Contents
Page 96 of 333
95
Instrument Panel
Gauges and Multi-Information Display Multi-Information Display
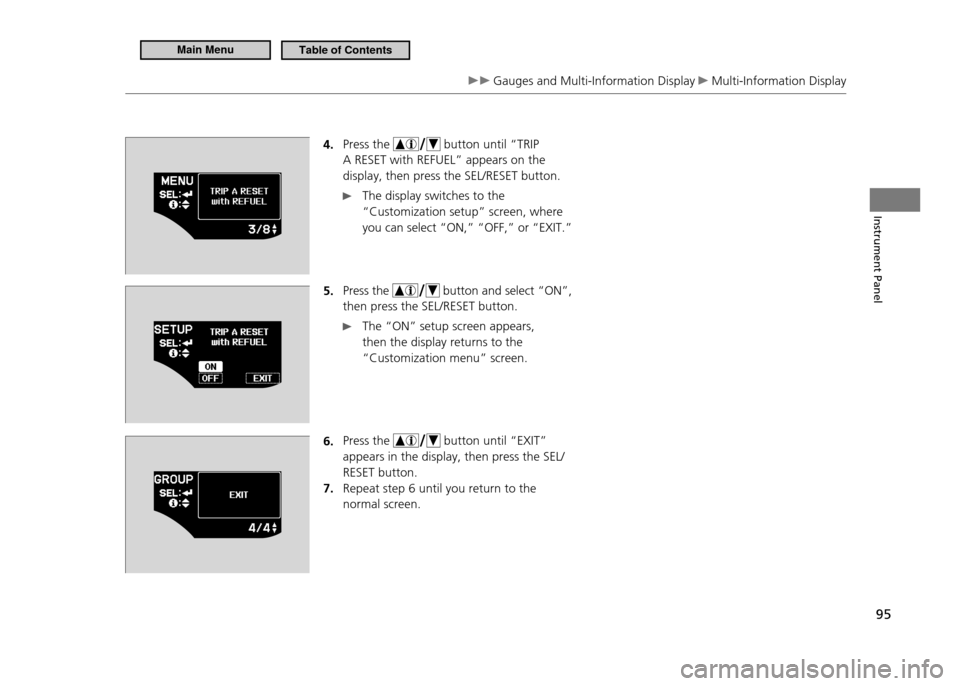
4. Press the
button until “TRIP
A RESET with REFUEL” appears on the display, then press the SEL/RESET button.
The display switches to the
“Customization setup” screen, where you can select “ON,” “OFF,” or “EXIT.”
5. Press the
button and select “ON”,
then press the SEL/RESET button.
The “ON” setup screen appears, then the display returns to the “Customization menu” screen.
6. Press the
button until “EXIT”
appears in the display, then press the SEL/ RESET button.Repeat step 6 until you return to the
7.
normal screen.
Main MenuTable of Contents
Page 97 of 333
96
Main MenuTable of Contents
Page 98 of 333
Controls
This chapter explains how to operate the various controls necessary for driving.
97
Setting the Clock
....................................... 98
Locking and Unlocking the Doors Key Types and Functions .......................... 99 Locking/Unlocking the Doors from
the Outside ........................................... 100Locking/Unlocking the Doors from
the Inside .............................................. 102
Auto Door Lock/Unlock .......................... 103
Opening and Closing the Hatch ............. 104
Security System ....................................... 105
Immobilizer System ................................ 105
Security Alarm System ............................ 105
Opening and Closing the Windows ....... 107Operating the Switches Around the Steering Wheel
Ignition Switch ....................................... 109
Turn Signals ........................................... 110
Light Switches ........................................ 110Fog Lights * ............................................ 112
Daytime Running Lights .......................... 112
Wipers and Washers ............................... 113
Brightness Control .................................. 115Rear Defogger/Heated Door Mirror *
Button ................................................... 116
Adjusting the Steering Wheel ................. 117 Adjusting the Mirror
Interior Rearview Mirror .......................... 118
Door Mirrors .......................................... 118
Adjusting the Seats Adjusting the Seat Position ..................... 119
Interior Lights/Interior Convenience Items Interior Lights ......................................... 123
Interior Convenience Items ..................... 125
Climate Control System Using Automatic Climate Control ........... 131
Automatic Climate Control Sensors ........ 133
* Not available on all models
Main Menu
Page 99 of 333
98
Controls
Setting the Clock
Clock
Models without navigation system
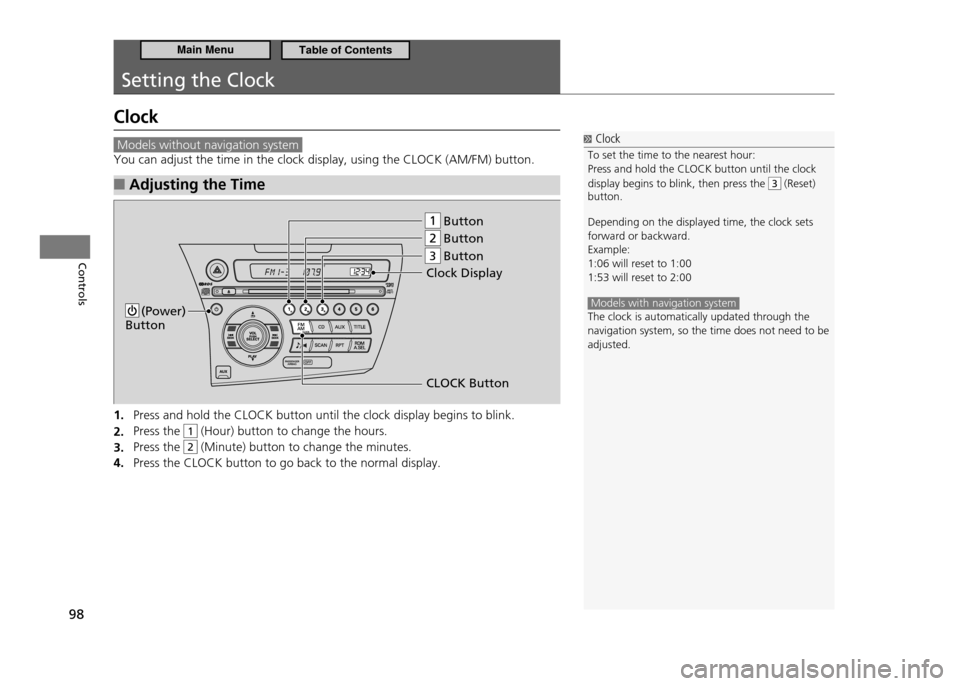
You can adjust the time in the clock display, using the CLOCK (AM/FM) button.Adjusting the Time
■
Press and hold the CLOCK button until the clock display begins to blink.
1.
Press the
2.
1 (Hour) button to change the hours.
Press the
3.
2 (Minute) button to change the minutes.
Press the CLOCK button to go back to the normal display.
4.
Button
Button
Button
(Power) Button
Clock Display
CLOCK Button
3
Clock
To set the time to the nearest hour: Press and hold the CLOCK button until the clock display begins to blink, then press the
3 (Reset)
button. Depending on the displayed time, the clock sets forward or backward.Example:1:06 will reset to 1:001:53 will reset to 2:00
Models with navigation system The clock is automatically updated through the navigation system, so the time does not need to be adjusted.
Main MenuTable of Contents
Page 100 of 333
99
Controls
Locking and Unlocking the Doors
Key Types and Functions
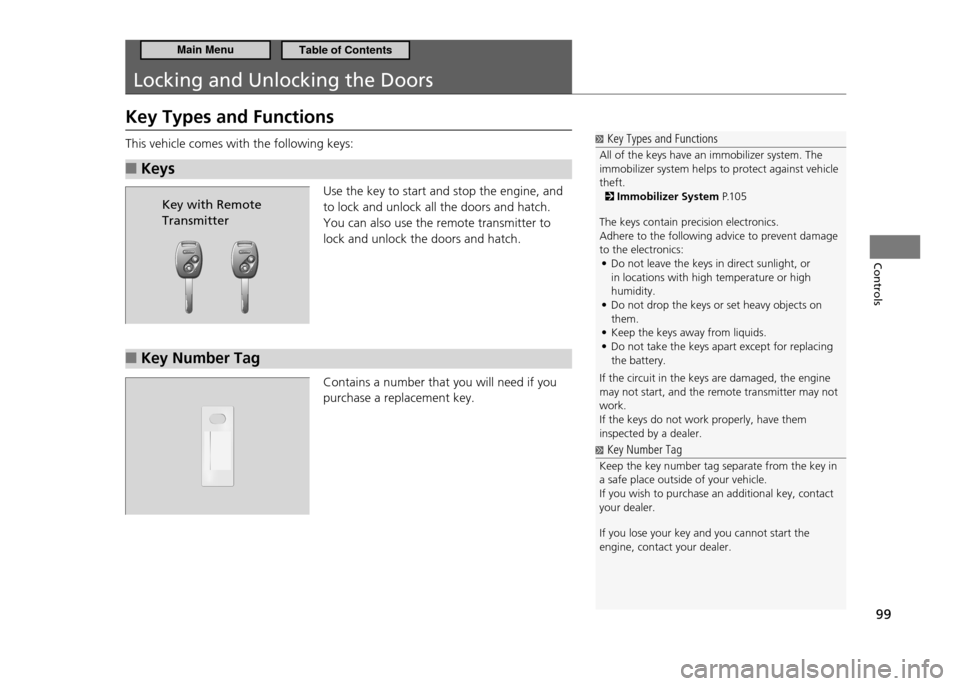
This vehicle comes with the following keys:Keys
■
Use the key to start and stop the engine, and to lock and unlock all the doors and hatch. You can also use the remote transmitter to lock and unlock the doors and hatch.
Key Number Tag
■
Contains a number that you will need if you purchase a replacement key.
Key Types and Functions
All of the keys have an immobilizer system. The immobilizer system helps to protect against vehicle theft.
Immobilizer System P.1 0 5
The keys contain precision electronics. Adhere to the following advice to prevent damage to the electronics: Do not leave the keys in direct sunlight, or
•
in locations with high temperature or high humidity.Do not drop the keys or set heavy objects on
•
them.Keep the keys away from liquids.
•
Do not take the keys apart except for replacing
•
the battery.
If the circuit in the keys are damaged, the engine may not start, and the remote transmitter may not work.If the keys do not work properly, have them inspected by a dealer.
Key Number Tag
Keep the key number tag separate from the key in a safe place outside of your vehicle.If you wish to purchase an additional key, contact your dealer. If you lose your key and you cannot start the engine, contact your dealer.
Key with Remote Transmitter
Main MenuTable of Contents