cks HONDA INTEGRA 1994 4.G Service Manual
[x] Cancel search | Manufacturer: HONDA, Model Year: 1994, Model line: INTEGRA, Model: HONDA INTEGRA 1994 4.GPages: 1413, PDF Size: 37.94 MB
Page 595 of 1413
Driveshafts
Inspection
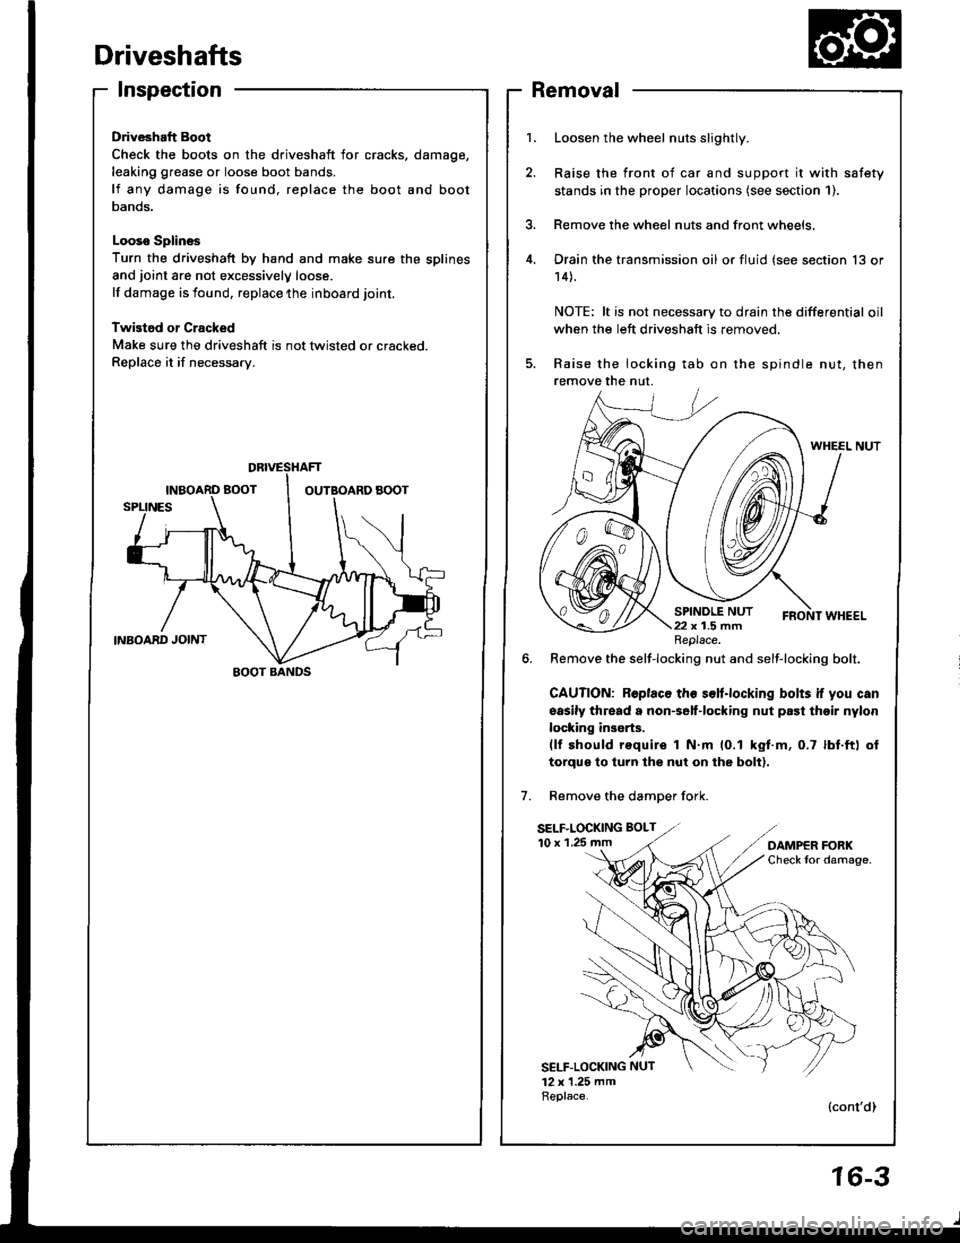
Driveshaft Boot
Check the boots on the driveshaft for cracks,
leaking grease or loose boot bands.
lf any damage is found, replace the boot
Danos.
Looso Splines
Turn the driveshaft by hand and make sure the splines
and joint are not excessivelV loose.
lf damage is found, replace the inboard joint,
Twistod or Cracked
Make sure the driveshaft is not twisted or cracked.
Replace it if necessarv.
damage,
and boot
Removal
Loosen the wheel nuts slightly.
Raise the front of car and support it with safety
stands in the proper locataons (see section 1),
Remove the wheel nuts and front wheels,
Drain the transmission oil or fluid (see section 13 or
14).
NOTE: lt is not necessary to drain the differential oil
when the left driveshaft is removed.
Raise the locking tab on the spindle nut, then
remove the nut.
WHEEL NUT
6. Remove the self-locking nut and self-locking bolt.
GAUTION: Roplaco th€ s€lt.locking bolts if you can
sasily thread a non€elf-locking nut prst thoir nylon
locking inserts.(lf should require I N.m (0.1 kgt.m, 0.7 lbf.ft) ol
torqus to turn lhs nut on the bolt).
Remove the damDer fork.
SELF.LOCKING BOLT
10 x 1.25 mm
SELF-LOCKING NUT
12 x 1.25 mmReplace.(cont'dl
DBIVESTIAFT
EOOT BANDS
Replace.
16-3
Page 598 of 1413
Driveshafts
Disassembly (cont'd)
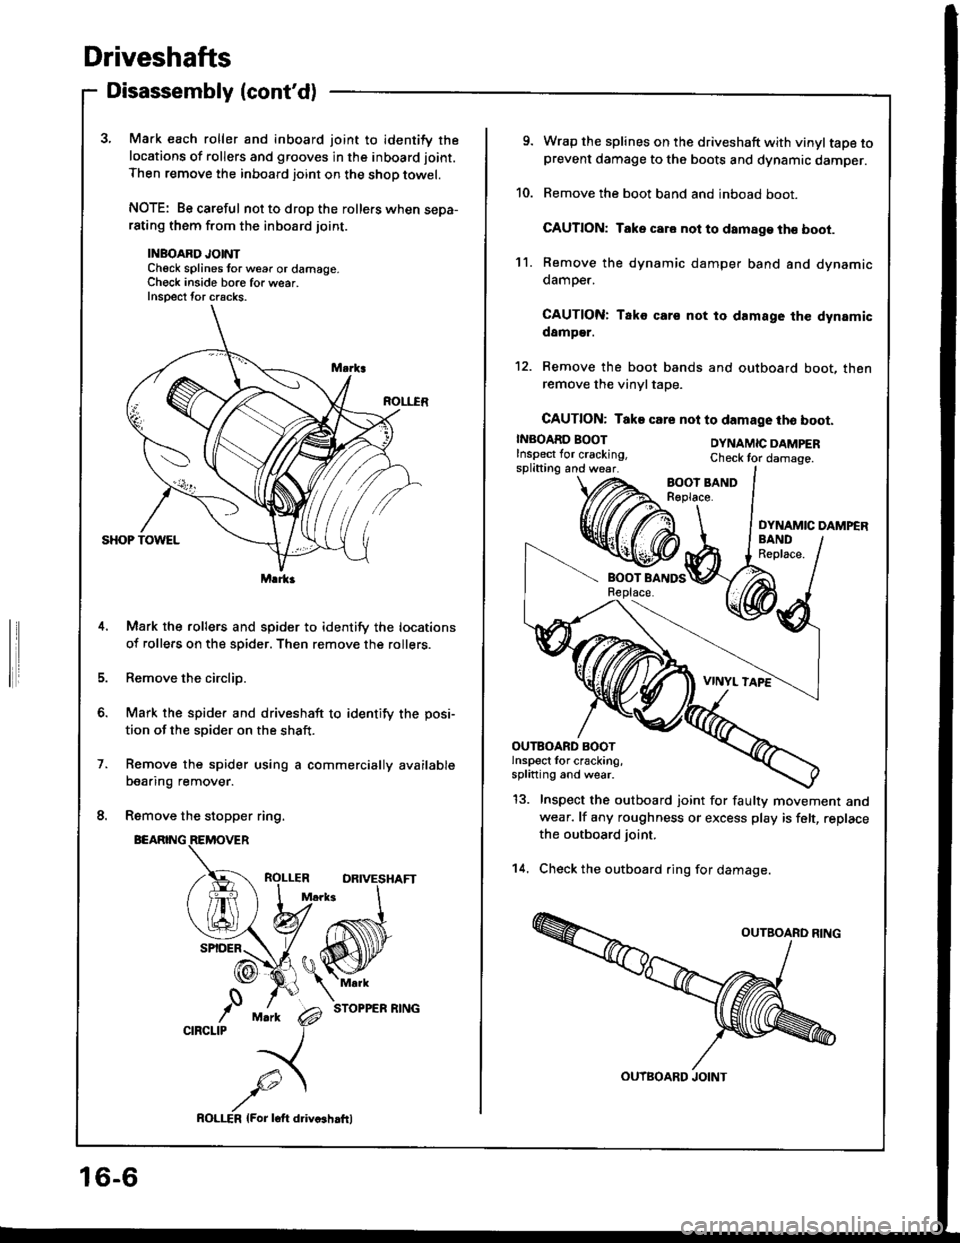
3, Mark each roller and inboard joint to identify the
locations of rollers and grooves in the inboard joint.
Then remove the inboard joint on the shop towel.
NOTE: Be careful not to drop the rollers when sepa-rating them from the inboard joint.
INBOARD JOINTCheck splines tor w6ar or damage.Ch€ck inside bore for wear.Inspect tor cracks.
Mark the rollers and spider to identify the locations
of rollers on the spider. Then remove the rollers.
Remove the circlip.
Mark the spider and driveshaft to identify the posi-
tion of the spider on the shaft.
Remove the spider using a commercially available
bearing remover.
Remove the stopper ring.
BEARING
STOPPER RING
Marka
o.
,'0CIRCLIP
16-6
ROLI-€R lFor loft ddvcshrfrl
9. Wrap the splines on the driveshaft with vinyltape toprevent damage to the boots and dynamic damper.
10. Remove the boot band and inboad boot.
CAUTION: Take car. not to damage th€ boot.
11. Remove the dynamic damper band and dynamicdamoer.
CAUTION: Tako cars not to damage the dynamicdamper.
12. Remove the boot bands and outboard boot, thenremove the vinyltape.
CAUTION: Take csre nol to damage tho boot.
INBOARD BOOTInspect lor cracking,splitting and wear.
DYNAMIC DAMPERCheck tor damage.
DYNAMIC DAMPER
13. Inspect the outboard joint for faulty movement andwear. lf any roughness or excess play is felt, replace
the outboard joint.
14. Check the outboard ring for damage.
OUTBOARD BOOTlnspect for cracking,splining and wear.
OUTBOARD JOINT
Page 603 of 1413
5.
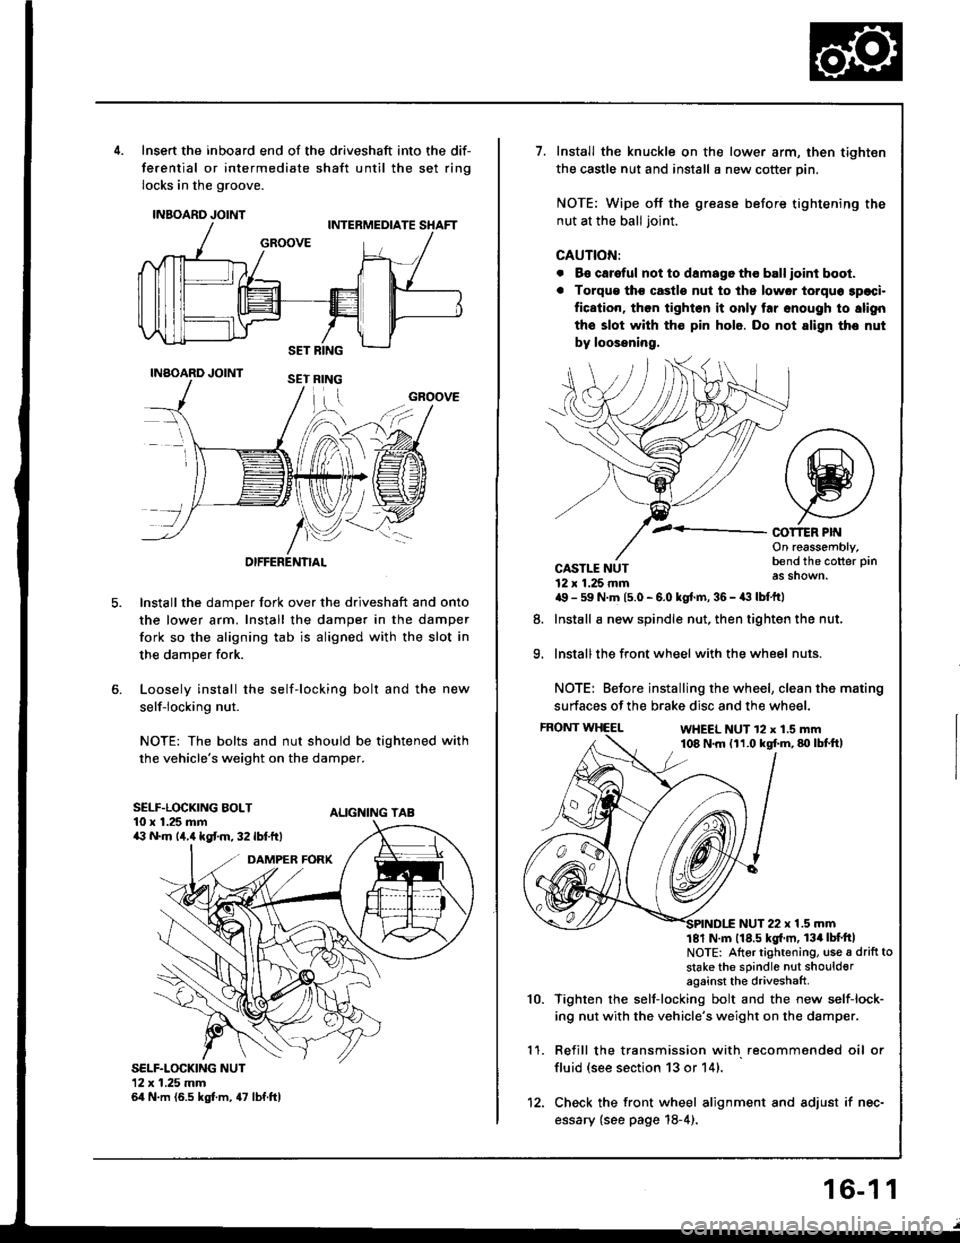
Insert the inboard end of the driveshaft into the dif-
ferential or intermediate shaft until the set ring
locks in the groove.
INBOARD JOINT
INAOARD JOINT
OIFFERENTIAL
Install the damper fork over the driveshaft and onto
the lower arm. Install the damper in the damper
fork so the aligning tab is aligned with the slot in
the damper fork.
Loosely install the self-locking bolt and the new
self-locking nut.
NOTE: The bolts and nut should be tightened with
the vehicle's weight on the damper.
ALIGNING TAB
SELF.LOCKING NUT12x 1.25 mm64 N.m (6.5 kgt m, 47 lbf.ftl
GROOVE
SELF.LOCKING BOLT10 x 1.25 mma:' N.m lir,4 kgt m, 32 lbf.ftt
1.Install the knuckle on the lower arm, then tighten
the castle nut and install a new cotter pin.
NOTE: Wipe off the grease before tightening the
nut at the ball joint.
CAUTION:
. B€ careful not to damago tho ball ioint boot.
. Torqu€ tho castle nut to ths lower torquo 3paci.
fication, then tighlon it only tar snough to slign
the slot with th€ pin hole. Do not align tho nut
by loossning,
COT1ER PIf{On reassembly,bend the cotter pin
as shown.
9.
CASTLE NUT12 x 1.25 rnma9 - 59 N.m 15.0 - 6.0 kgt.m, 36 - a:t lbtftl
Install a new spindle nut, then tighten the nut,
Install the front wheel with the wheel nuts.
NOTE: Before installing the wheel, clean the mating
surfaces of the brake disc and the wheel.
FRONT WHEELWHEEL NUT 12 x 1.5 mm108 N.m (11.0 kgf.m,80lbtft,
8.
1 '�I.
10.
NUT 22 x 1.5 mm181 N m 118.5 kgl'm, 134lbt'ftlNOTE: Altor tightening, use a drift to
stake the sPindle nut shoulderagainst the driveshaft
Tighten rhe self-locking bolt and the new self-lock-
ing nut with the vehicle's weight on the damper.
Refill the transmission with recommended oil or
fluid (see section 13 or 14).
Check the front wheel alignment and adjust if nec-
essary {see page 18-4).
12.
16-1 1
Page 627 of 1413
Inspection and Adjustment
Pump Belt
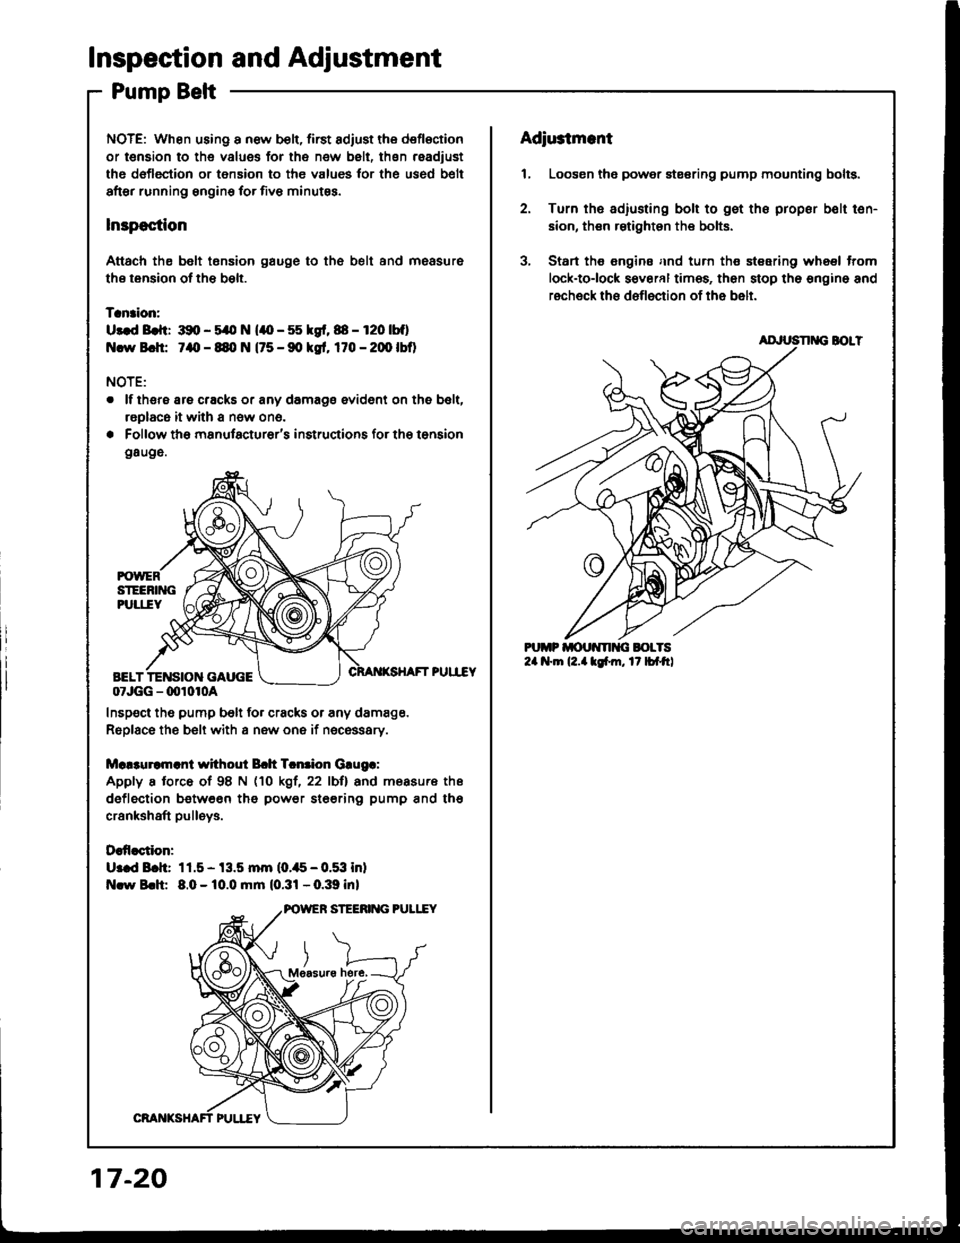
NOTE: When using a new b€li, first adiust the deflection
or t€naion to the values for the new belt, thsn readiust
ths deflection or tension to the values tor the used b€lt
after running sngine for five minutss.
lnspoction
Attach th€ belt tonsion gauge to th6 belt and measure
ths tension of the bslt.
Tanaion:
U3.d Brft: 391, - 5/O N (lO - 55 kgf, 88 - r20 |bf)
Ncw Bch: 7aO - 89, N (75 - 90 kgt, 170 - 20O lbO
NOTE:
. lf thsre are cracks or any damage evident on the belt,
raplaca it with a now ono.
. Follow the manufacturer's insructions for the tonsion
g8uge.
PUII"EY
07JGG - 00r0r0a
Inspect the pump belt for cracks or any damage.
Replace the belt with a new one if nec€ssary.
Mc!3uramrnl without Bch Tcntion Grugr:
Apply a torce of 98 N (10 kgl, 22 lbll and measure ths
deflection between tho power ste€rin9 pump and tho
crankshaft pulleys.
Daffaction:
U:ed Bch: 11.5- 13.5 mm (0.,t5-0.53 inl
Nlw Brh: 8.0 - 10.0 mm (0.31 - 0.39 inl
here,
17-20
Adiu3tmant
1, Loosen the power stesring pump mounting bolts.
2. Turn ths adiusting bolt to gst the propor bolt ten-
sion, then rstighten the bolts.
3, Start ths €ngine and turn the steering wheel trom
lock-tolock s€veral times, then stop the engino and
recheck ths deflection of the belt.
AD'USN G BOLT
Page 672 of 1413
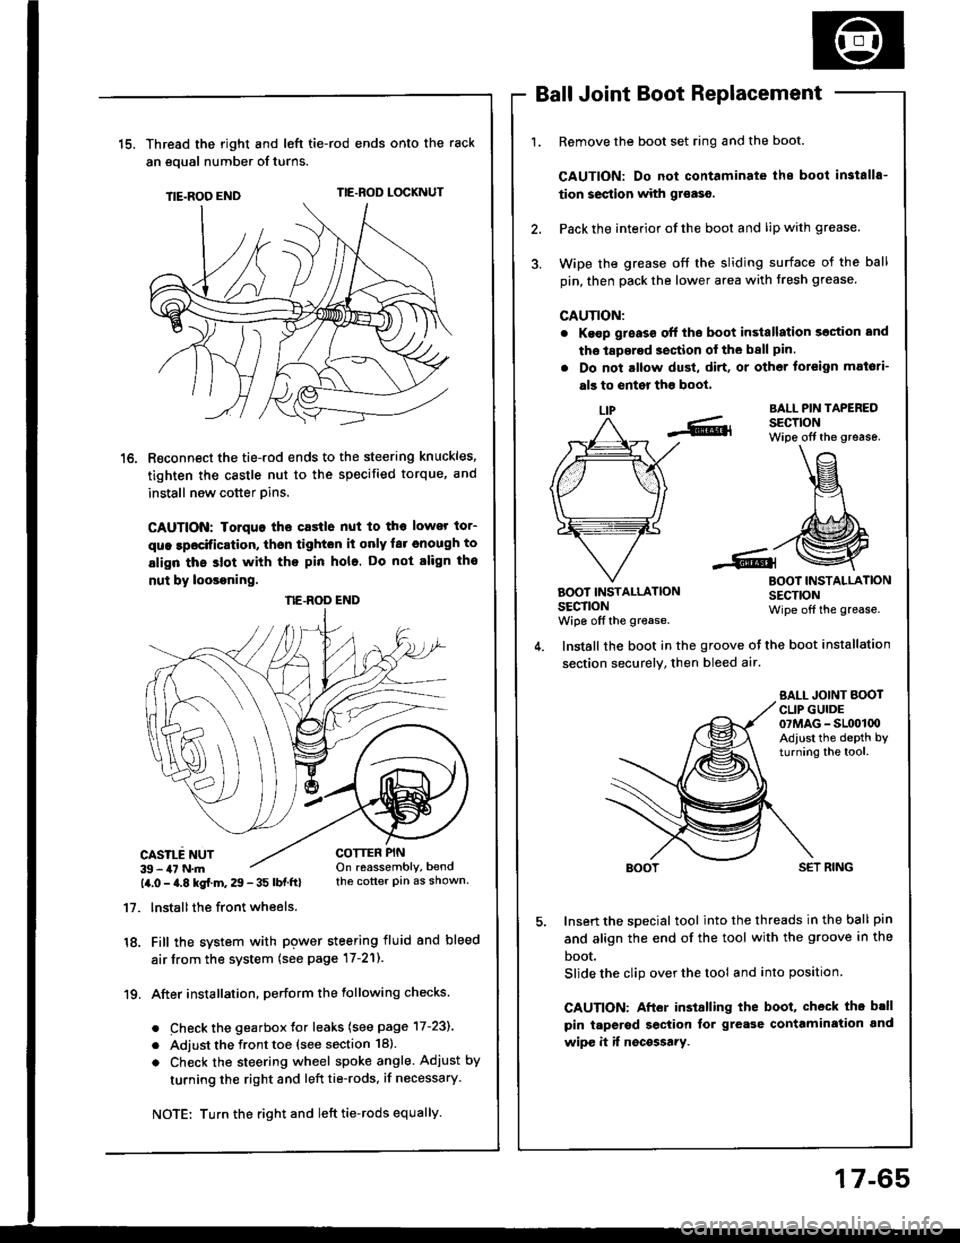
15.Thread the right and lefi tie-rod ends onto the rack
an eoual number of turns.
TIE-ROO ENDTIE.ROD LOCKNUT
R€connect the tie-rod ends to the steering knuckles,
tighten the castle nut to the specified torque, and
install new cotter pins.
CAUTION: Iorquo tho castle nut to tho lower tor-
que lpocification, thsn tighton it only far cnough to
align thc slot with tho pin hole. Do not align tho
nut by loosoning.
CASILE NUT39 - 47 N.m14.0 - a.8 kgf.m. 29 - 35 lbf ftl
17. lnstallthe front wheels.
18. Fill the system with pgwer steering fluid and bleed
air from the system (see page 17-21).
19. After installation. perform the following checks.
. Check the gearbox Jor leaks (see page 17-231
. Adjust the front toe (see section 18).
o Check the steering wheel spoke angle. Adjust by
turning the right and left tie-rods, if necessary.
Ball Joint Boot Replacement
Remove the boot set ring and the boot.
CAUTION: Do not contaminate ihe boot in3talls-
tion section with gr€aso.
Pack the interior of the boot and lip with grease.
Wipe the grease off the sliding surface of the ball
pin, then pack the lower area with fresh grease.
CAUTION:
. Ke€p g;eass off the boot in3tallation section and
tho laperad section of the ball pin.
. Do not altow dust, di.t, or other toreign mat6ti-
als to enter tho boot,
LIPBALL PIN TAPEREDSECTIONWipe off the grease.
BOOT INSTALLATIONSECTIONwiDe off the grease.
BOOT INSTALLATIONSECTIONWipe off the grease.
COTTER PINOn reassembly, bendthe cotter pin as shown.
Install the boot in the groove ot the boot installation
section securely, then bleed air.
SALL JOINT BOOTCLIP GUIDE07MAG - SL(x)l00Adiust the depth byturning the tool.
SET RING
Insert the special tool into the threads in the ball pin
and align the end of the tool with the groove in the
boot.
Slide the clip over the tool and into position
CAUTION: After installing the boot, check th. b.ll
pin taperod section tor grease contamiration and
wipe it if nocossary.
NE.ROD END
Turn the right and left tie-rods equally.
17-65
Page 931 of 1413
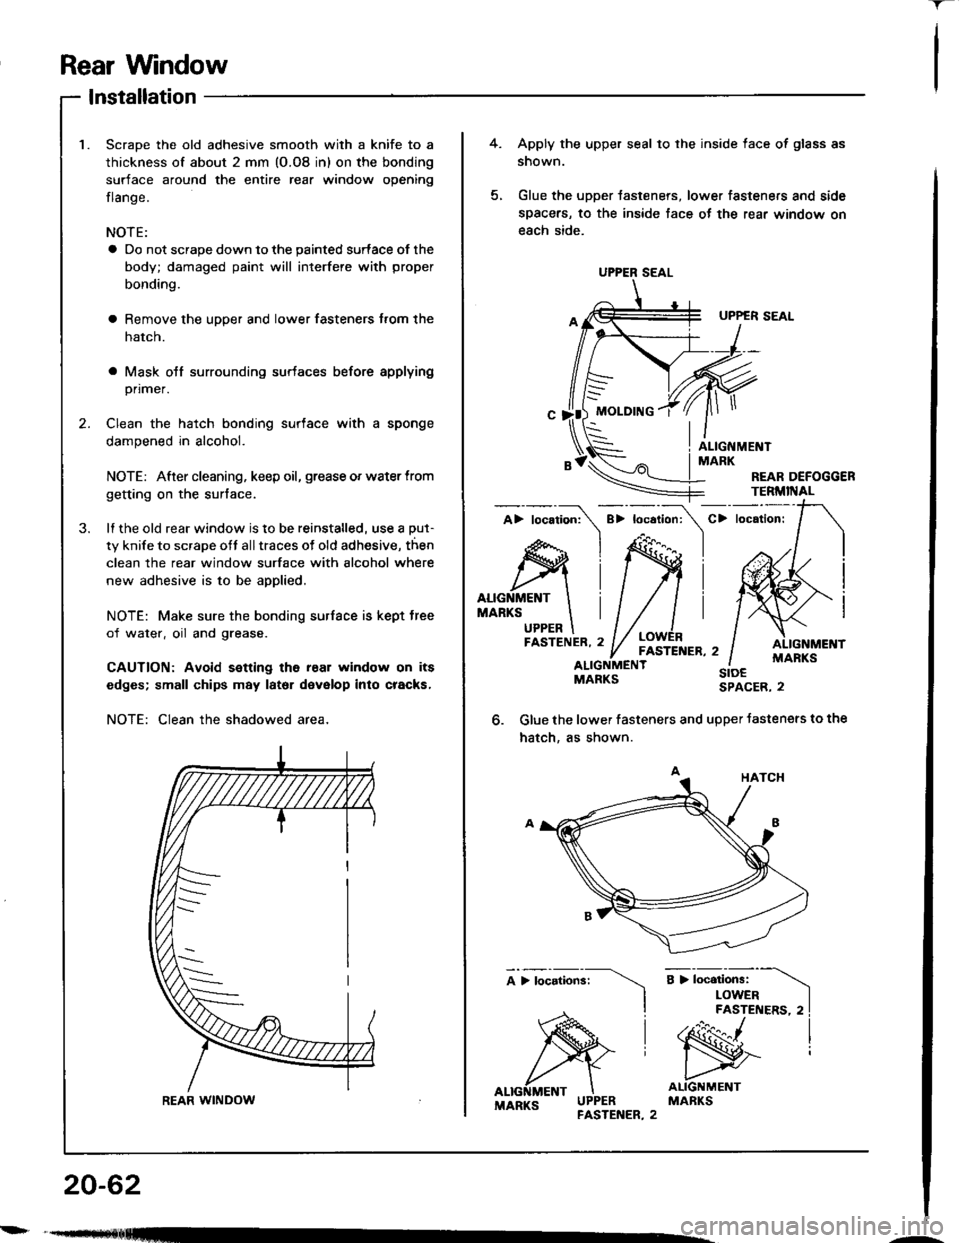
Rear Wndow
-r
lnstallation
Scrape the old adhesive smooth with a knife to a
thickness of about 2 mm (O.O8 in) on the bonding
surface around the entire rear window opening
flange.
NOTE:
a Do not scrape down to the painted surface of the
body; damaged paint will interfere with proper
bonding.
a Remove the upper and lower fasteners trom the
hatch.
a Mask otf surrounding surtaces before applying
primer.
Clean the hatch bonding surface with a sponge
dampened in alcohol.
NOTE: After cleaning, keep oil, grease or water trom
getting on the surface.
lI the old rear window is to be reinstalled, use a put-
ty knile to scrape ott all traces ot old adhesive, then
clean the rear window surface with alcohol where
new adhesive is to be applied.
NOTE: Make sure the bonding surface is kept tree
of water, oil and grease.
CAUTION: Avoid s€tting ths rear window on its
edges; small chips may lator devalop into cracks,
NOTE: Clean the shadowed area,
REAR WINDOW
20-62
---
UPPER SEAL
4.Apply the upper seal to the inside face of glass as
snown.
Glue the upper tasteners, lower fasteners and side
spacers, to the inside tace ot the rear window on
each side.
FASTENER,2' / FASTENER,2ALIGNMENT
G||le the lower fasteners and upper Jasteners to the
hatch, as shown.
sroESPACER, 2
Page 938 of 1413
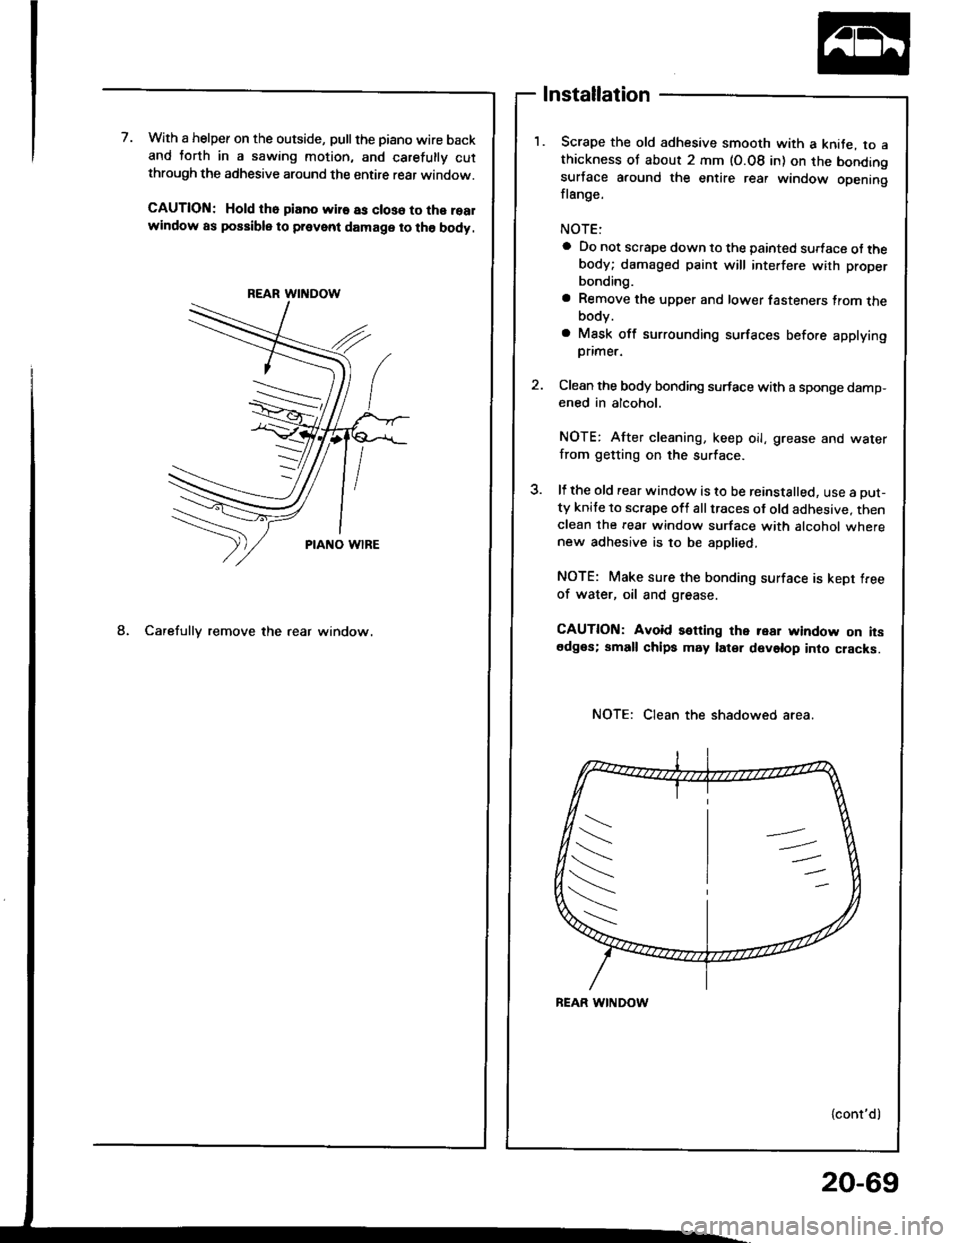
7.With a helper on the outside, pullthe piano wire backand torth in a sawing motion, and carelully cutthrough the adhesive around the entire rear window.
CAUTION: Hold tho piano wir€ as closo to the realwindow as possible to prevent damage to the body.
REAR WINDOW
PIANO wlRE
8. Carefully remove the rear window.
Installation
Scrape the old adhesive smooth with a knite, to athickness of about 2 mm (O.08 in) on the bondingsurface around the entire rear window openingflange.
a Do not scrape down to the painted sudace of thebody; damaged paint will interfere with proper
bonding.
a Remove the upper and lower fasteners trom thebody.
a Mask off surrounding surfaces before applying
Dflmer.
2. Clean the body bonding surface with a sponge damp-ened in alcohol.
NOTE: After cleaning, keep oil, grease and water
from getting on the surface.
3. ll the old rear window is to be reinstalled, use a Dut-ty knife to scrape oft all traces of old adhesive. thenclean the rear window surface with alcohol wherenew adhesive is to be aDolied.
NOTE: Make sure the bonding surface is kept freeof water, oil and grease.
CAUTION: Avoid setting the rear window on itsedges; small chips may later develop into cracks.
Clean the shadowed area.
{cont'd)
/s
\--
t\
20-69
Page 943 of 1413
Ouarter Glass
Replacement (cont'd)
Scrape the old adhesive smooth with a knife. to a
thickness of about 2 mm (O.08 in) on the bonding
surface around the entire quaner glass opening
flange.
NOTE:
a Do not scrape down to the painted surface of the
body: damaged paint will interfere with proper
bonding.
a Mask oft surrounding surfaces before applying
orimer.
Clean the body bonding surface with a sponge damp-
ened in alcohol.
NOTE: Atter cleaning, keep oil, grease and water
from getting on the surtace.
Clean the new quarter glass surface with alcohol
where adhesive is to be aDDlied.
NOTE: Make sure the bonding surface is kept tree
of water, oil and grease.
CAUTION: Avoid setting th€ quartsr glass on its
edgas; small chips may later d€velop into cracks.
b-
CLIP
Clean the shadowed area allthe way around.CLIP
srDE sPAcER I
nrolonc i
\/ i
IfR-.s I-l i
_c$$l
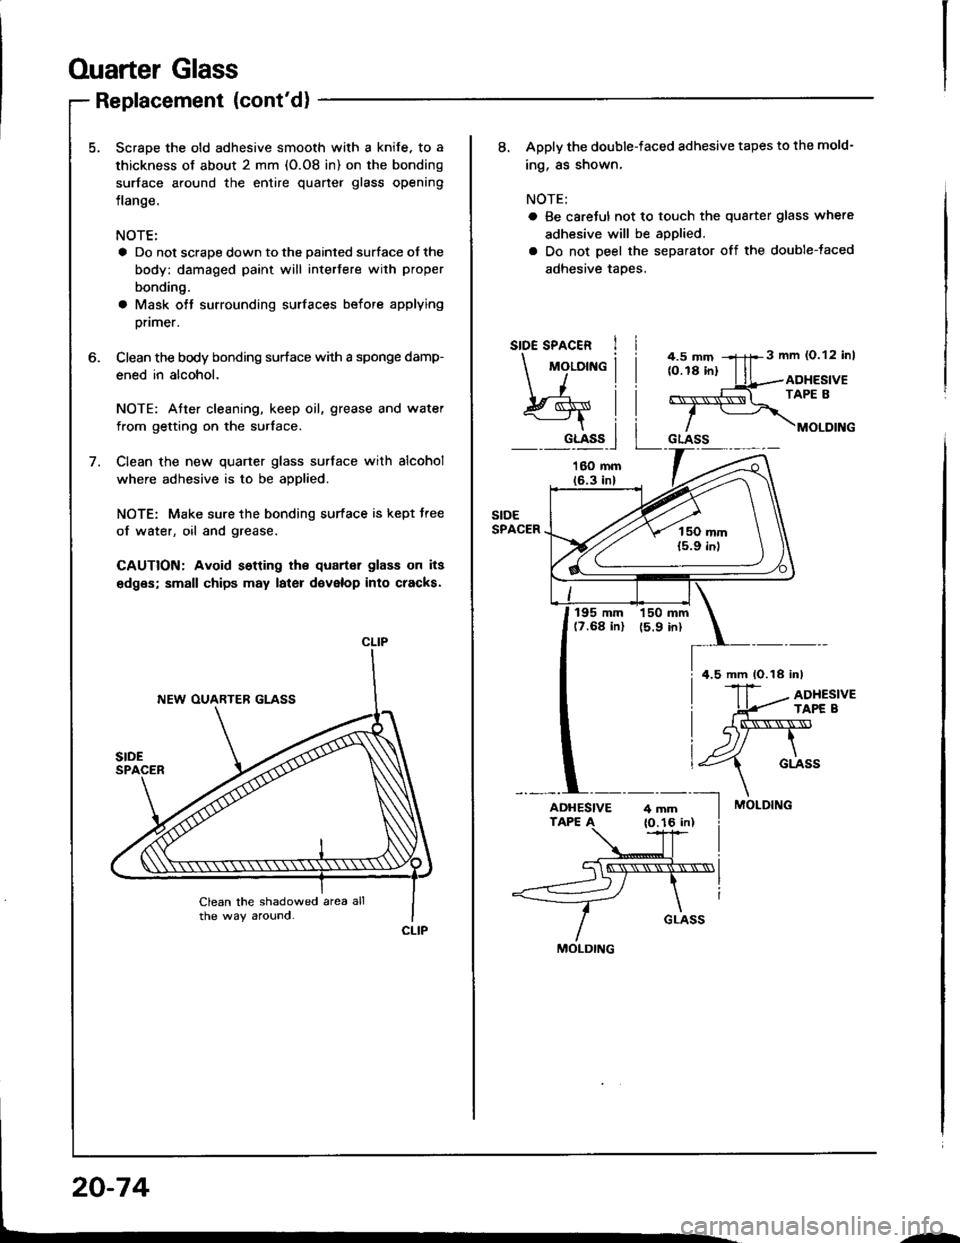
8. Apply the double-faced adhesive tapes to the mold-
ing, as shown,
NOTE:
o Be careJul not to touch the quarter glass where
adhesive will be applied.
a Do not peel the separator off the double-taced
adhesive taPes.
3 mm (0.12 inl
ADHESIVETAPE 8
MOLDING
195 mm 150 mm(?.68 in) 15.9 inl
MOLDING
4.5 mm 1O.18 inl
ADHESIVE
MOLDING
--
Page 974 of 1413
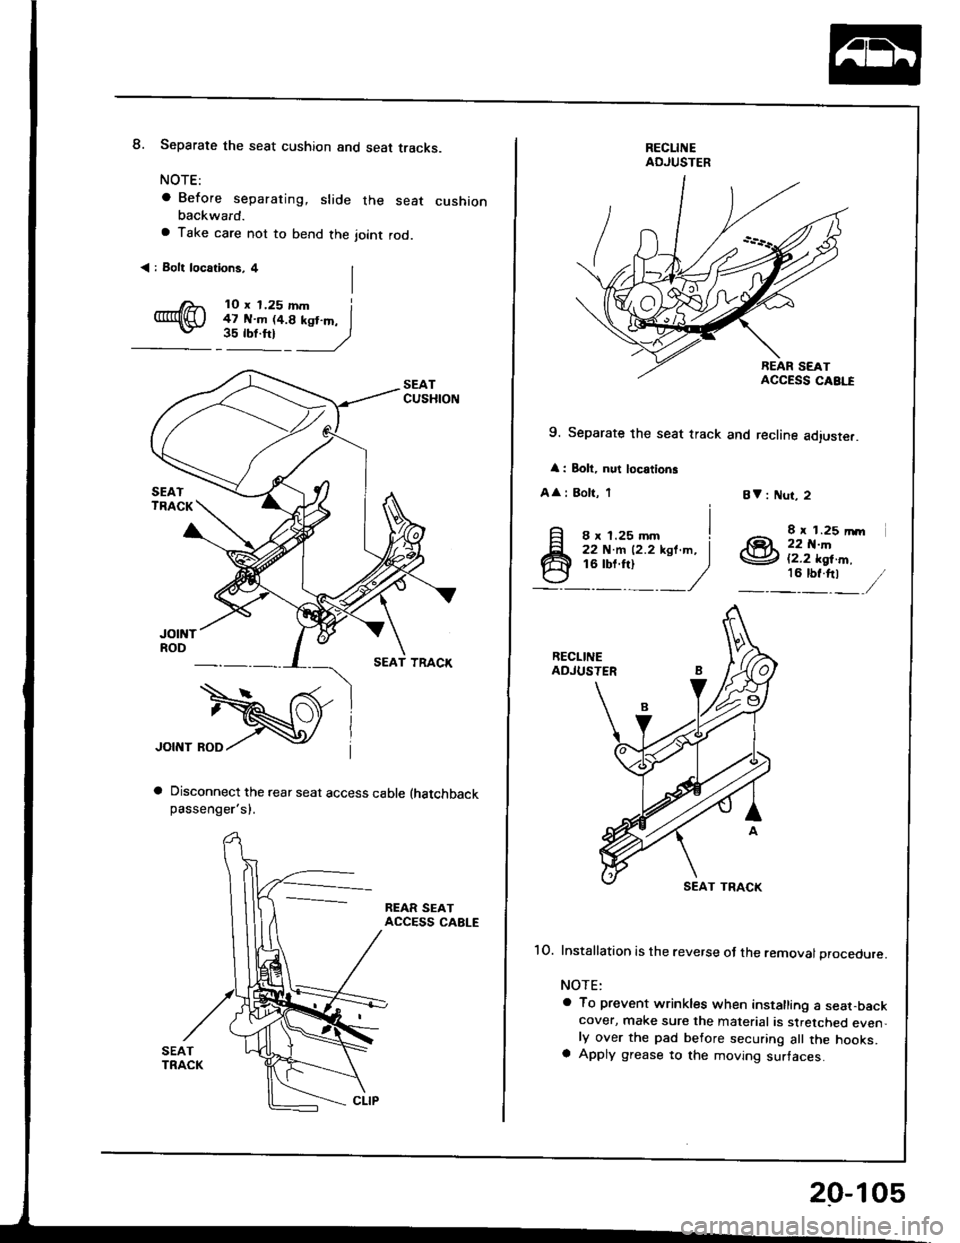
8. Separate the seat cushion and seat tracks.
NOTE:
a Before separating, slide the seat cushionbackward.
a Take care not to bend the joint rod.
< : Bolt locations, 4
JOINT BOD
Disconnect the rear seat access cable (hatchback
passenger'sl.
REAR SEATACCESS CABLE
RECLINEAOJUSTER
9. Separate the seat track and recline adiuste..
: Bolt, nut locations
A
: Bolt, IBY : Nut, 2
j
A;iil;iiry-,'- j @i+ilJ
_o()_ _/ _ _].'*",
RECLINEADJUSTER
Installation is the reverse of the removal procedure.
NOTE:
a To prevent wrinkles when installing a seat-backcover, make sure the material is stretched even,ly over the pad before securing all the hooks.a Apply grease to the moving surtaces.
10.
20-105
Page 976 of 1413
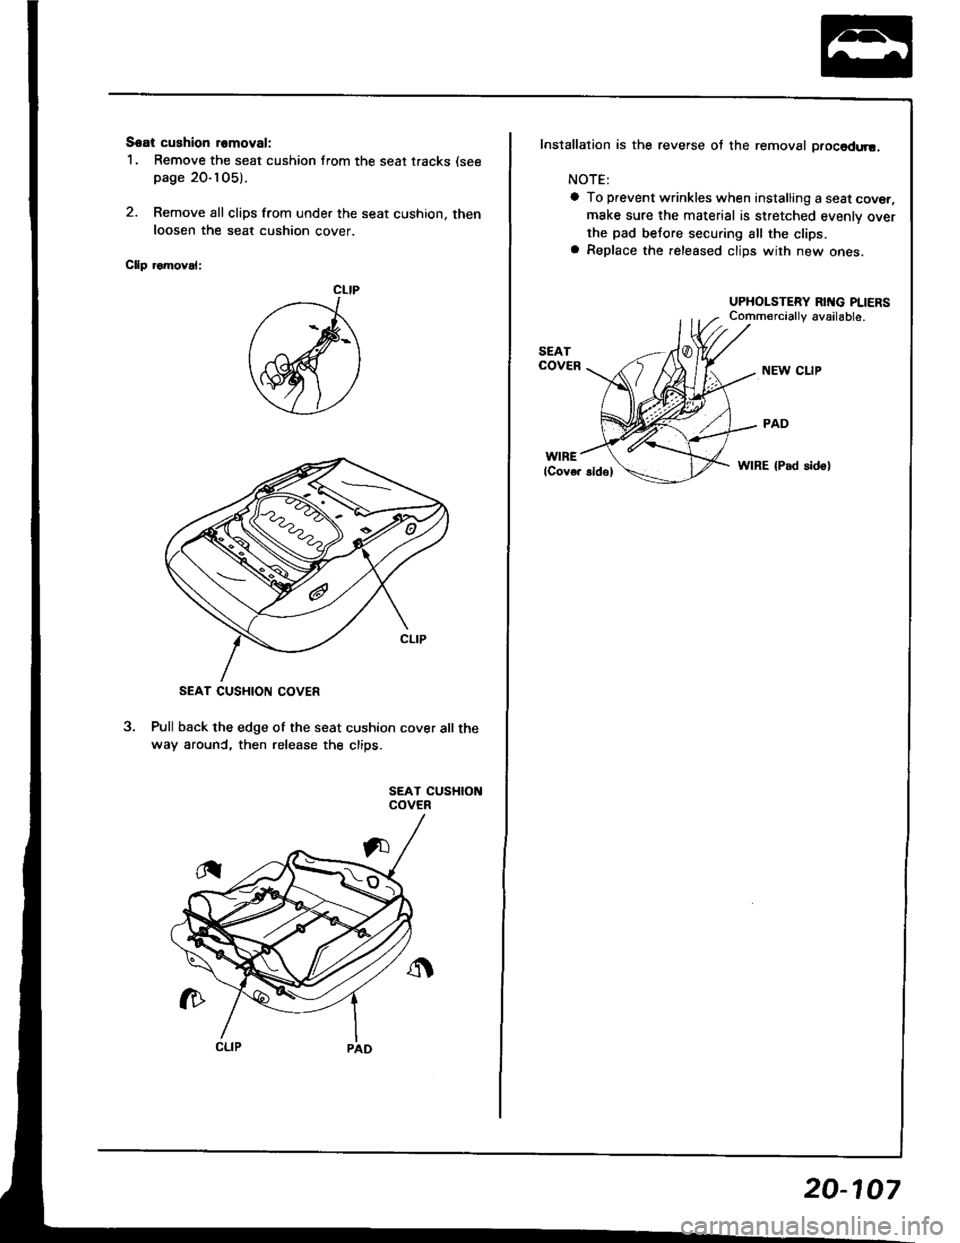
Seat cushion romoval:
1. Remove the seat cushion from the seat tracks (see
page 20-105).
2. Remove all clips from under the seat cushion, then
loosen the seat cushion cover
Cllp romoval:
Pull back the edge of the seat cushion cover all the
way arounC, then release the clips.
SEAT CUSHIONCOVER
2
CLIP
SEAT CUSHION COVER
Installation is the reverse of the removal ptocadtr!.
NOTE:
a To prevent wrinkles when installing a seat cover,
make sure the material is stretched evenly over
the pad before securing all the clips.a Replace the.eleased clips with new ones.
UPHOLSTERY RING PLIERS
NEW CLIP
PAD
WIRE {Pad sido}
20-107