boot HONDA INTEGRA 1998 4.G Service Manual
[x] Cancel search | Manufacturer: HONDA, Model Year: 1998, Model line: INTEGRA, Model: HONDA INTEGRA 1998 4.GPages: 1681, PDF Size: 54.22 MB
Page 756 of 1681
Inspection and Adiustment
Brake System Rubber Parts and Brake Booster
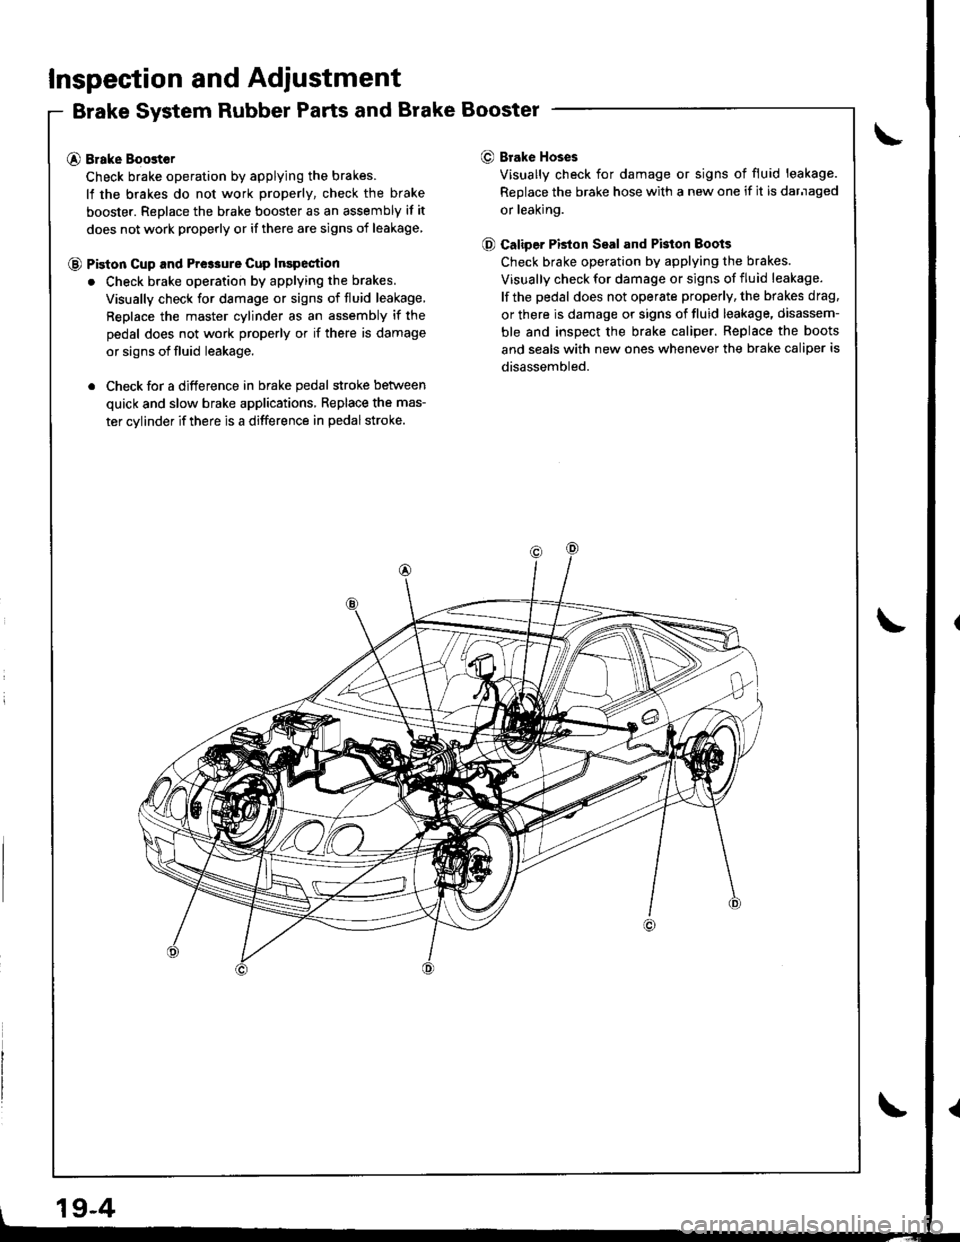
@ Brake Boost€r
Check brake operation by applying the brakes.
lf the brakes do not work properly, check the brake
booster. Replace the brake booster as an assembly if it
does not work properly or if there are signs of leakage
@ Piston cup and Pre3sure cup Inspection
. Check brake operation by applying the brakes.
Visually check for damage or signs of fluid leakage,
Replace the master cylinder as an assembly if the
pedal does not work properly or if there is damage
or signs of fluid leakage.
. Check for a difference in brake pedal stroke betlveen
quick and slow brake applications, Replace the mas-
ter cylinder if there is a difference in pedal stroke.
O Brake Hoses
Visually check for damage or signs of fluid leakage.
Replace the brake hose with a new one if it is darnaged
or leaking.
@ Caliper PBton Seal and Pkton Boots
Check brake operation by applying the brakes.
Visually check for damage or signs of fluid leakage.
lf the pedal does not operate properly, the brakes drag.
or there is damage or signs of fluid leakage, disassem-
ble and inspect the brake caliper. Replace the boots
and seals with new ones whenever the brake caliper is
disassembled.
19-4
Page 760 of 1681
Front Brake Pads
Inspection and Replacement
fi
1i
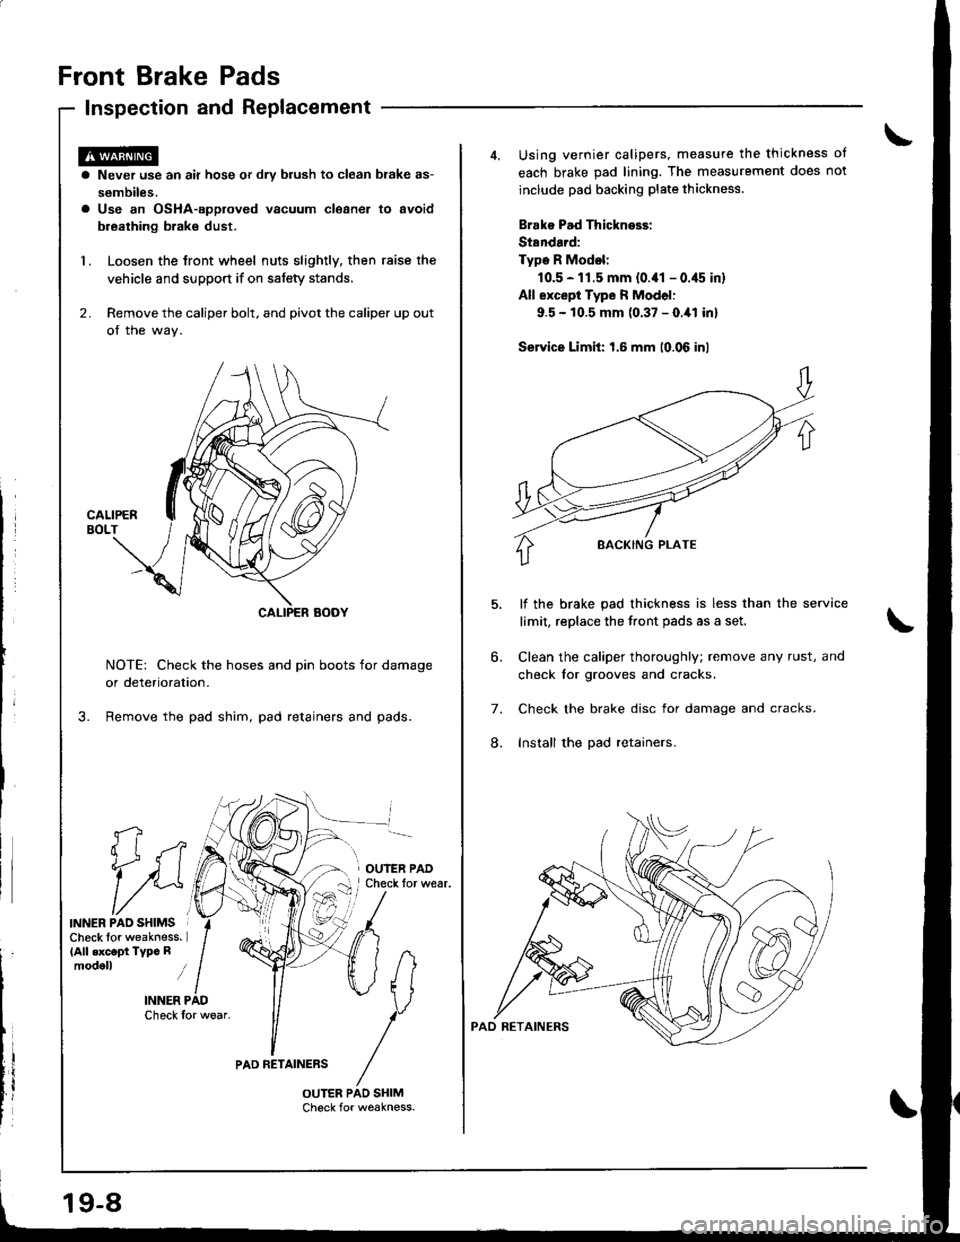
INNER PAO SHIMSCheck lor weakness.(All .xc.pt Typc Rmodoll i
INNER PADCheck for woar.
a Never use an air hose or dry blush to clean brake as-
sembiles.a Use an OsHA-approved vacuum cleaner to avoid
breathing brak€ dust.
1. Loosen the Jront wheel nuts slightly, then raise the
vehicle and support if on satety stands,
2. Remove the caliper bolt, and pivot the caliper up out
of the wav.
NOTE: Check the hoses and pin boots for damage
or deterioration.
Remove the pad shim, pad retainers and pads.
OUIER PADCheck tor wear.
PAD RETAINERS
19-8
Using vernier calipers, measure the thickness ot
each brake pad lining. The measurement does not
include pad backing plate thickness.
Brako Pad Thickness:
St8ndard:
Type R Modol:
10.5 - 11.5 mm {0.41 - 0.45 in}
All except Type R Model:
9.5 - 10.5 mm (0.37 - O.ial inl
Service Limit: 1.6 mm (0.06 inl
lf the brake pad thickness is less than the service
limit, replace the front pads as a set,
Clean the caliper thoroughly; remove any rust, and
check tor grooves and cracks.
Check the brake disc for damage and cracks.
Install the pad retainers.
6.
7.
8.
Page 761 of 1681
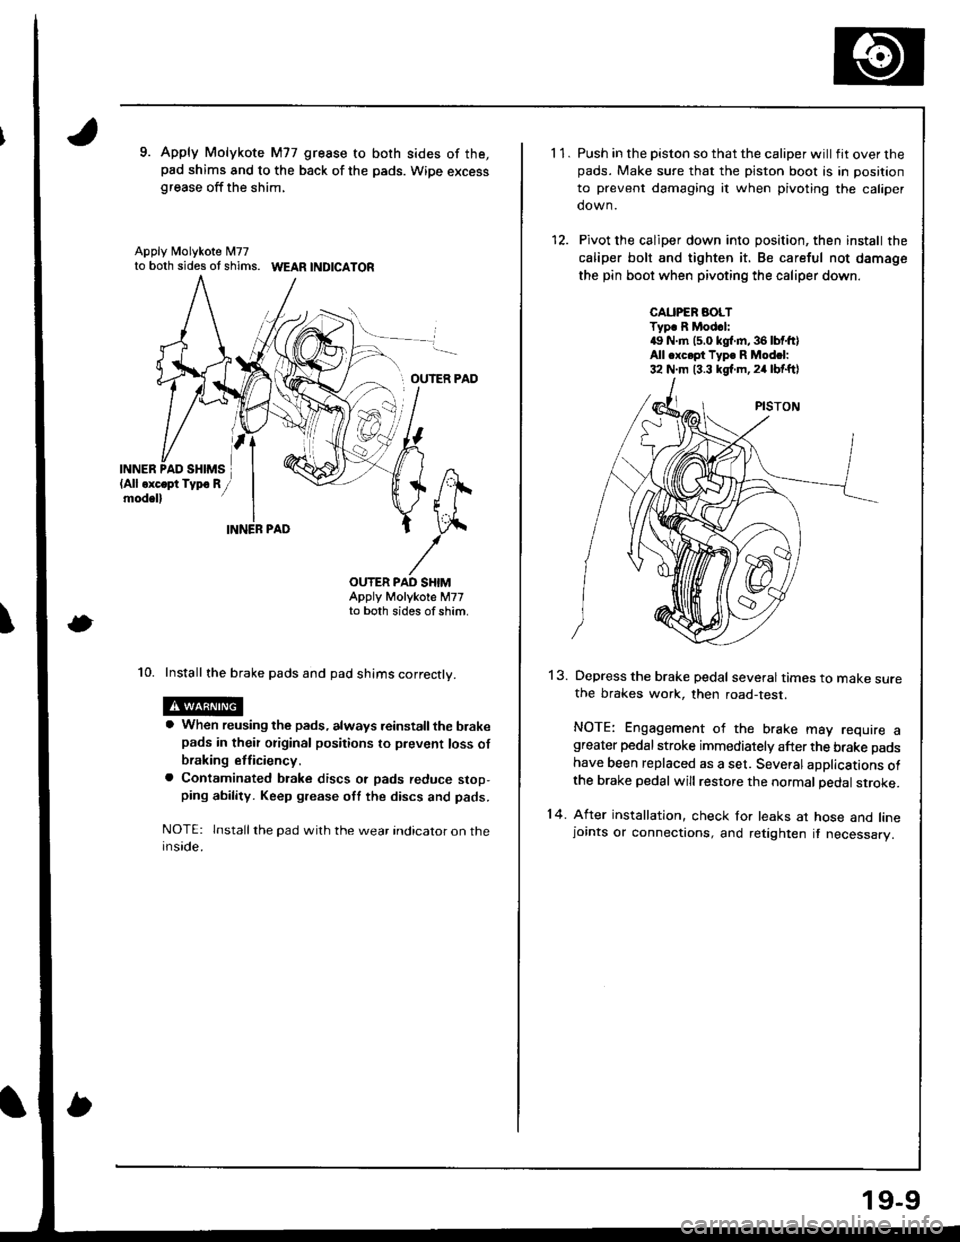
9. Apply Molykote M77 gresse to both sides of the,pad shims and to the back of the pads. Wipe excessgrease off the shim,
Apply N4olykote M77to both sides ot shims. WEAR |ND|CATOR
OUTER PAD
INN
\
ER,
OUTER PAD SHIMAppty Motykote M77to both sides of shim,
10. Install the brake pads and pad shims correctly.
a When reusing the pads, always reinstall the brakepads in their original positions to prevent loss of
braking etficiency.
a Contaminated btake discs ot pads reduce stop,ping ability. Keep grease oft the discs and pads.
NOTE: lnstall the pad wilh the wear indicator on theinside.
11.
14.
Push in the piston so that the caliper will fit over thepads. Make sure that the piston boot is in position
to prevent damaging it when pivoting the caliper
down.
Pivot the caliper down into position, then install the
caliper bolt and tighten it. Be careful not damage
the pin boot when pivoting the caliper down.
CAUPER AOLTTyp. R Mod.l:4!, N.m (5.0 kgl.m,36lbtft)All .xc.pt Typ. R Modcl:32 N.m 13.3 kgf.m,24 lbf.ftl
13.Depress the brake pedal several times to make surethe brakes work, then road-test.
NOTE: Engagement of the brake may require agreater pedal stroke immediately after the brake pads
have been replaced as a set. Several aDplications ofthe brake pedal will restore the normal pedal stroke.
After installation, check for leaks at hose and linejoints or connections, and retighten it necessary.
19-9
Page 763 of 1681
Front Brake Caliper
Disassembly/Reassembly
. Never use an air hoss or dry brush to claan b.ake assemblies.. Use an OsHA-approvod vacuum cleane. to avoid breathing braks dust,. Contaminated brake discs or pads roduce stopping ability.. When rausing tha pads. always rein3tall the brake p8d3 in thoir original positions to prevont loss of braking etticlency.
GAUTION: Do not spill brake fluid on the vehicle; it may damags the paint; it brake fluid do6s contast the paint, wash hoff imm€diately with wator.
NOTE:
. Coat the piston, piston seal, and caliper bore with clean brake fluid.. Replace all rubber pans with new ones whenever disassembled,. Clean all pans in brake fluid and air dry; blow out all passages with compressed air,. Before reassembling, check that all parts are free of dust and other foreign particles.
. Replace parts with new ones whenever specified to do so.. Make sure no din or other foreign matter is 8llowed to contaminate the br8ke fluid.. Always use Genuine Honda DOT3 Brake Fluid. Using non-Honda brake fluid can caus6 corrosion and d€crease the liftof the system.
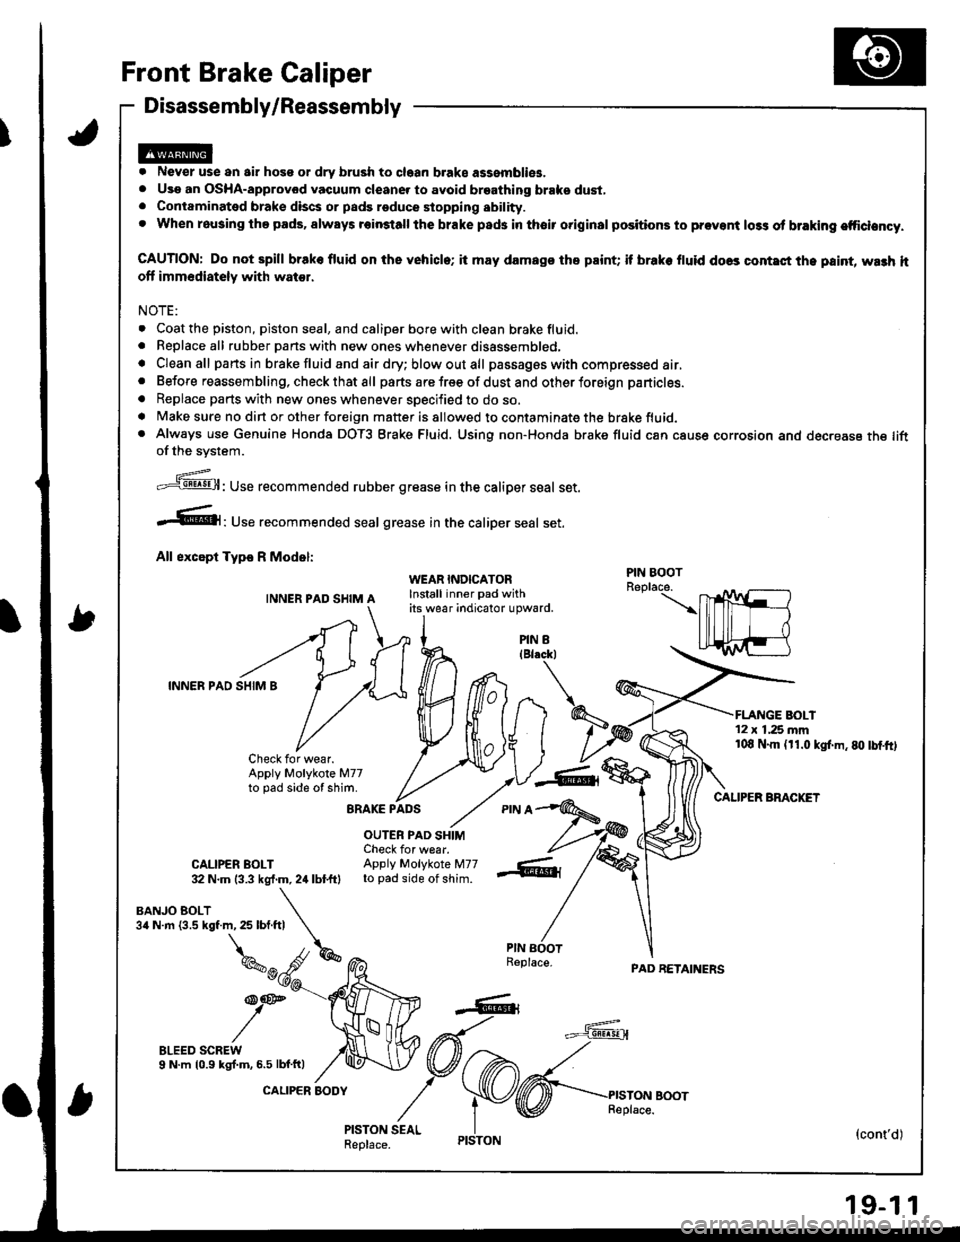
ffl; Use recommended rubber grease in the caliper seal set.
.61, Use recommended seal grease ,n the caliper seal set.
All except Type R Model:
INNER PAD SHIM A
BRAKE PADS
OUTER PAD SHIMCheck for wear.CALIPER BOLT Apply Molykote M7732 N.m {3.3 kgf.m, 2,1 lbtftl to pad side of shim.
WEAR INDICATORInstall inner pad withits wear ;ndicator upward.
nh/t I
T)2
,V--6&,
PAD RETAINERS
'12 x 1.25 mm108 N.m (r1.0 kgl.m.80 tbtftl
CALIPER BMCKET
{cont'd)
PIN BOOT
PIN 8
INNER PAD SHIM B
BANJO BOLT3a N.m {3.5 kgf.m, 25 lbf.ftl
Check for wear.Apply Molykote M77to pad side of shim.
,\
kw
/":^
19-1 1
Page 768 of 1681
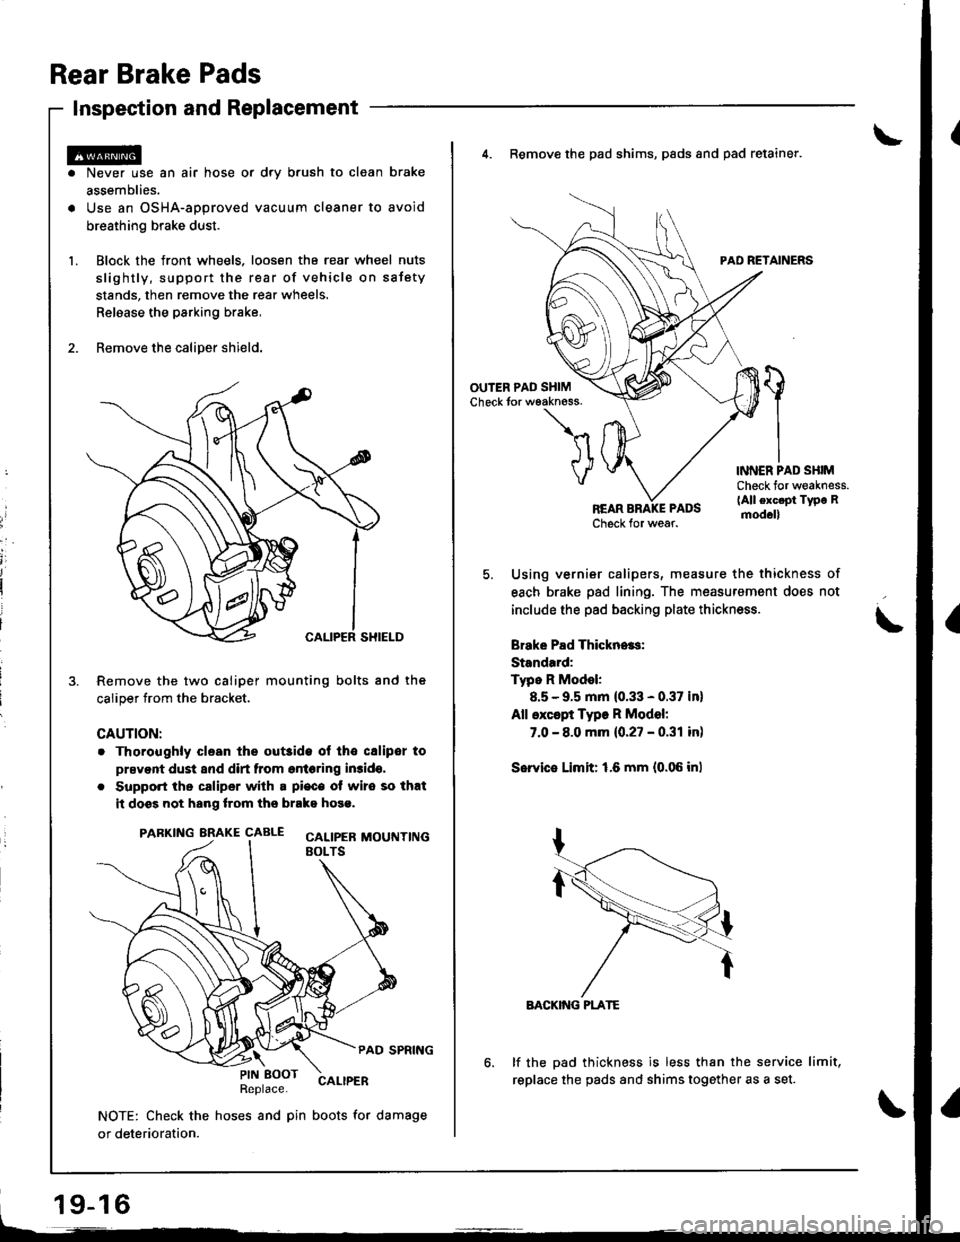
Rear Brake Pads
Inspection and Replacement
Never use an air hose or dry b.ush to clean brake
assemblies.
Use an OSHA-approved vacuum cleaner to avoid
breathing brake dust.
Block the front wheels. loosen tha rear wheel nuts
slightly, support the rear of vehicle on sstety
stands, then remove the rear wheels.
Relaase the parking brake,
Remove the caliper shield.
Remove the two caliper mounting bolts and the
caliper trom the bracket.
CAUTION:
. Thoroughly clesn the out3ide ol tho csliper to
prsvent dust and dirt from entering in3ido,
. Support the caliper with a pi€c€ ot wire so that
it doss not hang lrom ths brako hose.
PARKING BRAKE CAALE cALtpEB MOUTTT|NGEOLTS
PAD SPRING
Replace.CALIPER
NOTE: Check the hoses and pin boots for damage
or deterioration.
\PIN EOOT
19-16
4. Remove the pad shims, pads and pad retainer.
PAD RETAINERS
'l
VINNER PAD SHIMCheck for weakness.(All exc.pt Type Rmod.ll
Using vernier calipers, measure the thickness of
each brake pad lining. The measurement does not
include the pad backing plate thickness.
Brake Pad Thickn..s:
Standard:
Typo R Model:
8.5 - 9.5 mm (0.33 - 0.37 in)
All except Type R Model:
7.0 - 8.0 mm {0.27 - 0.31 in)
Sorvie Limit: 1.6 mm {0.06 inl
BACKIiIG PLATE
lf the pad thickness is less than the service limit,
replace the pads and shims together as a set.
Page 769 of 1681
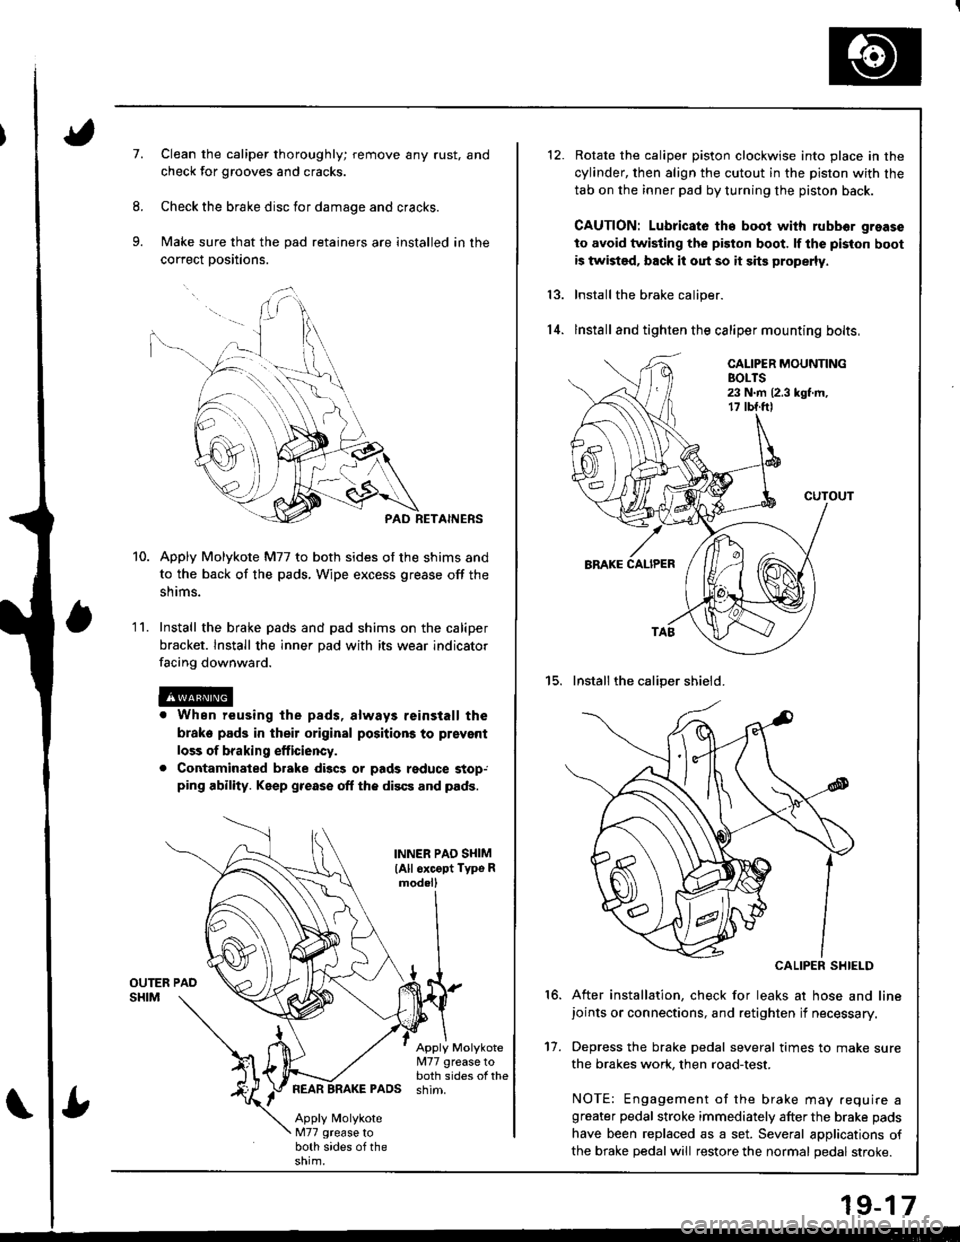
7.Clean the caliper thoroughly; remove any rust, and
check for grooves and cracks.
Check the brake disc for damage and cracks.
Make sure that the pad retainers are installed in the
correct positions.
PAD RETAINERS
Apply Molykote M77 to both sides of the shims and
to the back of the pads, Wipe excess grease off the
snrms.
Install the brake pads and pad shims on the caliper
bracket. Install the inner pad with its wear indicator
facing downward.
r When reusing the pads, always reinstall the
brake pads in their original positions to prsvent
loss of braking efficiency.
. Contaminated brake discs or pads reduce stop,ping ability. Keep grease off the discs and pads.
1 '�I.
INNER PAO SI{IM
lAll oxcopt Typo Rmod.ll
Apply Molykote[I77 grease toboth sides of thePADS shim.
Apply MolykoteM77 grease toboth sides of the
Rotate the caliper piston clockwise into place in the
cylinder, then align the cutout in the piston with the
tab on the inner pad by turning the piston back.
CAUTION: Lubricato th€ boot with rubbor grease
to avoid twisting the piston boot. lf the piston boot
is twist€d, back it out so it sits properly.
Install the brake caliper.
lnstall and tighten the caliper mounting bolts,
15. Installthe caliper shield.
CALIPER SHIELD
After installation, check for leaks at hose and linejoints or connections, and retighten if necessary.
Depress the brake pedal several times to make sure
the brakes work, then road-test.
NOTE: Engagement of the brake may .equire agreater pedal stroke immediately after the brake pads
have been replaced as a set. Several applications of
the brake pedal will restore the normal pedal stroke.
13.
14.
16.
't7.
19-17
Page 771 of 1681
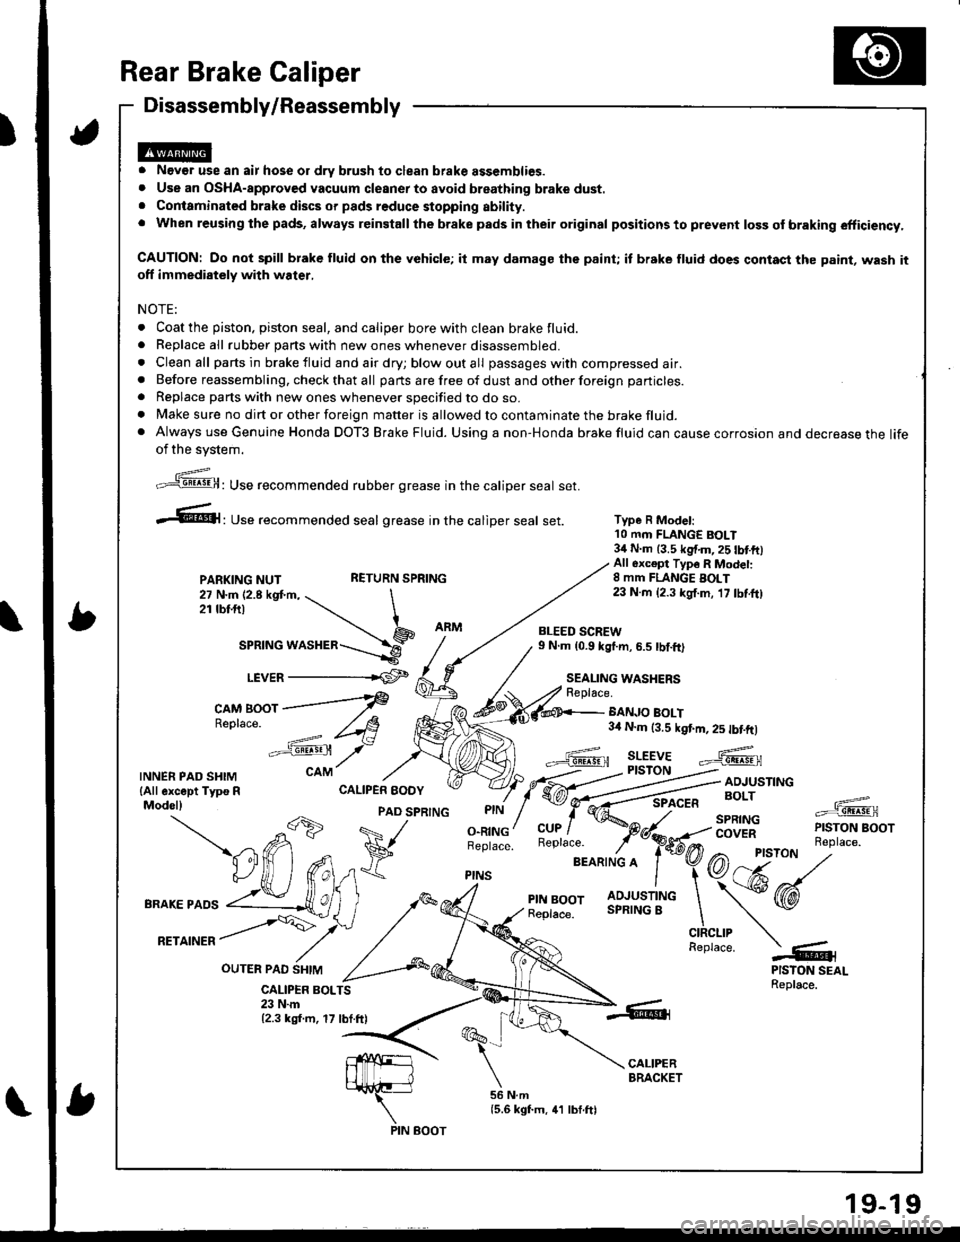
Rear Brake Caliper
Disassembly/Reassembly
o Never use an air hose or dry brush to clean brake assemblies.o Use an OSHA-approv€d vacuum cleaner to avoid breathing brake dust.. Conlaminated brake discs or pads reduce stopping ability.. When reusing the pads, always reinstall the brake pads in their original positions to prevent loss of braking efficiency,
CAUTION: Do not spill brake fluid on the vehicle; it may damags the paint; it brake fluid does contast the paint, wash itoff immediately with water,
NOTE:
. Coat the piston. piston seal, and caliper bore with clean brake fluid.. Beplace all rubber parts with new ones whenever disassembled.o Clean all parts in brake fluid and air dry; blow out all passages with compressed air.a Before reassembling, check that all parts are free of dust and other foreign particles.
. Replace parts with new ones whenever specified to do so.. Make sure no dirt or other foreign matter is allowed to contaminate the brake fluid.. Always use Genuine Honda DOT3 Brake Fluid. Using a non-Honda brake fluid can cause corrosion and decrease the lifeof the svstem.
Type R Model:10 mm FLANGE BOLT34 N.m 13.5 kg{.m,25 tbtftlAll 6xc€pt Typ6 R Modet:8 mm FLANGE BOLT23 N.m {2.3 kgf.m, 17 tbf.ft)
BANJO BOLT3,0 N.m (3.5 kgt m, 2s tbtftl
Replace.
;,'"]@: Use recommended rubber grease in the caliper seal set.
.61, Use recommended seal grease in the catiper seal set.
PARKING NUTRETURN SPRING
27 N.m 12.8 kgt m, \2rtbt.frl \
ar"t"o *or"a"=-\9_r.r,e=
LEVER -------rCF
c^M Boor ---f
Re'lace
-==': /t8
"':sst /-
CALIPER BOLTS23 N.m12.3 kgf.m, 17 lbf.ft)
TNNERPADSHTM cAM
lAll except Typs R CALIPER EODYModel)
OUTER PAO SHIM
-db
PAD SPRTNG
a71 ^ V
BRAKEPA''
vUffifi*
,*,
^rrorr /Y'
,/ ^,
O.RINGBeplace.
PINS
BLEED SCREW9 N.m (0.9 kg{.m, 6.5 tbf.ft)
SEALING WASHERSReplace.
PIN BOOT
Page 1152 of 1681
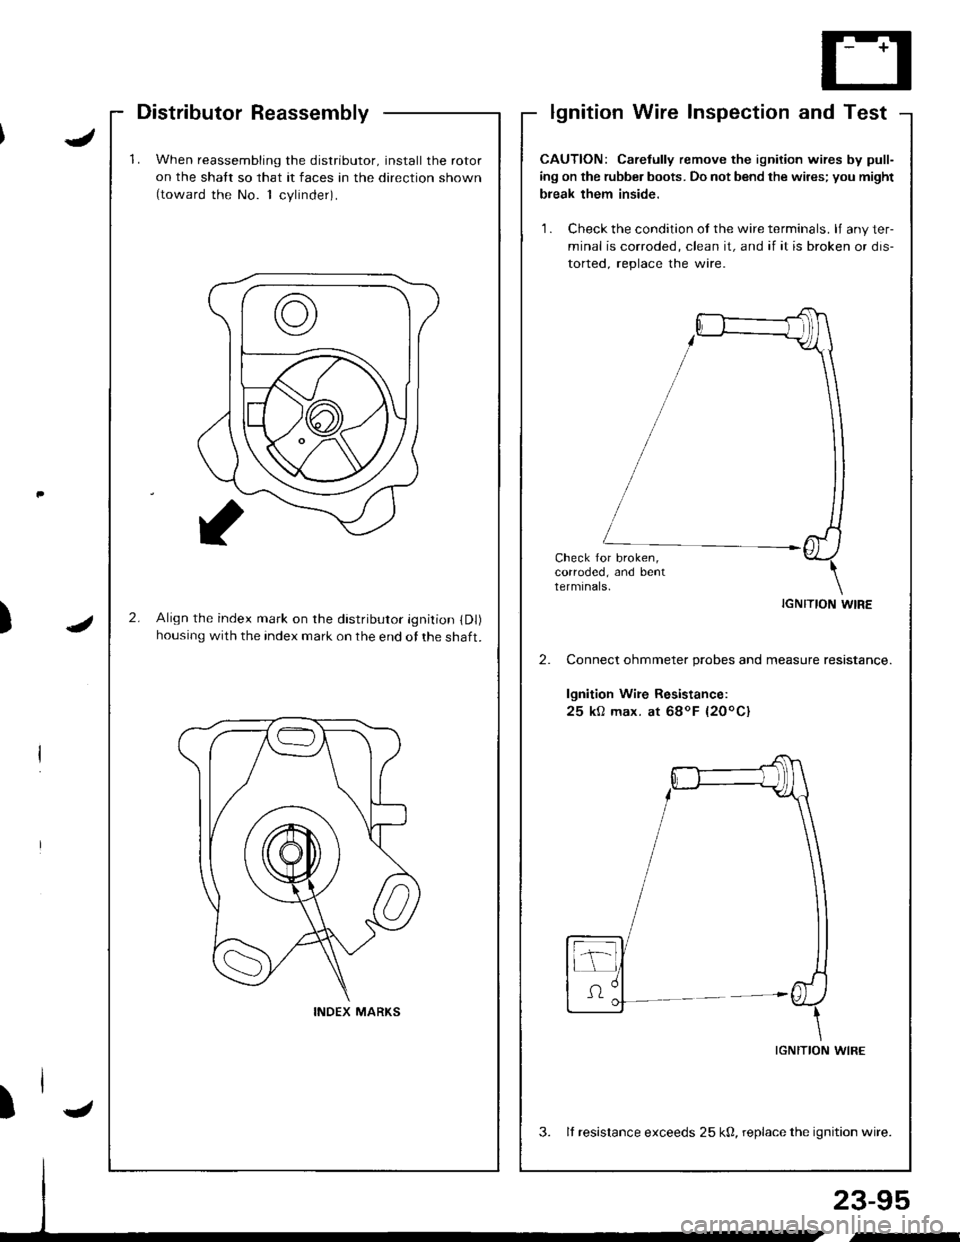
'1.When reassembling the distributor, install the rotor
on the shatt so that it faces an the direction shown(toward the No. 1 cvlinder).
2.Align the index mark on rhe distributor ignition (Dl)
housing with the index mark on the end of the shaft.
INDEX MARKS
Distributor Reassemblylgnition Wire Inspection and Test
J
J)
23-95
,-
CAUTION: Carelully remove the ignition wires by pull-
ing on the rubber boots. Do not bend the wires; you might
break them inside.
'1 . Check the condition ot the wire terminals. lJ any ter-
minal is corroded, clean it, and if it is broken or dis-
torted. reolace the wire.
Check for broken,corroded, and bentterminals.
IGNITION WIRE
Connect ohmmeter probes and measure resistance.
lgnition Wire Resistance:
25 kO max. at 68oF {20oC}
IGNITION WIRE
3. It resistance exceeds 25 k0, replace the ignition wire.
)l-