key HONDA INTEGRA 1998 4.G Service Manual
[x] Cancel search | Manufacturer: HONDA, Model Year: 1998, Model line: INTEGRA, Model: HONDA INTEGRA 1998 4.GPages: 1681, PDF Size: 54.22 MB
Page 1544 of 1681
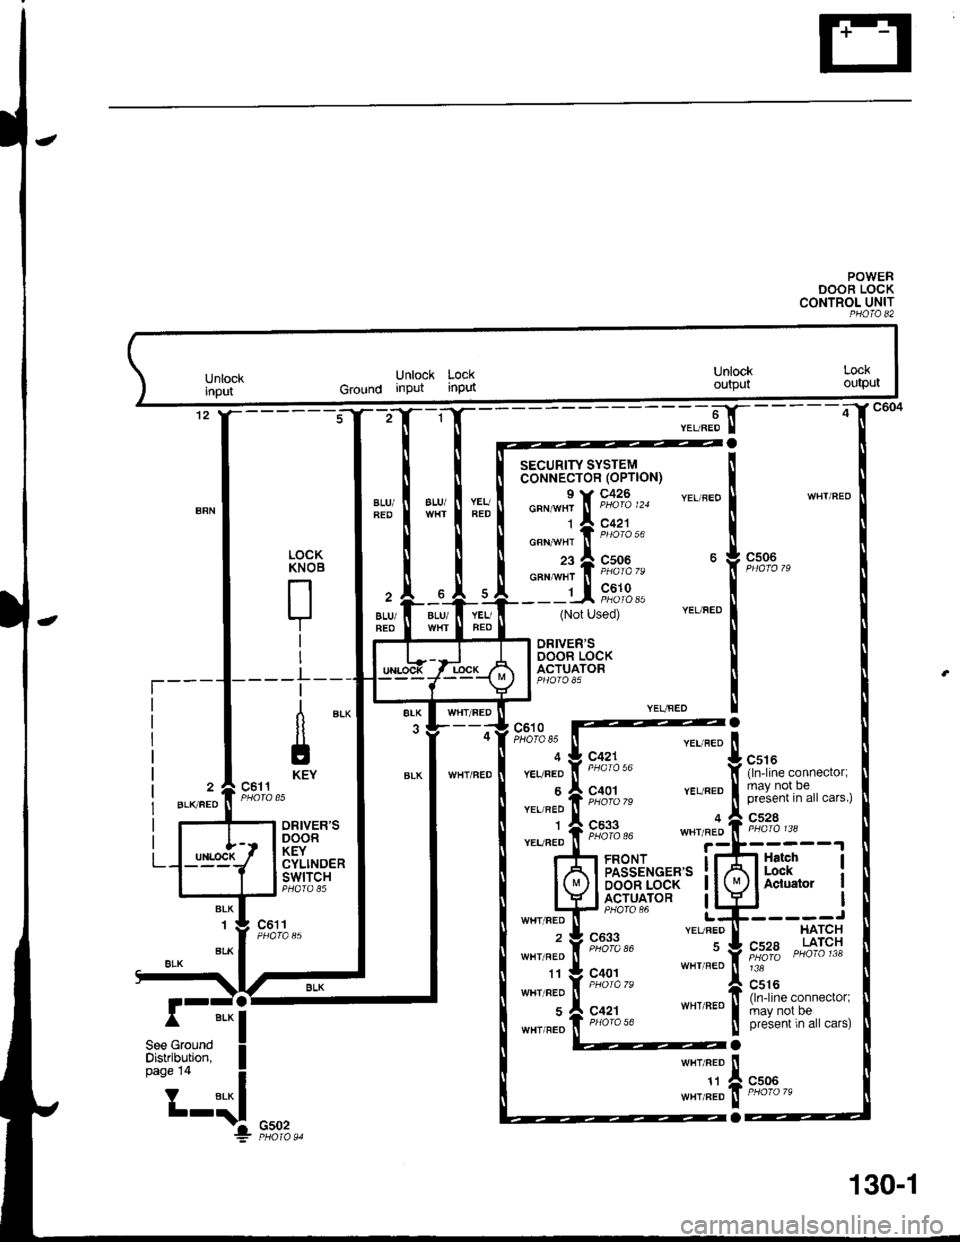
POWEBDOOR LOCKCONTROL UNITPHO|O 82
;"-"str-_
YEL/FEDWHT/FEOalU/YEUFED
YEUBEO
SECURITY SYSTEMcoNNECTOR (OPTION)
o"n-"! [ ;c,fo?uo ,,,
t | 9,o""1"""
"""-ii*r*"
___LL "",9t9,,(Not Used)
LOCK
ry"
'r
I
_L__
c506
BLU/BLU/FEO
YEUAED
DRIVER'SDOOR LOCKACTUATOR
f) BrK
ll
IKEYc511
WHT/FED
WHT/RED
c610PHOTO 85
YEUFED
6
YEL/BED
1
YEURED
WHT/FEO
WHT/RED
11
WHT/REO
WHT/FEO
"a,-rro [l
#:,L," f, ,"ru_1,i" "onn"",o,,
9:::. ," "" "'o I lSY.Jnt'l?,, ""...r
F,%t3* ,'"n^J" fi "t"%',3 '*
FRONTPASSENGER'SDOOR LOCKACTUATOR
ffi*l-i"'JJ.r, Ui3!
2
BLKFED
DRIVER'SDOORKEYCYLINDERswtTcH
BLK,l
BLK
L--L---,-
c633inoroed sYi,::f.,"6",*
c4o1 WHIFED ! 13s
PHoraTe
C516
c421 wnrneo ! f][f[eoffl!n"cto''p4oto56 ! pre'sent 'n all carst
a
I
Ia
c506#{':l
",.,
ALK
l::t-'^^.
130-1
Page 1545 of 1681
![HONDA INTEGRA 1998 4.G Service Manual Power Door Locks (contd)
- Sedan
10
!. -T----t UNDER.DASH
i IHP* ![[]::*LJ----J
n "r,n"tn tr t"%% u,
"";f F,x9B^
rc I ceoa
LT GFI{
4
LT GRN
-"4{"*
--
;;:*,*uu
n"","..
I secunrrvI SYSTEMi CONN HONDA INTEGRA 1998 4.G Service Manual Power Door Locks (contd)
- Sedan
10
!. -T----t UNDER.DASH
i IHP* ![[]::*LJ----J
n "r,n"tn tr t"%% u,
"";f F,x9B^
rc I ceoa
LT GFI{
4
LT GRN
-"4{"*
--
;;:*,*uu
n"","..
I secunrrvI SYSTEMi CONN](/img/13/6069/w960_6069-1544.png)
Power Door Locks (cont'd)
- Sedan
10
!. -T----'t UNDER.DASH
i IHP'* ![[]:':'*'LJ----J
n "r,n"tn tr t"%% u,
"";f F,x9B^
rc I ceoa
LT GFI{
4
LT GRN
-"4{"*
--'
;;:*,*uu
n"","..
I secunrrvI SYSTEMi CONNECTOR
I (oPloil)
!"'-!x',}*
19
!T GRN
BLU/AED
14
LT BT]U
Ic611PHOTO 85c634PHOTO 86
2
BLKBEOFRONTPASSEN.GER'SoooRKEYCYLINDERSWITCH
L-t--*J-
DRIVER'SDOORKEYCYLINOERSWITCHPHOfO A5
FRONTPASSEN-GER'SDOORLOCKSwlTCH
DRIVER'SDOORLOCKswtTcH
8LK
1
ALX
I-"a
2
at(
ALK
2c634 "noto tt
PHO|O 86c611PHOfO 85
BLK
130-2
Page 1548 of 1681
- How the Circuit Works
The immobilizer system is designed to prevent the
car f rom being started without the owner's ignition
key. lf an attempt is made to start the car without
the correct key, the immobilizer system will disable
the car's fuel supply.
The immobilizer system consists of the ignition key,
immobilizer receiver unit, immobilizer indicator
light, PGM-FI main relay, fuel pump, and the PCM
or ECM.
With the ignition switch in ON (ll) or START (lll), the
immobilizer receiver unit and the PCM or ECM
receive an "ignition on" signal through fuse 44 and
the PGM-FI main relay. The PCM or ECM then
sends power to the ignition key transponder through
the immobilizer receiver unit. The transponder then
sends a coded signal back to the PCM or ECM
through the receiver unit. lf the signal is correct, the
PCM or ECM will energize the car's fuel supply
system by grounding the PGM-FI main relay. The
immobilizer indicator light flashes a code to indicate
that the correct key has been inserted. lf the
ignition key signal is not correct, the PCM or ECM
will not energize the car's fuel supply system by not
grounding the PGM-Fl main relay. The immobilizer
indicator light then flashes a code to indicate that an
incorrect key has been inserted.
Refer to the Service Manual (Section 23,
Body Electrical) for specific tests and
troubleshooting procedures.
132-1
Page 1554 of 1681
- How the Circuit Works
The security system control unit has a 3 position
switch: Manual. Auto. and Auto Lock. Here's what
happens when you arm the system, regardless ol
the switch position:
o The parking lights will flash once.
. The security indicator will flash once per second
after the system is armed.
With the switch in the Manual position, the security
system can only be armed by using the remote
control transmitter, After you remove the key from
the ignition and close all doors, the hood (if
equipped with the optional hood switch), the hatch
or trunk. Dress the lock button on the transmitter
and the system will arm (if the system is in the beep
sound mode, the horn will sound once). The doors
will automatically lock when the system is armed.
With the switch in the Auto position, the security
system will arm itself within about 20 seconds after
you turn the engine off, remove the key from the
ignition, and close the halch or trunk, the hood (if
equipped with the optional hood switch), or last
door. lf a door is opened during the 2o-second exit
delay time, the timer will reset itself . The remote
control transmitler can still be used to arm the
system with the switch in Auto position (see manual
for details).
With the switch in Auto Lock position, the security
system will arm itself and lock the doors about 20
seconds after you turn the engine of{, remove the
key from the ignition, and close the hatch or trunk,
the hood (if equipped with the optional hood
switch), or last door. lf a door is opened during the
2o-second exit delay time, the timer will reset. The
remote control transmitter can still be used to arm
the system in the Auto Lock position.
Triggering the Alarm
After the security system is armed, the sound ot
breaking glass or the opening of a door, hood,
hatch or trunk will trigger the alarm, and cause
the following:
r The horn will sound for30 seconds.
The optional siren will sound lor 60 seconds.
. The parking lights will flash.
. The security indicator LED will flash twice per
second.
. The starter will be disabled.
At the end of the alarm cycle, the system will
automatically rearm.
Disarming the Security System
There are two ways to disarm the security system:
. With the transmitter
o With the disarm/valet switch
When the system is disarmed, regardless of the
method used, the parking lights will flash two times if
the alarm has not been triggered and three times if
the alarm has been triggered. To disarm the system
with the transmitter, press the unlock button (if the
system is in the beep sound mode, the horn will
sound two times if the alarm has not been triggered,
however, will sound three times if the alarm has
been triggered). The driver's door will unlock
(pressing the unlock button twice will unlock all
doors).
To disarm the security system using the
disarm/valet switch, enter the car and turn the
ignition switch to ON (ll) then press the disarm/valet
switch button. lf you open the door when the control
unit switch is in Auto or Auto Lock, a 2o-second
entry delay will give you time to disarm the system.
However, when the system is armed by the
transmitter, the entry delay time is changed to zero
seconds, and the alarm is triggered as soon as you
oDen the door.
ldentifying Tripped Sensors
The system will indicate the sensor which triggered
the alarm through the security indicator LED. While
sitting inside the vehicle wlth the key out of the
ignition switch, all doors, the hood (if equipped with
the optional hood swilch), the hatch or trunk must be
closed. Press and hold the disarm/valet switch.
Press the lock button and then the unlock button of
the transmitter. Belease the disarm/valet switch. The
status LED will blink according to the following code:
Sensors
Door
Trunk/Hatch
System Switches
Glass Breakage
Hood (Optional)
Number ol Flashes
1 blink, pause, repeat
2 blinks, pause, repeat
3 blinks, pause, repeat
4 blinks, pause, repeat
5 blinks, pause, repeat
For further operating instructions and troubleshooting,
see the security system owner's manual.
133-5
Page 1556 of 1681
![HONDA INTEGRA 1998 4.G Service Manual lnterlock System
- 98-99 Models
l
HxPS*. !Til;;----
-i yxRi*I DASH I / rulE rz I HOOD
i[EiF,, i]!orn.o" Bli;;1il ilEjii
!s?T"., Lt::-s::3L j "3T",,. P,vu,d Lg _ _ Lt av ^rra: 8Y C216 16I wx HONDA INTEGRA 1998 4.G Service Manual lnterlock System
- 98-99 Models
l
HxPS*. !Til;;----
-i yxRi*I DASH I / rulE rz I HOOD
i[EiF,, i]!orn.o" Bli;;1il ilEjii
!s?T"., Lt::-s::3L j "3T",,. P,vu,d Lg _ _ Lt av ^rra: 8Y C216 16I wx](/img/13/6069/w960_6069-1555.png)
lnterlock System
- '98-'99 Models
'l
HxPS*. !'Til;;----
-''i yxRi*I DASH I / rulE rz I HOOD
i[EiF,, i]!orn.'o" Bli;;1il ilEjii
!s?T"., Lt::-s::3L j "'3T",,. P,v'u,d Lg _ _ Lt av ^rra: 8Y C216 16I wxlcnr,r PHora 24
J!^_YEUBLI
UNOER.OASHFUSE/RELAYBOX
c440
c432
ll S€o Power Diskibution,I page 10-9.
,n"tto"" I
1c,u'"" 11 | sa31F-I''I BRAKE SWITCH T--1 THROTTLE
I I closed wrth brake | 5"ns6, I lg.qLrlgN fiP)
lq-]J 1"""",i:;*""* t iii*' i "s'H39*
:ilH1fti$;",,"
;lX *Tt r#i*f= ft;1uii,'" 11? I ;:: [S[l 5p,[,"f*,,*""*l
;ny,t;sfl E?[T
l-T;l'"
t, L- t''""t'1"' ---C "0.,, to"-t' I
STEEBINGLOCK
r-=KeyInlerlockSwitchClosed withkey pushsd.
KeylnterlockSolenold
'" I--j"$t'U"t--:t "o', 3*".''
'f 'o"
i
-
r-, gEr-
- - -;;; - - - -: t rmrsu tsstot't ll
L$'e: 1ui ifiin?rri!::::
I
:- - _ _ _ _::{ : _ _ _ _ _ _ __ - - - J "",.
-JWHT]"TEL
INTERLOCKCONTROLUNIT
;,-".t^-l[-
-------;;f[ ":'"'"."'
seeA/rGearr A c+sg ar< Posnon
wHr BL( [ ero'o i28 cn1,,rvxr ll Indicalor
r* "o"* rz | g+r.q -,
l,/ |Bi*:yJL,tx o"nf'$y:-----1a"r.EAR
I G-11 sh,ft rever push ! | "- i a.o, I P/,oSlTloN swlTcH
-il,tii,oJ,tu"o.""""0 | ^ll \, | -'
-iJcni.'
!"L-----. i, !
'g",J"T,F;:'A$l"Y"";%,r, i" ---1 'r a solenord flom enelgrTing
"'^l '";;'"-
R:":.Rt?i# i F 33""'?Ji"" i ::f;',3J3u:"00":"":Ji",",",a-< 3l'Jlilgl L___+_::':_j ;;ff;;;;rr"p,".."dBLK I NOTE: In case olBLK I NOTE: In case ot syslem
Y r ! ccro malfunchon lhesh1fllever
I ",, I paoro to can be released byI --' I oushino the ionition kev
J---r"?r-"*l-f----) Distribution,
I oaoe to-o.
I ruse aa flNTERLocK uNrn( r.5^
i.- - ---- -
Koy Int6rlockCircuitAllows key inlerlocksolenoid to boenergized unlessshift lever is in "P'
138
f __ --__l pushing lhe ignition key
,lt--- il'""J1:oi:'""i,:"0'"d'l-' c4ol
Page 1557 of 1681
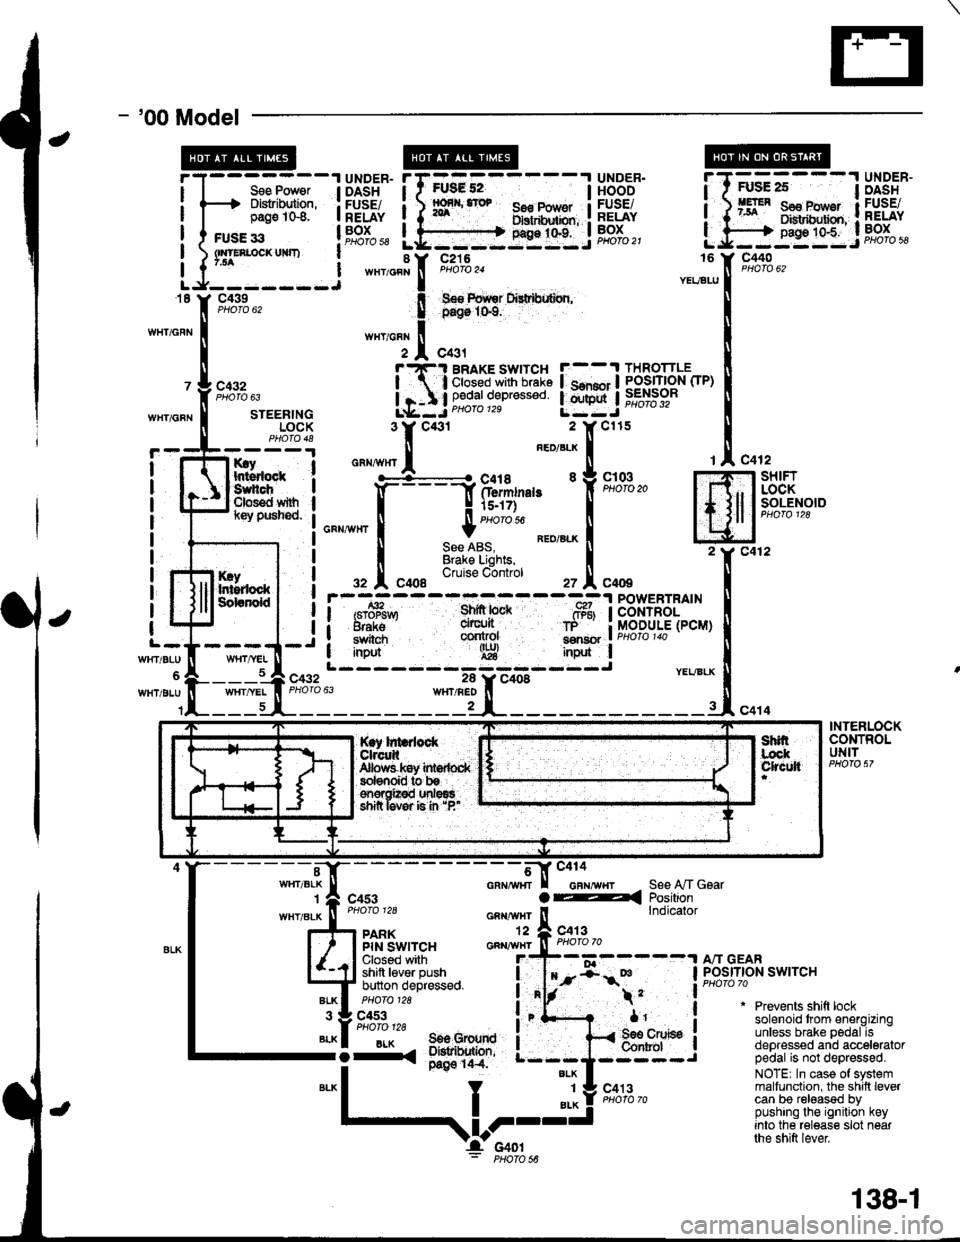
- '00 Model
I
I
FUsg 52I56€ Pow€r Ilxrtdhxbn, :g9:t"t:.i
UNDER.HOODFUSEiRELAYBOXPHOfO 21
Sse Power I DASHDlslribution, : FUSE/page 1G8. I RELAY
c440
c432
WHT/GFNSTEERINGLOCK
rry Ihtsdock :Suhch IClos€d with Il(ey pusned. I
I
I
I
I
I
I
c432
It
I
I
l-
WrtT/BLU
WHT/BLU
KryIr$rdockSdanold
c412-l SHIFT
, I LOCKI I SOLENOIDI lcuoto tzo
Jc412
c414
rAc4
m2Y c4
INtl
.-, I
i/BLX U
-rl"o
POWERTRAINCONTROLMODULE(PCM)
YEVBLX
INTERLOCKCONTROLUNIT
"-*;.'l[-
- - - - - - - -;*f-tr "'"'"'"-,,
r I casr a4
""""#"J;:.
_^ ll"ij*sa*,"
l4J $l't'"ii,''F:^,
*"T't. 3il1;'
;fi;ifJ,t""**o
i"'f- .
*1'
S€e A,/T GsarPositionlndicator
"liiffo,,' a"-BLK I 506 Grourd I-i-. ;*'o' ---;
*"1
I "l! s'*l'"-
Prevents shift locksolenoid trom energizingunless brake pedal isdepressed and acceleratorpedal is not depressed.
NOTE| In case of systemmalfunction, the shilt levercan be released bypushing the ignition keyinto the release slot nearthe shift lever
$l;---l UiSi'"
BRAKE SWITCH F--.t THROTTLE
;'3i:g*s::: !.mnj iffibr-
*,
,V-I'c4ol: PHoro s6
138-1
Page 1558 of 1681
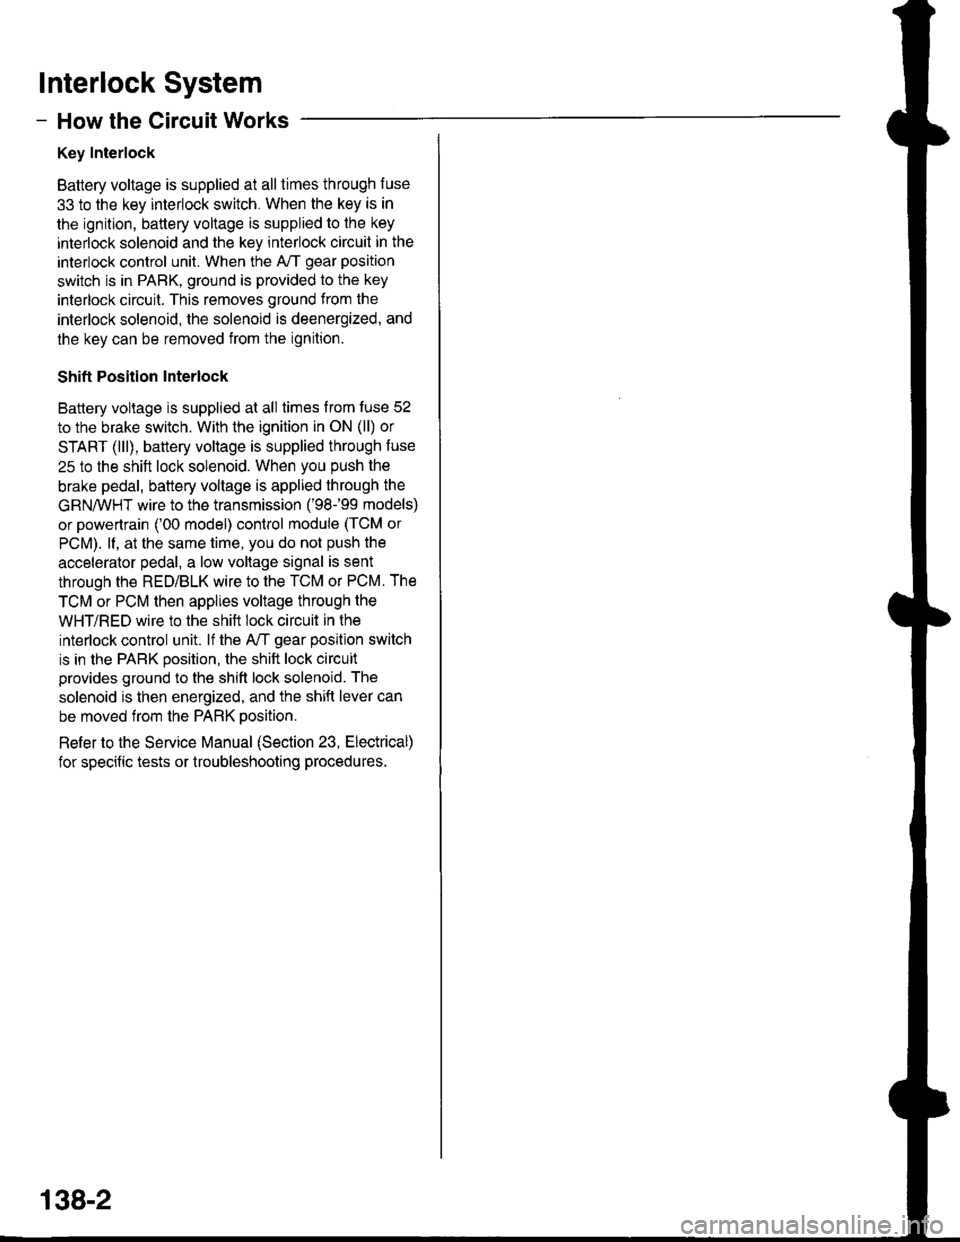
lnterlock System
- How the Circuit Works
Key Interlock
Battery voltage is supplied at all times through f use
33 to the key interlock switch. When the key is in
the ignition, battery voltage is supplied to the key
intedock solenoid and the key interlock circuit in the
interlock control unit. When the A/T gear position
switch is in PABK, ground is provided to the key
interlock circuit. This removes ground from the
interlock solenoid, the solenoid is deenergized, and
the key can be removed from the ignition.
Shift Position Interlock
Battery voltage is supplied at all times lrom fuse 52
to the brake switch. With the ignition in ON (ll) or
START (lll), battery voltage is supplied through luse
25 to the shift lock solenoid. When you push the
brake pedal, battery voltage is applied through the
GRN/VVHT wire to the transmission ('98-�99 models)
or powertrain ('00 model) control module (TCM or
PCM). lf, at the same time, you do not push the
accelerator pedal, a low voltage signal is sent
through the RED/BLK wire to the TCM or PCM. The
TCM or PCM then applies voltage through the
WHT/RED wire to the shift lock circuit in the
interlock control unit. lf the A,/T gear position switch
is in the PARK position, the shift lock circuit
provides ground to the shift lock solenoid. The
solenoid is then energized, and the shift lever can
be moved from the PARK Dosition.
Refer to the Service Manual (Section 23, Electrical)
for specific tests or troubleshooting procedures.
138-2
Page 1610 of 1681
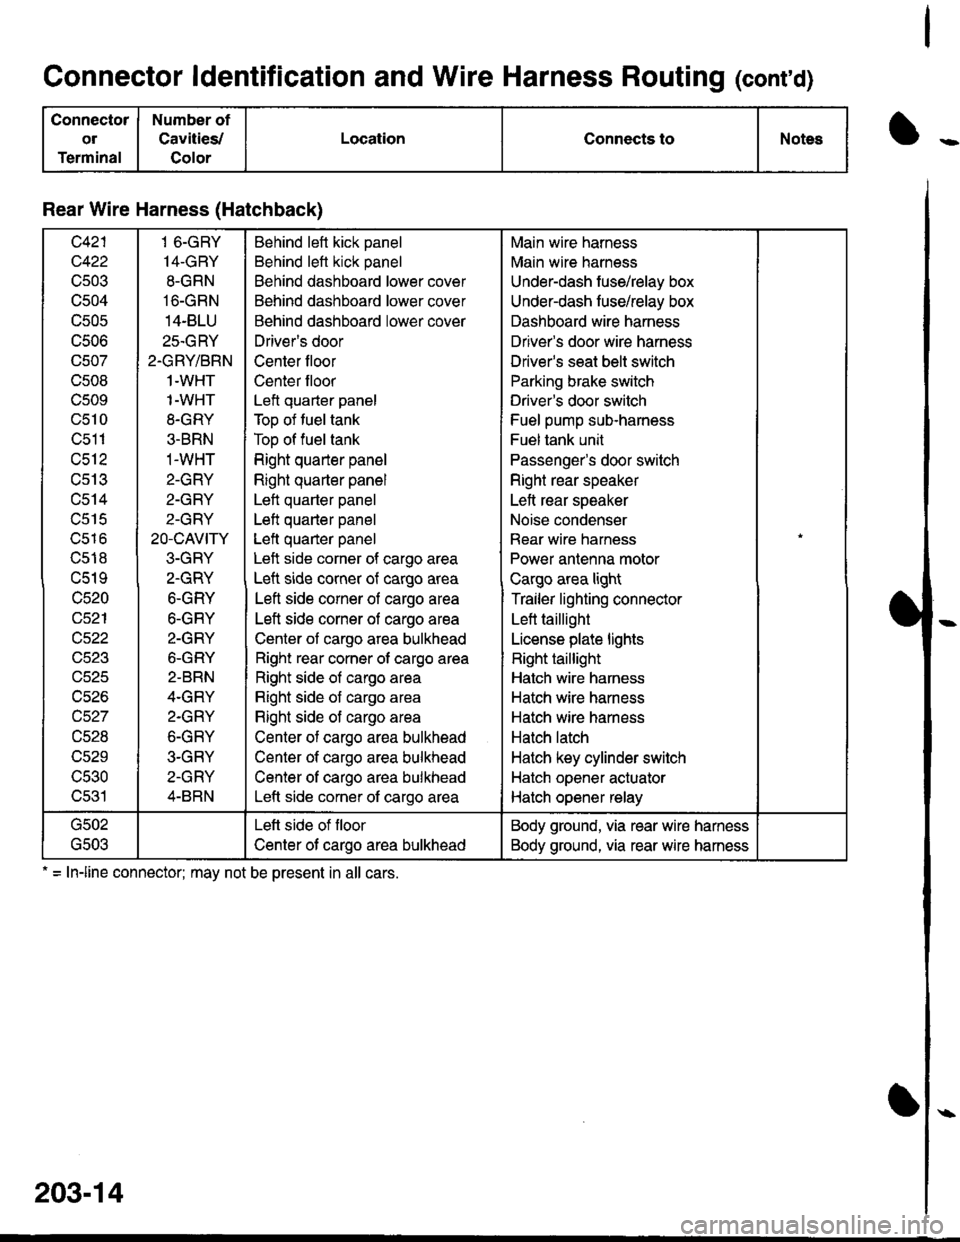
Connector ldentification and Wire Harness Routing (cont'd)
Connector
ol
Terminal
Number of
Cavities/
Color
LocationConnects toNotes
Rear Wire Harness (Hatchback)
c421
c422
cs03
c504
c505
UCUO
c507
c508
c509
c510
c511
c512
cs13
c514
c515
ucto
c518
c519
c520
c521
c522
c523
uczc
c526
c527
c528
c529
c530
c531
1 6-GRY
14-GRY
8-GRN
16-GRN
14-BLU
25.GRY
2.GRY/BRN
1-WHT
1-WHT
8-GRY
3-BRN
1-WHT
2-GRY
2-GRY
2-GRY
20-cAVtry
3-GRY
2.GRY
6-GRY
6-GRY
2-GRY
6-GRY
2-BRN
4.GRY
2.GRY
6-GRY
3-GRY
2-GRY
4-BRN
Behind left kick panel
Behind left kick panel
Behind dashboard lower cover
Behind dashboard lower cover
Behind dashboard lower cover
Driver's door
Center floor
Center floor
Left quarter panel
Top of tuel tank
Top of fuel tank
Right quarter panel
Right quarter panel
Left quarter panel
Left quarter panel
Lett quaner panel
Left side corner of cargo area
Left side corner of cargo area
Left side corner of cargo area
Left side corner of cargo area
Center of cargo area bulkhead
Right rear corner of cargo area
Right side of cargo area
Right side of cargo area
Right side of cargo area
Center of cargo area bulkhead
Center of cargo area bulkhead
Center of cargo area bulkhead
Left side corner of cargo area
Main wire harness
Main wire harness
Under-dash fuse/relay box
Under-dash fuse/relay box
Dashboard wire harness
Driver's door wire harness
Driver's seat belt switch
Parking brake switch
Driver's door switch
Fuel pump sub-harness
Fuel tank unit
Passenger's door switch
Right rear speaker
Left rear speaker
Noise condenser
Rear wire harness
Power antenna motor
Cargo area light
Trailer lighting connector
Lett taillight
License plate lights
Right taillight
Hatch wire harness
Hatch wire harness
Hatch wire harness
Hatch latch
Hatch key cylinder switch
Hatch opener actuator
Hatch opener relay
G502
\,CUJ
Lett side of floor
Center ot cargo area bulkhead
Body ground, via rear wire hamess
Body ground, via rear wire hamess
. = Inline connector: mav not be oresent in all cars.
203-14
Page 1616 of 1681
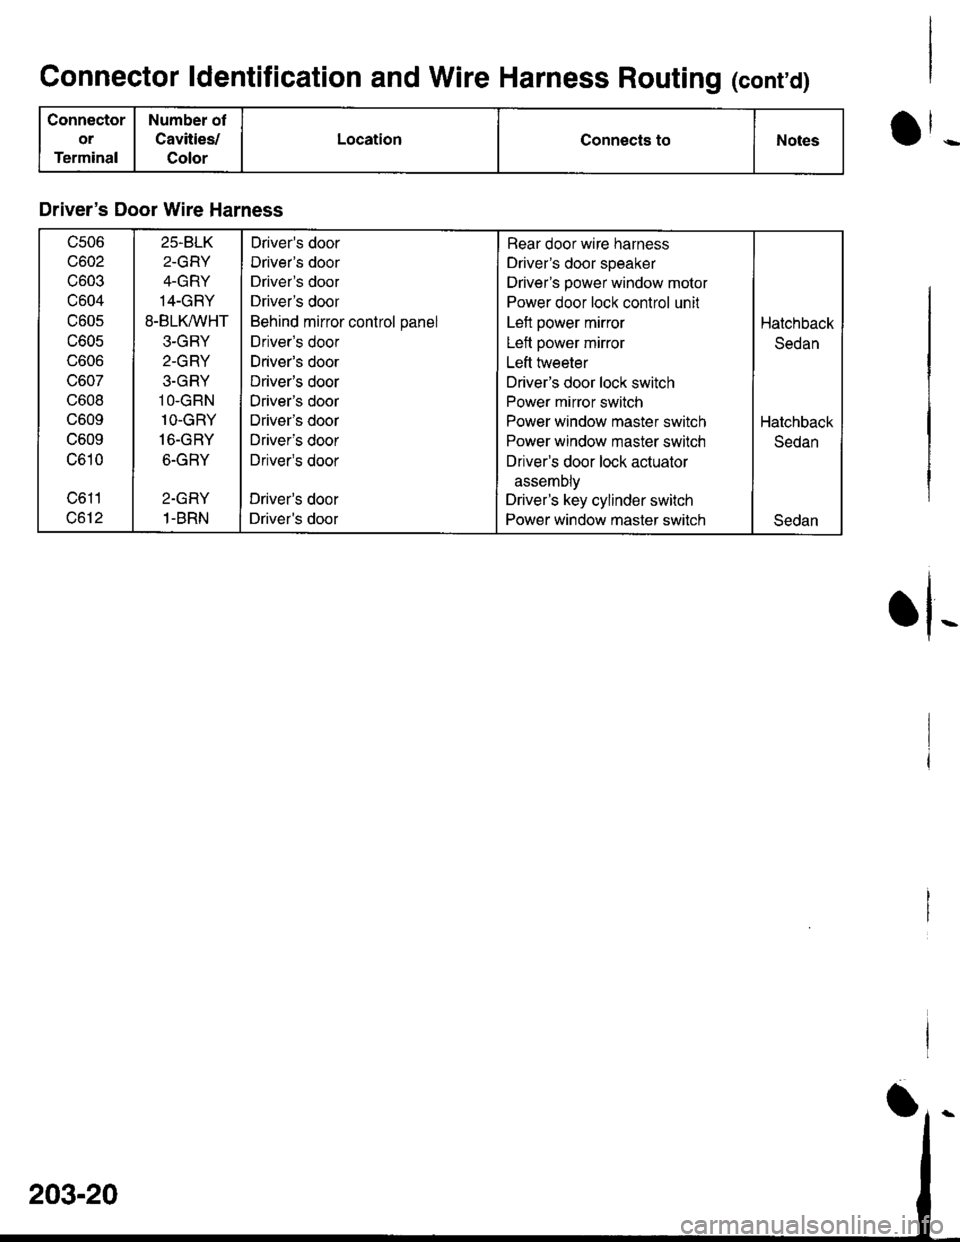
Connector ldentification and Wire Harness Routing (cont'd)
Connector
or
Terminal
Number ot
Cavities/
Color
LocationConnects toNotes
Driver's Door Wire Harness
c506
c602
c603
c604
c605
c605
UOUO
vou/
c608
c609
c609
c610
c611
c612
25.BLK
2-GRY
4-GRY
14-GRY
8-BLK,^/VHT
3-GRY
2-GRY
3.GRY
1O-GRN
1O-GRY
16-GRY
6-GRY
2-GRY
1-BRN
Driver's door
Driver's door
Driver's door
Driver's door
Behind mirror control panel
Driver's door
Driver's door
Driver's door
Driver's door
Driver's door
Driver's door
Driver's door
Driver's door
Driver's door
Rear door wire harness
Driver's door speaker
Driver's power window motor
Power door lock control unit
Left power mirror
Left power mirror
Left hveeter
Driver's door lock switch
Power mirror switch
Power window master switch
Power window master switch
Driver's door lock actuator
assemDly
Driver's key cylinder switch
Power window master switch
Hatchback
Sedan
Hatchback
Sedan
Sedan
rl-
Page 1618 of 1681
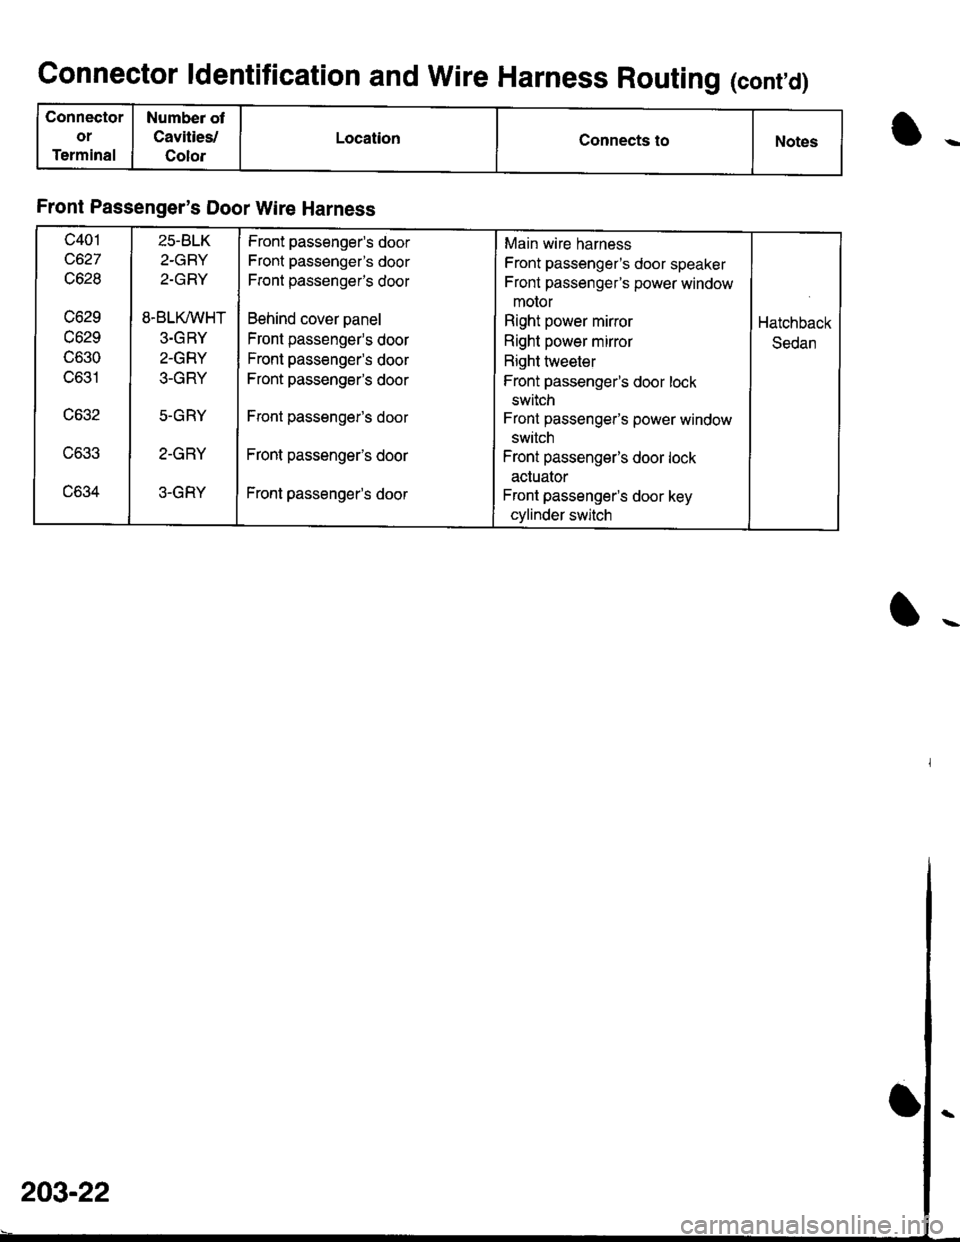
Connector ldentification and Wire Harness Routing (cont,d)
Connector
or
Terminal
Numbea ot
Cavities,l
Color
LocationConnects toNotes
Front Passenger's Door Wire Harness
c401
c627
c628
vozv
c629
lJOOU
c631
uo.tz
c633
uo.tz+
25-BLK
2-GRY
2-GRY
8.BLK/VVHT
3.GRY
2-GRY
.t-
h T
5.GRY
Z-I'FI T
3-GRY
Front passenger's door
Front passenger's door
F[ont passengefs door
Behind cover panel
Front passenger's door
Front passenger's door
Front passenger's door
Front passenger's door
Front passenger's door
Front passenger's door
Main wire harness
Front passenger's door speaker
Front passengefs power window
motor
Right power mirror
Right power mirror
Right tweeter
Front passenger's door lock
switch
Front passenger's power window
switch
Front passenger's door lock
actuator
Front passenger's door key
cylinder switch
Hatchback
Sedan
I
203-22