ground HONDA INTEGRA 1998 4.G Repair Manual
[x] Cancel search | Manufacturer: HONDA, Model Year: 1998, Model line: INTEGRA, Model: HONDA INTEGRA 1998 4.GPages: 1681, PDF Size: 54.22 MB
Page 504 of 1681
Replacement
(.
L
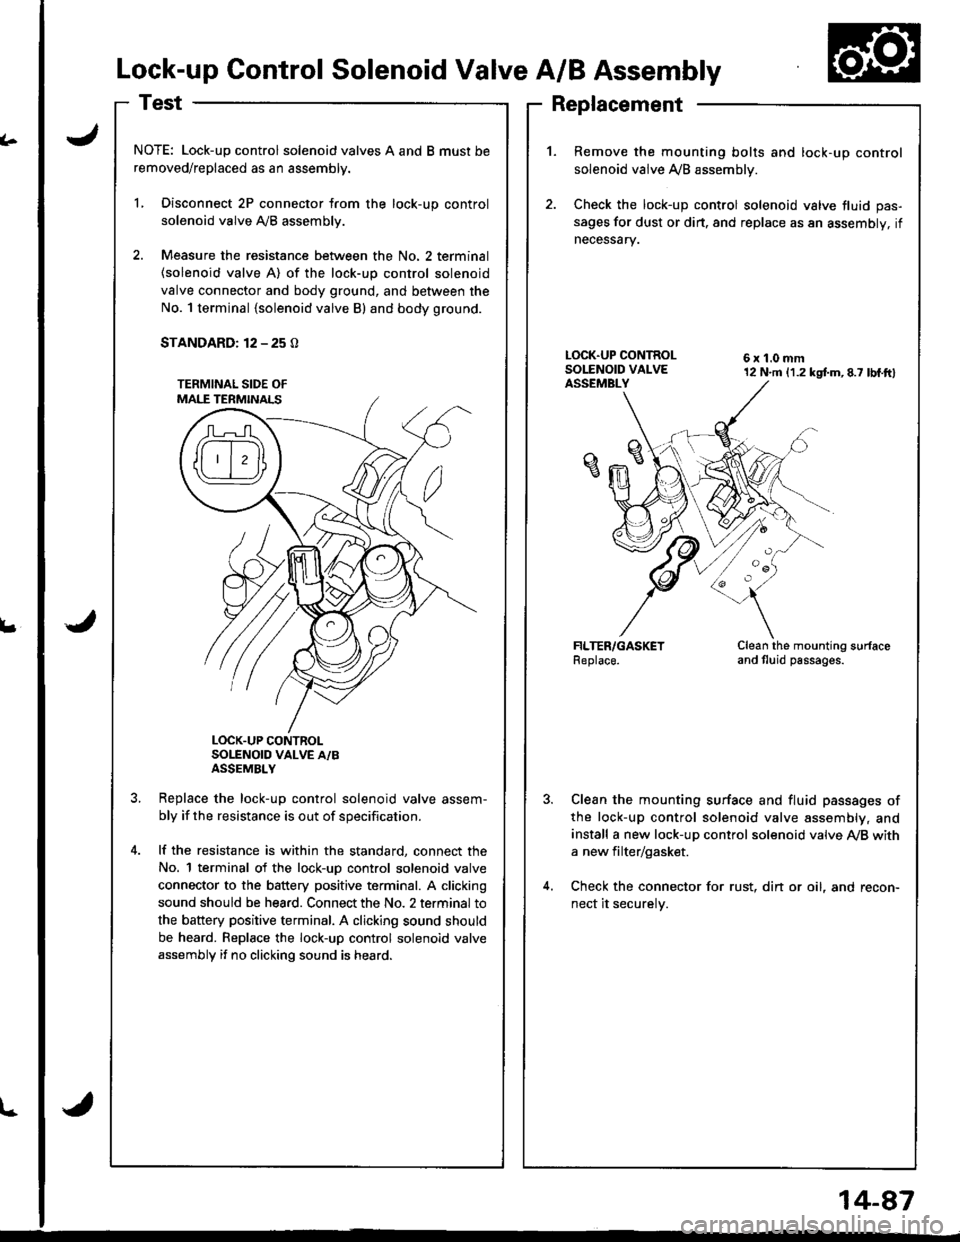
Lock-up Control Solenoid Valve A/B Assembly
NOTE: Lock-up control solenoid valves A and B must be
removed/replaced as an assembly.
L Disconnect 2P connector from the lock-up control
solenoid valve Ay'B assembly.
2. Measure the resistance between the No. 2 terminal
{solenoid valve A) of the lock-up control solenoid
valve connector and body ground, and between the
No. 1 terminal {solenoid valve B) and body ground.
STANDARD: 12 - 25 O
LOCK.UP CONTROLSOLENOID VALVE A/BASSEMBLY
Replace the lock-uo control solenoid valve assem-
bly if the resistance is out of specification.
lf the resistance is within the standard, connect the
No. 1 terminal of the lock-uD control solenoid valve
connector to the battery positive terminal. A clicking
sound should be hea.d. Connect the No. 2 terminal to
the battery positive terminal. A clicking sound should
be heard. Replace the lock-up control solenoid valve
assembly if no clicking sound is heard.
1.Remove the mounting bolts and lock-up control
solenoid valve A/B assemblv.
Check the lock-up control solenoid valve fluid pas-
sages for dust or dirt. and replace as an assembly, if
necessary.
6x1.0mm12 N.m (1.2 kgtm,8.7 lbf.ftl
Clean the mounting surfaceand tluid passages.
Clean the mounting surface and fluid passages of
the lock-up control solenoid valve assembly, and
install a new lock-up control solenoid valve Ay'B with
a new filter/gasket.
Check the connector for rust, din or oil, and recon-
nect it securelv.
l-
14-87
Page 505 of 1681
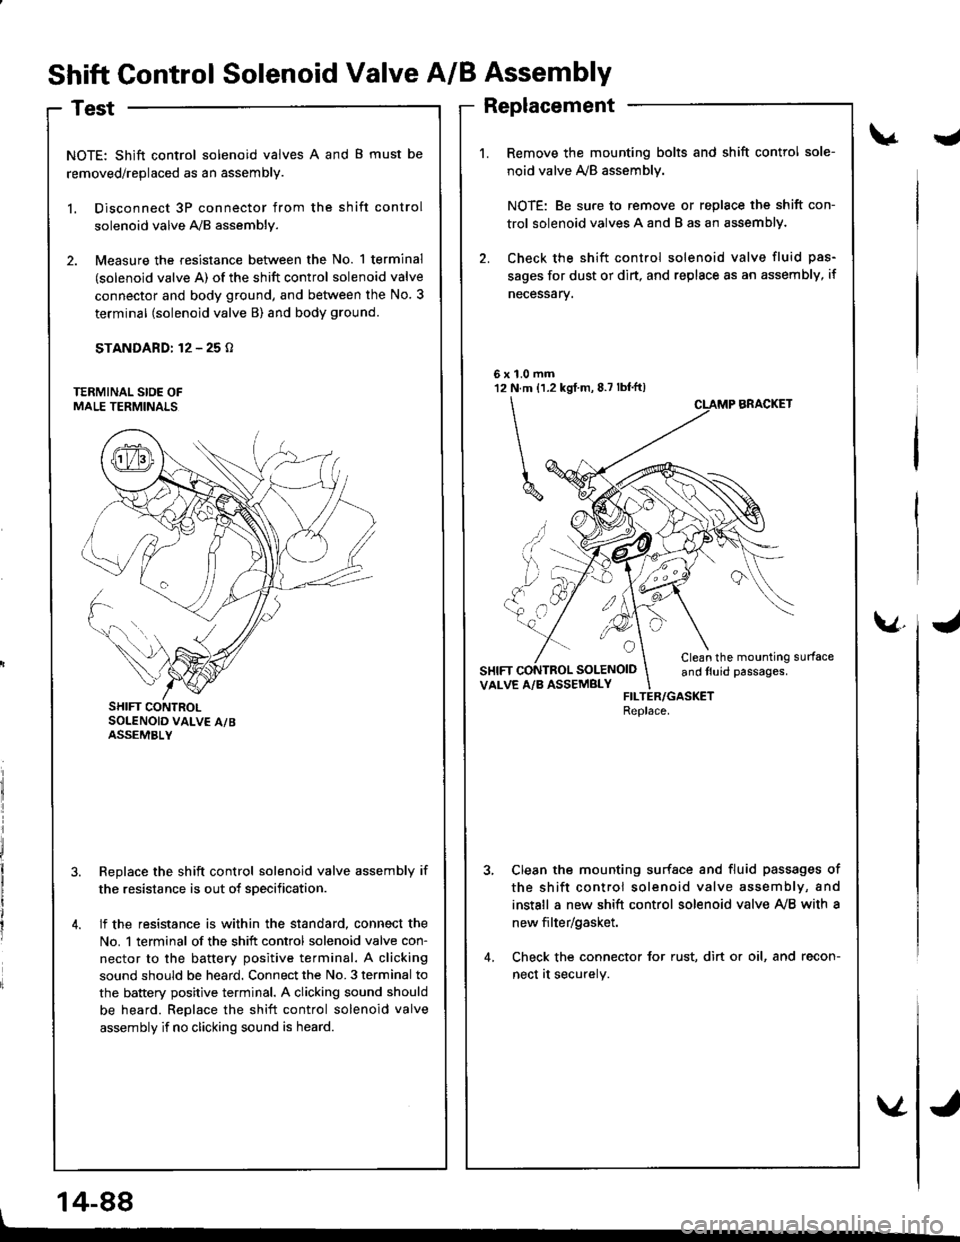
Shift Control Solenoid Valve A/B Assembly
Test
NOTE: Shift control solenoid valves A and B must be
removed/replaced as an assembly.
l. Disconnect 3P connector from the shift control
solenoid valve A,/B assembly.
2. Measure the resistance between the No. 1 terminal
(solenoid valve A) of the shift control solenoid valve
connector and body ground, and between the No. 3
terminal (solenoid valve B) and body ground.
STANDARD: 12 - 25 o
Replace the shift control solenoid valve assembly if
the resistance is out of sDecification.
lf the resistance is within the standard, connect the
No. 1 terminal of the shift control solenoid valve con-
nector to the battery positive terminal. A clicking
sound should be heard. Connect the No. 3 terminal to
the battery positive terminal. A clicking sound should
be heard. Replace the shift control solenoid valve
assembly if no clicking sound is heard.
J
1.0 mmN.m {1.2 kgf m, 8.7 lbf'ft)
\
^ ,, ..,'
UYM
6x't2
a
SOLENOID
v.
SHIFT CONTROLSOLENOID VALV€ A/BASSEMBLY
Replacement
Remove the mounting bolts and shift control sole-
noid valve ly'B assemblv.
NOTE: Be sure to remove or replace the shift con-
trol solenoid valves A and B as an assemblY.
Check the shift control solenoid valve fluid pas-
sages for dust or dirt, and replsce as an assembly, if
necessarv.
BRACKET
Clean the mounting surfaceand tluid passages.VALVE A/B ASSEMBLYFILTER/GASKETReplace.
Clean the mounting surfsce and fluid passages of
the shift control solenoid valve assembly, and
install a new shift control solenoid valve Ay'B with a
new filter/gasket.
Check the connector for rust, dirt or oil, and recon-
nect at securely.
14-88
Page 515 of 1681
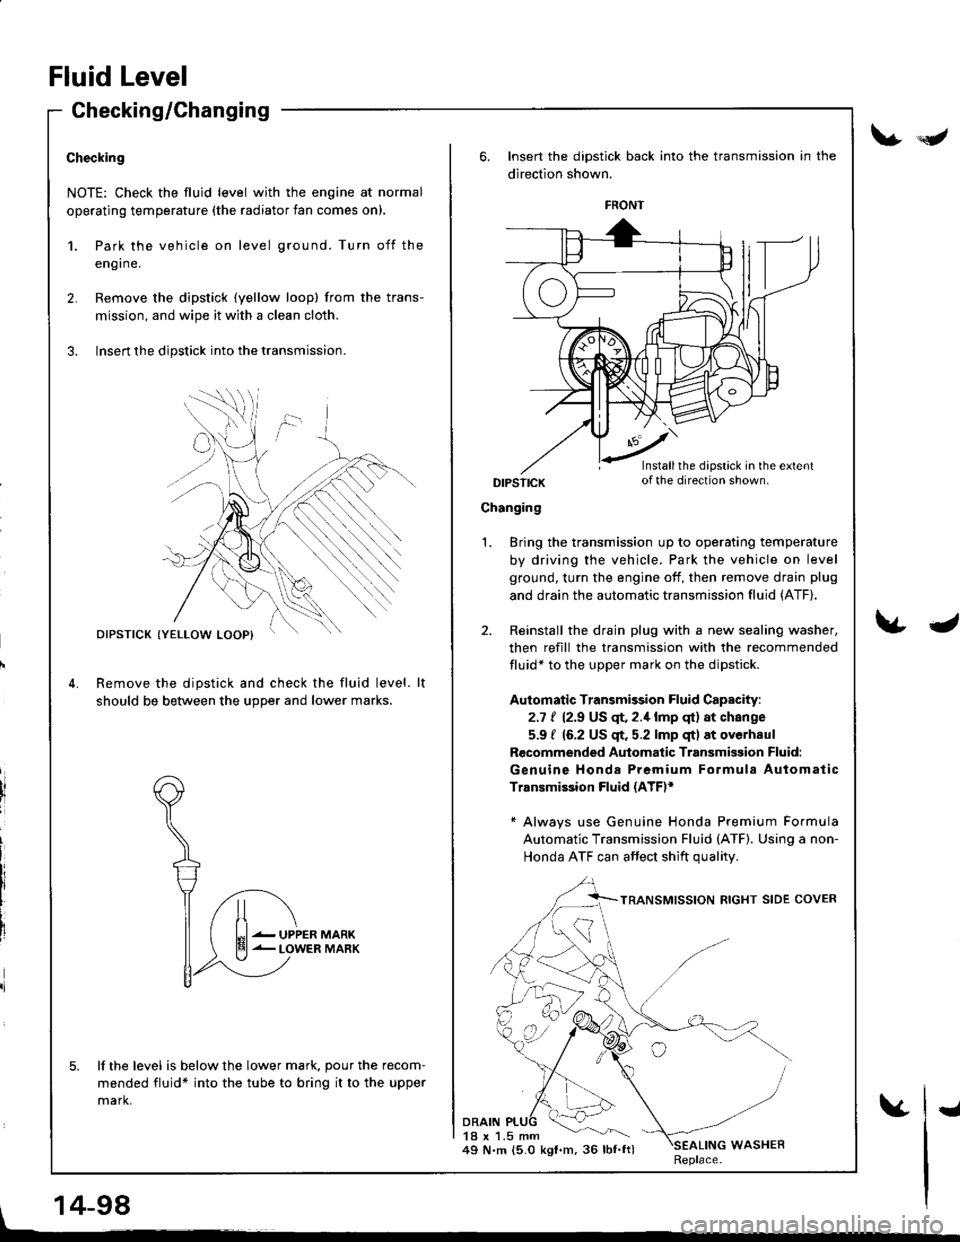
Checking/Changing
Checking
NOTE: Check the fluid level with the engine at normal
operating temperature (the radiator fan comes on).
1.
2.
Park the vehicle on level ground. Turn off the
eng I ne.
Remove the dipstick (yellow loopl from the trans-
mission, and wipe it with a clean cloth.
Insert the dipstick into the transmission.
Remove the dipstick and check the fluid level.
should be between the u9Der and lower marks.
lf the level is below the lower mark. pour the recom-
mended fluid* into the tube to bring it to the upper
mark.
DIPSTICK
UPPERLOWER
Insert the dipstick back into the transmission in the
direction shown.
DIPSTICK
Changing
DRAIN18 x 1.5 mm49 N.m 15.0 kgt.m, 36 lbf.ftl
Bring the transmission up to operating temperature
by driving the vehicle. Park the vehicle on level
ground, turn the engine off, then remove drain plug
and drain the automatic transmission fluid (ATF).
Reinstall the drain plug with a new sealing washer,
then refill the transmission with the recommended
fluid* to the upper mark on the dipstick.
Automatic Transmission Fluid Capacity:
2.7 t 12.9 US qr,2.1lmp qt) at change
5.9 / 16.2 US $. 5.2 lmp qt) at overhaul
Recommended Automatic Transmisgion Fluid:
Genuine Honda Premium Formula Automatic
Transmission Fluid (ATE*
* Always use Genuine Honda Premium Formula
Automatic Transmission Fluid (ATF). Using a non-
Honda ATF can affect shift qualitv
1.
WASHERReplace.
FRONT
Installthe dipstick in the extentof the direction shown.
Fluid Level
V*Y
\&J
, 14-98
vI
Page 521 of 1681
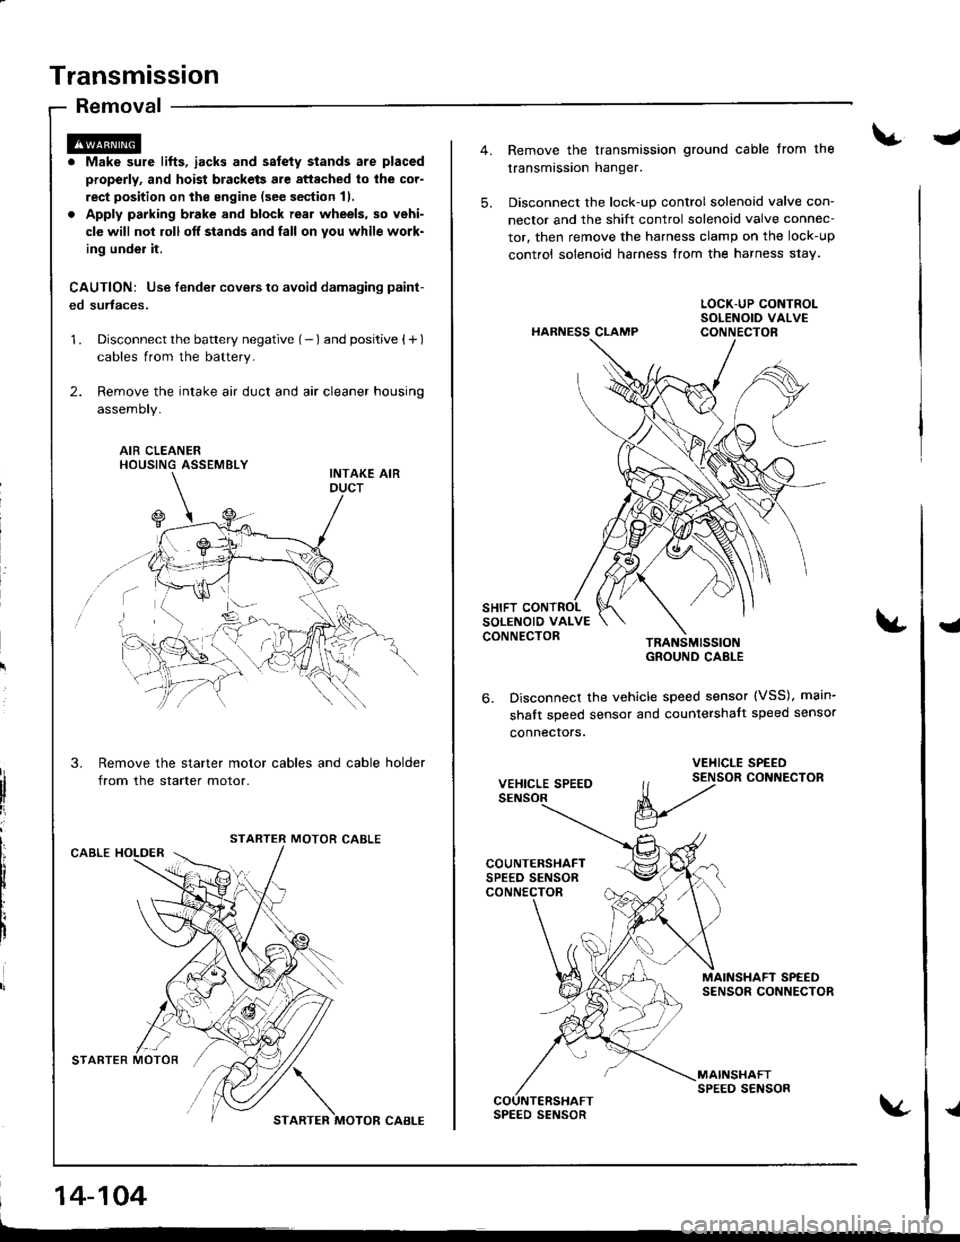
Transmission
Removal
. Make sure lifts, iacks and salety stands are placed
properly, and hoist brackets are attached to lhe cor-
rect position on the engine (see section 11.
. Apply parking brake and block real wheels, so vehi-
cle will nol roll off stands and fall on you while work-
ing under it.
CAUTION: Use fender covers to avoid damaging paint-
ed surtaces.
1 . Disconnect the battery negative (- ) and positive { + )
cables from the battery.
2. Remove the intake air duct and air cleaner housing
assemoty.
AIR CLEANERHOUSING ASSEMBLY
Remove the starter motor cables and cable holder
from the starter motor.
MOTOR CABLECABLE HOLDER
STARTER MOTOR'/,/ \
STARTER MOTOR CABI-E
14-104
-
5.
Remove the transmission ground cable from the
transmission hanger.
Disconnect the lock-up control solenoid valve con-
nector and the shift control solenoid valve connec-
tor, then remove the harness clamp on the lock-up
control solenoid harness from the harness s1ay.
HARNESS CLAMP
TRANSMISSIOIGROUND CABLE
Disconnect the vehicle speed sensor (VSS), main-
shalt speed sensor and countershalt speed sensor
connecrors.
{
6.
VEHICLE SPEED
VEHICLE SPEED
ll t2tor coNNEcroR
V
MAINSHAFT SPEEDSENSOR CONNECTOR
MAINSHAFTSPEED SENSORCOUNTERSHAFTSPEED SENSOR{
Page 554 of 1681
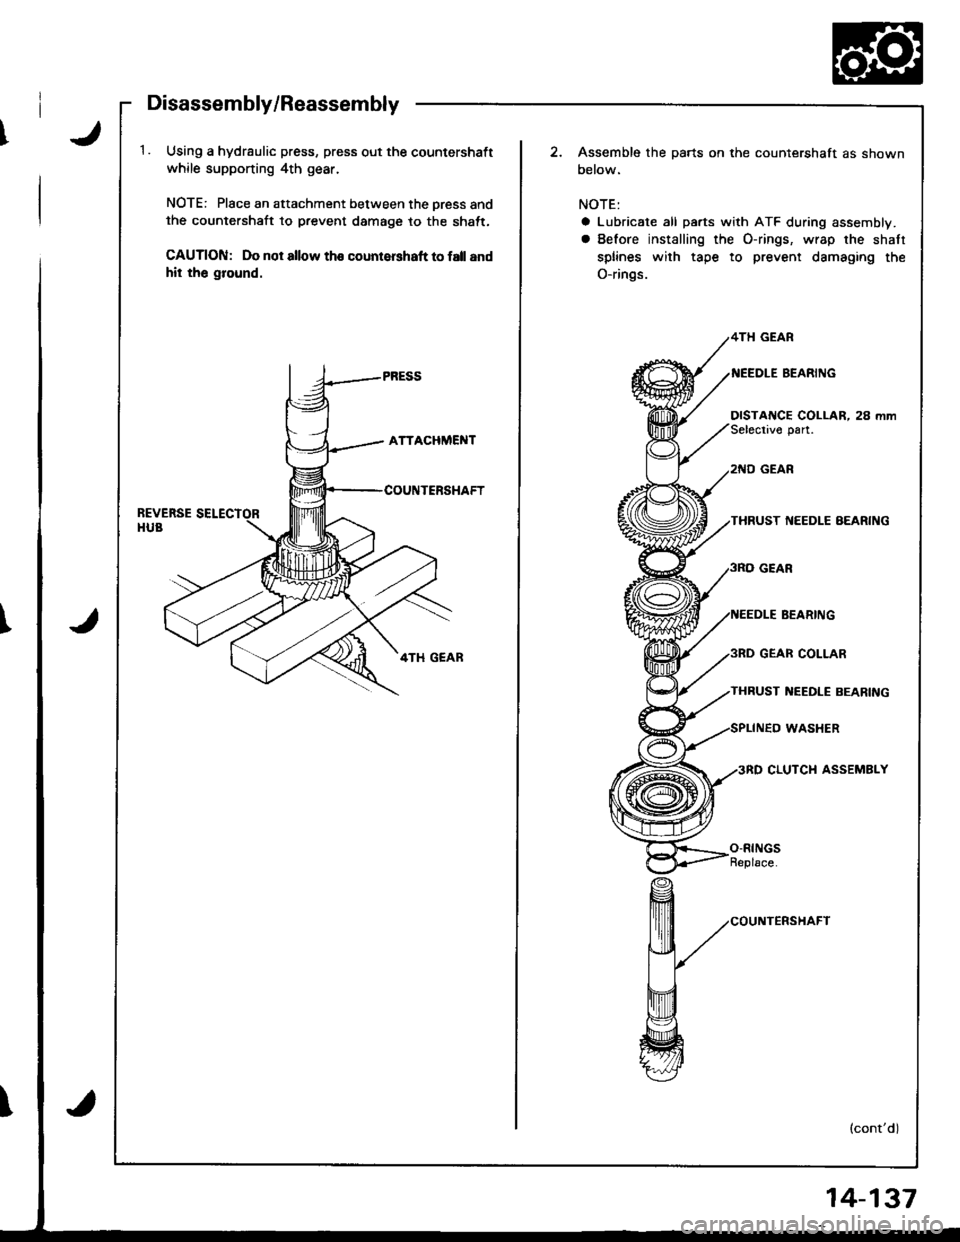
Disassembly/Reassembly
1. Using a hydrsulic press, press out the countershaft
while supponing 4th gear.
NOTE: Place an attachment between the oress andthe countershaft to prevent damage to the shatt,
CAUTION: Do not allow th€ count€rshaft to fall rnd
hit the ground.
T
T
2. Assemble the parts on the countershaft as shown
below.
NOTE:
a Lubricate all parts with ATF during assembly.
a Before installing the O-rings, wrap the shaft
splines with tape to prevent damaging the
O-rings.
'{EEDLE EEARIIIG
DISTANCE COLLAR, 28 mmSelectivo part.
THRUST NEEDLE BEARING
BEARING
GEAR COLLAR
TI{BUST NEEDLE BEARING
WASHER
CLUTCH ASSEMBLY
(cont'd)
14-137
Page 587 of 1681
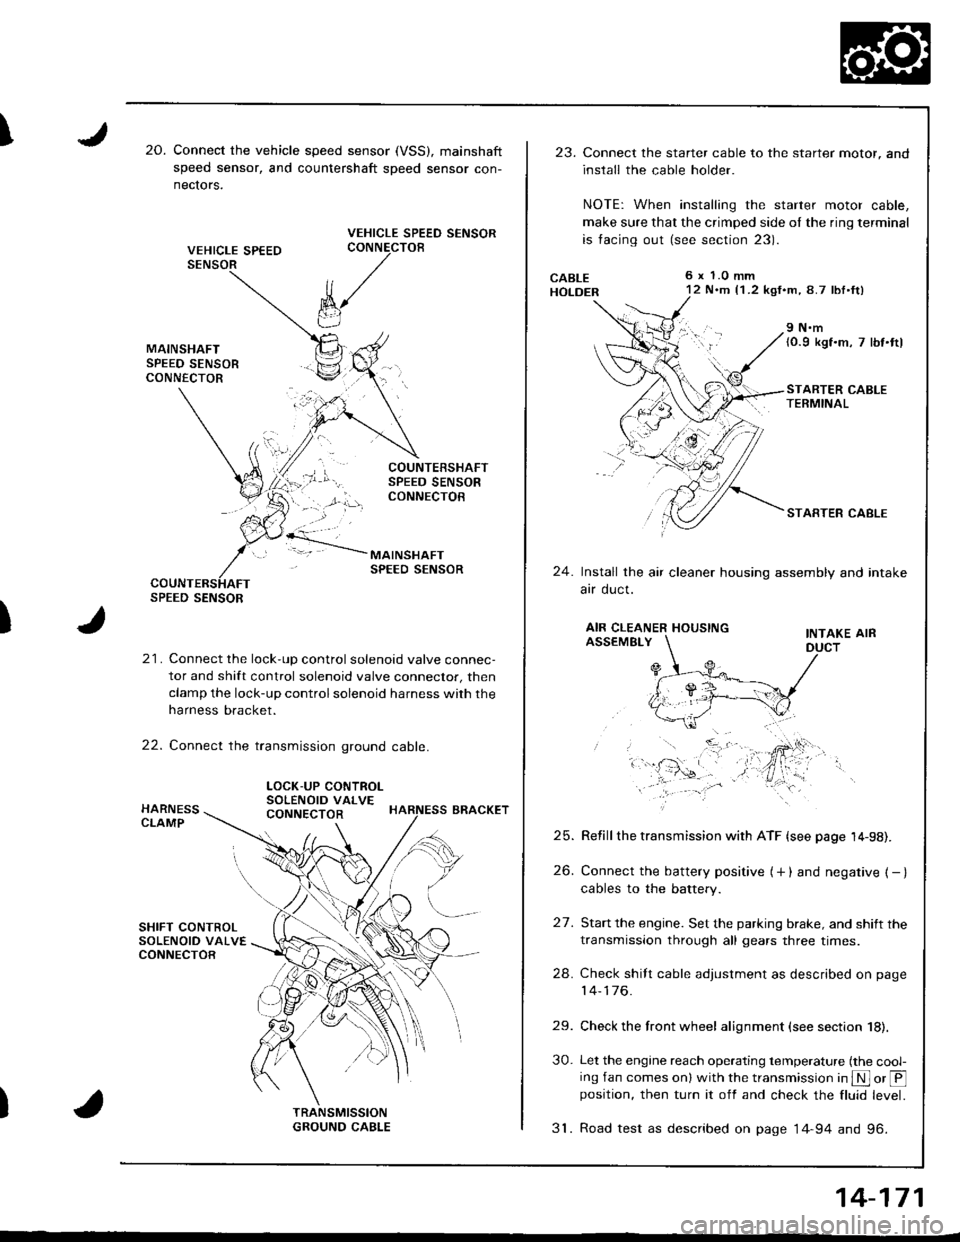
I20.Connect the vehicle speed sensor (VSS), mainshaft
speed sensor, and countershaft sDeed sensor con-
nectors.
VEHICLE SPEED SENSORCONNECTOB
)
k/
t"J
21. Connect the lock-up control solenoid valve connec-
tor and shift control solenoid valve conneclor, then
clamp the lock-up control solenoid harness with the
harness bracket.
22. Connect the transmission ground cable.
SPEED SENSOR
LOCK-UP CONTROLSOLENOID VALVECONNECTOR
23.Connect the starter cable to the starter motor, and
install the cable holder.
NOTE: When installing the starter motor cable,
make sure that the crimped side ol the ring terminal
is facing out (see section 23).
6 x 1.0 mm12 N.m {1 .2 kgf.m, 8.7 lbl.ft)
9 N.m(0.9 kgf.m, 7 lbt.ttl
STARTER CABLETERMINAL
STARTER CABLE
24.Install the air cleaner housing assembly and intake
arr oucl.
AIR CLEANER HOUSINGINTAKE AIRASSEMBLY
27.
Refill the transmission with ATF {see page 14-98).
Connect the battery positive (+ ) and negative { - }cables to the battery.
Start the engine. Set the parking brake, and shift the
transmission through all gears three times.
Check shilt cable adjustment as described on page
14-176.
Check the front wheel alignment (see section 18).
Let the engine reach operating temperature (the cool-ing fan comes onl with the transmission in S or @position, then turn it off and check the fluid level.
31. Road test as described on page 14-94 and 96.
25.
26.
24.
29.
30.
14-171
Page 717 of 1681
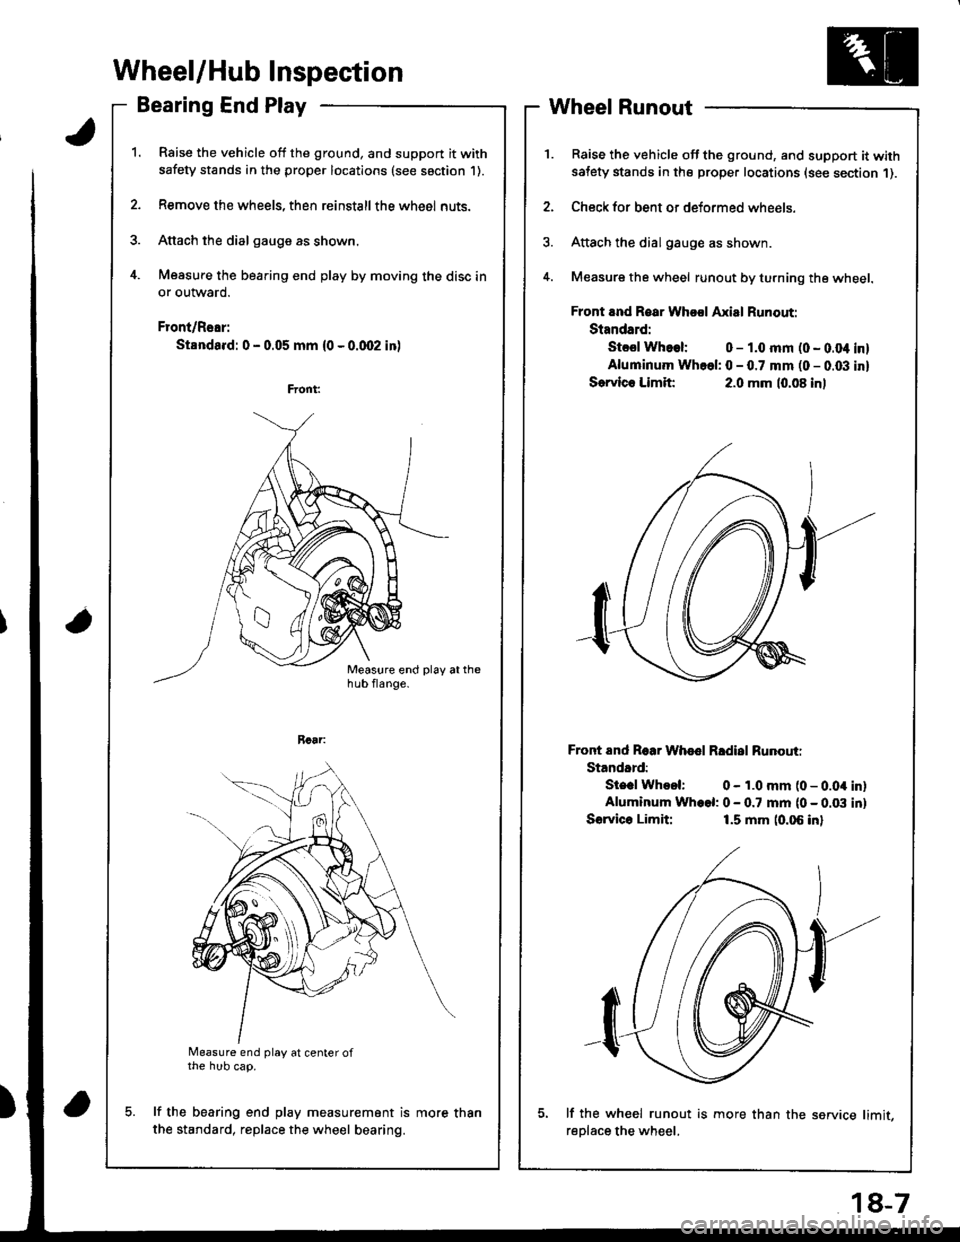
Wheel/Hub Inspection
Bearing End Play
Raise the vehicle off the ground, and support it with
safety stands in the proper locations (see saction 1).
Remove the wheels, then reinstallthe whe6l nuts.
Attach the dial gauge as shown.
Measure the bearing end play by moving the disc in
or outward.
Front/Rear:
Standa.d: 0 - 0.05 mm (0 - 0.qr2 in)
a
Measure end play at center ofthe hub cap.
lf the bearing end play measurement is
the standard, replace the wheel bearing.
Wheel Runout
Raise the vehicle off the ground, and support it withsatety stands in the proper locations (see section 1).
Check for bent or deformed wheels.
Attach the dial gauge as shown.
Measure the wheel runout by turning the wheel.
Front and Roar Whool Axial Runout:
Standard:
Stcsl Whoel: 0 - 1.0 mm (0 - 0.04 inl
Aluminum Whcel: 0 - 0.7 mm (0 - 0.03 inl
Sorvlc. Limit:2.0 mm (0.08 inl
Front End Roar Whod Rldisl Runouti
Standard:
Ste.l Whool: 0 - 1.0 mm (0 - 0.04 inlAluminum Wh.el: 0 - 0.7 mm (0 - 0.03 inl
Sorvico Limit:1.5 mm (0.06 inl
lf the wh€el runout is more than the service limit,
reDlace the wheel.
more than
18-7
Page 718 of 1681
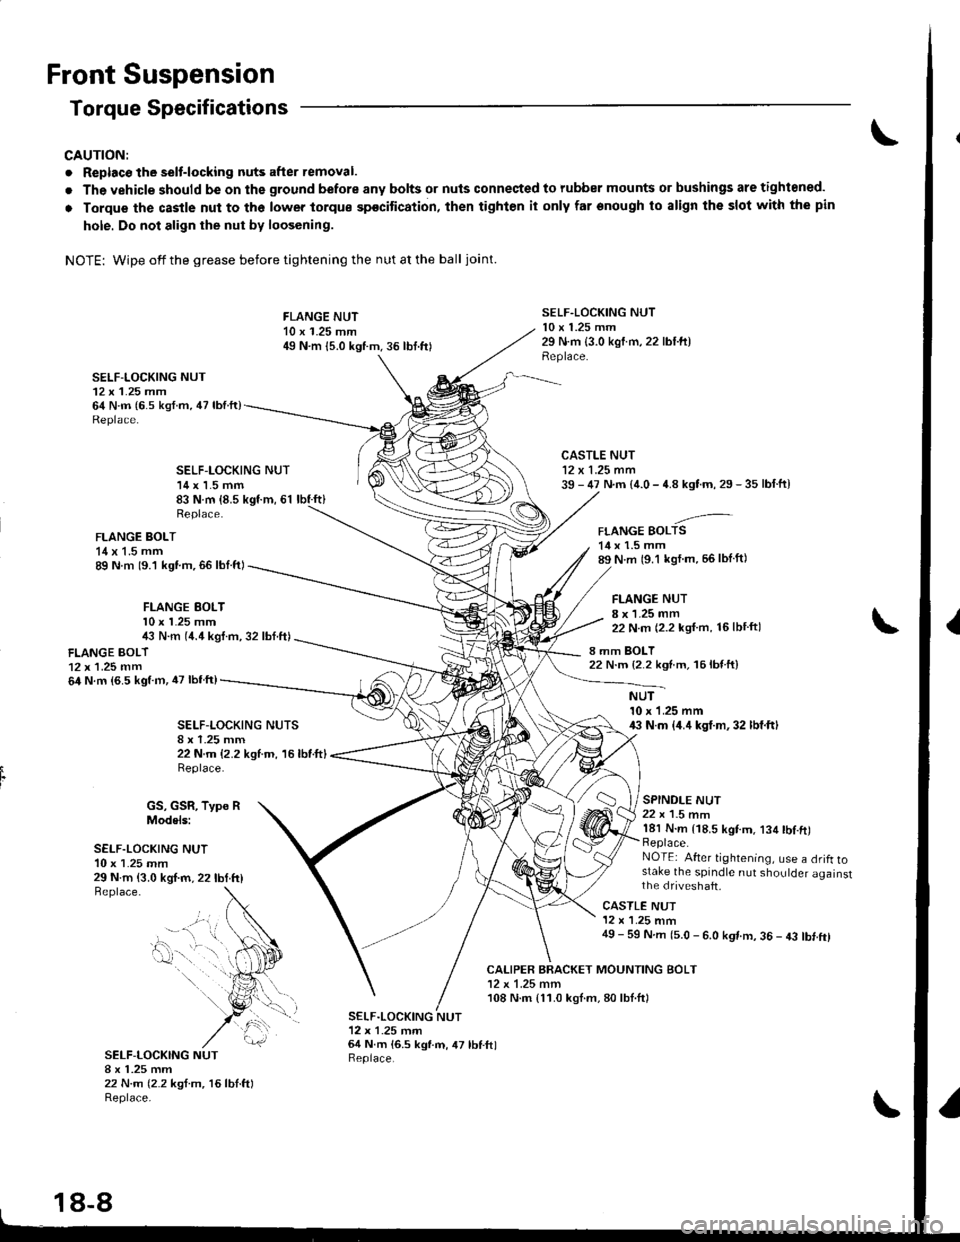
Front Suspension
Torque Specifications
CAUTION:
. Replacc the selt-locking nuts after removal.
. The vehicle should be on the ground before any bolts or nuls connected to rubber mounts or bushings are tightoned.
o Torque thc castle nut to the lower torque spocitication, then tighten it only far onough to align the slot with the pin
hole. Do not align the nut bv loosening.
NOTE: Wipe offthegrease before tightening the nutatthe ball joint.
SELF-LOCKING NUT12 x 1.25 mm64 N.m (6.s ksf.m, 47 lbfft)
FLANGE NUT10 x 1.25 mm49 N.m {5.0 kgtm.36 lbt.frl
SELF.LOCKING NUT10 x 1.25 mm29 N.m {3.0 kgtm,22 lbl.ft)Replace.
CALIPER BRACKET MOUNTING BOLT12 x 1.25 mm108 N.m {11.0 kgl.m,80lbl.ftl
SELF-LOCKING NUT14 x 1.5 mm83 N.m {8.5 kgf.m, 61 lbf.ft}
CASTLE NUT12 x 1.25 mm39 - 47 N.m {4.0 - 4.8 kgtm, 29 - 35 lbf.ft}
-'-FLANGE BOLTS14 x 1.5 mm89 N.m (9.1 kgl m, 56lblft)
FLANGE NUT8 x 1.25 mm22 N.m (2.2 kgf.m, 16lbtftl
8 mm BOLT22 N.m {2.2 ksnm, 16lb{ ft}
Replace.
FLANGE BOLT14 x 1.5 mm89 N m 19.1 kgt.m,66 lbl.ftl
FLANGE EOLTl0 x l�25 mm4i, N.m (4.4 kgl.m, 32 lbf.ft)
FLANGE BOLT12x 1.25 mm64 N.m (6.5 kgtm, iU lbfftl
SELF-I-OCKING NUTS
22 N.m {2.2 kgtm, 16lbtftlReplace.
NUT10 x 1.25 mm43 N.m {4.4 kgt.m,32 lbf.ftl
SPINDLE NUT22 x 1.5 nm181 N.m {18.5 kgtm. 134 tbl.ft)Replace.NOTEi After tightening, use a drifl tostake the spindle nut shoulder againstthe dfiveshaft,29 N.m {3.0 kgf.m, 22lbtttlBeplace.
GS, GSR, Type RModels:
SELF.LOCKING NUT10 x 1.25 mm
SELF-LOCKING NUTI x 1.25 mm22 N.m (2.2 ksf.m, 16lbl.ftlReplace-
CASTLE NUT12 x '1.25 mm49 - 59 N.m (5.0 - 6.0 kgt m, 36 - 43 tbt.ftl
SELF.LOCKING NUT12x 1-25 tnrn64 N.m 16.5 kgl.m, 47 lbf.ftlReplace.
- --.." t,..
0-. .
18-8
Page 731 of 1681
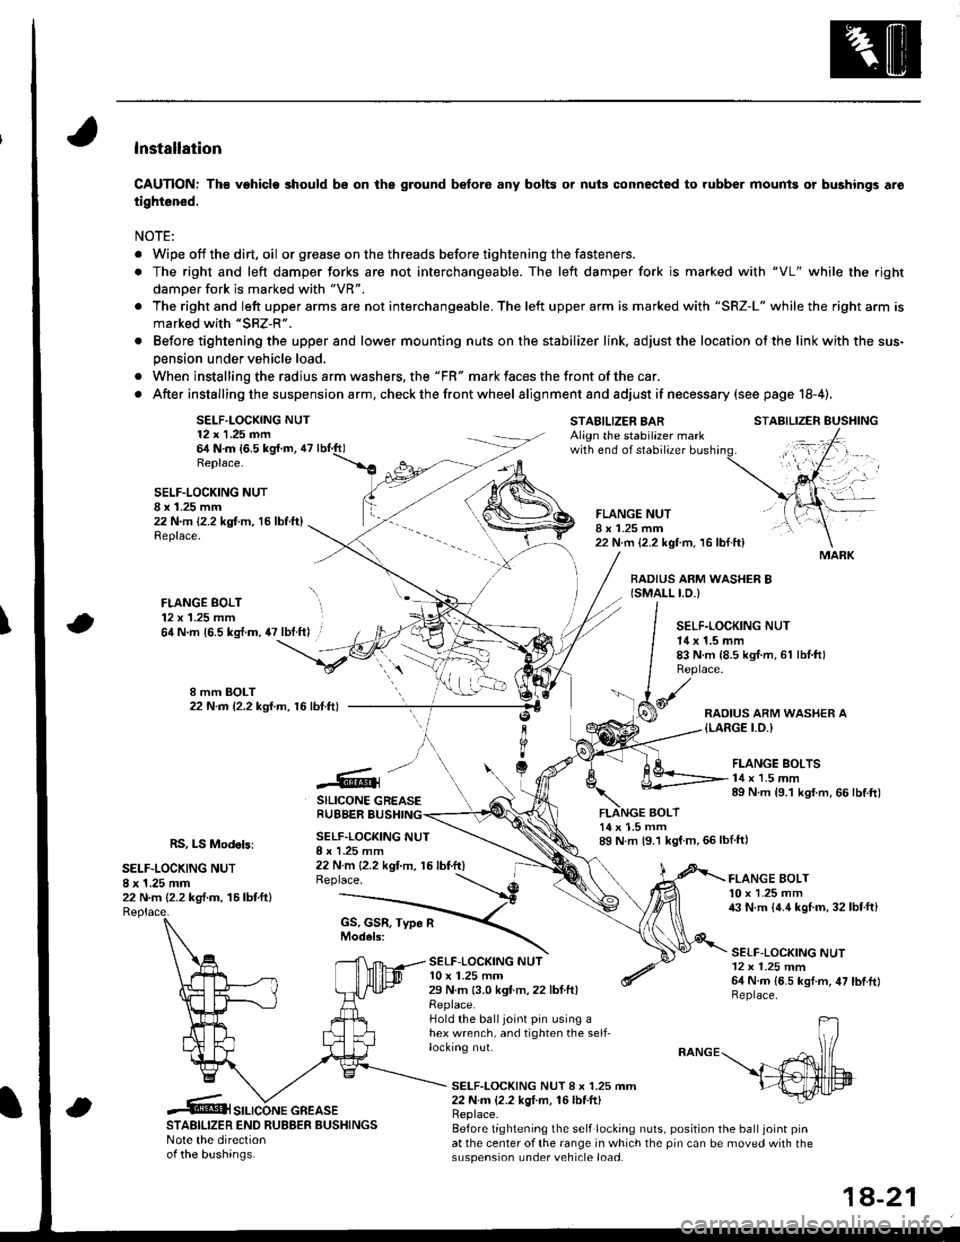
lnstallation
CAUTION: Th€ vehiclo should bs on the ground b€fore any bolts or nuis connectod to rubber mounis or bushings aro
tightened.
NOTE:
. Wipe off thedirt,oil or gr€ase on the threads before tightening the fasteners.
. The right and left damper forks are not interchangeable. The left damper fork is ma.ked with "VL" while the righr
damoer fork is marked with "VR".
. The right and left upper arms are not interchangeable. The left upper arm is marked with "SRZ-L" while the right arm is
marked with "SRZ-R".
. Before tightening the upper and lower mounting nuts on the stabilizer link, adjust the location ot the link with the sus-
pension under vehicle load.
. When installing the radius arm washers, the "FR" mark faces the front ofthe car.
. After installing the suspension a rm, check the front wheel alignmentand adjust if necesssry (see page 18-4).
SELF-LOCKING NUT12 x 1.25 nn64 N.m {6,5 kg{.m, 47Replace.
STABILIZER BARAlign the stabilazer markwith end of stabilizer
BOLT
STABILIZER EUSHING
SELF.LOCKING NUTI x 1.25 mm22 N.m 12.2 kgt m, 16 lbf.ft)Replace.
FLANGE BOLT12 x 1.25 mm
FLANGE NUTI x 1.25 mm22 N.m {2.2 kgt m. 16 lbf.ft}
BADIUS ARM WASHER B{SMALL I.D.)
\64 N.m {6.5 kg{.m, 47 lbt.ft) .SELF.LOCKING NUT14 x 1.5 mm83 N.m {8.5 kgI.m, 61 lbl.ftlReplace.
RAOIUS ARM WASHER A{LARGE I.O.I
.@]
SILICONE GREASERUBBER BUSHING
FLANGE BOLTS14 x 1.5 mm89 N.m {9.1 kgf.m, 66 lbtft)
RS, LS Modebi
SELF.LOCKING NUT8 x 1.25 mm22 N.m (2.2 kg,f.m. 16lbtftl
SELF.LOCKING NUTI x I .25 mm22 N m {2.2 kgt'm, 15 lbf.ft)Replace.
14 x 1.5 mm89 N m {9.1 kgf m,66lblft)
SELF-LOC(ING NUTl0 x 1.25 mm29 N.m 13.0 kgf.m,22 lbtftlReplace.Hold the balljoint pin using ahex wrench, and tighten the self-locking nut.
FLANGE BOLT10 x 1.25 mm43 N.m {4.4 kgl.m, 32lbf.ft}
SELF-LOCKING NUT12 x 1.25 mm64 N.m {6.5 kgf.m, 47 lbtftlReplace.
SELF-LOCKING NUT 8 x 1.25 mm22 N.m {2.2 kgI m, 16lbf.ft)
STABILIZER END RUBBER BUSHINGSNote the directionof the bushinas.
Replace.Before tightening the self locking nuts, position the ball joint pinat the center of the range in which the pin can be moved with thesuspension under vehicle load.
MARK
SILICONE GREASE
1A-21
Page 736 of 1681
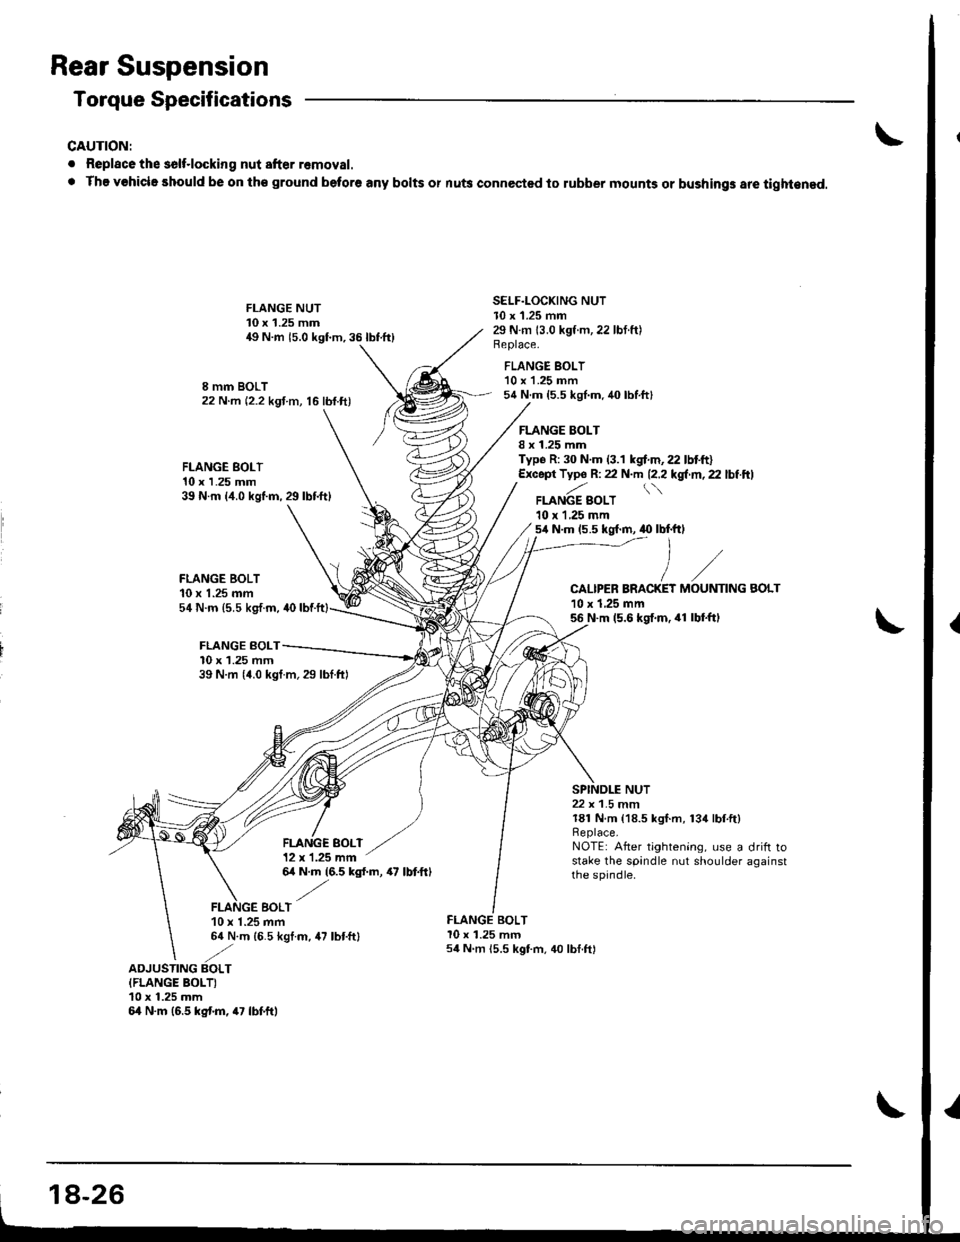
Rear Suspension
Torque Specifications
CAUTION:
. Replace the solt.locking nut after removal.
. The vohicle should be on th€ ground beto.6 any bolts or nu$ connected to lubber mounts or bushings are tight€ned.
FLANGE BOLT10 x 1.25 mm39 N.m {4.0 kgl.m,29lbtft}
FLANGE BOLT10 x 1.25 mm54 N.m (5.5 kg,f.m, 40
FLANGE BOLT10 x 1.25 mm
I mm BOLT22 N.m (2.2 kgf m, 16 lbf.ft)
FLANGE NUT10 x 1.25 mm49 N.m 15.0 kgf.m,35lbtft)
FLANGE SOLT12 x 1.25 mm
SELF.LOCKING NUTl0 x 1.25 mm29 N.m 13.0 kgt.m,22 lbf.ft)Beplace.
FLANGE BOLT'10 x 'l.25 mm54 N.m {5.5 kgl.m.40 lbtft}
FLANGE BOLTI x 1.25 mmTyp6 R: 30 N.m (3.1 kgf.m,22 lbtft)Except Typ6 R: 22 N.m 12.2l'gl'rn,2.lbiftl
FLANGE SOLT10 r L25 mm5,1N.m (5.5 kg{.m, .0 lbf.ftl
CALIPER BRACKET10 x 1,25 mm56 N.m (5.6 kgf.m. 41 lbl.ftl
NUT
MOUNTING
39 N.m 14.0 kgl m,29 lbtftl
BOLT
22 x 1.5 mm181 N.m {18.5 kgf.m, 134lbf.ft}Replace,NOTE: After tightening, use a drift rostake the spandle nut shoulder againstthe spjndle.64 N.m (6.5 kgl.m, 47 lbtftl
EOLT10 x 1.25 mm64 N.m (6.5 kgl.m, 47 lbtftl
FLANGE BOLTl0 x 1.25 mm54 N m 15.5 kgt m, 40 lbf.ft)
ADJUSTING BOLTIFLANGE BOLTI10 x 1.25 mm64 N.m (6.5 kg{.m, 47 lbf.ft,
18-26