HONDA PRELUDE 1992 Owners Manual
Manufacturer: HONDA, Model Year: 1992, Model line: PRELUDE, Model: HONDA PRELUDE 1992Pages: 225, PDF Size: 2.1 MB
Page 91 of 225
Audio System (Si, SR)
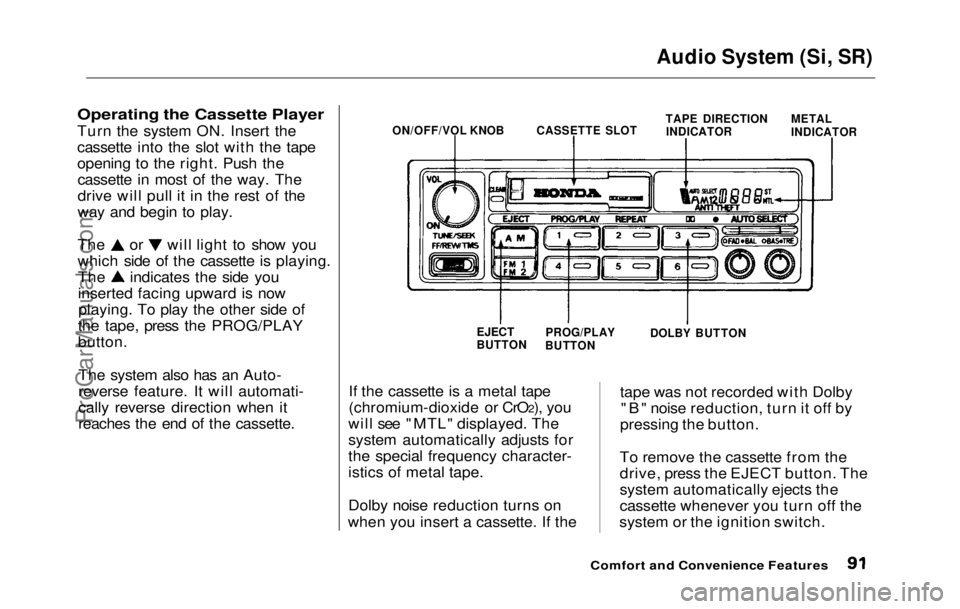
Operating the Cassette Player
Turn the
system ON. Insert the
cassette into the slot with the tape
opening to the right. Push the cassette in most of the way. The
drive will pull it in the rest of the
way and begin to play. The or will light to show you
which side of the cassette is playing.
The indicates the side you
inserted facing upward is now
playing. To play the other side of
the tape, press the PROG/PLAY
button.
The system also has an Auto-
reverse feature. It will automati-
cally reverse direction when it
reaches the end of the cassette. If the cassette is a metal tape
(chromium-dioxide or CrO2), you
will see "MTL" displayed. The
system automatically adjusts for
the special frequency character-
istics of metal tape.
Dolby noise reduction turns on
when you insert a cassette. If the tape was not recorded with Dolby
"B" noise reduction, turn it off by
pressing the button.
To remove the cassette from the
drive, press the EJECT button. The
system automatically ejects the
cassette whenever you turn off the
system or the ignition switch.
Comfort and Convenience Features
ON/OFF/VOL KNOB
CASSETTE SLOT
TAPE DIRECTION
INDICATOR METAL
INDICATOR
EJECT
BUTTON PROG/PLAY
BUTTON DOLBY BUTTONProCarManuals.comMain Menu Table of Contents s t
Page 92 of 225
Audio System (Si, SR)
Cassette Search Functions
Once a cassette is playing, you can
use the FF, REW, TMS, or REPEAT function to look for
desired songs or passages.
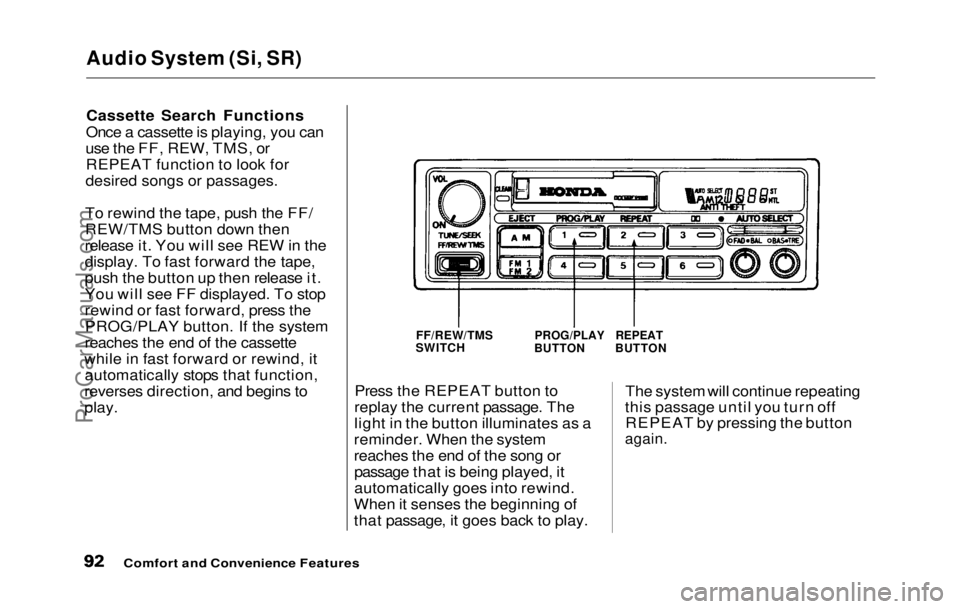
To rewind the tape, push the FF/
REW/TMS button down then
release it. You will see REW in the
display. To fast forward the tape,
push the button up then release it.
You will see FF displayed. To stop
rewind or fast forward, press the PROG/PLAY button. If the system
reaches the end of the cassette
while in fast forward or rewind, it automatically stops that function,
reverses direction, and begins to
play. Press the REPEAT button to
replay the current passage. The
light in the button illuminates as a
reminder. When the system
reaches the end of the song or passage that is being played, it
automatically goes into rewind.
When it senses the beginning of
that passage, it goes back to play. The system will continue repeating
this passage until you turn off REPEAT by pressing the button
again.
Comfort and Convenience Features
FF/REW/TMS
SWITCH
PROG/PLAY
BUTTON
REPEAT
BUTTONProCarManuals.comMain Menu Table of Contents s t
Page 93 of 225
Audio System (Si, SR)
The TMS function lets you skip to
the beginning of a song or other
passage. The tape skips forward or
backward, depending on which direction you push the FF/REW/
TMS switch.
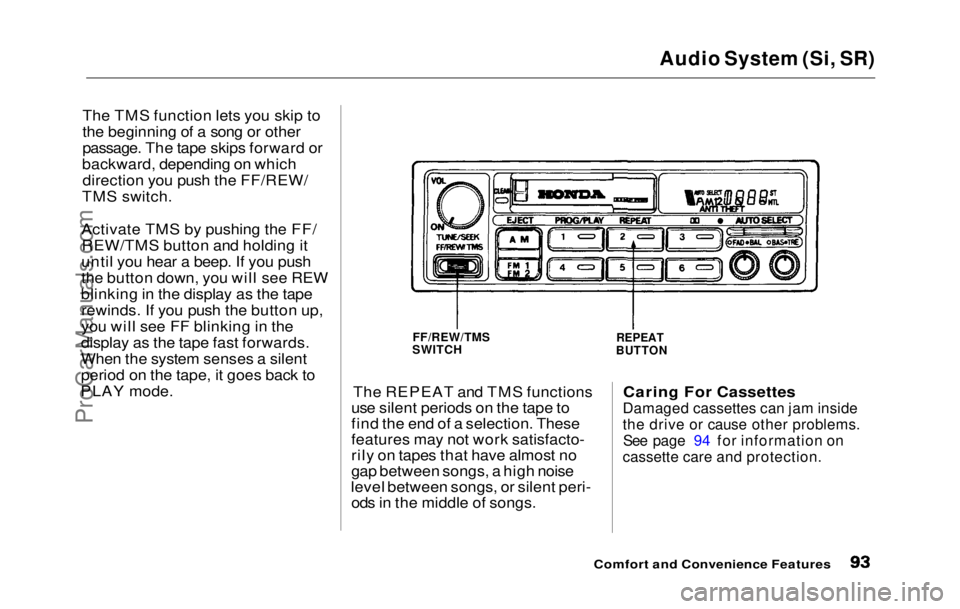
Activate TMS by pushing the FF/ REW/TMS button and holding it
until you hear a beep. If you push
the button down, you will see REW
blinking in the display as the tape rewinds. If you push the button up,
you will see FF blinking in the
display as the tape fast forwards.
When the system senses a silent
period on the tape, it goes back to
PLAY mode.
The REPEAT and TMS functions
use silent periods on the tape to
find the end of a selection. These
features may not work satisfacto-
rily on tapes that have almost no
gap between songs, a high noise
level between songs, or silent peri- ods in the middle of songs.
Caring For Cassettes
Damaged cassettes can jam inside
the drive or cause other problems.
See page 94 for information on
cassette care and protection.
Comfort and Convenience Features
FF/REW/TMS
SWITCH
REPEAT
BUTTONProCarManuals.comMain Menu Table of Contents s t
Page 94 of 225
Caring for the Cassette Player
The cassette drive picks up dirt
and oxides whenever you play a
tape. This builds up over time and
causes the sound quality to degrade.
To prevent this, you should clean
the cassette drive after every 30
hours of use. Your dealer has a cleaning kit available for this
purpose.
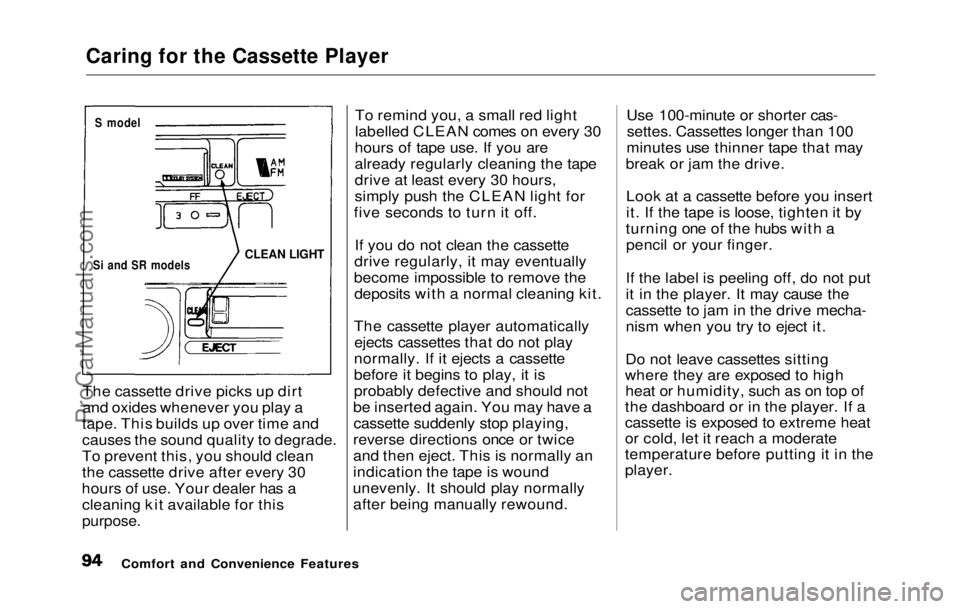
To remind you, a small red light
labelled CLEAN comes on every 30
hours of tape use. If you are
already regularly cleaning the tape
drive at least every 30 hours,
simply push the CLEAN light for
five seconds to turn it off.
If you do not clean the cassette
drive regularly, it may eventually
become impossible to remove the deposits with a normal cleaning kit.
The cassette player automatically ejects cassettes that do not play
normally. If it ejects a cassette
before it begins to play, it is
probably defective and should not
be inserted again. You may have a cassette suddenly stop playing,
reverse directions once or twice
and then eject. This is normally an
indication the tape is wound
unevenly. It should play normally after being manually rewound. Use 100-minute or shorter cas-
settes. Cassettes longer than 100
minutes use thinner tape that may
break or jam the drive.
Look at a cassette before you insert
it. If the tape is loose, tighten it by
turning one of the hubs with a pencil or your finger.
If the label is peeling off, do not put
it in the player. It may cause the
cassette to jam in the drive mecha-
nism when you try to eject it.
Do not leave cassettes sitting
where they are exposed to high heat or humidity, such as on top of
the dashboard or in the player. If a
cassette is exposed to extreme heat
or cold, let it reach a moderate
temperature before putting it in the
player.
Comfort and Convenience Features
S model
Si and SR models
CLEAN LIGHTProCarManuals.comMain Menu Table of Contents s t
Page 95 of 225
Theft Protection
Theft Protection is standard on the Si and Si 4WS models in the U. S.,
and the SR and SR 4WS models in
Canada.
Your audio system is protected by a code number. The system immedi-
ately disables itself whenever the
radio/player unit is disconnected
from the battery. To make it work again, you must enter a five-digit
code with the station Preset
buttons.
Your dealer should have given you
two copies of your audio system's
code number with your car. Keep one of these copies at home, and
the other in your wallet or a con- cealed place in the car. If your car's battery is discon-
nected or goes dead, the audio
system will disable itself. The next
time you turn on the radio you will
see "Code" in the frequency display.
Use the Preset buttons to enter the
five-digit code. If entered correctly,
the radio will start to play.
You will then have to store your
favorite stations in the Preset
buttons. Your original settings
were lost when power was discon-
nected.
Comfort and Convenience FeaturesProCarManuals.comMain Menu Table of Contents s t
Page 96 of 225
Before Driving
Before you begin driving your
Honda, you should know what gaso-
line to use, and that your car is full
of oil and other important fluids.
You also need to know how to pro-
perly stow luggage or packages.
This section will help you. If you plan to add any accessories to your
car, please read the informatio n in
this section
first.
Break-in Period .............................. 98
Gasoline........................................... 98
Oxygenated Fuels...................... 98
Driving in Foreign Countries... 99
Service Station Procedures........ 100 Filling the Gas Tank ............... 100
Opening the Hood....................
101
Fuel Economy
.............................. 104
Vehicle Condition..................... 104
Driving Habits.......................... 104
Accessories................................... 105
Loading Cargo.............................. 106
Before DrivingProCarManuals.comMain Menu s t
Page 97 of 225
Break-in Period, Gasoline
Break-in Period
Help assure your car's future
reliability and performance by
paying extra attention to how you
drive during the first 1,000 km (600
miles).
During thi
s period:
Avoid full-throttle starts and
rapid acceleration.
If you need to add oil, use the
engine oil recommended in this
owner's manual.
Avoid hard braking. New brakes need to be broken-in by moderate
use for the first 300 km (200
miles).
You should follow these same re-
commendations with an overhauled
or exchanged engine, or when the
brakes are relined. Gasoline
Your Honda is designed to operate
most effectively on unleaded
gasoline.
Using gasoline containing lead will
damage your car's emission
controls. Thi s
contributes to air
pollution and can void certain parts
of your warranty.
(S model)
Use an unleaded gasoline with a
pump octane number of 86 or
higher.
Use of a lower octane gasoline can
cause a persistent, heavy metallic
rapping noise that can lead to
engine damage.
(All other models)
Use a
premium unleaded gasoline
with a pump octane number of
91
or higher .
I
f you are unable to find premium
unleaded, you may substitute an
unleaded regular gasoline. The engine will compensate for the
lower octane, but you may notice a
slight decrease in power as a result.
Oxygenated Fuels
Some conventional gasolines are
being blended with alcohol or an
ether compound to increase the
gasoline's octane. These gasolines
are collectively referred to as
oxygenated fuels. Some areas of
the United States and Canada use
oxygenated fuels to help meet clean
air standards.
If you use an oxygenated fuel, be
sure it meets the minimum octane
rating requirement as recom-
mended.
Before DrivingProCarManuals.comMain Menu Table of Contents s t
Page 98 of 225
Gasoline
ETHANOL (ethyl or grain alcohol) — Gasoline containing more than
10% ethanol by volume may cause
starting and/or performance
problems. Gasoline containing
ethanol may be marketed under the name "Gasohol."
METHANOL (methyl or woodalcohol) — Gasoline containing
methanol must contain cosolvents
and corrosion inhibitors to protect
the fuel system. Gasoline contain-
ing more than 5% methanol by
volume may cause starting and/orperformance problems and may
damage metal, rubber and plastic
parts o f
your fuel system.
MTBE (Methyl Tertiary Butyl
Ether) — You may use gasoline containing up to 15% MTBE by
volume.
Before using an oxygenated fuel,
try to confirm the fuel's contents.
Some states and provinces require
this information to be posted on the
pump. If you notice any undesirable
operating symptoms, switch to a
conventional unleaded gasoline.
Fuel system damage or perform-
ance problems resulting from the
use of an oxygenated fuel are not
the responsibility of Honda and are not covered under warranty.
Oxygenated fuels can damage paint and plastic. Be careful not to spill
fuel when filling your fuel tank.
Damage caused by spilled fuel is
not covered under warranty. Driving in Foreign Countries
Using any type of leaded gasoline
in your Honda will affect perform-
ance and damage its emission con-
trols. Unleaded gasoline may not be
available i
n
other countries. If you
are planning to take your car out-
side the U.S. or Canada, write to
Honda at the address shown for
information about any modifica-
tions your car may need. Be sure to include the year and model of your
car.
U.S. Owners:
American Honda Motor Co., Inc. Consumer Affairs
1919 Torrance Blvd.
Torrance, CA 90501-2746
Canadian Owners:
Honda Canada Inc.
715 Milner Ave.
Scarborough, Ontario M1B 2K8
Before Driving
NOTICEProCarManuals.comMain Menu Table of Contents s t
Page 99 of 225
Service Station Procedures
Filling the Gas Tank
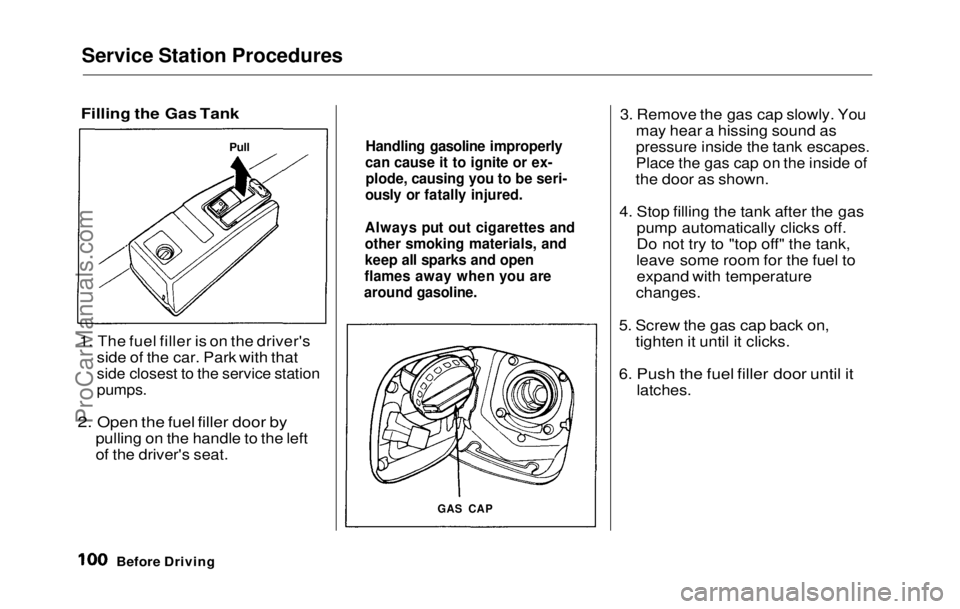
1. The fuel filler is on the driver's
side of the car. Park with that
side closest to the service station
pumps.
2. Open the fuel filler door by
pulling on the handle to the left
of the driver's seat.
3. Remove
the gas cap slowly. You
may hear a hissing sound as
pressure inside the tank escapes.
Place the gas cap on the inside of
the door as shown.
4. Stop
filling the tank after the gas
pump automatically clicks off.
Do not try to "top off" the tank,
leave some room for the fuel to expand with temperature
changes.
5. Screw
the gas cap back on,
tighten it until it clicks.
6. Push the fuel filler door until it
latches.
Before Drivin
g
Handlin
g gasoline improperly
can cause it to ignite or ex- plode, causing you to be seri-
ously or fatally injured.
Always put out cigarettes and
other smoking materials, and
keep all sparks and open
flames away when you are
around gasoline.
GAS CAP
PullProCarManuals.comMain Menu Table of Contents s t
Page 100 of 225
Service Station Procedures
Opening the Hood
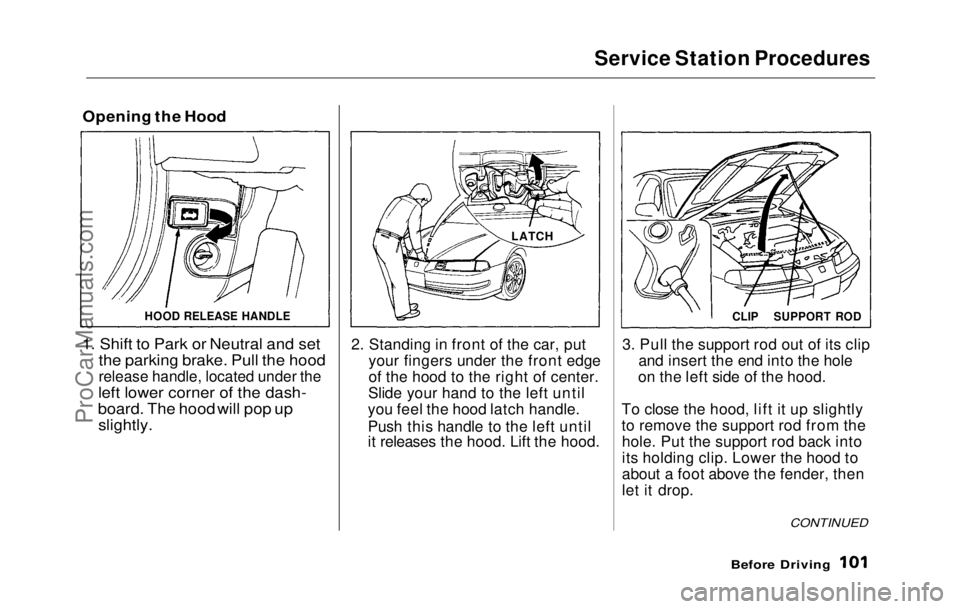
1. Shift to Park or Neutral and set
the parking brake. Pull the hood
release handle, located under the
left lower corner of
the dash-
board. The hood will pop up slightly.
2. Standing
in front of the car, put
your fingers under the front edge
of the hood to the right of center.
Slide your hand to the left until
you feel the hood latch handle.
Push this handle to the left until
it releases the hood. Lift the hood.
3. Pul l
the support rod out of its clip
and insert the end into the hole
on the left side of the hood.
To close the hood, lift it up slightly
to remove the support rod from the hole. Put the support rod back into
its holding clip. Lower the hood to
about a foot above the fender, then
let it drop.
Before Driving
HOOD RELEASE HANDLE
LATCH
CONTINUED
CLIP
SUPPORT RODProCarManuals.comMain Menu Table of Contents s t