HONDA PRELUDE 1998 Owners Manual
Manufacturer: HONDA, Model Year: 1998, Model line: PRELUDE, Model: HONDA PRELUDE 1998Pages: 278, PDF Size: 2.61 MB
Page 121 of 278
Service Station Procedures
Filling the Fuel Tank
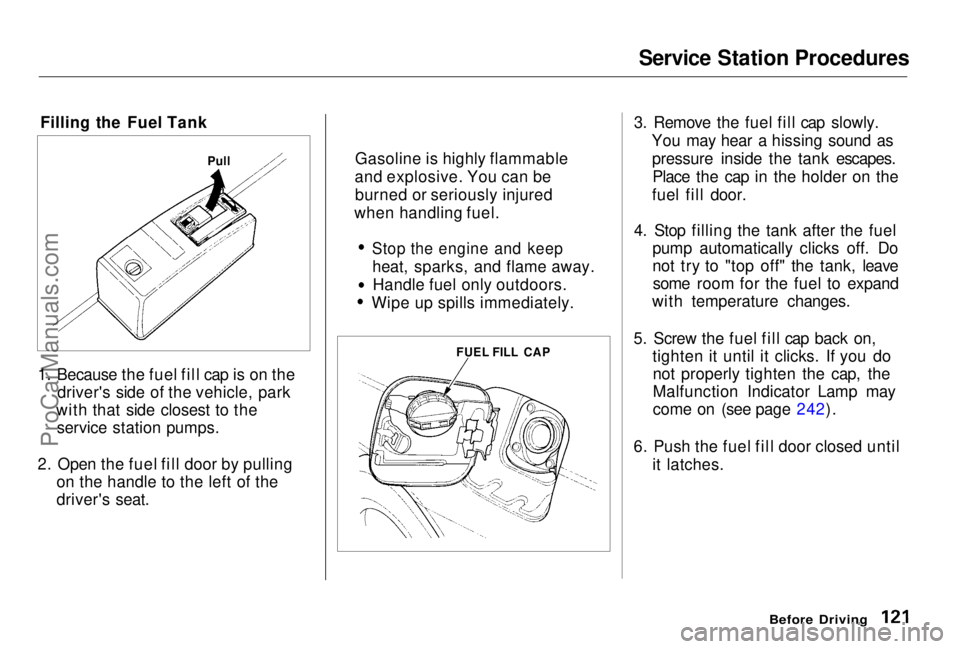
1. Because the fuel fill cap is on the driver's side of the vehicle, park
with that side closest to the service station pumps.
2. Open the fuel fill door by pulling on the handle to the left of the
driver's seat. 3. Remove the fuel fill cap slowly.
You may hear a hissing sound aspressure inside the tank escapes.Place the cap in the holder on the
fuel fill door.
4. Stop filling the tank after the fuel pump automatically clicks off. Do
not try to "top off" the tank, leavesome room for the fuel to expand
with temperature changes.
5. Screw the fuel fill cap back on, tighten it until it clicks. If you donot properly tighten the cap, the
Malfunction Indicator Lamp may
come on (see page 242).
6. Push the fuel fill door closed until it latches.
Before Driving
Pull
FUEL FILL CAP
Gasoline is highly flammable
and explosive. You can be burned or seriously injured
when handling fuel.
Stop the engine and keep
heat, sparks, and flame away.Handle fuel only outdoors.
Wipe up spills immediately.ProCarManuals.comMain Menu Table of Contents s t
Page 122 of 278
Service Station Procedures
Opening the Hood
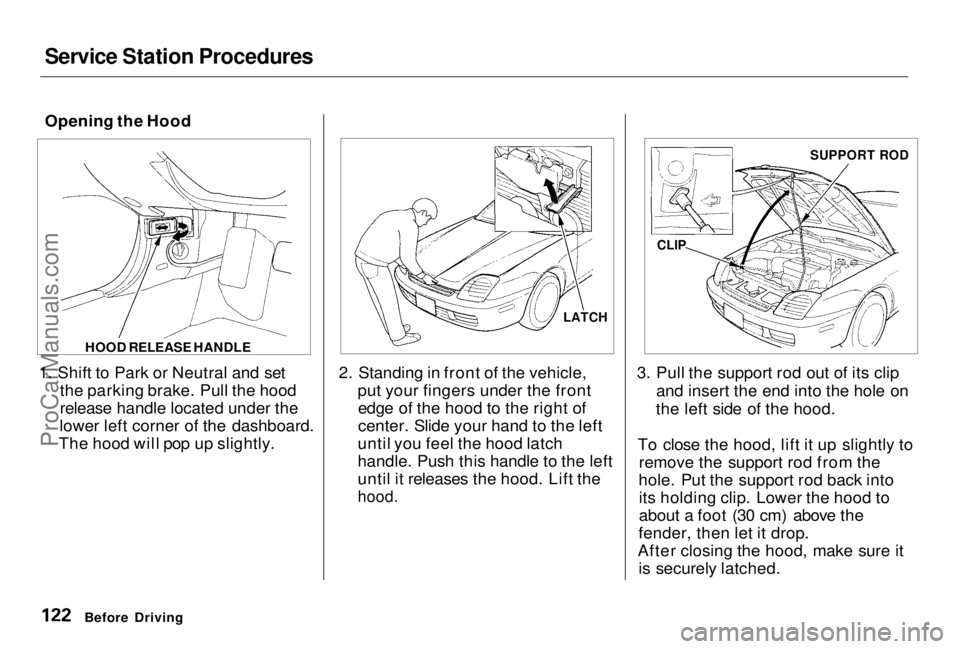
1. Shift to Park or Neutral and set the parking brake. Pull the hood
release handle located under the
lower left corner of the dashboard.
The hood will pop up slightly. 2. Standing in front of the vehicle,
put your fingers under the frontedge of the hood to the right of
center. Slide your hand to the left
until you feel the hood latch
handle. Push this handle to the left
until it releases the hood. Lift the
hood.
3. Pull the support rod out of its clip
and insert the end into the hole on
the left side of the hood.
To close the hood, lift it up slightly to remove the support rod from the
hole. Put the support rod back into its holding clip. Lower the hood to
about a foot (30 cm) above the
fender, then let it drop.
After closing the hood, make sure it is securely latched.
Before Driving HOOD RELEASE HANDLE
LATCHCLIP SUPPORT RODProCarManuals.comMain Menu Table of Contents s t
Page 123 of 278
Service Station Procedures
Oil Check
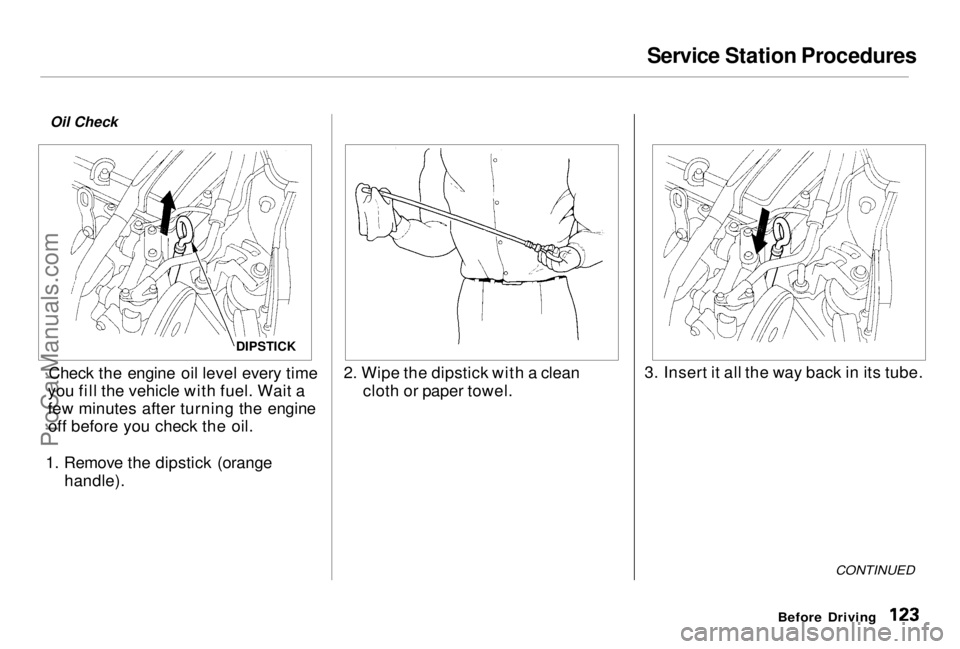
Check the engine oil level every time
you fill the vehicle with fuel. Wait a
few minutes after turning the engine off before you check the oil.
1. Remove the dipstick (orange handle). 2. Wipe the dipstick with a clean
cloth or paper towel. 3. Insert it all the way back in its tube.
CONTINUED
Before Driving
DIPSTICKProCarManuals.comMain Menu Table of Contents s t
Page 124 of 278
Service Station Procedures
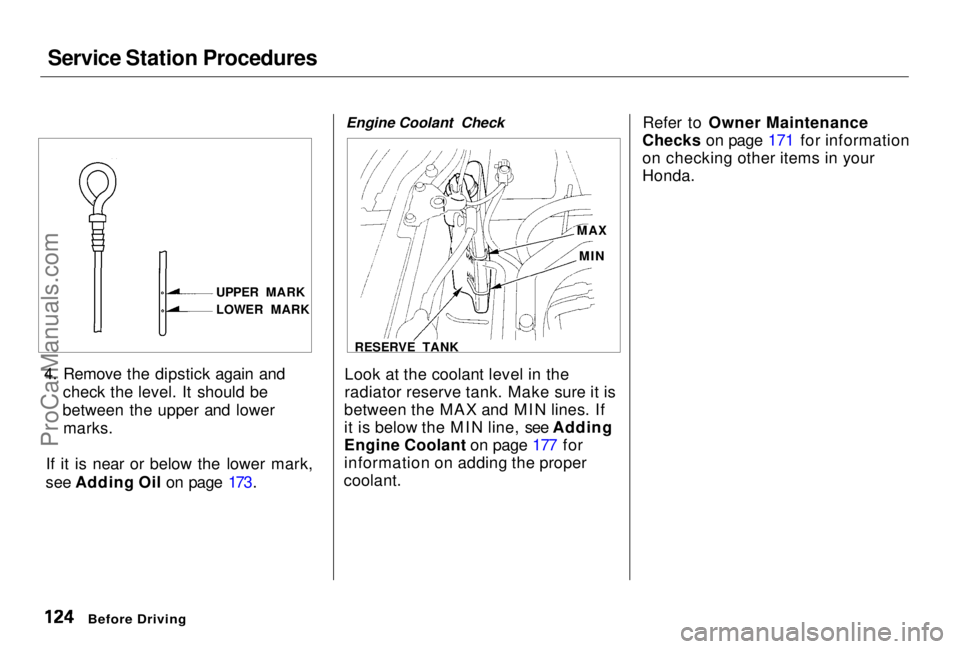
4. Remove the dipstick again and check the level. It should be
between the upper and lower marks.
If it is near or below the lower mark,
see Adding Oil on page 173. Engine Coolant Check
Look at the coolant level in the
radiator reserve tank. Make sure it is
between the MAX and MIN lines. If
it is below the MIN line, see Adding
Engine Coolant on page 177 for
information on adding the proper
coolant. Refer to Owner Maintenance
Checks on page 171 for information
on checking other items in your
Honda.
Before Driving
UPPER MARK
LOWER MARK
MAX
MIN
RESERVE TANKProCarManuals.comMain Menu Table of Contents s t
Page 125 of 278

Fuel Economy
The condition of your vehicle and your driving habits are the two most important things that affect the fuel
mileage you get.
Vehicle Condition Always maintain your vehicle accord- ing to the maintenance schedule.
This will keep it in top operating condition.
An important part of that mainte- nance is the Owner MaintenanceChecks (see page 171). For
example, an underinflated tire
causes more "rolling resistance,"
which uses fuel. It also wears out
faster, so check the tire pressure at
least monthly.
In winter, the build-up of snow on
your vehicle's underside adds weight and rolling resistance. Frequent
cleaning helps your fuel mileage and
reduces the chance of corrosion. Driving Habits
You can improve fuel economy by driving moderately. Rapid acceler-
ation, abrupt cornering, and hard
braking use more fuel.
Always drive in the highest gear that allows the engine to run and acceler-
ate smoothly.
Depending on traffic conditions, try
to maintain a constant speed. Every
time you slow down and speed up,
your vehicle uses extra fuel. Use the cruise control, when appropriate, to
increase fuel economy. A cold engine uses more fuel than a
warm engine. It is not necessary to "warm-up" a cold engine by letting it
idle for a long time. You can drive
away in about a minute, no matter
how cold it is outside. The engine
will warm up faster, and you get better fuel economy. To cut down on
the number of "cold starts," try tocombine several short trips into one.
The air conditioning puts an extra load on the engine which makes ituse more fuel. Turn off the A/C to
cut down on air conditioning use.
Use the flow-through ventilation
when the outside air temperature ismoderate.
Before DrivingProCarManuals.comMain Menu Table of Contents s t
Page 126 of 278
Accessories and Modifications
Modifying your vehicle, or installingsome non-Honda accessories, can
make your vehicle unsafe. Before
you make any modifications or add any accessories, be sure to read the
following information.
Accessories
Your dealer has Genuine Honda accessories that allow you to
personalize your vehicle. These accessories have been designed and
approved for your vehicle, and are
covered by warranty.
Non-Honda accessories are usually designed for universal applications.
Although aftermarket accessories may fit on your vehicle, they may not
meet factory specifications, and
could adversely affect your vehicle's
handling and stability. (See "Modifications" on the page 127 for
additional information.) When properly installed, car phones,
alarms, two-way radios, and low-
powered audio systems should notinterfere with your vehicle's
computer-controlled systems, such
as the SRS and anti-lock brake
system.
However, if electronic accessories
are improperly installed, or exceed
your vehicle's electrical system capacity, they can interfere with the operation of your vehicle, or even
cause the airbags to deploy.
Before installing any accessory:
Make sure the accessory does not
obscure any lights, or interfere
with proper vehicle operation or performance. Be sure electronic accessories do
not overload electrical circuits (see page 248 ). Have the installer contact your
Honda dealer for assistance before
installing any electronic accessory.
If possible, have your dealer inspect
the final installation.
Before Driving
Improper accessories or
modifications can affect your
vehicle's handling, stability and performance, and cause a
crash in which you can be hurt
or killed.
Follow all instructions in this
owner's manual regarding
accessories and modifications.ProCarManuals.comMain Menu Table of Contents s t
Page 127 of 278

Accessories and Modifications
Modifications Do not remove any original
equipment or modify your vehicle in
any way that would alter its design oroperation. This could make your
vehicle unsafe and illegal to drive.
For example, do not make any
modifications that would change the
ride height of your vehicle, or install
wheels and tires with a different overall diameter.
Such modifications can adversely
affect handling, and interfere with
the operation of the vehicle's anti-
lock brakes and other systems. In addition, any modifications that
decrease ground clearance increase
the chance of undercarriage parts striking a curb, speed bump, or other
raised object, which could cause
your airbags to deploy.
Do not modify your steering wheelor any other part of your
Supplemental Restraint System. Modifications could make the
system ineffective. Additional Safety Precaution
Do not attach or place objects on the
airbag covers. Any object attached toor placed on the covers marked "SRS,
in the center of the steering wheel and on top of the dashboard, could
interfere with the proper operation of the airbags. Or, if the airbags
inflate, the objects could be
propelled inside the vehicle and hurt
someone.
Before DrivingProCarManuals.comMain Menu Table of Contents s t
Page 128 of 278
Carrying Cargo
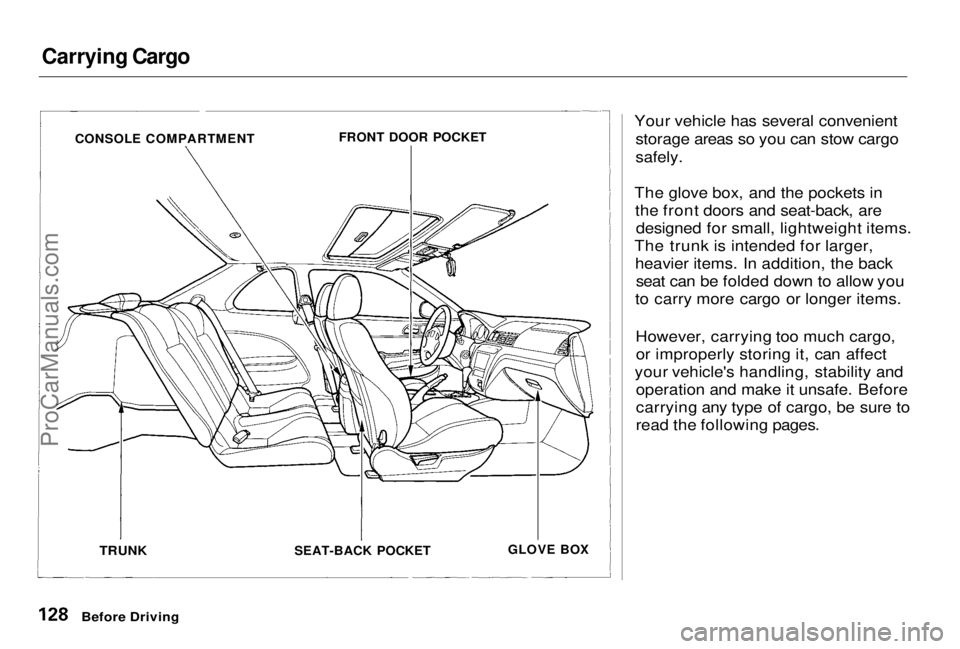
Your vehicle has several convenientstorage areas so you can stow cargo
safely.
The glove box, and the pockets in the front doors and seat-back, aredesigned for small, lightweight items.
The trunk is intended for larger, heavier items. In addition, the backseat can be folded down to allow you
to carry more cargo or longer items.
However, carrying too much cargo,or improperly storing it, can affect
your vehicle's handling, stability and operation and make it unsafe. Before
carrying any type of cargo, be sure to
read the following pages.
Before Driving
CONSOLE COMPARTMENT
FRONT DOOR POCKET
TRUNK
SEAT-BACK POCKET
GLOVE BOXProCarManuals.comMain Menu Table of Contents s t
Page 129 of 278
Carrying Cargo
Load Limit
The maximum load for your vehicle is 700 1b (325kg).
This figure includes the total weight of all occupants, cargo, accessories,
and the tongue weight if you are
towing a trailer.
To figure out how much cargo you can carry: Add up the weight of all occupants.
If you are towing a trailer, add the
tongue weight to the number
above.
Subtract the total from 700 Ib (325
kg).
The final number is the total weight
of cargo you can carry.
Carrying Items in the Passenger
Compartment Store or secure all items that could
be thrown around and hurt someone during a crash. Do not put any items on top of the
rear shelf. They can block your
view and be thrown around the
vehicle during a crash. Be sure items placed on the floor
behind the front seats cannot roll under the seats and interfere with
the driver's ability to operate the pedals, or with the proper operation of the seats. Keep the glove box closed while
driving. If the lid is open, a
passenger could injure their knees during a crash or sudden stop.
Before Driving
Overloading or improper
loading can affect handling and
stability and cause a crash in
which you can be hurt or killed.
Follow all load limits and other
loading guidelines in this
manual.ProCarManuals.comMain Menu Table of Contents s t
Page 130 of 278
Carrying Cargo
Carrying Cargo in the Trunk or on
a Roof Rack Distribute cargo evenly on the
floor of the trunk, placing the
heaviest items on the bottom and as far forward as possible. If you fold down the back seat, tie
down items that could be thrown
about the vehicle during a crash or
sudden stop.
If you carry large items that
prevent you from closing the trunk, exhaust gas can enter the
passenger area. To avoid the
possibility of carbon monoxide
poisoning, follow the instructionson page 47. If you can carry any items on a
roof rack, be sure the total weight of the rack and the items does not
exceed the maximum allowable
weight. Please contact your Honda dealer for further information.
Before DrivingProCarManuals.comMain Menu Table of Contents s t