engine HONDA PRELUDE 1998 Workshop Manual
[x] Cancel search | Manufacturer: HONDA, Model Year: 1998, Model line: PRELUDE, Model: HONDA PRELUDE 1998Pages: 278, PDF Size: 2.61 MB
Page 181 of 278
Windshield Washers
Check the level in the windshield
washer reservoir at least monthly
during normal usage. In bad weather,
when you use the washers often,
check the level every time you stop
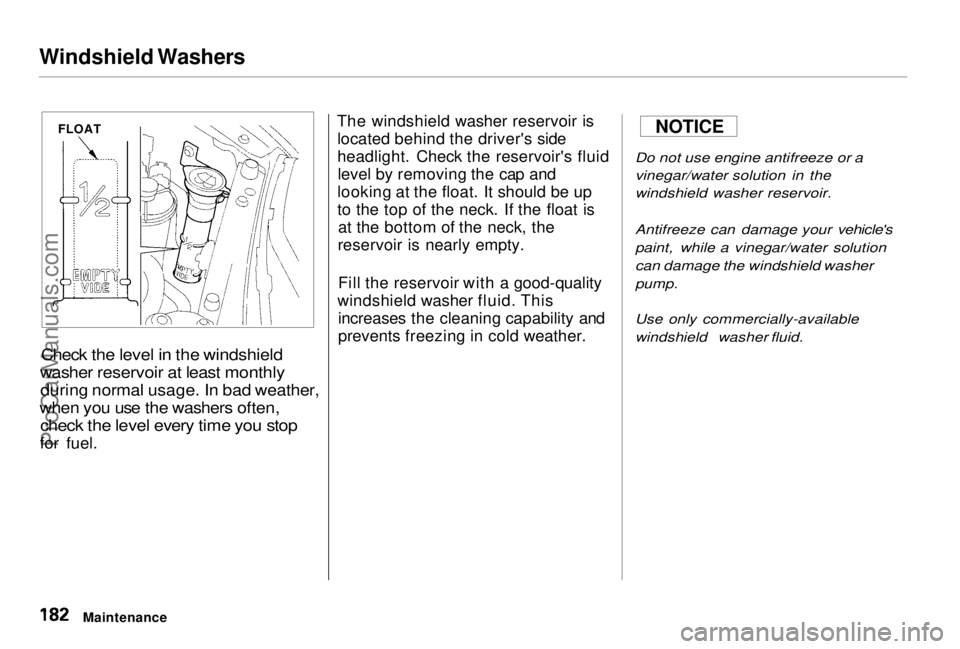
for fuel. The windshield washer reservoir is
located behind the driver's side
headlight. Check the reservoir's fluidlevel by removing the cap and
looking at the float. It should be up
to the top of the neck. If the float is at the bottom of the neck, the
reservoir is nearly empty.
Fill the reservoir with a good-quality
windshield washer fluid. This increases the cleaning capability and
prevents freezing in cold weather.
Do not use engine antifreeze or a
vinegar/water solution in the
windshield washer reservoir.
Antifreeze can damage your vehicle's
paint, while a vinegar/water solution
can damage the windshield washer
pump.
Use only commercially-available
windshield washer fluid.
Maintenance
NOTICE
FLOATProCarManuals.comMain Menu Table of Contents s t
Page 182 of 278
Transmission Fluid
Automatic Transmission
Check the fluid level with the engine
at normal operating temperature.
1. Park the vehicle on level ground. Shut off the engine.
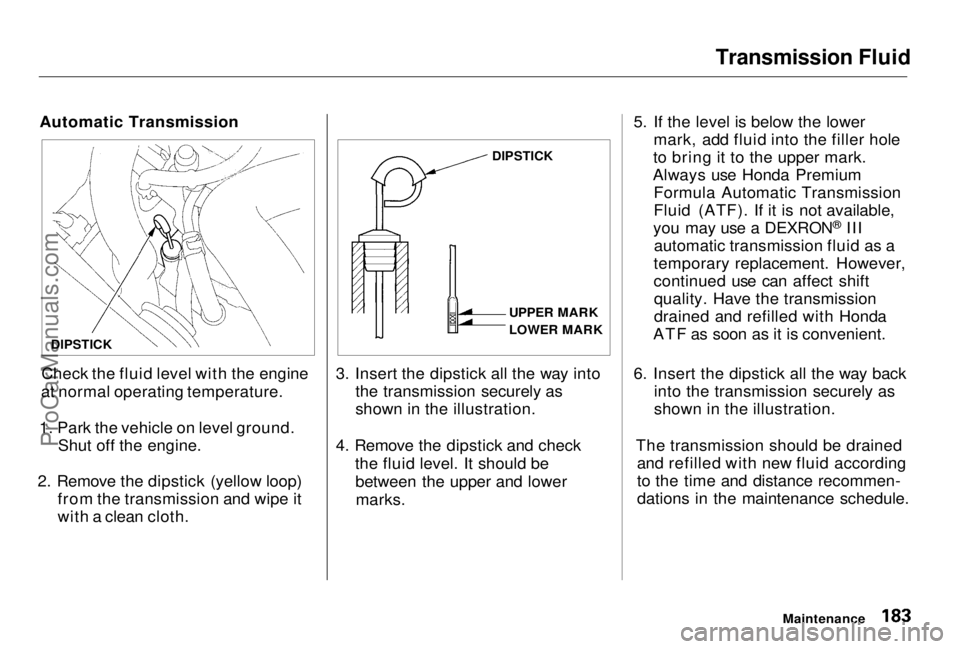
2. Remove the dipstick (yellow loop) from the transmission and wipe it
with a clean cloth. 3. Insert the dipstick all the way into
the transmission securely as
shown in the illustration.
4. Remove the dipstick and check the fluid level. It should bebetween the upper and lowermarks. 5. If the level is below the lower
mark, add fluid into the filler hole
to bring it to the upper mark.
Always use Honda Premium Formula Automatic Transmission
Fluid (ATF). If it is not available,
you may use a DEXRON ®
III
automatic transmission fluid as a
temporary replacement. However,
continued use can affect shift quality. Have the transmission
drained and refilled with Honda
ATF as soon as it is convenient.
6. Insert the dipstick all the way back into the transmission securely as
shown in the illustration.
The transmission should be drained and refilled with new fluid according
to the time and distance recommen-
dations in the maintenance schedule.
Maintenance
DIPSTICK
UPPER MARK
LOWER MARK
DIPSTICKProCarManuals.comMain Menu Table of Contents s t
Page 185 of 278
Brake and Clutch Fluid, Power Steering
Clutch System
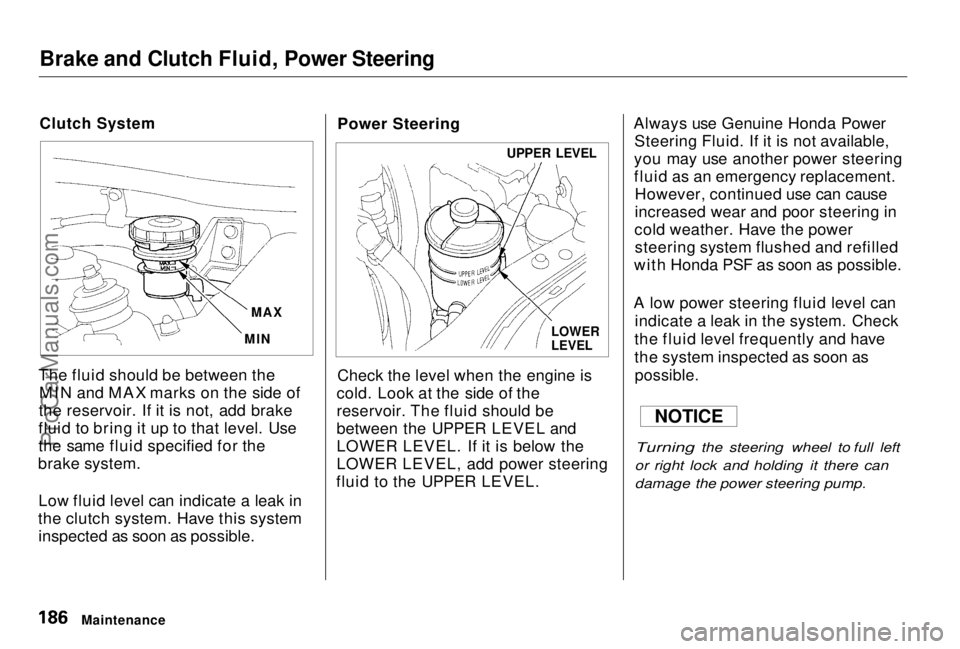
The fluid should be between the MIN and MAX marks on the side of
the reservoir. If it is not, add brake
fluid to bring it up to that level. Use
the same fluid specified for the
brake system.
Low fluid level can indicate a leak in
the clutch system. Have this system inspected as soon as possible. Power Steering
Check the level when the engine is
cold. Look at the side of the
reservoir. The fluid should be
between the UPPER LEVEL and
LOWER LEVEL. If it is below the
LOWER LEVEL, add power steering
fluid to the UPPER LEVEL. Always use Genuine Honda Power
Steering Fluid. If it is not available,
you may use another power steering
fluid as an emergency replacement. However, continued use can cause
increased wear and poor steering in
cold weather. Have the power steering system flushed and refilled
with Honda PSF as soon as possible.
A low power steering fluid level can indicate a leak in the system. Check
the fluid level frequently and have
the system inspected as soon as
possible.
Turning the steering wheel to full left
or right lock and holding it there can
damage the power steering pump.
Maintenance
MAX
MIN
LOWER
LEVEL
UPPER LEVEL
NOTICE
ProCarManuals.comMain Menu Table of Contents s t
Page 186 of 278
Air Cleaner Element
The air cleaner element should be cleaned or replaced according to the
time and distance recommendationsin the maintenance schedule.
Cleaning (Severe Conditions)
Clean the air cleaner element by
blowing compressed air through it in
the opposite direction to normal air
flow. If you do not have access to compressed air (such as a service
station), ask your Honda dealer to do
this service.
Follow the replacement procedure
for removal and reinstallation. Replacement
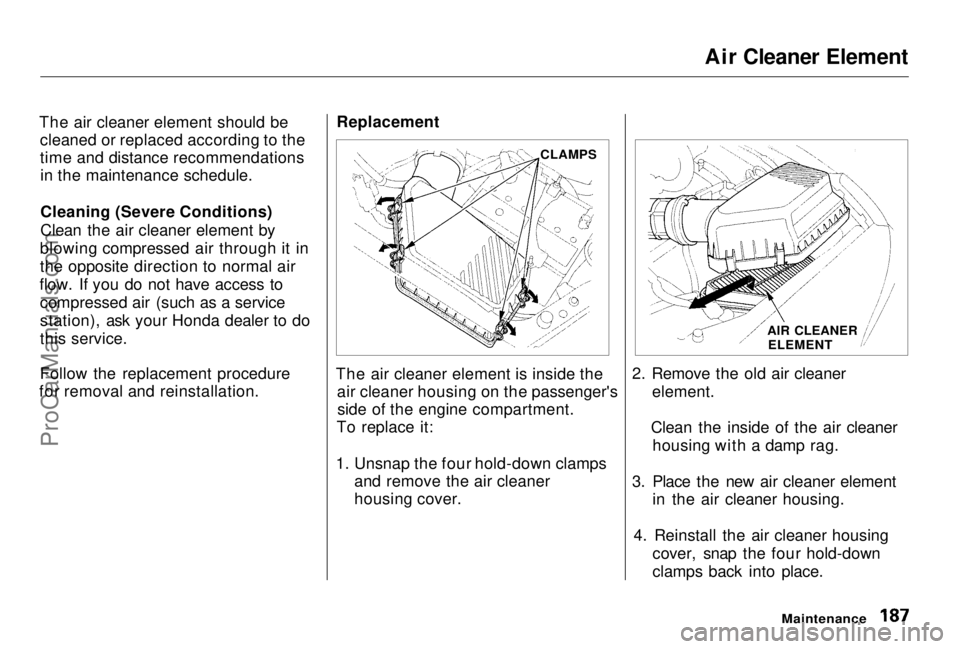
The air cleaner element is inside the air cleaner housing on the passenger'sside of the engine compartment.
To replace it:
1. Unsnap the four hold-down clamps and remove the air cleaner
housing cover.
AIR CLEANER
ELEMENT
2. Remove the old air cleaner element.
Clean the inside of the air cleaner housing with a damp rag.
3. Place the new air cleaner element in the air cleaner housing.
4. Reinstall the air cleaner housing cover, snap the four hold-down
clamps back into place.
Maintenance
CLAMPSProCarManuals.comMain Menu Table of Contents s t
Page 188 of 278
Spark Plugs
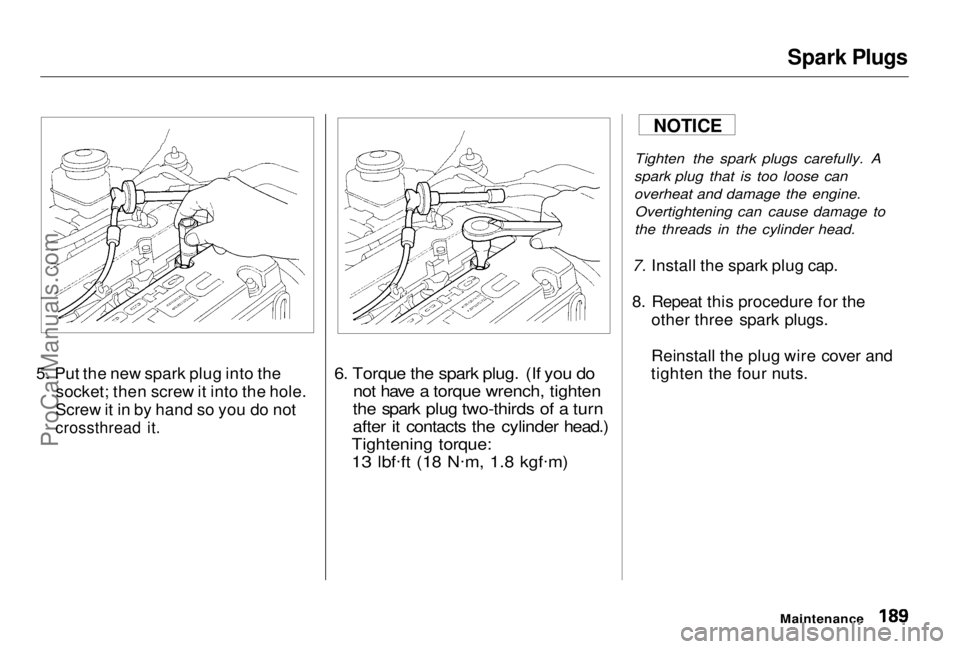
5. Put the new spark plug into the socket; then screw it into the hole.
Screw it in by hand so you do not
crossthread it.
6. Torque the spark plug. (If you do
not have a torque wrench, tighten
the spark plug two-thirds of a turn
after it contacts the cylinder head.)
Tightening torque:
13 lbf .
ft (18 N .
m, 1.8 kgf .
m)
Tighten the spark plugs carefully. A
spark plug that is too loose can
overheat and damage the engine. Overtightening can cause damage to
the threads in the cylinder head.
7. Install the spark plug cap.
8. Repeat this procedure for the other three spark plugs.
Reinstall the plug wire cover and
tighten the four nuts.
Maintenance
NOTICE
ProCarManuals.comMain Menu Table of Contents s t
Page 194 of 278
Air Conditioning System
Your vehicle's air conditioning is a sealed system. Any major mainte-
nance, such as recharging, should be
done by a qualified mechanic. You
can do a couple of things to make
sure the air conditioning works
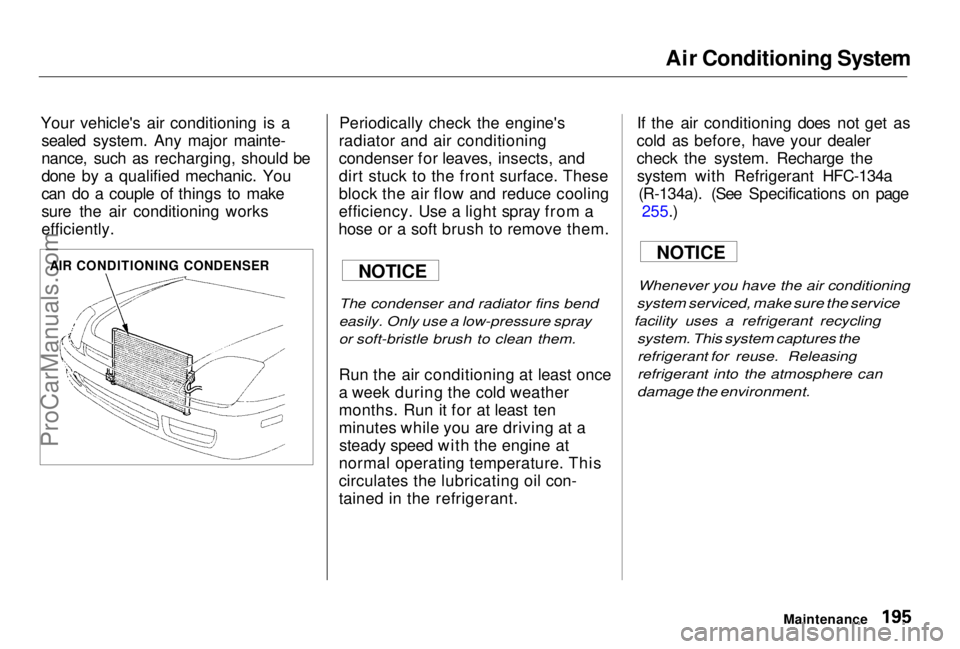
efficiently. Periodically check the engine's
radiator and air conditioning
condenser for leaves, insects, and
dirt stuck to the front surface. These
block the air flow and reduce cooling
efficiency. Use a light spray from a
hose or a soft brush to remove them.
The condenser and radiator fins bend
easily. Only use a low-pressure spray
or soft-bristle brush to clean them.
Run the air conditioning at least once
a week during the cold weather
months. Run it for at least ten
minutes while you are driving at a steady speed with the engine at
normal operating temperature. This
circulates the lubricating oil con-
tained in the refrigerant. If the air conditioning does not get as
cold as before, have your dealer
check the system. Recharge the system with Refrigerant HFC-134a (R-134a). (See Specifications on page 255.)
Whenever you have the air conditioning
system serviced, make sure the service
facility uses a refrigerant recycling
system. This system captures the
refrigerant for reuse. Releasing
refrigerant into the atmosphere can
damage the environment.
Maintenance
AIR CONDITIONING CONDENSER
NOTICENOTICEProCarManuals.comMain Menu Table of Contents s t
Page 216 of 278
Storing Your Vehicle
If you need to park your vehicle for
an extended period (more than one
month), there are several things you should do to prepare it for storage.
Proper preparation helps prevent
deterioration and makes it easier to
get your vehicle back on the road. If
possible, store your vehicle indoors. Fill the fuel tank.
Change the engine oil and filter
(see page 175). Wash and dry the exterior
completely.
Clean the interior. Make sure the
carpeting, floor mats, etc. are
completely dry.
Leave the parking brake off. Put
the transmission in Reverse (5- speed manual) or Park (automatic). Block the rear wheels. If the vehicle is to be stored for a
longer period, it should be supported on jackstands so the
tires are off the ground. Leave one window open slightly (if
the vehicle is being stored
indoors).
Disconnect the battery.
Support the front wiper blade
arms with a folded towel or rag so
they do not touch the windshield.
To minimize sticking, apply a silicone spray lubricant to all door
and trunk seals. Also, apply a
vehicle body wax to the painted surfaces that mate with the door
and trunk seals. Cover the vehicle with a
"breathable" vehicle cover, one
made from a porous material such as cotton. Nonporous materials,such as plastic sheeting, trap
moisture, which can damage the
paint. If possible, run the engine for a
while periodically (preferably once a month).
If you store your vehicle for 12
months or longer, have your Honda dealer perform the inspections called
for in the 24 months/30,000 miles (48,000 km) maintenance schedule
(Normal Conditions) as soon as you
take it out of storage (see page 164).
The replacements called for in the maintenance schedule are not
needed unless the vehicle hasactually reached that time or mileage.
MaintenanceProCarManuals.comMain Menu Table of Contents s t
Page 224 of 278
Taking Care of the Unexpected
This section covers the more-
common problems that motorists
experience with their vehicles. It
gives you information about how to safely evaluate the problem and what
to do to correct it. If the problem has stranded you on the side of the road,
you may be able to get going again. If not, you will also find instructions
on getting your vehicle towed.
Compact Spare Tire....................... 228
Changing a Flat Tire ..................... 229
If Your Engine Won't Start........... 234
Nothing Happens or theStarter Motor OperatesVery Slowly.............................235
The Starter Operates Normally................................. 236
Jump Starting................................. 236 If Your Engine Overheats............. 238
Low Oil Pressure Indicator.......... 240Charging System Indicator........... 241
Malfunction Indicator Lamp ........ 242
Brake System Indicator................ 243
Closing the Moonroof................... 244
Fuses............................................... 245
Checking and Replacing........... 246
Towing............................................ 250
Taking Care of the UnexpectedProCarManuals.comMain Menu s t
Page 231 of 278
Changing a Flat Tire, If Your Engine Won't Start
19. Secure the flat tire by screwing the win
g bolt back into its hole.
20. Store the jack in its holder. Turn the jack's end bracket to lock it in
place.
Replace the cover. Store the
tool kit. 21. Stor
e the center cap in the trunk.
Make
sure it does not get scratch-
ed
or damaged.
22.
Lower the trunk floor, then close
the trunk lid.
Type SH only
If yo
u mount the compact spare on
either front or rear tire, it may cause
the
ATTS indicator light in the
instrument
panel to come on due to
the
difference in tire diameter. The
light
will go out when the proper tire
is installed.
If Your Engine Won't Start
Diagnosing
why your engine won't
start falls into two areas, depending
on what you hear when you turn the
key to START (III):
You hear nothing, or almostnothing. The engine's starter
motor does not operate at all, oroperates
very slowly. You can hear the starter motor
operating normally, or the starter
motor
sounds like it is spinning
faster than normal, but the engine does
not start up and run.
Taking Car
e of the Unexpected
Loose items can fly around the
interior i
n a crash and could
seriously injure the occupants.
Store th
e wheel, jack and tools
securely before driving.
ProCarManuals.comMain Menu Table of Contents s t
Page 232 of 278
If Your Engine Won't Start
Nothing Happens or the Starter
Motor Operates Very Slowly
When you turn the ignition switch to START (III), you do not hear the
normal noise of the engine trying tostart. You may hear a clicking sound
or series of clicks, or nothing at all. Check these things: Your vehicle has the Immobilizer
System. You should use a
properly-coded master or valet key
to start the engine (see page 69).
A key that is not properly coded will cause the immobilizer systemindicator in the dash panel to blinkrapidly. Check the transmission interlock.
If you have a manual transmission,
the clutch pedal must be pushed all the way to the floor or the
starter will not operate. With an
automatic transmission, it must be
in Park or Neutral. Turn the ignition switch to ON (II).
Turn on the headlights and check
their brightness. If the headlightsare very dim or don't light at all,
the battery is discharged. See
Jump Starting on page 236.
Turn the ignition switch to START
(III). If the headlights do not dim,
check the condition of the fuses. If
the fuses are OK, there is proba-
bly something wrong with the electrical circuit for the ignitionswitch or starter motor. You will
need a qualified technician to
determine the problem. (See
Towing on page 250.) If the headlights dim noticeably or
go out when you try to start the
engine, either the battery is dis-
charged or the connections are
corroded. Check the condition of
the battery and terminal connec- tions (see page 190). You can
then try jump starting the vehicle
from a booster battery (see page
236).
Taking Care of the UnexpectedProCarManuals.comMain Menu Table of Contents s t