Hyundai Accent 2006 Owner's Manual
Manufacturer: HYUNDAI, Model Year: 2006, Model line: Accent, Model: Hyundai Accent 2006Pages: 599, PDF Size: 17.59 MB
Page 571 of 599
6
OWNER MAINTENANCE
29
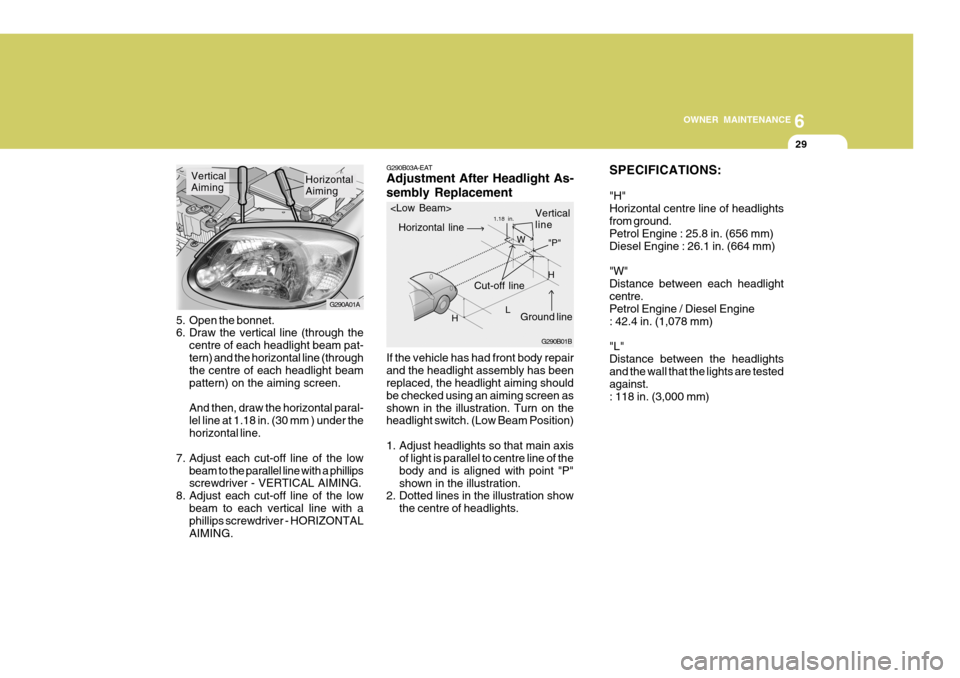
5. Open the bonnet.
6. Draw the vertical line (through the
centre of each headlight beam pat- tern) and the horizontal line (through the centre of each headlight beam pattern) on the aiming screen. And then, draw the horizontal paral- lel line at 1.18 in. (30 mm ) under thehorizontal line.
7. Adjust each cut-off line of the low beam to the parallel line with a phillips screwdriver - VERTICAL AIMING.
8. Adjust each cut-off line of the low beam to each vertical line with aphillips screwdriver - HORIZONTAL AIMING.
G290A01A
Horizontal Aiming
Vertical Aiming
SPECIFICATIONS: "H" Horizontal centre line of headlightsfrom ground. Petrol Engine : 25.8 in. (656 mm) Diesel Engine : 26.1 in. (664 mm) "W" Distance between each headlightcentre. Petrol Engine / Diesel Engine : 42.4 in. (1,078 mm) "L" Distance between the headlightsand the wall that the lights are tested against. : 118 in. (3,000 mm)
If the vehicle has had front body repairand the headlight assembly has been replaced, the headlight aiming should be checked using an aiming screen asshown in the illustration. Turn on the headlight switch. (Low Beam Position)
1. Adjust headlights so that main axis
of light is parallel to centre line of the body and is aligned with point "P"shown in the illustration.
2. Dotted lines in the illustration show
the centre of headlights.
G290B03A-EAT Adjustment After Headlight As- sembly Replacement
G290B01B
LW
Cut-off line Ground line
"P"
Horizontal line
Vertical line1.18 in.
H H
Page 572 of 599
6OWNER MAINTENANCE
30REPLACING LIGHT BULBS
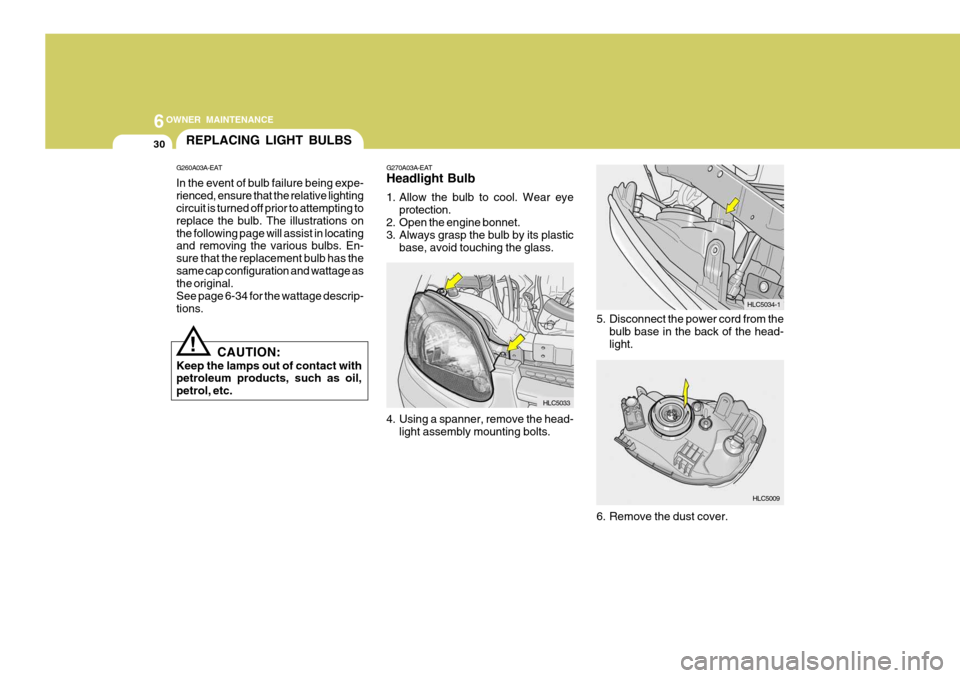
G270A03A-EAT Headlight Bulb
1. Allow the bulb to cool. Wear eyeprotection.
2. Open the engine bonnet.
3. Always grasp the bulb by its plastic
base, avoid touching the glass.
4. Using a spanner, remove the head- light assembly mounting bolts. 5. Disconnect the power cord from the
bulb base in the back of the head-light.
6. Remove the dust cover.
G260A03A-EAT In the event of bulb failure being expe- rienced, ensure that the relative lighting circuit is turned off prior to attempting to replace the bulb. The illustrations onthe following page will assist in locating and removing the various bulbs. En- sure that the replacement bulb has thesame cap configuration and wattage as the original. See page 6-34 for the wattage descrip-tions.
!
CAUTION:
Keep the lamps out of contact with petroleum products, such as oil, petrol, etc. HLC5033
HLC5009
HLC5034-1
Page 573 of 599
6
OWNER MAINTENANCE
31
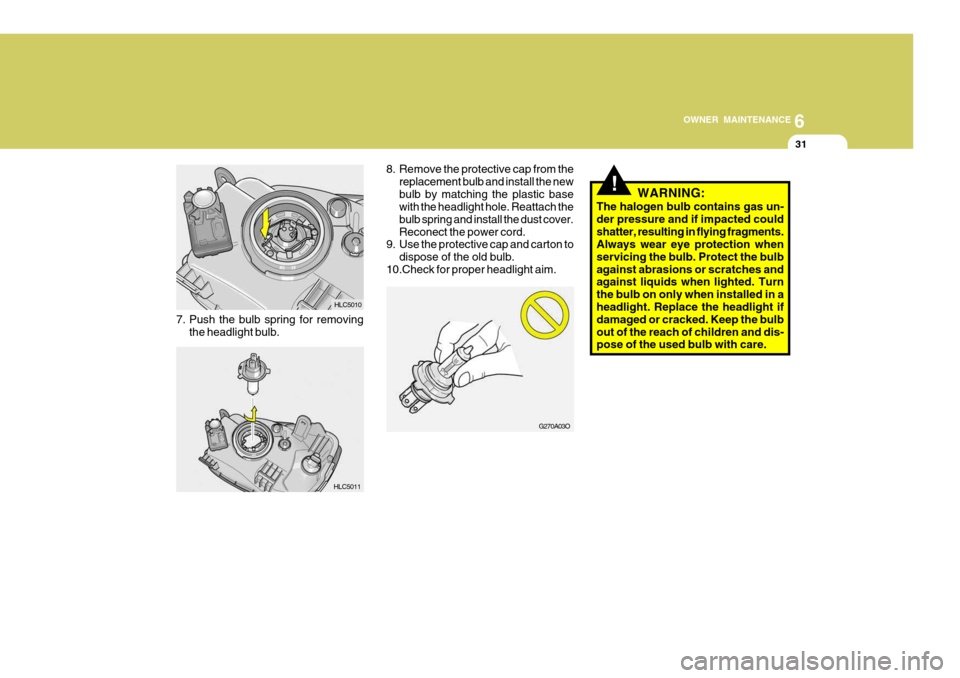
7. Push the bulb spring for removing
the headlight bulb.
!
8. Remove the protective cap from thereplacement bulb and install the new bulb by matching the plastic base with the headlight hole. Reattach the bulb spring and install the dust cover.Reconect the power cord.
9. Use the protective cap and carton to
dispose of the old bulb.
10.Check for proper headlight aim. WARNING:
The halogen bulb contains gas un-der pressure and if impacted couldshatter, resulting in flying fragments. Always wear eye protection when servicing the bulb. Protect the bulbagainst abrasions or scratches and against liquids when lighted. Turn the bulb on only when installed in aheadlight. Replace the headlight if damaged or cracked. Keep the bulb out of the reach of children and dis- pose of the used bulb with care.
HLC5011 HLC5010
G270A03O
Page 574 of 599
6OWNER MAINTENANCE
32
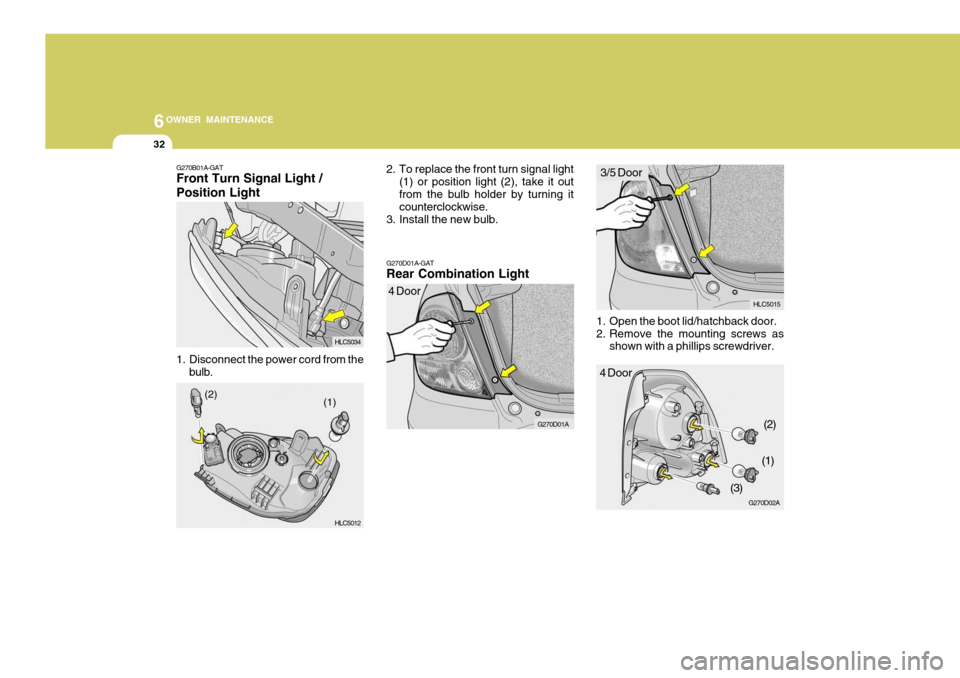
1. Open the boot lid/hatchback door.
2. Remove the mounting screws as
shown with a phillips screwdriver.
G270D01A-GAT Rear Combination Light
2. To replace the front turn signal light
(1) or position light (2), take it out from the bulb holder by turning it counterclockwise.
3. Install the new bulb.
G270B01A-GAT Front Turn Signal Light / Position Light
1. Disconnect the power cord from the
bulb.
G270D01A
HLC5034 HLC5012 4 Door
(1)
(2)
HLC5015
G270D02A
4 Door 3/5 Door
(2)
(1)
(3)
Page 575 of 599
6
OWNER MAINTENANCE
33
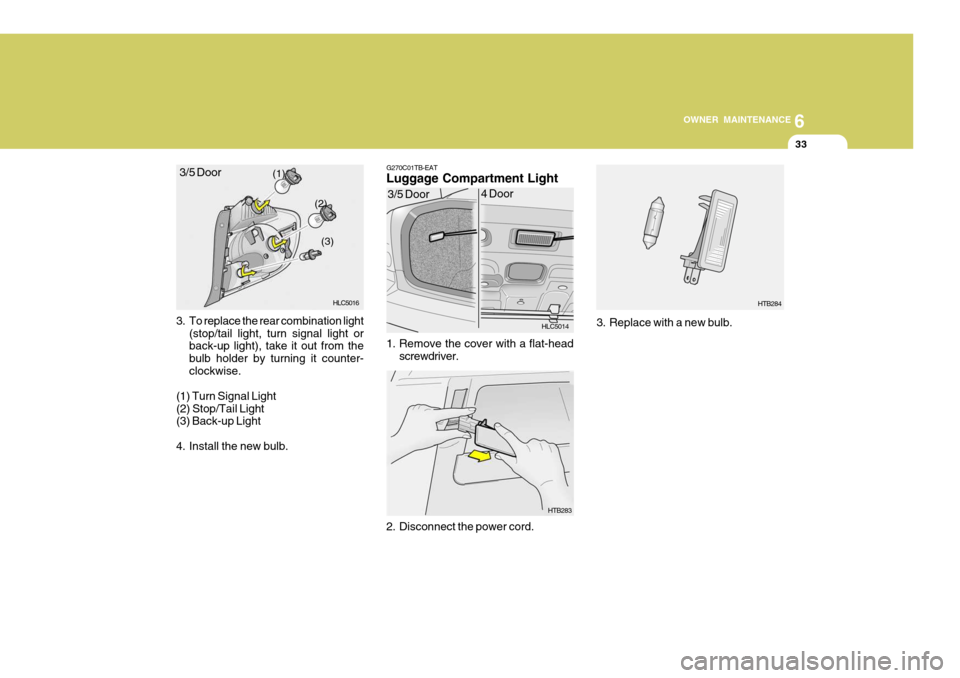
3. To replace the rear combination light (stop/tail light, turn signal light or back-up light), take it out from the bulb holder by turning it counter-clockwise.
(1) Turn Signal Light(2) Stop/Tail Light (3) Back-up Light
4. Install the new bulb. G270C01TB-EAT Luggage Compartment Light
1. Remove the cover with a flat-head
screwdriver.
2. Disconnect the power cord.
(1) (2)
(3)
HLC5016
3/5 Door
HLC5014
HTB283
3/5 Door
4 Door3. Replace with a new bulb.
HTB284
Page 576 of 599
6OWNER MAINTENANCE
34
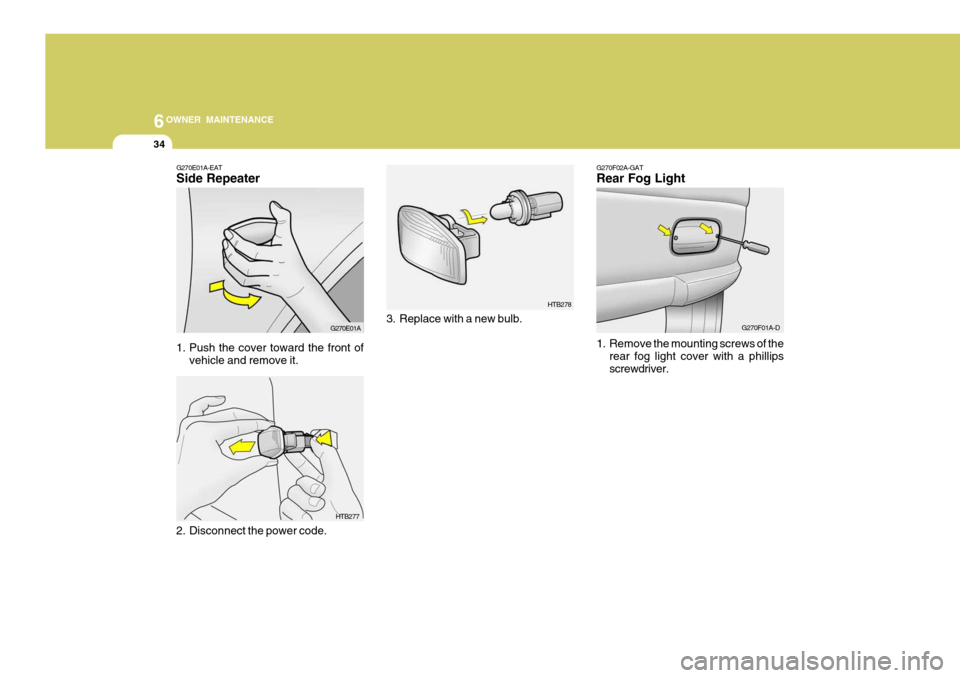
G270F02A-GAT Rear Fog Light
1. Remove the mounting screws of the rear fog light cover with a phillips screwdriver.
3. Replace with a new bulb.
G270E01A-EAT Side Repeater
1. Push the cover toward the front of
vehicle and remove it.
2. Disconnect the power code.
HTB278
HTB277
G270E01A
G270F01A-D
Page 577 of 599
6
OWNER MAINTENANCE
35
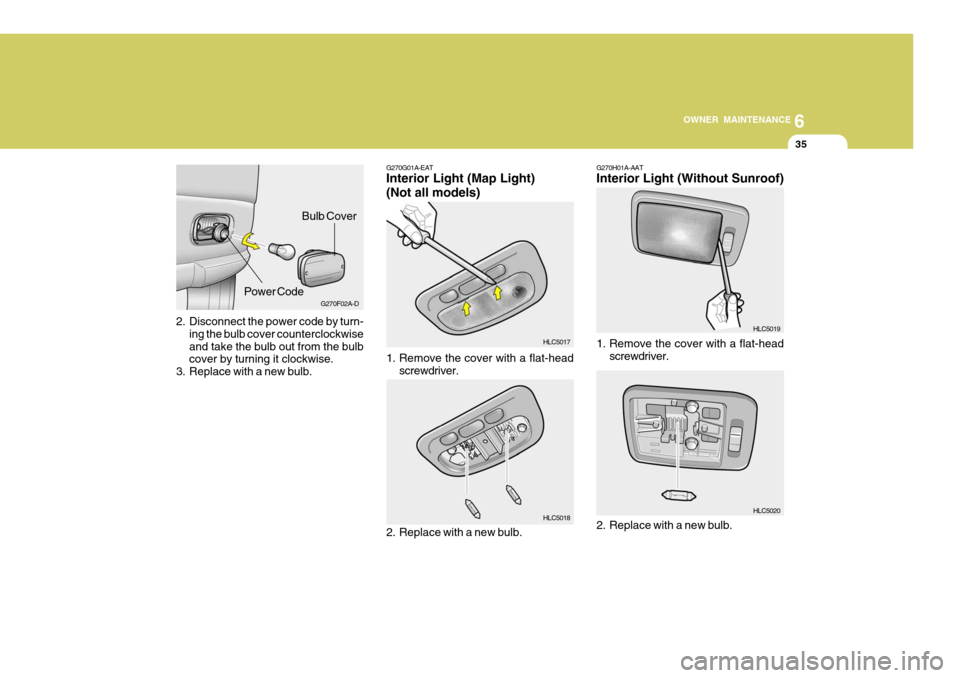
2. Disconnect the power code by turn-
ing the bulb cover counterclockwise and take the bulb out from the bulb cover by turning it clockwise.
3. Replace with a new bulb. G270F02A-D
Bulb Cover
Power Code G270G01A-EAT Interior Light (Map Light) (Not all models)
1. Remove the cover with a flat-head screwdriver.
2. Replace with a new bulb.
HLC5017 HLC5018 G270H01A-AAT Interior Light (Without Sunroof)
1. Remove the cover with a flat-head screwdriver.
2. Replace with a new bulb.
HLC5019 HLC5020
Page 578 of 599
6OWNER MAINTENANCE
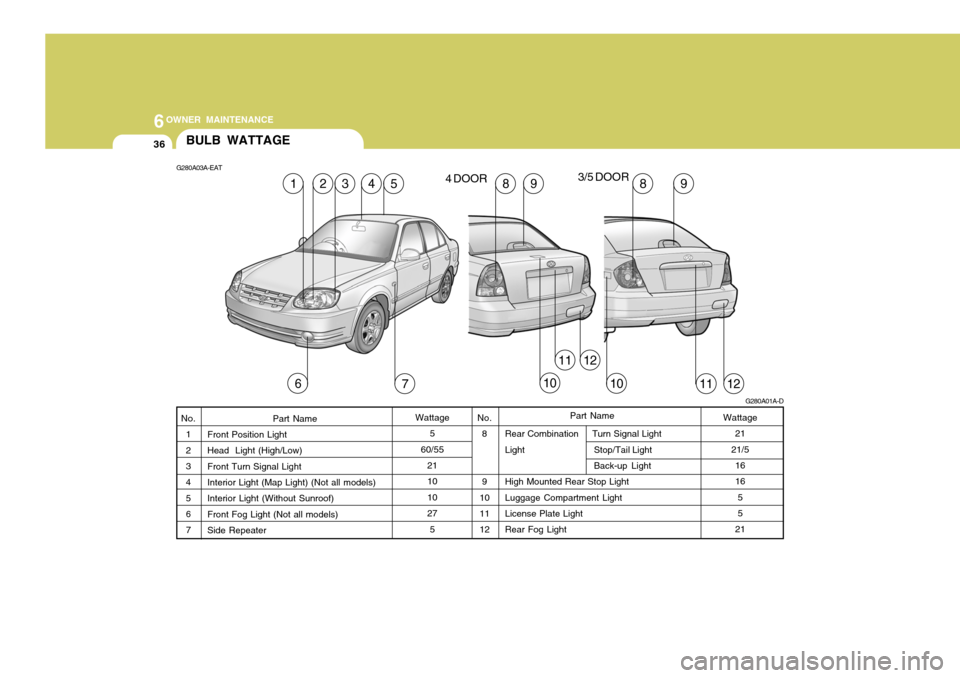
36BULB WATTAGE
Rear Combination Turn Signal Light
Light Stop/Tail LightBack-up Light
High Mounted Rear Stop LightLuggage Compartment Light License Plate Light Rear Fog Light
Part Name
Front Position Light Head Light (High/Low) Front Turn Signal LightInterior Light (Map Light) (Not all models) Interior Light (Without Sunroof) Front Fog Light (Not all models)Side Repeater No.
8 9
10 11 12
G280A03A-EAT
G280A01A-D
52
Wattage5
60/55 21 10 1027
5No. 1 2 3 45 6 7Wattage 21
21/5 16 165 5
21
Part Name
761110
1349898
10
11
4 DOOR
3/5 DOOR
12
12
Page 579 of 599

6
OWNER MAINTENANCE
37FUSE PANEL DESCRIPTION
G200C02A-EAT Engine Compartment (Petrol Engine)
HLC5027
NOTE: Not all fuse panel descriptions in this manual may be applicable to your vehicle. It is accurate at the time of printing. When you inspect the fuse box on your vehicle, refer to the fuse box label. FUSE RATING
120A50A 50A20A30A20A 30A 30A30A30A20A 10A 10A 10A 10A10A 10A10A15A 10A15A 15A 10A 25A PROTECTED COMPONENTS
Charging (Generator) Fuse 6, 7, 8, 9, Horn fuse, Room lamp fuse
Head lamp fuse, Front fog lamp fuse, Tail lamp relay, H/LP washer fuse
Engine control relay, Generator, Fuel pump relay, ECU #3 fuse Ignition power source, Start relayRadiator fan control Blower control ABS control, ABS bleeding connectorABS control, ABS bleeding connector Power window Condenser fan controlRadiator fan, Condenser fan, ECM, Oxygen sensor, Purge control valve,
SMATRA, Glow plug relay, Heater relay, Stop lamp switch A/C relayHorn relay Illumination lamps, Left rear combination lamp, License lamp, DRL control, Position lamp, H/LP washer relayRight rear combination lamp, License lamp, Position lamp Left head lamp, DRL control, Instrument cluster Right head lampFront fog lamp relay
Instrument cluster, Courtesy lamp, Trunk room lamp, ETACM, DLC, Door warning, Multipurpose check connectorAudio, Digital clock, Power antenna, A/C switch, Rear fog lamp switch Idle speed actuator, ECM, Camshaft position sensor, EGR actuator, Throttle plate actuatorECM Head lamp washer motor
Fuel pump relay, Fuel pump motor
ALT
BATTERY LAMPECU
IGN
RAD FAN
BLOWER
ABS ABS
P/WDW
COND FAN
ECU #1
A/CON COMP HORN
TAIL LH
TAIL RH
H/LP LH
H/LP RH
FRONT FOG
ROOM LP AUDIO
ECU #2 ECU#3
H/L WASHER
FUSIBLE
LINK
FUSE
DESCRIPTION
F/PUMP CHK (E50)
Page 580 of 599
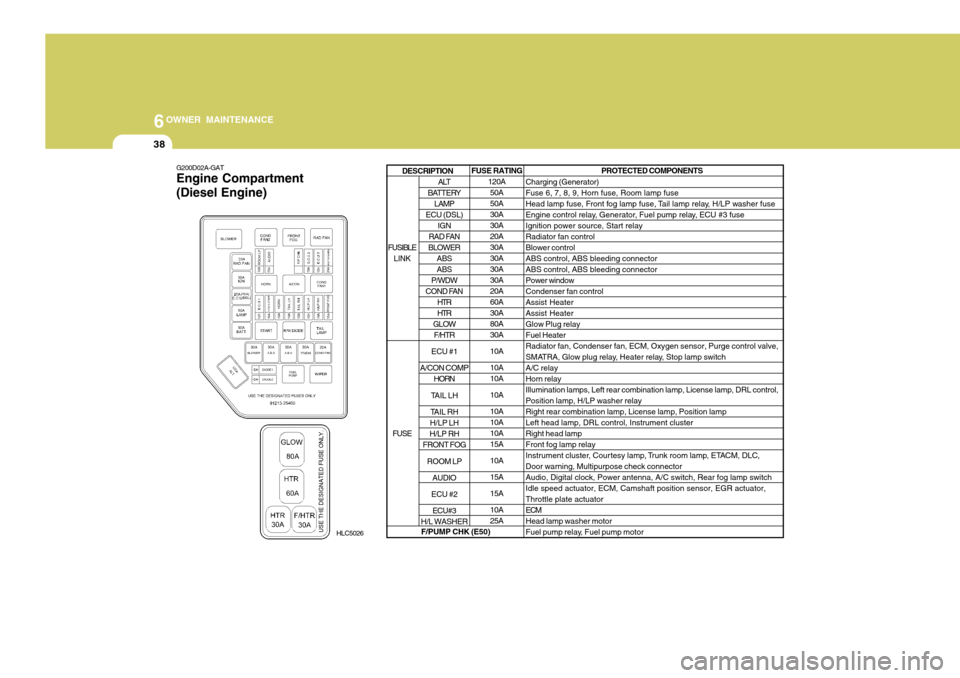
6OWNER MAINTENANCE
38
PROTECTED COMPONENTS
Charging (Generator) Fuse 6, 7, 8, 9, Horn fuse, Room lamp fuse
Head lamp fuse, Front fog lamp fuse, Tail lamp relay, H/LP washer fuse
Engine control relay, Generator, Fuel pump relay, ECU #3 fuseIgnition power source, Start relayRadiator fan controlBlower controlABS control, ABS bleeding connectorABS control, ABS bleeding connectorPower windowCondenser fan controlAssist HeaterAssist HeaterGlow Plug relayFuel HeaterRadiator fan, Condenser fan, ECM, Oxygen sensor, Purge control valve,
SMATRA, Glow plug relay, Heater relay, Stop lamp switchA/C relayHorn relayIllumination lamps, Left rear combination lamp, License lamp, DRL control,Position lamp, H/LP washer relayRight rear combination lamp, License lamp, Position lampLeft head lamp, DRL control, Instrument clusterRight head lampFront fog lamp relay
Instrument cluster, Cour tesy lamp, Trunk room lamp, ETACM, DLC,Door warning, Multipurpose check connectorAudio, Digital clock, Power antenna, A/C switch, Rear fog lamp switchIdle speed actuator, ECM, Camshaft position sensor, EGR actuator,Throttle plate actuatorECMHead lamp washer motor
Fuel pump relay, Fuel pump motor
HLC5026 FUSE RATING
120A
50A50A30A30A20A30A30A30A30A20A60A30A80A30A 10A10A 10A 10A10A 10A10A15A 10A15A15A10A 25A
ALT
BATTERY
LAMP
ECU (DSL)
IGN
RAD FAN
BLOWER ABS ABS
P/WDW
COND FAN HTRHTR
GLOW F/HTR
ECU #1
A/CON COMP HORN
TAIL LH
TAIL RH
H/LP LH
H/LP RH
FRONT FOG
ROOM LP
AUDIO
ECU #2 ECU#3
H/L WASHER
FUSIBLE
LINK
FUSEDESCRIPTION
F/PUMP CHK (E50)G200D02A-GAT Engine Compartment (Diesel Engine)