lock Hyundai Atos 2002 User Guide
[x] Cancel search | Manufacturer: HYUNDAI, Model Year: 2002, Model line: Atos, Model: Hyundai Atos 2002Pages: 249, PDF Size: 3.11 MB
Page 25 of 249
FEATURES OF YOUR HYUNDAI
FEATURES OF YOUR HYUNDAI FEATURES OF YOUR HYUNDAI
FEATURES OF YOUR HYUNDAI
FEATURES OF YOUR HYUNDAI
1- 16 to the body structure, can adversely affect SRS performance and lead to possibleinjury.
o For cleaning the airbag pad covers, use only a soft, dry cloth or one which hasbeen moistened with plain water. Solventsor cleaners could adversely affect theairbag covers and proper deployment ofthe system.
o No objects should be placed over or near the airbag modules on the steering wheel,instrument panel, and the front passen-ger's panel above the glove box, becauseany such object could cause harm if thevehicle is in a crash severe enough tocause the airbags to inflate.
o If the airbags inflate, they must be re- placed by an authorized Hyundai dealer.
o Do not tamper with or disconnect SRS wiring, or other components of the SRSsystem. Doing so could result in injury,due to accidental firing of the airbags orby rendering the SRS inoperative.
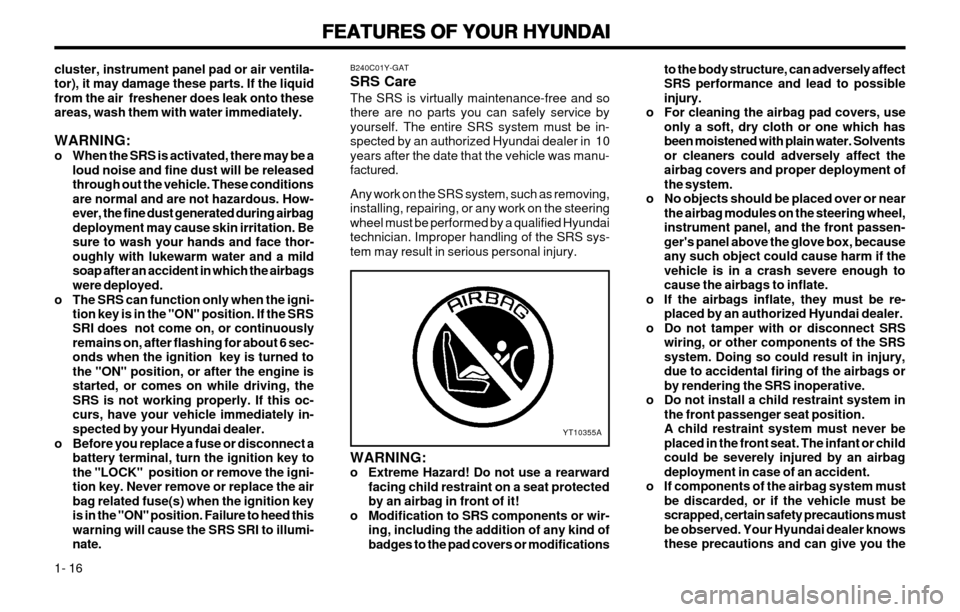
o Do not install a child restraint system in the front passenger seat position.A child restraint system must never beplaced in the front seat. The infant or childcould be severely injured by an airbagdeployment in case of an accident.
o If components of the airbag system must be discarded, or if the vehicle must bescrapped, certain safety precautions mustbe observed. Your Hyundai dealer knowsthese precautions and can give you the
YT10355A
cluster, instrument panel pad or air ventila- tor), it may damage these parts. If the liquidfrom the air freshener does leak onto theseareas, wash them with water immediately. WARNING:
o When the SRS is activated, there may be a loud noise and fine dust will be released through out the vehicle. These conditionsare normal and are not hazardous. How-ever, the fine dust generated during airbagdeployment may cause skin irritation. Besure to wash your hands and face thor-oughly with lukewarm water and a mildsoap after an accident in which the airbagswere deployed.
o The SRS can function only when the igni- tion key is in the "ON" position. If the SRSSRI does not come on, or continuouslyremains on, after flashing for about 6 sec-onds when the ignition key is turned tothe "ON" position, or after the engine isstarted, or comes on while driving, theSRS is not working properly. If this oc-curs, have your vehicle immediately in-spected by your Hyundai dealer.
o Before you replace a fuse or disconnect a battery terminal, turn the ignition key tothe "LOCK" position or remove the igni-tion key. Never remove or replace the airbag related fuse(s) when the ignition keyis in the "ON" position. Failure to heed thiswarning will cause the SRS SRI to illumi-nate. B240C01Y-GAT SRS CareThe SRS is virtually maintenance-free and so there are no parts you can safely service byyourself. The entire SRS system must be in-spected by an authorized Hyundai dealer in 10years after the date that the vehicle was manu-factured. Any work on the SRS system, such as removing, installing, repairing, or any work on the steeringwheel must be performed by a qualified Hyundaitechnician. Improper handling of the SRS sys-tem may result in serious personal injury. WARNING:
o Extreme Hazard! Do not use a rearward
facing child restraint on a seat protectedby an airbag in front of it!
o Modification to SRS components or wir- ing, including the addition of any kind ofbadges to the pad covers or modifications
Page 27 of 249
FEATURES OF YOUR HYUNDAI
FEATURES OF YOUR HYUNDAI FEATURES OF YOUR HYUNDAI
FEATURES OF YOUR HYUNDAI
FEATURES OF YOUR HYUNDAI
1- 18
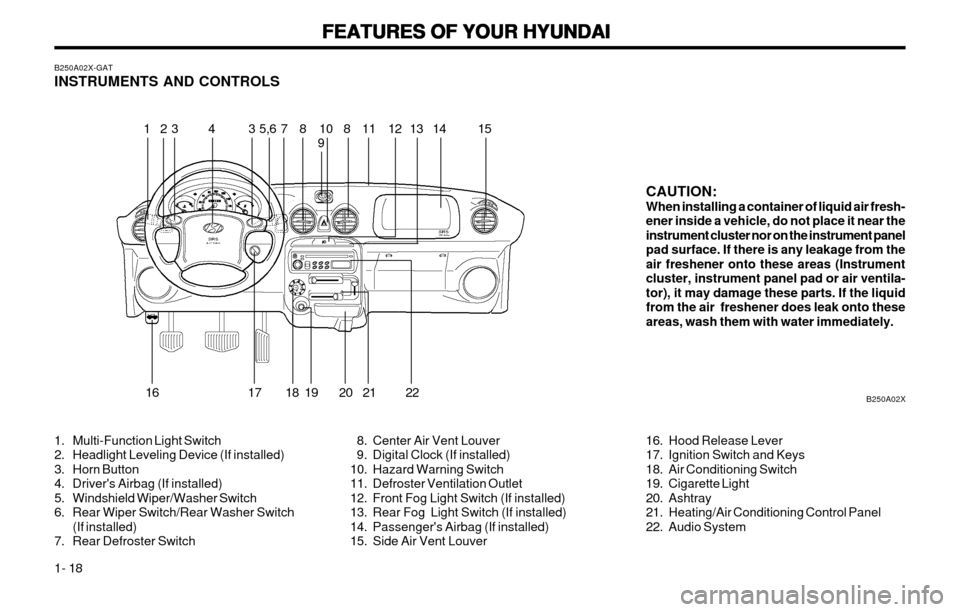
B250A02X-GAT INSTRUMENTS AND CONTROLS
1. Multi-Function Light Switch
2. Headlight Leveling Device (If installed)
3. Horn Button
4. Driver's Airbag (If installed)
5. Windshield Wiper/Washer Switch
6. Rear Wiper Switch/Rear Washer Switch (If installed)
7. Rear Defroster Switch 8. Center Air Vent Louver
9. Digital Clock (If installed)
10. Hazard Warning Switch
11. Defroster Ventilation Outlet
12. Front Fog Light Switch (If installed)
13. Rear Fog Light Switch (If installed)
14. Passenger's Airbag (If installed)
15. Side Air Vent Louver16. Hood Release Lever
17. Ignition Switch and Keys
18. Air Conditioning Switch
19. Cigarette Light
20. Ashtray
21. Heating/Air Conditioning Control Panel
22. Audio System
CAUTION:When installing a container of liquid air fresh-ener inside a vehicle, do not place it near theinstrument cluster nor on the instrument panelpad surface. If there is any leakage from theair freshener onto these areas (Instrumentcluster, instrument panel pad or air ventila-tor), it may damage these parts. If the liquidfrom the air freshener does leak onto theseareas, wash them with water immediately.
15
1 3 4 5,6 11 12 13 14
16 17 18 19 20 21 22 27389
8
10
B250A02X
Page 29 of 249
FEATURES OF YOUR HYUNDAI
FEATURES OF YOUR HYUNDAI FEATURES OF YOUR HYUNDAI
FEATURES OF YOUR HYUNDAI
FEATURES OF YOUR HYUNDAI
1- 20
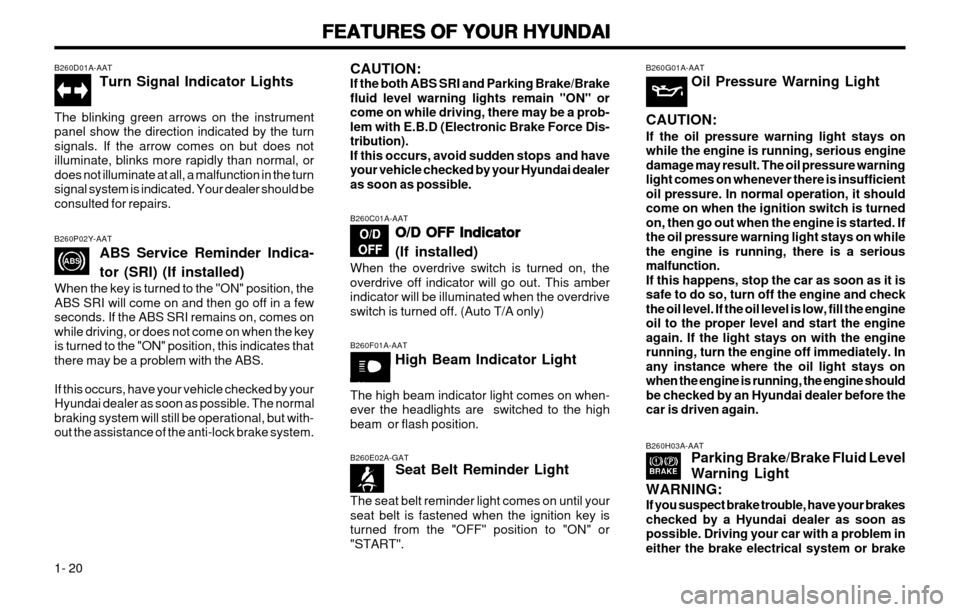
B260P02Y-AAT ABS Service Reminder Indica- tor (SRI) (If installed)
When the key is turned to the "ON" position, the ABS SRI will come on and then go off in a fewseconds. If the ABS SRI remains on, comes onwhile driving, or does not come on when the keyis turned to the "ON" position, this indicates thatthere may be a problem with the ABS. If this occurs, have your vehicle checked by your Hyundai dealer as soon as possible. The normalbraking system will still be operational, but with-out the assistance of the anti-lock brake system.
B260D01A-AAT
Turn Signal Indicator Lights
The blinking green arrows on the instrumentpanel show the direction indicated by the turnsignals. If the arrow comes on but does notilluminate, blinks more rapidly than normal, ordoes not illuminate at all, a malfunction in the turnsignal system is indicated. Your dealer should beconsulted for repairs. B260G01A-AAT
Oil Pressure Warning Light
CAUTION: If the oil pressure warning light stays on while the engine is running, serious enginedamage may result. The oil pressure warninglight comes on whenever there is insufficientoil pressure. In normal operation, it shouldcome on when the ignition switch is turnedon, then go out when the engine is started. Ifthe oil pressure warning light stays on whilethe engine is running, there is a seriousmalfunction.If this happens, stop the car as soon as it issafe to do so, turn off the engine and checkthe oil level. If the oil level is low, fill the engineoil to the proper level and start the engineagain. If the light stays on with the enginerunning, turn the engine off immediately. Inany instance where the oil light stays onwhen the engine is running, the engine shouldbe checked by an Hyundai dealer before thecar is driven again.
B260E02A-GAT Seat Belt Reminder Light
The seat belt reminder light comes on until your seat belt is fastened when the ignition key isturned from the "OFF" position to "ON" or"START".B260H03A-AAT Parking Brake/Brake Fluid Level Warning Light
WARNING: If you suspect brake trouble, have your brakes checked by a Hyundai dealer as soon aspossible. Driving your car with a problem ineither the brake electrical system or brake
B260F01A-AAT High Beam Indicator Light
The high beam indicator light comes on when- ever the headlights are switched to the highbeam or flash position.
B260C01A-AAT O/D OFF Indicator
O/D OFF Indicator O/D OFF Indicator
O/D OFF Indicator
O/D OFF Indicator (If installed)
When the overdrive switch is turned on, the overdrive off indicator will go out. This amberindicator will be illuminated when the overdriveswitch is turned off. (Auto T/A only)
CAUTION: If the both ABS SRI and Parking Brake/Brakefluid level warning lights remain "ON" orcome on while driving, there may be a prob-lem with E.B.D (Electronic Brake Force Dis-tribution).If this occurs, avoid sudden stops and haveyour vehicle checked by your Hyundai dealeras soon as possible.
Page 35 of 249
FEATURES OF YOUR HYUNDAI
FEATURES OF YOUR HYUNDAI FEATURES OF YOUR HYUNDAI
FEATURES OF YOUR HYUNDAI
FEATURES OF YOUR HYUNDAI
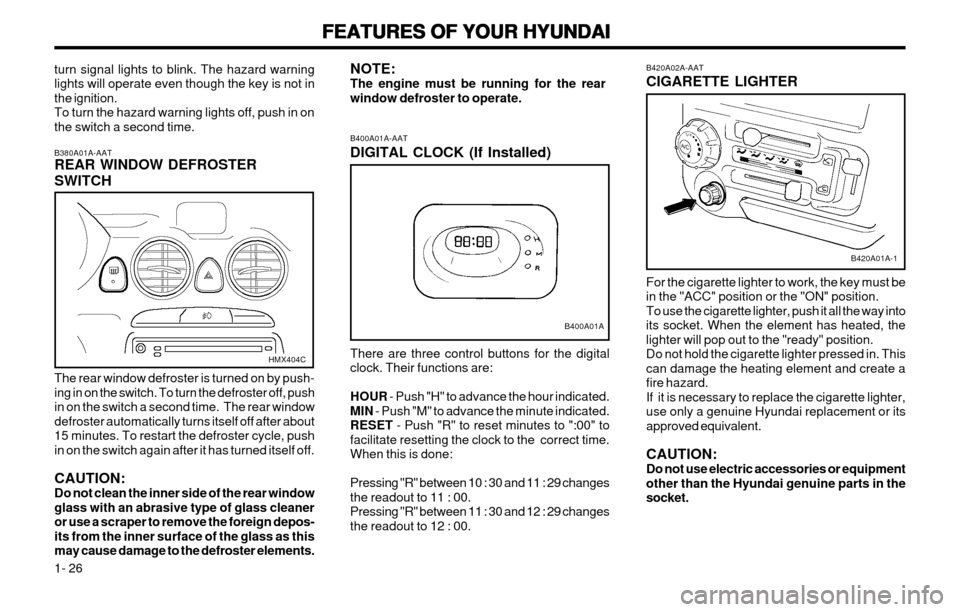
1- 26 B420A02A-AAT CIGARETTE LIGHTER For the cigarette lighter to work, the key must be in the "ACC" position or the "ON" position.To use the cigarette lighter, push it all the way intoits socket. When the element has heated, thelighter will pop out to the "ready" position.Do not hold the cigarette lighter pressed in. Thiscan damage the heating element and create afire hazard.If it is necessary to replace the cigarette lighter,use only a genuine Hyundai replacement or itsapproved equivalent. CAUTION: Do not use electric accessories or equipmentother than the Hyundai genuine parts in thesocket.
B420A01A-1
B400A01A-AAT DIGITAL CLOCK (If Installed) There are three control buttons for the digital clock. Their functions are: HOUR
- Push "H" to advance the hour indicated.
MIN - Push "M" to advance the minute indicated.
RESET - Push "R" to reset minutes to ":00" to
facilitate resetting the clock to the correct time. When this is done: Pressing "R" between 10 : 30 and 11 : 29 changes the readout to 11 : 00.Pressing "R" between 11 : 30 and 12 : 29 changesthe readout to 12 : 00.
NOTE:The engine must be running for the rearwindow defroster to operate.
B400A01A
turn signal lights to blink. The hazard warning lights will operate even though the key is not inthe ignition.To turn the hazard warning lights off, push in onthe switch a second time. B380A01A-AAT REAR WINDOW DEFROSTER SWITCH The rear window defroster is turned on by push- ing in on the switch. To turn the defroster off, pushin on the switch a second time. The rear windowdefroster automatically turns itself off after about15 minutes. To restart the defroster cycle, pushin on the switch again after it has turned itself off. CAUTION: Do not clean the inner side of the rear windowglass with an abrasive type of glass cleaneror use a scraper to remove the foreign depos-its from the inner surface of the glass as thismay cause damage to the defroster elements.
HMX404C
Page 38 of 249
FEATURES OF YOUR HYUNDAI
FEATURES OF YOUR HYUNDAI FEATURES OF YOUR HYUNDAI
FEATURES OF YOUR HYUNDAI
FEATURES OF YOUR HYUNDAI
1- 29
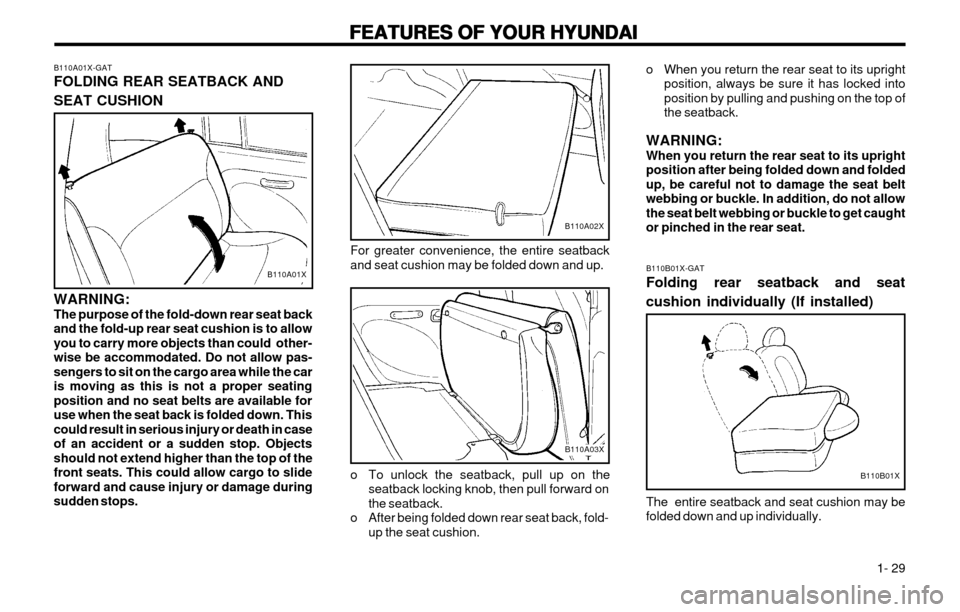
For greater convenience, the entire seatback and seat cushion may be folded down and up.
B110A02X
B110A03X
o To unlock the seatback, pull up on the seatback locking knob, then pull forward on the seatback.
o After being folded down rear seat back, fold- up the seat cushion.
B110A01X-GAT FOLDING REAR SEATBACK AND SEAT CUSHION
B110A01X
WARNING: The purpose of the fold-down rear seat backand the fold-up rear seat cushion is to allowyou to carry more objects than could other-wise be accommodated. Do not allow pas-
sengers to sit on the cargo area while the caris moving as this is not a proper seatingposition and no seat belts are available foruse when the seat back is folded down. This
could result in serious injury or death in caseof an accident or a sudden stop. Objectsshould not extend higher than the top of thefront seats. This could allow cargo to slideforward and cause injury or damage duringsudden stops. o When you return the rear seat to its upright
position, always be sure it has locked intoposition by pulling and pushing on the top ofthe seatback.
WARNING:When you return the rear seat to its uprightposition after being folded down and foldedup, be careful not to damage the seat belt
webbing or buckle. In addition, do not allowthe seat belt webbing or buckle to get caughtor pinched in the rear seat. B110B01X-GAT Folding rear seatback and seat cushion individually (If installed)
B110B01X
The entire seatback and seat cushion may be folded down and up individually.
Page 39 of 249
FEATURES OF YOUR HYUNDAI
FEATURES OF YOUR HYUNDAI FEATURES OF YOUR HYUNDAI
FEATURES OF YOUR HYUNDAI
FEATURES OF YOUR HYUNDAI
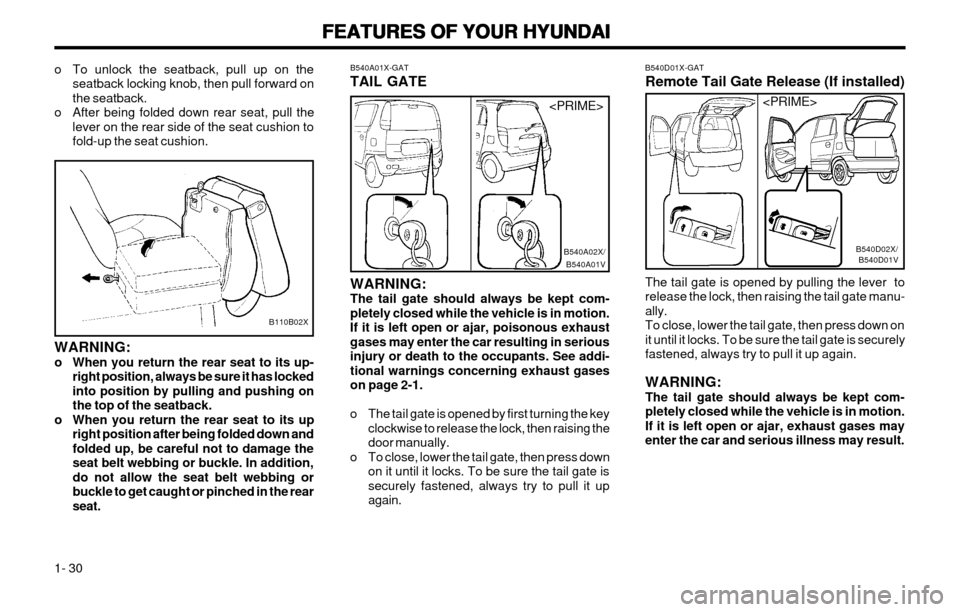
1- 30 B540D01X-GAT Remote Tail Gate Release (If installed) The tail gate is opened by pulling the lever to release the lock, then raising the tail gate manu-ally.To close, lower the tail gate, then press down on
it until it locks. To be sure the tail gate is securelyfastened, always try to pull it up again. WARNING: The tail gate should always be kept com-pletely closed while the vehicle is in motion.If it is left open or ajar, exhaust gases mayenter the car and serious illness may result.
B540D01VB540D02X/
B540A01X-GAT TAIL GATE
B540A01VB540A02X/
WARNING: The tail gate should always be kept com-pletely closed while the vehicle is in motion.If it is left open or ajar, poisonous exhaust
gases may enter the car resulting in seriousinjury or death to the occupants. See addi-tional warnings concerning exhaust gaseson page 2-1.
o The tail gate is opened by first turning the key clockwise to release the lock, then raising the door manually.
o To close, lower the tail gate, then press down on it until it locks. To be sure the tail gate is
securely fastened, always try to pull it upagain.
o To unlock the seatback, pull up on the
seatback locking knob, then pull forward onthe seatback.
o After being folded down rear seat, pull the lever on the rear side of the seat cushion tofold-up the seat cushion.
B110B02X
WARNING:
o When you return the rear seat to its up-right position, always be sure it has lockedinto position by pulling and pushing onthe top of the seatback.
o When you return the rear seat to its up right position after being folded down andfolded up, be careful not to damage the
seat belt webbing or buckle. In addition,do not allow the seat belt webbing orbuckle to get caught or pinched in the rearseat.
Page 41 of 249
FEATURES OF YOUR HYUNDAI
FEATURES OF YOUR HYUNDAI FEATURES OF YOUR HYUNDAI
FEATURES OF YOUR HYUNDAI
FEATURES OF YOUR HYUNDAI
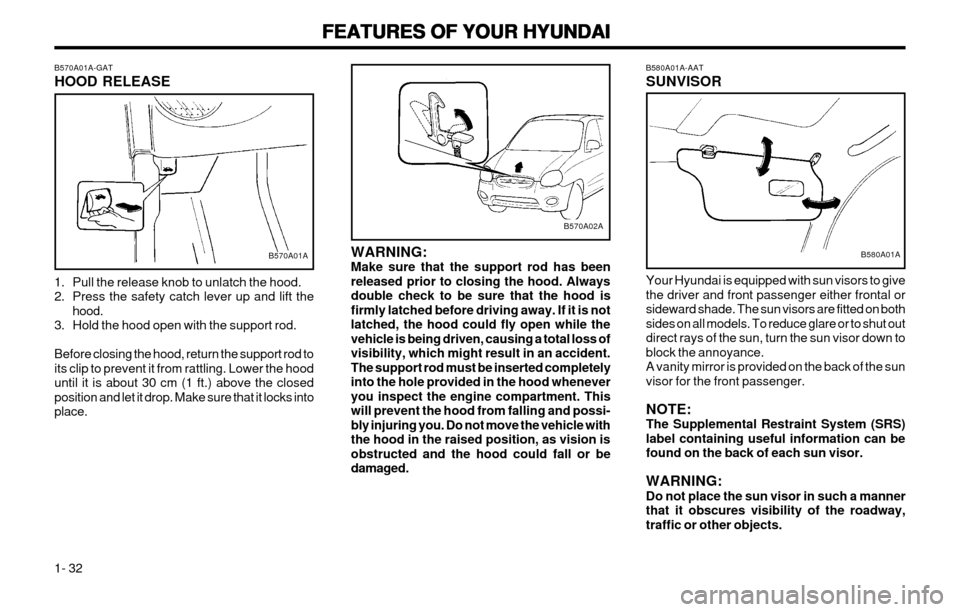
1- 32 B580A01A-AAT SUNVISOR Your Hyundai is equipped with sun visors to give the driver and front passenger either frontal orsideward shade. The sun visors are fitted on bothsides on all models. To reduce glare or to shut outdirect rays of the sun, turn the sun visor down toblock the annoyance.A vanity mirror is provided on the back of the sunvisor for the front passenger. NOTE: The Supplemental Restraint System (SRS)label containing useful information can befound on the back of each sun visor. WARNING: Do not place the sun visor in such a mannerthat it obscures visibility of the roadway,traffic or other objects.
B580A01AWARNING: Make sure that the support rod has beenreleased prior to closing the hood. Alwaysdouble check to be sure that the hood isfirmly latched before driving away. If it is notlatched, the hood could fly open while thevehicle is being driven, causing a total loss ofvisibility, which might result in an accident.The support rod must be inserted completelyinto the hole provided in the hood wheneveryou inspect the engine compartment. Thiswill prevent the hood from falling and possi-bly injuring you. Do not move the vehicle withthe hood in the raised position, as vision isobstructed and the hood could fall or bedamaged.
B570A02A
B570A01A-GAT HOOD RELEASE
1. Pull the release knob to unlatch the hood.
2. Press the safety catch lever up and lift the
hood.
3. Hold the hood open with the support rod. Before closing the hood, return the support rod to its clip to prevent it from rattling. Lower the hooduntil it is about 30 cm (1 ft.) above the closedposition and let it drop. Make sure that it locks intoplace.
B570A01A
Page 47 of 249
FEATURES OF YOUR HYUNDAI
FEATURES OF YOUR HYUNDAI FEATURES OF YOUR HYUNDAI
FEATURES OF YOUR HYUNDAI
FEATURES OF YOUR HYUNDAI
1- 38 B740B01X-GAT Air Conditioning Operation (If installed) Cooling
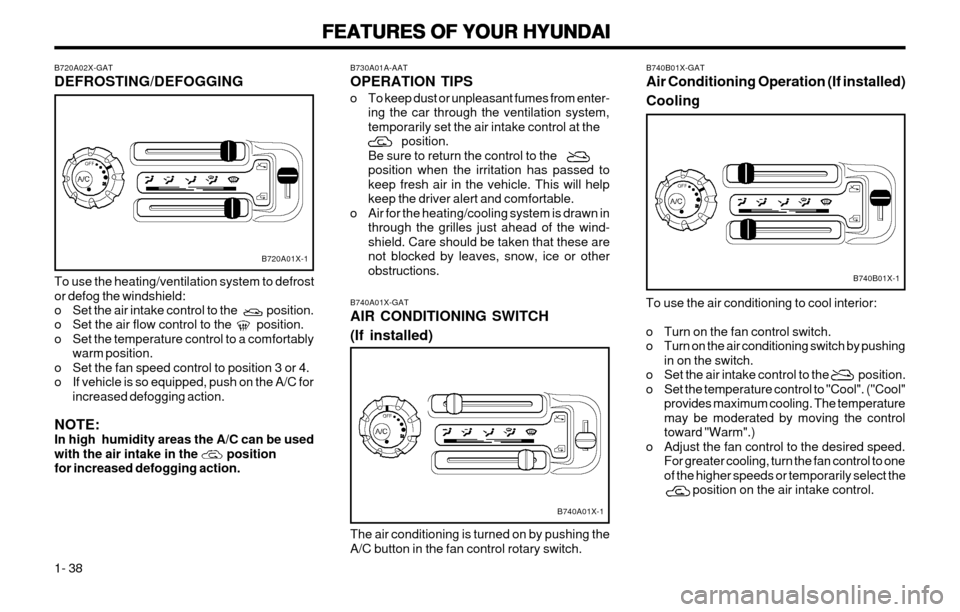
To use the air conditioning to cool interior:
o Turn on the fan control switch.
o Turn on the air conditioning switch by pushing in on the switch.
o Set the air intake control to the position.
o Set the temperature control to "Cool". ("Cool" provides maximum cooling. The temperaturemay be moderated by moving the controltoward "Warm".)
o Adjust the fan control to the desired speed. For greater cooling, turn the fan control to oneof the higher speeds or temporarily select the position on the air intake control.
B740B01X-1
B730A01A-AAT OPERATION TIPS
o To keep dust or unpleasant fumes from enter-ing the car through the ventilation system, temporarily set the air intake control at the position.Be sure to return the control to theposition when the irritation has passed tokeep fresh air in the vehicle. This will helpkeep the driver alert and comfortable.
o Air for the heating/cooling system is drawn in through the grilles just ahead of the wind-shield. Care should be taken that these arenot blocked by leaves, snow, ice or otherobstructions.
B740A01X-GAT AIR CONDITIONING SWITCH (If installed) The air conditioning is turned on by pushing the
A/C button in the fan control rotary switch.
B740A01X-1
B720A02X-GAT DEFROSTING/DEFOGGING To use the heating/ventilation system to defrost or defog the windshield:
o Set the air intake control to the position.
o Set the air flow control to the position.
o Set the temperature control to a comfortably warm position.
o Set the fan speed control to position 3 or 4.
o If vehicle is so equipped, push on the A/C for increased defogging action.
NOTE:In high humidity areas the A/C can be used
with the air intake in the positionfor increased defogging action.
B720A01X-1
Page 50 of 249
FEATURES OF YOUR HYUNDAI
FEATURES OF YOUR HYUNDAI FEATURES OF YOUR HYUNDAI
FEATURES OF YOUR HYUNDAI
FEATURES OF YOUR HYUNDAI
1- 41
B750B02Y-AAT Using a cellular phone or a two-way radio When a cellular phone is used inside the vehicle, noise may be produced from the audio equip-ment. This does not mean that something iswrong with the audio equipment. In such a case,use the cellular phone at a place as far aspossible from the audio equipment. CAUTION: When using a communication system suchas a cellular phone or a radio inside thevehicle, a separate external antenna must befitted. When a cellular phone or a radio set isused with an internal antenna alone, it mayinterfere with the vehicle's electrical systemand adversely affect safe operation of thevehicle. WARNING: Don't use a cellular phone when you aredriving, you must stop at a safe place to usea cellular phone.
SSAR013A
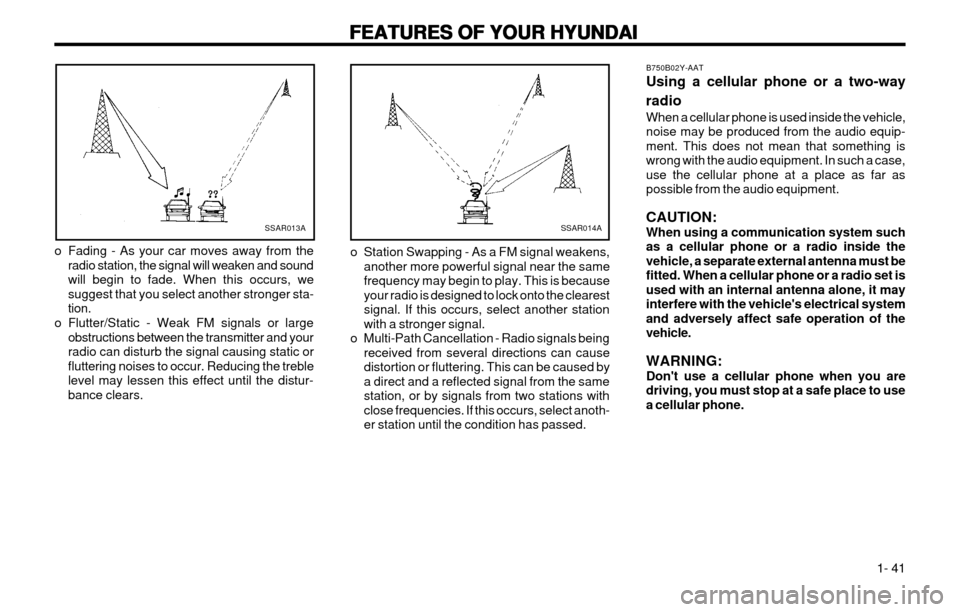
o Fading - As your car moves away from the radio station, the signal will weaken and sound will begin to fade. When this occurs, wesuggest that you select another stronger sta-tion.
o Flutter/Static - Weak FM signals or large obstructions between the transmitter and yourradio can disturb the signal causing static orfluttering noises to occur. Reducing the treblelevel may lessen this effect until the distur-bance clears.SSAR014A
o Station Swapping - As a FM signal weakens, another more powerful signal near the same frequency may begin to play. This is becauseyour radio is designed to lock onto the clearestsignal. If this occurs, select another stationwith a stronger signal.
o Multi-Path Cancellation - Radio signals being received from several directions can causedistortion or fluttering. This can be caused bya direct and a reflected signal from the samestation, or by signals from two stations withclose frequencies. If this occurs, select anoth-er station until the condition has passed.
Page 52 of 249
FEATURES OF YOUR HYUNDAI
FEATURES OF YOUR HYUNDAI FEATURES OF YOUR HYUNDAI
FEATURES OF YOUR HYUNDAI
FEATURES OF YOUR HYUNDAI
1- 43
B901B02X-GAT
1. POWER ON-OFF/VOLUME CON-
TROL KNOB
The radio unit may be operated when the ignition key is in the "ACC" or "ON" position. Rotatethe knob clockwise to switch the radio unit on,and to increase the volume.The LCD shows the radio frequency in the radiomode. Turn the knob counterclockwise to reducethe volume, and to switch the radio unit off. BAL (Balance Control) Knob Pull and turn the control knob clockwise to em- phasize right speaker sound. (Left speaker soundwill be attenuated). When the control knob isturned counterclockwise, left speaker sound willbe emphasized. (Right speaker sound will beattenuated). 2. BASS Control Knob Press to pop the knob out and turn to the left or right for the desired bass tone. TREBLE Control Knob Further pull-lock position of popped-up knob. Turn to the left or right for the desired treble tone. 3. BAND Selector Pressing the button changes the AM, FM1 and FM2 bands. The mode selected is displayedon LCD. 4. TUNE (manual) Select Button Press the (+) side or (-) side to increase or to decrease the frequency. With the button helddown for 0.5 sec. or more, the stop signal (broad-casting radio wave) is ignored and channel se-lection continues. SEEK Operation (Automatic Channel Selection) Press the TUNE select button 1 sec. or more. When the (+) side is pressed, the unit will auto-matically tune to the next higher frequency andwhen the (-) side is pressed, it will automaticallytune to the next lower frequency.
5. PRESET STATION SELECT Six (6) stations for AM, FM and FM2 respectively can be preset in the electronic memory circuit onthis unit.
FM
AMHOW TO PRESET STATIONS Six AM and twelve FM stations may be pro- grammed into the memory of the radio. Then, bysimply pressing the band select button and/orone of the six station select buttons, you mayrecall any of these stations instantly. To programthe stations, follow these steps:
o Press band selector to set the band for AM,
FM and FM2.
o Select the desired station to be stored by seek, scan or manual tuning.
o Determine the preset station select button you wish to use to access that station.
o Press the station select button for more than two seconds. A select button indicator will show in the display indicating which selectbutton you have depressed. The frequencydisplay will flash after it has been stored intothe memory. You should then release thebutton, and proceed to program the nextdesired station. A total of 18 stations can beprogrammed by selecting one AM and twoFM stations per button.
o When completed, any preset station may be recalled by selecting AM, FM or FM2 bandand the appropriate station button.