warning light Hyundai Elantra 2009 Инструкция по эксплуатации (in Russian)
[x] Cancel search | Manufacturer: HYUNDAI, Model Year: 2009, Model line: Elantra, Model: Hyundai Elantra 2009Pages: 308, PDF Size: 15.03 MB
Page 43 of 308
Safety system of your vehicle
34
3
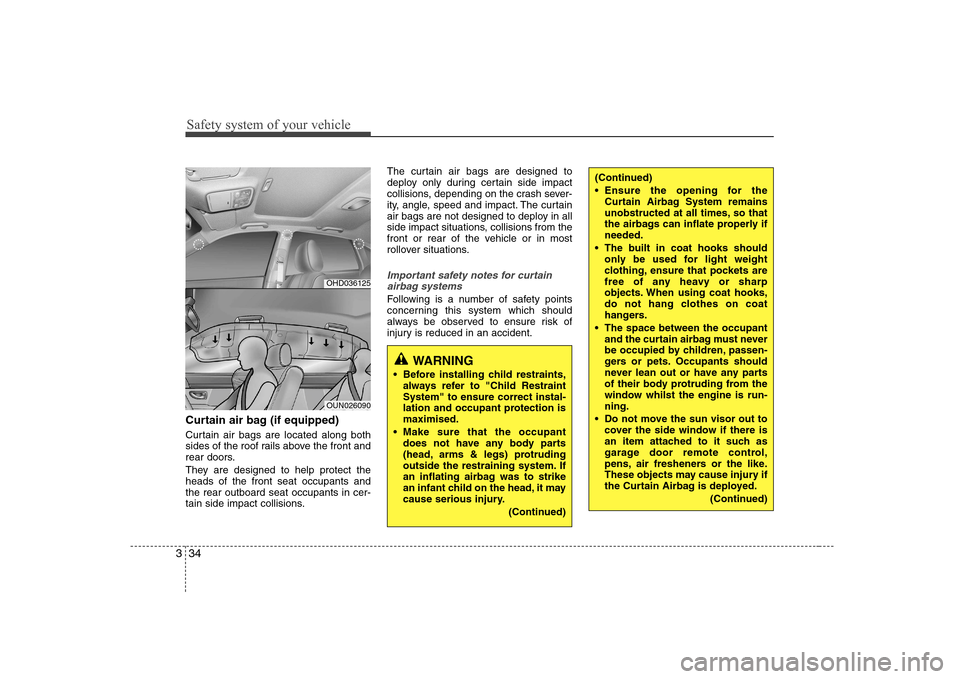
Curtain air bag (if equipped)
Curtain air bags are located along both
sides of the roof rails above the front and
rear doors.
They are designed to help protect the heads of the front seat occupants andthe rear outboard seat occupants in cer-
tain side impact collisions. The curtain air bags are designed to
deploy only during certain side impact
collisions, depending on the crash sever-
ity, angle, speed and impact. The curtain
air bags are not designed to deploy in all
side impact situations, collisions from the
front or rear of the vehicle or in most
rollover situations.
Important safety notes for curtain
airbag systems
Following is a number of safety points
concerning this system which should
always be observed to ensure risk of
injury is reduced in an accident.
WARNING
Before installing child restraints, always refer to "Child Restraint System" to ensure correct instal-
lation and occupant protection ismaximised.
Make sure that the occupant does not have any body parts
(head, arms & legs) protruding
outside the restraining system. If
an inflating airbag was to strike
an infant child on the head, it may
cause serious injury.
(Continued)
(Continued)
Ensure the opening for theCurtain Airbag System remains
unobstructed at all times, so that
the airbags can inflate properly ifneeded.
The built in coat hooks should only be used for light weight
clothing, ensure that pockets are
free of any heavy or sharp
objects. When using coat hooks,
do not hang clothes on coat
hangers.
The space between the occupant and the curtain airbag must never
be occupied by children, passen-
gers or pets. Occupants should
never lean out or have any parts
of their body protruding from the
window whilst the engine is run-ning.
Do not move the sun visor out to cover the side window if there is
an item attached to it such as
garage door remote control,
pens, air fresheners or the like.
These objects may cause injury if
the Curtain Airbag is deployed.
(Continued)
OHD036125
OUN026090
Page 52 of 308
343
Safety system of your vehicle
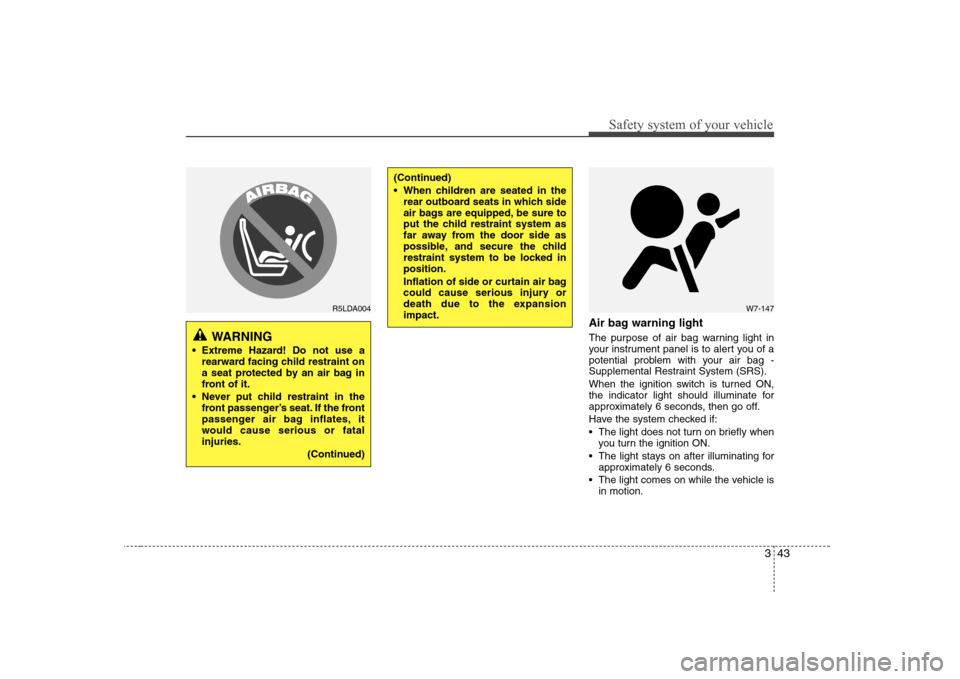
Air bag warning light
The purpose of air bag warning light in
your instrument panel is to alert you of a
potential problem with your air bag -
Supplemental Restraint System (SRS).
When the ignition switch is turned ON,
the indicator light should illuminate for
approximately 6 seconds, then go off.
Have the system checked if:
The light does not turn on briefly whenyou turn the ignition ON.
The light stays on after illuminating for approximately 6 seconds.
The light comes on while the vehicle is in motion.
WARNING
Extreme Hazard! Do not use a rearward facing child restraint on
a seat protected by an air bag in
front of it.
Never put child restraint in the front passenger’s seat. If the front
passenger air bag inflates, it
would cause serious or fatalinjuries.
(Continued)
(Continued)
When children are seated in therear outboard seats in which side
air bags are equipped, be sure to
put the child restraint system as
far away from the door side as
possible, and secure the child
restraint system to be locked inposition.
Inflation of side or curtain air bag
could cause serious injury or
death due to the expansionimpact.
W7-147R5LDA004
Page 53 of 308
Safety system of your vehicle
44
3
SRS Care
The SRS is virtually maintenance-free
and so there are no parts you can safely
service by yourself. If the SRS air bag
warning light does not illuminate, or con-
tinuously remains on, have your vehicle
immediately inspected by an authorised
Hyundai dealer.
Any work on the SRS system, such as
removing, installing, repairing, or any
work on the steering wheel must be per-
formed by an authorised Hyundai dealer.Improper handling of the SRS system
may result in serious personal injury.
WARNING
Do not install a child restraint system in the front passenger
seat position. A child restraint
system must never be placed in
the front seat. The infant or child
could be severely injured by an
air bag deployment in case of anaccident.
Modification to SRS components or wiring, including the addition
of any kind of badges to the pad
covers or modifications to the
body structure, can adversely
affect SRS performance and lead
to possible injury.
For cleaning the air bag pad cov- ers, use only a soft, dry cloth or
one which has been moistened
with plain water. Solvents or
cleaners could adversely affect
the air bag covers and proper
deployment of the system.
No objects should be placed over
or near the air bag modules on the
steering wheel, instrument panel,
and the front passenger's panel
above the glove box, because any
such object could cause harm if the
vehicle is in a crash severe enough
to cause the air bags to inflate.
(Continued)
(Continued)
If the air bags inflate, they must be replaced by an authorised
Hyundai dealer.
Do not tamper with or disconnect SRS wiring, or other components
of the SRS system. Doing so
could result in injury, due to acci-
dental inflation of the air bags or
by rendering the SRS inopera-
tive.
If components of the air bag sys- tem must be discarded, or if the
vehicle must be scrapped, certain
safety precautions must be
observed. An authorised Hyundai
dealer knows these precautions
and can give you the necessary
information. Failure to follow
these precautions and proce-dures could increase the risk of
personal injury.
If your car was flooded and has soaked carpeting or water on
flooring, you shouldn't try to start
the engine; have the car towed to
an authorised Hyundai dealer.
Page 56 of 308
4
Keys / 4-2 Remote keyless entry / 4-4Theft-alarm system / 4-6
Door locks / 4-8Boot / 4-12
Windows / 4-13Bonnet / 4-17
Fuel filler lid / 4-19
Sunroof / 4-22
Steering wheel / 4-26
Mirrors / 4-29
Instrument cluster / 4-33
Hazard warning flasher / 4-45Lighting / 4-46
Wipers and washers / 4-49
Interior light / 4-51
Defroster / 4-54
Manual climate control system / 4-55
Automatic climate control system / 4-64
Windshield defrosting and defogging / 4-72
Storage compartment / 4-75
Interior features / 4-77Audio system / 4-82
Features of your vehicle
Page 59 of 308
Features of your vehicle
4
4
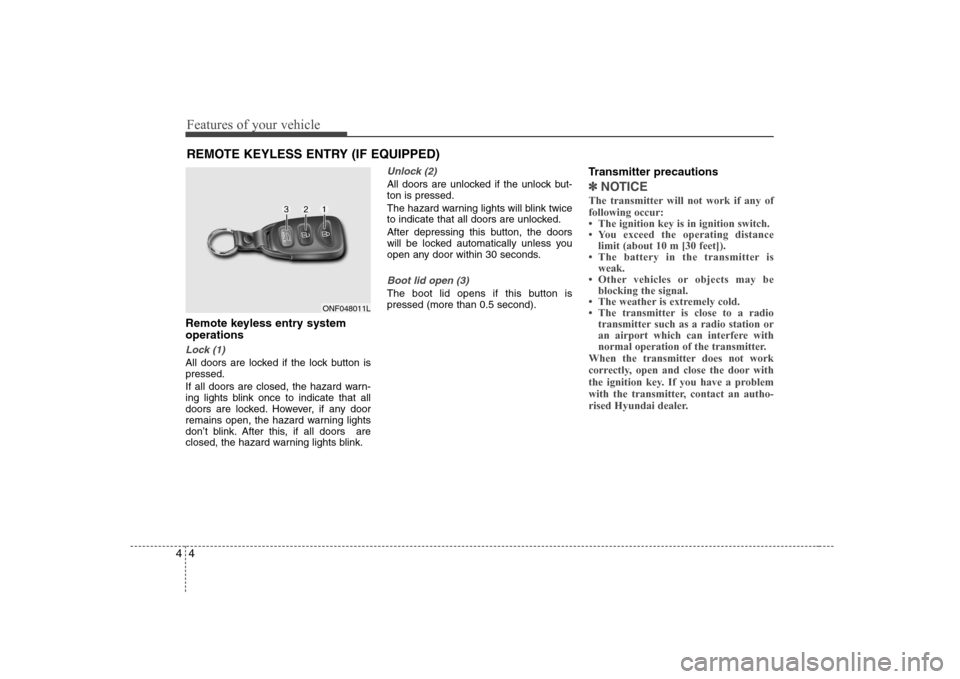
Remote keyless entry system operations
Lock (1)
All doors are locked if the lock button is pressed.
If all doors are closed, the hazard warn-
ing lights blink once to indicate that all
doors are locked. However, if any door
remains open, the hazard warning lights
don’t blink. After this, if all doors are
closed, the hazard warning lights blink.
Unlock (2)
All doors are unlocked if the unlock but- ton is pressed.
The hazard warning lights will blink twice
to indicate that all doors are unlocked.
After depressing this button, the doors
will be locked automatically unless you
open any door within 30 seconds.
Boot lid open (3)
The boot lid opens if this button is pressed (more than 0.5 second). Transmitter precautions
✽✽
NOTICE
The transmitter will not work if any of following occur:
Page 61 of 308
Features of your vehicle
6
4
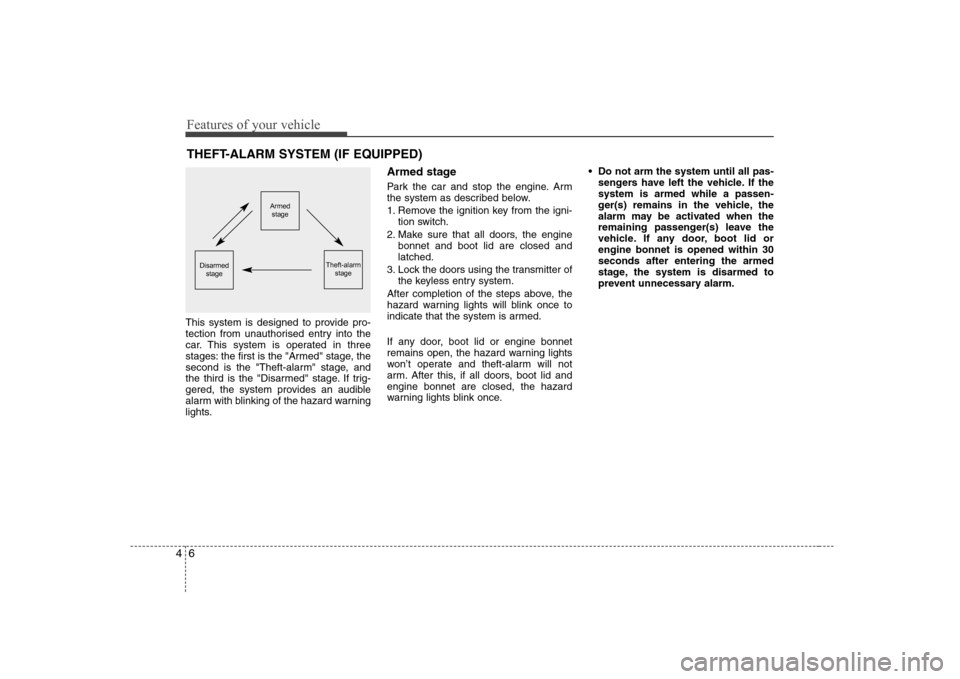
This system is designed to provide pro-
tection from unauthorised entry into the
car. This system is operated in three
stages: the first is the "Armed" stage, the
second is the "Theft-alarm" stage, and
the third is the "Disarmed" stage. If trig-
gered, the system provides an audible
alarm with blinking of the hazard warning
lights. Armed stage
Park the car and stop the engine. Arm
the system as described below.
1. Remove the ignition key from the igni-
tion switch.
2. Make sure that all doors, the engine bonnet and boot lid are closed and latched.
3. Lock the doors using the transmitter of the keyless entry system.
After completion of the steps above, the
hazard warning lights will blink once to
indicate that the system is armed.
If any door, boot lid or engine bonnet
remains open, the hazard warning lights
won’t operate and theft-alarm will not
arm. After this, if all doors, boot lid andengine bonnet are closed, the hazard
warning lights blink once. Do not arm the system until all pas-
sengers have left the vehicle. If thesystem is armed while a passen-
ger(s) remains in the vehicle, the
alarm may be activated when the
remaining passenger(s) leave the
vehicle. If any door, boot lid orengine bonnet is opened within 30seconds after entering the armed
stage, the system is disarmed to
prevent unnecessary alarm.
THEFT-ALARM SYSTEM (IF EQUIPPED)
Armed
stage
Theft-alarm stageDisarmedstage
Page 62 of 308
47
Features of your vehicle
Theft-alarm stage
The alarm will be activated if any of the
following occurs while the system is
armed.
A front or rear door is opened withoutusing the ignition key or transmitter.
The boot lid is opened without using the transmitter.
The engine bonnet is opened.The siren will sound and the hazard
warning lights will blink continuously for
27 seconds, and repeat the alarm 3
times unless the system is disarmed. To
turn off the system, unlock the doors with
the ignition key or transmitter.
✽✽ NOTICE
If you lose your keys, consult your
authorised Hyundai dealer.
Withheld alarm
If the boot lid is opened with the trans-
mitter during the armed stage, the alarm
will not be activated but the armed state
will be maintained for the doors and bon-net. Disarmed stage
The system will be disarmed when the
doors are unlocked by depressing the
unlock button on the transmitter or
unlocked with the ignition key.
After depressing unlock button, the haz-
ard warning lights will blink twice to indi-
cate that the system is disarmed.
After depressing unlock button, if any
door is not opened within 30 seconds,
the system will be rearmed.
If the system is not disarmed with the
ignition key or transmitter, insert the key
in the ignition switch and turn the key to
the START position. Then the system will
be disarmed.
Page 67 of 308
Features of your vehicle
12
4
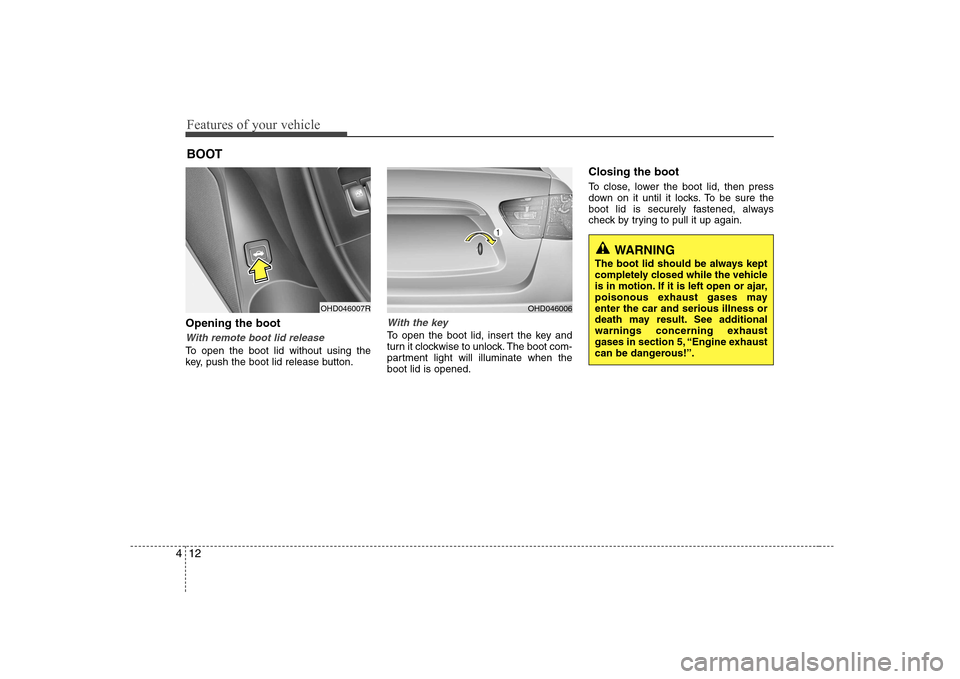
Opening the boot
With remote boot lid release
To open the boot lid without using the
key, push the boot lid release button.
With the key
To open the boot lid, insert the key and
turn it clockwise to unlock. The boot com-
partment light will illuminate when theboot lid is opened. Closing the boot
To close, lower the boot lid, then press
down on it until it locks. To be sure the
boot lid is securely fastened, always
check by trying to pull it up again.
BOOT
OHD046007ROHD046006
WARNING
The boot lid should be always kept
completely closed while the vehicle
is in motion. If it is left open or ajar,
poisonous exhaust gases mayenter the car and serious illness or
death may result. See additional
warnings concerning exhaust
gases in section 5, “Engine exhaust
can be dangerous!”.
Page 69 of 308
Features of your vehicle
14
4
Power windows (if equipped)
The ignition switch must be in the ON
position for power windows to operate.
Each door has a power window switch
that controls the door’s window. However,
the driver has a power window lock
switch which can block the operation of
passenger windows.
The power windows can be operated for
approximately 30 seconds after the igni-
tion key is removed or turned to the ACC
or LOCK position. However, if the front
doors are opened, the power windows
cannot be operated even within the 30
seconds after the ignition key removal.
✽✽
NOTICE
While driving with the rear windows
down or with the sunroof (if equipped)
in an open (or partially open) position,
your vehicle may demonstrate a wind
buffeting or pulsation noise. This noise
is a normal occurrence and can be
reduced or eliminated by taking the fol-lowing actions. If the noise occurs with
one or both of the rear windows down,
partially lower both front windows
approximately one inch. If you experi-
ence the noise with the sunroof open,
slightly reduce the size of the sunroofopening.
Window opening and closing
The driver’s door has a master power
window switch that controls all the win-
dows in the vehicle.
To open or close a window, press down or pull up the front portion of the corre-
sponding switch to the first detent posi-tion (5).
Auto down window (if equipped)
(driver’s window)
Depressing the power window switch
momentarily to the second detent posi-
tion (6) completely lowers the driver’s
window even when the switch is
released. To stop the window at the
desired position while the window is in
operation, pull up the switch momentarily
to the opposite direction of the window
movement.
WARNING - Windows
Always double check to make sure
all arms, hands, head and other
obstructions are safely out of the
way before closing a window.
Do not allow children to play with the power windows. Keep the dri-
ver’s door power window lock
switch in the LOCK position
(depressed). Serious injury can
result from unintentional window
operation by the child.
Do not extend any face or arms outside through the windowopening while driving.
CAUTION
To prevent the power window
system from the possibility ofdamage, do not open or close twowindows at the same time. This
will also ensure the longevity ofthe fuse.
Never try to operate the main switch on the driver's door andthe individual door window
switch in opposing directions atthe same time. If this is done, thewindow will stop and cannot be
opened or closed.
Page 72 of 308
417
Features of your vehicle
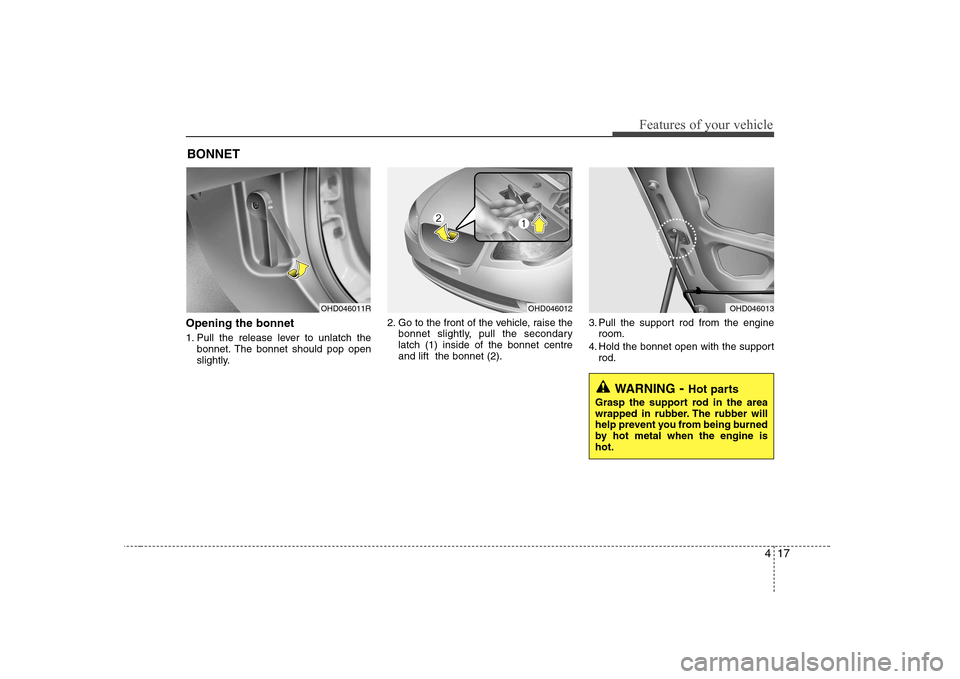
Opening the bonnet
1. Pull the release lever to unlatch thebonnet. The bonnet should pop open
slightly. 2. Go to the front of the vehicle, raise the
bonnet slightly, pull the secondarylatch (1) inside of the bonnet centreand lift the bonnet (2). 3. Pull the support rod from the engine
room.
4. Hold the bonnet open with the support rod.
BONNET
OHD046011ROHD046012OHD046013
WARNING
- Hot parts
Grasp the support rod in the area
wrapped in rubber. The rubber will
help prevent you from being burned
by hot metal when the engine ishot.