Hyundai H-1 (Grand Starex) 2005 Owner's Manual
Manufacturer: HYUNDAI, Model Year: 2005, Model line: H-1 (Grand Starex), Model: Hyundai H-1 (Grand Starex) 2005Pages: 205, PDF Size: 9.14 MB
Page 111 of 205
44IN CASE OF EMERGENCY
10
!
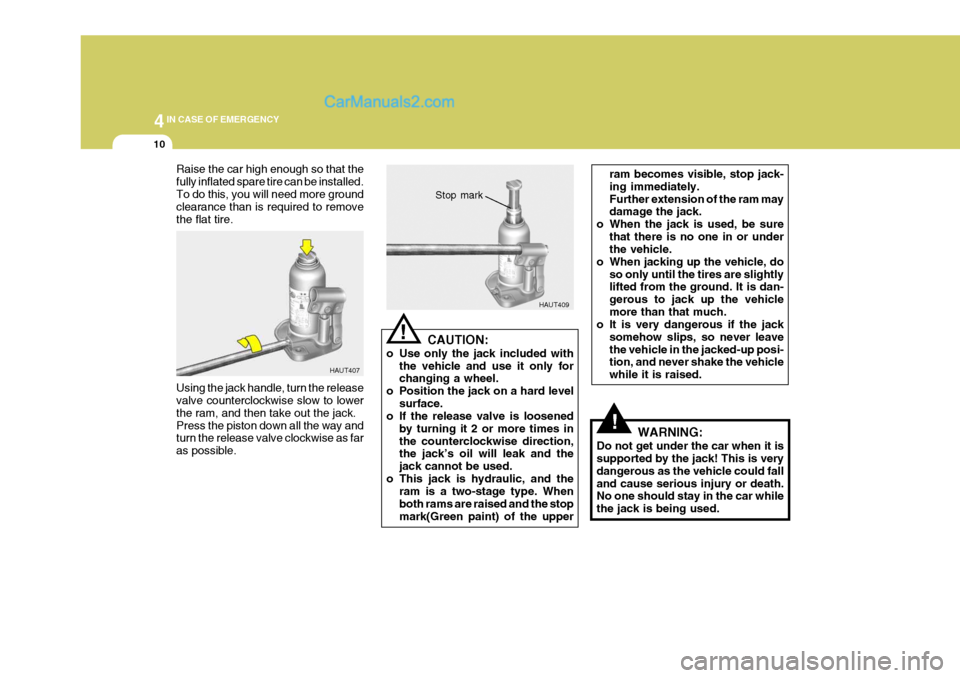
Raise the car high enough so that the fully inflated spare tire can be installed.To do this, you will need more ground clearance than is required to remove the flat tire. Using the jack handle, turn the release valve counterclockwise slow to lower the ram, and then take out the jack.Press the piston down all the way and turn the release valve clockwise as far as possible. HAUT407
HAUT409
CAUTION:
o Use only the jack included with the vehicle and use it only for changing a wheel.
o Position the jack on a hard level
surface.
o If the release valve is loosened
by turning it 2 or more times in the counterclockwise direction, the jack’s oil will leak and the jack cannot be used.
o This jack is hydraulic, and the ram is a two-stage type. Whenboth rams are raised and the stopmark(Green paint) of the upper
! Stop mark
ram becomes visible, stop jack- ing immediately.Further extension of the ram may damage the jack.
o When the jack is used, be sure
that there is no one in or underthe vehicle.
o When jacking up the vehicle, do so only until the tires are slightlylifted from the ground. It is dan- gerous to jack up the vehiclemore than that much.
o It is very dangerous if the jack
somehow slips, so never leavethe vehicle in the jacked-up posi- tion, and never shake the vehicle while it is raised.
WARNING:
Do not get under the car when it is supported by the jack! This is very dangerous as the vehicle could falland cause serious injury or death. No one should stay in the car while the jack is being used.
Page 112 of 205
4
CORROSION PREVENTION AND APPEARANCE CARE
11
4
IN CASE OF EMERGENCY
11
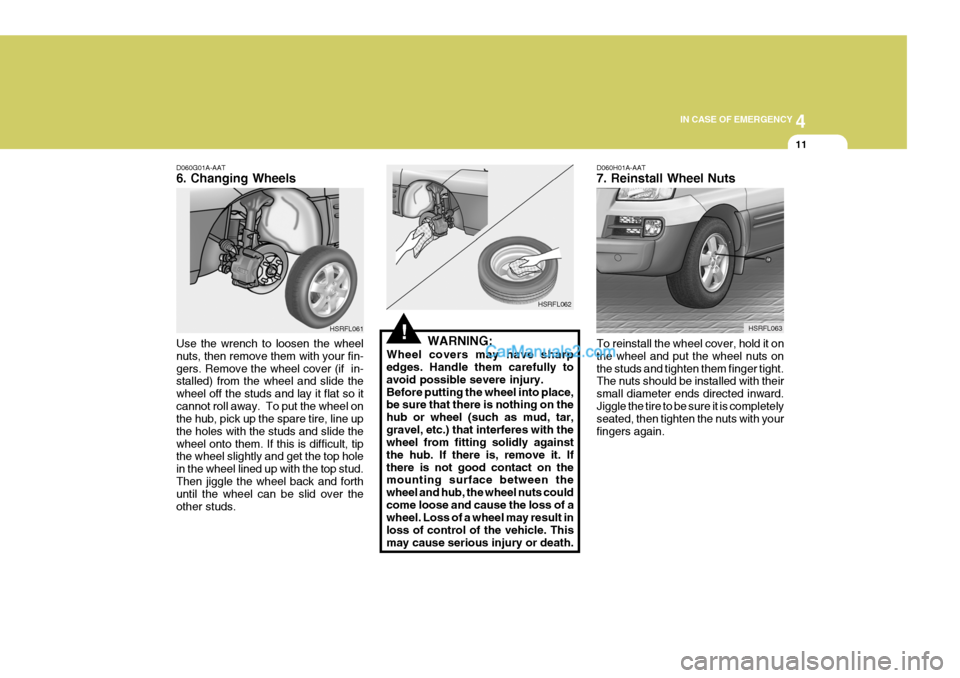
D060G01A-AAT 6. Changing Wheels Use the wrench to loosen the wheel nuts, then remove them with your fin-gers. Remove the wheel cover (if in- stalled) from the wheel and slide the wheel off the studs and lay it flat so itcannot roll away. To put the wheel on the hub, pick up the spare tire, line up the holes with the studs and slide thewheel onto them. If this is difficult, tip the wheel slightly and get the top hole in the wheel lined up with the top stud.Then jiggle the wheel back and forth until the wheel can be slid over the other studs. HSRFL061
!
HSRFL062
WARNING:
Wheel covers may have sharp edges. Handle them carefully to avoid possible severe injury.Before putting the wheel into place, be sure that there is nothing on the hub or wheel (such as mud, tar,gravel, etc.) that interferes with the wheel from fitting solidly against the hub. If there is, remove it. Ifthere is not good contact on the mounting surface between the wheel and hub, the wheel nuts couldcome loose and cause the loss of a wheel. Loss of a wheel may result in loss of control of the vehicle. Thismay cause serious injury or death. D060H01A-AAT 7. Reinstall Wheel Nuts To reinstall the wheel cover, hold it on the wheel and put the wheel nuts onthe studs and tighten them finger tight. The nuts should be installed with their small diameter ends directed inward.Jiggle the tire to be sure it is completely seated, then tighten the nuts with your fingers again.
HSRFL063
Page 113 of 205
44IN CASE OF EMERGENCY
12
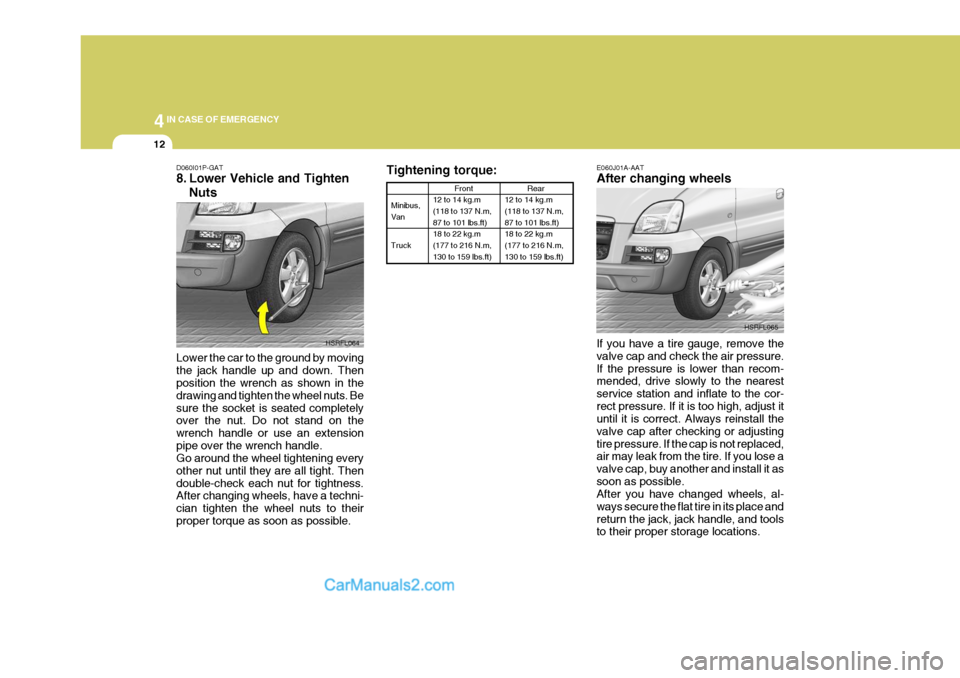
Tightening torque:
Minibus, Van Truck Front
12 to 14 kg.m (118 to 137 N.m, 87 to 101 lbs.ft) 18 to 22 kg.m(177 to 216 N.m, 130 to 159 lbs.ft)
Rear
12 to 14 kg.m (118 to 137 N.m, 87 to 101 lbs.ft) 18 to 22 kg.m(177 to 216 N.m, 130 to 159 lbs.ft)
E060J01A-AAT After changing wheels If you have a tire gauge, remove the valve cap and check the air pressure.If the pressure is lower than recom- mended, drive slowly to the nearest service station and inflate to the cor-rect pressure. If it is too high, adjust it until it is correct. Always reinstall the valve cap after checking or adjustingtire pressure. If the cap is not replaced, air may leak from the tire. If you lose a valve cap, buy another and install it assoon as possible. After you have changed wheels, al- ways secure the flat tire in its place andreturn the jack, jack handle, and tools to their proper storage locations. HSRFL065
D060I01P-GAT
8. Lower Vehicle and Tighten
Nuts
Lower the car to the ground by moving the jack handle up and down. Then position the wrench as shown in the drawing and tighten the wheel nuts. Besure the socket is seated completely over the nut. Do not stand on the wrench handle or use an extensionpipe over the wrench handle. Go around the wheel tightening every other nut until they are all tight. Thendouble-check each nut for tightness. After changing wheels, have a techni- cian tighten the wheel nuts to theirproper torque as soon as possible. HSRFL064
Page 114 of 205
4
CORROSION PREVENTION AND APPEARANCE CARE
13
4
IN CASE OF EMERGENCY
13IF YOUR VEHICLE MUST BE TOWED
D080A02HR-GAT If your vehicle has to be towed, it should be done by your Hyundai dealeror a commercial tow truck service. This will help assure that your vehicle is not damaged in towing. Also, profes-sionals are generally aware of local laws governing towing. In any case, rather than risk damage to your car, itis suggested that you show this infor- mation to the tow truck operator. Be sure that a safety chain system is usedand that all local laws are observed. It is recommended that your vehicle be towed with a wheel lift and dollies orflatbed equipment with all the wheels off the ground.
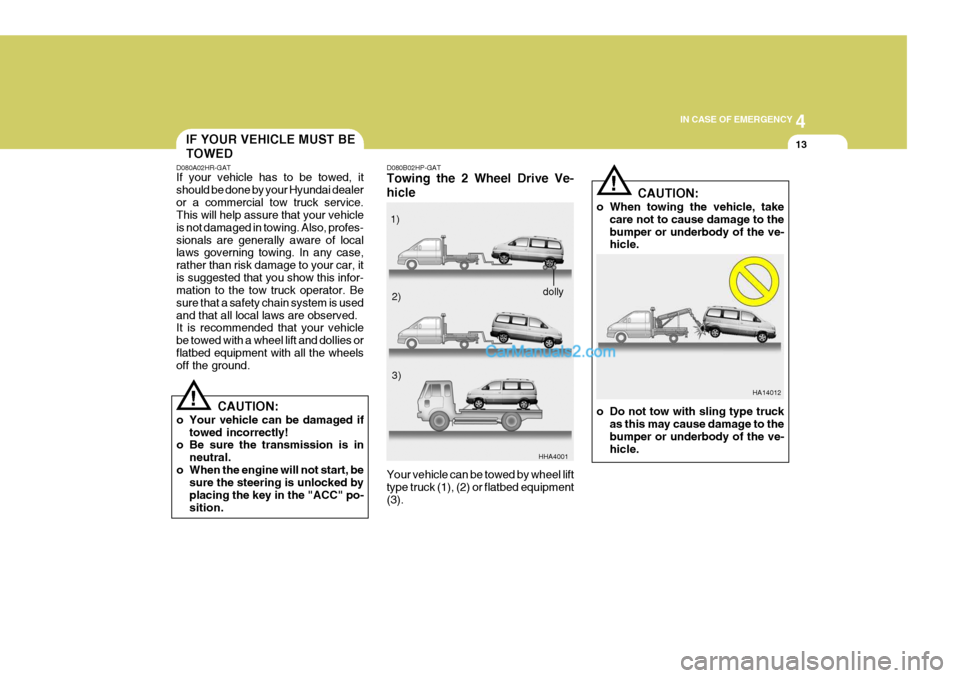
! D080B02HP-GAT Towing the 2 Wheel Drive Ve- hicle
HHA4001
Your vehicle can be towed by wheel lift type truck (1), (2) or flatbed equipment (3).
CAUTION:
o Your vehicle can be damaged if towed incorrectly!
o Be sure the transmission is in
neutral.
o When the engine will not start, be sure the steering is unlocked by placing the key in the "ACC" po-sition. 1)
2)
3)
dolly
HA14012
CAUTION:
o When towing the vehicle, take care not to cause damage to the bumper or underbody of the ve- hicle.
o Do not tow with sling type truck as this may cause damage to the bumper or underbody of the ve-hicle.
!
Page 115 of 205
44IN CASE OF EMERGENCY
14
!
!
1) If any of the loaded wheels or sus-
pension components are damaged or the vehicle is being towed with the rear wheels on the ground, use a towing dolly under the rear wheels.
o Manual Transmission: If you do not use a towing dolly,place the ignition key in the "ACC"position and put the transaxle in "N (Neutral)".
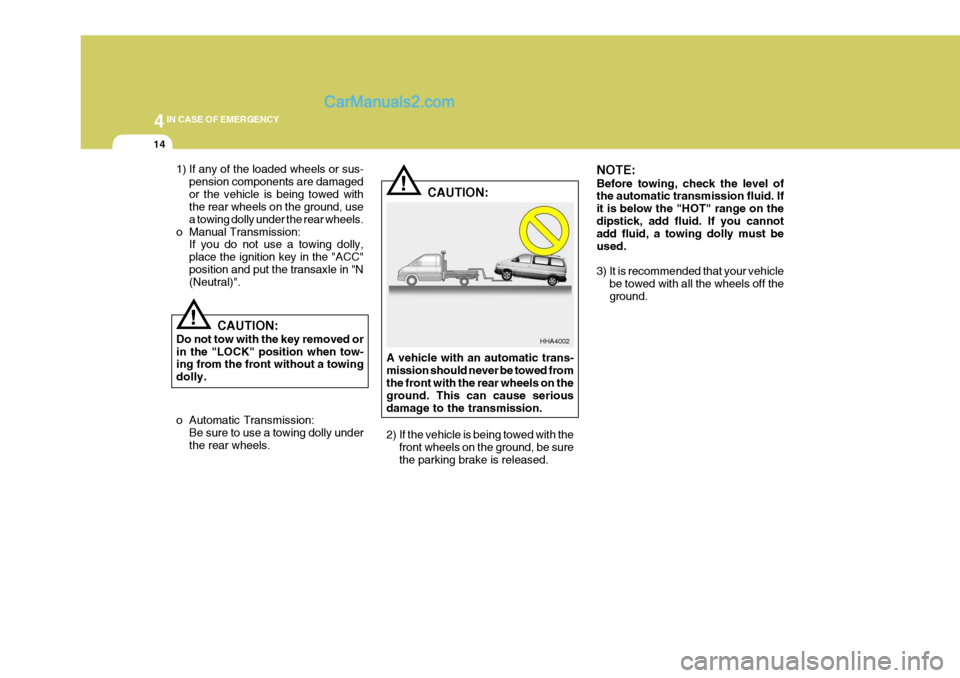
HHA4002
CAUTION:
Do not tow with the key removed or in the "LOCK" position when tow- ing from the front without a towing dolly. A vehicle with an automatic trans-mission should never be towed from the front with the rear wheels on the ground. This can cause seriousdamage to the transmission.
2) If the vehicle is being towed with the
front wheels on the ground, be sure the parking brake is released.
o Automatic Transmission:
Be sure to use a towing dolly under the rear wheels. CAUTION:
NOTE: Before towing, check the level of the automatic transmission fluid. If it is below the "HOT" range on thedipstick, add fluid. If you cannot add fluid, a towing dolly must be used.
3) It is recommended that your vehicle
be towed with all the wheels off the ground.
Page 116 of 205
4
CORROSION PREVENTION AND APPEARANCE CARE
15
4
IN CASE OF EMERGENCY
15
CAUTION:
o The 4WD vehicle should never be towed with the wheels on the ground. This can cause seriousdamage to the transmission or the 4WD system.
o When towing the vehicle, take
care not to cause damage to thebumper or underbody of the ve- hicle.!
HHA4045
o Do not tow with sling type truck as this may cause damage to the bumper or underbody of the ve- hicle.
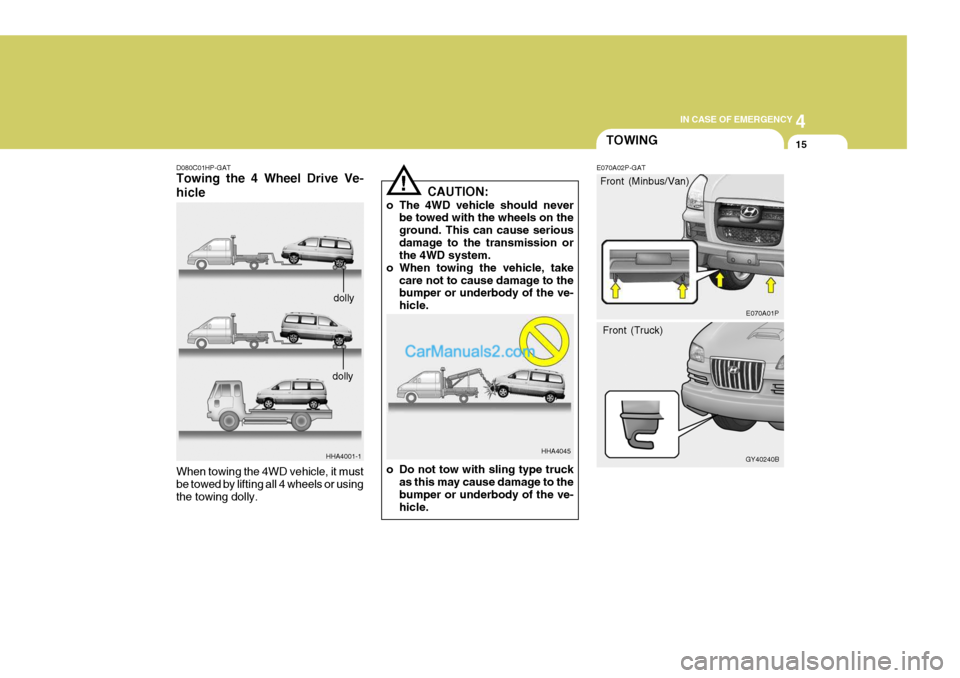
D080C01HP-GAT Towing the 4 Wheel Drive Ve- hicle
HHA4001-1
When towing the 4WD vehicle, it must be towed by lifting all 4 wheels or usingthe towing dolly.
dolly
dolly
TOWING
E070A02P-GAT Front (Minbus/Van)
Front (Truck) E070A01P
GY40240B
Page 117 of 205
44IN CASE OF EMERGENCY
16
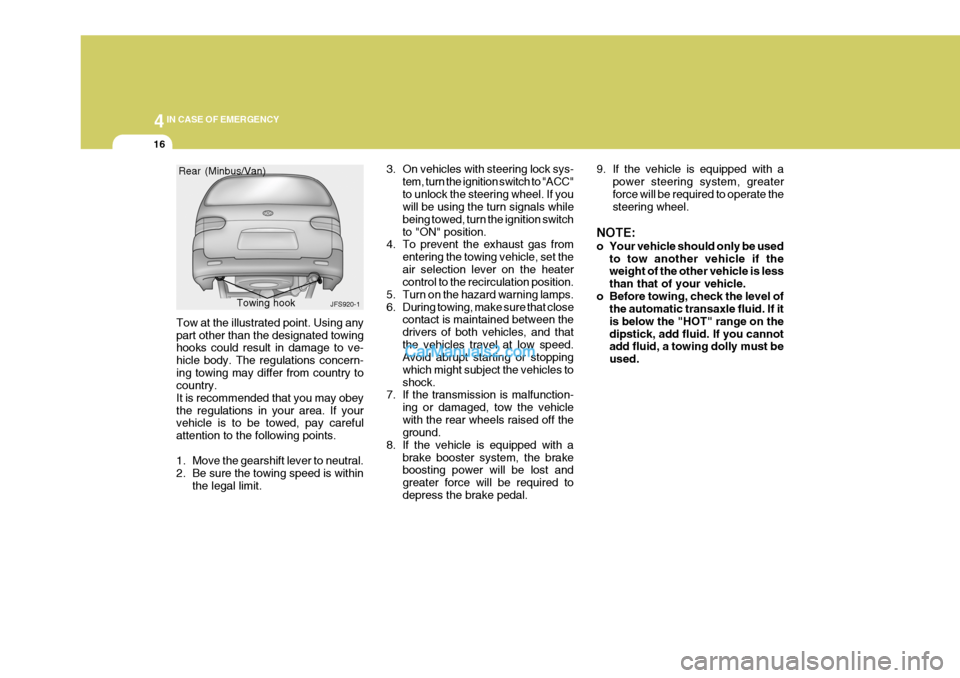
Tow at the illustrated point. Using any part other than the designated towing hooks could result in damage to ve- hicle body. The regulations concern-ing towing may differ from country to country. It is recommended that you may obeythe regulations in your area. If your vehicle is to be towed, pay careful attention to the following points.
1. Move the gearshift lever to neutral.
2. Be sure the towing speed is within
the legal limit. 3. On vehicles with steering lock sys-
tem, turn the ignition switch to "ACC"to unlock the steering wheel. If you will be using the turn signals while being towed, turn the ignition switchto "ON" position.
4. To prevent the exhaust gas from
entering the towing vehicle, set theair selection lever on the heater control to the recirculation position.
5. Turn on the hazard warning lamps.
6. During towing, make sure that close contact is maintained between thedrivers of both vehicles, and thatthe vehicles travel at low speed. Avoid abrupt starting or stopping which might subject the vehicles toshock.
7. If the transmission is malfunction-
ing or damaged, tow the vehiclewith the rear wheels raised off the ground.
8. If the vehicle is equipped with a brake booster system, the brakeboosting power will be lost and greater force will be required todepress the brake pedal.
JFS920-1
Rear (Minbus/Van)
Towing hook
9. If the vehicle is equipped with apower steering system, greater force will be required to operate the steering wheel.
NOTE:
o Your vehicle should only be used to tow another vehicle if the weight of the other vehicle is less than that of your vehicle.
o Before towing, check the level of the automatic transaxle fluid. If itis below the "HOT" range on thedipstick, add fluid. If you cannot add fluid, a towing dolly must be used.
Page 118 of 205
4
CORROSION PREVENTION AND APPEARANCE CARE
17
4
IN CASE OF EMERGENCY
17
C190B01S-AAT Trailer Hitches Select the proper hitch and ball combi- nation, making sure that its location iscompatible with that of the trailer or vehicle being towed. Use a quality non-equalizing hitch which distributesthe tongue load uniformly throughout the chassis. The hitch should be bolted securely to the car and installed by a qualified technician. DO NOT USE A HITCHDESIGNED FOR TEMPORARY IN- STALLATION AND NEVER USE ONE THAT ATTACHES ONLY TO THEBUMPER. C190C01P-GAT Trailer Brakes If your trailer is equipped with a braking system, make sure it conforms to fed-eral and/or local regulations and that it is properly installed and operating cor- rectly. NOTE: If you tow a trailer or vehicle, your car will require more frequent main-tenance due to the additional load. See "Maintenance Under Severe Usage Conditions" on page 6-11.
CAUTION:
o Never connect a trailer brake sys- tem directly to the vehicle brakesystem.
o When towing a trailer on steep
grades (in excess of 12%) payclose attention to the engine cool- ant temperature gauge to ensure the engine does not overheat. Ifthe needle of the coolant tem- perature gauge moves across the dial towards "H" (HOT), pull over
!
C190A01A-GAT TRAILER OR VEHICLE TOWING If you are considering towing with your car, you should first check with yourProvince Department of Motor Vehicles to determine their legal requirements. Since laws vary from province to prov-ince, the requirements for towing trail- ers, cars, other types of vehicles, or apparatus may differ. Ask your Hyundaidealer for further details before towing.
CAUTION:
Do not do any towing with your carduring its first 2,000 km (1,200 miles)in order to allow the engine to prop- erly break in. Failure to heed this caution may result in serious en-gine or transmission damage.
!
Page 119 of 205
44IN CASE OF EMERGENCY
18
and stop as soon as it is safe to do so, and allow the engine toidle until it cools down. You may proceed once the engine has cooled sufficiently.
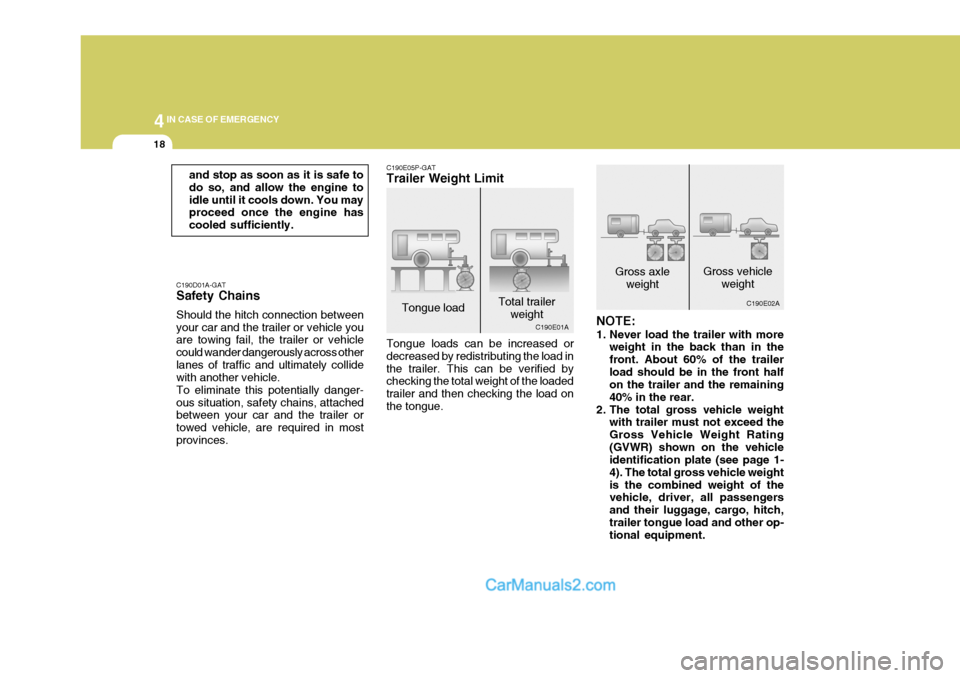
C190D01A-GAT Safety Chains Should the hitch connection between your car and the trailer or vehicle you are towing fail, the trailer or vehicle could wander dangerously across otherlanes of traffic and ultimately collide with another vehicle. To eliminate this potentially danger-ous situation, safety chains, attached between your car and the trailer or towed vehicle, are required in mostprovinces. C190E05P-GAT Trailer Weight Limit Tongue loads can be increased or decreased by redistributing the load inthe trailer. This can be verified by checking the total weight of the loaded trailer and then checking the load onthe tongue.
NOTE:
1. Never load the trailer with more
weight in the back than in the front. About 60% of the trailerload should be in the front half on the trailer and the remaining 40% in the rear.
2. The total gross vehicle weight with trailer must not exceed theGross Vehicle Weight Rating(GVWR) shown on the vehicle identification plate (see page 1- 4). The total gross vehicle weightis the combined weight of the vehicle, driver, all passengers and their luggage, cargo, hitch,trailer tongue load and other op- tional equipment.
Tongue load
Total trailer
weight Gross axle
weight Gross vehicle
weight
C190E01A C190E02A
Page 120 of 205
4
CORROSION PREVENTION AND APPEARANCE CARE
19
4
IN CASE OF EMERGENCY
19
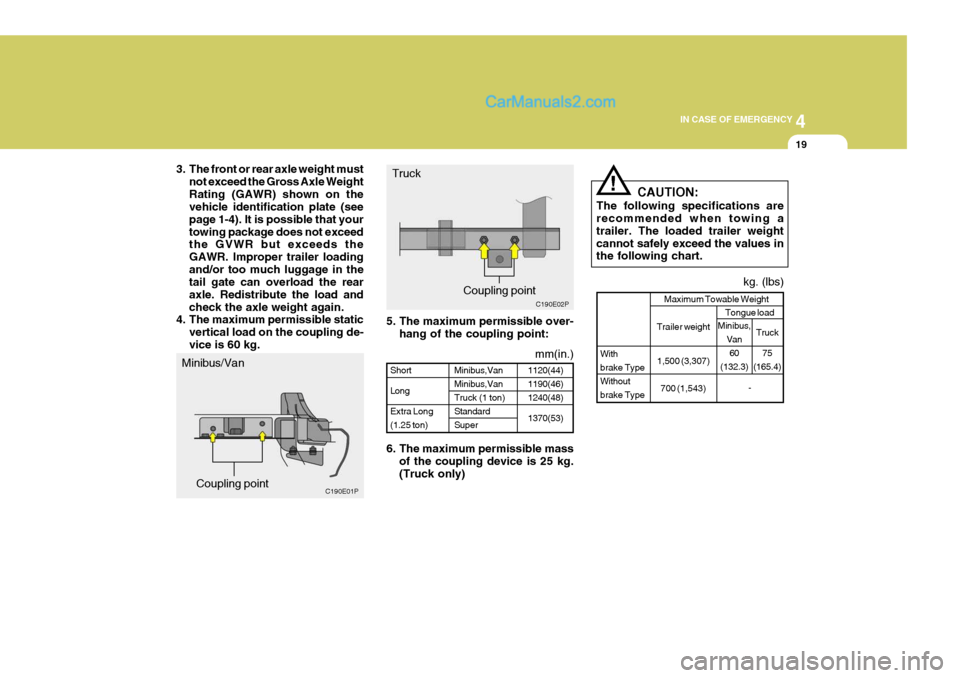
5. The maximum permissible over-
hang of the coupling point:
6. The maximum permissible mass of the coupling device is 25 kg. (Truck only) CAUTION:
The following specifications are recommended when towing a trailer. The loaded trailer weightcannot safely exceed the values in the following chart.
!
Truck
Coupling point
1120(44) 1190(46)1240(48) 1370(53)
ShortLongExtra Long (1.25 ton) Minibus,VanMinibus,VanTruck (1 ton)StandardSuper
kg. (lbs)
With brake TypeWithoutbrake Type Maximum Towable Weight
Trailer weight
1,500 (3,307) 700 (1,543) Tongue load
-
Minibus,
Van60
(132.3) Truck
75
(165.4)
C190E02P
mm(in.)
C190E01P
3. The front or rear axle weight must
not exceed the Gross Axle Weight Rating (GAWR) shown on the vehicle identification plate (see page 1-4). It is possible that yourtowing package does not exceed the GVWR but exceeds the GAWR. Improper trailer loadingand/or too much luggage in the tail gate can overload the rear axle. Redistribute the load andcheck the axle weight again.
4. The maximum permissible static
vertical load on the coupling de-vice is 60 kg.
Minibus/Van
Coupling point