Hyundai Ioniq Electric 2017 Owner's Manual
Manufacturer: HYUNDAI, Model Year: 2017, Model line: Ioniq Electric, Model: Hyundai Ioniq Electric 2017Pages: 582, PDF Size: 37.73 MB
Page 461 of 582
6-20
What to do in an emergency
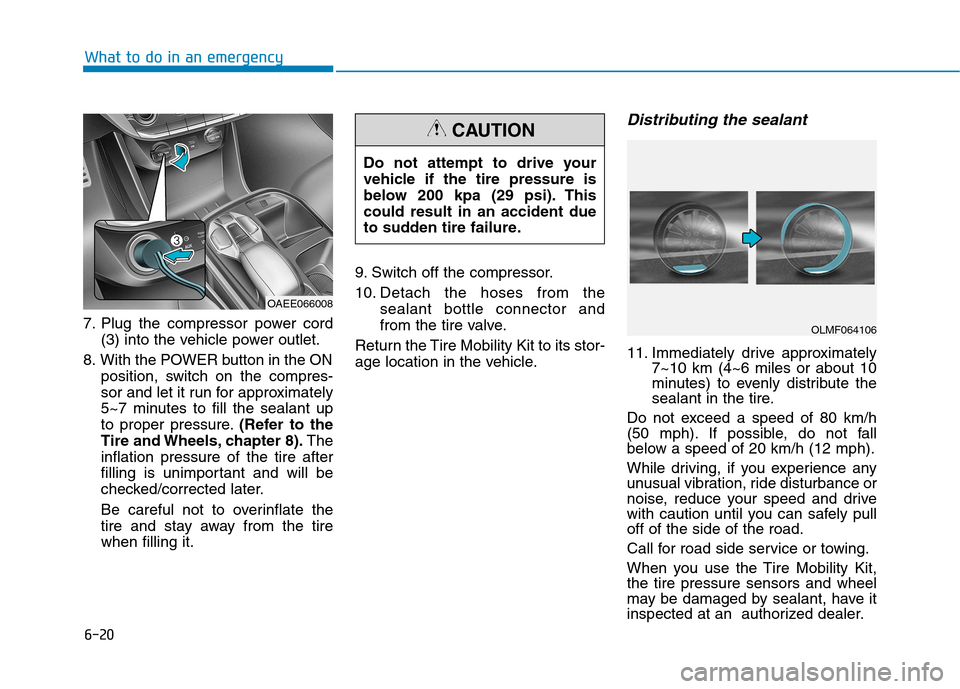
7. Plug the compressor power cord(3) into the vehicle power outlet.
8. With the POWER button in the ON position, switch on the compres-
sor and let it run for approximately
5~7 minutes to fill the sealant up
to proper pressure. (Refer to the
Tire and Wheels, chapter 8). The
inflation pressure of the tire after
filling is unimportant and will be
checked/corrected later.
Be careful not to overinflate the
tire and stay away from the tirewhen filling it. 9. Switch off the compressor.
10. Detach the hoses from the
sealant bottle connector and
from the tire valve.
Return the Tire Mobility Kit to its stor-
age location in the vehicle.
Distributing the sealant
11. Immediately drive approximately 7~10 km (4~6 miles or about 10
minutes) to evenly distribute the
sealant in the tire.
Do not exceed a speed of 80 km/h
(50 mph). If possible, do not fall
below a speed of 20 km/h (12 mph).
While driving, if you experience any
unusual vibration, ride disturbance or
noise, reduce your speed and drive
with caution until you can safely pulloff of the side of the road.
Call for road side service or towing.
When you use the Tire Mobility Kit, the tire pressure sensors and wheel
may be damaged by sealant, have it
inspected at an authorized dealer.
Do not attempt to drive your
vehicle if the tire pressure is
below 200 kpa (29 psi). Thiscould result in an accident due
to sudden tire failure.
CAUTION
OAEE066008
OLMF064106
Page 462 of 582

6-21
What to do in an emergency
6
Checking the tire inflation pressure
1. After driving approximately 7~10 km(4~6 miles or about 10 minutes),
stop at a safe location.
2. Connect the filling hose (2) of the compressor directly to the tire
valve.
3. Plug the compressor power cord into the vehicle power outlet. 4. Adjust the tire inflation pressure to
the recommended tire inflation.
With the POWER button ON, pro- ceed as follows.
- To increase the inflation pres- sure:
Switch on the compressor, posi-
tion to "I". To check the current
inflation pressure setting, briefly
switch off the compressor.
- To reduce the inflation pres- sure:
Press the button (8) on the com-
pressor.
Information
The pressure gauge may show higher
than actual reading when the com-
pressor is running. To get an accurate
tire pressure, the compressor needs to
be turned off.
i
OAEE066005 When you use the Tire Mobility Kit
including sealant not approved by
HYUNDAI, the tire pressure sen-
sors may be damaged by sealant.The sealant on the tire pressuresensor and wheel should be
removed when you replace the
tire with a new one and inspect
the tire pressure sensors at an
authorized dealer.
CAUTION
Page 463 of 582
6-22
What to do in an emergency
Towing service
If emergency towing is necessary,
we recommend having it done by an
authorized HYUNDAI dealer or a
commercial tow-truck service.
Proper lifting and towing procedures
are necessary to prevent damage to
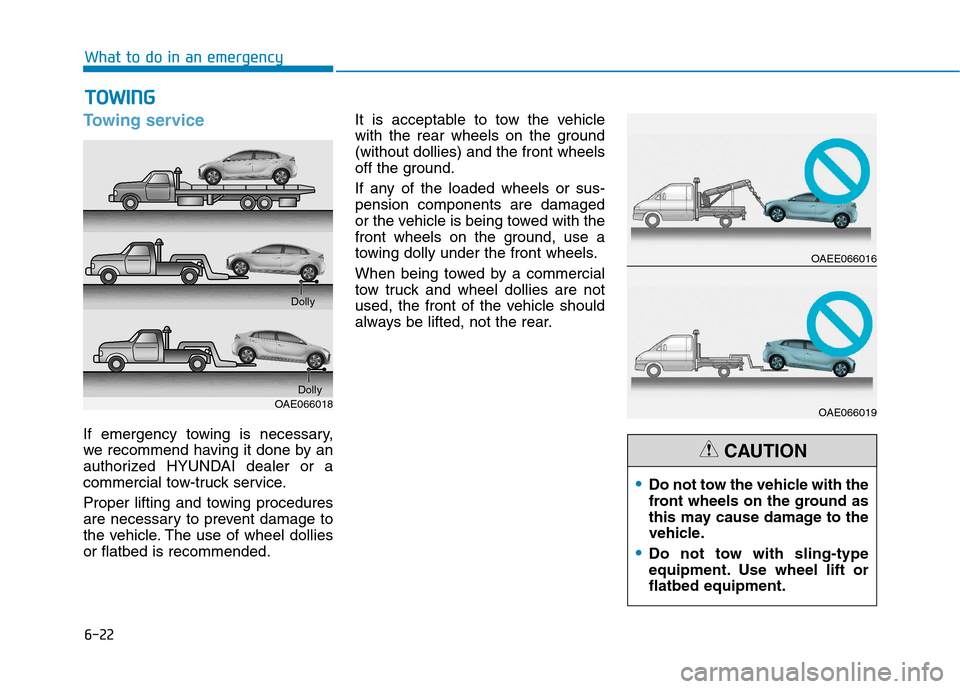
the vehicle. The use of wheel dolliesor flatbed is recommended.It is acceptable to tow the vehicle
with the rear wheels on the ground(without dollies) and the front wheels
off the ground.
If any of the loaded wheels or sus- pension components are damaged
or the vehicle is being towed with the
front wheels on the ground, use a
towing dolly under the front wheels.
When being towed by a commercial
tow truck and wheel dollies are not
used, the front of the vehicle should
always be lifted, not the rear.
TT
OO WW IINN GG
OAE066018 Dolly
Dolly
Do not tow the vehicle with the
front wheels on the ground as
this may cause damage to the
vehicle.
Do not tow with sling-type
equipment. Use wheel lift orflatbed equipment.
CAUTION
OAEE066016
OAE066019
Page 464 of 582
6-23
What to do in an emergency
6
When towing your vehicle in an emergency without wheel dollies:
1. While depressing the brake pedalshift to the N (Neutral) position
and turn the vehicle off. The
POWER button will be in the ACCposition.
2. Release the parking brake.
Failure to shift to N (Neutral) may
cause internal damage to the vehi-
cle.Removable towing hook
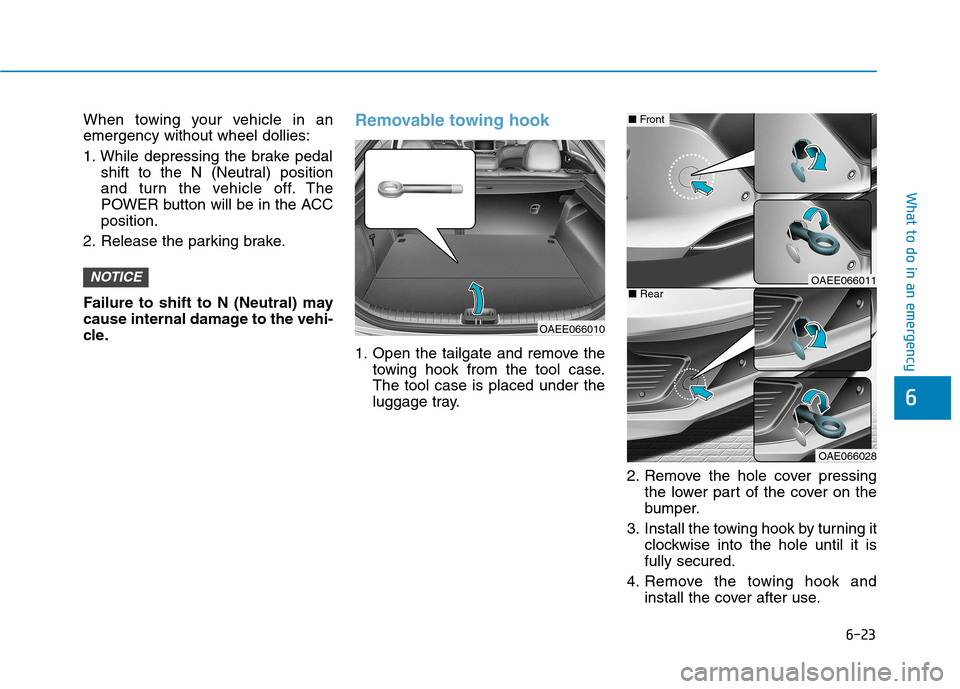
1. Open the tailgate and remove the towing hook from the tool case. The tool case is placed under the
luggage tray.
2. Remove the hole cover pressingthe lower part of the cover on the
bumper.
3. Install the towing hook by turning it clockwise into the hole until it isfully secured.
4. Remove the towing hook and install the cover after use.
NOTICE
OAEE066010
OAEE066011
OAE066028
■Front
■Rear
Page 465 of 582
6-24
What to do in an emergency
Emergency towing
If towing is necessary, we recom-
mend you have it done by an author-
ized HYUNDAI dealer or a commer-
cial tow truck service.
If towing service is not available in an
emergency, your vehicle may be
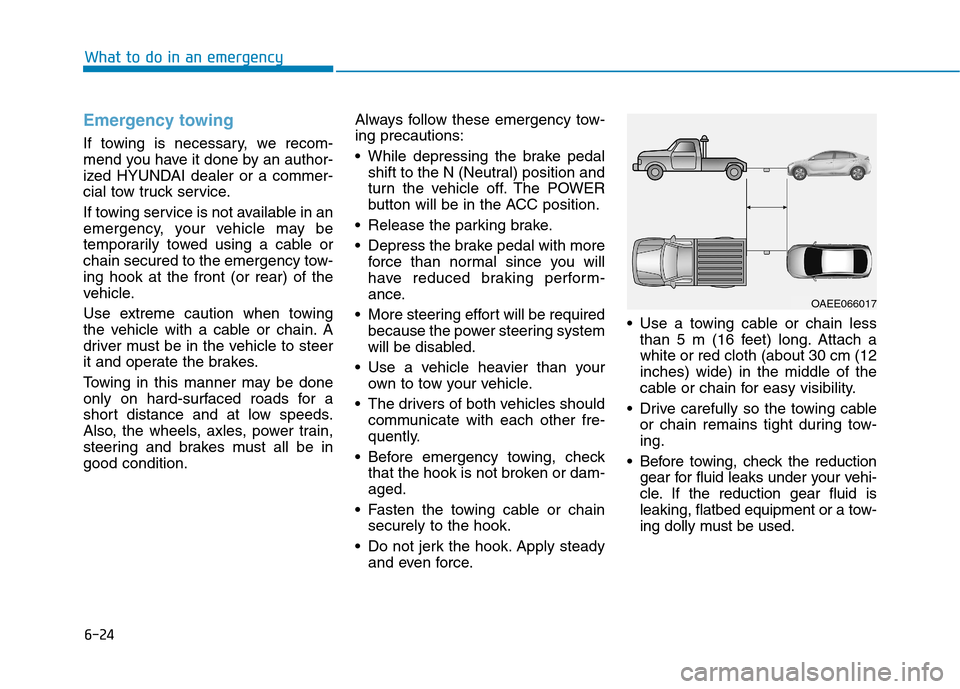
temporarily towed using a cable or
chain secured to the emergency tow-ing hook at the front (or rear) of the
vehicle.
Use extreme caution when towing
the vehicle with a cable or chain. A
driver must be in the vehicle to steer
it and operate the brakes.
Towing in this manner may be done
only on hard-surfaced roads for a
short distance and at low speeds.
Also, the wheels, axles, power train,
steering and brakes must all be ingood condition.Always follow these emergency tow-ing precautions:
While depressing the brake pedal
shift to the N (Neutral) position and
turn the vehicle off. The POWER
button will be in the ACC position.
Release the parking brake.
Depress the brake pedal with more force than normal since you will
have reduced braking perform-
ance.
More steering effort will be required because the power steering system
will be disabled.
Use a vehicle heavier than your own to tow your vehicle.
The drivers of both vehicles should communicate with each other fre-
quently.
Before emergency towing, check that the hook is not broken or dam-aged.
Fasten the towing cable or chain securely to the hook.
Do not jerk the hook. Apply steady and even force. Use a towing cable or chain less
than 5 m (16 feet) long. Attach awhite or red cloth (about 30 cm (12inches) wide) in the middle of the
cable or chain for easy visibility.
Drive carefully so the towing cable or chain remains tight during tow-ing.
Before towing, check the reduction gear for fluid leaks under your vehi-
cle. If the reduction gear fluid is
leaking, flatbed equipment or a tow-
ing dolly must be used.
OAEE066017
Page 466 of 582
6-25
What to do in an emergency
6
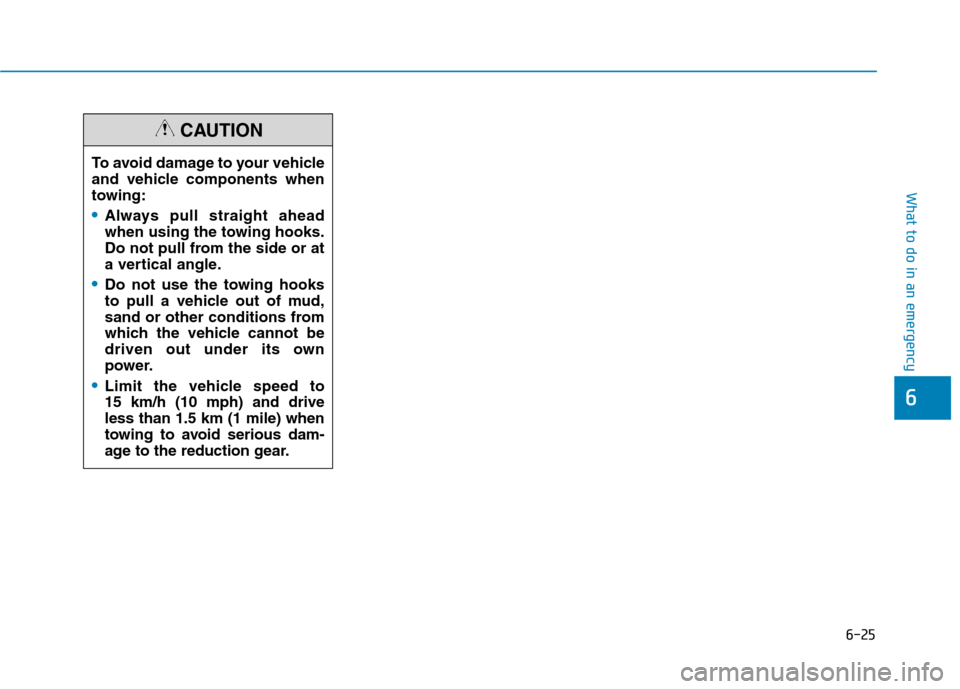
To avoid damage to your vehicle
and vehicle components when
towing:
Always pull straight ahead
when using the towing hooks.
Do not pull from the side or at
a vertical angle.
Do not use the towing hooks
to pull a vehicle out of mud,
sand or other conditions from
which the vehicle cannot be
driven out under its own
power.
Limit the vehicle speed to 15 km/h (10 mph) and driveless than 1.5 km (1 mile) when
towing to avoid serious dam-
age to the reduction gear.
CAUTION
Page 467 of 582
7
Maintenance
7
Maintenance
Motor compartment...............................................7-3
Maintenance services ...........................................7-4Owner's responsibility ......................................................7-4
Owner maintenance precautions ..................................7-4
Owner maintenance ...............................................7-5 Owner maintenance schedule ........................................7-5
Scheduled maintenance services.........................7-7 Normal maintenance schedule - For Europe.............7-8
Maintenance under severe usage conditions -
For Europe ........................................................................7-10 Normal maintenance schedule - Except Europe ....7-12
Maintenance under severe usage conditions -
Except Europe..................................................................7-14
Explanation of scheduled maintenance items .7-16 Coolant...................................................................7-17 Checking the coolant level ...........................................7-17 Changing coolant.............................................................7-20
Brake fluid ............................................................7-21 Checking the brake fluid level .....................................7-21
Washer fluid .........................................................7-22 Checking the washer fluid level ..................................7-22
Climate control air filter .....................................7-23 Filter inspection ...............................................................7-23 Wiper blades .........................................................7-25
Blade inspection ..............................................................7-25
Blade replacement ..........................................................7-25
Battery (12 Volt) ..................................................7-27 For best battery service................................................7-28
Battery capacity label ....................................................7-28
Battery recharging .........................................................7-29
Reset features .................................................................7-30
Tires and wheels ..................................................7-31 Tire care ............................................................................7-31
Recommended cold tire inflation pressures.............7-32
Check tire inflation pressure........................................7-33
Tire rotation .....................................................................7-34
Wheel alignment and tire balance ..............................7-35
Tire replacement ............................................................7-35
Wheel replacement .........................................................7-36
Tire traction ....................................................................7-36
Tire maintenance ............................................................7-36
Tire sidewall labeling ......................................................7-36
Low aspect ratio tires ....................................................7-40
Fuses ......................................................................7-42 Instrument panel fuse replacement ...........................7-43
Motor compartment panel fuse replacement ..........7-44
Fuse/relay panel description .......................................7-45
7
Page 468 of 582
Light bulbs.............................................................7-57Headlamp, position lamp, turn signal lamp
bulb replacement .............................................................7-58Headlamp aiming (For Europe) ....................................7-62
Daytime running lamp ....................................................7-66
Side repeater lamp replacement .................................7-66
Rear combination lamp bulb replacement ................7-66
Rear fog lamp ..................................................................7-69
High mounted stop lamp ...............................................7-69
License plate light bulb replacement .........................7-69
Interior light bulb replacement ....................................7-69
Appearance care ..................................................7-71 Exterior care ....................................................................7-71
Interior care......................................................................7-76
Page 469 of 582
7-3
7
Maintenance
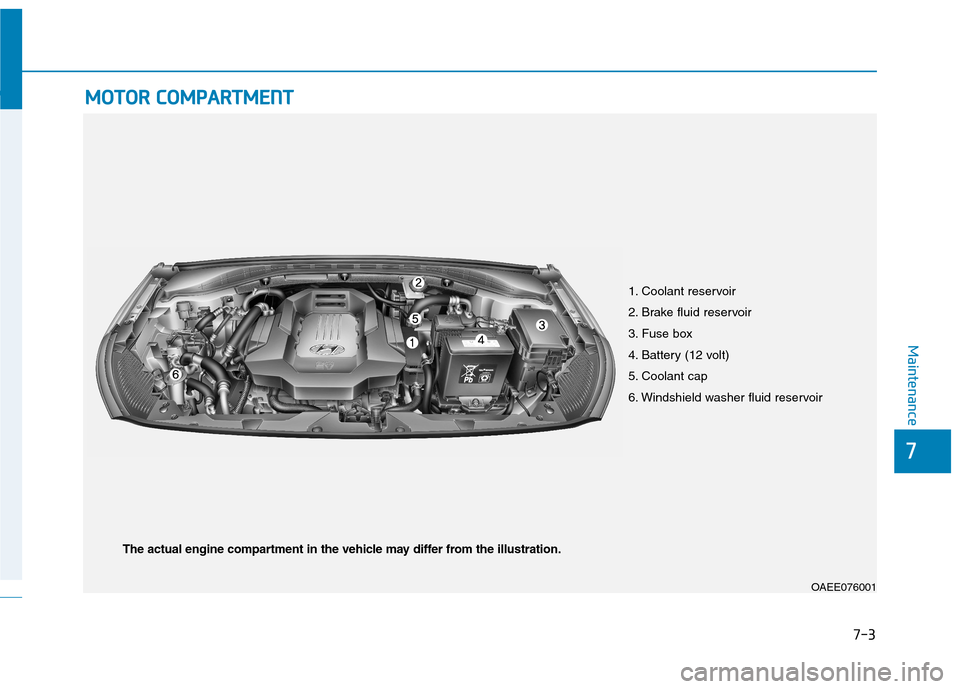
MMOOTTOO RR CC OO MM PPAA RRTTMM EENN TT
1. Coolant reservoir
2. Brake fluid reservoir
3. Fuse box
4. Battery (12 volt)
5. Coolant cap
6. Windshield washer fluid reservoir
OAEE076001
The actual engine compartment in the vehicle may differ from the illustration.
Page 470 of 582
7-4
MaintenanceM
M AAIINN TTEENN AANN CCEE SS EE RR VV IICC EE SS
You should exercise the utmost care
to prevent damage to your vehicle
and injury to yourself whenever per-
forming any maintenance or inspec-
tion procedures.
We recommend you have your vehi-
cle maintained and repaired by an
authorized HYUNDAI dealer. An
authorized HYUNDAI dealer meets
HYUNDAI’s high service quality
standards and receives technical
support from HYUNDAI in order to
provide you with a high level of serv-
ice satisfaction.Owner’s responsibility
Maintenance service and record reten-
tion are the owner’s responsibility.
You should retain documents that
show proper maintenance has been
performed on your vehicle in accor-dance with the scheduled mainte-
nance service charts shown on the
following pages. You need this infor-
mation to establish your compliance
with the servicing and maintenance
requirements of your vehicle war-
ranties.
Detailed warranty information is pro-
vided in your Service Passport. Repairs and adjustments required as a result of improper maintenance or
a lack of required maintenance are
not covered.
Owner maintenance precau-
tions
Inadequate, incomplete or insuffi-
cient servicing may result in opera-
tional problems with your vehicle that
could lead to vehicle damage, an
accident, or personal injury. This
chapter provides instructions only forthe maintenance items that are easy
to perform. Several procedures can
be done only by an authorized
HYUNDAI dealer with special tools.
Your vehicle should not be modified
in any way. Such modifications may
adversely affect the performance,
safety or durability of your vehicle
and may, in addition, violate condi-
tions of the limited warranties cover-
ing the vehicle.
Improper owner maintenance dur-
ing the warranty period may affect
warranty coverage. For details, read
the separate Service Passport pro-
vided with the vehicle. If you’re
unsure about any service or mainte-
nance procedure, have it done by an
authorized HYUNDAI dealer.
NOTICE