display Hyundai Ioniq Electric 2017 Quick Reference Guide
[x] Cancel search | Manufacturer: HYUNDAI, Model Year: 2017, Model line: Ioniq Electric, Model: Hyundai Ioniq Electric 2017Pages: 26, PDF Size: 9.24 MB
Page 2 of 26
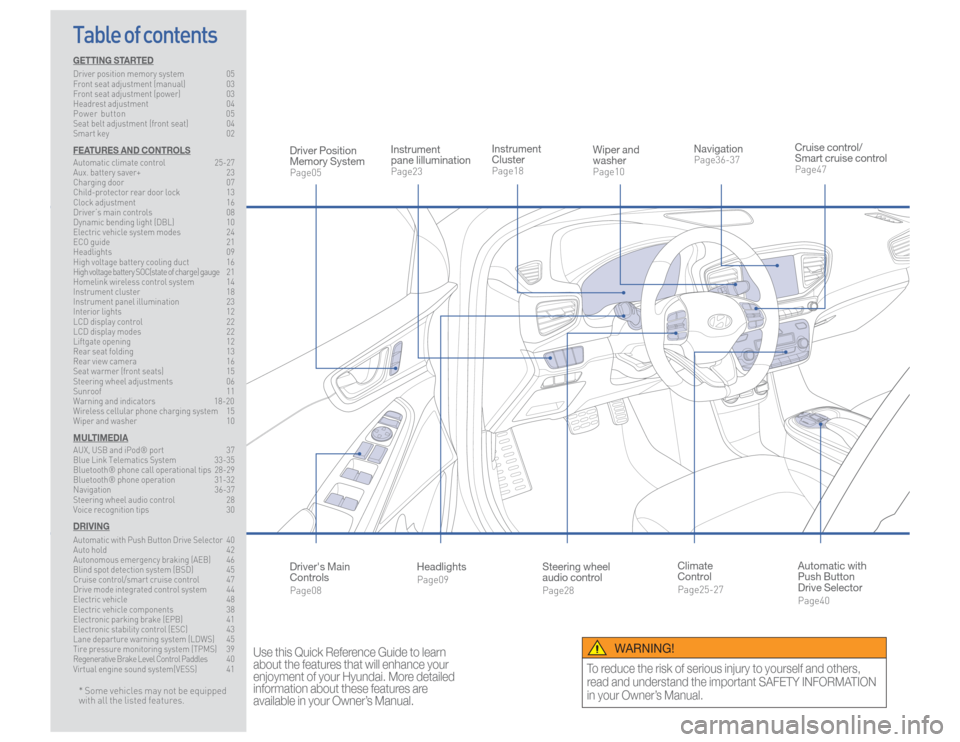
Steering wheel
audio controlPage28
Instrument
ClusterPage18
NavigationPage36-37
Instrument
pane lillumination Page23
Climate
ControlPage25-27
HeadlightsPage09
Table of contents
Cruise control/
Smart cruise controlPage47
Wiper and
washerPage10
Automatic with
Push Button
Drive SelectorPage40
Driver Position
Memory SystemPage05
WARNING!
To reduce the risk of serious injury to yourself and others,
read and understand the important SAFETY INFORMATION
in your Owner’s Manual.
* Some vehicles may not be equipped
with all the listed features.
Use this Quick Reference Guide to learn
about the features that will enhance your
enjoyment of your Hyundai. More detailed
information about these features are
available in your Owner’s Manual.
Driver's Main
ControlsPage08
GETTING STARTEDDriver position memory system 05
Front seat adjustment (manual) 03
Front seat adjustment (power) 03
Headrest adjustment 04
Power button 05
Seat belt adjustment (front seat) 04
Smart key 02FEATURES AND CONTROLSAutomatic climate control 25-27
Aux. battery saver+ 23
Charging door 07
Child-protector rear door lock 13
Clock adjustment 16
Driver’s main controls 08
Dynamic bending light (DBL) 10
Electric vehicle system modes 24
ECO guide 21
Headlights 09
High voltage battery cooling duct 16
High voltage battery SOC(state of charge) gauge 2 1
Homelink wireless control system 14
Instrument cluster 18
Instrument panel illumination 23
Interior lights 12
LCD display control 22
LCD display modes 22
Liftgate opening 12
Rear seat folding 13
Rear view camera 16
Seat warmer (front seats) 15
Steering wheel adjustments 06
Sunroof 11
Warning and indicators 18-20
Wireless cellular phone charging system 15
Wiper and washer 10MULTIMEDIAAUX, USB and iPod® port 37
Blue Link Telematics System 33-35
Bluetooth® phone call operational tips 28-29
Bluetooth® phone operation 31-32
Navigation 36-37
Steering wheel audio control 28
Voice recognition tips 30DRIVINGAutomatic with Push Button Drive Selector
40
Auto hold 42
Autonomous emergency braking (AEB) 46
Blind spot detection system (BSD) 45
Cruise control/smart cruise control 47
Drive mode integrated control system 44
Electric vehicle 48
Electric vehicle components 38
Electronic parking brake (EPB) 41
Electronic stability control (ESC) 43
Lane departure warning system (LDWS) 45
Tire pressure monitoring system (TPMS) 39
Regenerative Brake Level Control Paddles 40
Virtual engine sound system(VESS) 41
Page 10 of 26
Quick Reference Guide I 17
16 I Quick Reference Guide
IONIQ ELECTRIC HYUNDAI
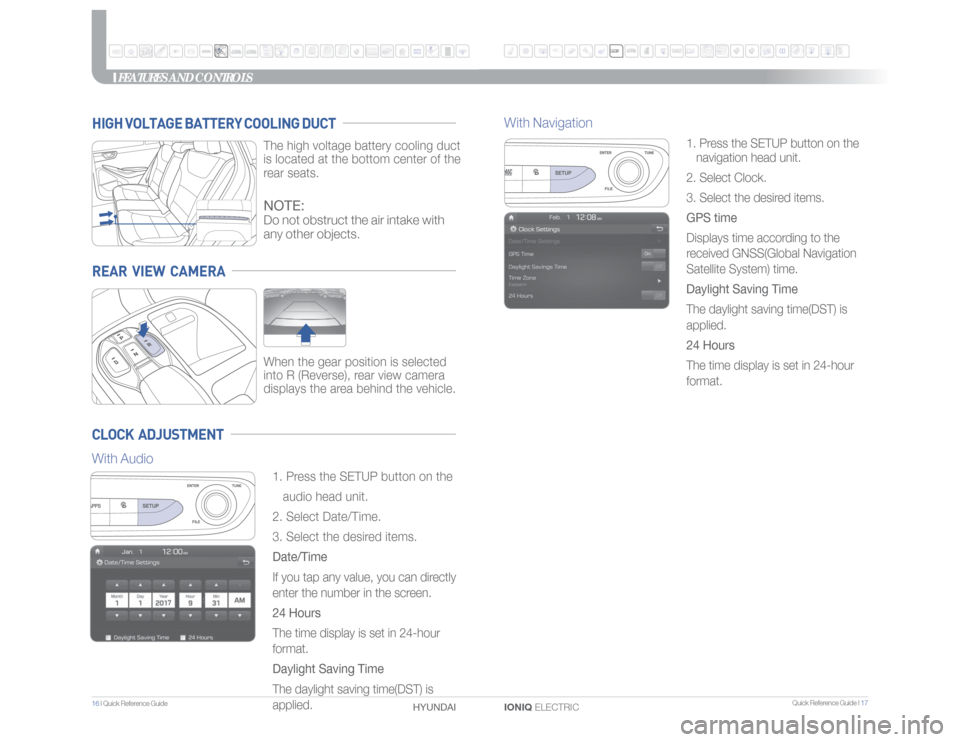
REAR VIEW CAMERA
When the gear position is selected
into R (Reverse), rear view camera
displays the area behind the vehicle.
HIGH VOLTAGE BATTERY COOLING DUCT
The high voltage battery cooling duct
is located at the bottom center of the
rear seats.
CLOCK ADJUSTMENT
1. Press the SETUP button on the
audio head unit.
2. Select Date/Time.
3. Select the desired items.
Date/Time
If you tap any value, you can directly
enter the number in the screen.
24 Hours
The time display is set in 24-hour
format.
Daylight Saving Time
The daylight saving time(DST) is
applied.1. Press the SETUP button on the
navigation head unit.
2. Select Clock.
3. Select the desired items.
GPS time
Displays time according to the
received GNSS(Global Navigation
Satellite System) time.
Daylight Saving Time
The daylight saving time(DST) is
applied.
24 Hours
The time display is set in 24-hour
format.
FEATURES AND CONTROLS
NOTE:Do not obstruct the air intake with
any other objects.
With AudioWith Navigation
Page 11 of 26
Quick Reference Guide I 19
18 I Quick Reference Guide
IONIQ ELECTRIC HYUNDAI
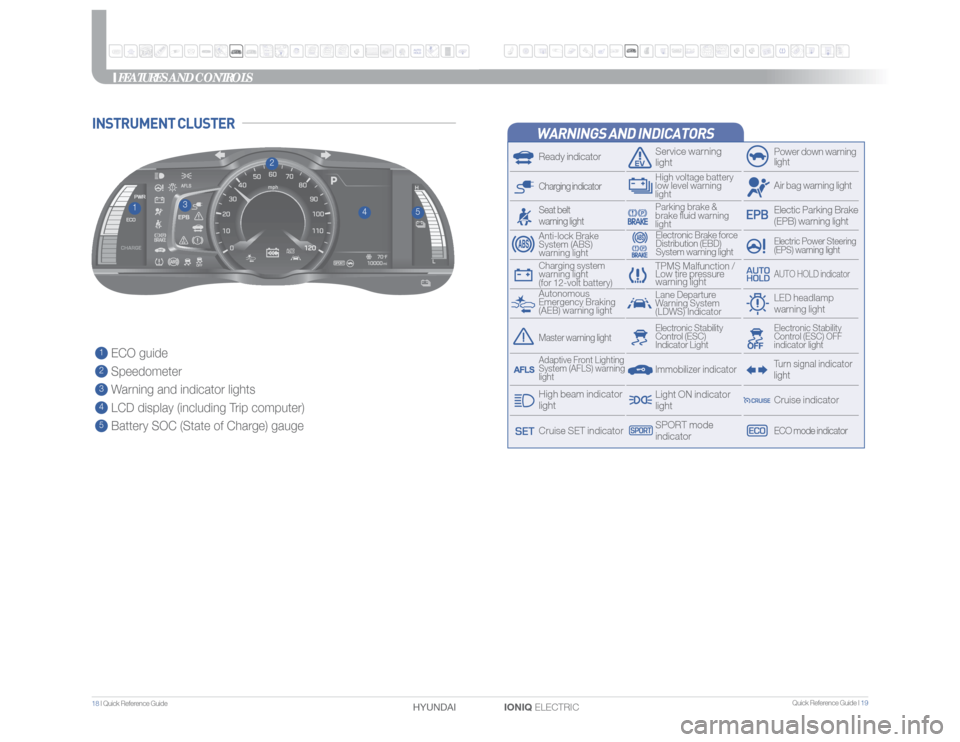
1 ECO guide2 Speedometer3 Warning and indicator lights4 LCD display (including Trip computer)5 Battery SOC (State of Charge) gauge
3
4
1
2
5
FEATURES AND CONTROLS
WARNINGS AND INDICATORSReady indicator
Service warning
light
Power down warning
lightAir bag warning lightElectric Power Steering
(EPS) warning light
Electronic Brake force
Distribution (EBD)
System warning light
Charging indicator
TPMS Malfunction /
Low tire pressure
warning light
AUTO HOLD indicator
Autonomous
Emergency Braking
(AEB) warning lightLane Departure
Warning System
(LDWS) Indicator
LED headlamp
warning light
Charging system
warning light
(for 12-volt battery)Anti-lock Brake
System (ABS)
warning light
Electic Parking Brake
(EPB) warning light
Parking brake &
brake fluid warning
light
Seat belt
warning light
Turn signal indicator
light
Immobilizer indicator
Master warning light
Electronic Stability
Control (ESC) OFF
indicator light
Electronic Stability
Control (ESC)
Indicator LightLight ON indicator
light
ECO mode indicatorCruise indicator
Adaptive Front Lighting
System (AFLS) warning
lightHigh beam indicator
lightCruise SET indicator
SPORT mode
indicator
INSTRUMENT CLUSTER
High voltage battery
low level warning
light
Page 12 of 26
Quick Reference Guide I 21
20 I Quick Reference Guide
IONIQ ELECTRIC HYUNDAI
FEATURES AND CONTROLS
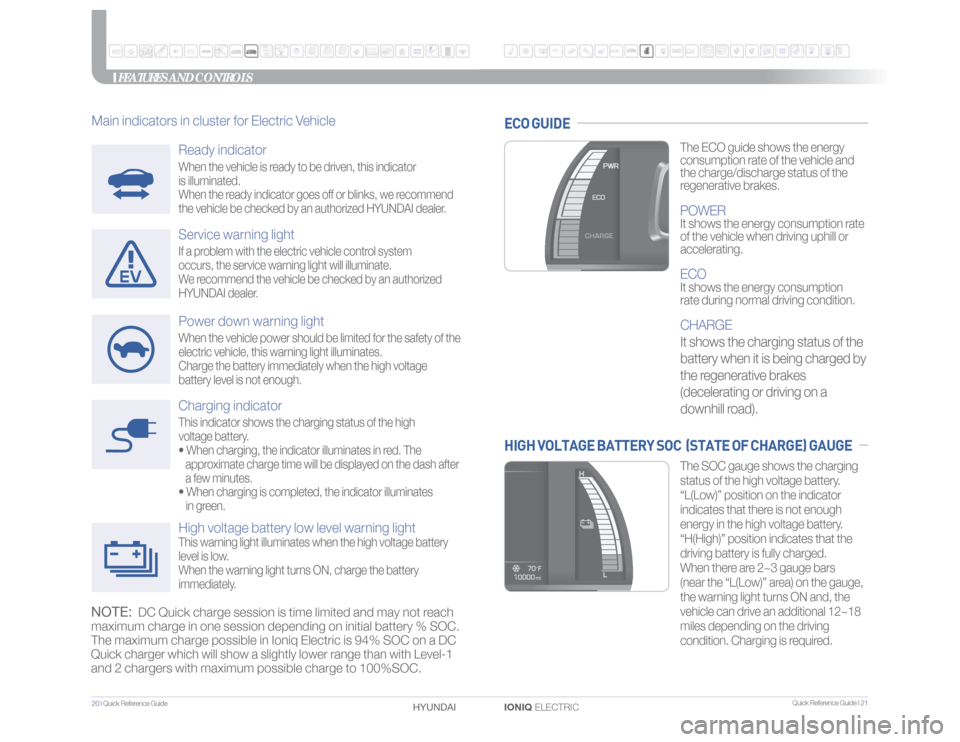
Charging indicatorThis indicator shows the charging status of the high
voltage battery.
• When charging, the indicator illuminates in red. The
approximate charge time will be displayed on the dash after
a few minutes.
• When charging is completed, the indicator illuminates
in green.High voltage battery low level warning lightThis warning light illuminates when the high voltage battery
level is low.
When the warning light turns ON, charge the battery
immediately.
The ECO guide shows the energy
consumption rate of the vehicle and
the charge/discharge status of the
regenerative brakes.POWERIt shows the energy consumption rate
of the vehicle when driving uphill or
accelerating.ECOIt shows the energy consumption
rate during normal driving condition.CHARGE
It shows the charging status of the
battery when it is being charged by
the regenerative brakes
(decelerating or driving on a
downhill road).The SOC gauge shows the charging
status of the high voltage battery.
“L(Low)” position on the indicator
indicates that there is not enough
energy in the high voltage battery.
“H(High)” position indicates that the
driving battery is fully charged.
When there are 2~3 gauge bars
(near the “L(Low)” area) on the gauge,
the warning light turns ON and, the
vehicle can drive an additional 12~18
miles depending on the driving
condition. Charging is required.
ECO GUIDEHIGH VOLTAGE BATTERY SOC (STATE OF CHARGE) GAUGE
Ready indicatorWhen the vehicle is ready to be driven, this indicator
is illuminated.
When the ready indicator goes off or blinks, we recommend
the vehicle be checked by an authorized HYUNDAI dealer.Service warning lightIf a problem with the electric vehicle control system
occurs, the service warning light will illuminate.
We recommend the vehicle be checked by an authorized
HYUNDAI dealer.Power down warning lightWhen the vehicle power should be limited for the safety of the
electric vehicle, this warning light illuminates.
Charge the battery immediately when the high voltage
battery level is not enough.
Main indicators in cluster for Electric VehicleNOTE:
DC Quick charge session is time limited and may not reach
maximum charge in one session depending on initial battery % SOC.
The maximum charge possible in Ioniq Electric is 94% SOC on a DC
Quick charger which will show a slightly lower range than with Level-1
and 2 chargers with maximum possible charge to 100%SOC.
Page 13 of 26
Quick Reference Guide I 23
22 I Quick Reference Guide
IONIQ ELECTRIC HYUNDAI
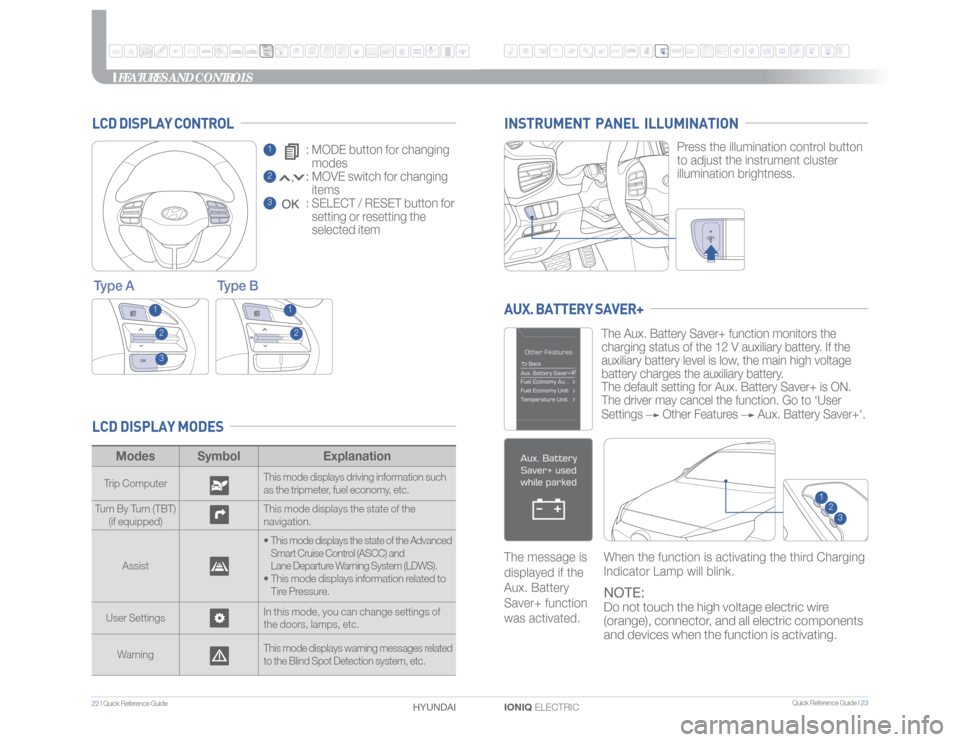
FEATURES AND CONTROLSModes Symbol ExplanationTrip ComputerThis mode displays driving information such
as the tripmeter, fuel economy, etc.
Turn By Turn (TBT)
(if equipped)This mode displays the state of the
navigation.
Assist• This mode displays the state of the Advanced
Smart Cruise Control (ASCC) and
Lane Departure Warning System (LDWS).
•
This mode displays information related to
Tire Pressure.
User SettingsIn this mode, you can change settings of
the doors, lamps, etc.
WarningThis mode displays warning messages related
to the Blind Spot Detection system, etc.
LCD DISPLAY MODES
Type B Type A
1 : MODE button for changing
modes2 : MOVE switch for changing
items3 : SELECT / RESET button for
setting or resetting the
selected item
LCD DISPLAY CONTROL
3
2
2
1
1
Press the illumination control button
to adjust the instrument cluster
illumination brightness.
INSTRUMENT PANEL ILLUMINATION
The Aux. Battery Saver+ function monitors the
charging status of the 12 V auxiliary battery. If the
auxiliary battery level is low, the main high voltage
battery charges the auxiliary battery.
The default setting for Aux. Battery Saver+ is ON.
The driver may cancel the function. Go to ‘User
Settings
Other Features
Aux. Battery Saver+‘.
AUX. BATTERY SAVER+
When the function is activating the third Charging
Indicator Lamp will blink. The message is
displayed if the
Aux. Battery
Saver+ function
was activated.NOTE:Do not touch the high voltage electric wire
(orange), connector, and all electric components
and devices when the function is activating.
1
32
Page 14 of 26
Quick Reference Guide I 25
24 I Quick Reference Guide
IONIQ ELECTRIC HYUNDAI
FEATURES AND CONTROLS
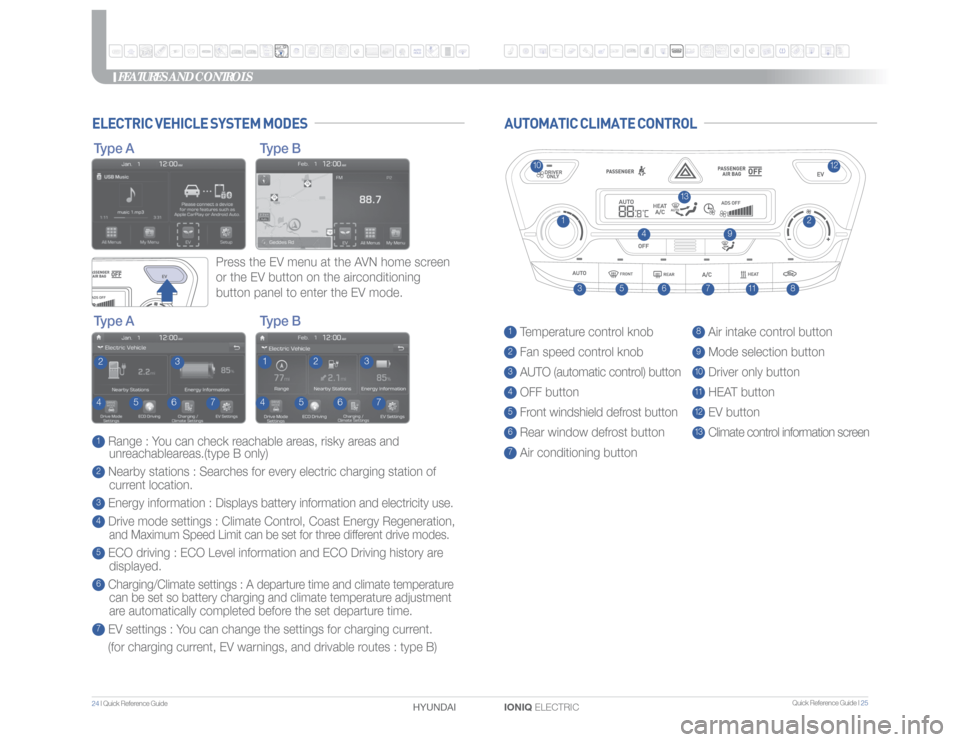
8 Air intake control button9 Mode selection button10 Driver only button11 HEAT button12 EV button13 Climate control information screen
1 Temperature control knob2 Fan speed control knob3 AUTO (automatic control) button4 OFF button5 Front windshield defrost button6 Rear window defrost button7 Air conditioning button
ELECTRIC VEHICLE SYSTEM MODES
AUTOMATIC CLIMATE CONTROL
3
5
6
11
7
8
4
9
13
1
12
10
2
1 Range : You can check reachable areas, risky areas and
unreachableareas.(type B only)2 Nearby stations : Searches for every electric charging station of
current location.3 Energy information : Displays battery information and electricity use.4 Drive mode settings : Climate Control, Coast Energy Regeneration,
and Maximum Speed Limit can be set for three different drive modes.
5 ECO driving : ECO Level information and ECO Driving history are
displayed.6 Charging/Climate settings : A departure time and climate temperature
can
be set so battery charging and climate temperature adjustment
are automatically completed before the set departure time.
7 EV settings : You can change the settings for charging current.
(for charging current, EV warnings, and drivable routes : type B)
Press the EV menu at the AVN home screen
or the EV button on the airconditioning
button panel to enter the EV mode.
Type B
Type B Type A
Type A
3
3
5
5
6
6
7
7
4
4
1
2
2
Page 17 of 26
Quick Reference Guide I 31
30 I Quick Reference Guide
IONIQ ELECTRIC HYUNDAI
MULTIMEDIA
BLUETOOTH
® PHONE OPERATION
VOICE RECOGNITION TIPSYour vehicle is equipped with Voice Recognition technology which allows drivers to
operate their phones without having to take their eyes off the road to minimize
distractions.
Voice recognition performance may be affected if driving with windows
and sun roof open; when the heating-cooling system is on; when passing in
a tunnel or when driving on rugged and uneven roads.
Quick reference on using voice commands
To start voice command, press the
key, the following commands are
available:
Command FunctionCall Displays downloaded Contacts.
Call
Dial Number Displays a screen where you can say a phone number to dial.
Dial
ex) Dial 111 555 1234
RedialDirectly calls at the number that you last dialed.
Call History Displays your Call History.
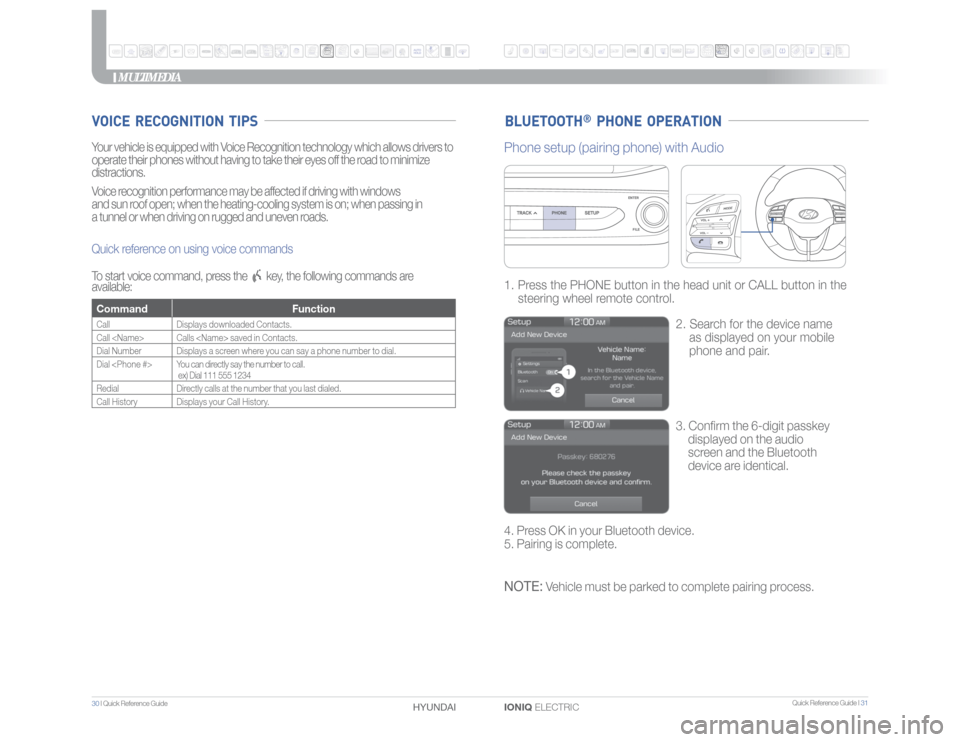
3. Confirm the 6-digit passkey
displayed on the audio
screen and the Bluetooth
device are identical. 1. Press the PHONE button in the head unit or CALL button in the
steering wheel remote control.
2. Search for the device name
as displayed on your mobile
phone and pair.
Phone setup (pairing phone) with Audio4. Press OK in your Bluetooth device.
5. Pairing is complete.NOTE:
Vehicle must be parked to complete pairing process.
Page 20 of 26
Quick Reference Guide I 37
36 I Quick Reference Guide
IONIQ ELECTRIC HYUNDAI
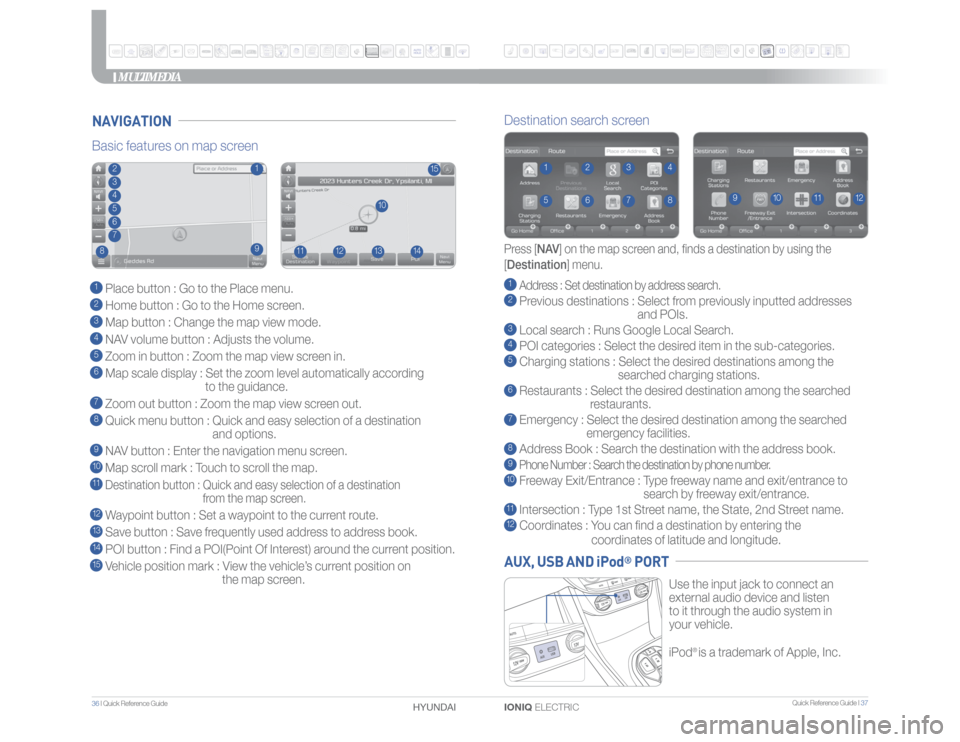
Use the input jack to connect an
external audio device and listen
to it through the audio system in
your vehicle.
iPod
® is a trademark of Apple, Inc.
Basic features on map screen1 Place button : Go to the Place menu.2 Home button : Go to the Home screen.3 Map button : Change the map view mode.4 NAV volume button : Adjusts the volume.5 Zoom in button : Zoom the map view screen in.6 Map scale display : Set the zoom level automatically according
to the guidance.7 Zoom out button : Zoom the map view screen out.8 Quick menu button : Quick and easy selection of a destination
and options.9 NAV button : Enter the navigation menu screen.10 Map scroll mark : Touch to scroll the map.
11 Destination button : Quick and easy selection of a destination
from the map screen.12 Waypoint button : Set a waypoint to the current route.13 Save button : Save frequently used address to address book.14 POI button : Find a POI(Point Of Interest) around the current position.15 Vehicle position mark : View the vehicle’s current position on
the map screen.
15
11
10
12
13
14
234
1
567
8
Destination search screen1 Address : Set destination by address search.2 Previous destinations : Select from previously inputted addresses
and POIs.3 Local search : Runs Google Local Search.4 POI categories : Select the desired item in the sub-categories.5 Charging stations : Select the desired destinations among the
searched charging stations.6 Restaurants : Select the desired destination among the searched
restaurants.7 Emergency : Select the desired destination among the searched
emergency facilities.8 Address Book : Search the destination with the address book.9 Phone Number : Search the destination by phone number.10 Freeway Exit/Entrance : Type freeway name and exit/entrance to
search by freeway exit/entrance.11 Intersection : Type 1st Street name, the State, 2nd Street name.12 Coordinates : You can find a destination by entering the
coordinates of latitude and longitude.
Press [NAV] on the map screen and, finds a destination by using the
[Destination] menu.
2
3
4
15
6
7
8
9
10
11
12
NAVIGATION
MULTIMEDIA
9
AUX, USB AND iPod
® PORT
Page 21 of 26
Quick Reference Guide I 39
38 I Quick Reference Guide
IONIQ ELECTRIC HYUNDAI
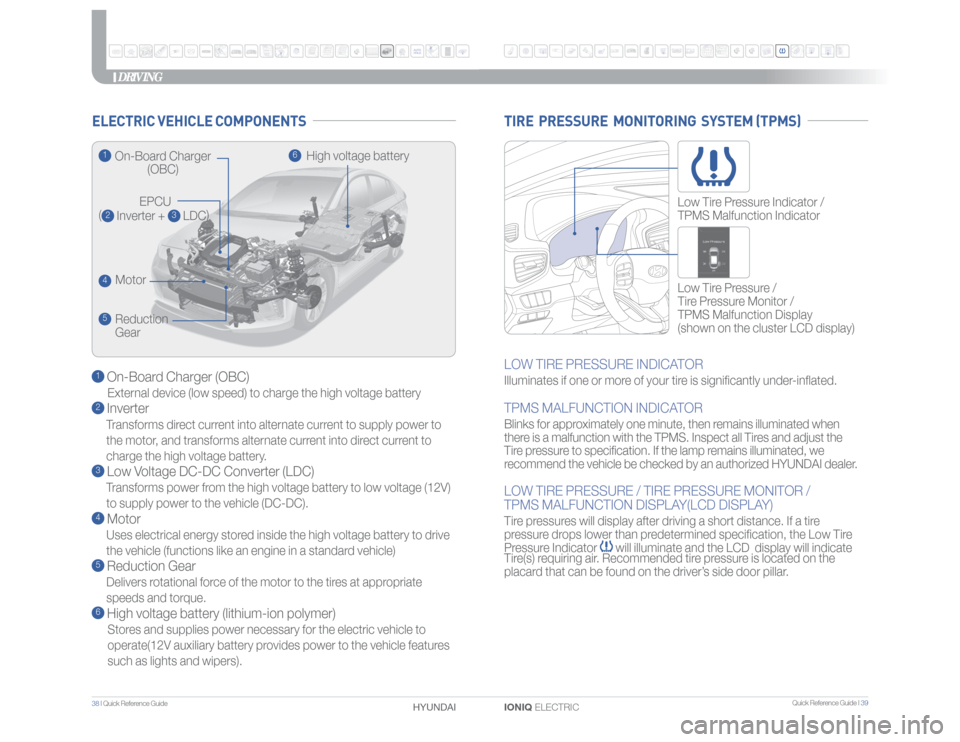
1 On-Board Charger (OBC)External device (low speed) to charge the high voltage battery2 InverterTransforms direct current into alternate current to supply power to
the motor, and transforms alternate current into direct current to
charge the high voltage battery.3 Low Voltage DC-DC Converter (LDC)Transforms power from the high voltage battery to low voltage (12V)
to supply power to the vehicle (DC-DC).4 MotorUses electrical energy stored inside the high voltage battery to drive
the vehicle (functions like an engine in a standard vehicle)5 Reduction GearDelivers rotational force of the motor to the tires at appropriate
speeds and torque.6 High voltage battery (lithium-ion polymer)Stores and supplies power necessary for the electric vehicle to
operate(12V auxiliary battery provides power to the vehicle features
such as lights and wipers).
ELECTRIC VEHICLE COMPONENTS
DRIVING
LOW TIRE PRESSURE INDICATORIlluminates if one or more of your tire is significantly under-inflated.TPMS MALFUNCTION INDICATORBlinks for approximately one minute, then remains illuminated when
there is a malfunction with the TPMS. Inspect all Tires and adjust the
Tire pressure to specification. If the lamp remains illuminated, we
recommend the vehicle be checked by an authorized HYUNDAI dealer.LOW TIRE PRESSURE / TIRE PRESSURE MONITOR /
TPMS MALFUNCTION DISPLAY(LCD DISPLAY)Tire pressures will display after driving a short distance. If a tire
pressure drops lower than predetermined specification, the Low Tire
Pressure Indicator
will illuminate and the LCD display will indicate
Tire(s) requiring air. Recommended tire pressure is located on the
placard that can be found on the driver’s side door pillar.Low Tire Pressure /
Tire Pressure Monitor /
TPMS Malfunction Display
(shown on the cluster LCD display) Low Tire Pressure Indicator /
TPMS Malfunction Indicator
TIRE PRESSURE MONITORING SYSTEM (TPMS)
1
On-Board Charger
(OBC)
EPCU
(2 Inverter +
3 LDC)
4
Motor
5
Reduction
Gear
6
High voltage battery
Page 22 of 26
Quick Reference Guide I 41
40 I Quick Reference Guide
IONIQ ELECTRIC HYUNDAI
DRIVING
AUTOMATIC WITH PUSH BUTTON DRIVE SELECTORREGENERATIVE BRAKE LEVEL CONTROL PADDLES
ELECTRONIC PARKING BRAKE (EPB)VIRTUAL ENGINE SOUND SYSTEM (VESS)
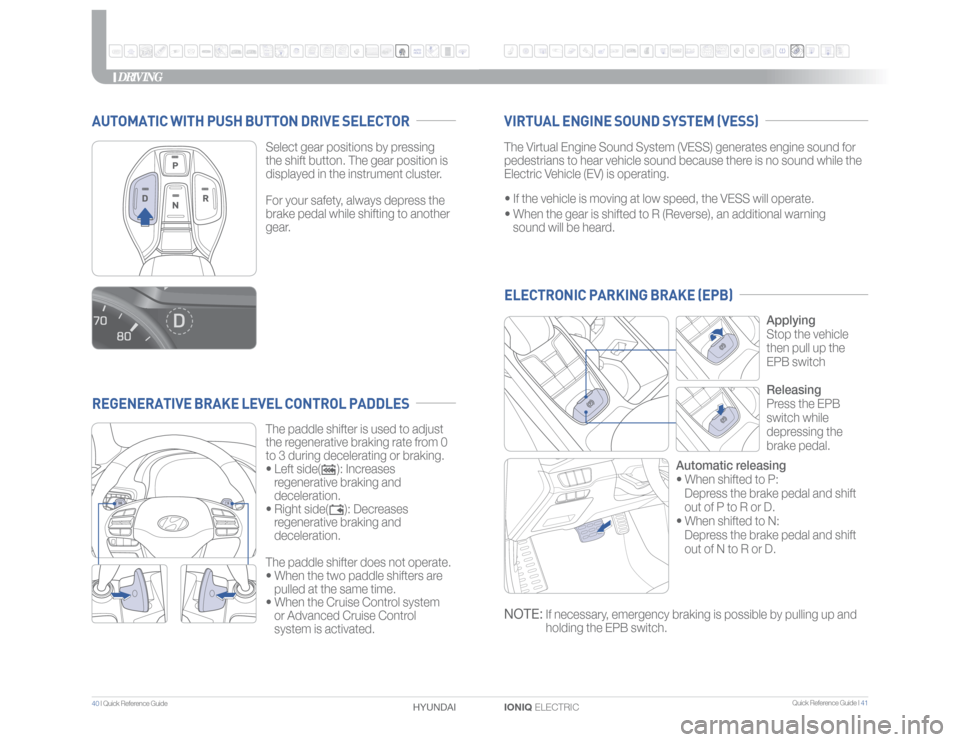
Select gear positions by pressing
the shift button. The gear position is
displayed in the instrument cluster.
For your safety, always depress the
brake pedal while shifting to another
gear.
The paddle shifter is used to adjust
the regenerative braking rate from 0
to 3 during decelerating or braking.
• Left side( ): Increases
regenerative braking and
deceleration.
• Right side( ): Decreases
regenerative braking and
deceleration.
The paddle shifter does not operate.
• When the two paddle shifters are
pulled at the same time.
• When the Cruise Control system
or Advanced Cruise Control
system is activated.The Virtual Engine Sound System (VESS) generates engine sound for
pedestrians to hear vehicle sound because there is no sound while the
Electric Vehicle (EV) is operating.
• If the vehicle is moving at low speed, the VESS will operate.
• When the gear is shifted to R (Reverse), an additional warning
sound will be heard.
Applying
Stop the vehicle
then pull up the
EPB switch
Releasing
Press the EPB
switch while
depressing the
brake pedal.
Automatic releasing
• When shifted to P:
Depress the brake pedal and shift
out of P to R or D.
• When shifted to N:
Depress the brake pedal and shift
out of N to R or D.
NOTE:
If necessary, emergency braking is possible by pulling up and
holding the EPB switch.