warning Hyundai Matrix 2004 Workshop Manual
[x] Cancel search | Manufacturer: HYUNDAI, Model Year: 2004, Model line: Matrix, Model: Hyundai Matrix 2004Pages: 317, PDF Size: 5.12 MB
Page 106 of 317
DRIVING YOUR HYUNDAI
2- 8 o Do not hold the vehicle on the upgrade with
the accelerator pedal. This can cause the transmission to overheat. Always use the brake pedal or parking brake.
C120A02A-AAT ANTI-LOCK BRAKE SYSTEM (If Installed) The Anti-Lock Brake System (ABS) is designed to prevent wheel lock-up during sudden braking or on hazardous road surfaces. The ABS control module monitors the wheel speed and controls the pressure applied to each brake. Thus, in emergency situations or on slick roads, ABS will increase vehicle control during braking. NOTE: During ABS operation, a slight pulsation may be felt in the brake pedal when the brakes are applied. Also, a noise may be heard in the engine compartment while braking. These conditions are normal and indicate that the anti-lock brake system is functioning proper- ly. WARNING: ABS will not prevent accidents due to im- proper or dangerous driving maneuvers. Even though vehicle control is improved during emergency braking, always maintain a safe distance between you and objects ahead. Vehicle speeds should always be reduced during extreme road conditions. The braking distance for cars equipped with
also increases the wear of the brake compo-nents.
o If a tire goes flat while you are driving, apply
the brakes gently and keep the car pointed straight ahead while you slow down. When
you are moving slowly enough for it to be safe to do so, pull off the road and stop in a safe place.
o If your car is equipped with an automatic
transaxle, don't let your car creep forward. To avoid creeping forward, keep your foot on the brake pedal when the car is stopped.
o Use caution when parking on a hill. Engage
the parking brake and place the gear selector lever in "P" (automatic transaxle) or in first or
reverse gear (manual transaxle). If your car is
facing downhill, turn the front wheels into the curb to help keep the car from rolling. If your car is facing uphill, turn the front wheels away from the curb to help keep the car from rolling. If there is no curb or if it is required by other conditions to keep the car from rolling, block the wheels.
o Under some conditions your parking brake can freeze in the engaged position. This is most likely to happen when there is an accu- mulation of snow or ice around or near the rear brakes or if the brakes are wet. If there is a risk that the parking brake may freeze, apply it only temporarily while you put the gear selector lever in "P" (automatic) or in first or reverse gear (manual transaxle) and block the rear wheels so the car cannot roll. Then release the parking brake.
C130A01A-AAT GOOD BRAKING PRACTICES WARNING: Nothing should be carried on top of the shelf panel behind the rear seat. If there were an accident or a sudden stop, such objects could move forward and cause damage to the ve- hicle or injure the occupants.
o After being parked, check to be sure the
parking brake is not engaged and that the parking brake indicator light is out before driving away.
o Driving through water may get the brakes
wet. They can also get wet when the car is washed. Wet brakes can be dangerous! Your
car will not stop as quickly if the brakes are wet. Wet brakes may cause the car to pull to one side. To dry the brakes, apply the brakes lightly until the braking action returns to nor-
mal, taking care to keep the car under control at all times. If the braking action does not return to normal, stop as soon as it is safe to do so and call your Hyundai dealer for assis- tance.
o Don't coast down hills with the car out of gear.
This is extremely hazardous. Keep the car in gear at all times, use the brakes to slow down, then shift to a lower gear so that engine braking will help you maintain a safe speed.
o Don't "ride" the brake pedal. Resting your foot on the brake pedal while driving can be dan- gerous because it can result in the brakes overheating and losing their effectiveness. It
Page 107 of 317
DRIVING YOUR HYUNDAI 2- 9
an anti-lock braking system may be longer than for those without it in the following road conditions.
o Driving on rough, gravel or snow-covered
roads.
o Driving with tire chains installed.
o Driving on roads where the road surface is pitted or has different surface height.
During these conditions, the vehicle shouldbe driven at reduced speeds. The safety fea- tures of an ABS equipped vehicle should not be tested by high speed driving or cornering. This could endanger the safety of yourself or others. C300A01O-GAT BRAKE TRACTION CONTROL SYSTEM (BTCS) (If Installed) On slippery road surfaces, the traction control system (TCS) limits the drive wheels from spin- ning excessively, thus helping the car to acceler- ate. It also provides sufficient driving force and steering performance as the car turns at acceler- ated speeds. SLIP Control Limits the drive wheels from spinning exces- sively during starting or while making accelerat- ed turns on slippery roads to avoid losing the driving force of the front wheels. C300B01O-GAT TCS ON ModeIn the TCS ON mode, the indicator in the instru- ment cluster will not be illuminated. NOTE:
1) Turn off the engine. Then restart the en-
gine, and the TCS mode will automaticallyturn "ON".
2) When the traction control is operating
properly, you can feel a slight pulsation in the vehicle. This is only the effect of brake control and indicates nothing unusual. C300D02O-GAT Indicator and Warning The indicator should illuminate when the ignition key is turned to "ON" or "START", but should go out after three seconds. If the indicator does not illuminate, have it checked by an authorized Hyundai dealer. Should there be any unusual conditions in the device, TCS illuminates as a warning. If TCS illuminates, pull your car to a safe place and stop the engine. Then, start the engine again to check if the TCS indicator goes out. If the indicator remains lit even after the engine has been started, have your car checked by an authorized Hyundai dealer. NOTE: When TCS illuminates, traction control is automatically deactivated for safety.
Driving hints TCS does not actively apply brakes. Be sure to decelerate the car sufficiently before entering curves. CAUTION: When the TCS indicator blinks, SLIP control has been activated. It also means that the road is slippery or your car is accelerating excessively. In this situation, release foot pressure from the accelerator pedal and main- tain moderate speed. WARNING: Traction control is only a driving aid; all normal precautions for driving in inclement weather and on slippery driving surfaces should be observed.
3) When the engine starts, a click is heard
from the engine compartment; however, this is only the sound of traction control being checked.
4) When moving out of the mud or fresh
snow, pressing the accelerator pedal may not cause the engine speed to increase.
Page 112 of 317
DRIVING YOUR HYUNDAI
2- 14 MANUAL
TRANSAXLE AUTO
TRANSAXLE Trailer
1,300
(2,865) 1,100
(2,424)
550 (1,212) Tongue
52
(115)
kg (Lbs.)
Maximum Towable Weight
With BrakeType
1.5 Diesel 1.6/1.8 L 1.6/1.8 L
WARNING: Improperly loading your car and trailer can serious affect its steering and braking perfor- mance causing a crash in which could cause serious injury or death.
Without Brake Type
5. Always secure items in the trailer to prevent load shift while driving.
6. Check the condition and air pressure of all
tires on the trailer and your car. Low tire pressure can seriously affect the handling. Also check the spare tire.
7. The vehicle/trailer combination is more af-
fected by crosswind and buffeting. When being passed by a large vehicle, keep a constant speed and steer straight ahead. If there is too much wind buffeting slow down to get out of the other vehicle’s air turbulence.
8. When parking your car and trailer, especially
on a hill, be sure to follow all the normal precautions. Turn your front wheel into the curb, set the parking brake firmly, and put the transaxle in 1st or Reverse (manual) or Park (automatic). In addition, place wheel chocks at each of the trailer’s tires.
9. If the trailer has electric brakes, start your vehicle and trailer moving, and then apply the trailer brake controller by hand to be sure the brakes are working. This lets you check your electrical connection at the same time.
10. During your trip, check occasionally to be
sure that the load is secure, and that the lights and any trailer brakes are still working.
11. Avoid jerky starts, sudden acceleration or sudden stops.
12. Avoid sharp turns and rapid lane changes.
13. Avoid holding the brake pedal down too long or too frequently. This could cause the brakesto overheat, resulting in reduced braking effi- ciency. 14. When going down a hill, shift into a lower gear
and use the engine braking effect. When ascending a long grade, downshift the transaxle to a lower gear and reduce speed to reduce chances of engine overloading and/or overheating.
15. If you have to stop while going uphill, do not
hold the vehicle in place by pressing on the accelerator. This can cause the automatic transaxle to overheat. Use the parking brake or footbrake.
NOTE: When towing check transaxle fluid more fre- quently. CAUTION: If overheating should occur when towing, (temperature gauge reads near red zone), taking the following action may reduce or eliminate the problem.
1. Turn off the air conditioner.
2. Reduce highway speed.
3. Select a lower gear when going uphill.
4. While in stop and go traffic, place the gear selection in park or neutral and idle theengine at a higher speed.
C190F02A-GAT Trailer or Vehicle Towing Tips
1. Before towing, check hitch and safety chain
connections as well as proper operation of the trailer running lights, brake lights, and turn signals.
2. Always drive your vehicle at a moderate
speed (Less than 100 km/h).
3. Trailer towing requires more fuel than normal
conditions.
4. To maintain engine braking efficiency and
electrical charging performance, do not use fifth gear (manual transaxle) or overdrive (automatic transaxle).
Page 113 of 317
WHAT TO DO IN AN EMERGENCY 3-1
3. WHAT TO DO IN ANEMERGENCY
D010A01A-AAT IF THE ENGINE WILL NOT START WARNING If the engine will not start, do not push or pull the car to start it. This could result in a collision or cause other damage. In addition, push or pull starting may cause the catalytic converter to be overloaded and create a fire hazard. D010B02A-AAT If Engine Doesn’t Turn Over or Turns Over Slowly
D010B01FC
1. If your car has an automatic transaxle, be sure the gear selector lever is in "N" or "P" and the emergency brake is set. 2. Check the battery connections to be sure
they are clean and tight.
3. Turn on the interior light. If the light dims or
goes out when you operate the starter, the battery is discharged.
4. Check the starter connections to be sure they are securely tightened.
5. Do not push or pull the vehicle to start it. See instructions for "Jump Starting".
SSA3020C
D010C01A-AAT If Engine Turns Over Normally but Does Not Start
1 Check fuel level.
2 Check all connectors at ignition, coil and
spark plugs. Reconnect any that may bedisconnected or loose.
3 Check the fuel line in the engine room.
4 If engine still refuses to start, call a Hyundai dealer or seek other qualified assistance. D010D01A-AAT If the Engine Stalls While Driving
1. Reduce your speed gradually, keeping a
straight line. Move cautiously off the road to a safe place.
2. Turn on your emergency flashers.
3. Try to start the engine again. If your vehicle will not start, contact a Hyundai dealer or seekother qualified assistance.
D020A03A-AAT JUMP STARTING
HFC4002
WARNING: The gas produced by the battery during the jump-start operation is highly explosive. If these instructions are not followed exactly, serious personal injury and damage to the vehicle may occur! If you are not sure how to follow this procedure, seek qualified assis- tance. Automobile batteries contain sulfuric acid. This is poisonous and highly corrosive.
Booster battery Discharged battery
3
Page 115 of 317
WHAT TO DO IN AN EMERGENCY 3-3
WARNING: While the engine is running, keep hair, hands, and clothing away from moving parts such as the fan and drive belts to prevent injury. WARNING (Diesel only): Never work on injection system with engine running or within 30 seconds after shutting off engine. High pressure pump, rail, injec- tors and high pressure pipes are subject to high pressure even after the engine stopped. The fuel jet produced by fuel leaks may cause serious injury, if it touch the body. People using pacemakers should not move than 30cm closer to the ECU or wiring harness within the engine room while engine is running, since the high currents in the Common Rail system produce considerable magnetic fields.
5. If the water pump drive belt is broken or
coolant is leaking out, stop the engine im- mediately and call the nearest Hyundai deal- er for assistance.
WARNING: Do not remove the radiator cap when the engine is hot. This can allow coolant to be blown out of the opening and cause serious burns. 2. The spare tire should only be used temporari-
ly and should be returned to the luggage compartment as soon as the original tire can be repaired or replaced.
3. Continuous use at speeds of over 80 km/h (50 mph) is not recommended.
4. As the temporary spare tire is specifically designed for your car, it should not be used on any other vehicle.
5. The temporary spare tire should not be used
on any other wheels, nor should standard tires, snow tires, wheel covers or trim rings be used with the temporary spare wheel. If such use is attempted, damage to these items or other car components may occur.
6. The temporary spare tire pressure should be
checked once a month while the tire is stored.
CAUTION:
o Do not use snow chains with your tempo- rary spare tire.
o Do not use more than one temporary spare tire at a time.
D040A01FC-GAT TEMPORARY SPARE TIRE The following instructions for the temporary spare tire should be observed:
1. Check inflation pressure as soon as possible
after installing the spare tire, and adjust to the specified pressure. The tire pressure should be periodically checked and maintained at the specified pressure while the tire is stored.
Inflation Pressure
Tire Size
T115/70R(D)15 420 kPa (60 psi)
Spare Tire Pressure
6. If you cannot find the cause of the overheat-
ing, wait until the engine temperature has returned to normal. Then, if the engine cool- ant has been lost, carefully remove the radia- tor cap and add engine coolant to bring the fluid level in the reservoir up to the halfway mark.
7. Proceed with caution, keeping alert for fur- ther signs of overheating. If overheating hap- pens again, call a Hyundai dealer for assis- tance.
CAUTION: Serious loss of engine coolant indicates there is a leak in the cooling system and this should be checked as soon as possible by a Hyundai dealer.
Page 118 of 317
WHAT TO DO IN AN EMERGENCY
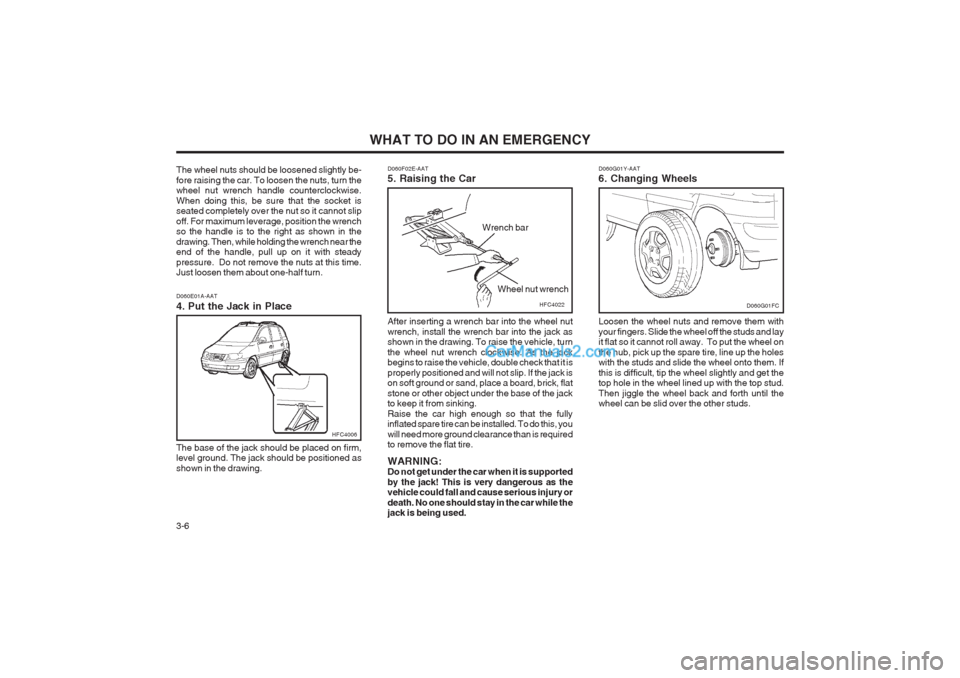
3-6 D060G01Y-AAT 6. Changing Wheels Loosen the wheel nuts and remove them with your fingers. Slide the wheel off the studs and lay it flat so it cannot roll away. To put the wheel on the hub, pick up the spare tire, line up the holes with the studs and slide the wheel onto them. If this is difficult, tip the wheel slightly and get the top hole in the wheel lined up with the top stud. Then jiggle the wheel back and forth until the wheel can be slid over the other studs.
D060G01FC
D060F02E-AAT 5. Raising the Car After inserting a wrench bar into the wheel nut wrench, install the wrench bar into the jack as shown in the drawing. To raise the vehicle, turn the wheel nut wrench clockwise. As the jack begins to raise the vehicle, double check that it is properly positioned and will not slip. If the jack is on soft ground or sand, place a board, brick, flat stone or other object under the base of the jack to keep it from sinking. Raise the car high enough so that the fully inflated spare tire can be installed. To do this, you will need more ground clearance than is required to remove the flat tire. WARNING: Do not get under the car when it is supported by the jack! This is very dangerous as the vehicle could fall and cause serious injury or death. No one should stay in the car while the jack is being used.HFC4022
Wrench bar
Wheel nut wrench
The wheel nuts should be loosened slightly be- fore raising the car. To loosen the nuts, turn the wheel nut wrench handle counterclockwise. When doing this, be sure that the socket is seated completely over the nut so it cannot slip off. For maximum leverage, position the wrench so the handle is to the right as shown in the drawing. Then, while holding the wrench near the end of the handle, pull up on it with steady pressure. Do not remove the nuts at this time. Just loosen them about one-half turn. D060E01A-AAT 4. Put the Jack in Place The base of the jack should be placed on firm, level ground. The jack should be positioned as shown in the drawing.
HFC4006
Page 119 of 317
WHAT TO DO IN AN EMERGENCY 3-7
STA3071H
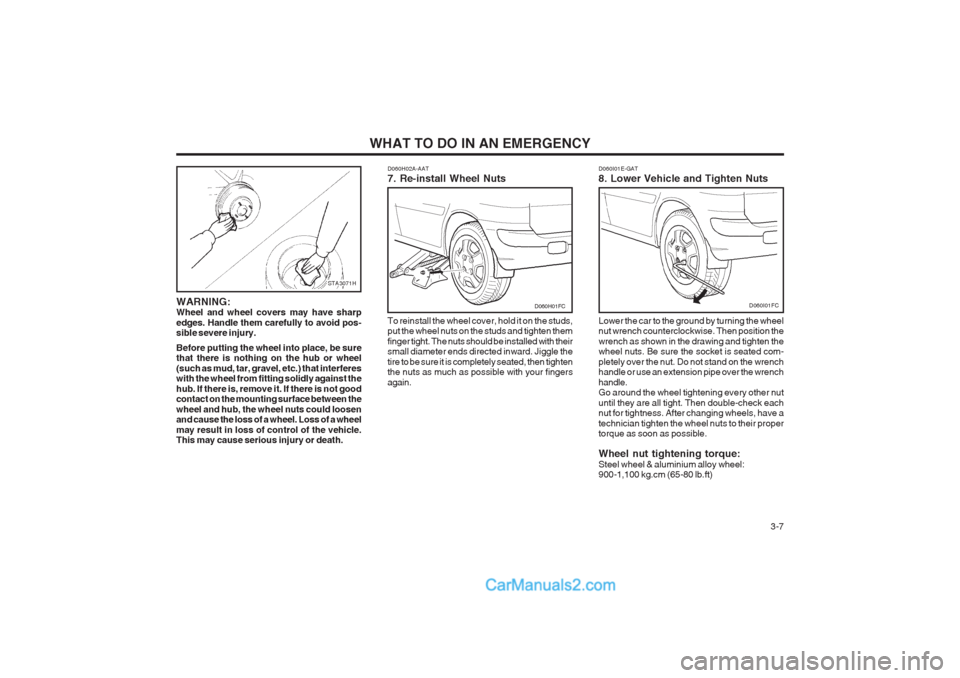
WARNING: Wheel and wheel covers may have sharp edges. Handle them carefully to avoid pos- sible severe injury. Before putting the wheel into place, be sure that there is nothing on the hub or wheel (such as mud, tar, gravel, etc.) that interferes with the wheel from fitting solidly against the hub. If there is, remove it. If there is not good contact on the mounting surface between the wheel and hub, the wheel nuts could loosen and cause the loss of a wheel. Loss of a wheel may result in loss of control of the vehicle. This may cause serious injury or death. D060H02A-AAT 7. Re-install Wheel Nuts To reinstall the wheel cover, hold it on the studs, put the wheel nuts on the studs and tighten them finger tight. The nuts should be installed with their small diameter ends directed inward. Jiggle the tire to be sure it is completely seated, then tighten the nuts as much as possible with your fingers again.
Lower the car to the ground by turning the wheel nut wrench counterclockwise. Then position the wrench as shown in the drawing and tighten the wheel nuts. Be sure the socket is seated com- pletely over the nut. Do not stand on the wrench handle or use an extension pipe over the wrench handle. Go around the wheel tightening every other nut until they are all tight. Then double-check each nut for tightness. After changing wheels, have a technician tighten the wheel nuts to their proper torque as soon as possible. Wheel nut tightening torque: Steel wheel & aluminium alloy wheel: 900-1,100 kg.cm (65-80 lb.ft)
D060H01FCD060I01E-GAT 8. Lower Vehicle and Tighten NutsD060I01FC
Page 132 of 317
VEHICLE MAINTENANCE REQUIREMENTS
5- 6
F060A01A-AAT EXPLANATION OF SCHEDULED MAINTENANCE ITEMS F060M01A-AAT o Engine Oil and FilterThe engine oil and filter should be changed at
the intervals specified in the maintenance sched- ule. If the car is being driven in severe condi- tions, more frequent oil and filter changes are required. F060B01A-AAT
o Drive BeltsInspect all drive belts for evidence of cuts, cracks, excessive wear or oil saturation andreplace if necessary. Drive belts should be checked periodically for proper tension and adjusted as necessary. F060C01A-AAT
o Fuel FilterA clogged filter can limit the speed at which the vehicle may be driven, damage the emission system and cause hard starting. If an exces- sive amount of foreign matter accumulates in the fuel tank, the filter may require replacement more frequently. After installing a new filter, run the engine forseveral minutes, and check for leaks at the connections. Fuel filters should be installed by trained technicians.
F060D01TB-AAT
o Fuel Lines, Fuel Hoses and
Connections
Check the fuel lines, fuel hoses and connec- tions for leakage and damage. Replace any damaged or leaking parts immediately. WARNING (Diesel only): Never work on injection system with engine running or within 30 seconds after shutting off engine. High pressure pump, rail, injec- tors and high pressure pipes are subject to high pressure even after the engine stopped. The fuel jet produced by fuel leaks may cause serious injury, if it touch the body. People using pacemakers should not move than 30cm closer to the ECU or wiring har- ness within the engine room while engine is running, since the high currents in the Com- mon Rail system produce considerable mag- netic fields. F060E01A-AAT
o Timing BeltInspect all parts related to the timing belt for damage and deformation. Replace any dam- aged parts immediately. F060G01A-AAT
o Vapor Hose and Fuel Filler Cap The vapor hose and fuel filler cap should be
inspected at those intervals specified in themaintenance schedule. Make sure that a new vapor hose or fuel filler cap is correctly re- placed.
F060F01A-AAT
o Vacuum, Crankcase Ventilation
Hoses
Inspect the surface of hoses for evidence of
heat and/or mechanical damage. Hard and brit-tle rubber, cracking, tears, cuts, abrasions, and excessive swelling indicate deterioration. Par- ticular attention should be paid to examining those hose surfaces nearest to high heat sourc- es, such as the exhaust manifold.
Inspect the hose routing to assure that the
hoses do not come in contact with any heatsource, sharp edges or moving component which might cause heat damage or mechanical wear. Inspect all hose connections, such as clamps and couplings, to make sure they are secure, and that no leaks are present. Hoses should be replaced immediately if there is any evidence of deterioration or damage.
Page 140 of 317
DO-IT-YOURSELF MAINTENANCE
6-6 If the oil level is close to or below the "L" mark,
add oil until it reaches the "F" mark. To add oil:
1. Remove the oil filler cap by turning it counter- clockwise.
2. Add oil, then check the level again. Do not overfill.
3. Replace the cap by turning it clockwise.
The distance between the "F" and "L" marks is
equal to about 1 liter(Gasoline Engine)/1.2 liter(Diesel Engine) of oil.
G350A01A-GAT
ENGINE OIL CONSUMPTION Function of Engine Oil
Engine oil has the primary function of lubricat-
ing and cooling the inside of the engine.
Engine oil consumption It is normal that an engine should consume
some engine oil while normal driving. The cause of oil consumption in a normal engine are asfollows;
o Engine oil is used to lubricate pistons, piston rings and cylinders. A thin film of oil is left on the cylinder wall when a piston moves downwards in thecylinder. High negative pressure generated
during engine operation sucks some of theoil into the combustion chamber. This oil with some oil of the cylinder wall is burned by the high temperature combustion gases during the combustion process.
o The engine oil consumption is strongly ef- fected by the viscosity and quality of oil,engine rpm and driving condition etc. Theengine oil is more consumed under severedriving conditions such as high speeds and
frequent acceleration and deceleration thannormal driving condition.
G040A03FC-GAT
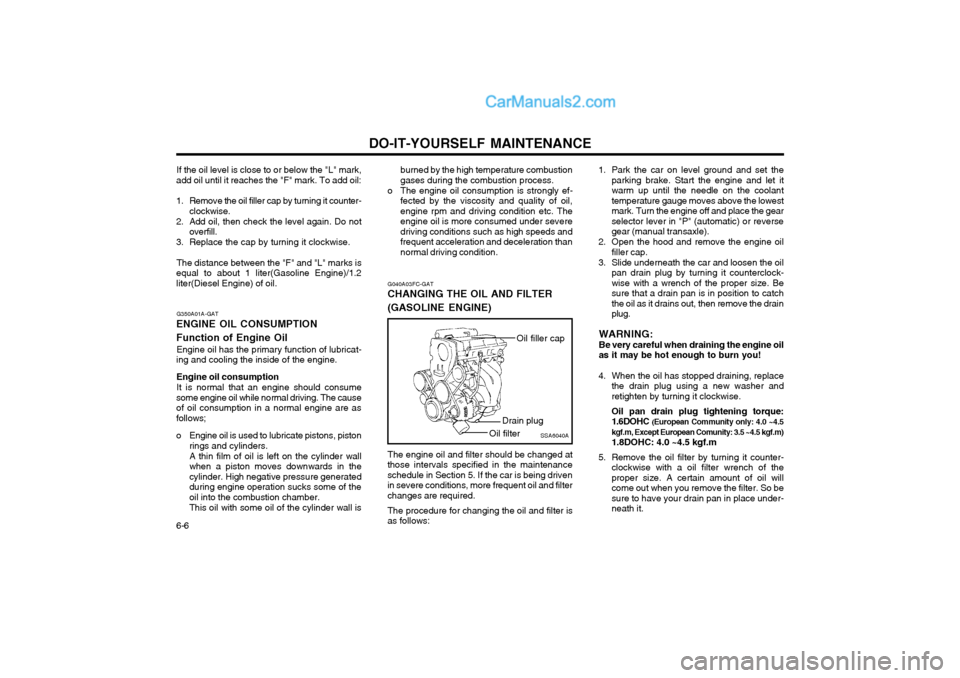
CHANGING THE OIL AND FILTER (GASOLINE ENGINE)
The engine oil and filter should be changed at
those intervals specified in the maintenance schedule in Section 5. If the car is being drivenin severe conditions, more frequent oil and filterchanges are required.
The procedure for changing the oil and filter is
as follows: 1. Park the car on level ground and set the
parking brake. Start the engine and let itwarm up until the needle on the coolanttemperature gauge moves above the lowestmark. Turn the engine off and place the gearselector lever in "P" (automatic) or reversegear (manual transaxle).
2. Open the hood and remove the engine oil filler cap.
3. Slide underneath the car and loosen the oil pan drain plug by turning it counterclock-wise with a wrench of the proper size. Besure that a drain pan is in position to catchthe oil as it drains out, then remove the drainplug.
WARNING:Be very careful when draining the engine oilas it may be hot enough to burn you!
4. When the oil has stopped draining, replace the drain plug using a new washer andretighten by turning it clockwise. Oil pan drain plug tightening torque: 1.6DOHC (European Community only: 4.0 ~4.5
kgf.m, Except European Comunity: 3.5 ~4.5 kgf.m) 1.8DOHC: 4.0 ~4.5 kgf.m
5. Remove the oil filter by turning it counter- clockwise with a oil filter wrench of the proper size. A certain amount of oil willcome out when you remove the filter. So besure to have your drain pan in place under-neath it.
SSA6040A
Oil filler cap
Drain plug
Oil filter
Page 141 of 317
DO-IT-YOURSELF MAINTENANCE 6-7
G040C01FCEngine oil drain plug
Oil filter
G040B03FC-GAT
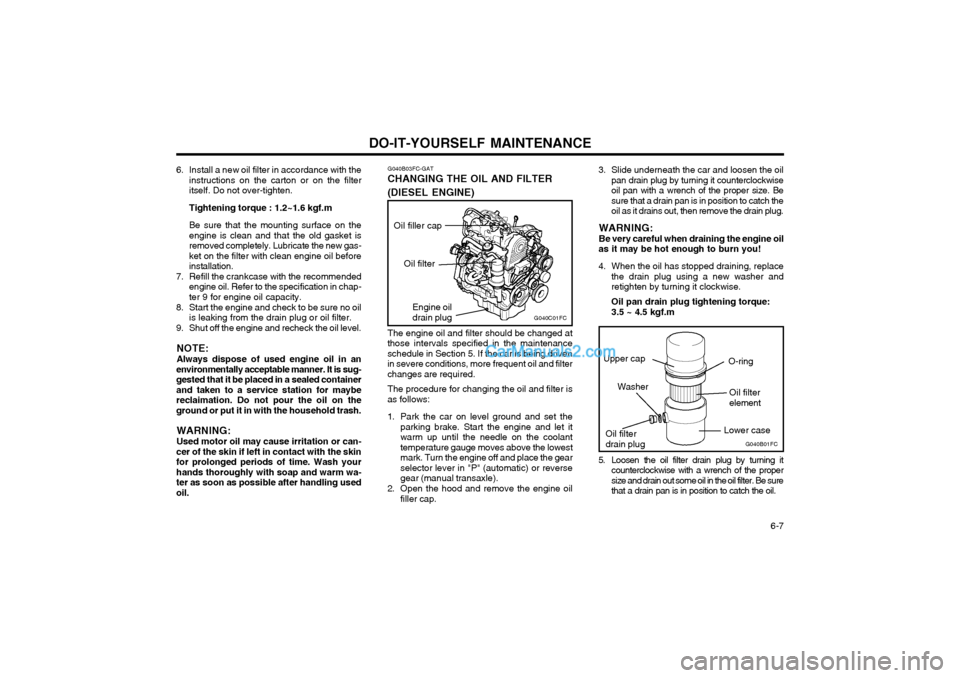
CHANGING THE OIL AND FILTER (DIESEL ENGINE)
The engine oil and filter should be changed at
those intervals specified in the maintenance schedule in Section 5. If the car is being drivenin severe conditions, more frequent oil and filterchanges are required.
The procedure for changing the oil and filter is
as follows:
1. Park the car on level ground and set the parking brake. Start the engine and let it warm up until the needle on the coolanttemperature gauge moves above the lowestmark. Turn the engine off and place the gearselector lever in "P" (automatic) or reversegear (manual transaxle).
2. Open the hood and remove the engine oil filler cap. 3. Slide underneath the car and loosen the oil
pan drain plug by turning it counterclockwiseoil pan with a wrench of the proper size. Besure that a drain pan is in position to catch theoil as it drains out, then remove the drain plug.
WARNING: Be very careful when draining the engine oil
as it may be hot enough to burn you!
4. When the oil has stopped draining, replace the drain plug using a new washer and retighten by turning it clockwise. Oil pan drain plug tightening torque: 3.5 ~ 4.5 kgf.m
6. Install a new oil filter in accordance with the
instructions on the carton or on the filter itself. Do not over-tighten. Tightening torque : 1.2~1.6 kgf.mBe sure that the mounting surface on the engine is clean and that the old gasket isremoved completely. Lubricate the new gas-ket on the filter with clean engine oil beforeinstallation.
7. Refill the crankcase with the recommended engine oil. Refer to the specification in chap-ter 9 for engine oil capacity.
8. Start the engine and check to be sure no oil is leaking from the drain plug or oil filter.
9. Shut off the engine and recheck the oil level.
NOTE: Always dispose of used engine oil in an
environmentally acceptable manner. It is sug- gested that it be placed in a sealed containerand taken to a service station for maybereclaimation. Do not pour the oil on theground or put it in with the household trash.
WARNING: Used motor oil may cause irritation or can-
cer of the skin if left in contact with the skin for prolonged periods of time. Wash yourhands thoroughly with soap and warm wa-ter as soon as possible after handling usedoil. 5. Loosen the oil filter drain plug by turning it
counterclockwise with a wrench of the propersize and drain out some oil in the oil filter. Be surethat a drain pan is in position to catch the oil.
G040B01FCOil filter drain plug O-ring
Oil filterelement
Washer
Upper cap
Lower case
Oil filler cap