warning Hyundai Matrix 2005 User Guide
[x] Cancel search | Manufacturer: HYUNDAI, Model Year: 2005, Model line: Matrix, Model: Hyundai Matrix 2005Pages: 407, PDF Size: 10.31 MB
Page 24 of 407
CONTROLS AND EQUIPMENT
1- 16
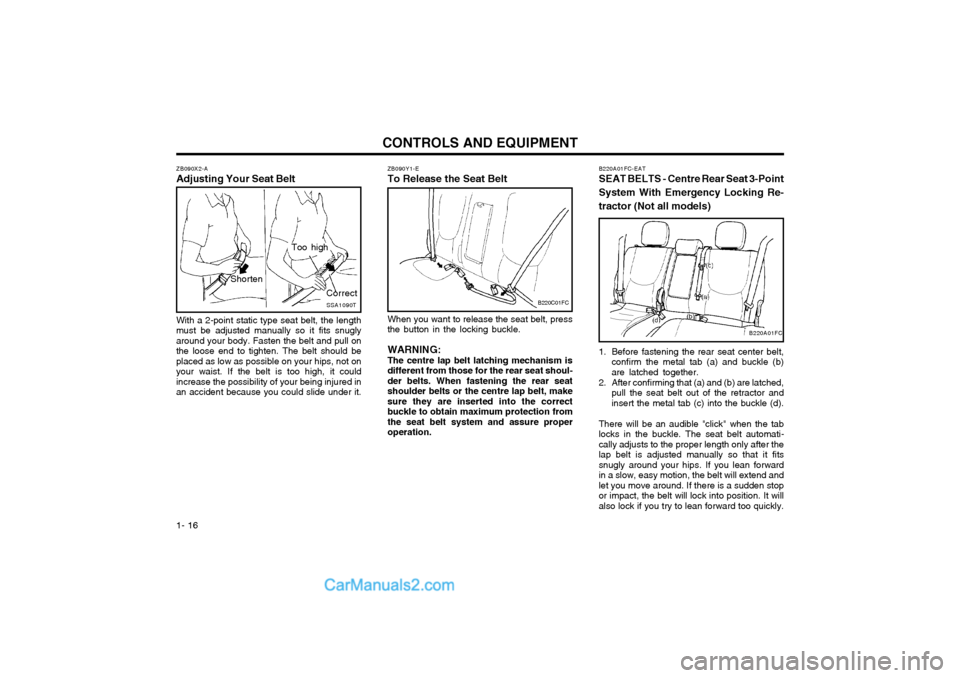
ZB090Y1-E To Release the Seat Belt
B220C01FC
When you want to release the seat belt, press the button in the locking buckle. WARNING: The centre lap belt latching mechanism is different from those for the rear seat shoul-der belts. When fastening the rear seatshoulder belts or the centre lap belt, makesure they are inserted into the correctbuckle to obtain maximum protection fromthe seat belt system and assure properoperation.
ZB090X2-A Adjusting Your Seat Belt
SSA1090T
Shorten Correct
Too high
With a 2-point static type seat belt, the length must be adjusted manually so it fits snuglyaround your body. Fasten the belt and pull onthe loose end to tighten. The belt should beplaced as low as possible on your hips, not onyour waist. If the belt is too high, it couldincrease the possibility of your being injured inan accident because you could slide under it. B220A01FC-EAT SEAT BELTS - Centre Rear Seat 3-Point System With Emergency Locking Re-tractor (Not all models)
1. Before fastening the rear seat center belt,
confirm the metal tab (a) and buckle (b) are latched together.
2. After confirming that (a) and (b) are latched, pull the seat belt out of the retractor andinsert the metal tab (c) into the buckle (d).
There will be an audible "click" when the tablocks in the buckle. The seat belt automati-cally adjusts to the proper length only after thelap belt is adjusted manually so that it fitssnugly around your hips. If you lean forwardin a slow, easy motion, the belt will extend andlet you move around. If there is a sudden stopor impact, the belt will lock into position. It willalso lock if you try to lean forward too quickly.
B220A01FC
Page 25 of 407
1- 17
CONTROLS AND EQUIPMENT
B230A04P-EAT
CHILD RESTRAINT SYSTEM
Children riding in the car should sit in the rear
seat and must always be properly restrained to minimise the risk of injury in an accident,sudden stop or sudden maneuver. Accordingto accident statistics, children are safer whenproperly restrained in the rear seats than inthe front seat. Larger children should use oneof the seat belts provided.
You are required by law to use safety re-
straints for children. If small children ride inyour vehicle you must put them in a childrestraint system (safety seat).
Children could be injured or killed in a crash if
their restraints are not properly secured. Forsmall children and babies, a child seat orinfant seat must be used. Before buying aparticular child restraint system, make sure itfits your car and seat belts, and fits your child.Follow all the instructions provided by themanufacturer when installing the child restraintsystem.
WARNING:
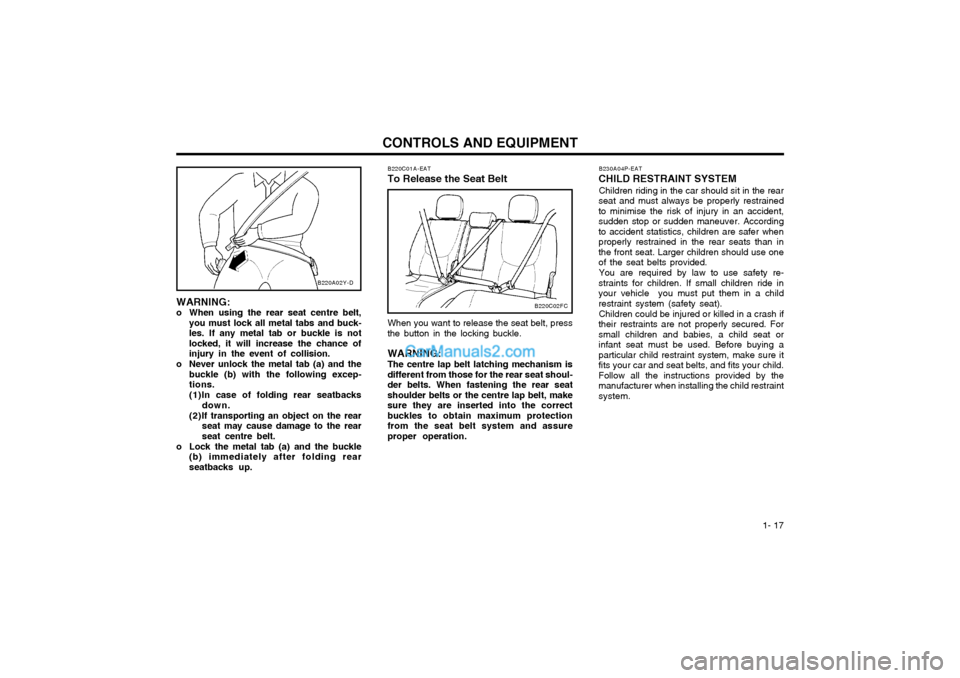
o When using the rear seat centre belt, you must lock all metal tabs and buck-les. If any metal tab or buckle is notlocked, it will increase the chance ofinjury in the event of collision.
o Never unlock the metal tab (a) and the buckle (b) with the following excep-tions.
(1) In case of folding rear seatbacksdown.
(2) If transporting an object on the rear seat may cause damage to the rear seat centre belt.
o Lock the metal tab (a) and the buckle (b) immediately after folding rearseatbacks up. B220C01A-EAT To Release the Seat Belt When you want to release the seat belt, press the button in the locking buckle. WARNING: The centre lap belt latching mechanism is different from those for the rear seat shoul-der belts. When fastening the rear seatshoulder belts or the centre lap belt, makesure they are inserted into the correctbuckles to obtain maximum protectionfrom the seat belt system and assureproper operation.
B220A02Y-D
B220C02FC
Page 26 of 407
CONTROLS AND EQUIPMENT
1- 18
WARNING:
o A child restraint system must be placed in the rear seat. Never install a child or infant seat on the front passenger's seat. Should an accident occur and cause the passenger side airbag to deploy, itcould severely injure or kill an infant orchild seated in an infant or child seat.Thus, only use a child restraint in therear seat of your vehicle.
o Since a safety belt or child restraint system can become very hot if it is leftin a closed vehicle, be sure to check theseat cover and buckles before placing achild there.
o When the child restraint system is not in use, fasten it with a safety belt so thatit will not be thrown forward in the caseof a sudden stop or an accident.
o Children who are too large to be in a child restraint should still sit in the rearseat and be restrained with the avail-able lap/shoulder belts. Never allowchildren to ride in the front passengerseat.
o Always make sure that the shoulder belt portion of the outboard lap/shoulder beltis positioned midway over the shoul-der, never across the neck or behindthe back. Moving the child closer to thecenter of the vehicle may help provide agood shoulder belt fit. The lap belt portion of the lap/shoulderbelt or the center seat lap belt mustalways be positioned as low as pos-sible on the child's hips and as snug aspossible.
o If the seat belt will not properly fit the child, we recommend the use of anapproved booster seat in the rear seatin order to raise the child's seatingheight so that the seat belt will prop-erly fit the child.
o Never allow a child to stand up or kneel on the seat.
o Never use an infant carrier or child safety seat that "hooks" over aseatback; it may not provide adequatesecurity in an accident.
o Never allow a child to be held in a person's arms whilst they are in a mov-ing vehicle, as this could result in se-rious injury to the child in the event ofan accident or a sudden stop. Holdinga child in a moving vehicle does notprovide the child with any means ofprotection during an accident, even ifthe person holding the child is wearinga seat belt.
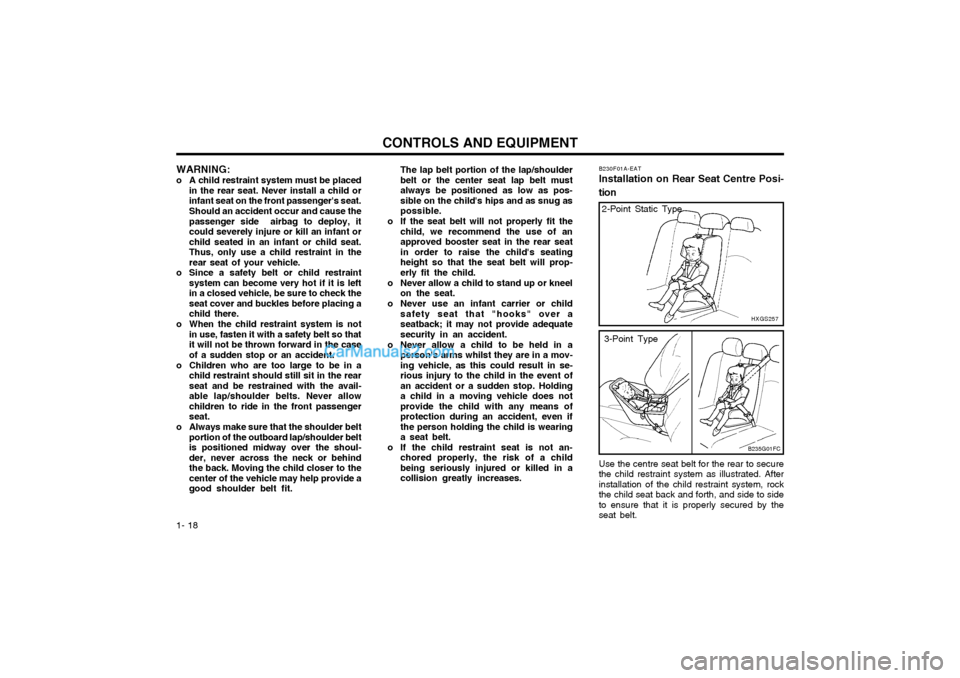
o If the child restraint seat is not an- chored properly, the risk of a childbeing seriously injured or killed in acollision greatly increases. B230F01A-EAT Installation on Rear Seat Centre Posi- tion Use the centre seat belt for the rear to secure the child restraint system as illustrated. Afterinstallation of the child restraint system, rockthe child seat back and forth, and side to sideto ensure that it is properly secured by theseat belt.
HXGS257
B235G01FC
2-Point Static Type
3-Point Type
Page 27 of 407
1- 19
CONTROLS AND EQUIPMENT
B230G01A-GAT
Installation on Outboard Rear Seats move it in all directions to be sure the child restraint system is securely installed. If you need to tighten the belt, pull more webbing toward the retractor. When you un-buckle the seat belt and allow it to retract, theretractor will automatically revert back to itsnormal seated passenger emergency lockingusage condition. NOTE:
o Before installing the child restraint
system, read the instructions supplied by the child restraint system manufac-turer.
o If the seat belt does not operate as described, have the system checkedimmediately by your Hyundaiauthorised repairer.
WARNING:Do not install any child restraint system inthe front passenger seat. Should an acci-dent occur and cause the passenger sideairbag to deploy, it could severely injureor kill an infant or child seated in an infantor child seat. Therefore, only use a childrestraint system in the rear seat of yourvehicle.
To install a child restraint system in the
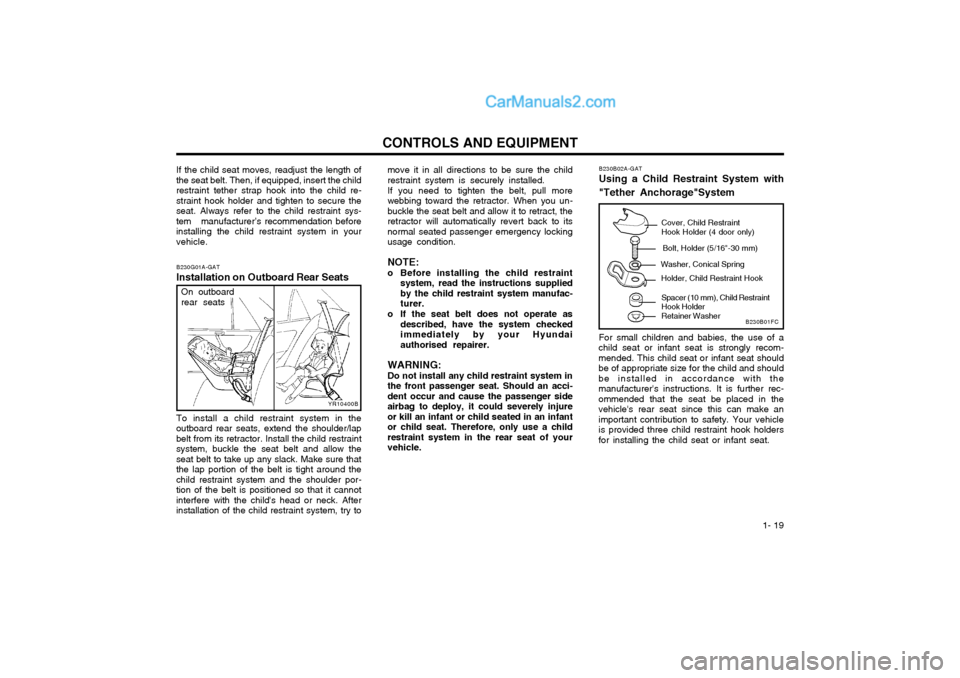
outboard rear seats, extend the shoulder/lapbelt from its retractor. Install the child restraintsystem, buckle the seat belt and allow theseat belt to take up any slack. Make sure thatthe lap portion of the belt is tight around thechild restraint system and the shoulder por-tion of the belt is positioned so that it cannotinterfere with the child's head or neck. Afterinstallation of the child restraint system, try to
YR10400B
On outboard rear seats
B230B02A-GAT Using a Child Restraint System with "Tether Anchorage"System For small children and babies, the use of a
child seat or infant seat is strongly recom- mended. This child seat or infant seat shouldbe of appropriate size for the child and shouldbe installed in accordance with themanufacturer's instructions. It is further rec-ommended that the seat be placed in thevehicle's rear seat since this can make animportant contribution to safety. Your vehicleis provided three child restraint hook holdersfor installing the child seat or infant seat.
Cover, Child Restraint Hook Holder (4 door only)
Bolt, Holder (5/16"-30 mm)
Washer, Conical Spring Holder, Child Restraint Hook
Spacer (10 mm), Child Restraint Hook Holder Retainer Washer
B230B01FC
If the child seat moves, readjust the length of
the seat belt. Then, if equipped, insert the child restraint tether strap hook into the child re-straint hook holder and tighten to secure theseat. Always refer to the child restraint sys-tem manufacturer’s recommendation beforeinstalling the child restraint system in yourvehicle.
Page 28 of 407
CONTROLS AND EQUIPMENT
1- 20
B230E01FC
Back panel
Front of Vehicle
Tether straphook
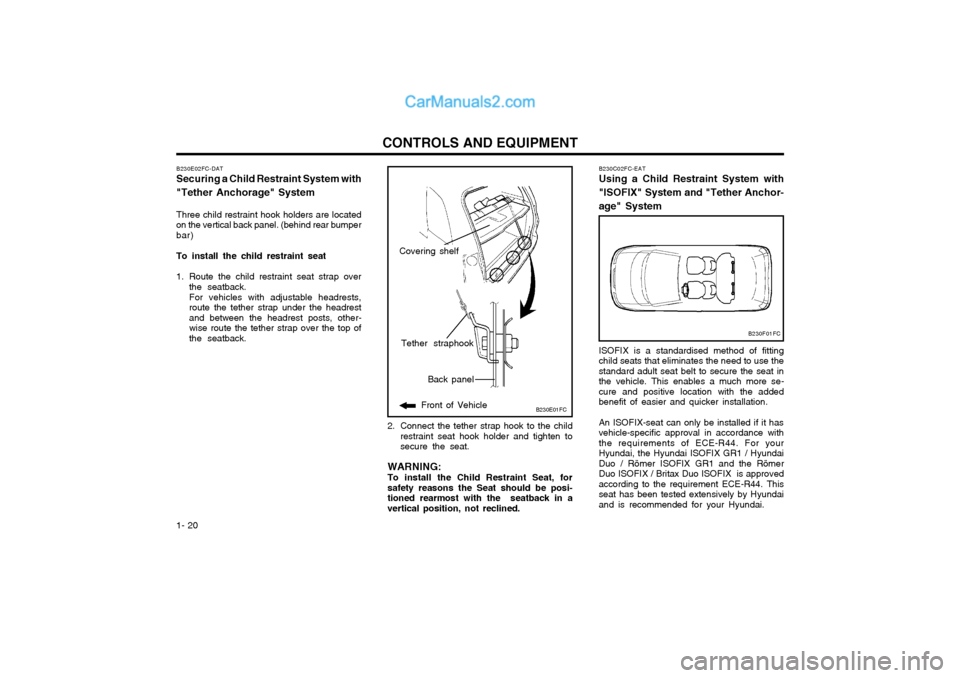
B230E02FC-DAT Securing a Child Restraint System with "Tether Anchorage" System Three child restraint hook holders are located on the vertical back panel. (behind rear bumperbar) To install the child restraint seat
1. Route the child restraint seat strap over the seatback. For vehicles with adjustable headrests, route the tether strap under the headrestand between the headrest posts, other-wise route the tether strap over the top ofthe seatback.
2. Connect the tether strap hook to the childrestraint seat hook holder and tighten tosecure the seat.
WARNING:
To install the Child Restraint Seat, for safety reasons the Seat should be posi-tioned rearmost with the seatback in avertical position, not reclined.
Covering shelf
B230F01FC
B230C02FC-EAT Using a Child Restraint System with "ISOFIX" System and "Tether Anchor-age" System ISOFIX is a standardised method of fitting child seats that eliminates the need to use thestandard adult seat belt to secure the seat inthe vehicle. This enables a much more se-cure and positive location with the addedbenefit of easier and quicker installation. An ISOFIX-seat can only be installed if it has vehicle-specific approval in accordance withthe requirements of ECE-R44. For yourHyundai, the Hyundai ISOFIX GR1 / HyundaiDuo / Römer ISOFIX GR1 and the RömerDuo ISOFIX / Britax Duo ISOFIX is approvedaccording to the requirement ECE-R44. Thisseat has been tested extensively by Hyundaiand is recommended for your Hyundai.
Page 29 of 407

1- 21
CONTROLS AND EQUIPMENT
B230D02FC-1
ISOFIX Anchor
NOTE:At present, this seat is the only one com-
plying with that provision. In case that other manufacturers will furnish proof ofa respective certification, Hyundai is go-ing to evaluate this seat carefully and willgive a recommendation provided that seatcomplies to the law. Please ask yourHyundai authorised repairer in this re-spect.
On each side of the rear seat, between the
cushion and backrest, are located a pair ofISOFIX anchorage points together with a toptether mounting located in the luggage com-partment. During the installation, the seat hasto be engaged at the anchorage-points insuch a way whereby you can hear it click(check by pulling!) and has to be fixed with theTop Tether-belt to the top tether mountinglocated in the luggage compartment. Theinstalling and the use of a child-seat has to bedone according to the installation manual for the ISOFIX-seat, whilst using the ISOFIX-child-seat, the rear-bench not allowed to bemoved beyond the middle position to theforward direction. NOTE: An ISOFIX-child-seat can only be installed if the seat has a vehicle-specific approvalaccording to ECE-R44. Before using theISOFIX-child-seat, which was bought foranother car, ask your Hyundai authorisedrepairer whether this seat-type is approvedand recommended for your Hyundai. To secure the child restraint seat
2. Connect the tether strap hook to the child
restraint hook holder and tighten to secure the seat. Refer to "Securing a Child Re-straint System with the Tether AnchorageSystem" on page 1-20.
WARNING:
o Do not install a child restraint seat at the centre of the rear seat using thevehicle's ISOFIX anchors. The ISOFIXanchors are only provided for the leftand right outboard rear seating posi-tions. Do not misuse the ISOFIX an-chors by attempting to attach a childrestraint seat in the middle of the rearseat to the ISOFIX anchors. In a crash,the child restraint seat ISOFIX attach-ments may not be strong enough tosecure the child restraint seat properlyin the centre of the rear seat and maybreak, causing serious injury or death.
o Do not mount more than one child restraint to a child restraint lower an-chorage point. Over-loading may causethe anchorage points or tether anchorto break, causing serious injury ordeath.
o Attach the ISOFIX or ISOFIX-compat- ible child restraint seat only to theappropriate locations shown in the il-lustration.
B230D03FC
1. To engage the child restraint seat to theISOFIX anchor, insert the child restraint seat latch into the ISOFIX anchor. Listenfor the audible "click" sound.
Page 30 of 407
CONTROLS AND EQUIPMENT
1- 22
Driver's airbag
The seat belt pre-tensioner system consists mainly of the following components. Theirlocations are shown in the illustration.
1. SRS airbag warning light
2. Seat belt pre-tensioner assembly
3. SRS control module
1 2
3
B180B02S-DAG
Passenger's airbag
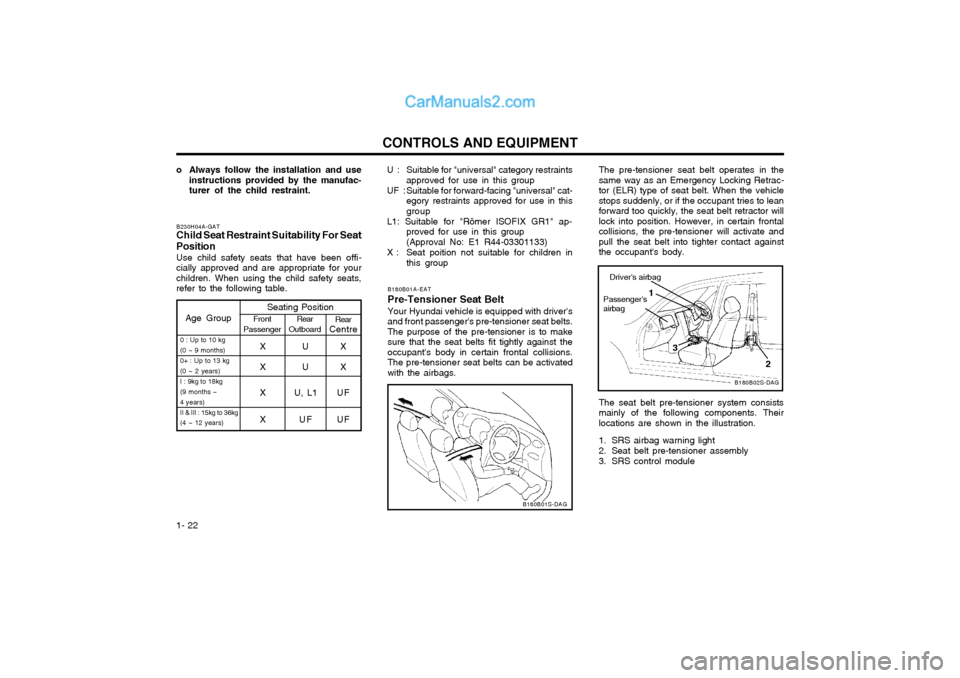
Age Group
Seating PositionFront
Passenger Rear
Outboard Rear
Centre
0 : Up to 10 kg (0 ~ 9 months) 0+ : Up to 13 kg (0 ~ 2 years)I : 9kg to 18kg(9 months ~4 years)II & III : 15kg to 36kg (4 ~ 12 years)XUX
XUX
X U, L1 U F XU FUF
B180B01S-DAG
B180B01A-EAT Pre-Tensioner Seat BeltYour Hyundai vehicle is equipped with driver's and front passenger's pre-tensioner seat belts.The purpose of the pre-tensioner is to makesure that the seat belts fit tightly against theoccupant's body in certain frontal collisions.The pre-tensioner seat belts can be activatedwith the airbags.
The pre-tensioner seat belt operates in the same way as an Emergency Locking Retrac-tor (ELR) type of seat belt. When the vehiclestops suddenly, or if the occupant tries to leanforward too quickly, the seat belt retractor willlock into position. However, in certain frontalcollisions, the pre-tensioner will activate andpull the seat belt into tighter contact againstthe occupant's body.
B230H04A-GAT Child Seat Restraint Suitability For Seat Position Use child safety seats that have been offi- cially approved and are appropriate for yourchildren. When using the child safety seats,refer to the following table.
U : Suitable for "universal" category restraints
approved for use in this group
UF : Suitable for forward-facing "universal" cat- egory restraints approved for use in thisgroup
L1: Suitable for "Römer ISOFIX GR1" ap- proved for use in this group (Approval No: E1 R44-03301133)
X : Seat poition not suitable for children in this group
o Always follow the installation and use
instructions provided by the manufac- turer of the child restraint.
Page 31 of 407
1- 23
CONTROLS AND EQUIPMENTWARNING:
o Pre-tensioners are designed to operateonly one time. After activation, pre- tensioner seat belts must be replaced.All seat belts, of any type, should al-ways be replaced after they have beenworn during a collision.
o The pre-tensioner seat belt assembly mechanisms become hot during activa-tion. Do not touch the pre-tensionerseat belt assemblies for several min-utes after they have been activated.
o Do not attempt to inspect or replace the pre-tensioner seat belts yourself.This must be done by an Hyundaiauthorised repairer.
o Do not strike the pre-tensioner seat belt assemblies.
o Do not attempt to service or repair the pre-tensioner seat belt system in anymanner.
o Improper handling of the pre-tensioner seat belt assemblies, and failure to heedthe warnings to not strike, modify, in-spect, replace, service or repair the pre-tensioner seat belt assemblies may leadto improper operation or inadvertentactivation and serious injury.
o Always wear the seat belts when driving or travelling in a motor vehicle.
WARNING: To obtain maximum benefit from a pre- tensioner seat belt:
1. The seat belt must be worn correctly.
2. The seat belt must be adjusted to the
correct position.
NOTE:
o Both the driver's and front passenger's pre-tensioner seat belts will be acti-vated in certain frontal collisions. Thepre-tensioner seat belts can be acti-vated with the airbags. The pre-tensioners will be activated under theseconditions even if the seat belts arenot being worn at the time of thecollision.
o When the pre-tensioner seat belts are activated, a loud noise may be heardand fine dust, which may appear to besmoke, may be visible in the passengercompartment. These are normal operat-ing conditions and are not hazardous.
o Although it is harmless, the fine dust may cause skin irritation and shouldnot be breathed for prolonged periods.Wash your hands and face thoroughlyafter an accident in which the pre-tensioner seat belts were activated.
AIR
BAG
CAUTION:
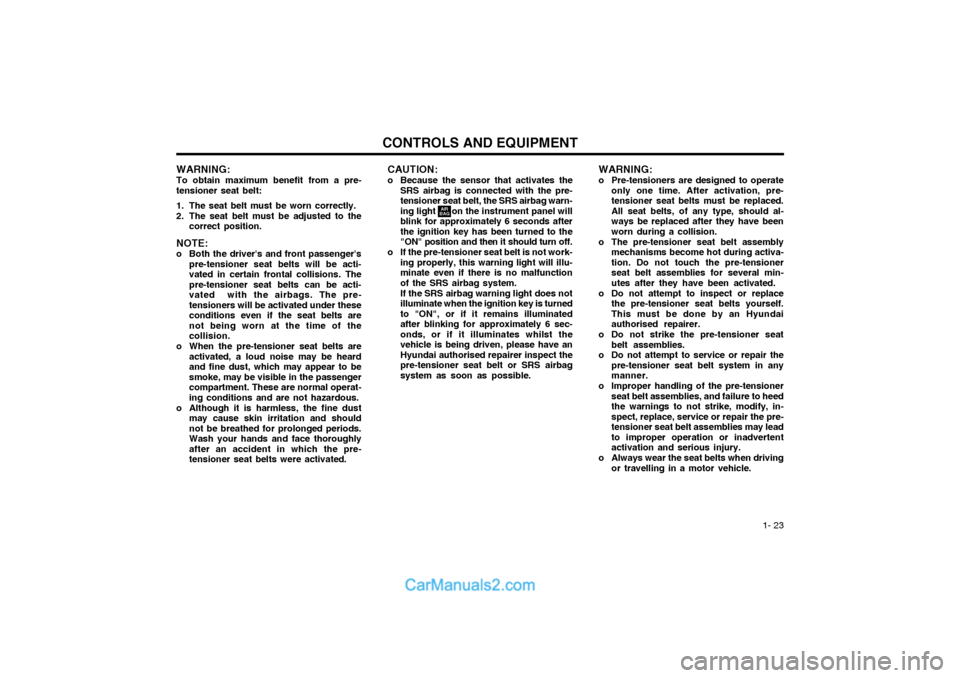
o Because the sensor that activates the
SRS airbag is connected with the pre- tensioner seat belt, the SRS airbag warn-ing light on the instrument panel willblink for approximately 6 seconds afterthe ignition key has been turned to the
"ON" position and then it should turn off.
o If the pre-tensioner seat belt is not work- ing properly, this warning light will illu-minate even if there is no malfunctionof the SRS airbag system. If the SRS airbag warning light does not illuminate when the ignition key is turnedto "ON", or if it remains illuminatedafter blinking for approximately 6 sec-onds, or if it illuminates whilst thevehicle is being driven, please have anHyundai authorised repairer inspect thepre-tensioner seat belt or SRS airbagsystem as soon as possible.
Page 32 of 407
CONTROLS AND EQUIPMENT
1- 24
Your Hyundai is equipped with a Supplemen- tal Restraint (Airbag) System. The indicationsof the system's presence are the letters "SRSAIR BAG" embossed on the airbag pad coverin the steering wheel and the passenger'sside front panel pad above the glove box. The Hyundai SRS consists of airbags in- stalled under the pad covers in the centre ofthe steering wheel and the passenger's sidefront panel above the glove box. The purposeof the SRS is to provide the vehicle's driverand/or the front passenger with additionalprotection than that offered by the seat beltsystem alone, in case of a frontal impact ofsufficient severity. NOTE: Be sure to read information about the SRS on the labels provided on the reverseside of the sun visor and in the glove box. WARNING:
o As its name implies, the SRS is de-
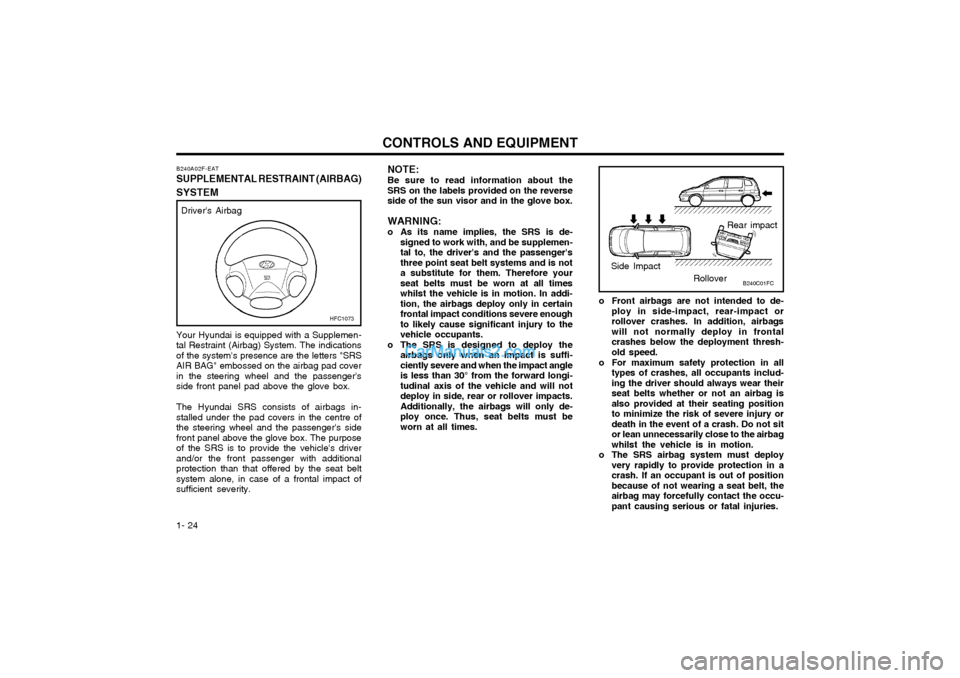
signed to work with, and be supplemen- tal to, the driver's and the passenger'sthree point seat belt systems and is nota substitute for them. Therefore yourseat belts must be worn at all timeswhilst the vehicle is in motion. In addi-tion, the airbags deploy only in certainfrontal impact conditions severe enoughto likely cause significant injury to thevehicle occupants.
o The SRS is designed to deploy the airbags only when an impact is suffi-ciently severe and when the impact angleis less than 30° from the forward longi-tudinal axis of the vehicle and will notdeploy in side, rear or rollover impacts.Additionally, the airbags will only de-ploy once. Thus, seat belts must beworn at all times.
Driver's Airbag
B240A02F-EAT
SUPPLEMENTAL RESTRAINT (AIRBAG)
SYSTEM
HFC1073
Rear impact
Side Impact RolloverB240C01FC
o Front airbags are not intended to de-
ploy in side-impact, rear-impact or rollover crashes. In addition, airbagswill not normally deploy in frontalcrashes below the deployment thresh-old speed.
o For maximum safety protection in all types of crashes, all occupants includ-ing the driver should always wear theirseat belts whether or not an airbag isalso provided at their seating positionto minimize the risk of severe injury ordeath in the event of a crash. Do not sitor lean unnecessarily close to the airbagwhilst the vehicle is in motion.
o The SRS airbag system must deploy very rapidly to provide protection in acrash. If an occupant is out of positionbecause of not wearing a seat belt, theairbag may forcefully contact the occu-pant causing serious or fatal injuries.
Page 34 of 407
CONTROLS AND EQUIPMENT
1- 26
WARNING:
o When the SRS is activated, there may be a loud noise and fine dust will be released throughout the vehicle. Theseconditions are normal and are not haz-ardous. However, the fine dust generat-ed during airbag deployment may causeskin irritation. Be sure to wash yourhands and face thoroughly with luke-warm water and a mild soap after anaccident in which the airbags were de-ployed.
o The SRS can function only when the ignition key is in the "ON" position. Ifthe SRS SRI does not come on, orcontinuously remains on, after flashingfor about 6 seconds when the ignitionkey is turned to the "ON" position, orafter the engine is started, or comes onwhilst driving, the SRS is not workingproperly. If this occurs, have your ve-hicle immediately inspected by yourHyundai authorised repairer.
o Before you replace a fuse or discon- nect a battery terminal, turn the igni-tion key to the "LOCK" position orremove the ignition key. Never removeor replace the air bag related fuse(s)when the ignition key is in the "ON"position. Failure to heed this warningwill cause the SRS SRI to illuminate.
Passenger's Airbag
After complete inflation, the airbag immedi- ately starts deflating, enabling the driver tomaintain forward visibility. CAUTION: When installing a container of liquid air freshener inside a vehicle, do not place itnear the instrument cluster nor on theinstrument panel pad surface. If there isany leakage from the air freshener ontothese areas (instrument cluster, instrumentpanel pad or air ventilator), it may damagethese parts. If the liquid from the air fresh-ener does leak onto these areas, washthem with water immediately. B240B05L
dangerous projectiles and cause injury ifthe passenger's side air bag inflates.
B990B04Y-EAT Side Impact Airbag
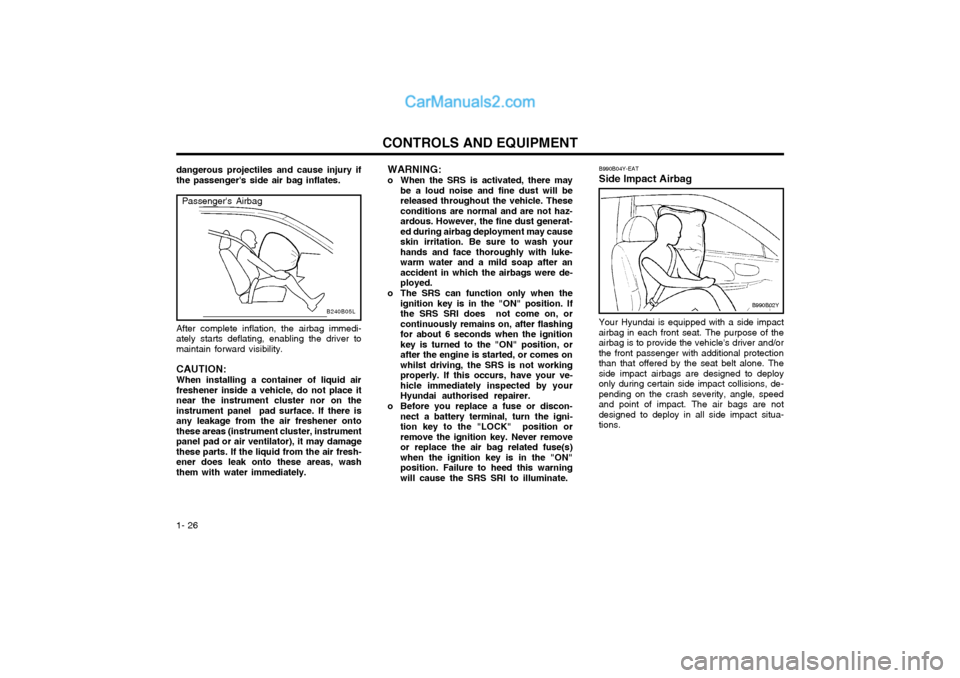
Your Hyundai is equipped with a side impact airbag in each front seat. The purpose of theairbag is to provide the vehicle's driver and/orthe front passenger with additional protectionthan that offered by the seat belt alone. Theside impact airbags are designed to deployonly during certain side impact collisions, de-pending on the crash severity, angle, speedand point of impact. The air bags are notdesigned to deploy in all side impact situa-tions.
B990B02Y