Rear seat Hyundai Terracan 2003 Owner's Manual
[x] Cancel search | Manufacturer: HYUNDAI, Model Year: 2003, Model line: Terracan, Model: Hyundai Terracan 2003Pages: 349, PDF Size: 4.56 MB
Page 15 of 349
FEATURES OF YOUR HYUNDAI 1- 7
o The door can be locked or unlocked with akey.
o Lock the door by turning the key toward the
front of the vehicle and unlock it by turning the key toward the rear.
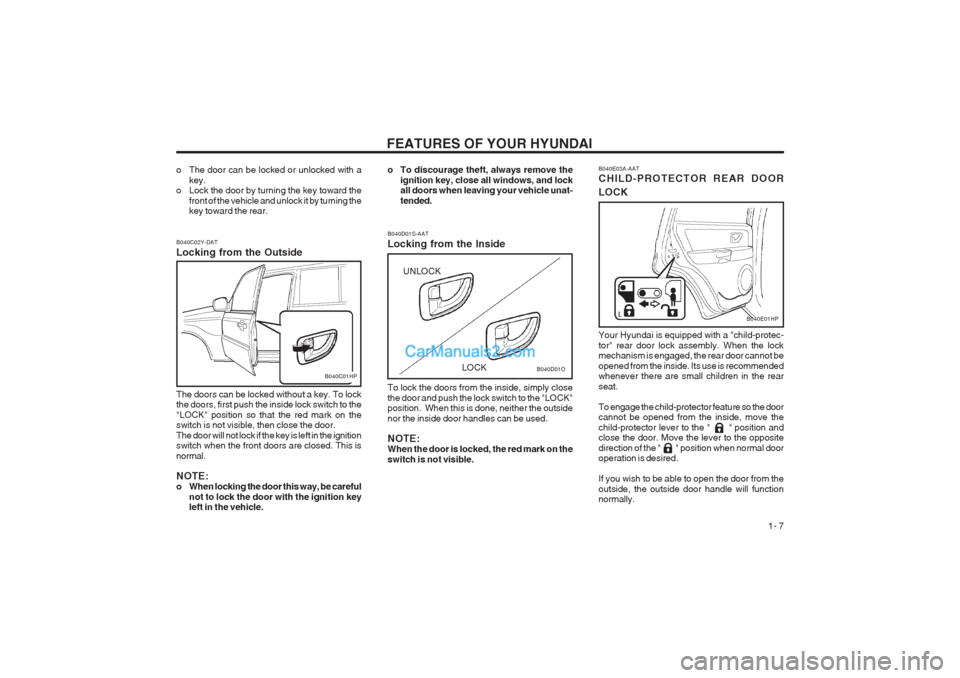
B040C02Y-DAT Locking from the Outside
B040C01HP
The doors can be locked without a key. To lock the doors, first push the inside lock switch to the "LOCK" position so that the red mark on the switch is not visible, then close the door. The door will not lock if the key is left in the ignition switch when the front doors are closed. This is normal. NOTE:
o When locking the door this way, be careful not to lock the door with the ignition keyleft in the vehicle.
B040D01S-AAT Locking from the Inside To lock the doors from the inside, simply close the door and push the lock switch to the "LOCK" position. When this is done, neither the outside nor the inside door handles can be used. NOTE: When the door is locked, the red mark on the switch is not visible.
B040D01O
LOCK
UNLOCK
o To discourage theft, always remove the
ignition key, close all windows, and lock all doors when leaving your vehicle unat- tended. B040E03A-AAT CHILD-PROTECTOR REAR DOOR LOCK Your Hyundai is equipped with a "child-protec- tor" rear door lock assembly. When the lock mechanism is engaged, the rear door cannot be opened from the inside. Its use is recommended whenever there are small children in the rear seat. To engage the child-protector feature so the door cannot be opened from the inside, move the child-protector lever to the " " position and close the door. Move the lever to the opposite direction of the " " position when normal door operation is desired. If you wish to be able to open the door from the outside, the outside door handle will function normally.
B040E01HP
Page 19 of 349
FEATURES OF YOUR HYUNDAI 1- 11
B060A02HP
NOTE: The power windows can be operated for 30 seconds after the ignition key is turned to the "ACC" or "LOCK" positions, or removed from the ignition switch. If the front doors are opened during this 30 second period, the power windows can no longer be operated without the ignition key turned to the "ON" position. WARNING:
(1) Be careful that someone's head, hands and body are not trapped by a closingwindow.
(2) Never try to operate the main switch on
the driver's door and the individual door window switch in opposing directions at the same time. If this is done, the window will stop and cannot be opened or closed.
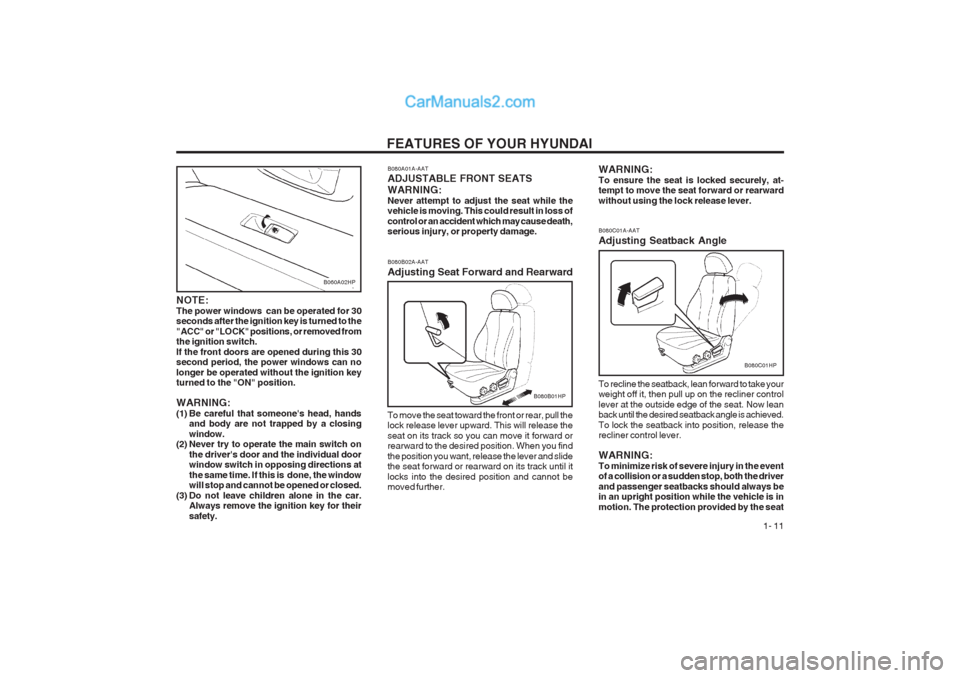
(3) Do not leave children alone in the car. Always remove the ignition key for their safety. To move the seat toward the front or rear, pull the lock release lever upward. This will release the seat on its track so you can move it forward or rearward to the desired position. When you find the position you want, release the lever and slide the seat forward or rearward on its track until it locks into the desired position and cannot be moved further.
B080A01A-AAT ADJUSTABLE FRONT SEATS WARNING: Never attempt to adjust the seat while the vehicle is moving. This could result in loss of control or an accident which may cause death, serious injury, or property damage. B080B02A-AAT Adjusting Seat Forward and Rearward
B080B01HP
B080C01A-AAT Adjusting Seatback Angle
To recline the seatback, lean forward to take your weight off it, then pull up on the recliner control lever at the outside edge of the seat. Now lean back until the desired seatback angle is achieved. To lock the seatback into position, release the recliner control lever. WARNING: To minimize risk of severe injury in the event of a collision or a sudden stop, both the driver and passenger seatbacks should always be in an upright position while the vehicle is in motion. The protection provided by the seat
B080C01HP
WARNING: To ensure the seat is locked securely, at- tempt to move the seat forward or rearward without using the lock release lever.
Page 20 of 349
FEATURES OF YOUR HYUNDAI
1- 12
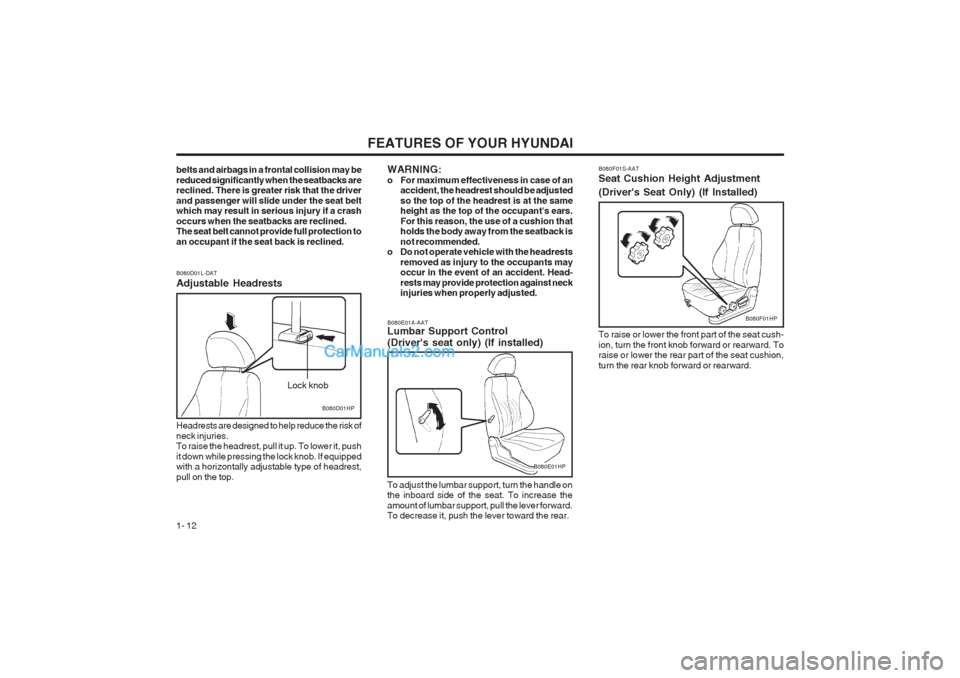
B080F01S-AAT Seat Cushion Height Adjustment (Driver's Seat Only) (If Installed) To raise or lower the front part of the seat cush- ion, turn the front knob forward or rearward. To raise or lower the rear part of the seat cushion, turn the rear knob forward or rearward.
B080F01HP
B080E01A-AAT Lumbar Support Control (Driver's seat only) (If installed)
B080E01HP
To adjust the lumbar support, turn the handle on the inboard side of the seat. To increase the amount of lumbar support, pull the lever forward. To decrease it, push the lever toward the rear.
B080D01L-DAT Adjustable Headrests
B080D01HP
Lock knob
Headrests are designed to help reduce the risk of neck injuries. To raise the headrest, pull it up. To lower it, push it down while pressing the lock knob. If equipped with a horizontally adjustable type of headrest, pull on the top.
belts and airbags in a frontal collision may bereduced significantly when the seatbacks are reclined. There is greater risk that the driver and passenger will slide under the seat belt which may result in serious injury if a crash occurs when the seatbacks are reclined. The seat belt cannot provide full protection to an occupant if the seat back is reclined.
WARNING:
o For maximum effectiveness in case of an
accident, the headrest should be adjustedso the top of the headrest is at the same height as the top of the occupant's ears. For this reason, the use of a cushion that holds the body away from the seatback is not recommended.
o Do not operate vehicle with the headrests
removed as injury to the occupants may occur in the event of an accident. Head- rests may provide protection against neck injuries when properly adjusted.
Page 21 of 349
FEATURES OF YOUR HYUNDAI 1- 13
B090B01L-AAT Adjusting Seat Forward and Rearward
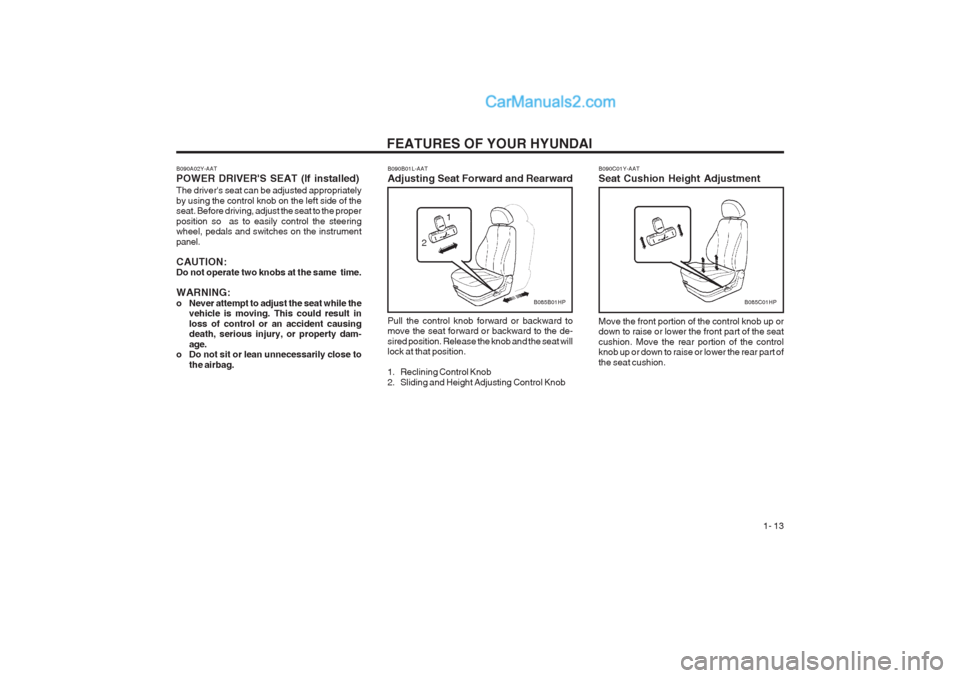
Pull the control knob forward or backward to move the seat forward or backward to the de- sired position. Release the knob and the seat will lock at that position.
1. Reclining Control Knob
2. Sliding and Height Adjusting Control KnobB085B01HP
1
2
B090A02Y-AAT POWER DRIVER'S SEAT (If installed) The driver's seat can be adjusted appropriately by using the control knob on the left side of the seat. Before driving, adjust the seat to the proper position so as to easily control the steering wheel, pedals and switches on the instrument panel. CAUTION: Do not operate two knobs at the same time. WARNING:
o Never attempt to adjust the seat while the
vehicle is moving. This could result inloss of control or an accident causing death, serious injury, or property dam- age.
o Do not sit or lean unnecessarily close to
the airbag. B090C01Y-AAT Seat Cushion Height Adjustment Move the front portion of the control knob up or down to raise or lower the front part of the seat cushion. Move the rear portion of the control knob up or down to raise or lower the rear part of the seat cushion.
B085C01HP
Page 23 of 349
FEATURES OF YOUR HYUNDAI 1- 15
HHP231-2
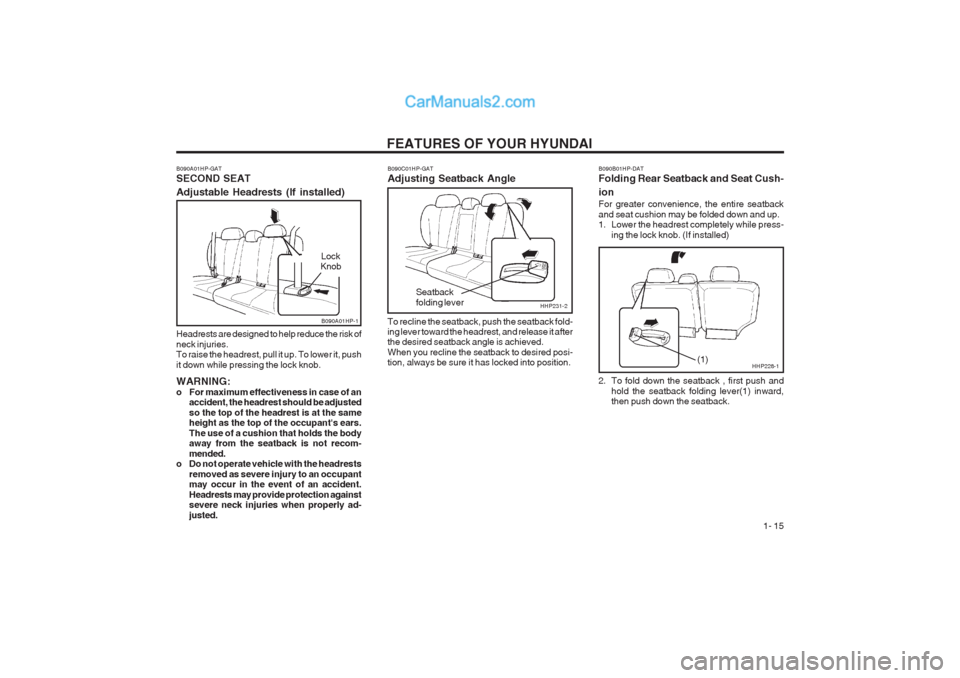
B090A01HP-GAT SECOND SEAT Adjustable Headrests (If installed) Headrests are designed to help reduce the risk of neck injuries. To raise the headrest, pull it up. To lower it, push it down while pressing the lock knob. WARNING:
o For maximum effectiveness in case of anaccident, the headrest should be adjustedso the top of the headrest is at the same height as the top of the occupant's ears.
The use of a cushion that holds the body away from the seatback is not recom- mended.
o Do not operate vehicle with the headrests
removed as severe injury to an occupant may occur in the event of an accident. Headrests may provide protection against severe neck injuries when properly ad- justed. B090C01HP-GAT Adjusting Seatback Angle To recline the seatback, push the seatback fold- ing lever toward the headrest, and release it afterthe desired seatback angle is achieved. When you recline the seatback to desired posi- tion, always be sure it has locked into position.
Seatback folding lever
B090A01HP-1
Lock
Knob
B090B01HP-DAT Folding Rear Seatback and Seat Cush- ion For greater convenience, the entire seatback and seat cushion may be folded down and up.
1. Lower the headrest completely while press-
ing the lock knob. (If installed)
2. To fold down the seatback , first push and hold the seatback folding lever(1) inward,
then push down the seatback.
HHP228-1(1)
Page 24 of 349
FEATURES OF YOUR HYUNDAI
1- 16 o When you return the seatback to its upright
position, always be sure it is locked into position by pulling and pushing on the top of seatback.
WARNING: o The purpose of the fold-down rear seat back and the fold-up rear seat cushion isto allow you to carry more objects than could be accommodated. Never allow pas- sengers to sit on the cargo area while the car is moving. This is not a proper seating position and no seat belts are available for use when the seat back is folded down. This could result in serious injury or death in case of an accident or a sudden stop. Objects should not extend higher than the top of the front seatbacks. This could allow cargo to slide forward and cause injury or damage during sud- den stops.
o When you return the rear seatback to its upright position after being folded down, be careful not to damage the seatbelt web- bing or buckle. In addition, do not allow the seatbelt webbing or buckle to get caught or pinched in the rear seat.
o Do not allow passengers to fold down and up the seatback and seat cushion while the car is moving.
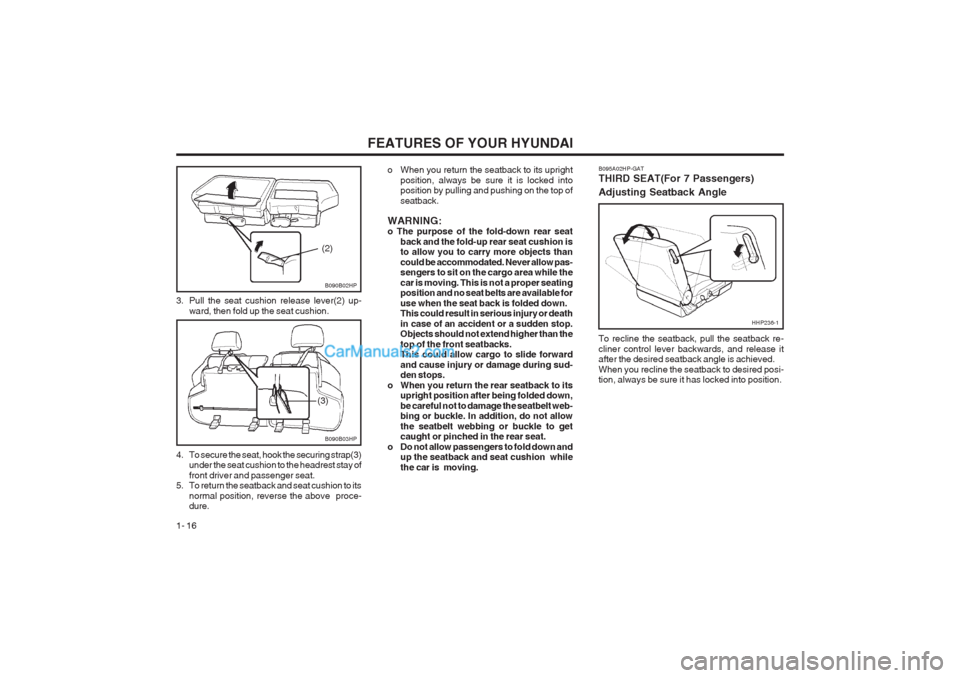
3. Pull the seat cushion release lever(2) up-
ward, then fold up the seat cushion.
B090B02HP
(2)
B090B03HP
(3)
4. To secure the seat, hook the securing strap(3) under the seat cushion to the headrest stay of front driver and passenger seat.
5. To return the seatback and seat cushion to its
normal position, reverse the above proce- dure. B095A02HP-GAT THIRD SEAT(For 7 Passengers) Adjusting Seatback Angle To recline the seatback, pull the seatback re- cliner control lever backwards, and release it after the desired seatback angle is achieved. When you recline the seatback to desired posi- tion, always be sure it has locked into position.
HHP236-1
Page 25 of 349
FEATURES OF YOUR HYUNDAI 1- 17
B095B02HP-1
(2)
B095B01HP-1
(1)
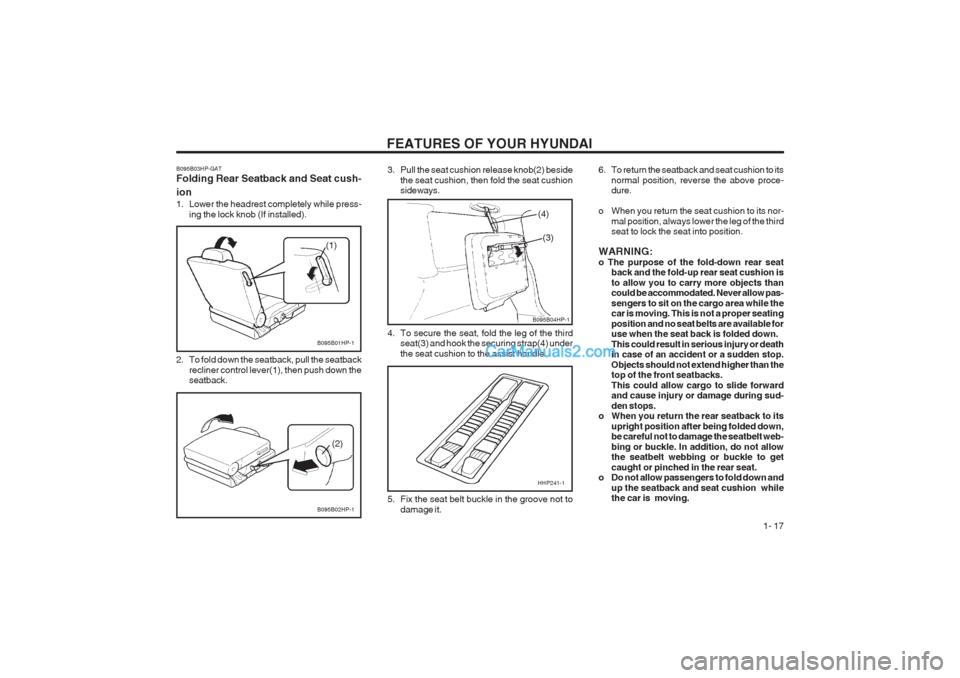
2. To fold down the seatback, pull the seatback recliner control lever(1), then push down the seatback.
B095B03HP-GAT Folding Rear Seatback and Seat cush- ion
1. Lower the headrest completely while press-
ing the lock knob (If installed). 3. Pull the seat cushion release knob(2) beside
the seat cushion, then fold the seat cushion sideways.
4. To secure the seat, fold the leg of the third seat(3) and hook the securing strap(4) under the seat cushion to the assist handle.
(4)
(3)
HHP241-1
B095B04HP-1
5. Fix the seat belt buckle in the groove not to damage it. 6. To return the seatback and seat cushion to its
normal position, reverse the above proce- dure.
o When you return the seat cushion to its nor- mal position, always lower the leg of the thirdseat to lock the seat into position.
WARNING: o The purpose of the fold-down rear seat back and the fold-up rear seat cushion isto allow you to carry more objects than could be accommodated. Never allow pas- sengers to sit on the cargo area while the car is moving. This is not a proper seating position and no seat belts are available for use when the seat back is folded down. This could result in serious injury or death in case of an accident or a sudden stop. Objects should not extend higher than the top of the front seatbacks. This could allow cargo to slide forward and cause injury or damage during sud- den stops.
o When you return the rear seatback to its
upright position after being folded down, be careful not to damage the seatbelt web- bing or buckle. In addition, do not allow the seatbelt webbing or buckle to get caught or pinched in the rear seat.
o Do not allow passengers to fold down and
up the seatback and seat cushion while the car is moving.
Page 26 of 349
FEATURES OF YOUR HYUNDAI
1- 18
B150A02A-GAT SEAT BELT PRECAUTIONSAll occupants of the vehicle should wear their seat belts at all times. Indeed, your province's laws may require that some or all occupants of the vehicle use seat belts. The possibility of injury or the severity of injury in
an accident will be decreased if this elementary safety precaution is observed. In addition, the following recommendations are made:
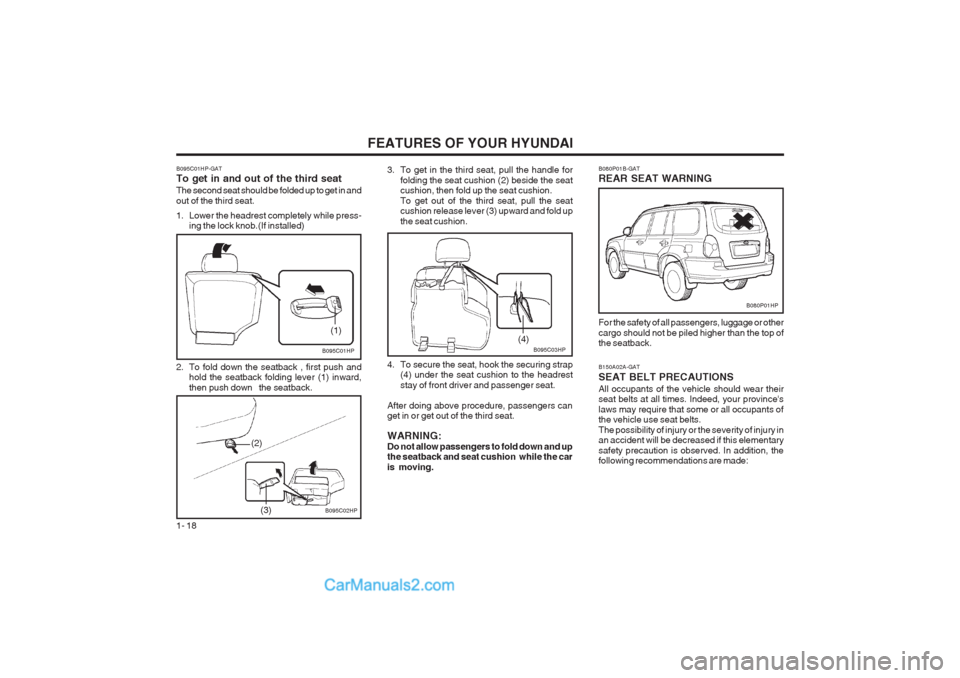
3. To get in the third seat, pull the handle for
folding the seat cushion (2) beside the seatcushion, then fold up the seat cushion. To get out of the third seat, pull the seat cushion release lever (3) upward and fold up the seat cushion.
4. To secure the seat, hook the securing strap (4) under the seat cushion to the headreststay of front driver and passenger seat.
After doing above procedure, passengers can get in or get out of the third seat. WARNING: Do not allow passengers to fold down and up the seatback and seat cushion while the car is moving.
B095C03HP
(4)
B080P01B-GAT REAR SEAT WARNING
B080P01HP
For the safety of all passengers, luggage or other cargo should not be piled higher than the top of the seatback.
B095C01HP-GAT To get in and out of the third seat The second seat should be folded up to get in and out of the third seat.
1. Lower the headrest completely while press- ing the lock knob.(If installed)
2. To fold down the seatback , first push and hold the seatback folding lever (1) inward, then push down the seatback.
B095C01HP
B095C02HP
(1)
(3)
(2)
Page 27 of 349
FEATURES OF YOUR HYUNDAI 1- 19
B150B01Y-GAT Infant or Small Child Some countries require the use of child restraint systems for infants and small children. Whether this is required by law or not, it is strongly recommended that a child restraint seat or infant
restraint system be used for infants or small children weighing less than 18 kilograms (40 pounds). NOTE: Small children are best protected in an acci- dent when properly restrained by a child restraint system. B150C02A-AAT Larger ChildrenChildren who are too large for child restraint systems should always occupy the rear seat and use the available lap/shoulder belts. The lap portion should be fastened snug on the hips and as low as possible. Check belt fit periodically. A child's squirming could put the belt out of posi- tion. Children are afforded the most safety in the event of an accident when they are restrained by a proper restraint system in the rear seat. If a larger child (over age 13) must be seated in the front seat, the child should be securely restrained by the available lap/shoulder belt and the seat should be placed in the rearmost position. Chil- dren under the age of 13 should be restrained securely in the rear seat. NEVER place a child under the age of 13 in the front seat. NEVER place a rear facing child seat in the front seat of a vehicle.
B150E01A-AAT Injured Person A seat belt should be used when an injured person is being transported. When this is neces- sary, you should consult a physician for recom- mendations. B150F01A-AAT One Person Per BeltTwo people (including children) should never attempt to use a single seat belt. This could increase the severity of injuries in case of an accident. B150G01A-AAT Do Not Lie Down To reduce the chance of injuries in the event of an accident and to achieve maximum effectiveness of the restraint system, all passengers should be sitting up and the front seats should be in an upright position when the car is moving. A seat belt cannot operate properly if the person is lying down in the rear seat or if the front seat is in a reclined position.
B150D01A-AAT Pregnant Women The use of a seat belt is recommended for pregnant women to lessen the chance of injury in an accident. When a seat belt is used, the lap belt portion should be placed as low and snugly as possible on the hips, not across the abdomen. For specific recommendations, consult a physi- cian.
WARNING: Sitting in a reclined position or lying down when your vehicle is in motion can be dan- gerous. Even if you buckle up, your seat belts can't do their job when you're reclined. The shoulder belt can't do its job because it won't be against your body. Instead, it will be in front of you. In a crash you could go into it with great force, receiving serious neck or other injuries. The lap belt can't do its job either. In a crash the belt could go up over your abdomen. The belt forces would be applied there, not at your strong pelvic bones. This could cause serious internal injuries. For proper protection when the vehicle is in motion, have the seatback upright. Then sit well back in the seat and wear your seat belt properly. See page 1-21. B160A01A-AAT CARE OF SEAT BELTS Seat belt systems should never be disassem- bled or modified. In addition, care should be taken to assure that seat belts and belt hardware are not damaged by seat hinges, doors or other abuse. WARNING: When you return the rear seatback to its upright position after the rear seatback was folded down, be careful not to damage the seat belt webbing or buckle. Be sure that the webbing or buckle does not get caught or pinched in the rear seat.
Page 30 of 349
FEATURES OF YOUR HYUNDAI
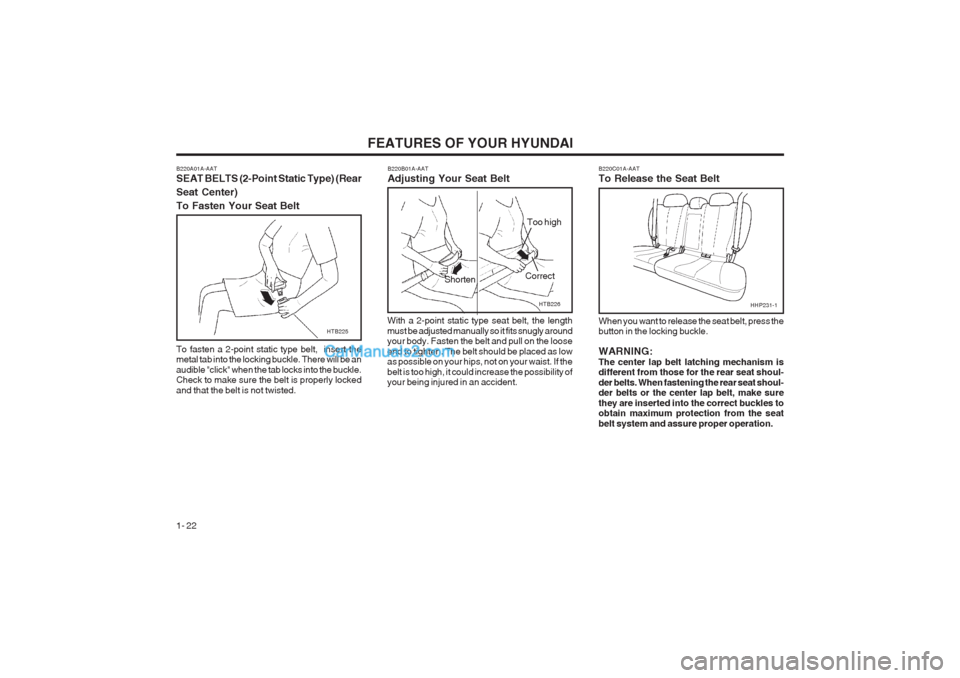
1- 22 B220C01A-AAT To Release the Seat Belt When you want to release the seat belt, press the button in the locking buckle. WARNING: The center lap belt latching mechanism is different from those for the rear seat shoul- der belts. When fastening the rear seat shoul- der belts or the center lap belt, make sure they are inserted into the correct buckles to obtain maximum protection from the seat belt system and assure proper operation.
B220B01A-AAT Adjusting Your Seat Belt
HTB226
With a 2-point static type seat belt, the length must be adjusted manually so it fits snugly around your body. Fasten the belt and pull on the loose end to tighten. The belt should be placed as low as possible on your hips, not on your waist. If the belt is too high, it could increase the possibility of your being injured in an accident. Correct
Shorten Too high
HTB225
B220A01A-AAT SEAT BELTS (2-Point Static Type) (Rear Seat Center)To Fasten Your Seat Belt To fasten a 2-point static type belt, insert the metal tab into the locking buckle. There will be an audible "click" when the tab locks into the buckle. Check to make sure the belt is properly locked and that the belt is not twisted.
HHP231-1