warning INFINITI FX35 2008 Workshop Manual
[x] Cancel search | Manufacturer: INFINITI, Model Year: 2008, Model line: FX35, Model: INFINITI FX35 2008Pages: 3924, PDF Size: 81.37 MB
Page 862 of 3924

BL-128
< SERVICE INFORMATION >
INTELLIGENT KEY SYSTEM
Check continuity between A/T device (park position switch) connec-
tor M67 terminal 2 (B) and ground.
OK or NG
OK >> Check harness connection.
NG >> Repair or replace harness.
Check Select Unlock RelayINFOID:0000000001327866
1.CHECK SELECT UNLOCK RELAY POWER SUPPLY
1. Turn ignition switch OFF.
2. Disconnect passenger side select unlock relay connector.
3. Check voltage between passenger side select unlock relay con- nector M30 terminal 1 and ground.
OK or NG
OK >> GO TO 2.
NG >> Repair or replace passenger side select unlock relay power supply circuit.
2.CHECK HARNESS
1. Disconnect Intelligent Key unit connector.
2. Check continuity between passenger side select unlock relay connector M30 terminal 2 and Intelligent Key unit connector
M34 terminal 40.
3. Check continuity between passenger side select unlock relay connector M30 terminal 2 and ground.
OK or NG
OK >> Replace passenger side select unlock relay.
NG >> Repair or replace harness between passenger side select unlock relay and Intelligent Key unit.
Check Hazard FunctionINFOID:0000000001327867
1.CHECK HAZARD WARNING LAMP
Does hazard warning lamp flash with hazard switch?
YES or NO
YES >> Hazard warning lamp circuit is OK.
NO >> Check hazard circuit. Refer to LT- 7 8
.
2 (B) – Ground : Continuity should exist.
PIIB9066E
1 (L/R) – Ground : Approx. 12V
PIIA6954E
2 (BR/W) – 40 (BR/W) : Continuity should exist.
2 (BR/W) – Ground : Conti
nuity should not exist.
PIIA6955E
3AA93ABC3ACD3AC03ACA3AC03AC63AC53A913A773A893A873A873A8E3A773A983AC73AC93AC03AC3
3A893A873A873A8F3A773A9D3AAF3A8A3A8C3A863A9D3AAF3A8B3A8C
Page 876 of 3924

BL-142
< SERVICE INFORMATION >
BACK DOOR
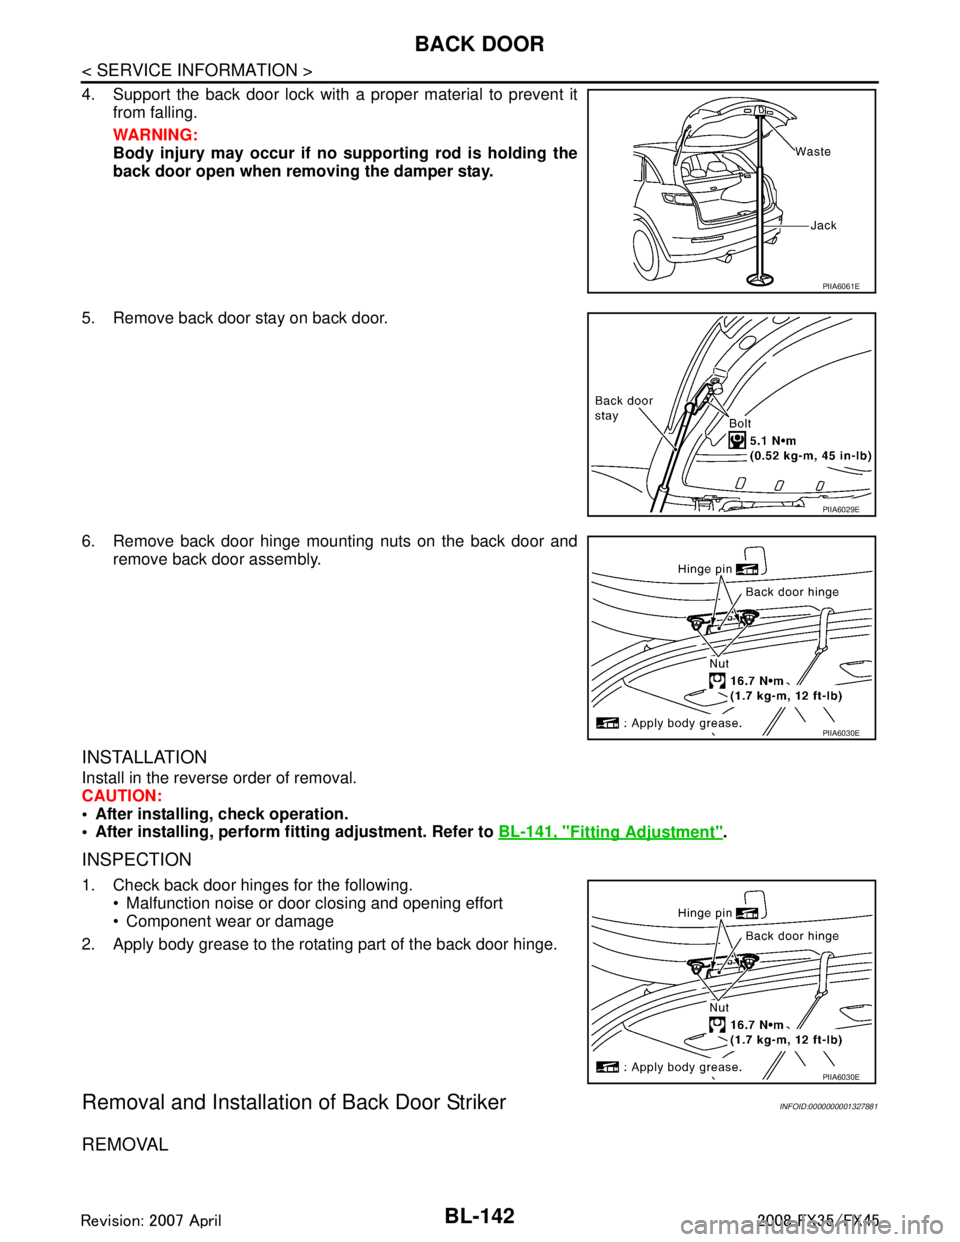
4. Support the back door lock with a proper material to prevent itfrom falling.
WARNING:
Body injury may occur if no supporting rod is holding the
back door open when removing the damper stay.
5. Remove back door stay on back door.
6. Remove back door hinge mounting nuts on the back door and remove back door assembly.
INSTALLATION
Install in the reverse order of removal.
CAUTION:
After installing, check operation.
After installing, perform fitting adjustment. Refer to BL-141, "
Fitting Adjustment".
INSPECTION
1. Check back door hinges for the following.
Malfunction noise or door closing and opening effort
Component wear or damage
2. Apply body grease to the rotating part of the back door hinge.
Removal and Installation of Back Door StrikerINFOID:0000000001327881
REMOVAL
PIIA6061E
PIIA6029E
PIIA6030E
PIIA6030E
3AA93ABC3ACD3AC03ACA3AC03AC63AC53A913A773A893A873A873A8E3A773A983AC73AC93AC03AC3
3A893A873A873A8F3A773A9D3AAF3A8A3A8C3A863A9D3AAF3A8B3A8C
Page 877 of 3924

BACK DOORBL-143
< SERVICE INFORMATION >
C
DE
F
G H
J
K L
M A
B
BL
N
O P
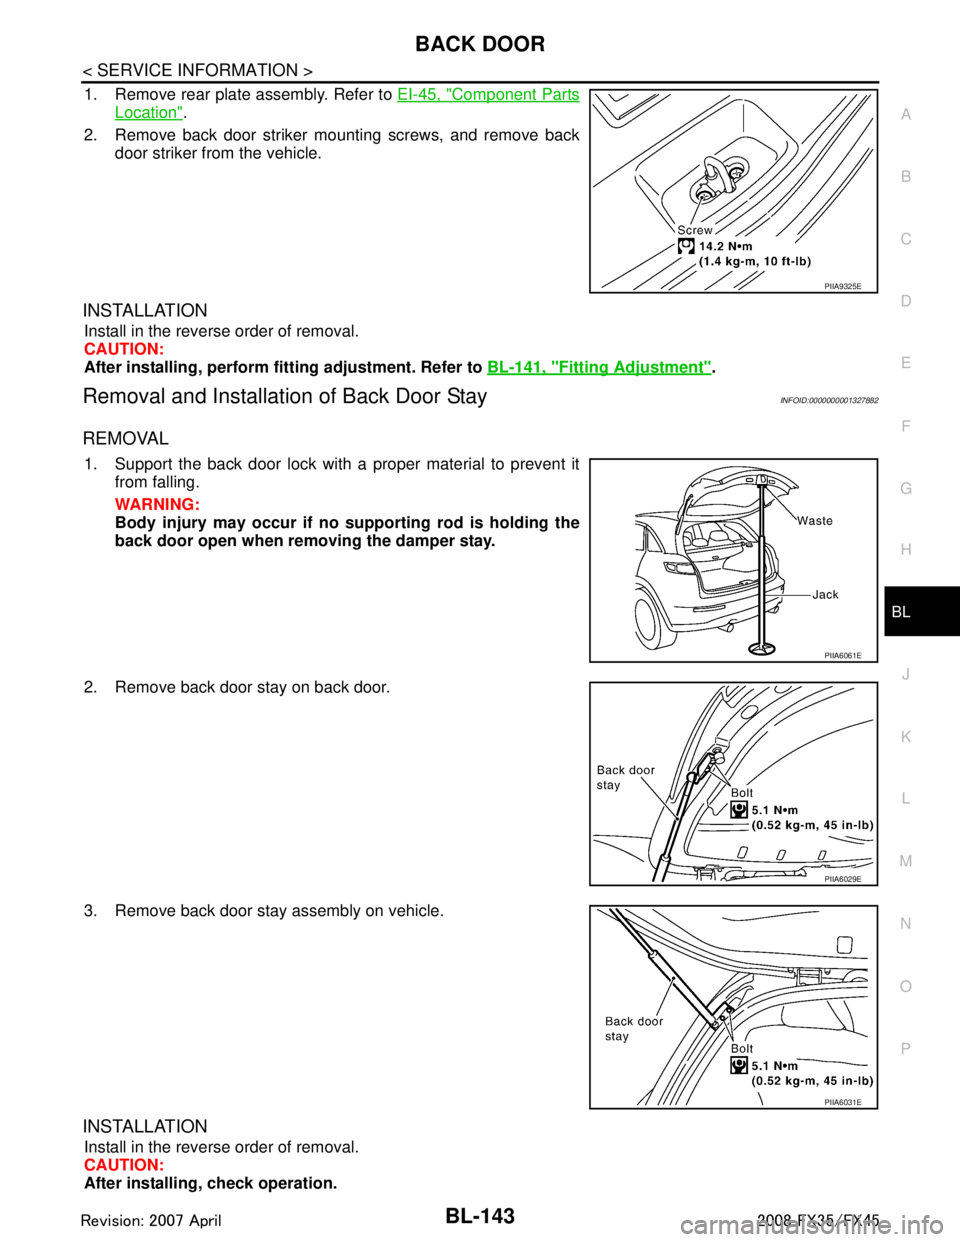
1. Remove rear plate assembly. Refer to EI-45, "Component Parts
Location".
2. Remove back door striker mounting screws, and remove back door striker from the vehicle.
INSTALLATION
Install in the reverse order of removal.
CAUTION:
After installing, perform fi tting adjustment. Refer to BL-141, "
Fitting Adjustment".
Removal and Installation of Back Door StayINFOID:0000000001327882
REMOVAL
1. Support the back door lock with a proper material to prevent it
from falling.
WARNING:
Body injury may occur if no supporting rod is holding the
back door open when removing the damper stay.
2. Remove back door stay on back door.
3. Remove back door stay assembly on vehicle.
INSTALLATION
Install in the reverse order of removal.
CAUTION:
After installing, check operation.
PIIA9325E
PIIA6061E
PIIA6029E
PIIA6031E
3AA93ABC3ACD3AC03ACA3AC03AC63AC53A913A773A893A873A873A8E3A773A983AC73AC93AC03AC3
3A893A873A873A8F3A773A9D3AAF3A8A3A8C3A863A9D3AAF3A8B3A8C
Page 897 of 3924

VEHICLE SECURITY (THEFT WARNING) SYSTEMBL-163
< SERVICE INFORMATION >
C
DE
F
G H
J
K L
M A
B
BL
N
O P
VEHICLE SECURITY (TH EFT WARNING) SYSTEM
Component Parts and Har ness Connector LocationINFOID:0000000001327904
PIIB0407E
3AA93ABC3ACD3AC03ACA3AC03AC63AC53A913A773A893A873A873A8E3A773A983AC73AC93AC03AC3
3A893A873A873A8F3A773A9D3AAF3A8A3A8C3A863A9D3AAF3A8B3A8C
Page 898 of 3924

BL-164
< SERVICE INFORMATION >
VEHICLE SECURITY (THEFT WARNING) SYSTEM
System Description
INFOID:0000000001327905
DESCRIPTION
Operation Flow
Setting the Vehicle Security System
Initial condition
Ignition switch is in OFF position.
Disarmed phase
When hood, doors or back door is open, the vehicle secu rity system is set in the disarmed phase on the
assumption that the owner is inside or near the vehicle.
When the vehicle security system is in the disarmed phase, the security indicator lamp blinks every 2.4 sec-
onds.
Pre-armed phase and armed phase
When the following operation 1 or 2 is performed, the vehicle security system turns into the “pre-armed”
phase. (The security indicator lamp illuminates.)
1. BCM receives LOCK signal from front door key cyli nder switch, key fob or Intelligent Key after hood, back
door and all doors are closed.
2. Hood, back door and all doors are closed after front doors are locked by key or door lock and unlock
switch.
The security indicator lamp illuminates for 30 sec onds. then, the system automatically shifts into the
“armed” phase.
Canceling the Set Vehicle Security System
When one of the following operations is performed, the armed phase is canceled.
1. Unlock the doors with the key, key fob or Intelligent Key.
2. Turn ignition switch “ON” or “ACC” position.
Canceling the Alarm Operation of the Vehicle Security System
When unlock the door with the key, key fob or Intelligent Key the alarm operation is canceled.
Activating the Alarm Operation of the Vehicle Security System
PIIB4075E
PIIB0176E
3AA93ABC3ACD3AC03ACA3AC03AC63AC53A913A773A893A873A873A8E3A773A983AC73AC93AC03AC3
3A893A873A873A8F3A773A9D3AAF3A8A3A8C3A863A9D3AAF3A8B3A8C
Page 899 of 3924

VEHICLE SECURITY (THEFT WARNING) SYSTEMBL-165
< SERVICE INFORMATION >
C
DE
F
G H
J
K L
M A
B
BL
N
O P
Make sure the system is in the armed phase. (The security indicator lamp brinks every 2.4 seconds.)
When the following operation 1 or 2 is performed, t he system sounds the horns and flashes the headlamps for
about 50 seconds.
1. Hood, back door or any door is opened during armed phase.
2. Disconnecting and connecting the battery connector before canceling armed phase.
POWER SUPPLY
Power is supplied at all times
through 10A fuse [No.19, located in the fuse block (J/B)]
to security indicator lamp terminal 1.
through 50A fusible link (letter M, located in the fuse and fusible link box)
to BCM terminal 55.
through 15A fuse [No.22, located in the fuse block (J/B)]
to BCM terminal 42.
through 15A fuse [No.34, located in the fuse and fusible link box]
to horn relay terminal 2.
through 10A fuse [No.71, located in the IPDM E/R]
to IPDM E/R internal CPU.
through 15A fuse [No.78, located in the IPDM E/R]
to IPDM E/R internal CPU.
With the ignition switch in the ACC or ON position, power is supplied
through 10A fuse [No. 6, located in the fuse block (J/B)]
to BCM terminal 11.
INITIAL CONDITION TO ACTIVATE THE SYSTEM
The operation of the vehicle security system is controlled by the doors, hood and back door.
To activate the vehicle security system, BCM must receive signals indicating the doors, hood and back door
are closed and the doors are locked by key fob, Intelligent Key or ignition key.
When a door is open, BCM terminal 12 (passenger side door), 13 (rear RH door), 62 (driver side door), 63
(rear LH door) receives a ground signal from each door switch.
When front door LH is unlocked by power window main switch (door lock and unlock switch),
BCM terminal 22 receives a signal from terminal 14 of power window main switch with power window serial
link.
When front door RH is unlocked by front power window s witch (passenger side) (door lock and unlock switch),
BCM terminal 22 receives a signal from terminal 16 of front power window switch (passenger side) with power
window serial link.
When the hood is open, IPDM E/R receives a ground signal
to IPDM E/R terminal 56
through hood switch terminal 2
through hood switch terminal 1
through body grounds E21, E50 and E51.
The IPDM E/R then sends a signal to the BCM through the CAN SYSTEM.
When the back door is open,
to BCM terminal 58
through back door closure motor terminal 7
through back door closure motor terminal 8
through body grounds B15 and B45.
VEHICLE SECURITY SYSTEM ALARM OPERATION
The vehicle security system is triggered by
opening a door
opening the back door
opening the hood
detection of battery disconnect and connect.
The vehicle security system will be triggered once the system is in armed phase,
When BCM receives a ground signal at terminals 12 (p assenger side door), 13 (rear RH door), 58 (back door),
62 (driver side door), 63 (rear LH door), or rece ives a signal from the IPDM E/R (hood switch).
When the vehicle security system is triggered,
ground is supplied intermittently from IPDM E/R terminals 38 and 60.
3AA93ABC3ACD3AC03ACA3AC03AC63AC53A913A773A893A873A873A8E3A773A983AC73AC93AC03AC3
3A893A873A873A8F3A773A9D3AAF3A8A3A8C3A863A9D3AAF3A8B3A8C
Page 900 of 3924

BL-166
< SERVICE INFORMATION >
VEHICLE SECURITY (THEFT WARNING) SYSTEM
When headlamp high relay (with built-in IPDM E/R) and horn relay are energized and then power is supplied
to headlamps (LH and RH) and horns (HIGH and LOW).
The headlamps flash and the horn sounds intermittently.
The alarm automatically turns off after 50 seconds, but will reactivate if the vehicle is tampered with again.
VEHICLE SECURITY SYSTEM DEACTIVATION
To deactivate the vehicle security system, a door or the back door must be unlocked with the key, key fob or
Intelligent Key.
When the key is used to unlock a door, BCM terminal 22 receives signal
from terminal 14 of the power window ma in switch (door lock and unlock switch).
When the BCM receives either one of these signals or unl ock signal from key cylinder switch, key fob or Intel-
ligent Key, the vehicle security sy stem is deactivated. (Disarmed phase)
PANIC ALARM OPERATION
Remote keyless entry system may or may not operat e vehicle security system (horn and headlamps) as
required.
When the remote keyless entry system is triggered, ground is supplied intermittently from IPDM E/R terminals
38 and 60.
When headlamp relay (which built-in IPDM E/R) and hor n relay are energized and then power is supplied to
headlamps (LH and RH) and horns (HIGH and LOW).
The headlamp flashes and the hor n sounds intermittently.
The alarm automatically turns off after 25 seconds or when BCM receives any signal from key fob or Intelligent
Key.
CAN Communication System DescriptionINFOID:0000000001327906
CAN (Controller Area Network) is a serial communication line for real time application. It is an on-vehicle mul-
tiplex communication line with high data communication s peed and excellent error detection ability. Many elec-
tronic control units are equipped onto a vehicle, and each control unit shares information and links with other
control units during operation (not independent). In CA N communication, control units are connected with 2
communication lines (CAN H line, CAN L line) allowing a high rate of information transmission with less wiring.
Each control unit transmits/receives data but selectively reads required data only.
CAN Communication UnitINFOID:0000000001327907
Refer to LAN-43, "CAN System Specification Chart".
3AA93ABC3ACD3AC03ACA3AC03AC63AC53A913A773A893A873A873A8E3A773A983AC73AC93AC03AC3
3A893A873A873A8F3A773A9D3AAF3A8A3A8C3A863A9D3AAF3A8B3A8C
Page 901 of 3924

VEHICLE SECURITY (THEFT WARNING) SYSTEMBL-167
< SERVICE INFORMATION >
C
DE
F
G H
J
K L
M A
B
BL
N
O P
SchematicINFOID:0000000001327908
TIWM0978E
3AA93ABC3ACD3AC03ACA3AC03AC63AC53A913A773A893A873A873A8E3A773A983AC73AC93AC03AC3
3A893A873A873A8F3A773A9D3AAF3A8A3A8C3A863A9D3AAF3A8B3A8C
Page 902 of 3924

BL-168
< SERVICE INFORMATION >
VEHICLE SECURITY (THEFT WARNING) SYSTEM
Wiring Diagram - VEHSEC -
INFOID:0000000001327909
TIWM1673E
3AA93ABC3ACD3AC03ACA3AC03AC63AC53A913A773A893A873A873A8E3A773A983AC73AC93AC03AC3
3A893A873A873A8F3A773A9D3AAF3A8A3A8C3A863A9D3AAF3A8B3A8C
Page 903 of 3924

VEHICLE SECURITY (THEFT WARNING) SYSTEMBL-169
< SERVICE INFORMATION >
C
DE
F
G H
J
K L
M A
B
BL
N
O P
TIWM1674E
3AA93ABC3ACD3AC03ACA3AC03AC63AC53A913A773A893A873A873A8E3A773A983AC73AC93AC03AC3
3A893A873A873A8F3A773A9D3AAF3A8A3A8C3A863A9D3AAF3A8B3A8C