warning INFINITI M 2010 Manual PDF
[x] Cancel search | Manufacturer: INFINITI, Model Year: 2010, Model line: M, Model: INFINITI M 2010Pages: 445, PDF Size: 6.15 MB
Page 143 of 445

TROUBLESHOOTING GUIDE
SymptomPossible causeAction to take
When pushing the ignition switch to
stop the engine The SHIFT P warning appears on the
display and the inside warning chime
sounds continuously. The selector lever is not in the P
(Park) position.
Shift the selector lever to the P
(Park) position.
When opening the driver's door to
get out of the vehicle The inside warning chime sounds
continuously. The ignition switch is in the ACC
position.
Push the ignition switch to the LOCK
position.
The Intelligent Key is in the Intelli-
gent Key port. Remove the Intelligent Key from the
Intelligent Key port.
When closing the door after getting
out of the vehicle The NO KEY warning appears on the
display, the outside chime sounds 3
times and the inside warning chime
sounds for approximately 3 seconds.
The ignition switch is in the ACC or
ON position.
Push the ignition switch to the LOCK
position.
The SHIFT P warning appears on the
display and the outside chime
sounds continuously. The ignition switch is in the ACC po-
sition and the selector lever is not in
the P (Park) position.Move the selector lever to the P
(Park) position and push the ignition
switch to the LOCK position.
When closing the door with the in-
side lock knob turned to LOCK The outside chime sounds for ap-
proximately 3 seconds and all the
doors unlock. The Intelligent Key is inside the ve-
hicle or trunk.
Carry the Intelligent Key with you.
When pushing the door handle re-
quest switch to lock the door The outside chime sounds for ap-
proximately 2 seconds. The Intelligent Key is inside the ve-
hicle or trunk.
Carry the Intelligent Key with you.
A door is not closed securely. Close the door securely.
The door handle request switch is
pushed before the door is closed. Push the door handle request switch
after the door is closed.
3-12Pre-driving checks and adjustments
wÐ
Ð
05/14/09Ðpattie
X
Page 146 of 445

cInserting the Intelligent Key into the Intelli-
gent Key port.
During this 1-minute time period, if the UNLOCK
button on the Intelligent Key is pushed,
all doors will be locked automatically after
another 1 minute.
Opening windows
To open the windows, push the door UNLOCK
button on the Intelligent Key for about 3
seconds after the door is unlocked.
To stop opening, release the UNLOCK
button.
Windows cannot be closed using the Intelligent
Key.
The windows can be opened or closed by
turning the mechanical key in a door lock. (See
ªDOORSº earlier in this section.)
Opening trunk lid
1. Push the TRUNKbuttons3on the
Intelligent Key for more than 1 second.
2. The trunk will unlatch.
3. Raise the trunk lid to open the trunk.
Using panic alarm
If you are near your vehicle and feel threatened,
you may activate the alarm to call attention as
follows:
1. Push the PANICbuttons4on the
Intelligent Key for more than 1 second.
2. The theft warning alarm and headlights will stay on for 25 seconds.
3. The panic alarm stops when:
c It has run for 25 seconds, or
c Any of the buttons on the Intelligent Key
is pushed. (Note: the TRUNK or PANIC
button must be pushed for more than 1
second.)
Setting hazard indicator and horn
mode
This vehicle is set in hazard indicator and horn
mode when you first receive the vehicle.
In hazard indicator and horn mode, when the
LOCK
buttons1is pushed, the hazard
indicator flashes twice and the horn chirps
once. When the UNLOCK
buttons2is
pushed, the hazard indicator flashes once.
If horns are not necessary, the system can be
switched to the hazard indicator mode. In hazard indicator mode, when the LOCK
button is pushed, the hazard indicator
flashes twice. When the UNLOCK
button
is pushed, neither the hazard indicator nor the
horn operates.
Pre-driving checks and adjustments3-15
wÐ
Ð
05/15/09Ðpattie
X
Page 148 of 445

1. Pull the hood lock release handles1
located below the instrument panel; the
hood will then spring up slightly.
2. Pull the lever
s2at the front of the hood
with your fingertips and raise the hood.
3. When closing the hood, slowly close the hood down to latch both the right and left
locks. Push the hood down to lock the
hood securely into place.
WARNING
cMake sure the hood is completely closed and
latched before driving. Failure to do so could
cause the hood to fly open and result in an
accident.
c If you see steam or smoke coming from the
engine compartment, to avoid injury do not
open the hood.
WARNING
cDo not drive with the trunk lid open. This
could allow dangerous exhaust gases to be
drawn into the vehicle. See ªEXHAUST GAS
(carbon monoxide)º in the ª5. Starting and
drivingº section of this manual.
c Closely supervise children when they are
around cars to prevent them from playing
and becoming locked in the trunk where they
could be seriously injured. Keep the car
locked, with the trunk closed, when not in
use, and prevent children's access to Intelli-
gent Keys.
SPA2446
HOOD TRUNK LID
Pre-driving checks and adjustments3-17
wÐ
Ð
05/14/09Ðpattie
X
Page 150 of 445

TRUNK RELEASE POWER CANCEL
SWITCH
When the switch located inside the glove box is
in the CANCEL position
s1, the power to the
trunk lid will be canceled and the trunk lid
cannot be opened by the trunk lid release
switch, the trunk open request switch with the
Intelligent Key carried with you or the TRUNK
button on the Intelligent Key.
When you have to leave the vehicle with a valet
and want to keep your belongings safe in the
glove box and the trunk, push this switch to
CANCEL and lock the glove box with the me-
chanical key. Then leave the vehicle and the
Intelligent Key with the valet and keep the
mechanical key with you. See ªKEYSº earlier in this section.
To connect the power to the trunk lid, push the
switch to the ON
s2position.
INTERIOR TRUNK LID RELEASE
WARNING
Closely supervise children when they are
around cars to prevent them from playing and
becoming locked in the trunk where they could
be seriously injured. Keep the car locked, with
the trunk lid securely latched, when not in use,
and prevent children's access to Intelligent
Keys.
The interior trunk lid release mechanism allows
opening of the trunk lid in the event that people
become locked inside the trunk or in the event
of the loss of electrical power such as a dis-
charged battery.
SPA2429SPA2552
Pre-driving checks and adjustments3-19
wÐ
Ð
05/14/09Ðpattie
X
Page 152 of 445

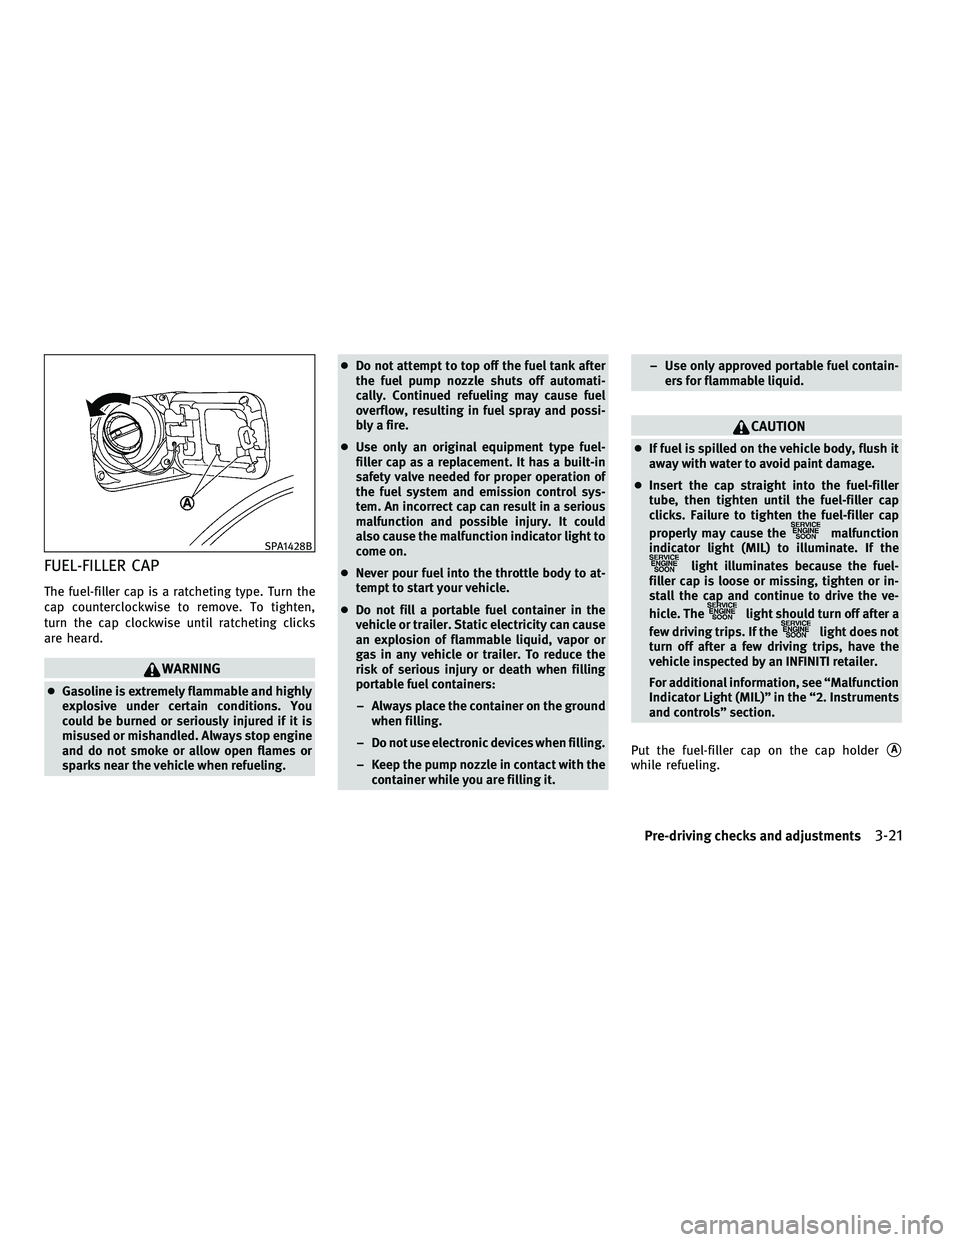
FUEL-FILLER CAP
The fuel-filler cap is a ratcheting type. Turn the
cap counterclockwise to remove. To tighten,
turn the cap clockwise until ratcheting clicks
are heard.
WARNING
cGasoline is extremely flammable and highly
explosive under certain conditions. You
could be burned or seriously injured if it is
misused or mishandled. Always stop engine
and do not smoke or allow open flames or
sparks near the vehicle when refueling. c
Do not attempt to top off the fuel tank after
the fuel pump nozzle shuts off automati-
cally. Continued refueling may cause fuel
overflow, resulting in fuel spray and possi-
bly a fire.
c Use only an original equipment type fuel-
filler cap as a replacement. It has a built-in
safety valve needed for proper operation of
the fuel system and emission control sys-
tem. An incorrect cap can result in a serious
malfunction and possible injury. It could
also cause the malfunction indicator light to
come on.
c Never pour fuel into the throttle body to at-
tempt to start your vehicle.
c Do not fill a portable fuel container in the
vehicle or trailer. Static electricity can cause
an explosion of flammable liquid, vapor or
gas in any vehicle or trailer. To reduce the
risk of serious injury or death when filling
portable fuel containers:
± Always place the container on the ground when filling.
± Do not use electronic devices when filling.
± Keep the pump nozzle in contact with the container while you are filling it. ± Use only approved portable fuel contain-
ers for flammable liquid.
CAUTION
cIf fuel is spilled on the vehicle body, flush it
away with water to avoid paint damage.
c Insert the cap straight into the fuel-filler
tube, then tighten until the fuel-filler cap
clicks. Failure to tighten the fuel-filler cap
properly may cause the
malfunction
indicator light (MIL) to illuminate. If the
light illuminates because the fuel-
filler cap is loose or missing, tighten or in-
stall the cap and continue to drive the ve-
hicle. The
light should turn off after a
few driving trips. If the
light does not
turn off after a few driving trips, have the
vehicle inspected by an INFINITI retailer.
For additional information, see ªMalfunction
Indicator Light (MIL)º in the ª2. Instruments
and controlsº section.
Put the fuel-filler cap on the cap holder
sA
while refueling.
SPA1428B
Pre-driving checks and adjustments3-21
wÐ
Ð
05/14/09Ðpattie
X
Page 153 of 445

WARNING
cDo not adjust the steering wheel while driv-
ing. You could lose control of your vehicle
and cause an accident.
c Do not adjust the steering wheel any closer
to you than is necessary for proper steering
operation and comfort. The driver's air bag
inflates with great force. If you are unre-
strained, leaning forward, sitting sideways
or out of position in any way, you are at
greater risk of injury or death in a crash. You
may also receive serious or fatal injuries
from the air bag if you are up against it when
it inflates. Always sit back against the seat-
back and as far away as practical from the
steering wheel. Always use the seat belts.
TILT OR TELESCOPIC OPERATION
Move the lever to adjust the steering wheel up
or down, forward or rearward to the desired
position.
Entry/Exit function operation
The automatic drive positioner system will
make the steering wheel move up automatically
when the driver's door is opened with the
ignition switch in the LOCK position. This lets
the driver get into and out of the seat more
easily.
For more information, see ªAUTOMATIC DRIVE
POSITIONERº later in this section.
SPA2018
SPA2057
TILT/TELESCOPIC STEERING SUN VISORS
3-22Pre-driving checks and adjustments
wÐ
Ð
05/14/09Ðpattie
X
Page 155 of 445

Automatic anti-glare type
The inside mirror is designed so that it auto-
matically changes reflection according to the
intensity of the headlights of the following
vehicle.
The anti-glare system will be automatically
turned on when the ignition switch is pushed to
the ON position.
When the anti-glare system is turned on, the
indicator light
sAwill illuminate and excessive
glare from the headlights of the vehicle behind
you will be reduced.
Type A: Push the
switchsBto make the
inside rearview mirror operate normally and the
indicator light will turn off. Push the
switch again to turn the system on.
Type B: Push the ª Cº switch
sCto make the
inside rearview mirror operate normally. The
indicator light will turn off. Push the ªIº switch
sDto turn the system on.
Do not allow any object to cover the sensors
sE
or apply glass cleaner on them. Doing so will
reduce the sensitivity of the sensor, resulting in
improper operation.
For the compass (if so equipped) operation, see
ªCOMPASSº in the ª2. Instruments and con-
trolsº section. For the HomeLink
TUniversal Transceiver opera-
tion, see ªHomeLink TUNIVERSAL TRANS-
CEIVERº in the ª2. Instruments and controlsº
section.
OUTSIDE MIRRORS
WARNING
Objects viewed in the outside mirror on the
passenger side are closer than they appear. Be
careful when moving to the right. Using only
this mirror could cause an accident. Use the
inside mirror or glance over your shoulder to
properly judge distances to other objects.
Adjusting outside mirrors
The outside mirror control switch is located at
the lower part of the instrument panel.
The outside mirror will operate only when the
ignition switch is in the ACC or ON position.
SPA2214
3-24Pre-driving checks and adjustments
wÐ
Ð
05/14/09Ðpattie
X
Page 162 of 445

4 Monitor, climate, audio, phone and voice
recognition systems
Safety note....................................... 4-2
Center multi-function control panel ................. 4-2
How to use INFINITI controller ................... 4-4
How to use touch screen
(models with navigation system) ................. 4-4
Start-up screen
(models with navigation system) ................. 4-6
Start menu
(models with navigation system) ................. 4-6
How to select menus on the screen .............. 4-7
Vehicle information and settings .................... 4-7
How to use STATUS button ...................... 4-7
How to use brightness control and display
ON/OFF button ................................. 4-7
How to use DISP button
(models without navigation system) .............. 4-8
How to use TRIP button
(models without navigation system) .............. 4-8
How to use FUEL ECON button
(models without navigation system) .............. 4-8
How to use INFO button ........................ 4-8
Warning display ............................... 4-14How to use SETTING button
.....................4-15
How to use AUX button ........................ 4-21
How to use DISC button (for models
without navigation system) .....................4-22
Rearview monitor (if so equipped) .................4-22
How to read the displayed lines ................4-23
How to park with predicted course lines .........4-23
Difference between predicted and actual
distances ..................................... 4-25
How to adjust the screen ......................4-27
Operating tips ................................ 4-27
Ventilators ....................................... 4-28
Automatic climate control ......................... 4-29
Automatic climate control ......................4-30
Rear switches for climate control
(if so equipped) ............................... 4-33
Operating tips ................................ 4-33
In-cabin microfilter ............................ 4-33
Servicing climate control ....................... 4-33
Audio system .................................... 4-34
Audio operation precautions ...................4-34
wÐ
Ð
05/19/09Ðtbrooks
X
Page 165 of 445

WARNING
cDo not disassemble or modify this system. If
you do, it may result in accidents, fire, or
electric shock.
c Do not use this system if you notice any
abnormality, such as a frozen screen or lack
of sound. Continued use of the system may
result in accident, fire or electric shock.
c In case you notice any foreign object in the
system hardware, spill liquid on it, or notice
smoke or smell coming from it, stop using
the system immediately and contact your
nearest INFINITI retailer. Ignoring such con-
ditions may lead to accidents, fire, or electric
shock.
c Park the vehicle in a safe location and apply
the parking brake to view the images on the
front center display screen using devices
connected to the auxiliary input jacks.
Do not attempt to operate the system in extreme
temperature conditions [below 24ÉF (220ÉC)
and above 158ÉF (70ÉC)]. Operating this system
under these conditions may result in system
malfunctions.
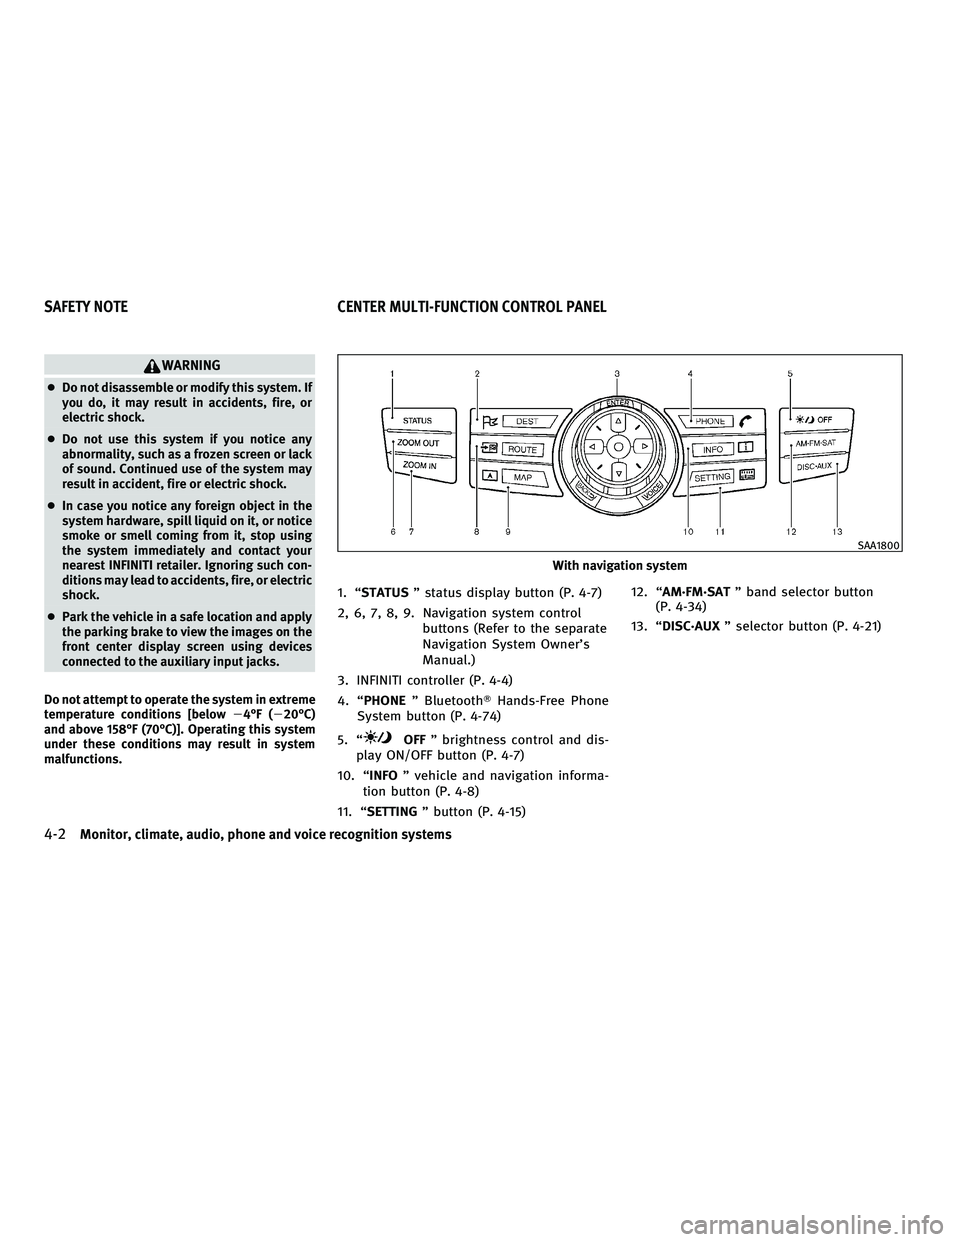
1. ªSTATUS º status display button (P. 4-7)
2, 6, 7, 8, 9. Navigation system control buttons (Refer to the separate
Navigation System Owner's
Manual.)
3. INFINITI controller (P. 4-4)
4. ªPHONE º BluetoothT Hands-Free Phone
System button (P. 4-74)
5. ª
OFF º brightness control and dis-
play ON/OFF button (P. 4-7)
10. ª INFO º vehicle and navigation informa-
tion button (P. 4-8)
11. ª SETTING º button (P. 4-15) 12. ª
AM´FM´SAT º band selector button
(P. 4-34)
13. ª DISC´AUX º selector button (P. 4-21)
With navigation system
SAA1800
SAFETY NOTE CENTER MULTI-FUNCTION CONTROL PANEL
4-2Monitor, climate, audio, phone and voice recognition systems
wÐ
Ð
05/19/09Ðtbrooks
X
Page 169 of 445

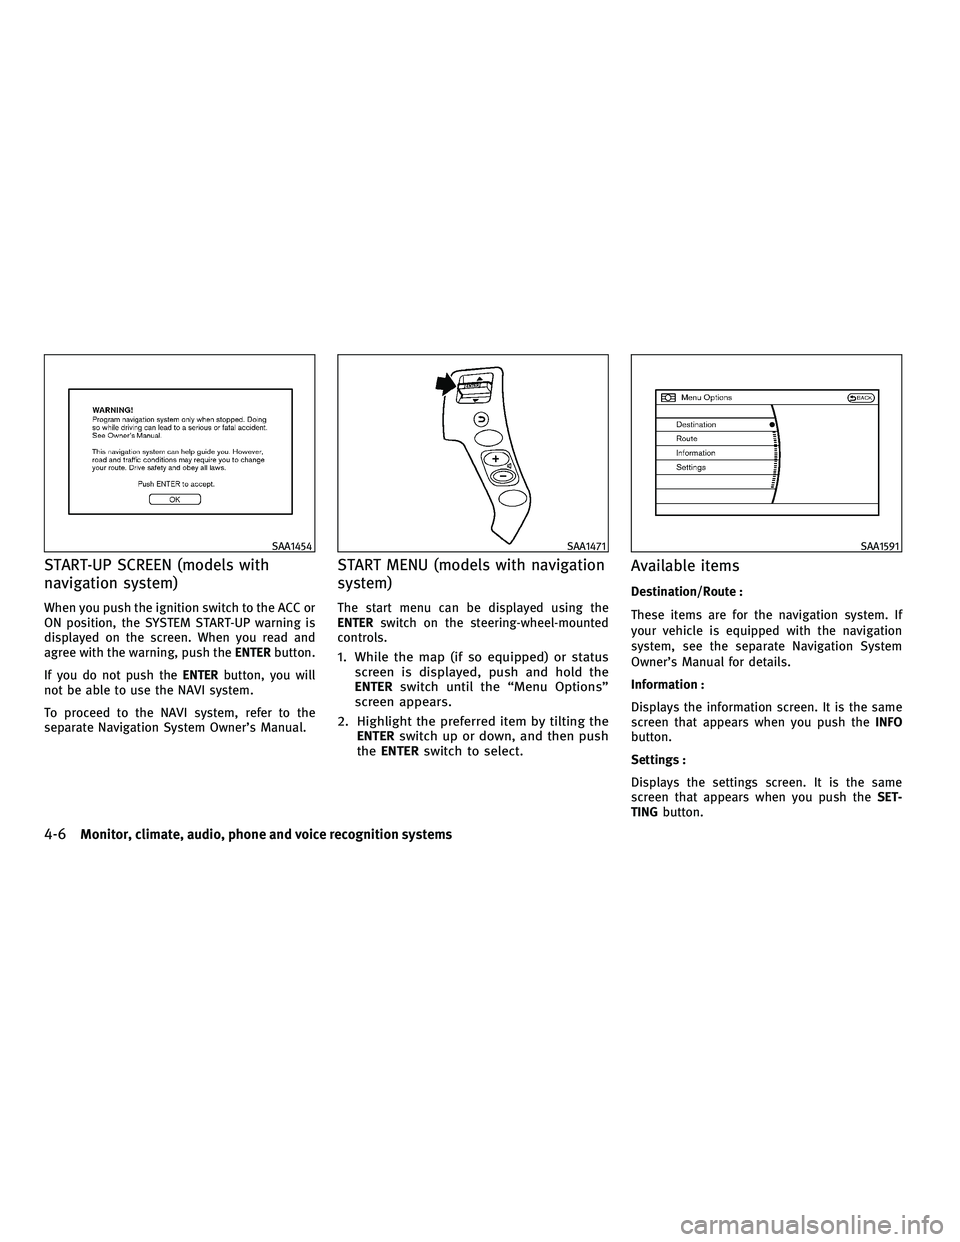
START-UP SCREEN (models with
navigation system)
When you push the ignition switch to the ACC or
ON position, the SYSTEM START-UP warning is
displayed on the screen. When you read and
agree with the warning, push theENTERbutton.
If you do not push the ENTERbutton, you will
not be able to use the NAVI system.
To proceed to the NAVI system, refer to the
separate Navigation System Owner's Manual.
START MENU (models with navigation
system)
The start menu can be displayed using the
ENTER switch on the steering-wheel-mounted
controls.
1. While the map (if so equipped) or status screen is displayed, push and hold the
ENTER switch until the ªMenu Optionsº
screen appears.
2. Highlight the preferred item by tilting the ENTER switch up or down, and then push
the ENTER switch to select.
Available items
Destination/Route :
These items are for the navigation system. If
your vehicle is equipped with the navigation
system, see the separate Navigation System
Owner's Manual for details.
Information :
Displays the information screen. It is the same
screen that appears when you push the INFO
button.
Settings :
Displays the settings screen. It is the same
screen that appears when you push the SET-
TING button.
SAA1454SAA1471SAA1591
4-6Monitor, climate, audio, phone and voice recognition systems
wÐ
Ð
05/14/09Ðpattie
X