battery INFINITI M35 2006 Factory Service Manual
[x] Cancel search | Manufacturer: INFINITI, Model Year: 2006, Model line: M35, Model: INFINITI M35 2006Pages: 5621, PDF Size: 65.56 MB
Page 5263 of 5621

SE-82
AUTOMATIC DRIVE POSITIONER
Revision: 2006 January2006 M35/M45
2. CHECK SEAT MEMORY INDICATOR LAMP POWER SYUPPLY CIRCUIT
1. Turn ignition switch OFF.
2. Disconnect seat memory switch connector.
3. Check voltage between seat memory switch connector and
ground.
OK or NG
OK >> GO TO 3.
NG >> Check the following.
10A fuse [No.18, Located in the fuse block (J/B)]
Harness for open or short between seat memory switch and fuse.
3. CHECK SEAT MEMORY INDICATOR CIRCUIT HARNESS CONTINUITY
1. Disconnect automatic drive positioner control unit connector.
2. Check continuity between automatic drive positioner control unit
connector and seat memory switch connector.
3. Check continuity between automatic drive positioner control unit
connector and ground.
OK or NG
OK >> GO TO 4.
NG >> Repair or replace harness.
Terminals
Voltage (V)
(Approx.) (+)
(–)
Seat memory
switch connectorTerminal
D9 5 Ground Battery voltage
PIIB6192E
AB
Continuity Automatic drive
positioner control
unit connectorTe r m i n a lSeat memory
switch connectorTerminal
M612
D96
Ye s
13 7
A
GroundContinuity Automatic drive posi-
tioner
control unit connectorTerminal
M612
No
13
PIIB6193E
Page 5264 of 5621

AUTOMATIC DRIVE POSITIONER
SE-83
C
D
E
F
G
H
J
K
L
MA
B
SE
Revision: 2006 January2006 M35/M45
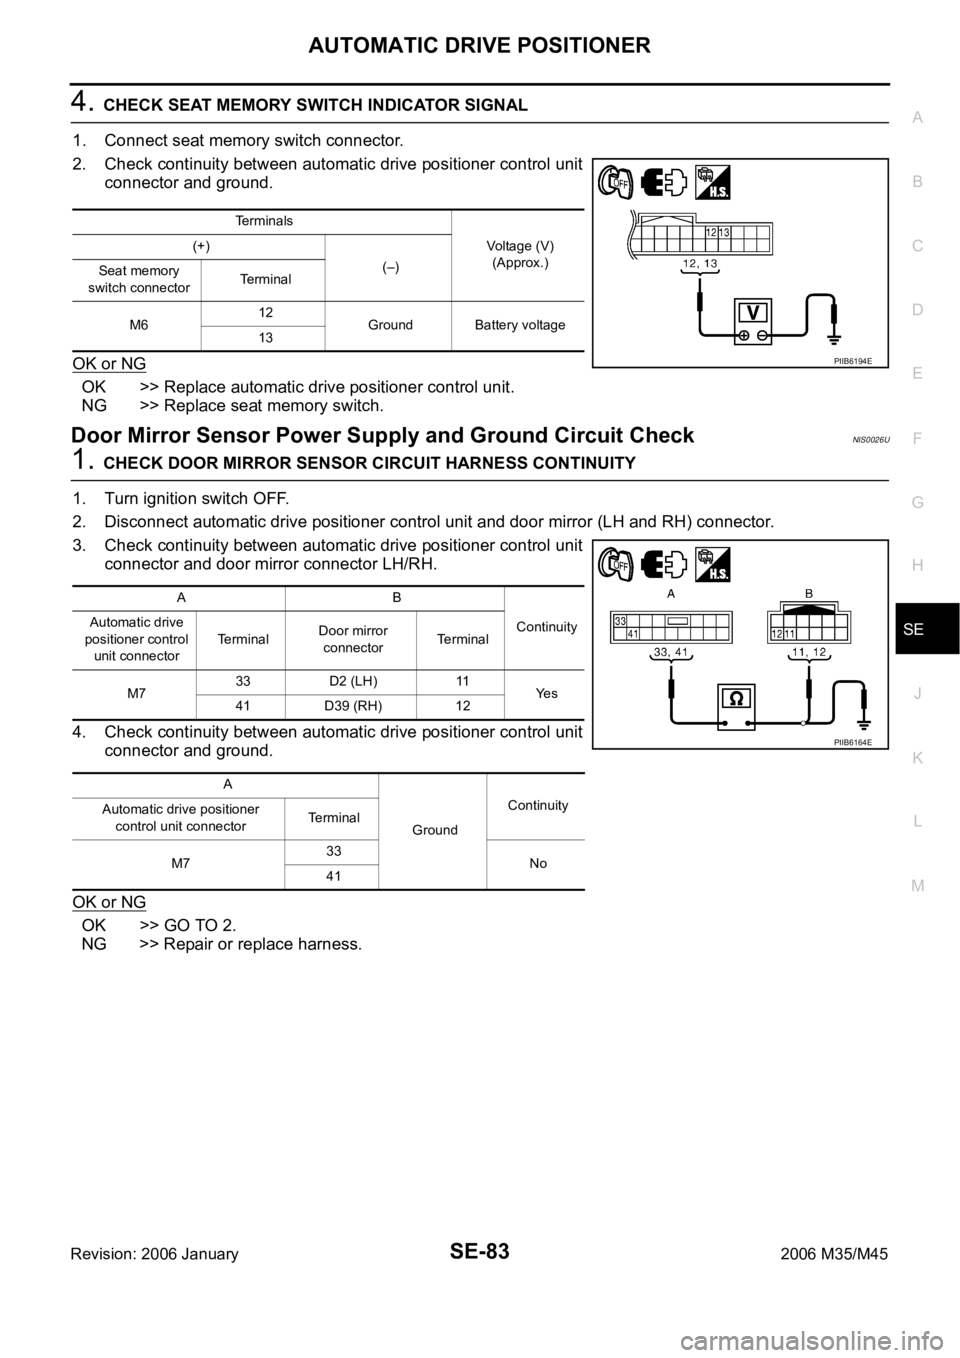
4. CHECK SEAT MEMORY SWITCH INDICATOR SIGNAL
1. Connect seat memory switch connector.
2. Check continuity between automatic drive positioner control unit
connector and ground.
OK or NG
OK >> Replace automatic drive positioner control unit.
NG >> Replace seat memory switch.
Door Mirror Sensor Power Supply and Ground Circuit CheckNIS0026U
1. CHECK DOOR MIRROR SENSOR CIRCUIT HARNESS CONTINUITY
1. Turn ignition switch OFF.
2. Disconnect automatic drive positioner control unit and door mirror (LH and RH) connector.
3. Check continuity between automatic drive positioner control unit
connector and door mirror connector LH/RH.
4. Check continuity between automatic drive positioner control unit
connector and ground.
OK or NG
OK >> GO TO 2.
NG >> Repair or replace harness.
Terminals
Voltage (V)
(Approx.) (+)
(–)
Seat memory
switch connectorTerminal
M612
Ground Battery voltage
13
PIIB6194E
AB
Continuity Automatic drive
positioner control
unit connectorTerminalDoor mirror
connectorTerminal
M733 D2 (LH) 11
Ye s
41 D39 (RH) 12
A
GroundContinuity
Automatic drive positioner
control unit connectorTerminal
M733
No
41
PIIB6164E
Page 5266 of 5621

AUTOMATIC DRIVE POSITIONER
SE-85
C
D
E
F
G
H
J
K
L
MA
B
SE
Revision: 2006 January2006 M35/M45
A/T Device (Detention Switch) Circuit CheckNIS0026V
1. CHECK FUNCTION
With CONSULT-II
Check that when the A/T selector lever is in P position, “DETENT
SW” on the DATA MONITOR becomes OFF.
Without CONSULT-II
1. Turn ignition switch OFF.
2. Check voltage between driver seat control unit connector and
ground.
OK or NG
OK >> A/T device (detention switch) circuit is OK.
NG >> GO TO 2.
2. CHECK A/T DEVICE (PARK POSITION SWITCH) HARNESS
1. Turn ignition switch OFF.
2. Disconnect A/T device and driver seat control unit connector.
3. Check continuity between A/T device connector and driver seat
control unit connector.
4. Check continuity between driver seat control unit connector and
ground.
OK or NG
OK >> GO TO 3.
NG >> Repair or replace harness.
Monitor item
[OPERATION or UNIT]Contents
Detention SW“ON/
OFF”The selector lever position “P position (OFF)/other than P
position (ON)” judged from the detention switch signal is
displayed.
PIIB6293E
Driver seat
control unit
connectorTe r m i n a l
Condition of A/T
selector leverVoltage (V)
(Approx.)
(+) (–)
M204 21 GroundP position 0
Other than above Battery voltage
PIIB6198E
AB
Continuity
Driver seat control
unit connectorTerminalA/T device
connectorTerminal
M204 21 M133 10 Yes
Driver seat control unit
connectorTerminal
GroundContinuity
M204 21 No
PIIB6199E
Page 5267 of 5621

SE-86
AUTOMATIC DRIVE POSITIONER
Revision: 2006 January2006 M35/M45
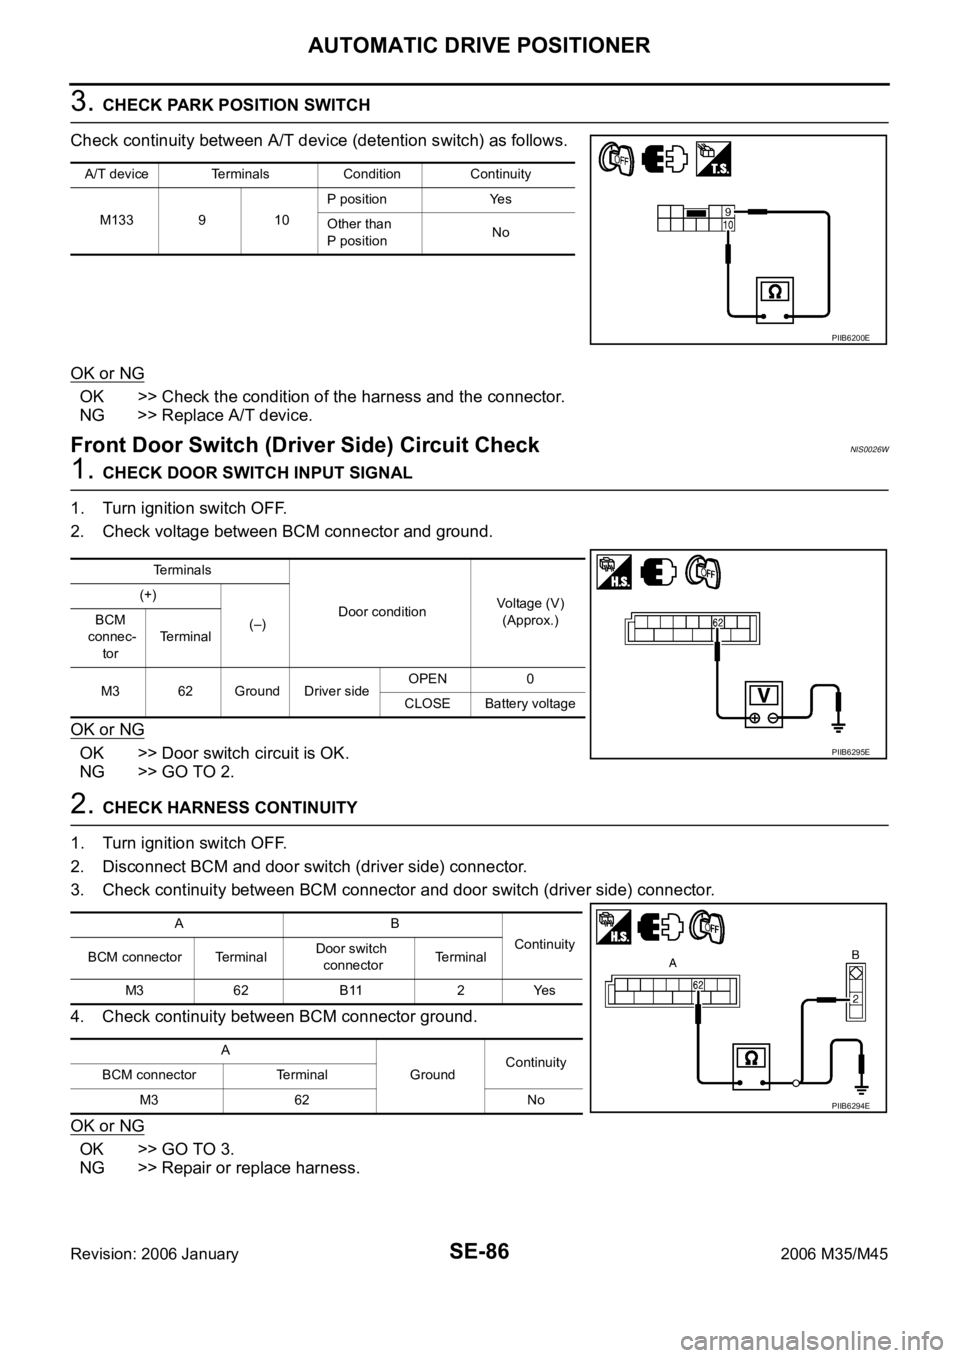
3. CHECK PARK POSITION SWITCH
Check continuity between A/T device (detention switch) as follows.
OK or NG
OK >> Check the condition of the harness and the connector.
NG >> Replace A/T device.
Front Door Switch (Driver Side) Circuit Check NIS0026W
1. CHECK DOOR SWITCH INPUT SIGNAL
1. Turn ignition switch OFF.
2. Check voltage between BCM connector and ground.
OK or NG
OK >> Door switch circuit is OK.
NG >> GO TO 2.
2. CHECK HARNESS CONTINUITY
1. Turn ignition switch OFF.
2. Disconnect BCM and door switch (driver side) connector.
3. Check continuity between BCM connector and door switch (driver side) connector.
4. Check continuity between BCM connector ground.
OK or NG
OK >> GO TO 3.
NG >> Repair or replace harness.
A/T device Terminals Condition Continuity
M133 9 10P position Yes
Other than
P positionNo
PIIB6200E
Terminals
Door conditionVoltage (V)
(Approx.) (+)
(–) BCM
connec-
torTerminal
M3 62 Ground Driver sideOPEN 0
CLOSE Battery voltage
PIIB6295E
AB
Continuity
BCM connector TerminalDoor switch
connectorTerminal
M3 62 B11 2 Yes
A
GroundContinuity
BCM connector Terminal
M3 62 No
PIIB6294E
Page 5268 of 5621

AUTOMATIC DRIVE POSITIONER
SE-87
C
D
E
F
G
H
J
K
L
MA
B
SE
Revision: 2006 January2006 M35/M45
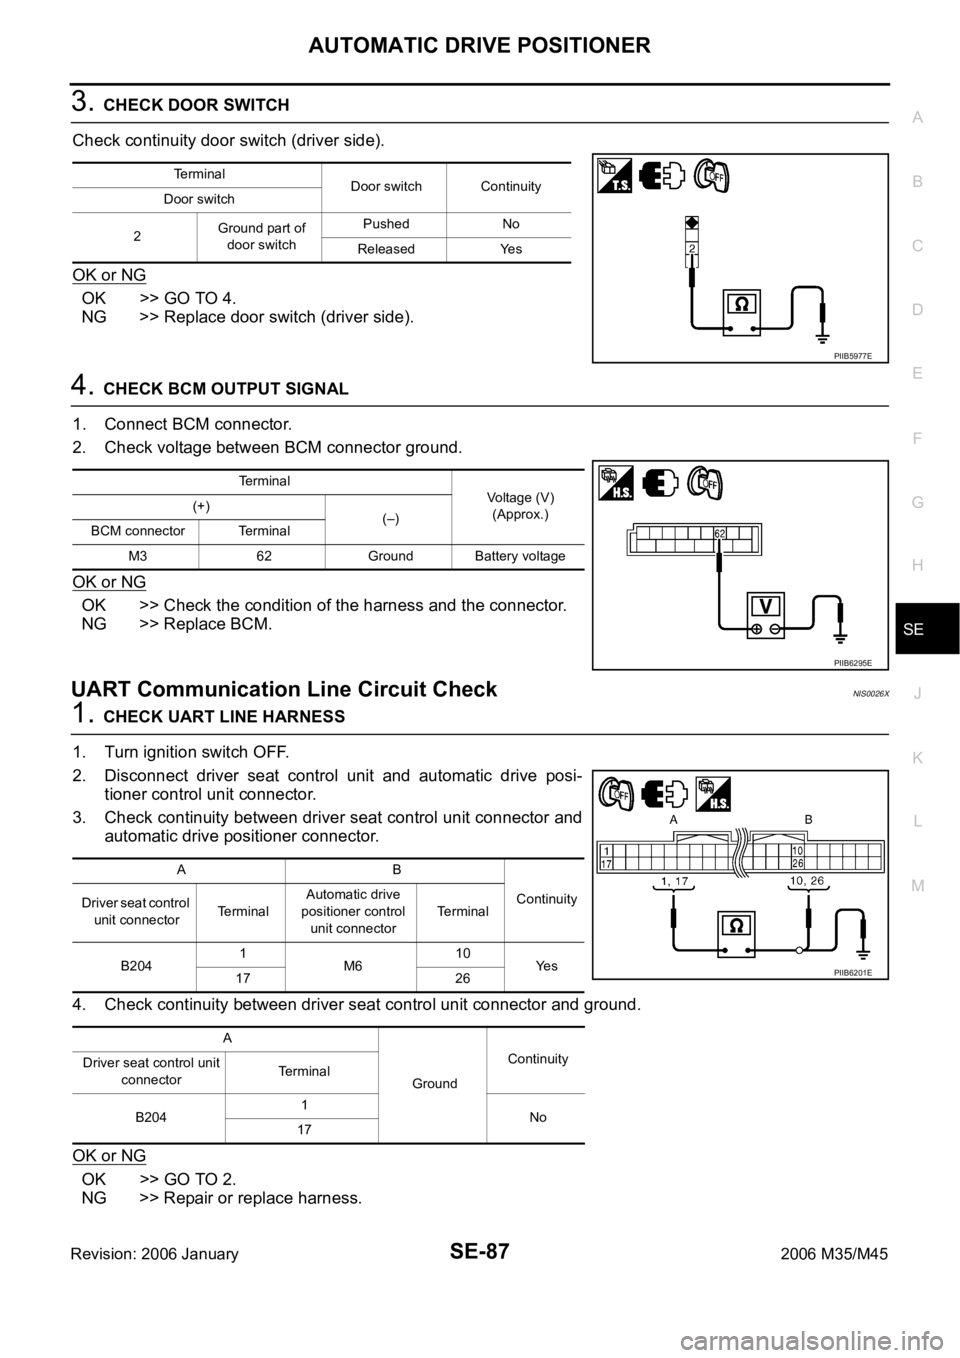
3. CHECK DOOR SWITCH
Check continuity door switch (driver side).
OK or NG
OK >> GO TO 4.
NG >> Replace door switch (driver side).
4. CHECK BCM OUTPUT SIGNAL
1. Connect BCM connector.
2. Check voltage between BCM connector ground.
OK or NG
OK >> Check the condition of the harness and the connector.
NG >> Replace BCM.
UART Communication Line Circuit CheckNIS0026X
1. CHECK UART LINE HARNESS
1. Turn ignition switch OFF.
2. Disconnect driver seat control unit and automatic drive posi-
tioner control unit connector.
3. Check continuity between driver seat control unit connector and
automatic drive positioner connector.
4. Check continuity between driver seat control unit connector and ground.
OK or NG
OK >> GO TO 2.
NG >> Repair or replace harness.
Terminal
Door switch Continuity
Door switch
2Ground part of
door switchPushed No
Released Yes
PIIB5977E
Terminal
Voltage (V)
(Approx.) (+)
(–)
BCM connector Terminal
M3 62 Ground Battery voltage
PIIB6295E
AB
Continuity
Driver seat control
unit connectorTerminalAutomatic drive
positioner control
unit connectorTerminal
B2041
M610
Ye s
17 26
A
GroundContinuity
Driver seat control unit
connectorTerminal
B2041
No
17
PIIB6201E
Page 5270 of 5621

AUTOMATIC DRIVE POSITIONER
SE-89
C
D
E
F
G
H
J
K
L
MA
B
SE
Revision: 2006 January2006 M35/M45
OK or NG
OK >> Replace driver seat control unit.
NG >> Replace automatic drive positioner control unit.
Lumber Support Circuit CheckNIS0026Y
1. CHECK LUMBER SUPPORT SWITCH
1. Turn ignition switch OFF.
2. Disconnect lumber support switch connector.
3. Check voltage between lumber support switch connector and
ground.
OK or NG
OK >> GO TO 2.
NG >> Repair or replace harness between fuse block (J/B) and
lumber support switch.
2. CHECK LUMBER SUPPORT SWITCH
Check continuity lumber support switch connector.
OK or NG
OK >> GO TO 3.
NG >> Replace lumber support switch.
Terminals
Voltage (V)
(Approx.) (+)
(–)
Lumbar support
switch connectorTerminal
B212 55 Ground Battery voltage
PIIB6204E
Lumbar
support switchTerminalCondition of
lumbar support switchContinuity
B2125557FORWARD Yes
Other than above No
58BACKWARD Yes
Other than above No
5657FORWARD No
Other than above Yes
58BACKWARD No
Other than above Yes
PIIB6205E
Page 5275 of 5621
![INFINITI M35 2006 Factory Service Manual SE-94
POWER SEAT(PASSENGER SIDE)
Revision: 2006 January2006 M35/M45
Terminals and Reference Values for BCMNIS00271
Terminal Wire color Item ConditionVoltage [V]
(Approx.)
42 P Power source (Fuse) — INFINITI M35 2006 Factory Service Manual SE-94
POWER SEAT(PASSENGER SIDE)
Revision: 2006 January2006 M35/M45
Terminals and Reference Values for BCMNIS00271
Terminal Wire color Item ConditionVoltage [V]
(Approx.)
42 P Power source (Fuse) —](/img/42/57023/w960_57023-5274.png)
SE-94
POWER SEAT(PASSENGER SIDE)
Revision: 2006 January2006 M35/M45
Terminals and Reference Values for BCMNIS00271
Terminal Wire color Item ConditionVoltage [V]
(Approx.)
42 P Power source (Fuse) — Battery voltage
52 B Ground — 0
54 OPower window power supply
(BAT)— Battery voltage
55 W Power source (F/L) — Battery voltage
Page 5283 of 5621

SE-102
POWER SEAT(REAR)
Revision: 2006 January2006 M35/M45
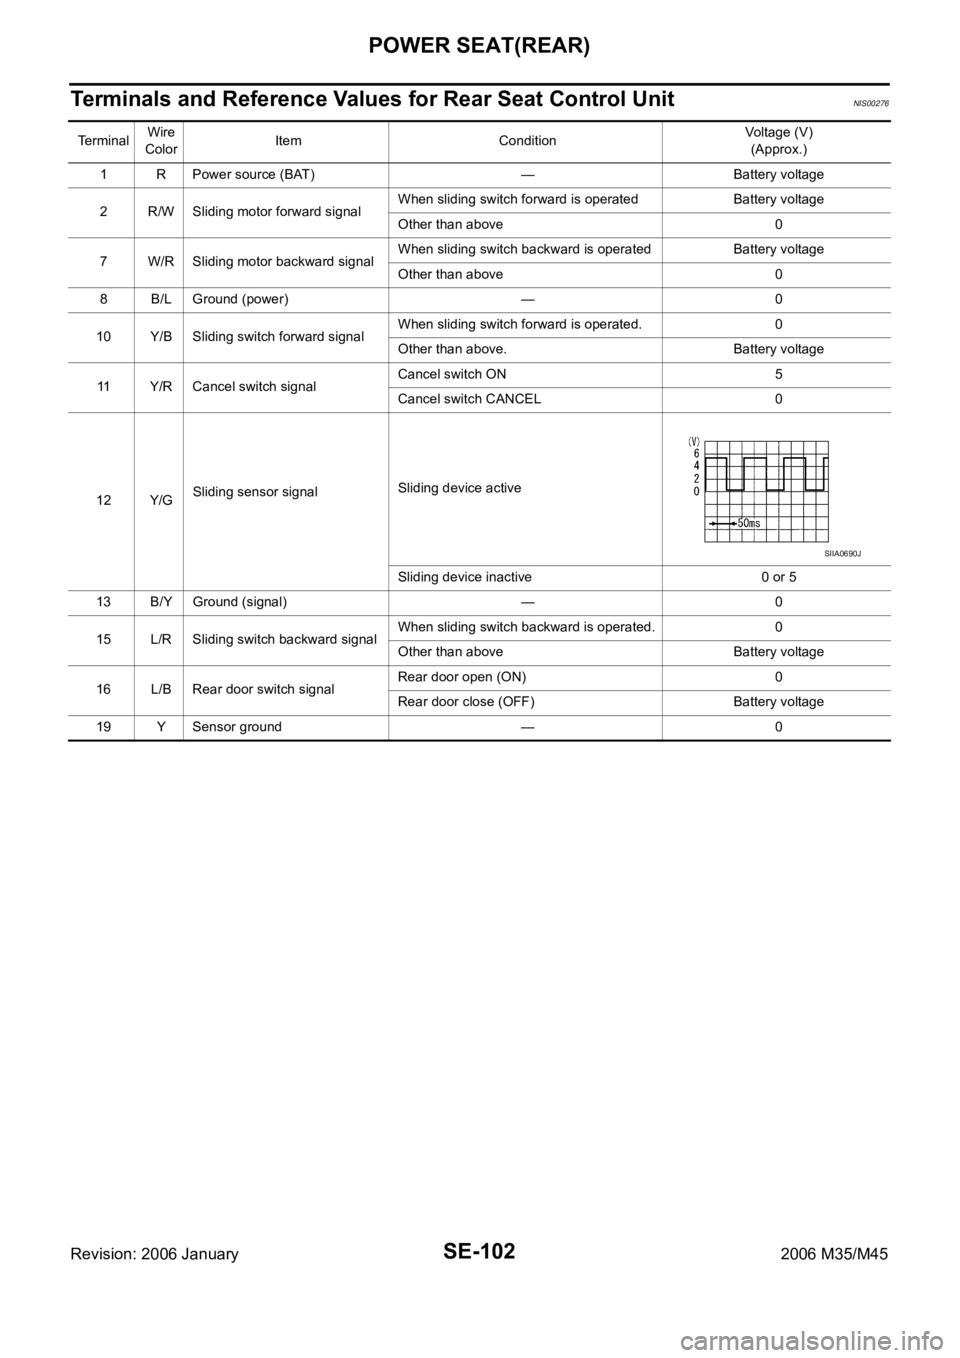
Terminals and Reference Values for Rear Seat Control Unit NIS00276
TerminalWire
ColorItem ConditionVoltage (V)
(Approx.)
1 R Power source (BAT) — Battery voltage
2 R/W Sliding motor forward signalWhen sliding switch forward is operated Battery voltage
Other than above 0
7 W/R Sliding motor backward signalWhen sliding switch backward is operated Battery voltage
Other than above 0
8 B/L Ground (power) — 0
10 Y/B Sliding switch forward signalWhen sliding switch forward is operated. 0
Other than above. Battery voltage
11 Y/R Cancel switch signalCancel switch ON 5
Cancel switch CANCEL 0
12 Y/GSliding sensor signalSliding device active
Sliding device inactive 0 or 5
13 B/Y Ground (signal) — 0
15 L/R Sliding switch backward signalWhen sliding switch backward is operated. 0
Other than above Battery voltage
16 L/B Rear door switch signalRear door open (ON) 0
Rear door close (OFF) Battery voltage
19 Y Sensor ground — 0
SIIA0690J
Page 5285 of 5621

SE-104
POWER SEAT(REAR)
Revision: 2006 January2006 M35/M45
Rear Seat Control Unit Power Supply and Ground Circuit InspectionNIS0027A
1. CHECK REAR SEAT CONTROL UNIT POWER SUPPLY CIRCUIT
1. Turn ignition switch OFF.
2. Check voltage between rear seat control unit connector and
ground.
OK or NG
OK >> GO TO 2.
NG >> Repair or replace harness between circuit breaker and rear seat control unit.
2. CHECK REAR POWER SEAT CONTROL UNIT GROUND CIRCUIT
1. Disconnect rear seat control unit connector.
2. Check continuity between rear seat control unit connector and
ground.
OK or NG
OK >> Rear seat control unit power supply and ground circuit is OK.
NG >> Repair or replace harness between rear seat control unit and ground.
Terminal
Voltage (V)
(Approx.) (+)
(–)
Rear seat control
unit connectorTerminal
B303 (LH)
B353 (RH)1 Ground Battery voltage
PIIB5917E
Te r m i n a l
Continuity
Rear seat control
unit connectorTerminal
Ground B303 (LH)
B353 (RH)8
Ye s
B304 (LH)
B354 (RH)13
PIIB5918E
Page 5286 of 5621

POWER SEAT(REAR)
SE-105
C
D
E
F
G
H
J
K
L
MA
B
SE
Revision: 2006 January2006 M35/M45
Rear Seat Sliding Motor Circuit InspectionNIS0027B
1. CHECK REAR SEAT SLIDING MOTOR POWER SUPPLY
1. Turn ignition switch OFF.
2. Check voltage between rear seat control unit connector and
ground.
OK or NG
OK >> GO TO 2.
NG >> Replace rear seat control unit.
2. CHECK REAR SEAT SLIDING MOTOR HARNESS
1. Disconnect rear seat control unit and rear seat sliding motor connector.
2. Check continuity between rear seat control unit connector and
rear seat sliding motor connector.
3. Check continuity between rear seat control unit connector and
ground.
OK or NG
OK >> Replace rear seat sliding motor.
NG >> Repair or replace harness between rear seat control unit and rear seat sliding motor.
Terminal
ConditionVoltage (V)
(Approx.) (+)
(–) Rear seat
control unit
connectorTerminal
B303 (LH)
B353 (RH)2
GroundRear power
seat switch Forward Battery voltage
Other than above. 0
7Rear power
seat switch Backward Battery voltage
Other than above. 0
PIIB5919E
AB
Continuity
Rear seat control
unit connectorTerminalRear seat sliding
motor connectorTerminal
B303 (LH)
B353 (RH)2
B311 (LH)
B361 (RH)3
Ye s
74
A
GroundContinuity
Rear seat control unit connector Terminal
B303 (LH)
B353 (RH)2
No
7
PIIB5920E