ground INFINITI M35 2006 Factory Service Manual
[x] Cancel search | Manufacturer: INFINITI, Model Year: 2006, Model line: M35, Model: INFINITI M35 2006Pages: 5621, PDF Size: 65.56 MB
Page 4597 of 5621
LT-170
ACTIVE AFS
Revision: 2006 January2006 M35/M45
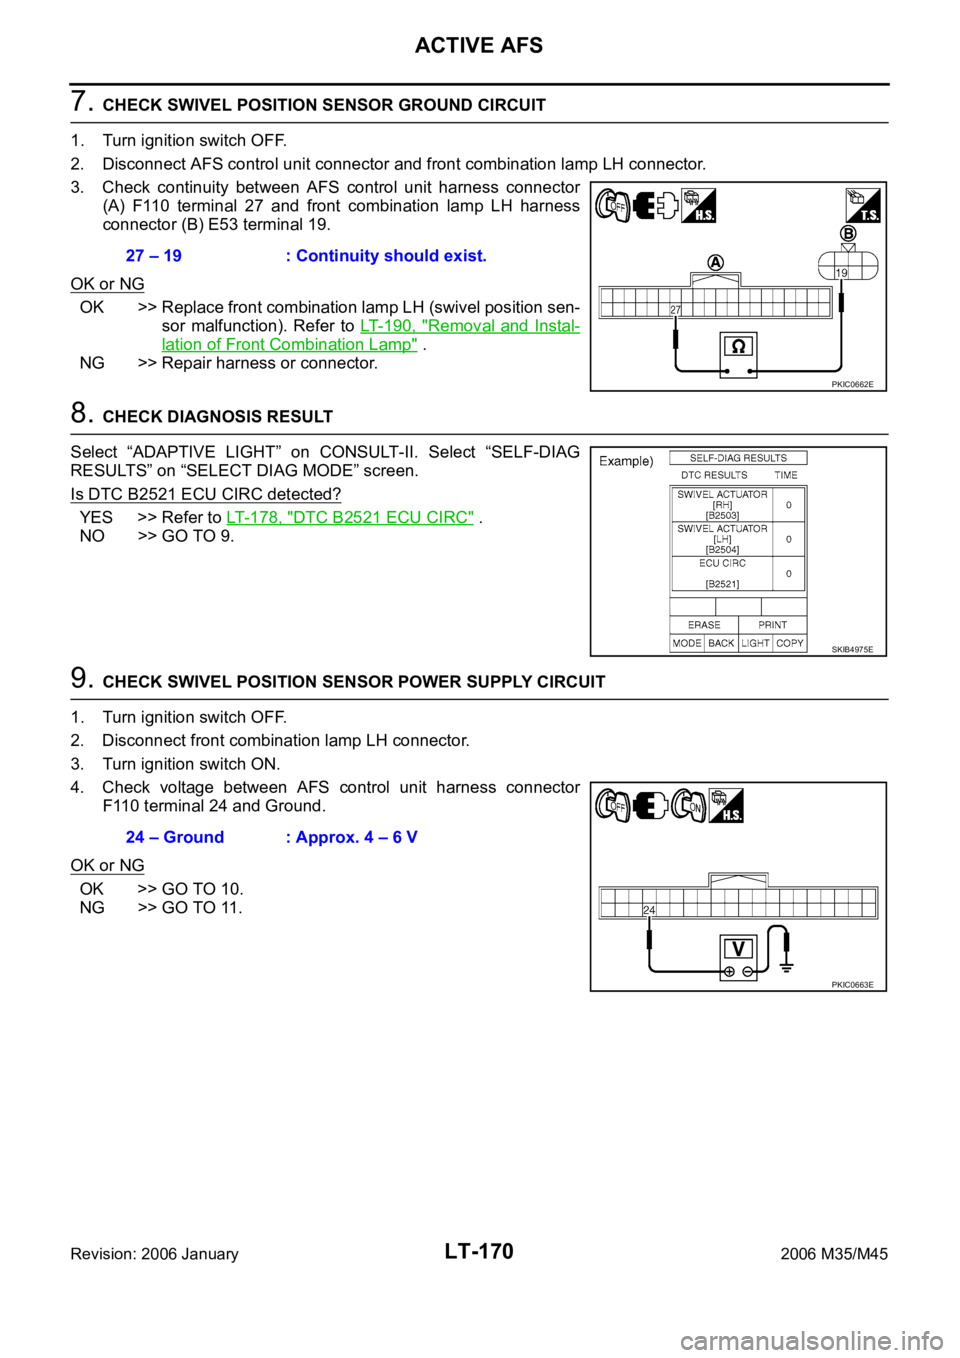
7. CHECK SWIVEL POSITION SENSOR GROUND CIRCUIT
1. Turn ignition switch OFF.
2. Disconnect AFS control unit connector and front combination lamp LH connector.
3. Check continuity between AFS control unit harness connector
(A) F110 terminal 27 and front combination lamp LH harness
connector (B) E53 terminal 19.
OK or NG
OK >> Replace front combination lamp LH (swivel position sen-
sor malfunction). Refer to LT- 1 9 0 , "
Removal and Instal-
lation of Front Combination Lamp" .
NG >> Repair harness or connector.
8. CHECK DIAGNOSIS RESULT
Select “ADAPTIVE LIGHT” on CONSULT-II. Select “SELF-DIAG
RESULTS” on “SELECT DIAG MODE” screen.
Is DTC B2521 ECU CIRC detected?
YES >> Refer to LT- 1 7 8 , "DTC B2521 ECU CIRC" .
NO >> GO TO 9.
9. CHECK SWIVEL POSITION SENSOR POWER SUPPLY CIRCUIT
1. Turn ignition switch OFF.
2. Disconnect front combination lamp LH connector.
3. Turn ignition switch ON.
4. Check voltage between AFS control unit harness connector
F110 terminal 24 and Ground.
OK or NG
OK >> GO TO 10.
NG >> GO TO 11.27 – 19 : Continuity should exist.
PKIC0662E
SKIB4975E
24 – Ground : Approx. 4 – 6 V
PKIC0663E
Page 4598 of 5621
ACTIVE AFS
LT-171
C
D
E
F
G
H
I
J
L
MA
B
LT
Revision: 2006 January2006 M35/M45
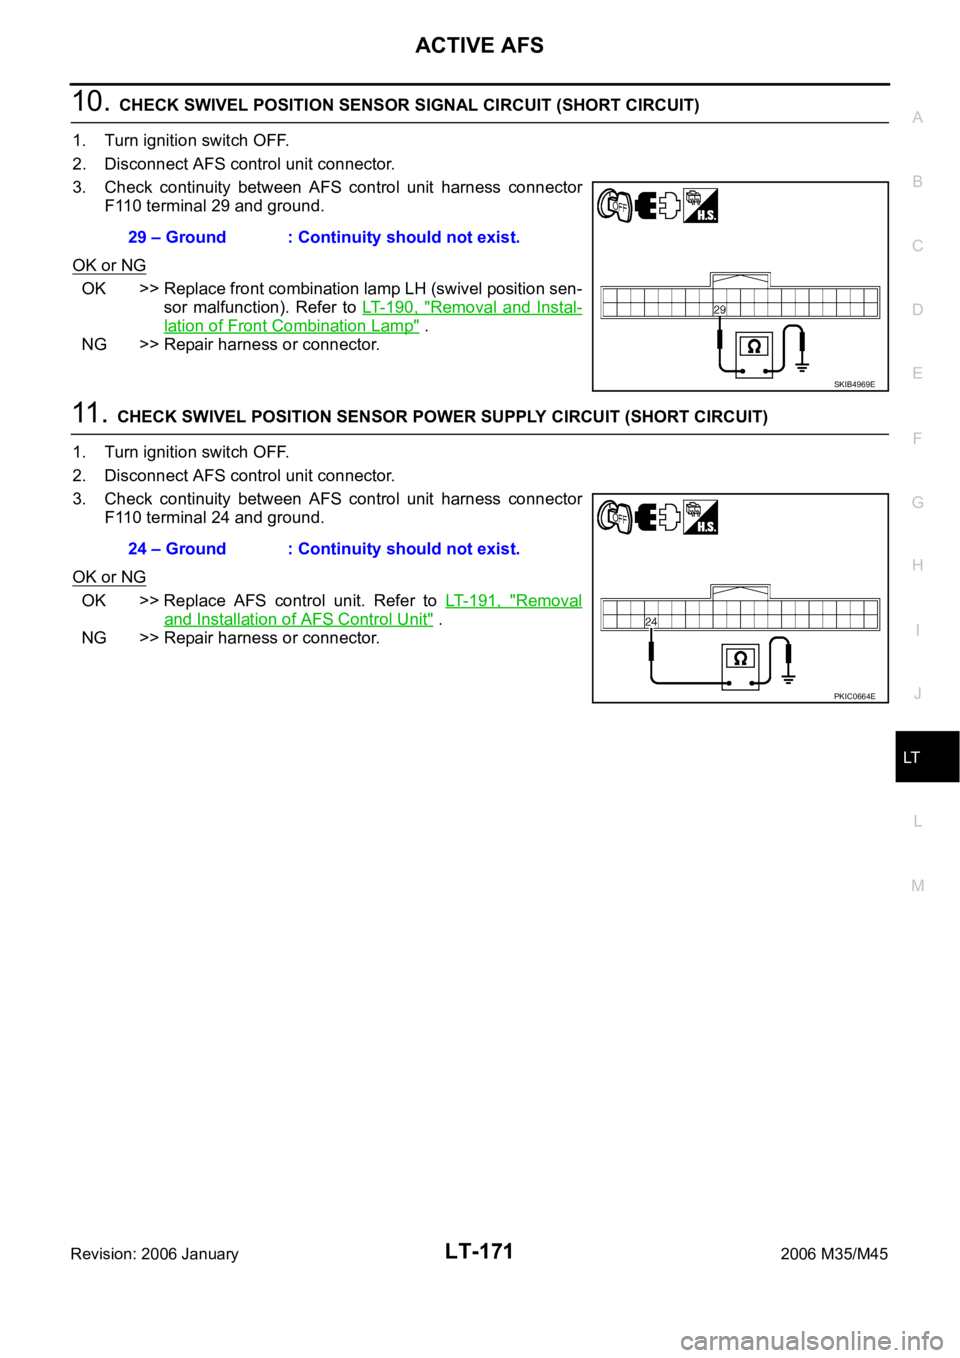
10. CHECK SWIVEL POSITION SENSOR SIGNAL CIRCUIT (SHORT CIRCUIT)
1. Turn ignition switch OFF.
2. Disconnect AFS control unit connector.
3. Check continuity between AFS control unit harness connector
F110 terminal 29 and ground.
OK or NG
OK >> Replace front combination lamp LH (swivel position sen-
sor malfunction). Refer to LT- 1 9 0 , "
Removal and Instal-
lation of Front Combination Lamp" .
NG >> Repair harness or connector.
11 . CHECK SWIVEL POSITION SENSOR POWER SUPPLY CIRCUIT (SHORT CIRCUIT)
1. Turn ignition switch OFF.
2. Disconnect AFS control unit connector.
3. Check continuity between AFS control unit harness connector
F110 terminal 24 and ground.
OK or NG
OK >> Replace AFS control unit. Refer to LT- 1 9 1 , "Removal
and Installation of AFS Control Unit" .
NG >> Repair harness or connector.29 – Ground : Continuity should not exist.
SKIB4969E
24 – Ground : Continuity should not exist.
PKIC0664E
Page 4599 of 5621

LT-172
ACTIVE AFS
Revision: 2006 January2006 M35/M45
12. CHECK SWIVEL MOTOR
1. Turn ignition switch OFF.
2. Disconnect front combination lamp LH connector.
3. Check continuity between front combination lamp LH connector
terminal 16 and 20.
4. Check continuity between front combination lamp LH connector
terminal 17 and 21.
5. Check continuity between front combination lamp LH connector
terminal 16 and 20 (insulation resistance).
OK or NG
OK >> GO TO 13.
NG >> Replace front combination lamp LH (swivel motor mal-
function). Refer to LT- 1 9 0 , "
Removal and Installation of
Front Combination Lamp" .
13. CHECK SWIVEL MOTOR CIRCUIT 1
1. Connect front combination lamp LH connector.
2. Turn ignition switch ON.
3. Check voltage between AFS control unit harness connector and
ground.
OK or NG
OK >> GO TO 14.
NG >> GO TO 16.16
20 (2 phase) : Approx. 7.4
PKIC0655E
17 21 (1 phase) : Approx. 7.4
PKIC0656E
16 17 : Approx. 1M or more
PKIC0654E
(+)
(-) Voltage
AFS control unit
connectorTerminal
F11015
Ground Approx. 9.5 – 11.5 V 17
36
38
PKIC0665E
Page 4600 of 5621

ACTIVE AFS
LT-173
C
D
E
F
G
H
I
J
L
MA
B
LT
Revision: 2006 January2006 M35/M45
14. CHECK DIAGNOSIS RESULT 1
Select “ADAPTIVE LIGHT” on CONSULT-II. Select “SELF-DIAG
RESULTS” on “SELECT DIAG MODE” screen.
Is DTC of present malfunction detected?
YES >>If detect DTC B2503 and B2504, refer to LT- 1 6 8 ,
"DTC B2504 SWIVEL ACTUATOR LH" .
If detect DTC B2504 only, replace AFS control unit.
Refer to LT- 1 9 1 , "
Removal and Installation of AFS
Control Unit" .
If detect any DTC except B2503 and B2504, refer to
LT- 1 5 4 , "
SELF-DIAG RESULTS" .
NO >> GO TO 15.
15. CHECK DIAGNOSIS RESULT 2
Check “SELF-DIAG RESULTS” with steering turning 180
or more to
left under swivel operative condition to keep more than 2 seconds.
Is DTC B2504 of present malfunction detected?
YES >> Replace front combination lamp LH (swivel actuator
malfunction). Refer to LT- 1 9 0 , "
Removal and Installation
of Front Combination Lamp" .
NO >> The swivel actuator system LH is normal at present.
16. CHECK SWIVEL MOTOR CIRCUIT 2
1. Turn ignition switch OFF.
2. Disconnect AFS control unit connector and front combination lamp LH connector.
3. Check continuity between AFS control unit harness connector
(A) and front combination lamp LH harness connector (B).
4. Check continuity between AFS control unit harness connector
(A) and ground.
OK or NG
OK >> Replace AFS control unit. Refer to LT-191, "Removal and Installation of AFS Control Unit" .
NG >> Repair or replace harness or connector.
SKIB4974E
SKIB4976E
AB
Continuity
Connector Terminal Connector Terminal
F11015
E5317
Ye s 17 16
36 20
38 21
A
GroundContinuity
Connector Terminal
F11015
No 17
36
38
PKIC0666E
Page 4601 of 5621
LT-174
ACTIVE AFS
Revision: 2006 January2006 M35/M45
DTC B2514 HI SEN UNUSUAL RRNKS003QQ
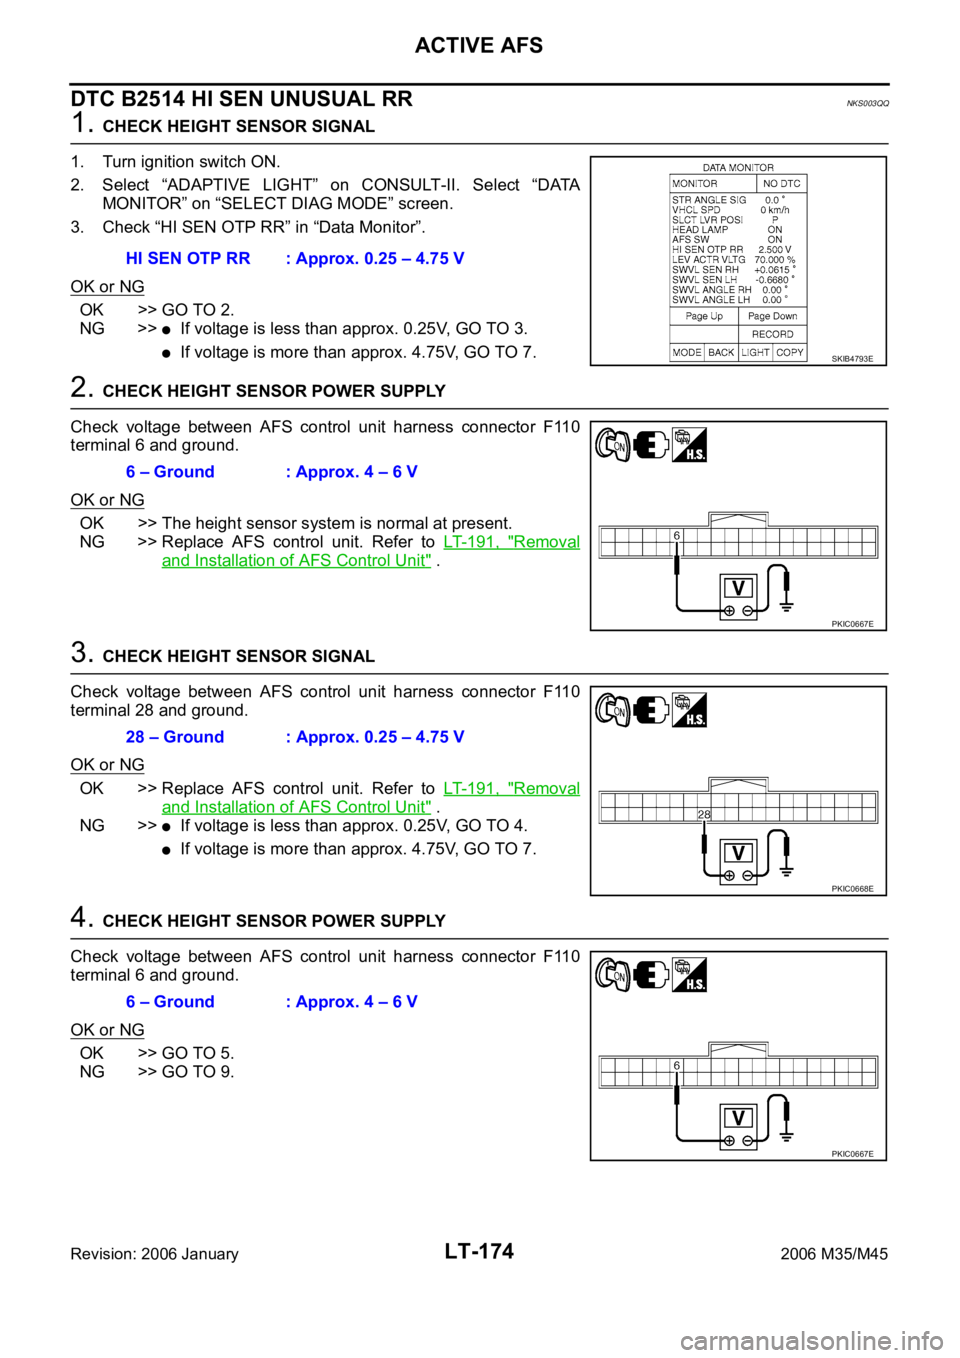
1. CHECK HEIGHT SENSOR SIGNAL
1. Turn ignition switch ON.
2. Select “ADAPTIVE LIGHT” on CONSULT-II. Select “DATA
MONITOR” on “SELECT DIAG MODE” screen.
3. Check “HI SEN OTP RR” in “Data Monitor”.
OK or NG
OK >> GO TO 2.
NG >>
If voltage is less than approx. 0.25V, GO TO 3.
If voltage is more than approx. 4.75V, GO TO 7.
2. CHECK HEIGHT SENSOR POWER SUPPLY
Check voltage between AFS control unit harness connector F110
terminal 6 and ground.
OK or NG
OK >> The height sensor system is normal at present.
NG >> Replace AFS control unit. Refer to LT- 1 9 1 , "
Removal
and Installation of AFS Control Unit" .
3. CHECK HEIGHT SENSOR SIGNAL
Check voltage between AFS control unit harness connector F110
terminal 28 and ground.
OK or NG
OK >> Replace AFS control unit. Refer to LT- 1 9 1 , "Removal
and Installation of AFS Control Unit" .
NG >>
If voltage is less than approx. 0.25V, GO TO 4.
If voltage is more than approx. 4.75V, GO TO 7.
4. CHECK HEIGHT SENSOR POWER SUPPLY
Check voltage between AFS control unit harness connector F110
terminal 6 and ground.
OK or NG
OK >> GO TO 5.
NG >> GO TO 9.HI SEN OTP RR : Approx. 0.25 – 4.75 V
SKIB4793E
6 – Ground : Approx. 4 – 6 V
PKIC0667E
28 – Ground : Approx. 0.25 – 4.75 V
PKIC0668E
6 – Ground : Approx. 4 – 6 V
PKIC0667E
Page 4602 of 5621
ACTIVE AFS
LT-175
C
D
E
F
G
H
I
J
L
MA
B
LT
Revision: 2006 January2006 M35/M45
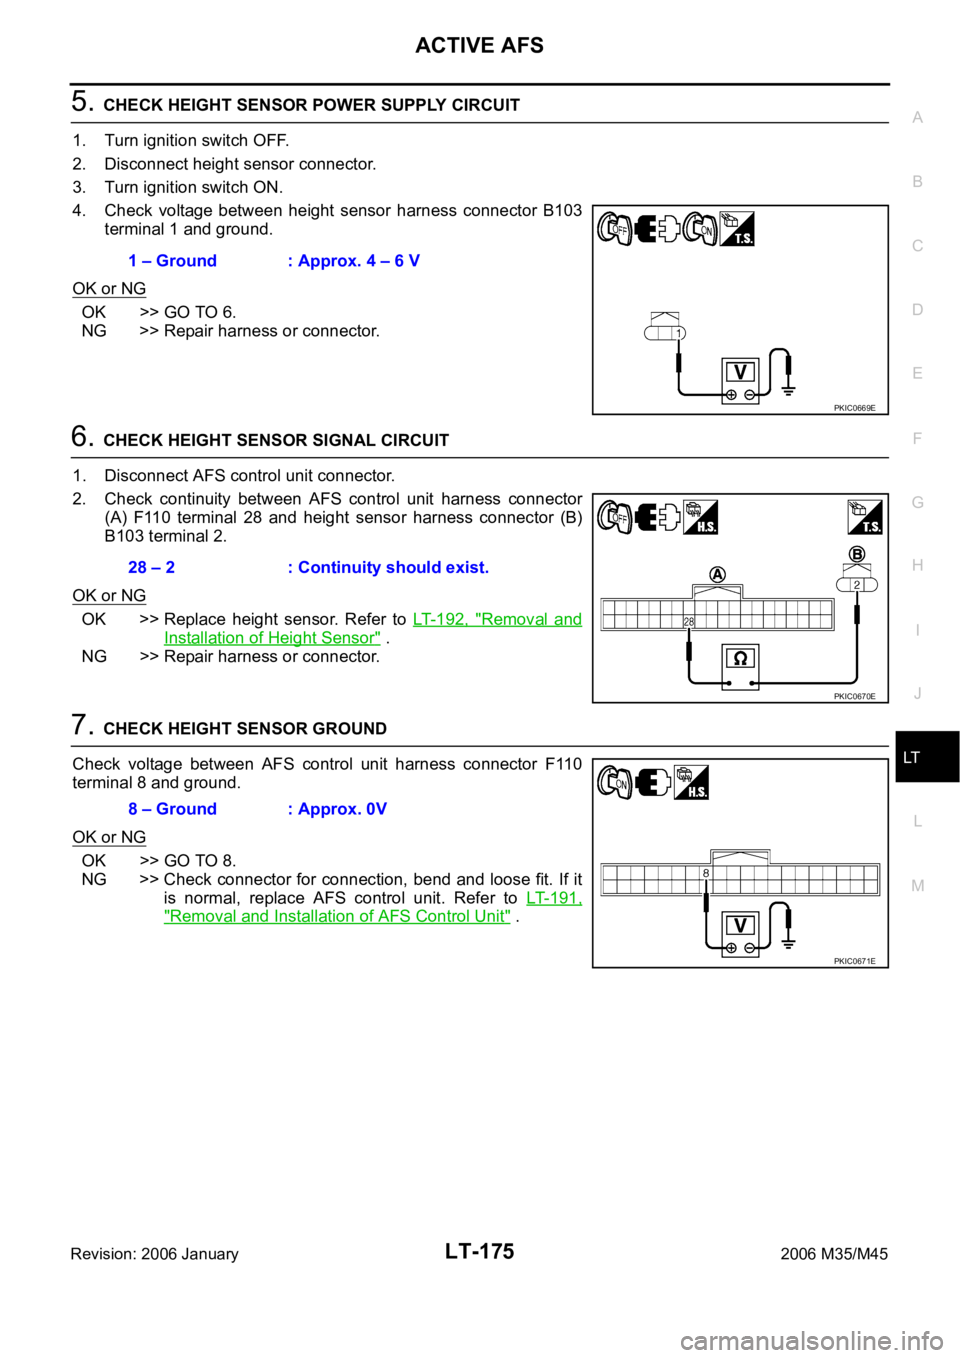
5. CHECK HEIGHT SENSOR POWER SUPPLY CIRCUIT
1. Turn ignition switch OFF.
2. Disconnect height sensor connector.
3. Turn ignition switch ON.
4. Check voltage between height sensor harness connector B103
terminal 1 and ground.
OK or NG
OK >> GO TO 6.
NG >> Repair harness or connector.
6. CHECK HEIGHT SENSOR SIGNAL CIRCUIT
1. Disconnect AFS control unit connector.
2. Check continuity between AFS control unit harness connector
(A) F110 terminal 28 and height sensor harness connector (B)
B103 terminal 2.
OK or NG
OK >> Replace height sensor. Refer to LT- 1 9 2 , "Removal and
Installation of Height Sensor" .
NG >> Repair harness or connector.
7. CHECK HEIGHT SENSOR GROUND
Check voltage between AFS control unit harness connector F110
terminal 8 and ground.
OK or NG
OK >> GO TO 8.
NG >> Check connector for connection, bend and loose fit. If it
is normal, replace AFS control unit. Refer to LT- 1 9 1 ,
"Removal and Installation of AFS Control Unit" . 1 – Ground : Approx. 4 – 6 V
PKIC0669E
28 – 2 : Continuity should exist.
PKIC0670E
8 – Ground : Approx. 0V
PKIC0671E
Page 4603 of 5621
LT-176
ACTIVE AFS
Revision: 2006 January2006 M35/M45
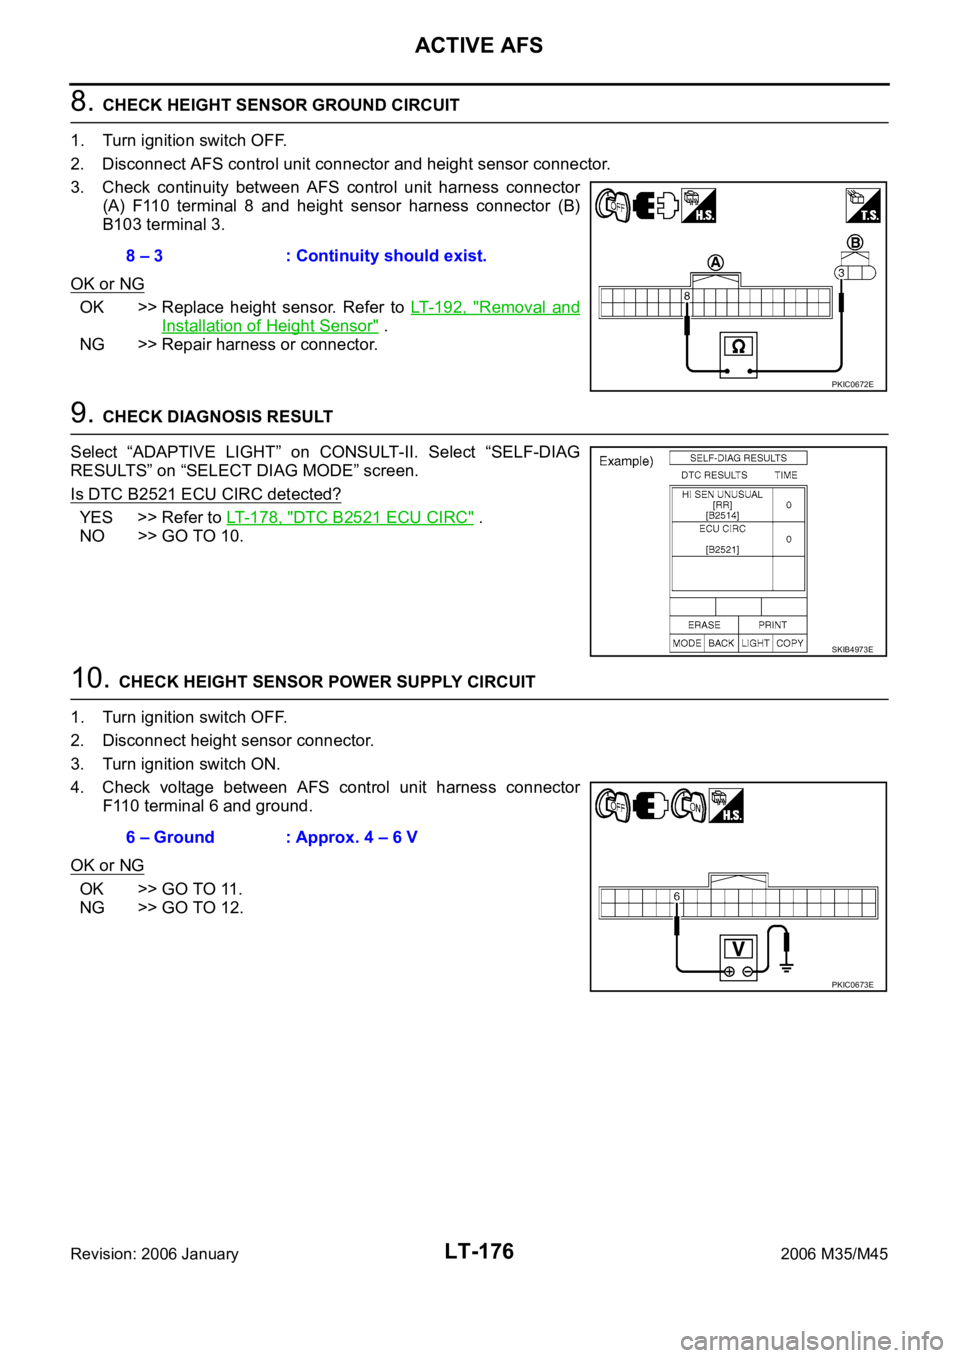
8. CHECK HEIGHT SENSOR GROUND CIRCUIT
1. Turn ignition switch OFF.
2. Disconnect AFS control unit connector and height sensor connector.
3. Check continuity between AFS control unit harness connector
(A) F110 terminal 8 and height sensor harness connector (B)
B103 terminal 3.
OK or NG
OK >> Replace height sensor. Refer to LT- 1 9 2 , "Removal and
Installation of Height Sensor" .
NG >> Repair harness or connector.
9. CHECK DIAGNOSIS RESULT
Select “ADAPTIVE LIGHT” on CONSULT-II. Select “SELF-DIAG
RESULTS” on “SELECT DIAG MODE” screen.
Is DTC B2521 ECU CIRC detected?
YES >> Refer to LT- 1 7 8 , "DTC B2521 ECU CIRC" .
NO >> GO TO 10.
10. CHECK HEIGHT SENSOR POWER SUPPLY CIRCUIT
1. Turn ignition switch OFF.
2. Disconnect height sensor connector.
3. Turn ignition switch ON.
4. Check voltage between AFS control unit harness connector
F110 terminal 6 and ground.
OK or NG
OK >> GO TO 11.
NG >> GO TO 12.8 – 3 : Continuity should exist.
PKIC0672E
SKIB4973E
6 – Ground : Approx. 4 – 6 V
PKIC0673E
Page 4604 of 5621
ACTIVE AFS
LT-177
C
D
E
F
G
H
I
J
L
MA
B
LT
Revision: 2006 January2006 M35/M45
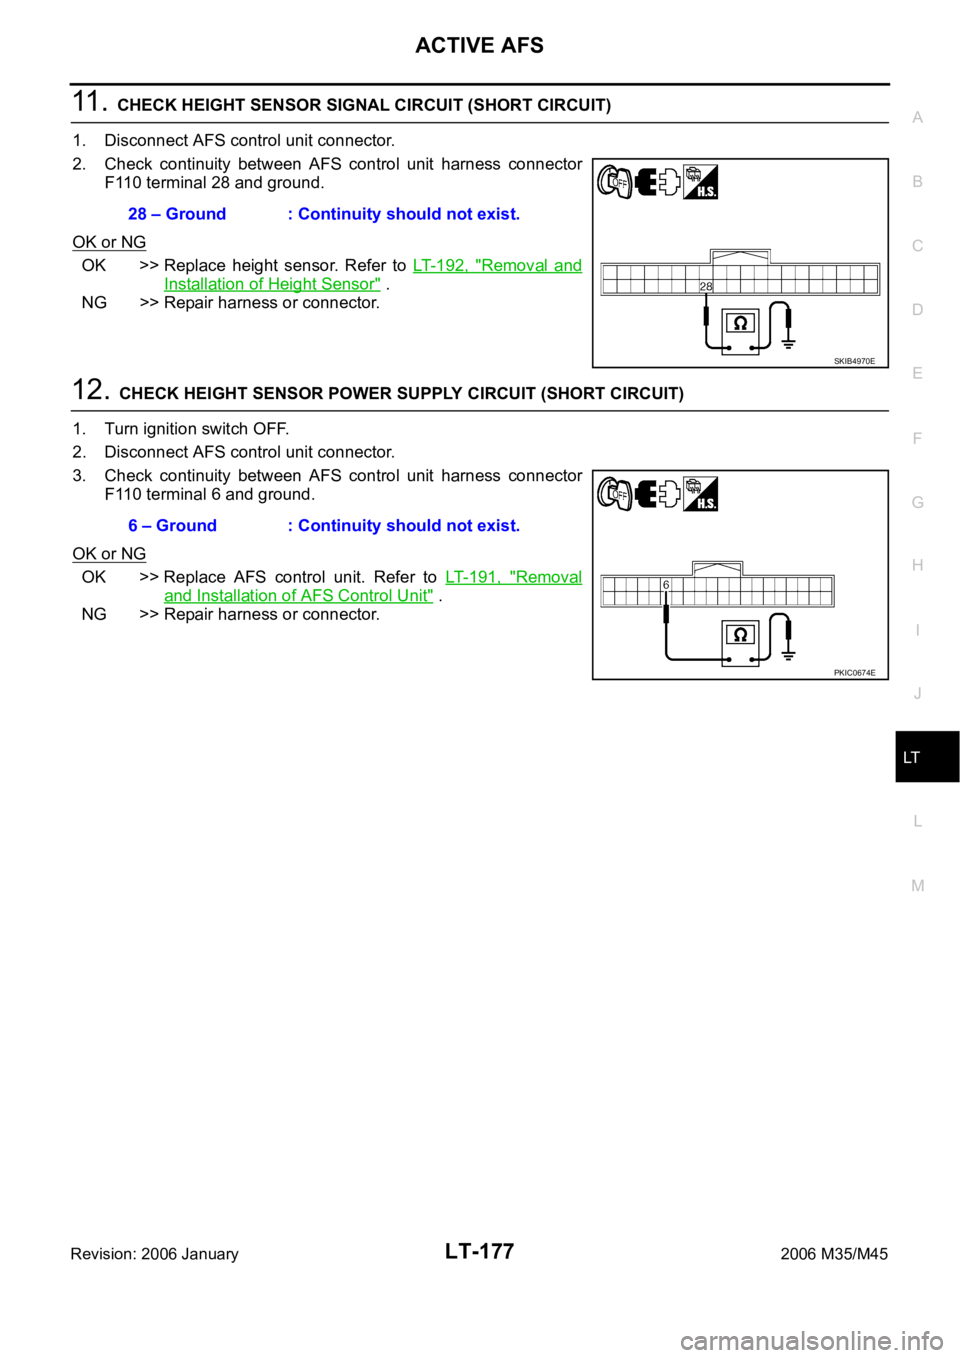
11 . CHECK HEIGHT SENSOR SIGNAL CIRCUIT (SHORT CIRCUIT)
1. Disconnect AFS control unit connector.
2. Check continuity between AFS control unit harness connector
F110 terminal 28 and ground.
OK or NG
OK >> Replace height sensor. Refer to LT- 1 9 2 , "Removal and
Installation of Height Sensor" .
NG >> Repair harness or connector.
12. CHECK HEIGHT SENSOR POWER SUPPLY CIRCUIT (SHORT CIRCUIT)
1. Turn ignition switch OFF.
2. Disconnect AFS control unit connector.
3. Check continuity between AFS control unit harness connector
F110 terminal 6 and ground.
OK or NG
OK >> Replace AFS control unit. Refer to LT- 1 9 1 , "Removal
and Installation of AFS Control Unit" .
NG >> Repair harness or connector.28 – Ground : Continuity should not exist.
SKIB4970E
6 – Ground : Continuity should not exist.
PKIC0674E
Page 4605 of 5621
LT-178
ACTIVE AFS
Revision: 2006 January2006 M35/M45
DTC B2521 ECU CIRCNKS003QR
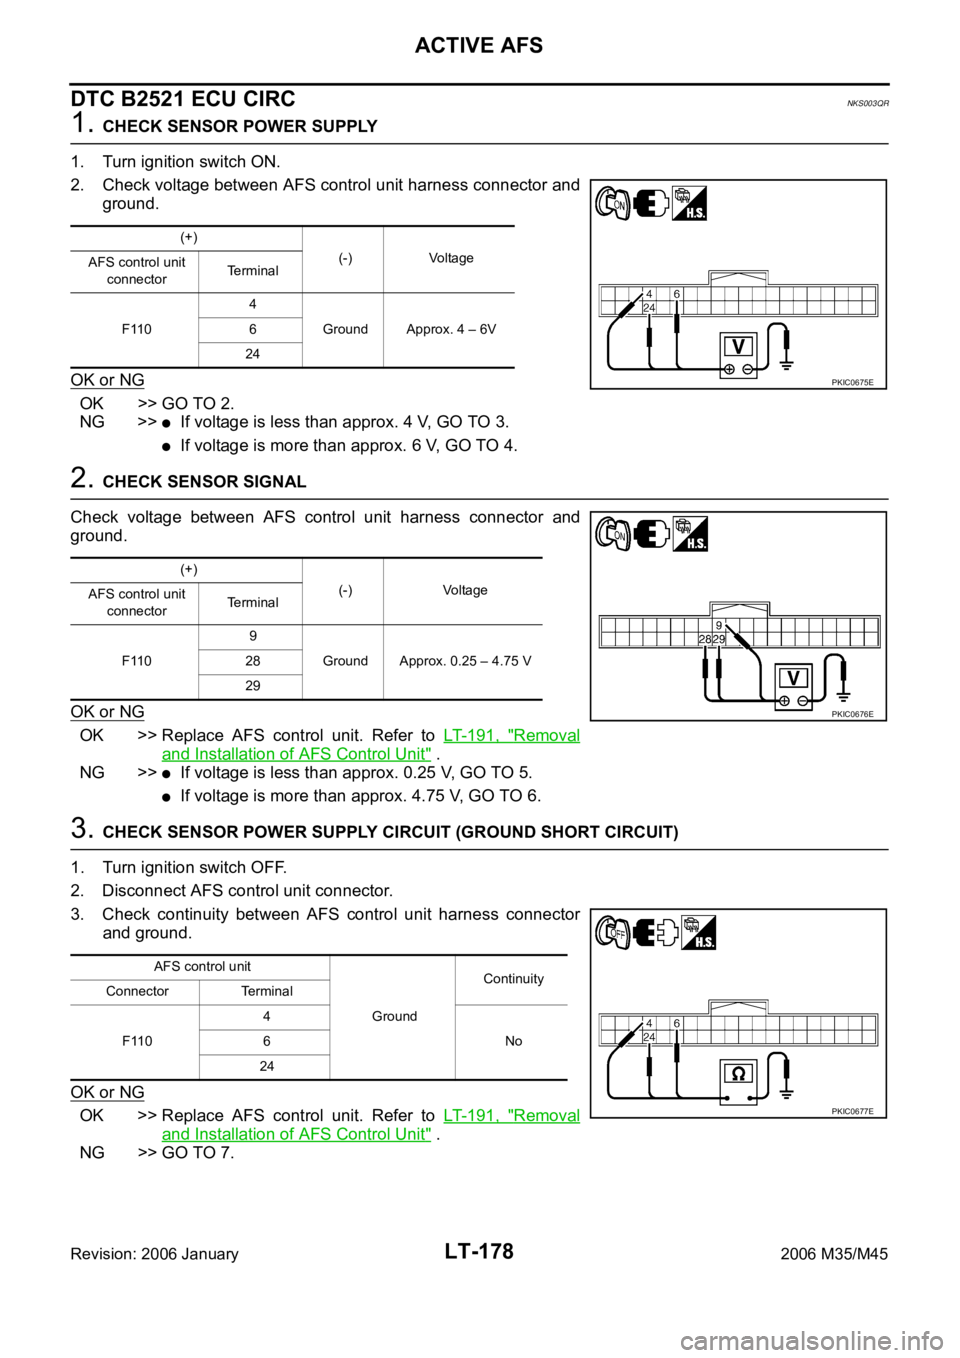
1. CHECK SENSOR POWER SUPPLY
1. Turn ignition switch ON.
2. Check voltage between AFS control unit harness connector and
ground.
OK or NG
OK >> GO TO 2.
NG >>
If voltage is less than approx. 4 V, GO TO 3.
If voltage is more than approx. 6 V, GO TO 4.
2. CHECK SENSOR SIGNAL
Check voltage between AFS control unit harness connector and
ground.
OK or NG
OK >> Replace AFS control unit. Refer to LT- 1 9 1 , "Removal
and Installation of AFS Control Unit" .
NG >>
If voltage is less than approx. 0.25 V, GO TO 5.
If voltage is more than approx. 4.75 V, GO TO 6.
3. CHECK SENSOR POWER SUPPLY CIRCUIT (GROUND SHORT CIRCUIT)
1. Turn ignition switch OFF.
2. Disconnect AFS control unit connector.
3. Check continuity between AFS control unit harness connector
and ground.
OK or NG
OK >> Replace AFS control unit. Refer to LT- 1 9 1 , "Removal
and Installation of AFS Control Unit" .
NG >> GO TO 7.
(+)
(-) Voltage
AFS control unit
connectorTerminal
F1104
Ground Approx. 4 – 6V 6
24
PKIC0675E
(+)
(-) Voltage
AFS control unit
connectorTerminal
F1109
Ground Approx. 0.25 – 4.75 V 28
29
PKIC0676E
AFS control unit
GroundContinuity
Connector Terminal
F1104
No 6
24
PKIC0677E
Page 4606 of 5621
ACTIVE AFS
LT-179
C
D
E
F
G
H
I
J
L
MA
B
LT
Revision: 2006 January2006 M35/M45
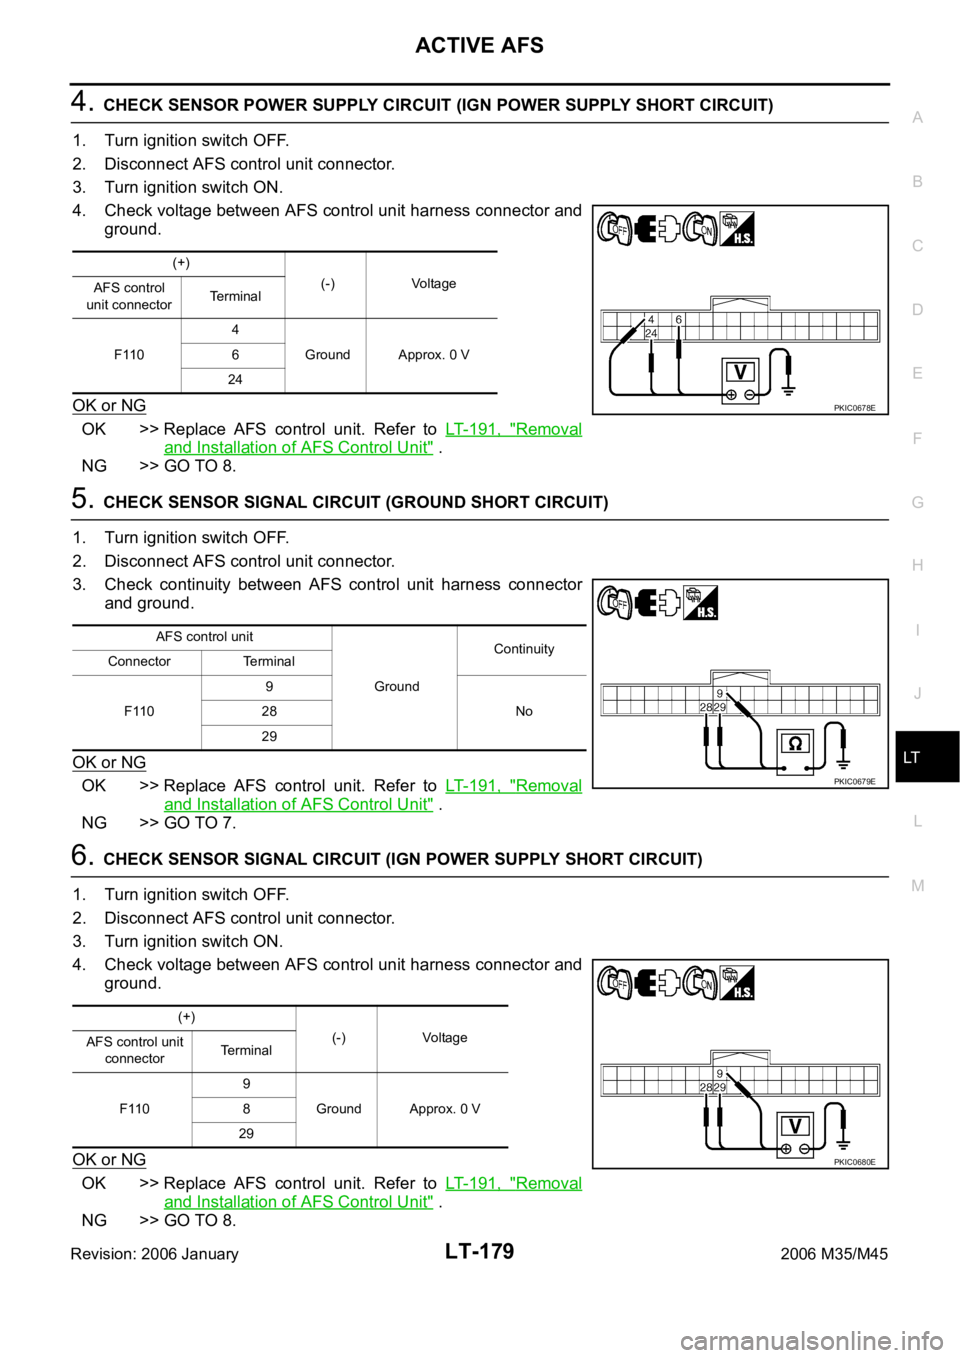
4. CHECK SENSOR POWER SUPPLY CIRCUIT (IGN POWER SUPPLY SHORT CIRCUIT)
1. Turn ignition switch OFF.
2. Disconnect AFS control unit connector.
3. Turn ignition switch ON.
4. Check voltage between AFS control unit harness connector and
ground.
OK or NG
OK >> Replace AFS control unit. Refer to LT- 1 9 1 , "Removal
and Installation of AFS Control Unit" .
NG >> GO TO 8.
5. CHECK SENSOR SIGNAL CIRCUIT (GROUND SHORT CIRCUIT)
1. Turn ignition switch OFF.
2. Disconnect AFS control unit connector.
3. Check continuity between AFS control unit harness connector
and ground.
OK or NG
OK >> Replace AFS control unit. Refer to LT- 1 9 1 , "Removal
and Installation of AFS Control Unit" .
NG >> GO TO 7.
6. CHECK SENSOR SIGNAL CIRCUIT (IGN POWER SUPPLY SHORT CIRCUIT)
1. Turn ignition switch OFF.
2. Disconnect AFS control unit connector.
3. Turn ignition switch ON.
4. Check voltage between AFS control unit harness connector and
ground.
OK or NG
OK >> Replace AFS control unit. Refer to LT- 1 9 1 , "Removal
and Installation of AFS Control Unit" .
NG >> GO TO 8.
(+)
(-) Voltage
AFS control
unit connectorTe r m i n a l
F1104
Ground Approx. 0 V 6
24
PKIC0678E
AFS control unit
GroundContinuity
Connector Terminal
F1109
No 28
29
PKIC0679E
(+)
(-) Voltage
AFS control unit
connectorTerminal
F1109
Ground Approx. 0 V 8
29
PKIC0680E