stall INFINITI M35 2006 Factory Service Manual
[x] Cancel search | Manufacturer: INFINITI, Model Year: 2006, Model line: M35, Model: INFINITI M35 2006Pages: 5621, PDF Size: 65.56 MB
Page 4857 of 5621

PG-30
IPDM E/R (INTELLIGENT POWER DISTRIBUTION MODULE ENGINE ROOM)
Revision: 2006 January2006 M35/M45
Check IPDM E/R Power Supply and Ground CircuitNKS004EA
1. CHECK FUSE AND FUSIBLE LINK
Check for blown fuses.
OK or NG
OK >> GO TO 2.
NG >> If fuse or fusible link is blown, be sure to eliminate cause of malfunction before installing new fuse
or fusible link.
2. CHECK POWER SUPPLY CIRCUIT
1. Turn ignition switch OFF.
2. Disconnect IPDM E/R harness connector.
3. Check voltage between IPDM E/R harness connector and
ground.
OK or NG
OK >> GO TO 3.
NG >> Check harness for open or short between IPDM E/R and fusible link.
3. CHECK GROUND CIRCUIT
1. Disconnect IPDM E/R harness connectors.
2. Check continuity between IPDM E/R harness connectors and
ground.
OK or NG
OK >> INSPECTION END
NG >> Check harness ground circuit.
Terminal No. Power source Fuse and fusible link No.
1
BatteryE
2C
—71
78
Terminals
Vo l ta g e (+) (-)
IPDM E/R connector Terminal
Ground
E31
Battery voltage
2
PKIB6562E
IPDM E/R connector Terminal
GroundContinuity
E8 38
E951
Ye s
54
PKIC0906E
Page 4858 of 5621

IPDM E/R (INTELLIGENT POWER DISTRIBUTION MODULE ENGINE ROOM)
PG-31
C
D
E
F
G
H
I
J
L
MA
B
PG
Revision: 2006 January2006 M35/M45
Inspection with CONSULT-II (Self-Diagnosis)NKS004EB
CAUTION:
If CONSULT-II is used with no connection of CONSULT-II CONVERTER, malfunctions might be
detected in self-diagnosis depending on control unit which carry out CAN communication.
1. CHECK SELF DIAGNOSTIC RESULT
1. Connect CONSULT-II and select “IPDM E/R” on the “SELECT SYSTEM” screen.
2. Select “SELF-DIAG RESULTS” on the “SELECT DIAG MODE” screen.
3. Check display content in self diagnostic results.
NOTE:
The details for display of the period are as follows:
CRNT: Error currently detected with IPDM E/R.
PAST: Error detected in the past and memorized with IPDM E/R.
Contents displayed
NO DTC IS DETECTED.FURTHER TESTING MAY BE REQUIRED.>>INSPECTION END
CAN COMM CIRC>>After print-out of the monitor items, refer to LAN-7, "
Precautions When Using CON-
SULT-II" .
Removal and Installation of IPDM E/RNKS004EC
: Vehicle front
REMOVAL
1. Remove cowl top cover (RH). Refer to EI-18, "COWL TOP" in
“EI” section.
2. Disengage pawls (A) 4 on both side of IPDM E/R cover B (1),
remove IPDM E/R cover A (2).
3. While pushing pawl (A) on backside of IPDM E/R cover B (1)
toward vehicle front to unlock, lift up IPDM E/R (2).
CONSULT-II displayCONSULT-II
display codeTIME
Details of diagnosis result
CRNT PAST
NO DTC IS DETECTED.
FURTHER TESTING MAY BE REQUIRED.- - - No malfunction
CAN COMM CIRC U1000
Any of or several items below have errors.
TRANSMIT DIAG
ECM
BCM/SEC
SKIB4109E
SKIB4110E
Page 4859 of 5621
PG-32
IPDM E/R (INTELLIGENT POWER DISTRIBUTION MODULE ENGINE ROOM)
Revision: 2006 January2006 M35/M45
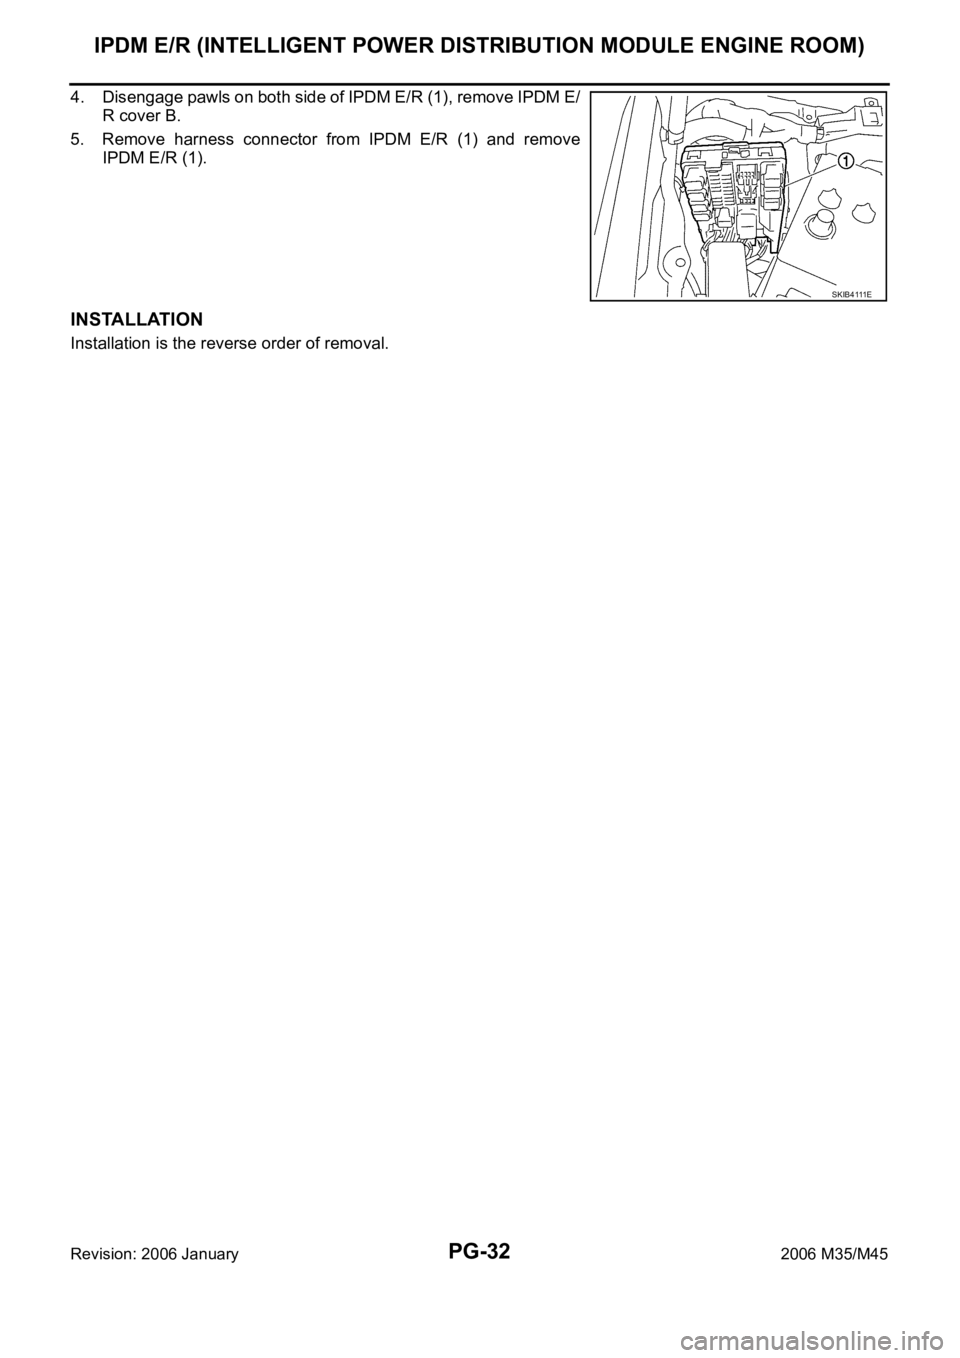
4. Disengage pawls on both side of IPDM E/R (1), remove IPDM E/
R cover B.
5. Remove harness connector from IPDM E/R (1) and remove
IPDM E/R (1).
INSTALLATION
Installation is the reverse order of removal.
SKIB4111E
Page 4861 of 5621

PG-34
PDU (POWER DISTRIBUTION UNIT)
Revision: 2006 January2006 M35/M45
*1: When the A/T selector lever position is N position, the engine start condition is different according to the vehicle speed.
At vehicle speed of 5 km/h or less, the engine can start only when the brake pedal is depressed.
At vehicle speed of 5 km/h or more, the engine can start even if the brake pedal is not depressed. (It is the same as “Engine stall
return operation while driving”.)
*2: When the A/T selector lever position is any position other than P position and when the vehicle speed is 5 km/h or more, the engine
stop condition is different.
Press and hold the push-button ignition switch for 2 seconds or more. (When the push-button ignition switch is pressed for too short
a time, the operation may be invalid, so properly press and hold to prevent the incorrect operation.)
Press the push-button ignition switch 3 times within 1.5 seconds. (Emergency stop operation) Power supply positionEngine start/stop condition Push-button ignition
switch operation fre-
quency Brake pedal operation condition A/T selector lever position
LOCK
ACCNot depressed
(When A/T selector lever is in any posi-
tion other than P or N, there will be no
effect even if it is depressed.)Any position other than P or N
(When the brake pedal is not
depressed, there will be no effect even
if the A/T selector lever is in P or N
position.)1
LOCK
ACC ONNot depressed
(When A/T selector lever is in any posi-
tion other than P or N, there will be no
effect even if it is depressed.)Any position other than P or N
(When the brake pedal is not
depressed, there will be no effect even
if the A/T selector lever is in P or N
position.)2
LOCK
ACC ON
LOCKNot depressed
(When A/T selector lever is in any posi-
tion other than P or N, there will be no
effect even if it is depressed.)Any position other than P or N
(When the brake pedal is not
depressed, there will be no effect even
if the A/T selector lever is in P or N
position.)3
LOCK
START
ACC
START
ON
START
(Engine start)Depressed P or N position (*1)1
[If the switch is
pushed once, the
engine starts from
any power supply
position (LOCK,
ACC, and ON)]
Engine start condition
LOCK
(Engine stop)— P position 1
Engine start condition
ACC
(Engine stop)— Any position other than P (*2) 1
Engine stall return
operation while driving— N position 1
Page 4872 of 5621
PDU (POWER DISTRIBUTION UNIT)
PG-45
C
D
E
F
G
H
I
J
L
MA
B
PG
Revision: 2006 January2006 M35/M45
Removal and Installation of PDUNKS004EQ
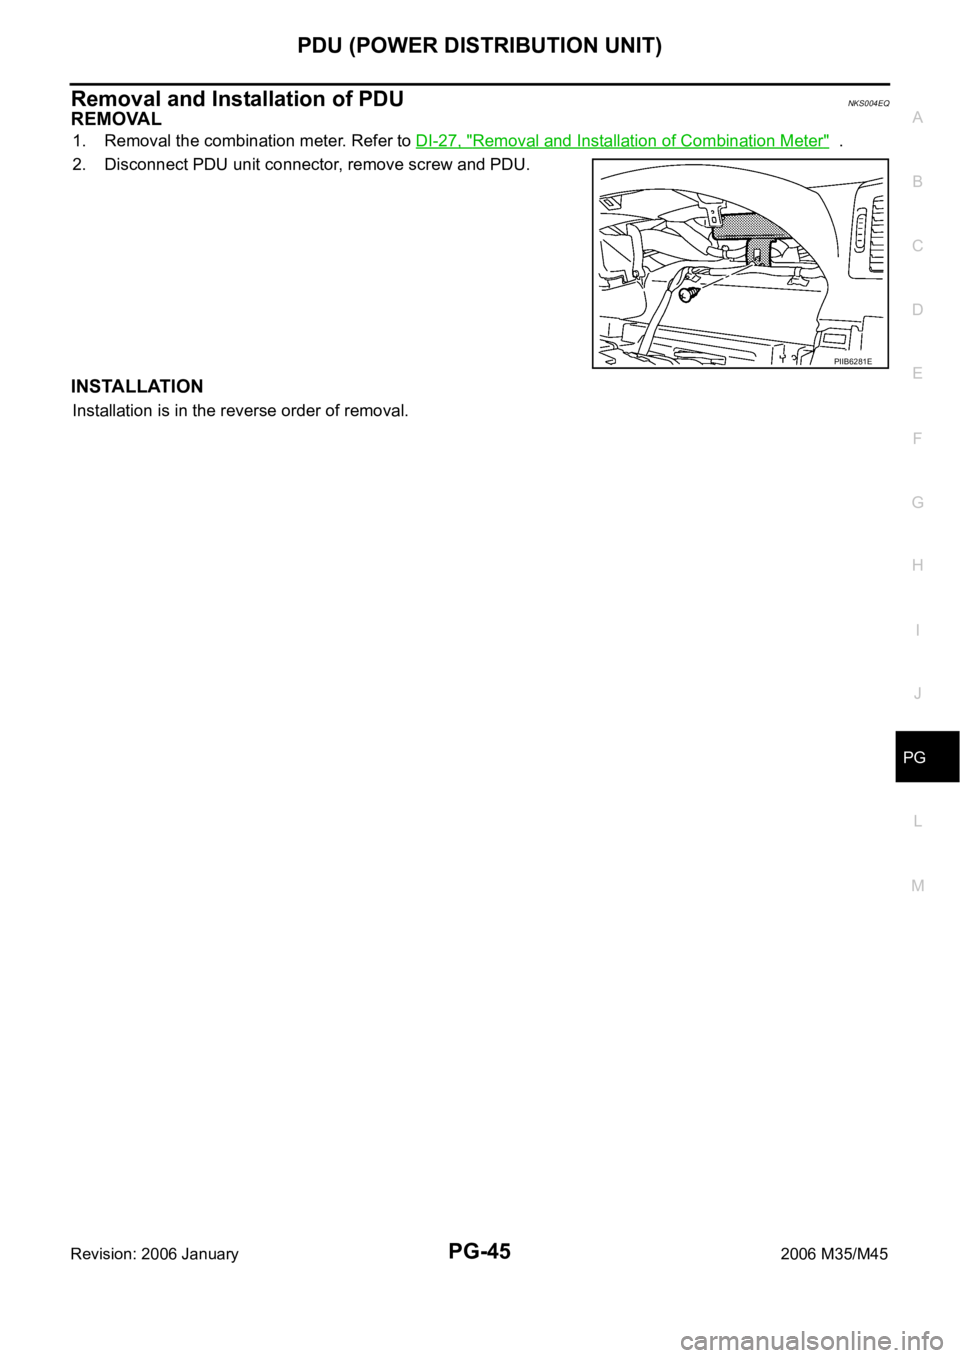
REMOVAL
1. Removal the combination meter. Refer to DI-27, "Removal and Installation of Combination Meter" .
2. Disconnect PDU unit connector, remove screw and PDU.
INSTALLATION
Installation is in the reverse order of removal.
PIIB6281E
Page 4940 of 5621
PR-1
PROPELLER SHAFT
D DRIVELINE/AXLE
CONTENTS
C
E
F
G
H
I
J
K
L
M
SECTION PR
A
B
PR
Revision: 2006 January2006 M35/M45
PROPELLER SHAFT
PREPARATION ........................................................... 2
Special Service Tools ............................................... 2
Commercial Service Tools ........................................ 2
NOISE, VIBRATION AND HARSHNESS (NVH)
TROUBLESHOOTING ................................................ 3
NVH Troubleshooting Chart ..................................... 3
FRONT PROPELLER SHAFT .................................... 4
On-Vehicle Inspection .............................................. 4
APPEARANCE AND NOISE INSPECTION .......... 4
PROPELLER SHAFT VIBRATION ........................ 4
Components ............................................................. 4
Removal and Installation .......................................... 5
REMOVAL ........................................................
..... 5
INSPECTION ........................................................ 5
INSTALLATION ..................................................... 5
REAR PROPELLER SHAFT ...................................... 6
On-Vehicle Inspection .............................................. 6APPEARANCE AND NOISE INSPECTION .......... 6
PROPELLER SHAFT VIBRATION ........................ 6
Components ............................................................. 7
Removal and Installation .......................................... 8
REMOVAL ........................................................
..... 8
INSPECTION ........................................................ 9
INSTALLATION ................................................... 10
Disassembly and Assembly of Center Bearing (For
3S80A-1VL107 and 3F80A-1VL107 Type) ............. 11
DISASSEMBLY ................................................... 11
ASSEMBLY ......................................................... 12
SERVICE DATA AND SPECIFICATIONS (SDS) ...... 13
General Specifications ......................................... ... 13
2WD MODELS .................................................... 13
AWD MODELS .................................................... 13
Journal Axial Play ................................................... 14
Propeller Shaft Runout ........................................... 14
Page 4941 of 5621
PR-2
PREPARATION
Revision: 2006 January2006 M35/M45
PREPARATIONPFP:00002
Special Service ToolsNDS000E7
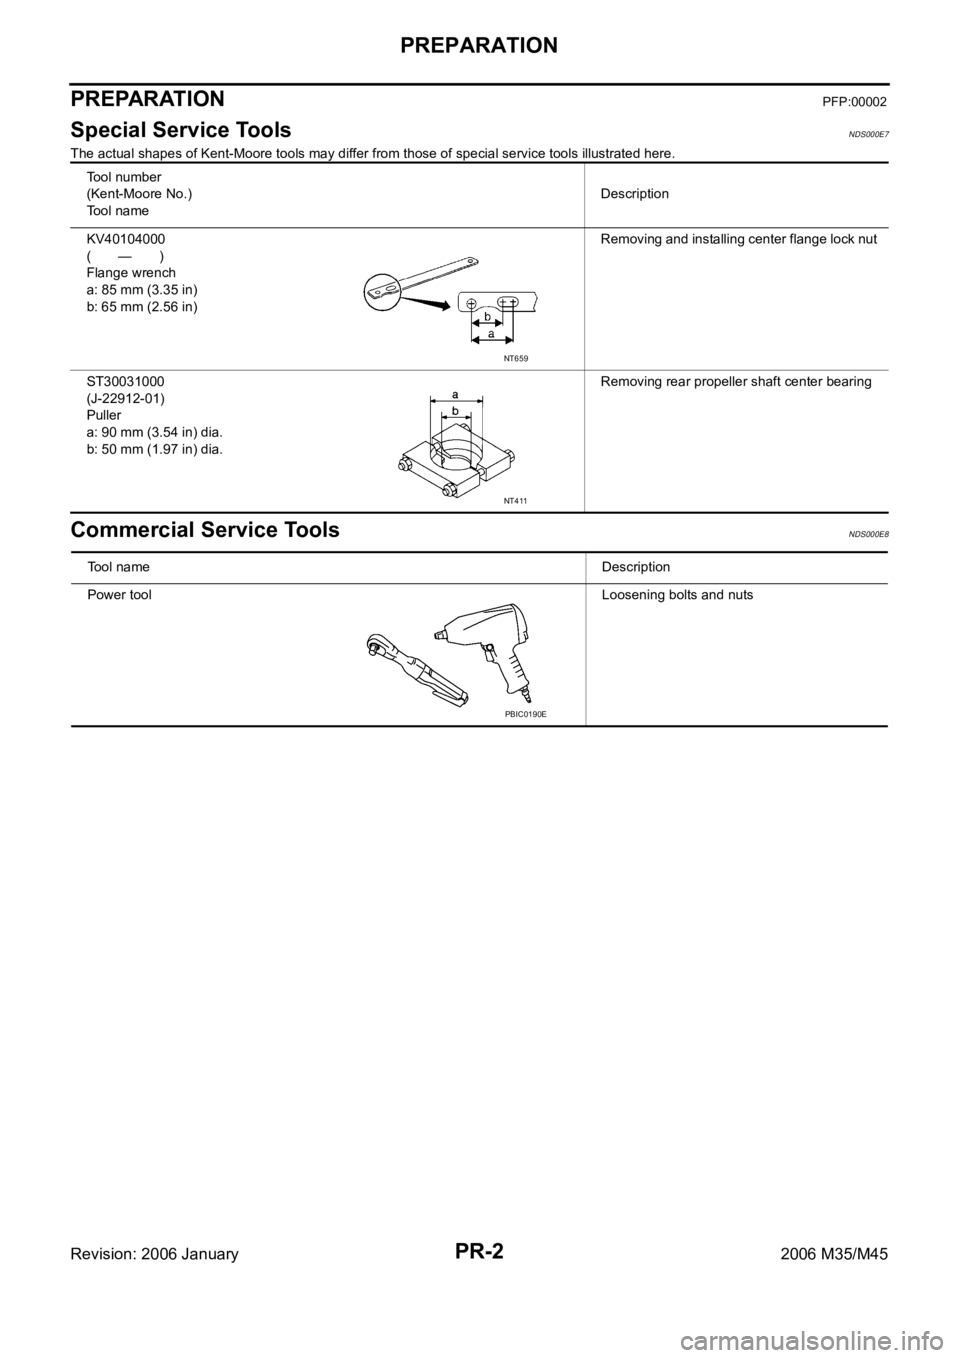
The actual shapes of Kent-Moore tools may differ from those of special service tools illustrated here.
Commercial Service ToolsNDS000E8
Tool number
(Kent-Moore No.)
Tool nameDescription
KV40104000
(—)
Flange wrench
a: 85 mm (3.35 in)
b: 65 mm (2.56 in)Removing and installing center flange lock nut
ST30031000
(J-22912-01)
Puller
a: 90 mm (3.54 in) dia.
b: 50 mm (1.97 in) dia.Removing rear propeller shaft center bearing
NT659
NT411
Tool nameDescription
Power toolLoosening bolts and nuts
PBIC0190E
Page 4942 of 5621

NOISE, VIBRATION AND HARSHNESS (NVH) TROUBLESHOOTING
PR-3
C
E
F
G
H
I
J
K
L
MA
B
PR
Revision: 2006 January2006 M35/M45
NOISE, VIBRATION AND HARSHNESS (NVH) TROUBLESHOOTINGPFP:00003
NVH Troubleshooting ChartNDS000E9
Use the chart below to help you find the cause of the symptom. If necessary, repair or replace these parts.
: Applicable Reference pageFront
PR-4—
—
—
—
PR-4PR-5
NVH in FFD and RFD section
NVH in FAX, RAX, FSU and RSU section
NVH in WT section
NVH in WT section
NVH in RAX section
NVH in BR section
NVH in PS section
RearPR-6PR-10—
PR-7—
PR-6PR-9
Possible cause and SUSPECTED PARTS
Uneven rotating torque
Center bearing improper installation
Excessive center bearing axial end play
Center bearing mounting (insulator) cracks, damage or deterioration
Excessive joint angle
Rotation imbalance
Excessive runout
DIFFERENTIAL
AXLE AND SUSPENSION
TIRES
ROAD WHEEL
DRIVE SHAFT
BRAKES
STEERING
SymptomNoiseShake
Vibration
Page 4943 of 5621
PR-4
FRONT PROPELLER SHAFT
Revision: 2006 January2006 M35/M45
FRONT PROPELLER SHAFTPFP:37200
On-Vehicle InspectionNDS000EA
APPEARANCE AND NOISE INSPECTION
Check the propeller shaft tube surface for dents or cracks. If damaged, replace propeller shaft assembly.
PROPELLER SHAFT VIBRATION
If vibration is present at high speed, inspect propeller shaft runout first.
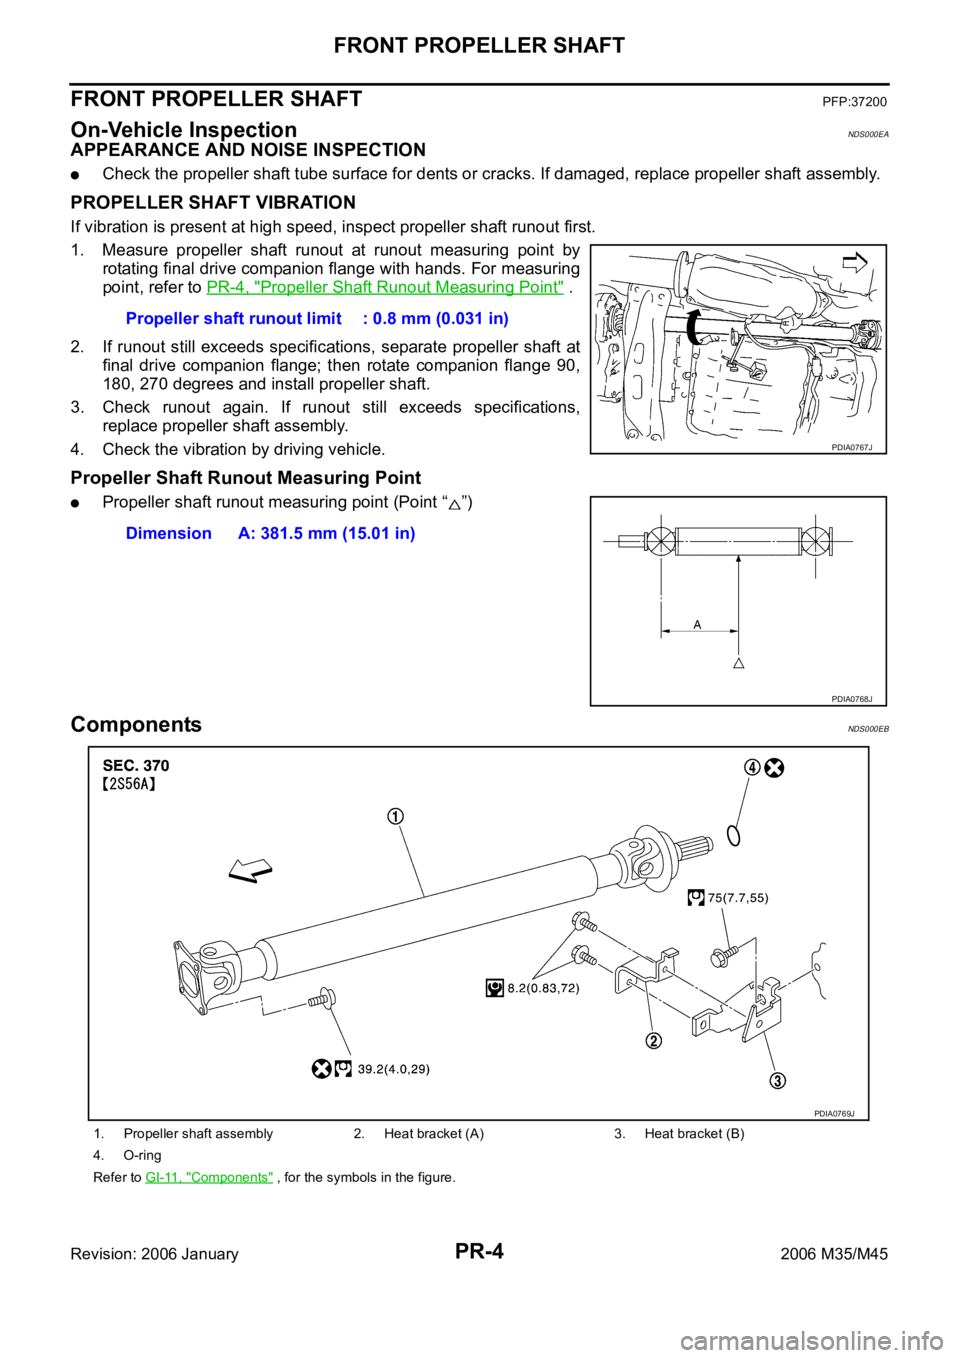
1. Measure propeller shaft runout at runout measuring point by
rotating final drive companion flange with hands. For measuring
point, refer to PR-4, "
Propeller Shaft Runout Measuring Point" .
2. If runout still exceeds specifications, separate propeller shaft at
final drive companion flange; then rotate companion flange 90,
180, 270 degrees and install propeller shaft.
3. Check runout again. If runout still exceeds specifications,
replace propeller shaft assembly.
4. Check the vibration by driving vehicle.
Propeller Shaft Runout Measuring Point
Propeller shaft runout measuring point (Point “ ”)
ComponentsNDS000EB
Propeller shaft runout limit : 0.8 mm (0.031 in)
PDIA0767J
Dimension A: 381.5 mm (15.01 in)
PDIA0768J
1. Propeller shaft assembly 2. Heat bracket (A) 3. Heat bracket (B)
4. O-ring
Refer to GI-11, "
Components" , for the symbols in the figure.
PDIA0769J
Page 4944 of 5621
FRONT PROPELLER SHAFT
PR-5
C
E
F
G
H
I
J
K
L
MA
B
PR
Revision: 2006 January2006 M35/M45
Removal and InstallationNDS000EC
REMOVAL
1. Remove engine undercover with a power tool.
2. If necessary, remove heat bracket.
3. Remove the three way catalyst (right bank) with a power tool. Refer to EX-3, "
EXHAUST SYSTEM" .
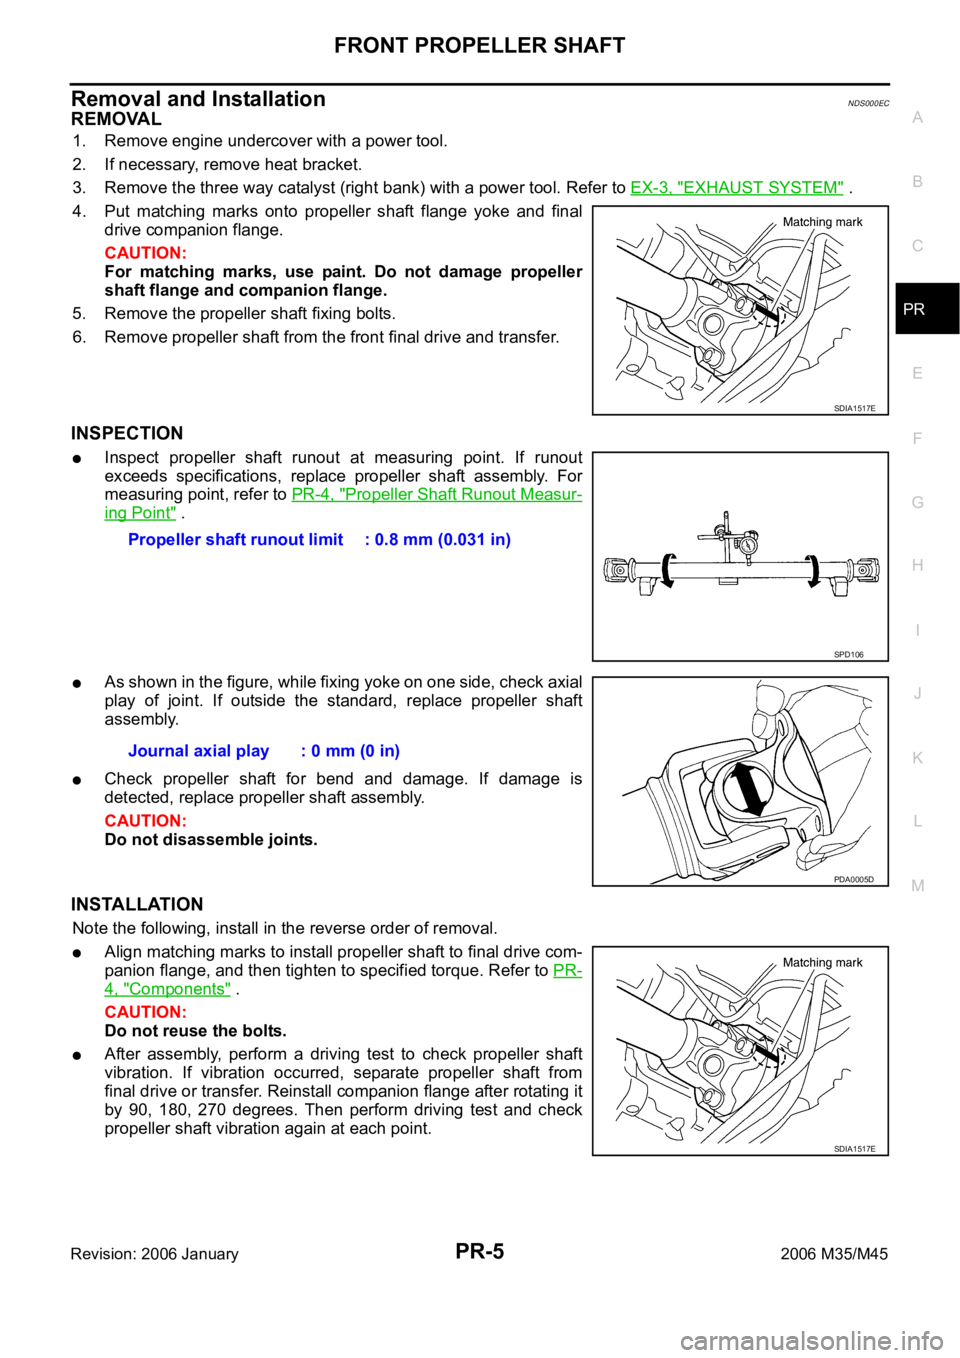
4. Put matching marks onto propeller shaft flange yoke and final
drive companion flange.
CAUTION:
For matching marks, use paint. Do not damage propeller
shaft flange and companion flange.
5. Remove the propeller shaft fixing bolts.
6. Remove propeller shaft from the front final drive and transfer.
INSPECTION
Inspect propeller shaft runout at measuring point. If runout
exceeds specifications, replace propeller shaft assembly. For
measuring point, refer to PR-4, "
Propeller Shaft Runout Measur-
ing Point" .
As shown in the figure, while fixing yoke on one side, check axial
play of joint. If outside the standard, replace propeller shaft
assembly.
Check propeller shaft for bend and damage. If damage is
detected, replace propeller shaft assembly.
CAUTION:
Do not disassemble joints.
INSTALLATION
Note the following, install in the reverse order of removal.
Align matching marks to install propeller shaft to final drive com-
panion flange, and then tighten to specified torque. Refer to PR-
4, "Components" .
CAUTION:
Do not reuse the bolts.
After assembly, perform a driving test to check propeller shaft
vibration. If vibration occurred, separate propeller shaft from
final drive or transfer. Reinstall companion flange after rotating it
by 90, 180, 270 degrees. Then perform driving test and check
propeller shaft vibration again at each point.
SDIA1517E
Propeller shaft runout limit : 0.8 mm (0.031 in)
SPD106
Journal axial play : 0 mm (0 in)
PDA0005D
SDIA1517E