INFINITI M35 2006 Factory Service Manual
Manufacturer: INFINITI, Model Year: 2006, Model line: M35, Model: INFINITI M35 2006Pages: 5621, PDF Size: 65.56 MB
Page 5091 of 5621
RSU-10
SHOCK ABSORBER
Revision: 2006 January2006 M35/M45
SHOCK ABSORBERPFP:56210
Removal and InstallationNES000JA
REMOVAL
1. Remove tires from vehicle with a power tool.
2. Set a jack under rear lower link to relieve the coil spring tension.
3. Remove shock absorber lower end bolt with a power tool.
4. Gradually lower the jack to remove it from rear lower link.
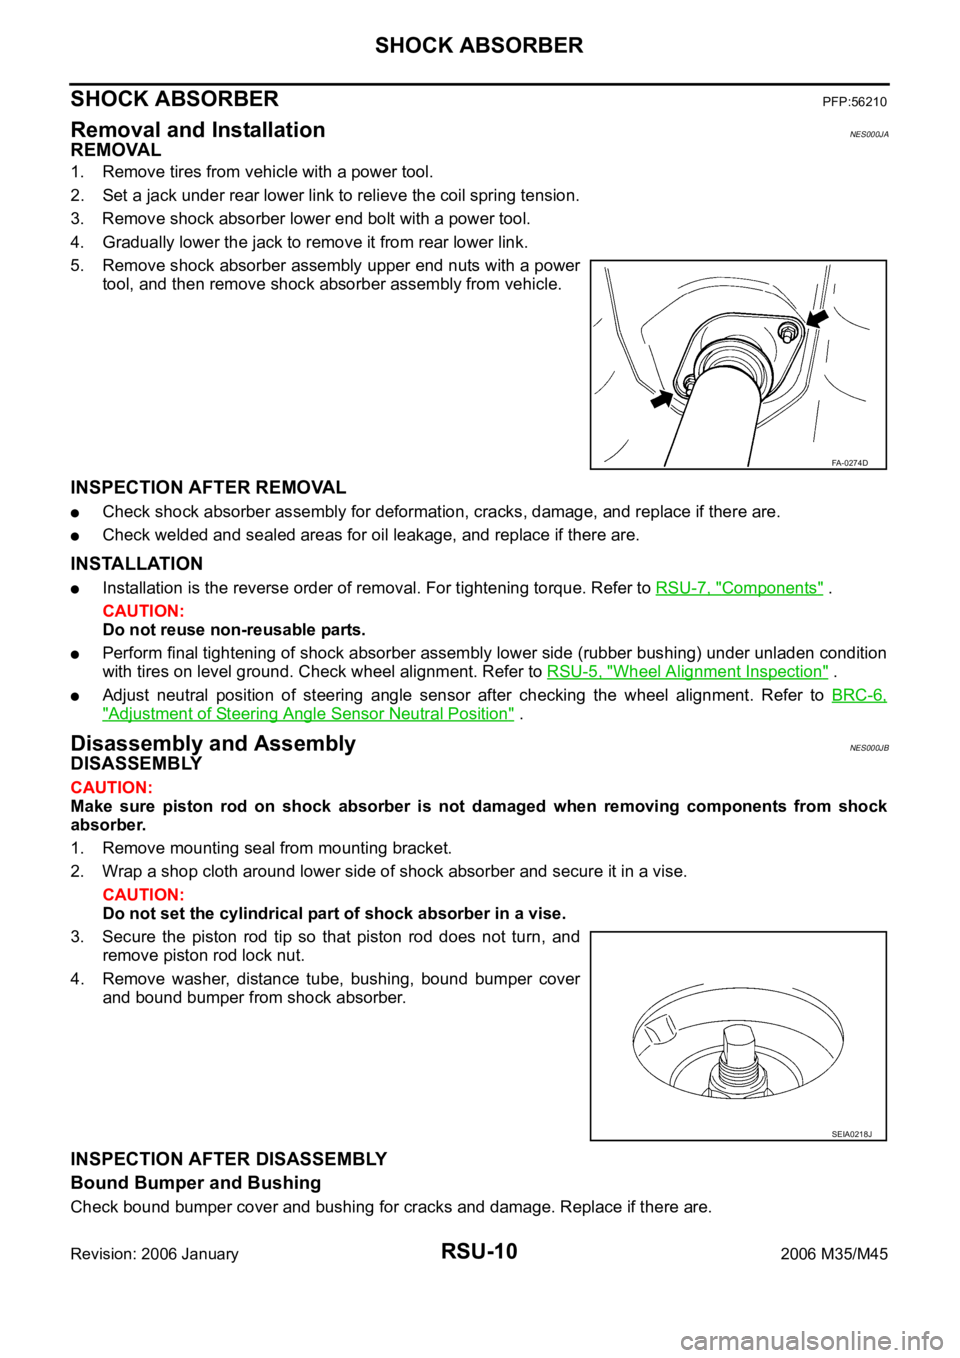
5. Remove shock absorber assembly upper end nuts with a power
tool, and then remove shock absorber assembly from vehicle.
INSPECTION AFTER REMOVAL
Check shock absorber assembly for deformation, cracks, damage, and replace if there are.
Check welded and sealed areas for oil leakage, and replace if there are.
INSTALLATION
Installation is the reverse order of removal. For tightening torque. Refer to RSU-7, "Components" .
CAUTION:
Do not reuse non-reusable parts.
Perform final tightening of shock absorber assembly lower side (rubber bushing) under unladen condition
with tires on level ground. Check wheel alignment. Refer to RSU-5, "
Wheel Alignment Inspection" .
Adjust neutral position of steering angle sensor after checking the wheel alignment. Refer to BRC-6,
"Adjustment of Steering Angle Sensor Neutral Position" .
Disassembly and AssemblyNES000JB
DISASSEMBLY
CAUTION:
Make sure piston rod on shock absorber is not damaged when removing components from shock
absorber.
1. Remove mounting seal from mounting bracket.
2. Wrap a shop cloth around lower side of shock absorber and secure it in a vise.
CAUTION:
Do not set the cylindrical part of shock absorber in a vise.
3. Secure the piston rod tip so that piston rod does not turn, and
remove piston rod lock nut.
4. Remove washer, distance tube, bushing, bound bumper cover
and bound bumper from shock absorber.
INSPECTION AFTER DISASSEMBLY
Bound Bumper and Bushing
Check bound bumper cover and bushing for cracks and damage. Replace if there are.
FA-0274D
SEIA0218J
Page 5092 of 5621

SHOCK ABSORBER
RSU-11
C
D
F
G
H
I
J
K
L
MA
B
RSU
Revision: 2006 January2006 M35/M45
Shock Absorber
Check the following:
Shock absorber for deformation, cracks, and other damage. Replace if there are.
Piston rod for damage, uneven wear, and distortion. Replace if there are.
ASSEMBLY
Installation is the reverse order of removal. For tightening torque. Refer to RSU-7, "Components" .
CAUTION:
Do not reuse non-reusable parts.
Make sure piston rod on shock absorber is not damaged when attaching components to shock absorber.
Page 5093 of 5621
RSU-12
SUSPENSION ARM
Revision: 2006 January2006 M35/M45
SUSPENSION ARMPFP:55501
Removal and InstallationNES000JC
REMOVAL
1. Remove tire with a power tool.
2. Set a jack under rear lower link to relieve the coil spring tension.
3. Remove connecting rod mounting bracket from suspension arm with a power tool.
4. Remove mounting nuts and bolts between suspension arm and rear suspension member.
5. Remove cotter pin of suspension arm ball joint, and loosen nut.
6. Use a ball joint remover (suitable tool) to remove suspension arm from axle. Be careful not to damage ball
joint boot.
CAUTION:
Tighten temporarily mounting nut to prevent damage to threads and to prevent ball joint remover
(suitable tool) from coming off.
7. Remove suspension arm and stopper rubber from vehicle.
INSPECTION AFTER REMOVAL
Visual Inspection
Check suspension arm and bushing for deformation, cracks or damage. If any non-standard condition is
found, replace it.
Check boot of ball joint for cracks or damage, and also for grease leakage. If a malfunction is detected,
replace suspension arm.
Ball Joint Inspection
Manually move ball stud at least ten times by hand to check for smooth movement.
Swing Torque Inspection
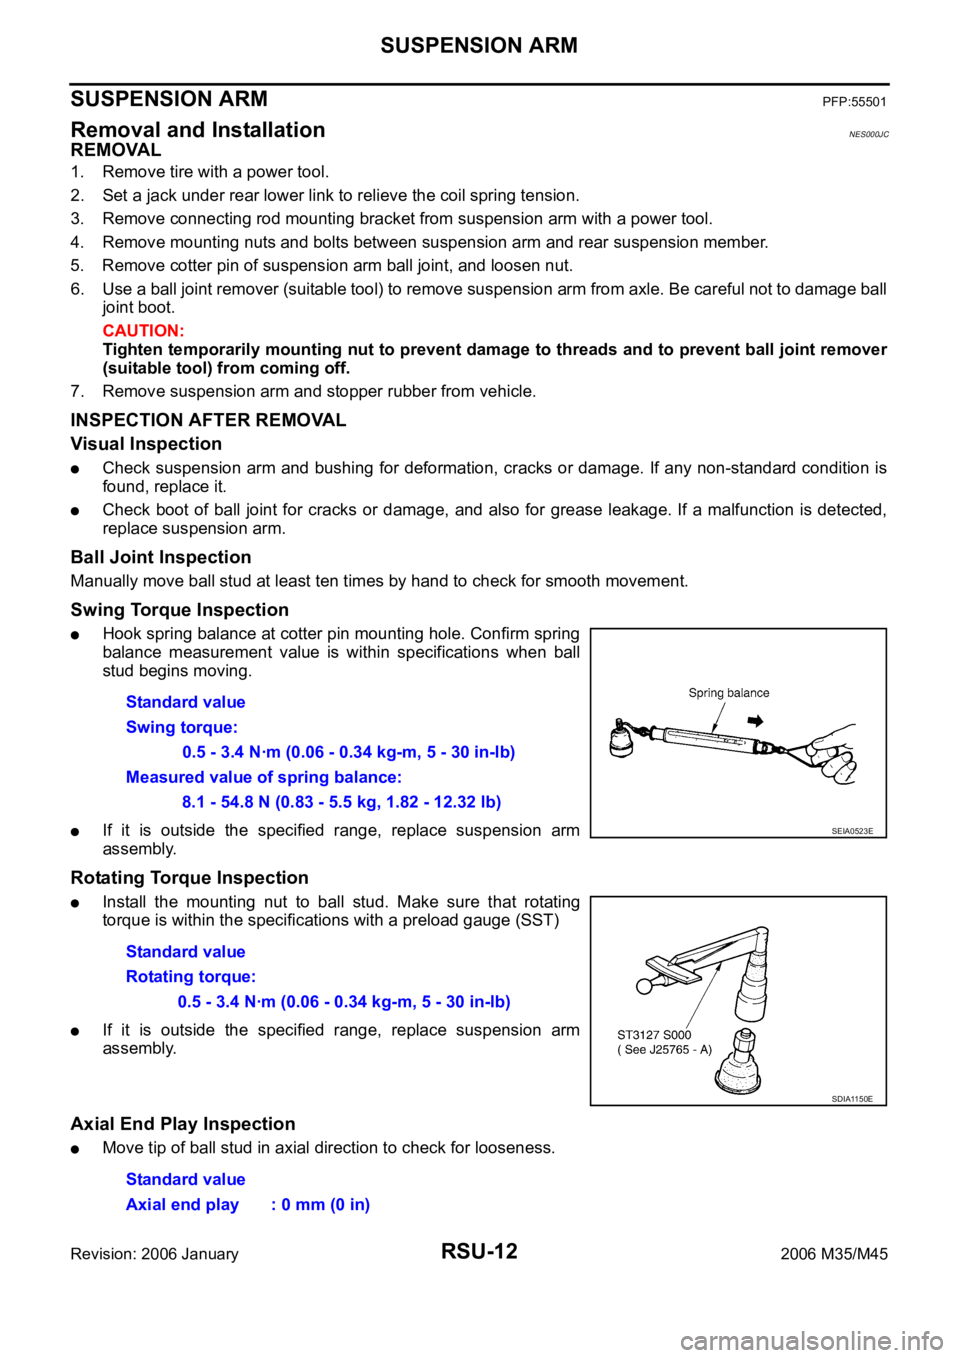
Hook spring balance at cotter pin mounting hole. Confirm spring
balance measurement value is within specifications when ball
stud begins moving.
If it is outside the specified range, replace suspension arm
assembly.
Rotating Torque Inspection
Install the mounting nut to ball stud. Make sure that rotating
torque is within the specifications with a preload gauge (SST)
If it is outside the specified range, replace suspension arm
assembly.
Axial End Play Inspection
Move tip of ball stud in axial direction to check for looseness. Standard value
Swing torque:
0.5 - 3.4 Nꞏm (0.06 - 0.34 kg-m, 5 - 30 in-lb)
Measured value of spring balance:
8.1 - 54.8 N (0.83 - 5.5 kg, 1.82 - 12.32 lb)
SEIA0523E
Standard value
Rotating torque:
0.5 - 3.4 Nꞏm (0.06 - 0.34 kg-m, 5 - 30 in-lb)
SDIA1150E
Standard value
Axial end play : 0 mm (0 in)
Page 5094 of 5621
SUSPENSION ARM
RSU-13
C
D
F
G
H
I
J
K
L
MA
B
RSU
Revision: 2006 January2006 M35/M45
If it is outside the specified range, replace suspension arm assembly.
INSTALLATION
Installation is the reverse order of removal. For tightening torque. Refer to RSU-7, "Components" .
CAUTION:
Do not reuse non-reusable parts.
Perform the final tightening of rear suspension member installation position (rubber bushing) under
unladen condition with tires on level ground. Refer to RSU-5, "
Wheel Alignment Inspection" .
Adjust neutral position of steering angle sensor after checking the wheel alignment. Refer to BRC-6,
"Adjustment of Steering Angle Sensor Neutral Position" .
Page 5095 of 5621
RSU-14
RADIUS ROD
Revision: 2006 January2006 M35/M45
RADIUS RODPFP:55110
Removal and InstallationNES000JD
REMOVAL
1. Remove tire with a power tool.
2. Remove brake caliper with a power tool. Hang it in a place where it will not interfere with work. Refer to
BR-29, "
REAR DISC BRAKE" .
CAUTION:
Do not depressing brake pedal while brake caliper is removed.
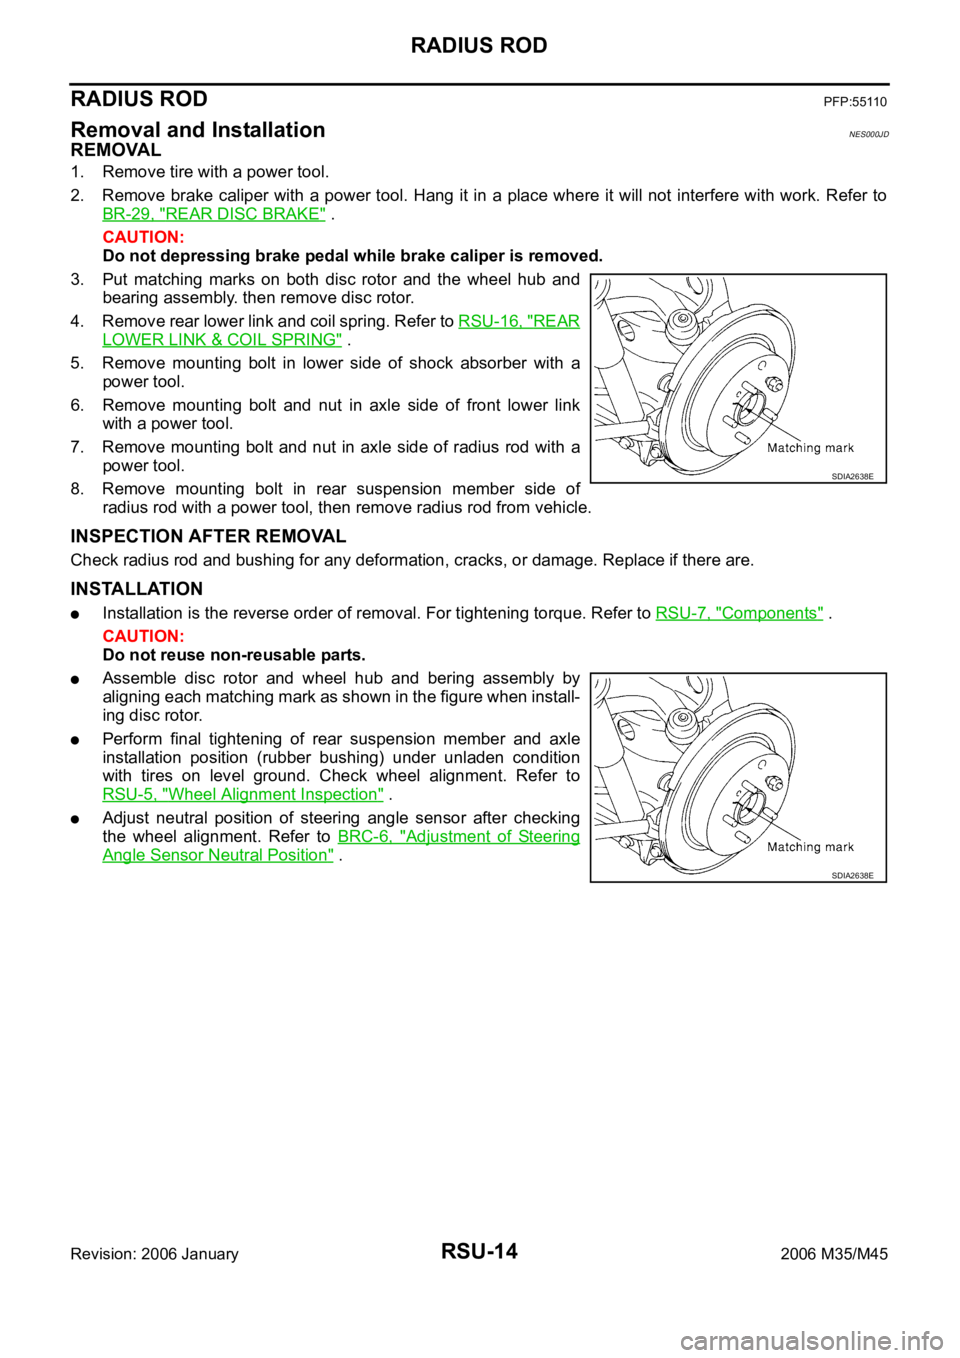
3. Put matching marks on both disc rotor and the wheel hub and
bearing assembly. then remove disc rotor.
4. Remove rear lower link and coil spring. Refer to RSU-16, "
REAR
LOWER LINK & COIL SPRING" .
5. Remove mounting bolt in lower side of shock absorber with a
power tool.
6. Remove mounting bolt and nut in axle side of front lower link
with a power tool.
7. Remove mounting bolt and nut in axle side of radius rod with a
power tool.
8. Remove mounting bolt in rear suspension member side of
radius rod with a power tool, then remove radius rod from vehicle.
INSPECTION AFTER REMOVAL
Check radius rod and bushing for any deformation, cracks, or damage. Replace if there are.
INSTALLATION
Installation is the reverse order of removal. For tightening torque. Refer to RSU-7, "Components" .
CAUTION:
Do not reuse non-reusable parts.
Assemble disc rotor and wheel hub and bering assembly by
aligning each matching mark as shown in the figure when install-
ing disc rotor.
Perform final tightening of rear suspension member and axle
installation position (rubber bushing) under unladen condition
with tires on level ground. Check wheel alignment. Refer to
RSU-5, "
Wheel Alignment Inspection" .
Adjust neutral position of steering angle sensor after checking
the wheel alignment. Refer to BRC-6, "
Adjustment of Steering
Angle Sensor Neutral Position" .
SDIA2638E
SDIA2638E
Page 5096 of 5621
FRONT LOWER LINK
RSU-15
C
D
F
G
H
I
J
K
L
MA
B
RSU
Revision: 2006 January2006 M35/M45
FRONT LOWER LINKPFP:55110
Removal and InstallationNES000JE
REMOVAL
1. Remove tire with a power tool.
2. Set a jack under rear lower link to relieve the coil spring tension.
3. Remove mounting nut and bolt between front lower link and rear suspension member with a power tool.
4. Remove mounting nut and bolt between front lower link and axle with a power tool.
5. Remove front lower link from vehicle.
INSPECTION AFTER REMOVAL
Check front lower link and bushing for any deformation, cracks, or damage. Replace if there are.
INSTALLATION
Installation is the reverse order of removal. For tightening torque. Refer to RSU-7, "Components" .
CAUTION:
Do not reuse non-reusable parts.
Perform the final tightening of rear suspension member and axle installation position (rubber bushing)
under unladen condition with tires on level ground. Check wheel alignment. Refer to RSU-5, "
Wheel Align-
ment Inspection" .
Adjust neutral position of steering angle sensor after checking the wheel alignment. Refer to Refer to
BRC-6, "
Adjustment of Steering Angle Sensor Neutral Position" .
Page 5097 of 5621
RSU-16
REAR LOWER LINK & COIL SPRING
Revision: 2006 January2006 M35/M45
REAR LOWER LINK & COIL SPRINGPFP:551B0
Removal and InstallationNES000JF
REMOVAL
1. Remove tire with a power tool.
2. Set a jack under rear lower link to relieve the coil spring tension.
3. Loosen mounting bolt and nut of rear lower link inside of suspension member, and then remove mounting
bolt and nut inside of axle with a power tool.
4. Slowly lower jack, then remove upper seat, coil spring and rubber sheet from rear lower link.
5. Remove mounting bolt and nut inside of suspension member to remove rear lower link with a power tool.
INSPECTION AFTER REMOVAL
Check rear lower link, bushing and coil spring for deformation, cracks, and damage. Replace rear lower link
and coil spring if there are.
INSTALLATION
Installation is the reverse order of removal. For tightening torque. Refer to RSU-7, "Components" .
CAUTION:
Do not reuse non-reusable parts.
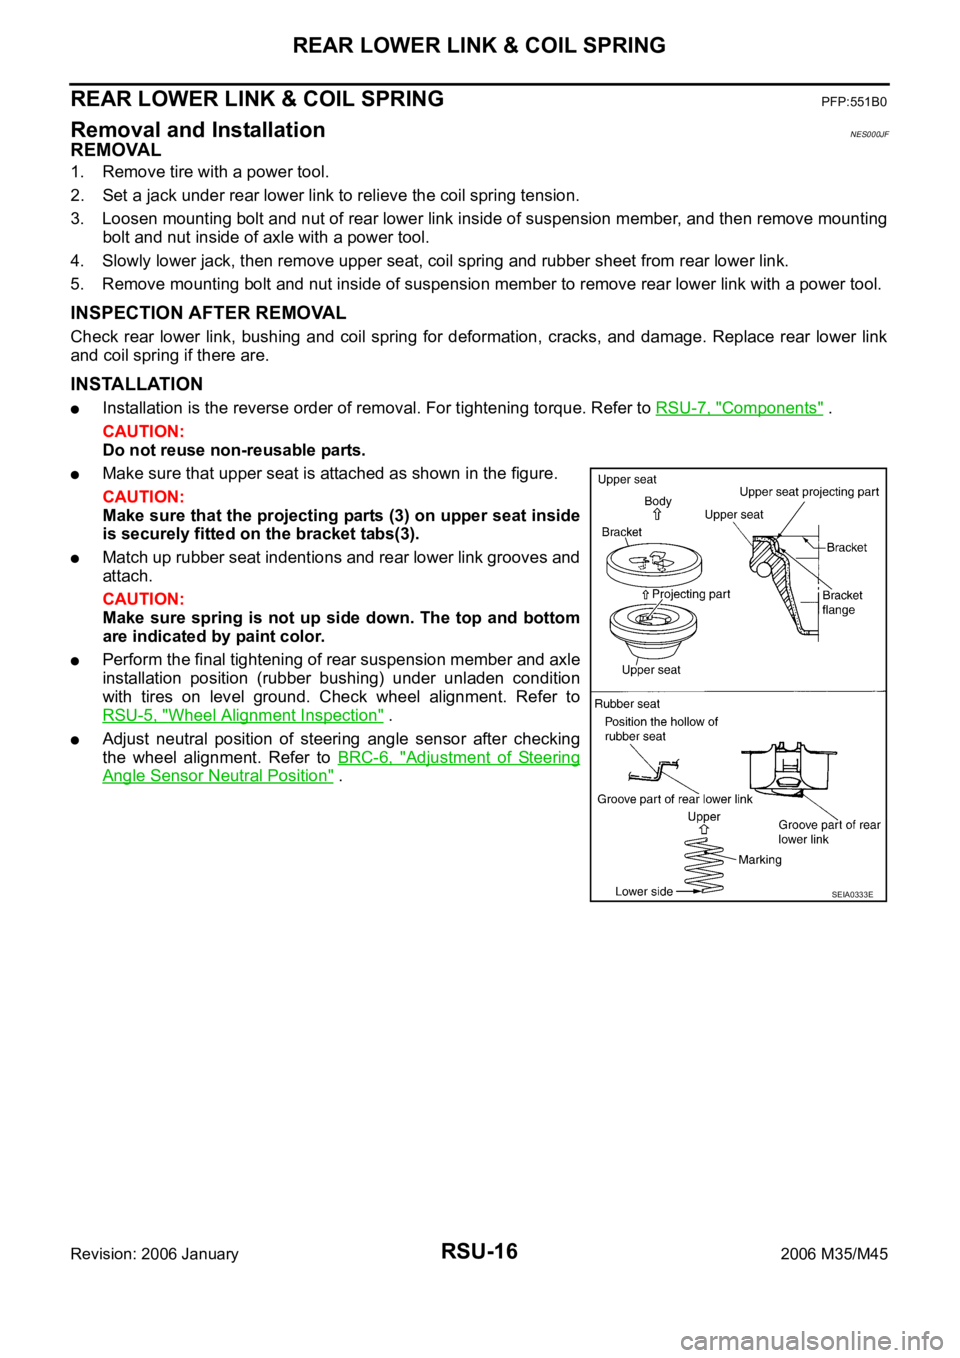
Make sure that upper seat is attached as shown in the figure.
CAUTION:
Make sure that the projecting parts (3) on upper seat inside
is securely fitted on the bracket tabs(3).
Match up rubber seat indentions and rear lower link grooves and
attach.
CAUTION:
Make sure spring is not up side down. The top and bottom
are indicated by paint color.
Perform the final tightening of rear suspension member and axle
installation position (rubber bushing) under unladen condition
with tires on level ground. Check wheel alignment. Refer to
RSU-5, "
Wheel Alignment Inspection" .
Adjust neutral position of steering angle sensor after checking
the wheel alignment. Refer to BRC-6, "
Adjustment of Steering
Angle Sensor Neutral Position" .
SEIA0333E
Page 5098 of 5621
STABILIZER BAR
RSU-17
C
D
F
G
H
I
J
K
L
MA
B
RSU
Revision: 2006 January2006 M35/M45
STABILIZER BARPFP:56230
Removal and InstallationNES000JG
REMOVAL
1. Remove mounting bracket of center muffler and remove mounting rubber of main muffler. Refer to EX-3,
"EXHAUST SYSTEM" .
2. Remove lower side mounting nut on stabilizer connecting rod and remove stabilizer connecting rod from
stabilizer bar with power tool.
3. Remove mounting nut on stabilizer clamp and remove stabilizer from vehicle with power tool.
INSPECTION AFTER REMOVAL
Check stabilizer bar, stabilizer bushings, stabilizer clamp, stabilizer connecting rod and stabilizer connecting
rod mounting bracket for any deformation, crack or damage. Replace if there are.
INSTALLATION
Installation is the reverse order of removal. For tightening torque. Refer to RSU-7, "Components" .
CAUTION:
Do not reuse non-reusable parts.
Page 5099 of 5621
RSU-18
SERVICE DATA
Revision: 2006 January2006 M35/M45
SERVICE DATAPFP:00030
Wheel Alignment (Unladen)*NES000JH
*: Fuel, engine coolant and engine oil full. Spare tire, jack, hand tools and mats in designated positions.
Ball JointNES000JI
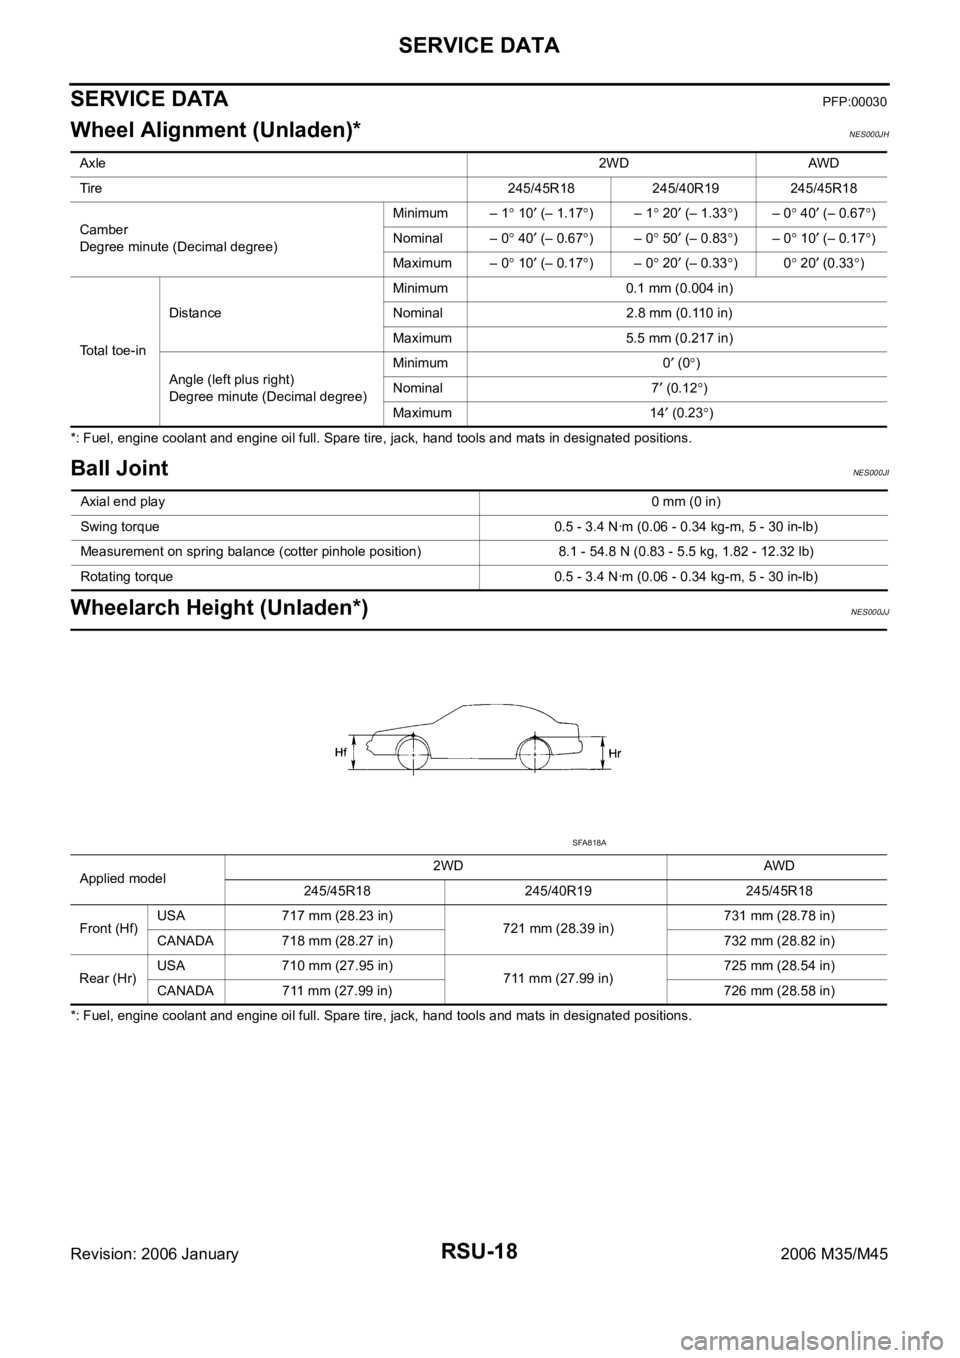
Wheelarch Height (Unladen*)NES000JJ
*: Fuel, engine coolant and engine oil full. Spare tire, jack, hand tools and mats in designated positions. Axle2WD AWD
Tire 245/45R18 245/40R19 245/45R18
Camber
Degree minute (Decimal degree)Minimum – 1
10 (– 1.17)– 1 20 (– 1.33)– 0 40 (– 0.67)
Nominal – 0
40 (– 0.67)– 0 50 (– 0.83)– 0 10 (– 0.17)
Maximum – 0
10 (– 0.17)– 0 20 (– 0.33)0 20 (0.33)
Total toe-inDistanceMinimum 0.1 mm (0.004 in)
Nominal 2.8 mm (0.110 in)
Maximum 5.5 mm (0.217 in)
Angle (left plus right)
Degree minute (Decimal degree)Minimum 0
(0)
Nominal 7
(0.12)
Maximum 14
(0.23)
Axial end play0 mm (0 in)
Swing torque 0.5 - 3.4 Nꞏm (0.06 - 0.34 kg-m, 5 - 30 in-lb)
Measurement on spring balance (cotter pinhole position) 8.1 - 54.8 N (0.83 - 5.5 kg, 1.82 - 12.32 lb)
Rotating torque 0.5 - 3.4 Nꞏm (0.06 - 0.34 kg-m, 5 - 30 in-lb)
Applied model2WD AWD
245/45R18 245/40R19 245/45R18
Front (Hf)USA 717 mm (28.23 in)
721 mm (28.39 in)731 mm (28.78 in)
CANADA 718 mm (28.27 in) 732 mm (28.82 in)
Rear (Hr)USA 710 mm (27.95 in)
711 mm (27.99 in)725 mm (28.54 in)
CANADA 711 mm (27.99 in) 726 mm (28.58 in)
SFA818A
Page 5100 of 5621
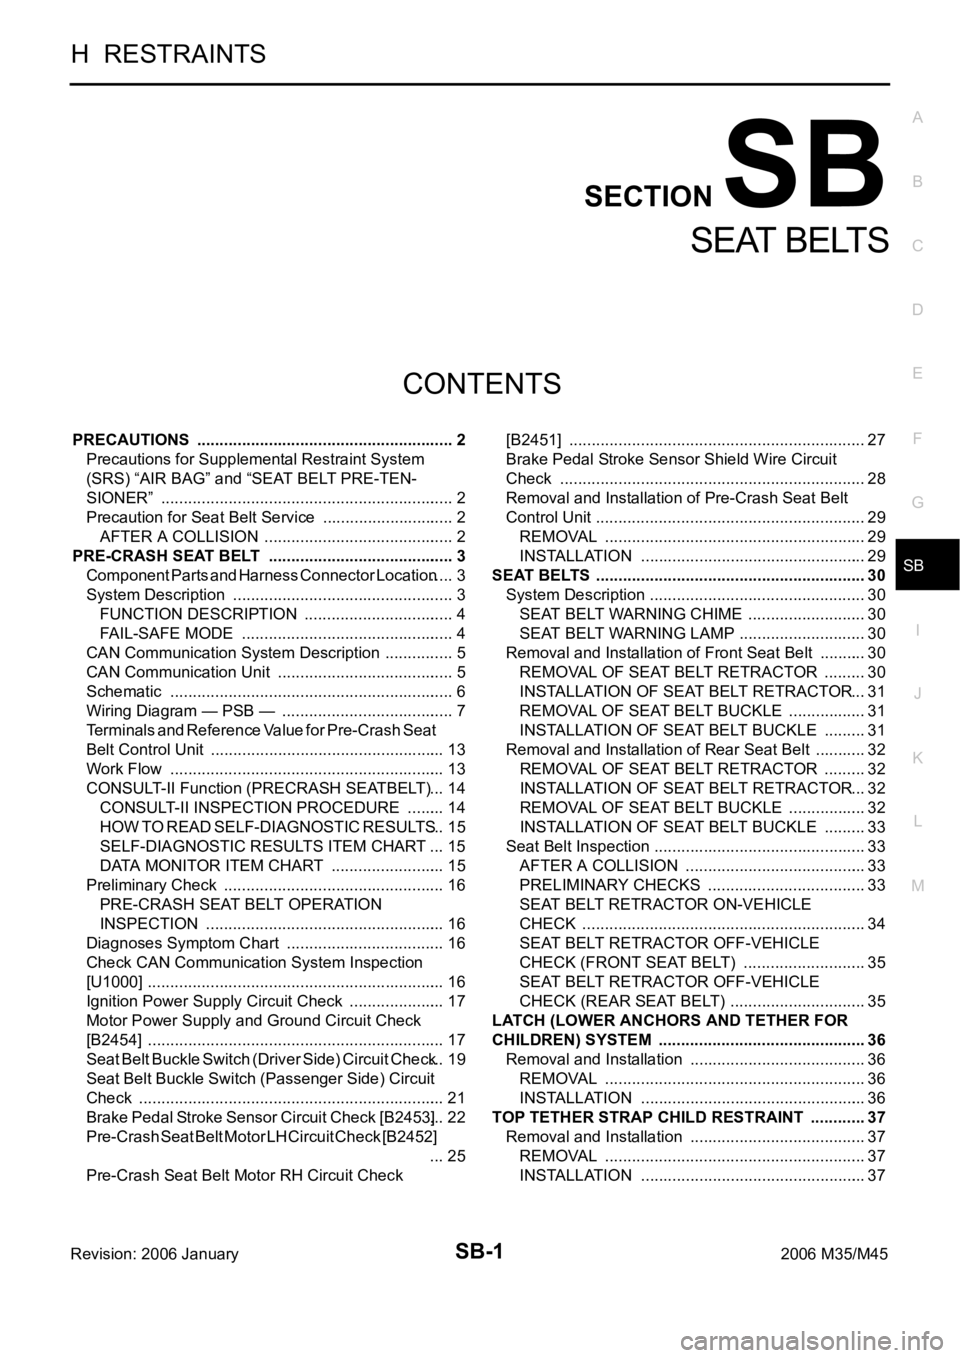
SB-1
SEAT BELTS
H RESTRAINTS
CONTENTS
C
D
E
F
G
I
J
K
L
M
SECTION SB
A
B
SB
Revision: 2006 January2006 M35/M45
SEAT BELTS
PRECAUTIONS .......................................................... 2
Precautions for Supplemental Restraint System
(SRS) “AIR BAG” and “SEAT BELT PRE-TEN-
SIONER” .................................................................. 2
Precaution for Seat Belt Service .............................. 2
AFTER A COLLISION ........................................... 2
PRE-CRASH SEAT BELT .......................................... 3
Component Parts and Harness Connector Location ..... 3
System Description .................................................. 3
FUNCTION DESCRIPTION .................................. 4
FAIL-SAFE MODE ................................................ 4
CAN Communication System Description ................ 5
CAN Communication Unit ........................................ 5
Schematic ................................................................ 6
Wiring Diagram — PSB — ....................................... 7
Terminals and Reference Value for Pre-Crash Seat
Belt Control Unit ..................................................... 13
Work Flow .............................................................. 13
CONSULT-II Function (PRECRASH SEATBELT) ... 14
CONSULT-II INSPECTION PROCEDURE ......... 14
HOW TO READ SELF-DIAGNOSTIC RESULTS ... 15
SELF-DIAGNOSTIC RESULTS ITEM CHART ... 15
DATA MONITOR ITEM CHART .......................... 15
Preliminary Check .................................................. 16
PRE-CRASH SEAT BELT OPERATION
INSPECTION ...................................................... 16
Diagnoses Symptom Chart .................................... 16
Check CAN Communication System Inspection
[U1000] ................................................................... 16
Ignition Power Supply Circuit Check ...................... 17
Motor Power Supply and Ground Circuit Check
[B2454] ................................................................... 17
Seat Belt Buckle Switch (Driver Side) Circuit Check ... 19
Seat Belt Buckle Switch (Passenger Side) Circuit
Check ..................................................................... 21
Brake Pedal Stroke Sensor Circuit Check [B2453] ... 22
Pre-Crash Seat Belt Motor LH Circuit Check [B2452]
... 25
Pre-Crash Seat Belt Motor RH Circuit Check [B2451] ................................................................... 27
Brake Pedal Stroke Sensor Shield Wire Circuit
Check ..................................................................... 28
Removal and Installation of Pre-Crash Seat Belt
Control Unit ............................................................. 29
REMOVAL ........................................................
... 29
INSTALLATION ................................................... 29
SEAT BELTS ............................................................. 30
System Description ................................................. 30
SEAT BELT WARNING CHIME ........................... 30
SEAT BELT WARNING LAMP ............................. 30
Removal and Installation of Front Seat Belt ........... 30
REMOVAL OF SEAT BELT RETRACTOR .......... 30
INSTALLATION OF SEAT BELT RETRACTOR ... 31
REMOVAL OF SEAT BELT BUCKLE .................. 31
INSTALLATION OF SEAT BELT BUCKLE .......
... 31
Removal and Installation of Rear Seat Belt ............ 32
REMOVAL OF SEAT BELT RETRACTOR .......... 32
INSTALLATION OF SEAT BELT RETRACTOR ... 32
REMOVAL OF SEAT BELT BUCKLE .................. 32
INSTALLATION OF SEAT BELT BUCKLE .......... 33
Seat Belt Inspection ................................................ 33
AFTER A COLLISION ......................................... 33
PRELIMINARY CHECKS .................................... 33
SEAT BELT RETRACTOR ON-VEHICLE
CHECK ................................................................ 34
SEAT BELT RETRACTOR OFF-VEHICLE
CHECK (FRONT SEAT BELT) ............................ 35
SEAT BELT RETRACTOR OFF-VEHICLE
CHECK (REAR SEAT BELT) ............................... 35
LATCH (LOWER ANCHORS AND TETHER FOR
CHILDREN) SYSTEM ............................................... 36
Removal and Installation ........................................ 36
REMOVAL ........................................................
... 36
INSTALLATION ................................................... 36
TOP TETHER STRAP CHILD RESTRAINT ............. 37
Removal and Installation ........................................ 37
REMOVAL ........................................................
... 37
INSTALLATION ................................................... 37