rear view mirror INFINITI Q50 2014 Infiniti Intouch
[x] Cancel search | Manufacturer: INFINITI, Model Year: 2014, Model line: Q50, Model: INFINITI Q50 2014Pages: 274, PDF Size: 1.43 MB
Page 2 of 274

Table of Contents
1Introduction
How to use this manual ................... 1-2
Safety information ........................... 1-3
Laser product .................................. 1-4
2Getting Started
Control buttons and functions .......... 2-2
Starting system ............................... 2-7
Touch panel operation .................... 2-8
Menu screen and
operation method ........................... 2-9
How to operate dual display .......... 2-10
Items to be set initially .................. 2-16
3Heater and air conditioner
Heater and air conditioner
operation precautions ...................... 3-2
Heater and air
conditioner controls ......................... 3-3
Automatic climate control system ..... 3-6Heated seats (if so equipped) .......... 3-9
Heated steering-wheel (if
so equipped) ................................. 3-10
Rear window and outside
mirror defroster ............................. 3-11
Heater and air
conditioner settings ....................... 3-11
4Audio system
Audio operation precautions ............ 4-2
Names and functions of audio
control buttons .............................. 4-10
Audio operations ........................... 4-11
Audio settings ............................... 4-31
CD/USB memory device care
and cleaning .................................. 4-33
Gracenote
®End User
License Agreement ......................... 4-33
5Hands-Free Phone
Bluetooth®Hands-Free
Phone System .................................. 5-2
6Infiniti InTouch Apps
Infiniti InTouch Apps Overview ......... 6-2
Using applications ........................... 6-3
Vehicle Apps .................................... 6-3
Mobile Apps ................................... 6-8
7Monitor system
RearView Monitor (if so equipped) ... 7-2
Around View®Monitor (AVM) (if
so equipped) ................................... 7-6
Difference between predictive and
actual distances ............................. 7-19
8Information and settings
Information screen ........................... 8-2
SiriusXM Travel Link®..................... 8-4
Infiniti Connection
TM..................... 8-10
Settings screen .............................. 8-22
Fully customizable
digital environment ........................ 8-28
Page 105 of 274
7. Monitor system
7-2
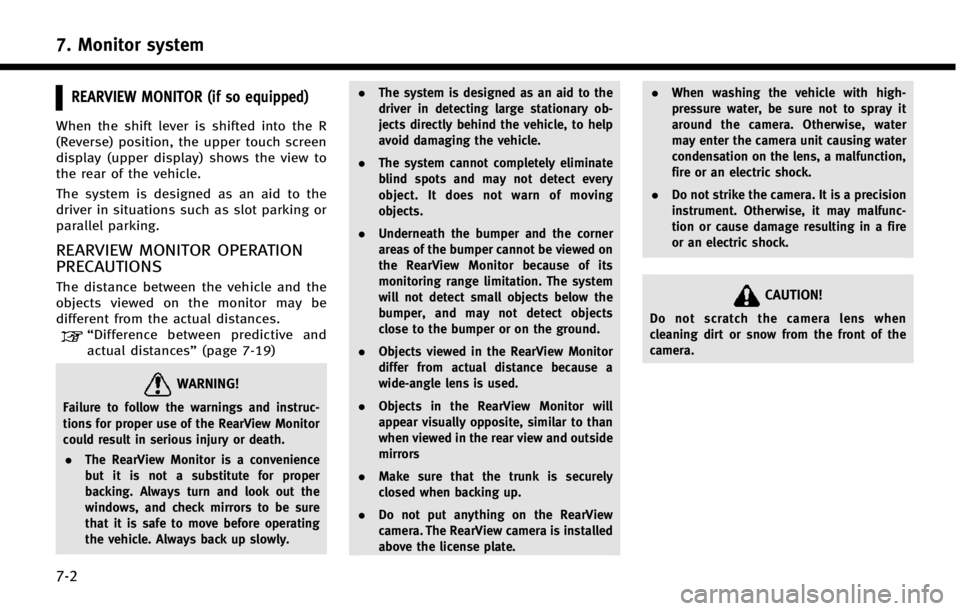
REARVIEW MONITOR (if so equipped)
When the shift lever is shifted into the R
(Reverse) position, the upper touch screen
display (upper display) shows the view to
the rear of the vehicle.
The system is designed as an aid to the
driver in situations such as slot parking or
parallel parking.
REARVIEW MONITOR OPERATION
PRECAUTIONS
The distance between the vehicle and the
objects viewed on the monitor may be
different from the actual distances.
“Difference between predictive and
actual distances” (page 7-19)
WARNING!
Failure to follow the warnings and instruc-
tions for proper use of the RearView Monitor
could result in serious injury or death.
. The RearView Monitor is a convenience
but it is not a substitute for proper
backing. Always turn and look out the
windows, and check mirrors to be sure
that it is safe to move before operating
the vehicle. Always back up slowly. .
The system is designed as an aid to the
driver in detecting large stationary ob-
jects directly behind the vehicle, to help
avoid damaging the vehicle.
. The system cannot completely eliminate
blind spots and may not detect every
object. It does not warn of moving
objects.
. Underneath the bumper and the corner
areas of the bumper cannot be viewed on
the RearView Monitor because of its
monitoring range limitation. The system
will not detect small objects below the
bumper, and may not detect objects
close to the bumper or on the ground.
. Objects viewed in the RearView Monitor
differ from actual distance because a
wide-angle lens is used.
. Objects in the RearView Monitor will
appear visually opposite, similar to than
when viewed in the rear view and outside
mirrors
. Make sure that the trunk is securely
closed when backing up.
. Do not put anything on the RearView
camera. The RearView camera is installed
above the license plate. .
When washing the vehicle with high-
pressure water, be sure not to spray it
around the camera. Otherwise, water
may enter the camera unit causing water
condensation on the lens, a malfunction,
fire or an electric shock.
. Do not strike the camera. It is a precision
instrument. Otherwise, it may malfunc-
tion or cause damage resulting in a fire
or an electric shock.
CAUTION!
Do not scratch the camera lens when
cleaning dirt or snow from the front of the
camera.
Page 107 of 274

7. Monitor system
7-4
vehicle down a hill, objects viewed in the
monitor are closer than they appear. Use
the inside mirror or glance over your
shoulder to properly judge distances to
other objects.
HOW TO PARK WITH PREDICTIVE
COURSE LINES
1. Visually check that the parking space issafe before parking your vehicle. 2. The rear view of the vehicle
*Ais
displayed as illustrated when the shift
lever is shifted to the R (Reverse)
position.
3. Slowly back up the vehicle adjusting the steering-wheel so that the predic-
tive course lines
*Benter the parking
space
*C.
4. When the back of the vehicle enters the parking space
*C, maneuver the steer-
ing-wheel to make the vehicle width
guide lines
*Dparallel to the parking
space
*C. 5. When the vehicle is parked in the space
completely, move the shift lever to the
P (Park) position and apply the parking
brake.
REAVIEW MONITOR SETTINGS
The RearView Monitor settings can be
changed with the following procedure.
1. Push
Page 109 of 274
7. Monitor system
7-6
AROUND VIEW®MONITOR (AVM) (if so
equipped)
When you push the
INFINITI Controller or shift the shift lever
into the R (Reverse) position while the
ignition switch is in the ON position, the
Around View Monitor operates with the
sonar system. The upper touch screen
display (upper display) shows the view to
the Around View Monitor. The Around View
Monitor shows various views of the posi-
tion of the vehicle.
Available views:
. Bird-Eye View
The surrounding view of the vehicle.
. Front-Side View
The view around and ahead of the front
passenger’s side wheel.
. Front View
An approximately 150-degree view of
the front of the vehicle.
. Front-Wide View
An approximately 180-degree view of
the front of the vehicle. .
Rear View
An approximately 150-degree view of
the rear of the vehicle.
. Rear-Wide View
An approximately 180-degree view of
the rear of the vehicle.
AROUND VIEW MONITOR OPERA-
TION PRECAUTIONS
The system is designed as an aid to the
driver in situations such as slot parking or
parallel parking.
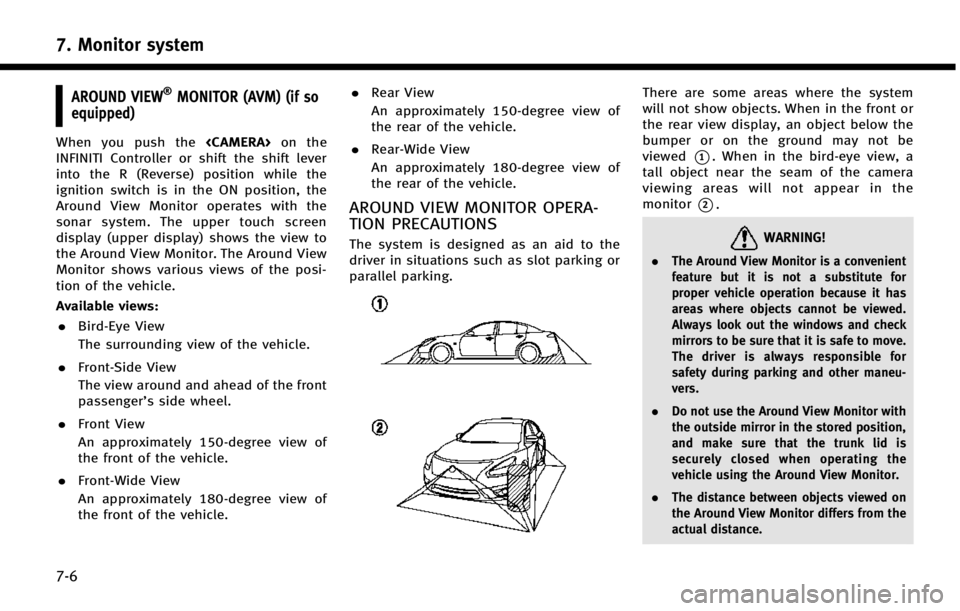
There are some areas where the system
will not show objects. When in the front or
the rear view display, an object below the
bumper or on the ground may not be
viewed
*1. When in the bird-eye view, a
tall object near the seam of the camera
viewing areas will not appear in the
monitor
*2.
WARNING!
. The Around View Monitor is a convenient
feature but it is not a substitute for
proper vehicle operation because it has
areas where objects cannot be viewed.
Always look out the windows and check
mirrors to be sure that it is safe to move.
The driver is always responsible for
safety during parking and other maneu-
vers.
. Do not use the Around View Monitor with
the outside mirror in the stored position,
and make sure that the trunk lid is
securely closed when operating the
vehicle using the Around View Monitor.
. The distance between objects viewed on
the Around View Monitor differs from the
actual distance.
Page 110 of 274

.The cameras are installed above the front
grille, the outside mirrors and above the
rear license plate. Do not put anything on
the cameras.
. When washing the vehicle with high-
pressure water, be sure not to spray it
around the cameras. Otherwise, water
may enter the camera unit causing water
condensation on the lens, a malfunction,
fire or an electric shock.
. Do not strike the cameras. They are
precision instruments. Doing so could
cause a malfunction or cause damage
resulting in a fire or an electric shock.
CAUTION!
Do not scratch the lens when cleaning dirt or
snow from the front of the camera.
AROUND VIEW MONITOR MAIN OP-
ERATION
Starting the system
To start the system, push
change the shift lever position into “R”
while the ignition switch is in the ON
position.
Switching views
Views on the AVM screen can be switched
by pushing
View] or by changing the shift lever
position.
Push
When
screen is displayed, Around View Monitor
operates and the front view and bird-eye
view are displayed. Push
switch the display to the front view and
front-side view screen or front-wide view
screen. Changing shift lever position:
When the shift lever is in the
“R”position,
the rear or rear-wide view is displayed.
When the shift lever is not in the “R”
position, the front or front-wide view is
displayed.
HOW TO VIEW AROUND VIEW
MONITOR SCREEN
Around view screen
7. Monitor system
7-7
Page 111 of 274
7. Monitor system
7-8
Wide view screen
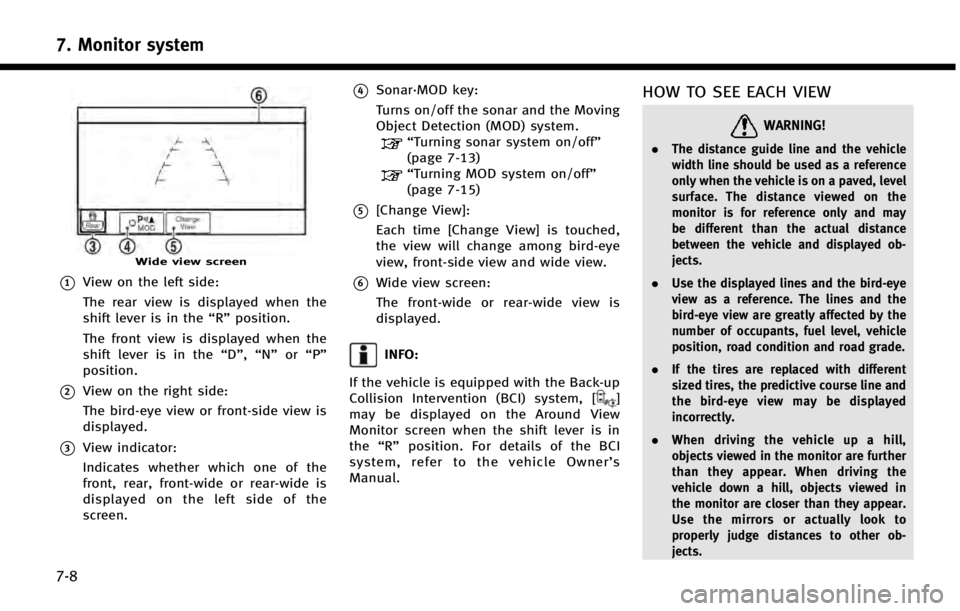
*1View on the left side:
The rear view is displayed when the
shift lever is in the“R”position.
The front view is displayed when the
shift lever is in the “D”,“N”or“P”
position.
*2View on the right side:
The bird-eye view or front-side view is
displayed.
*3View indicator:
Indicates whether which one of the
front, rear, front-wide or rear-wide is
displayed on the left side of the
screen.
*4Sonar·MOD key:
Turns on/off the sonar and the Moving
Object Detection (MOD) system.
“Turning sonar system on/off”
(page 7-13)
“Turning MOD system on/off”
(page 7-15)
*5[Change View]:
Each time [Change View] is touched,
the view will change among bird-eye
view, front-side view and wide view.
*6Wide view screen:
The front-wide or rear-wide view is
displayed.
INFO:
If the vehicle is equipped with the Back-up
Collision Intervention (BCI) system, [
]
may be displayed on the Around View
Monitor screen when the shift lever is in
the “R” position. For details of the BCI
system, refer to the vehicle Owner’ s
Manual.
HOW TO SEE EACH VIEW
WARNING!
. The distance guide line and the vehicle
width line should be used as a reference
only when the vehicle is on a paved, level
surface. The distance viewed on the
monitor is for reference only and may
be different than the actual distance
between the vehicle and displayed ob-
jects.
. Use the displayed lines and the bird-eye
view as a reference. The lines and the
bird-eye view are greatly affected by the
number of occupants, fuel level, vehicle
position, road condition and road grade.
. If the tires are replaced with different
sized tires, the predictive course line and
the bird-eye view may be displayed
incorrectly.
. When driving the vehicle up a hill,
objects viewed in the monitor are further
than they appear. When driving the
vehicle down a hill, objects viewed in
the monitor are closer than they appear.
Use the mirrors or actually look to
properly judge distances to other ob-
jects.
Page 112 of 274
.The vehicle width and predictive course
lines are wider than the actual width and
course.
. The distance between objects viewed in
the rear view differs from actual distance
because a wide-angle lens is used.
Objects in the rear view will appear
visually opposite than when viewed in
the rear view and outside mirrors.
. On a snow-covered or slippery road,
there may be a difference between the
predictive course line and the actual
course line.
. The displayed lines on the rear view will
appear slightly off to the right because
the RearView camera is not installed in
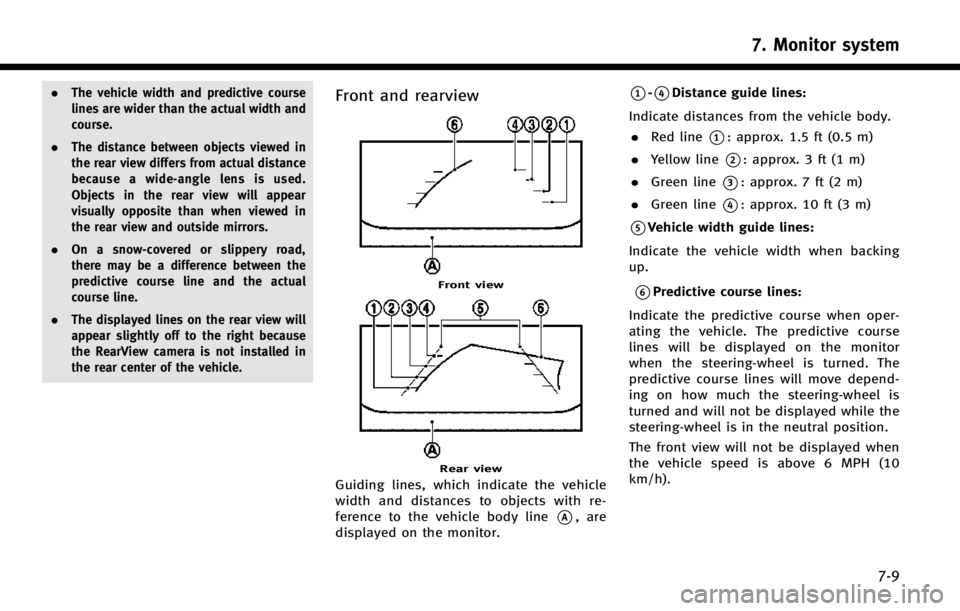
the rear center of the vehicle.Front and rearview
Front view
Rear view
Guiding lines, which indicate the vehicle
width and distances to objects with re-
ference to the vehicle body line
*A, are
displayed on the monitor.
*1-*4Distance guide lines:
Indicate distances from the vehicle body. . Red line
*1: approx. 1.5 ft (0.5 m)
. Yellow line
*2: approx. 3 ft (1 m)
. Green line
*3: approx. 7 ft (2 m)
. Green line
*4: approx. 10 ft (3 m)
*5Vehicle width guide lines:
Indicate the vehicle width when backing
up.
*6Predictive course lines:
Indicate the predictive course when oper-
ating the vehicle. The predictive course
lines will be displayed on the monitor
when the steering-wheel is turned. The
predictive course lines will move depend-
ing on how much the steering-wheel is
turned and will not be displayed while the
steering-wheel is in the neutral position.
The front view will not be displayed when
the vehicle speed is above 6 MPH (10
km/h).
7. Monitor system
7-9
Page 113 of 274
7. Monitor system
7-10
INFO:
When the monitor displays the front view and
the steering-wheel turns about 90 degrees or
less from the neutral position, both the right
and left predictive course lines
*6are dis-
played. When the steering-wheel turns about 90
degrees or more, a line is displayed only on the
opposite side of the turn.
Bird-eye view
WARNING!
. Objects in the bird-eye view will appear
further than the actual distance because
the bird-eye view is a pseudo view that is
processed by combining the views from
the cameras on the outside mirrors, the
front and the rear of the vehicle.
. Tall objects, such as a curb or vehicle,
may be misaligned or not displayed at
the seam of the views.
. Objects that are above the camera cannot
be displayed.
. The view for the bird-eye view may be
misaligned when the camera position
alters. .
A line on the ground may be misaligned
and is not seen as being straight at the
seam of the views. The misalignment will
increase as the line proceeds away from
the vehicle.
. The tire angle display does not indicate
the actual tire angle
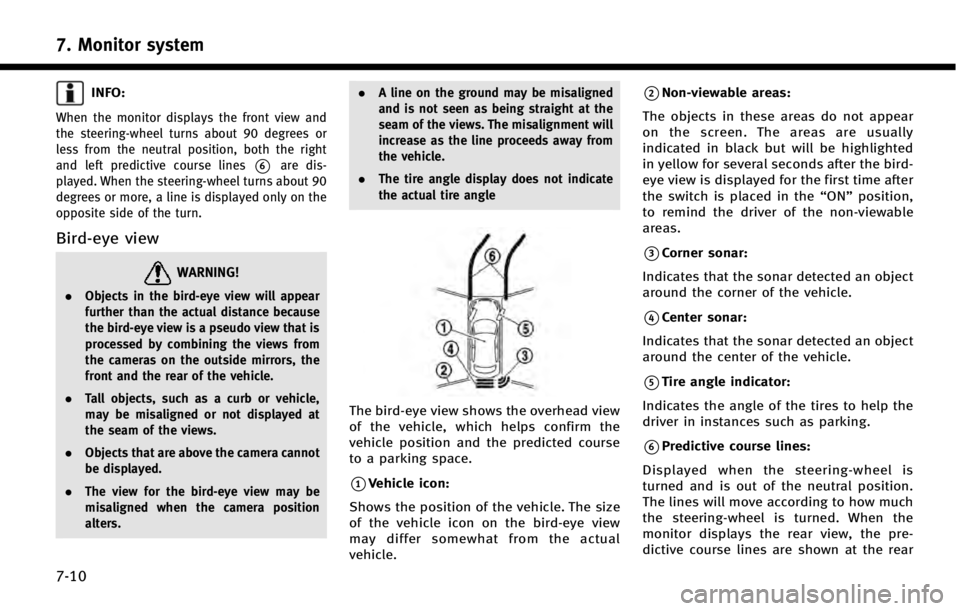
The bird-eye view shows the overhead view
of the vehicle, which helps confirm the
vehicle position and the predicted course
to a parking space.
*1Vehicle icon:
Shows the position of the vehicle. The size
of the vehicle icon on the bird-eye view
may differ somewhat from the actual
vehicle.
*2Non-viewable areas:
The objects in these areas do not appear
on the screen. The areas are usually
indicated in black but will be highlighted
in yellow for several seconds after the bird-
eye view is displayed for the first time after
the switch is placed in the “ON”position,
to remind the driver of the non-viewable
areas.
*3Corner sonar:
Indicates that the sonar detected an object
around the corner of the vehicle.
*4Center sonar:
Indicates that the sonar detected an object
around the center of the vehicle.
*5Tire angle indicator:
Indicates the angle of the tires to help the
driver in instances such as parking.
*6Predictive course lines:
Displayed when the steering-wheel is
turned and is out of the neutral position.
The lines will move according to how much
the steering-wheel is turned. When the
monitor displays the rear view, the pre-
dictive course lines are shown at the rear
Page 114 of 274
of the vehicle.
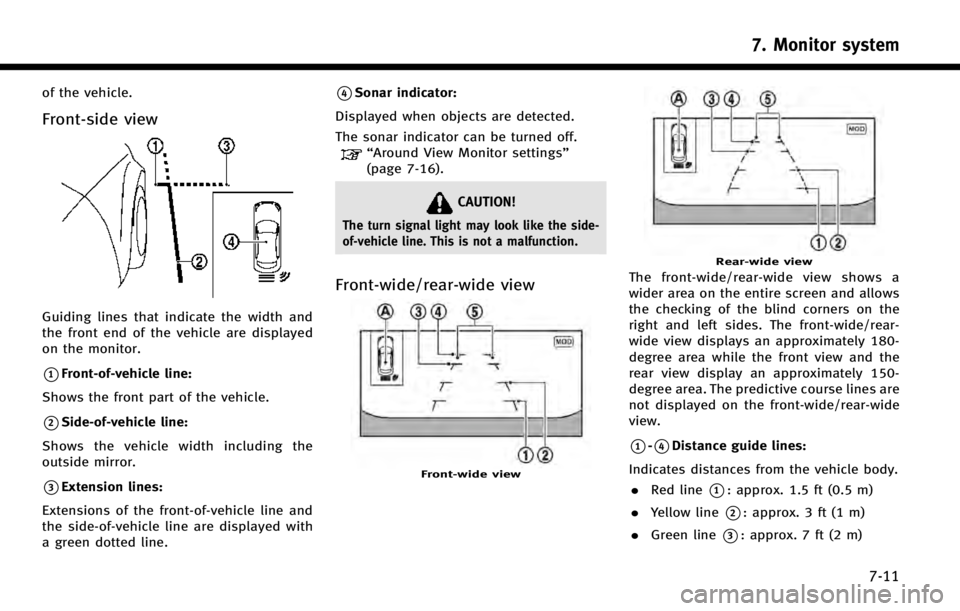
Front-side view
Guiding lines that indicate the width and
the front end of the vehicle are displayed
on the monitor.
*1Front-of-vehicle line:
Shows the front part of the vehicle.
*2Side-of-vehicle line:
Shows the vehicle width including the
outside mirror.
*3Extension lines:
Extensions of the front-of-vehicle line and
the side-of-vehicle line are displayed with
a green dotted line.
*4Sonar indicator:
Displayed when objects are detected.
The sonar indicator can be turned off.
“Around View Monitor settings”
(page 7-16).
CAUTION!
The turn signal light may look like the side-
of-vehicle line. This is not a malfunction.
Front-wide/rear-wide view
Front-wide view
Rear-wide view
The front-wide/rear-wide view shows a
wider area on the entire screen and allows
the checking of the blind corners on the
right and left sides. The front-wide/rear-
wide view displays an approximately 180-
degree area while the front view and the
rear view display an approximately 150-
degree area. The predictive course lines are
not displayed on the front-wide/rear-wide
view.
*1-*4Distance guide lines:
Indicates distances from the vehicle body. . Red line
*1: approx. 1.5 ft (0.5 m)
. Yellow line
*2: approx. 3 ft (1 m)
. Green line
*3: approx. 7 ft (2 m)
7. Monitor system
7-11
Page 117 of 274
7. Monitor system
7-14
approximately 5 MPH (8 km/h), the
MOD system detects moving objects in
the front view or front-wide view.
. When the shift lever is in the R
(Reverse) position and the vehicle
speed is below approximately 5 MPH
(8 km/h), the MOD system detects
moving objects in the rear view or
rear-wide view. The MOD system will
not operate if the trunk lid is open.
INFO:
.
The MOD system does not detect moving
objects in the front-side view. The MOD
indicator is not displayed on the screen
when in this view.
.While the sonar/BCI warning tone is beep-
ing, the MOD system does not chime.
WARNING!
. The MOD system is not a substitute for
proper vehicle operation and is not
designed to prevent contact with the
objects surrounding the vehicle. When
maneuvering, always use the outside
mirror and rearview mirror and turn and
check the surrounding area to ensure it is safe to maneuver.
. The MOD system does not have the
function to detect the surrounding sta-
tionary objects.
. Do not use the MOD system when towing
a trailer. The system may not function
properly.
. Excessive noise (for example, audio
system volume or open vehicle window)
will interfere with the chime sound, and
it may not be heard.
. The MOD system performance will be
limited according to environmental con-
ditions and surrounding objects such as:
— When there is low contrast between
background and the moving objects.
— When there is a blinking source of
light.
— When strong light such as another
vehicle’s headlight or sunlight is pre-
sent.
— When camera orientation is not in its
usual position, such as when a mirror
is folded.
— When there is dirt, water drops or
snow on the camera lens. —
When the position of the moving
objects in the display is not changed.
. The MOD system might detect something
like flowing water droplets on the camera
lens, white smoke from the muffler,
moving shadows, etc.
. The MOD system may not function
properly depending on the speed, direc-
tion, distance or shape of the moving
objects.
. If your vehicle sustains damage to the
parts where the camera is installed,
leaving it misaligned or bent, the sensing
zone may be altered and the MOD system
may not detect objects properly.