check engine INFINITI QX56 2007 Factory Service Manual
[x] Cancel search | Manufacturer: INFINITI, Model Year: 2007, Model line: QX56, Model: INFINITI QX56 2007Pages: 3061, PDF Size: 64.56 MB
Page 402 of 3061

ATC-32
< SERVICE INFORMATION >
TROUBLE DIAGNOSIS
How to Perform Trouble Diagnosis for Quick and Accurate Repair
INFOID:0000000003533243
WORK FLOW
SYMPTOM TABLE
Component Parts and Harness Connector LocationINFOID:0000000003533244
ENGINE COMPARTMENT
*1AT C - 5 0 , "Operational Check (Front)"
or AT C - 5 1 , "
Operational Check
(Rear)" .
SHA900E
Symptom Reference Page
A/C system does not come on. Go to Trouble Diagnosis Procedure for A/C System. AT C - 5 2
A/C system display is malfunctioning. Go to Navigation System. AV- 7 3
A/C system cannot be controlled. Go to Self-diagnosis Function.AT C - 4 8 , "
A/C Sys-
tem Self-Diagno-
sis Function"
Air outlet does not change.
Go to Trouble Diagnosis Procedure for Mode Door Motor. AT C - 5 4
Mode door motor is malfunctioning.
Discharge air temperature does not change.
Go to Trouble Diagnosis Procedure for Air Mix Door Motor. AT C - 5 9
Air mix door motor is malfunctioning.
Intake door does not change.
Go to Trouble Diagnosis Procedure for Intake Door Motor. AT C - 7 0
Intake door motor is malfunctioning.
Defroster door motor is malfunctioning. Go to Trouble Diagnosis Procedure for Defroster Door Motor. AT C - 7 4
Front blower motor operation is malfunction-
ing.Go to Trouble Diagnosis Procedure for Front Blower Motor.
AT C - 7 8
Rear blower motor operation is malfunction-
ing.Go to Trouble Diagnosis Procedure for Rear Blower Motor.
AT C - 8 5
Rear discharge air temperature and/or air
outlet does not change.Go to Trouble Diagnosis Procedure for Rear Air Control circuit.
AT C - 9 3
Magnet clutch does not engage. Go to Trouble Diagnosis Procedure for Magnet Clutch. AT C - 9 6
Insufficient cooling Go to Trouble Diagnosis Procedure for Insufficient Cooling.AT C - 1 0 0
Insufficient heating Go to Trouble Diagnosis Procedure for Insufficient Heating.AT C - 1 0 8
Noise Go to Trouble Diagnosis Procedure for Noise.AT C - 1 0 9
Self-diagnosis cannot be performed. Go to Trouble Diagnosis Procedure for Self-diagnosis. AT C - 111
Memory function does not operate. Go to Trouble Diagnosis Procedure for Memory Function.AT C - 11 2
Page 420 of 3061
ATC-50
< SERVICE INFORMATION >
TROUBLE DIAGNOSIS
Operational Check (Front)
INFOID:0000000003533249
The purpose of the operational check is to confirm that the system operates properly.
CHECKING MEMORY FUNCTION
1. Set the temperature to 90 °F or 32 °C.
2. Turn front blower control dial counterclockwise until system shuts OFF.
3. Turn ignition switch OFF.
4. Turn ignition switch ON.
5. Press the AUTO switch.
6. Confirm that the set temperature remains at previous temperature.
7. Turn front blower control counterclockwise until system shuts OFF.
If NG, go to trouble diagnosis procedure for ATC-112, "
Memory Function".
If OK, continue with next check.
CHECKING BLOWER
1. Turn front blower control clockwise, blower s hould operate on low speed. The blower symbol should have
one blade lit (on display).
2. Turn the front blower control dial again, and c ontinue checking blower speed and blower symbol until all
speeds are checked.
3. Leave blower on MAX speed.
If NG, go to trouble diagnosis procedure for ATC-78, "
Front Blower Motor Circuit".
If OK, continue with next check.
CHECKING DISCHARGE AIR
1. Press MODE switch four times and the DEF ( ) switch.
2. Each position indicator should change shape (on display).
3. Confirm that discharge air comes out according to the air distribution table. Refer to ATC-26, "
Discharge
Air Flow".
Mode door position is checked in the next step.
If NG, go to trouble diagnosis procedure for ATC-54, "
Mode Door Motor Circuit" .
If OK, continue the check.
NOTE:
Confirm that the compressor clutch is engaged (sound or vis ual inspection) and intake door position is at fresh
when the DEF or D/F is selected.
CHECKING RECIRCULATION ( , ONLY)
1. Press recirculation ( ) switch one time. Recirculation indicator should illuminate.
2. Press recirculation ( ) switch one more time. Recirculation indicator should go off.
3. Listen for intake door position change (blower sound should change slightly).
If NG, go to trouble diagnosis procedure for ATC-70, "
Intake Door Motor Circuit" .
If OK, continue the check.
NOTE:
Confirm that the compressor clutch is engaged (sound or vis ual inspection) and intake door position is at fresh
when the DEF or D/F is selected. REC ( ) is not allowed in DEF ( ) D/F ( ) or FOOT ( ).
CHECKING TEMPERATURE DECREASE
90 Stuck button ATC-123, "Removal and Installation"
92 Mode door motor circuit failureAT C - 5 4 , "Mode Door Motor Circuit"
Code No. Reference page
Conditions : Engine running and at normal operating temperature
Page 421 of 3061
TROUBLE DIAGNOSISATC-51
< SERVICE INFORMATION >
C
DE
F
G H
I
K L
M A
B
AT C
N
O P
1. Rotate temperature control dial (driver si de or passenger side) counterclockwise until 16 °C (60 °F) is dis-
played.
2. Check for cold air at appropriate discharge air outlets.
If NG, listen for sound of air mix door motor operat ion. If OK, go to trouble diagnosis procedure for ATC-100,
"Insufficient Cooling" . If air mix door motor appears to be malfunctioning, go to ATC-59, "Air Mix Door Motor
Circuit" or ATC-59, "Air Mix Door Motor Circuit".
If OK, continue the check.
CHECKING TEMPERATURE INCREASE
1. Rotate temperature control dial clockw ise (driver side or passenger side) until 32°C (90 °F) is displayed.
2. Check for hot air at appropriate discharge air outlets.
If NG, listen for sound of air mix door motor operat ion. If OK, go to trouble diagnosis procedure for ATC-108,
"Insufficient Heating" . If air mix door motor appears to be malfunctioning, go to ATC-59, "Air Mix Door Motor
Circuit" or ATC-59, "Air Mix Door Motor Circuit".
If OK, continue with next check.
CHECK A/C SWITCH
1. Press A/C switch when AUTO switch is ON, or in manual mode.
2. A/C switch indicator will turn ON.
• Confirm that the compressor clutch engages (sound or visual inspection).
NOTE:
If current mode setting is DEF or D/F, compressor clutch may already be engaged.
If NG, go to trouble diagnosis procedure for ATC-96, "
Magnet Clutch Circuit" .
If OK, continue with next check.
CHECKING AUTO MODE
1. Press AUTO switch.
2. Display should indicate AUTO.
• If ambient temperature is warm, and selected temperat ure is cool, confirm that the compressor clutch
engages (sound or visual inspection). (Discharge air and blower speed will depend on ambient, in-vehi-
cle, and set temperatures.)
If NG, go to trouble diagnosis procedure for ATC-52, "
Power Supply and Ground Circuit for Front Air Control" ,
then if necessary, trouble diagnosis procedure for ATC-96, "
Magnet Clutch Circuit" .
If all operational checks are OK (symptom cannot be duplicated), go to malfunction Simulation Tests in AT C -
32, "How to Perform Trouble Diagnosis for Quick and Accurate Repair" and perform tests as outlined to simu-
late driving conditions environment . If symptom appears. Refer to ATC-32, "
How to Perform Trouble Diagnosis
for Quick and Accurate Repair", ATC-32, "How to Perform Trouble Diagnosis for Quick and Accurate Repair"
and perform applicable trouble diagnosis procedures.
Operational Check (Rear)INFOID:0000000003533250
The purpose of the operational check is to confirm that the system operates properly.
CHECKING BLOWER
1. Turn the rear blower control dial to swit ch position "1". Blower should operate on low speed.
2. Turn the rear blower control dial counterclockwis e to switch position "2", "3", and "4" until all speeds are
checked.
3. Leave blower on MAX speed.
If NG, go to trouble diagnosis procedure for ATC-85, "
Rear Blower Motor Circuit" .
If OK, continue the check.
CHECKING TEMPERATURE DECREASE
1. Rotate temperature and mode dial fully counterclockwise.
2. Check for cold air at appropriate discharge air outlets. Conditions : Engine running and at normal operating temperature
Page 449 of 3061
TROUBLE DIAGNOSISATC-79
< SERVICE INFORMATION >
C
DE
F
G H
I
K L
M A
B
AT C
N
O P
1.CONFIRM SYMPTOM BY PERFORMING OPERATIONAL CHECK - FRONT BLOWER
1. Rotate the front blower control dial clockwise. Blower should operate.
2. Rotate the front blower control dial clockwise, and continue checking blower speed and fan symbol until
all speeds are checked.
Can the symptom be duplicated?
YES >> GO TO 3.
NO >> GO TO 2.
2.CHECK FOR ANY SYMPTOMS
Perform a complete operational check for any symptoms. Refer to ATC-50, "
Operational Check (Front)" .
Does another symptom exist?
YES >> Refer to ATC-32, "How to Perform Trouble Diagnosis for Quick and Accurate Repair" .
NO >> System OK.
3.CHECK FOR SERVICE BULLETINS
Check for any service bulletins.
>> GO TO 4.
4.PERFORM SELF-DIAGNOSIS
Perform self-diagnosis to check for any codes. Refer to ATC-48, "
A/C System Self-Diagnosis Function" .
Are any self-diagnosis codes present?
YES >> Refer to ATC-48, "A/C System Self-Diagnosis Function" .
NO >> GO TO 5.
5.CHECK BLOWER MOTOR OPERATION
Check and verify blower motor operates manually in all speeds.
Does blower motor operate in all speeds?
YES >> GO TO 6.
NO >> Refer to "DIAGNOSTIC PROCEDURE FOR BLOWER MOTOR".
6.CHECK ENGINE COOLANT TEMPERATURE SENSOR CIRCUIT
Check engine coolant temperature sensor circuit. Refer to EC-205
.
OK or NG?
OK >> GO TO 7.
NG >> Refer to EC-207, "
Diagnosis Procedure".
7.RECHECK FOR ANY SYMPTOMS
Perform a complete operational check for any symptoms. Refer to ATC-50, "
Operational Check (Front)" .
Does another symptom exist?
YES >> Refer to ATC-32, "How to Perform Trouble Diagnosis for Quick and Accurate Repair" .
NO >> Replace front air control. Refer to ATC-123, "
Removal and Installation".
SYSTEM DESCRIPTION
Component Parts
Blower speed control system components are:• Front air control
• Variable blower control
• Front blower motor relay
• Front blower motor
• In-vehicle sensor
• Ambient sensor
• Optical sensor
• Intake sensor
Page 455 of 3061
TROUBLE DIAGNOSISATC-85
< SERVICE INFORMATION >
C
DE
F
G H
I
K L
M A
B
AT C
N
O P
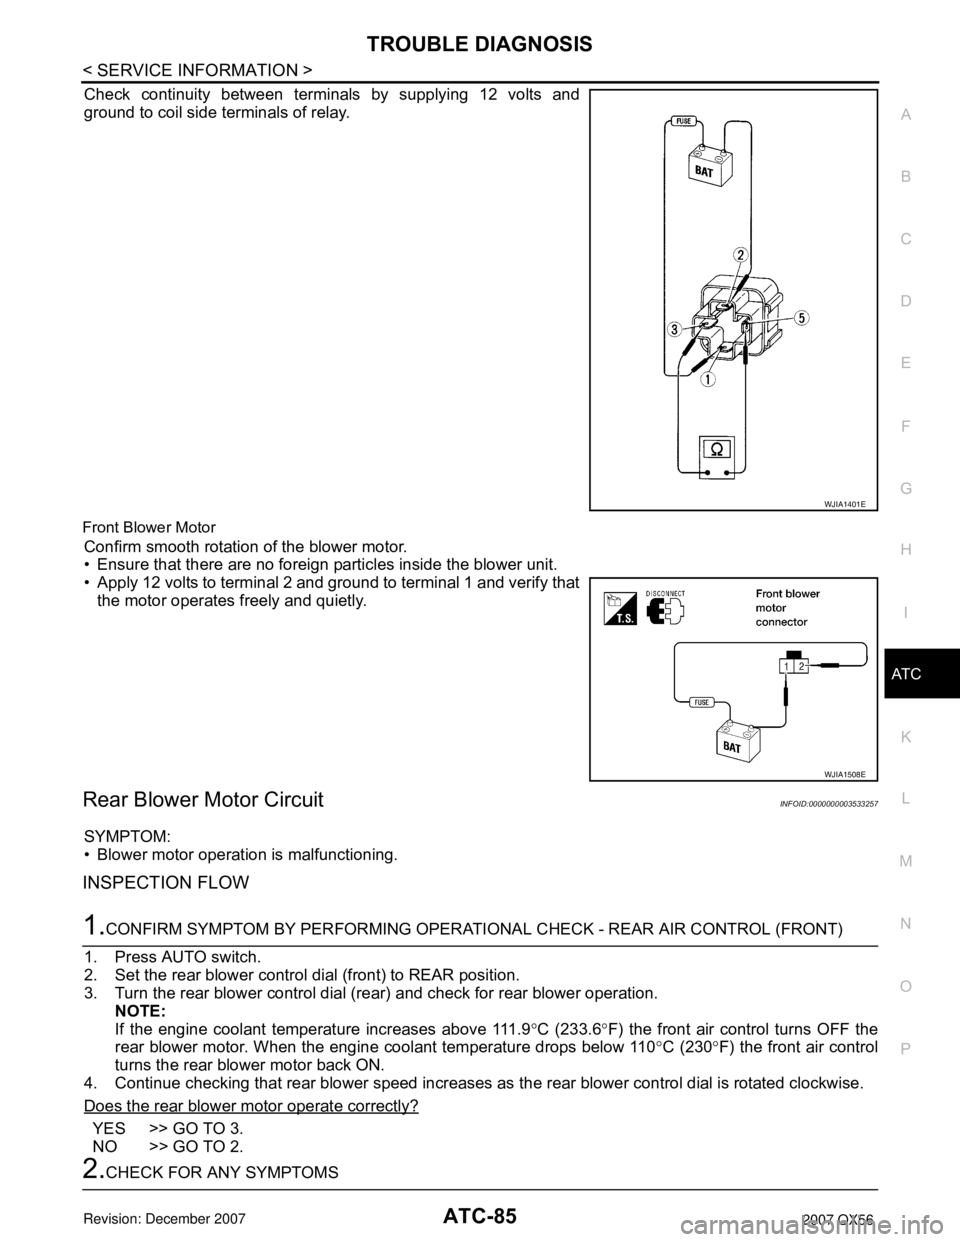
Check continuity between terminals by supplying 12 volts and
ground to coil side terminals of relay.
Front Blower Motor
Confirm smooth rotation of the blower motor.
• Ensure that there are no foreign particles inside the blower unit.
• Apply 12 volts to terminal 2 and ground to terminal 1 and verify that the motor operates freely and quietly.
Rear Blower Motor CircuitINFOID:0000000003533257
SYMPTOM:
• Blower motor operation is malfunctioning.
INSPECTION FLOW
1.CONFIRM SYMPTOM BY PERFORMING OPERATIO NAL CHECK - REAR AIR CONTROL (FRONT)
1. Press AUTO switch.
2. Set the rear blower control dial (front) to REAR position.
3. Turn the rear blower control dial (rear) and check for rear blower operation. NOTE:
If the engine coolant temperature increases above 111.9 °C (233.6 °F) the front air control turns OFF the
rear blower motor. When the engine coolant temperature drops below 110 °C (230 °F) the front air control
turns the rear blower motor back ON.
4. Continue checking that rear blower speed increases as the rear blower control dial is rotated clockwise.
Does the rear blower motor operate correctly?
YES >> GO TO 3.
NO >> GO TO 2.
2.CHECK FOR ANY SYMPTOMS
WJIA1401E
WJIA1508E
Page 469 of 3061

TROUBLE DIAGNOSISATC-99
< SERVICE INFORMATION >
C
DE
F
G H
I
K L
M A
B
AT C
N
O P
7.CHECK VOLTAGE FOR FRONT AIR CO NTROL (COMPRESSOR ON SIGNAL)
1. Reconnect BCM connector and front air control connector.
2. Turn ignition switch ON.
3. Check voltage between front air control harness connector M49 terminal 12 and ground.
OK or NG
OK >> GO TO 8.
NG-1 >> If the voltage is approx. 5V when A/C switch is ON, replace front air control. Refer to ATC-123,
"Removal and Installation".
NG-2 >> If the voltage is approx. 0V when A/C switch is OFF, replace BCM. Refer to BCS-24, "
BCM".
8.CHECK REFRIGERANT PRESSURE SENSOR
WITH CONSULT-II
1. Start engine.
2. Check voltage of refrigerant pressure sensor. Refer to EC-638
.
WITHOUT CONSULT-II
1. Start engine.
2. Check voltage between ECM harness connector F54 terminal
70 and ground.
OK or NG
OK >> • WITH CONSULT-II GO TO 9.
• WITHOUT CONSULT-II GO TO 10.
NG >> Refer to EC-638
.
9.CHECK BCM INPUT (FAN ON) SIGNAL
Check FAN ON/OFF signal. Refer to ATC-30, "
CONSULT-II Function
(HVAC)" .
OK or NG
OK >> GO TO 12.
NG >> GO TO 10.
10.CHECK CIRCUIT CONTINUITY BETWEE N BCM AND FRONT AIR CONTROL
Te r m i n a l s
Condition Voltage
(+)
(-)
Front air con-
trol connec- tor Te r m i n a l N o .
M49 12 Ground A/C switch: ON Approx. 0V
A/C switch: OFF Approx. 5V
WJIA0449E
Te r m i n a l s
Condition Voltage
(+)
(-)
ECM con-
nector Te r m i n a l N o .
F54 70 Ground A/C switch: ON Approx. 0.36 - 3.88V
LJIA0124E
FRONT BLOWER CONTROL
DIAL ON : FAN ON SIG ON
FRONT BLOWER CONTROL
DIAL OFF : FAN ON SIG OFF
WJIA0469E
Page 471 of 3061

TROUBLE DIAGNOSISATC-101
< SERVICE INFORMATION >
C
DE
F
G H
I
K L
M A
B
AT C
N
O P
YES >> Refer to ATC-32, "How to Perform Trouble Diagnosis for Quick and Accurate Repair" .
NO >> System OK.
3.CHECK FOR SERVICE BULLETINS
Check for any service bulletins.
>> GO TO 3.
4.PERFORM SELF-DIAGNOSIS
Perform self-diagnosis Refer to ATC-48, "
A/C System Self-Diagnosis Function" .
OK or NG
OK >> GO TO 5.
NG >> Refer to ATC-48, "
A/C System Self-Diagnosis Function" .
5.CHECK DRIVE BELTS
Check compressor belt tension. Refer to EM-13, "
Checking Drive Belts" .
OK or NG
OK >> GO TO 6.
NG >> Adjust or replace compressor belt. Refer to EM-13, "
Removal and Installation" .
6.CHECK AIR MIX DOOR OPERATION
Check and verify air mix door me chanism for smooth operation.
Does air mix door operate correctly?
YES >> GO TO 7.
NO >> Repair or replace air mix door control linkage.
7.CHECK COOLING FAN MOTOR OPERATION
Check and verify cooling fan moto r for smooth operation. Refer to EC-469, "
Description" .
Does cooling fan motor operate correctly?
YES >> GO TO 8.
NO >> Check cooling fan motor. Refer to EC-469
.
8.CHECK WATER VALVE OPERATION
Check and verify water valve for smooth operation. Refer to ATC-113, "
Water Valve Circuit".
Does water valve operate correctly?
YES >> GO TO 8.
NO >> Check water valve circuit. Refer to ATC-113, "
Water Valve Circuit" .
9.CHECK RECOVERY/RECYCLING EQUIPMENT BEFORE USAGE
Check recovery/recycling equipment befor e connecting to vehicle. Verify there is no pressure in the recovery/
recycling equipment by checking the gauges. If pressure exists, recover refrigerant from equipment lines.
>> GO TO 9.
10.CHECK REFRIGERANT PURITY
1. Connect recovery/recycling equipment to vehicle.
2. Confirm refrigerant purity in supply tank us ing recovery/recycling and refrigerant identifier.
OK or NG
OK >> GO TO 10.
NG >> Check contaminated refrigerant. Refer to AT C - 3 , "
Contaminated Refrigerant" .
11 .CHECK FOR EVAPORATOR FREEZE UP
Start engine and run A/C. Check for evaporator freeze up.
Does evaporator freeze up?
YES >> Perform performance test diagnoses. Refer to "PERFORMANCE TEST DIAGNOSES" .
NO >> GO TO 11.
Page 476 of 3061
ATC-106
< SERVICE INFORMATION >
TROUBLE DIAGNOSIS
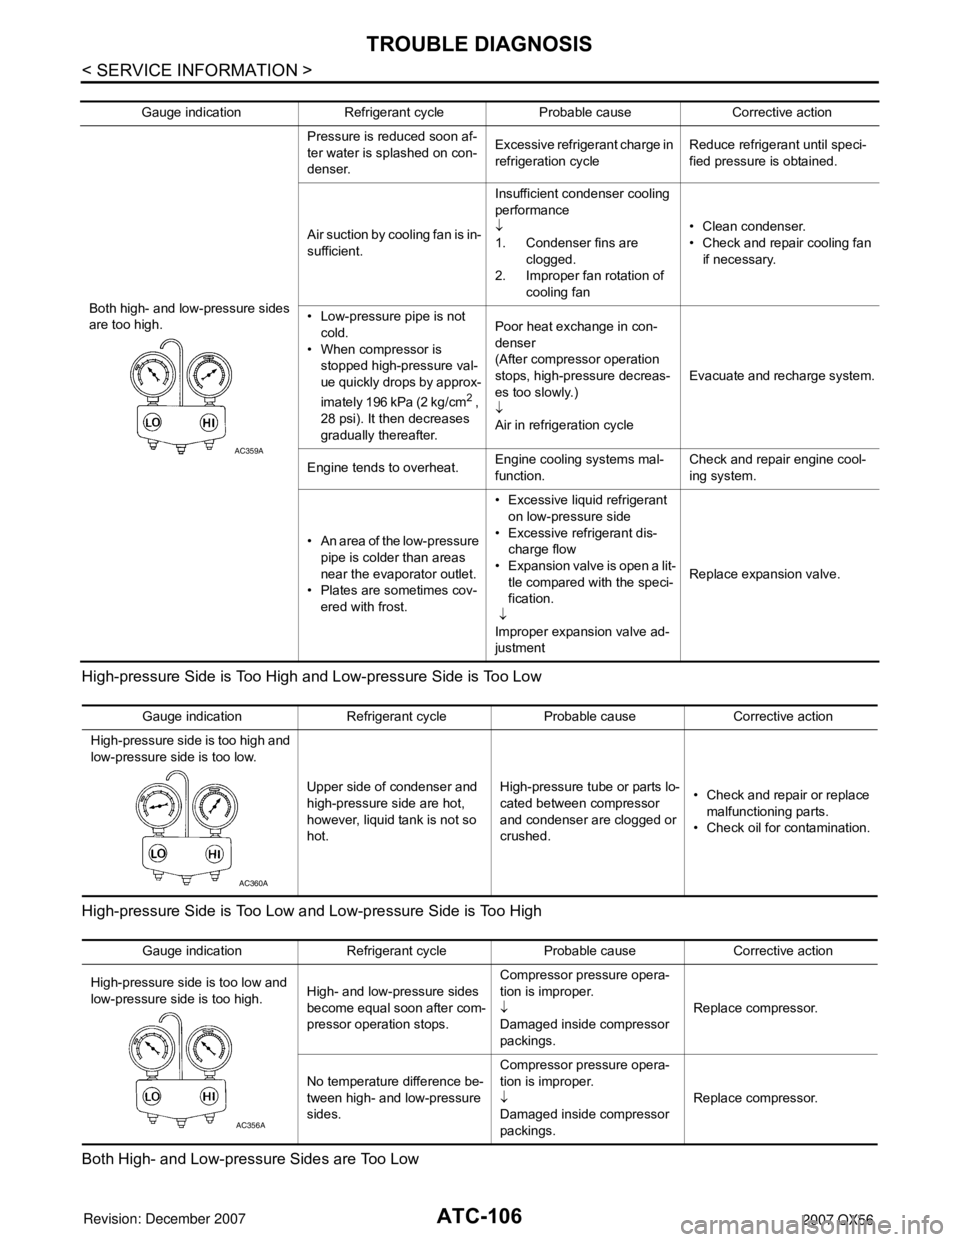
High-pressure Side is Too High and Low-pressure Side is Too Low
High-pressure Side is Too Low and Low-pressure Side is Too High
Both High- and Low-pressure Sides are Too Low
Gauge indication Refrigerant cycle Probable cause Corrective action
Both high- and low-pressure sides
are too high. Pressure is reduced soon af-
ter water is splashed on con-
denser.
Excessive refrigerant charge in
refrigeration cycle
Reduce refrigerant until speci-
fied pressure is obtained.
Air suction by cooling fan is in-
sufficient. Insufficient condenser cooling
performance
↓
1. Condenser fins are
clogged.
2. Improper fan rotation of cooling fan • Clean condenser.
• Check and repair cooling fan
if necessary.
• Low-pressure pipe is not cold.
• When compressor is stopped high-pressure val-
ue quickly drops by approx-
imately 196 kPa (2 kg/cm
2 ,
28 psi). It then decreases
gradually thereafter. Poor heat exchange in con-
denser
(After compressor operation
stops, high-pressure decreas-
es too slowly.)
↓
Air in refrigeration cycle
Evacuate and recharge system.
Engine tends to overheat. Engine cooling systems mal-
function. Check and repair engine cool-
ing system.
• An area of the low-pressure pipe is colder than areas
near the evaporator outlet.
• Plates are sometimes cov- ered with frost. • Excessive liquid refrigerant
on low-pressure side
• Excessive refrigerant dis- charge flow
• Expansion valve is open a lit- tle compared with the speci-
fication.
↓
Improper expansion valve ad-
justment Replace expansion valve.
AC359A
Gauge indication Refrigerant cycle Probable cause Corrective action
High-pressure side is too high and
low-pressure side is too low.
Upper side of condenser and
high-pressure side are hot,
however, liquid tank is not so
hot.High-pressure tu
be or parts lo-
cated between compressor
and condenser are clogged or
crushed. • Check and repair or replace
malfunctioning parts.
• Check oil for contamination.
AC360A
Gauge indication Refrigerant cycle Probable cause Corrective action
High-pressure side is too low and
low-pressure side is too high. High- and low-pressure sides
become equal soon after com-
pressor operation stops.Compressor pressure opera-
tion is improper.
↓
Damaged inside compressor
packings.
Replace compressor.
No temperature difference be-
tween high- and low-pressure
sides. Compressor pressure opera-
tion is improper.
↓
Damaged inside compressor
packings.
Replace compressor.
AC356A
Page 478 of 3061
ATC-108
< SERVICE INFORMATION >
TROUBLE DIAGNOSIS
Insufficient Heating
INFOID:0000000003533261
SYMPTOM: Insufficient heating
INSPECTION FLOW
1.CONFIRM SYMPTOM BY PERFORMING OPER ATIONAL CHECK - TEMPERATURE INCREASE
1. Press the AUTO switch.
2. Turn the temperature control dial (driver) clockwise until 32 ° C (90 ° F) is displayed.
3. Check for hot air at discharge air outlets.
Can this symptom be duplicated?
YES >> GO TO 2.
NO >> Perform complete system operational check. Refer to ATC-50, "
Operational Check (Front)" .
2.CHECK FOR SERVICE BULLETINS
Check for any service bulletins.
>> GO TO 3.
3.PERFORM SELF-DIAGNOSIS
Perform self-diagnosis. Refer to ATC-48, "
A/C System Self-Diagnosis Function" .
OK or NG
OK >> GO TO 4.
NG >> Refer to ATC-48, "
A/C System Self-Diagnosis Function" .
4.CHECK ENGINE COOLING SYSTEM
1. Check for proper engine coolant level. Refer to CO-9, "
Inspection".
2. Check hoses for leaks or kinks.
3. Check radiator cap. Refer to CO-9, "
Inspection" .
4. Check for air in cooling system.
>> GO TO 5.
5.CHECK AIR MIX DOOR OPERATION
Check the operation of the air mix door.
OK or NG
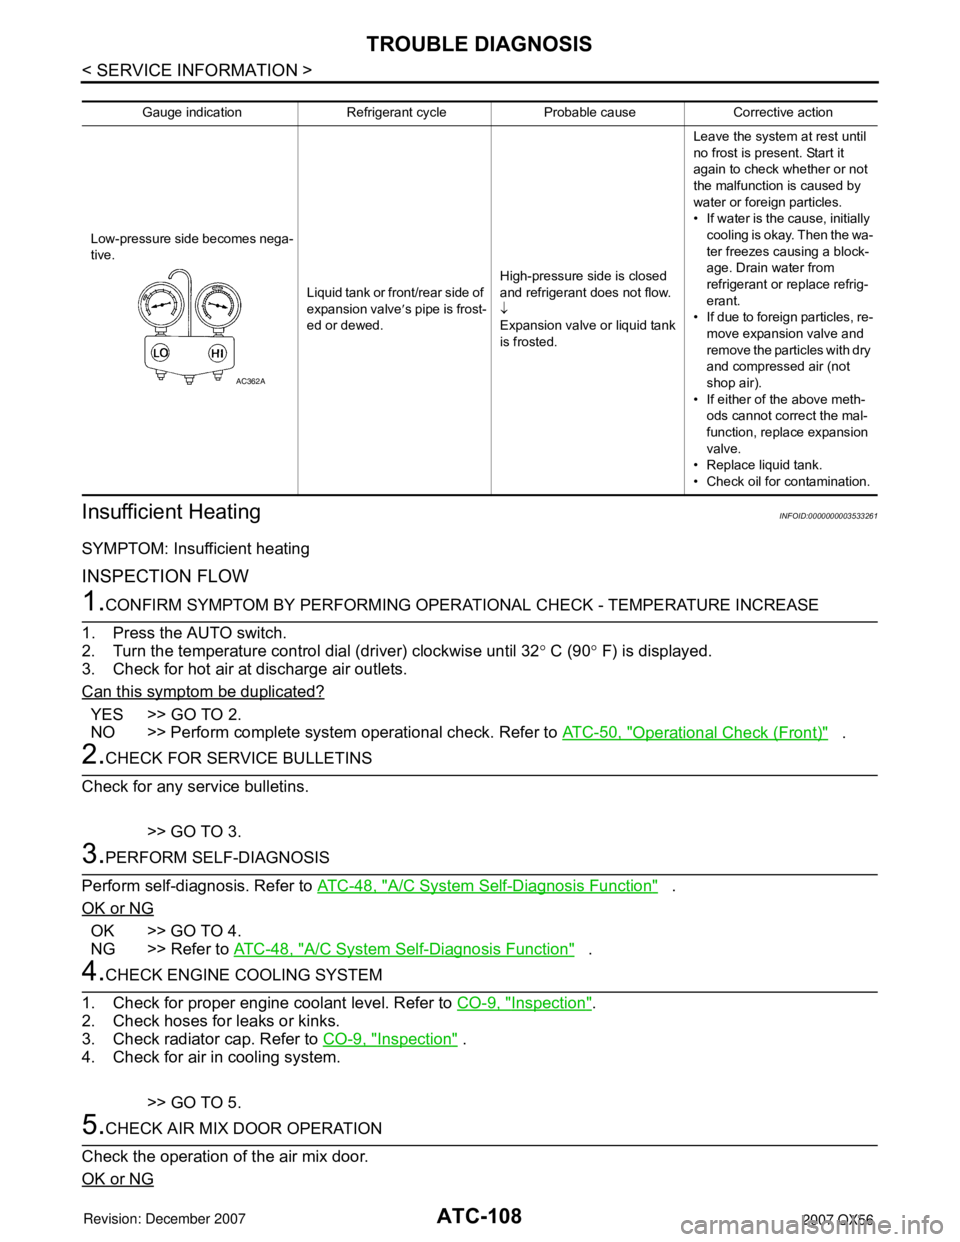
Gauge indication Refrigerant cycle Probable cause Corrective action
Low-pressure side becomes nega-
tive. Liquid tank or front/rear side of
expansion valve′s pipe is frost-
ed or dewed. High-pressure side is closed
and refrigerant does not flow.
↓
Expansion valve or liquid tank
is frosted. Leave the system at rest until
no frost is present. Start it
again to check whether or not
the malfunction is caused by
water or foreign particles.
• If water is the cause, initially
cooling is okay. Then the wa-
ter freezes causing a block-
age. Drain water from
refrigerant or replace refrig-
erant.
• If due to foreign particles, re-
move expansion valve and
remove the particles with dry
and compressed air (not
shop air).
• If either of the above meth- ods cannot correct the mal-
function, replace expansion
valve.
• Replace liquid tank.
• Check oil for contamination.
AC362A
Page 479 of 3061
TROUBLE DIAGNOSISATC-109
< SERVICE INFORMATION >
C
DE
F
G H
I
K L
M A
B
AT C
N
O P
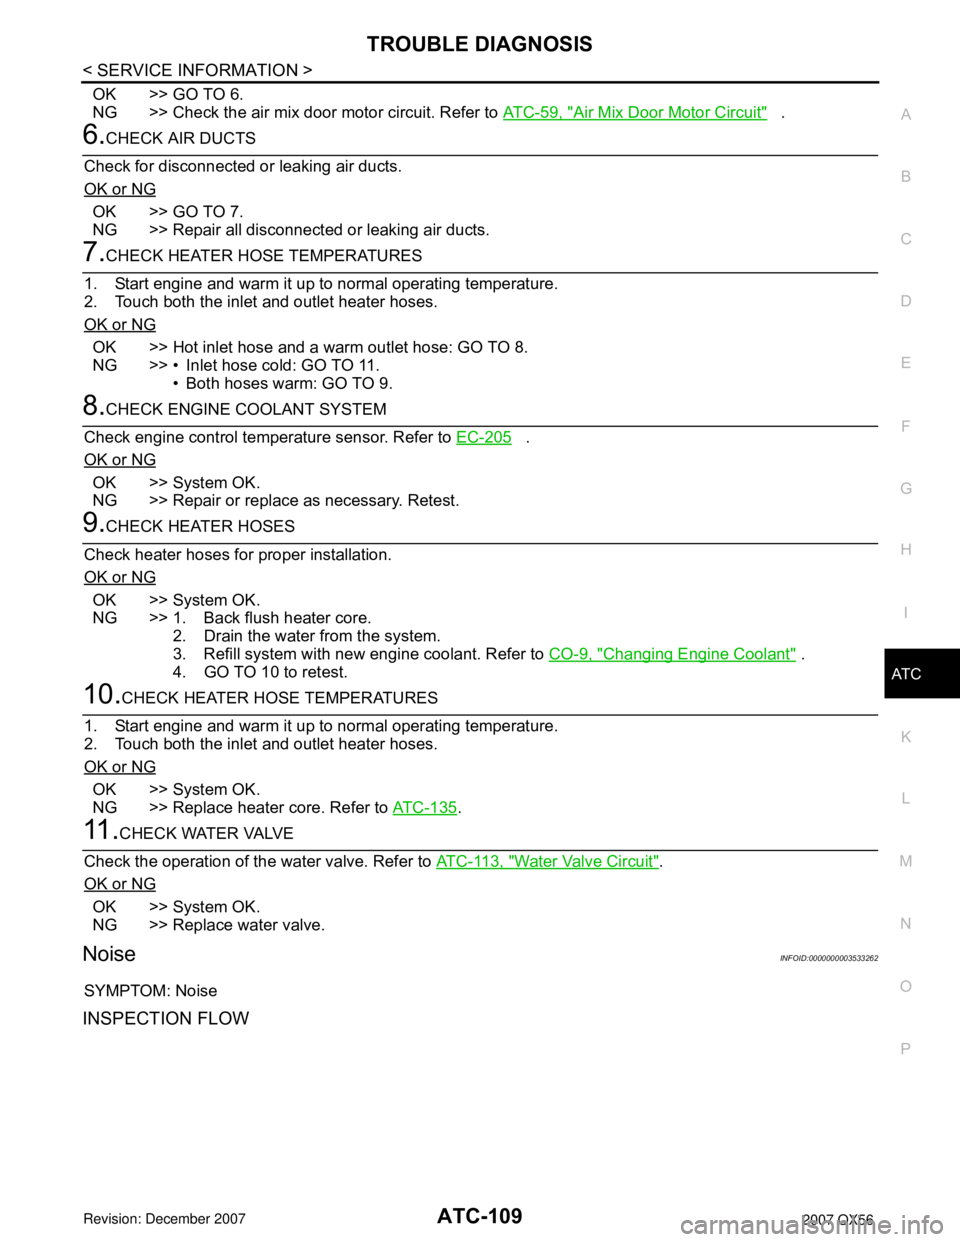
OK >> GO TO 6.
NG >> Check the air mix door motor circuit. Refer to ATC-59, "
Air Mix Door Motor Circuit" .
6.CHECK AIR DUCTS
Check for disconnected or leaking air ducts.
OK or NG
OK >> GO TO 7.
NG >> Repair all disconnected or leaking air ducts.
7.CHECK HEATER HOSE TEMPERATURES
1. Start engine and warm it up to normal operating temperature.
2. Touch both the inlet and outlet heater hoses.
OK or NG
OK >> Hot inlet hose and a warm outlet hose: GO TO 8.
NG >> • Inlet hose cold: GO TO 11. • Both hoses warm: GO TO 9.
8.CHECK ENGINE COOLANT SYSTEM
Check engine control temperature sensor. Refer to EC-205
.
OK or NG
OK >> System OK.
NG >> Repair or replace as necessary. Retest.
9.CHECK HEATER HOSES
Check heater hoses for proper installation.
OK or NG
OK >> System OK.
NG >> 1. Back flush heater core. 2. Drain the water from the system.
3. Refill system with new engine coolant. Refer to CO-9, "
Changing Engine Coolant" .
4. GO TO 10 to retest.
10.CHECK HEATER HOSE TEMPERATURES
1. Start engine and warm it up to normal operating temperature.
2. Touch both the inlet and outlet heater hoses.
OK or NG
OK >> System OK.
NG >> Replace heater core. Refer to ATC-135
.
11 .CHECK WATER VALVE
Check the operation of the water valve. Refer to ATC-113, "
Water Valve Circuit".
OK or NG
OK >> System OK.
NG >> Replace water valve.
NoiseINFOID:0000000003533262
SYMPTOM: Noise
INSPECTION FLOW