air condition INFINITI QX56 2007 Factory Service Manual
[x] Cancel search | Manufacturer: INFINITI, Model Year: 2007, Model line: QX56, Model: INFINITI QX56 2007Pages: 3061, PDF Size: 64.56 MB
Page 469 of 3061

TROUBLE DIAGNOSISATC-99
< SERVICE INFORMATION >
C
DE
F
G H
I
K L
M A
B
AT C
N
O P
7.CHECK VOLTAGE FOR FRONT AIR CO NTROL (COMPRESSOR ON SIGNAL)
1. Reconnect BCM connector and front air control connector.
2. Turn ignition switch ON.
3. Check voltage between front air control harness connector M49 terminal 12 and ground.
OK or NG
OK >> GO TO 8.
NG-1 >> If the voltage is approx. 5V when A/C switch is ON, replace front air control. Refer to ATC-123,
"Removal and Installation".
NG-2 >> If the voltage is approx. 0V when A/C switch is OFF, replace BCM. Refer to BCS-24, "
BCM".
8.CHECK REFRIGERANT PRESSURE SENSOR
WITH CONSULT-II
1. Start engine.
2. Check voltage of refrigerant pressure sensor. Refer to EC-638
.
WITHOUT CONSULT-II
1. Start engine.
2. Check voltage between ECM harness connector F54 terminal
70 and ground.
OK or NG
OK >> • WITH CONSULT-II GO TO 9.
• WITHOUT CONSULT-II GO TO 10.
NG >> Refer to EC-638
.
9.CHECK BCM INPUT (FAN ON) SIGNAL
Check FAN ON/OFF signal. Refer to ATC-30, "
CONSULT-II Function
(HVAC)" .
OK or NG
OK >> GO TO 12.
NG >> GO TO 10.
10.CHECK CIRCUIT CONTINUITY BETWEE N BCM AND FRONT AIR CONTROL
Te r m i n a l s
Condition Voltage
(+)
(-)
Front air con-
trol connec- tor Te r m i n a l N o .
M49 12 Ground A/C switch: ON Approx. 0V
A/C switch: OFF Approx. 5V
WJIA0449E
Te r m i n a l s
Condition Voltage
(+)
(-)
ECM con-
nector Te r m i n a l N o .
F54 70 Ground A/C switch: ON Approx. 0.36 - 3.88V
LJIA0124E
FRONT BLOWER CONTROL
DIAL ON : FAN ON SIG ON
FRONT BLOWER CONTROL
DIAL OFF : FAN ON SIG OFF
WJIA0469E
Page 470 of 3061

ATC-100
< SERVICE INFORMATION >
TROUBLE DIAGNOSIS
1. Turn ignition switch OFF.
2. Disconnect BCM connector and front air control connector.
3. Check continuity between BCM harness connector M18 terminal28 and front air control harness connector M49 terminal 10.
OK or NG
OK >> GO TO 11.
NG >> Repair harness or connector.
11 .CHECK VOLTAGE FOR FRONT AIR CONTROL (FAN ON SIGNAL)
1. Reconnect BCM connector and front air control connector.
2. Turn ignition switch ON.
3. Check voltage between front air control harness connector M49 terminal 10 and ground.
OK or NG
OK >> GO TO 12.
NG-1 >> If the voltage is approx. 5V when blower moto r is ON, replace front air control. Refer to ATC-123,
"Removal and Installation" .
NG-2 >> If the voltage is approx. 0V when blower motor is OFF, replace BCM. Refer to BCS-24, "
BCM".
12.CHECK CAN COMMUNICATION
Check CAN communication. Refer to LAN-4
.
•BCM – ECM
• ECM – IPDM E/R
• ECM – Front air control
OK or NG
OK >> Inspection End.
NG >> Repair or replace malfunctioning part(s).
Insufficient CoolingINFOID:0000000003533260
SYMPTOM: Insufficient cooling
INSPECTION FLOW
1.CONFIRM SYMPTOM BY PERFORMING OPER ATIONAL CHECK - TEMPERATURE DECREASE
1. Press the AUTO switch.
2. Turn temperature control dial (driver) counterclockwise until 16 ° C (60 ° F) is displayed.
3. Check for cold air at discharge air outlets.
Can the symptom be duplicated?
YES >> GO TO 3.
NO >> GO TO 2.
2.CHECK FOR ANY SYMPTOMS
Perform a complete operational check for any symptoms. Refer to ATC-50, "
Operational Check (Front)" .
Does another symptom exist?
28 - 10 Continuity should exist.
WJIA0450E
Te r m i n a l s
Condition Voltage
(+)
(-)
Front air con-
trol connector Te r m i n a l N o .
M49 10 Ground A/C switch: ON
Blower motor
operates
Approx. 0V
A/C switch: OFF Approx. 5V
WJIA0451E
Page 475 of 3061

TROUBLE DIAGNOSISATC-105
< SERVICE INFORMATION >
C
DE
F
G H
I
K L
M A
B
AT C
N
O P
Test Reading
Recirculating-to-discharge Air Temperature Table
Ambient Air Temperature-to-operating Pressure Table
Trouble Diagnoses for Unusual Pressure
Whenever system
′s high and/or low side pressure is unusual, diagnose using a manifold gauge. The marker
above the gauge scale in the following tables indicate s the standard (usual) pressure range. Since the stan-
dard (usual) pressure, however, differs from vehicle to vehicle, refer to above table (Ambient air temperature-
to-operating pressure table).
Both High- and Low-pressure Sides are Too High
Vehicle location Indoors or in the shade (in a well-ventilated place)
Doors Closed
Door window Open
Hood Open
TEMP. Max. COLD
Mode switch (Ventilation) set
Recirculation (REC) switch (Recirculation) set
Blower speed Max. speed set
Engine speed Idle speed
Operate the air conditioning system for 10 minutes before taking measurements.
Inside air (Recirculating air) at blower assembly inlet Discharge air temperature at center ventilator
°C ( °F)
Relative humidity
% Air temperature
°C ( °F)
50 - 60 20 (68) 9.9 - 13.9 (50 - 57)
25 (77) 14.6 - 18.6 (58 - 65)
30 (86) 16.8 - 21.8 (62 - 71)
35 (95) 21.1 - 27.1 (70 - 81)
40 (104) 25.3 - 31.5 (78 - 89)
60 - 70 20 (68) 11.4 - 15.2 (53 - 59)
25 (77) 15.5 - 20.0 (60 - 68)
30 (86) 19.9 - 25.0 (68 - 77)
35 (95) 24.5 - 29.6 (76 - 85)
40 (104) 28.7 - 34.9 (84 - 95)
Ambient air High-pressure (Discharge side)
kPa (kg/cm
2 , psi) Low-pressure (Suction side)
kPa (kg/cm2 , psi)
Relative humidity
% Air temperature
°C ( °F)
50 - 70 20 (68)
1020 - 1250
(10.4 - 12.7, 147.9 - 181.3) 160 - 190
(1.63 - 1.94, 23.2 - 27.6)
25 (77) 1236 - 1510
(12.6 - 15.4, 179.2 - 219) 206 - 245
(2.1 - 2.5, 29.9 - 35.6)
30 (86) 1569 - 1,922
(16.0 - 19.6, 227.6 - 278.8) 265 - 324
(2.7 - 3.3, 38.4 - 46.9)
35 (95) 1,697 - 2079
(17.3 - 21.2, 246.1 - 301.5) 304 - 363
(3.1 - 3.7, 44.1 - 52.6)
40 (104) 1971 - 2403
(20.1 - 24.5, 285.9 - 348.5) 373 - 451
(3.8 - 4.6, 54.0 - 65.4)
Page 477 of 3061

TROUBLE DIAGNOSISATC-107
< SERVICE INFORMATION >
C
DE
F
G H
I
K L
M A
B
AT C
N
O P
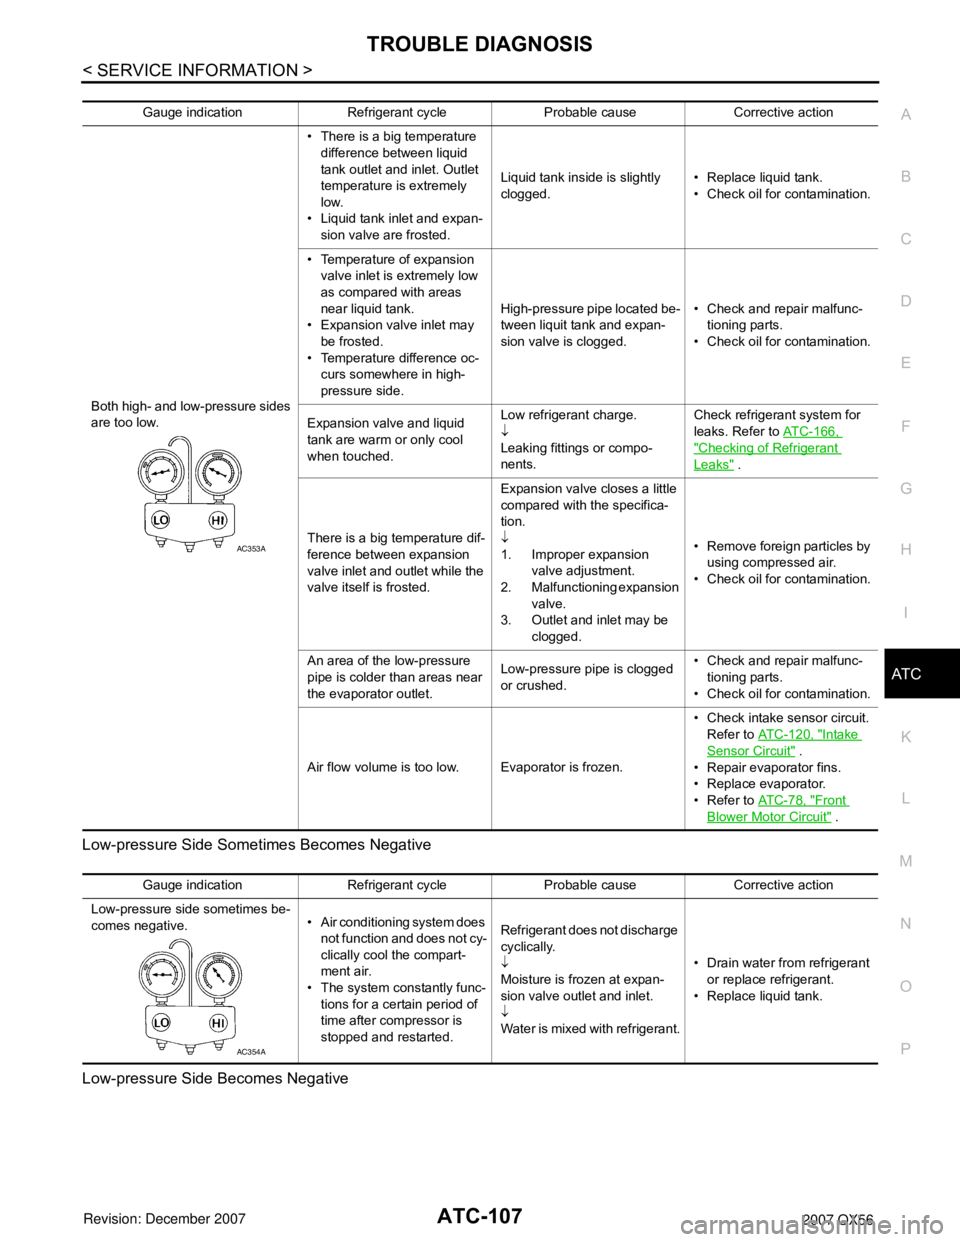
Low-pressure Side Some
times Becomes Negative
Low-pressure Side Becomes Negative
Gauge indication Refrigerant cycle Probable cause Corrective action
Both high- and low-pressure sides
are too low. • There is a big temperature
difference between liquid
tank outlet and inlet. Outlet
temperature is extremely
low.
• Liquid tank inlet and expan-
sion valve are frosted. Liquid tank inside is slightly
clogged.
• Replace liquid tank.
• Check oil for contamination.
• Temperature of expansion valve inlet is extremely low
as compared with areas
near liquid tank.
• Expansion valve inlet may be frosted.
• Temperature difference oc- curs somewhere in high-
pressure side. High-pressure pipe located be-
tween liquit tank and expan-
sion valve is clogged.
• Check and repair malfunc-
tioning parts.
• Check oil for contamination.
Expansion valve and liquid
tank are warm or only cool
when touched. Low refrigerant charge.
↓
Leaking fittings or compo-
nents.Check refrigerant system for
leaks. Refer to
ATC-166,
"Checking of Refrigerant
Leaks" .
There is a big temperature dif-
ference between expansion
valve inlet and outlet while the
valve itself is frosted. Expansion valve closes a little
compared with the specifica-
tion.
↓
1. Improper expansion
valve adjustment.
2. Malfunctioning expansion
valve.
3. Outlet and inlet may be clogged. • Remove foreign particles by
using compressed air.
• Check oil for contamination.
An area of the low-pressure
pipe is colder than areas near
the evaporator outlet. Low-pressure pipe is clogged
or crushed.• Check and repair malfunc-
tioning parts.
• Check oil for contamination.
Air flow volume is too low. Evaporator is frozen. • Check intake sensor circuit.
Refer to ATC-120, "
Intake
Sensor Circuit" .
• Repair evaporator fins.
• Replace evaporator.
• Refer to AT C - 7 8 , "
Front
Blower Motor Circuit" .
AC353A
Gauge indication Refrigerant cycle Probable cause Corrective action
Low-pressure side sometimes be-
comes negative. • Air conditioning system does
not function and does not cy-
clically cool the compart-
ment air.
• The system constantly func-
tions for a certain period of
time after compressor is
stopped and restarted. Refrigerant does not discharge
cyclically.
↓
Moisture is frozen at expan-
sion valve outlet and inlet.
↓
Water is mixed with refrigerant.
• Drain water from refrigerant
or replace refrigerant.
• Replace liquid tank.
AC354A
Page 483 of 3061

TROUBLE DIAGNOSISATC-113
< SERVICE INFORMATION >
C
DE
F
G H
I
K L
M A
B
AT C
N
O P
Does another symptom exist?
YES >> Refer to ATC-32, "How to Perform Trouble Diagnosis for Quick and Accurate Repair".
NO >> Replace front air control. Refer to ATC-123, "
Removal and Installation".
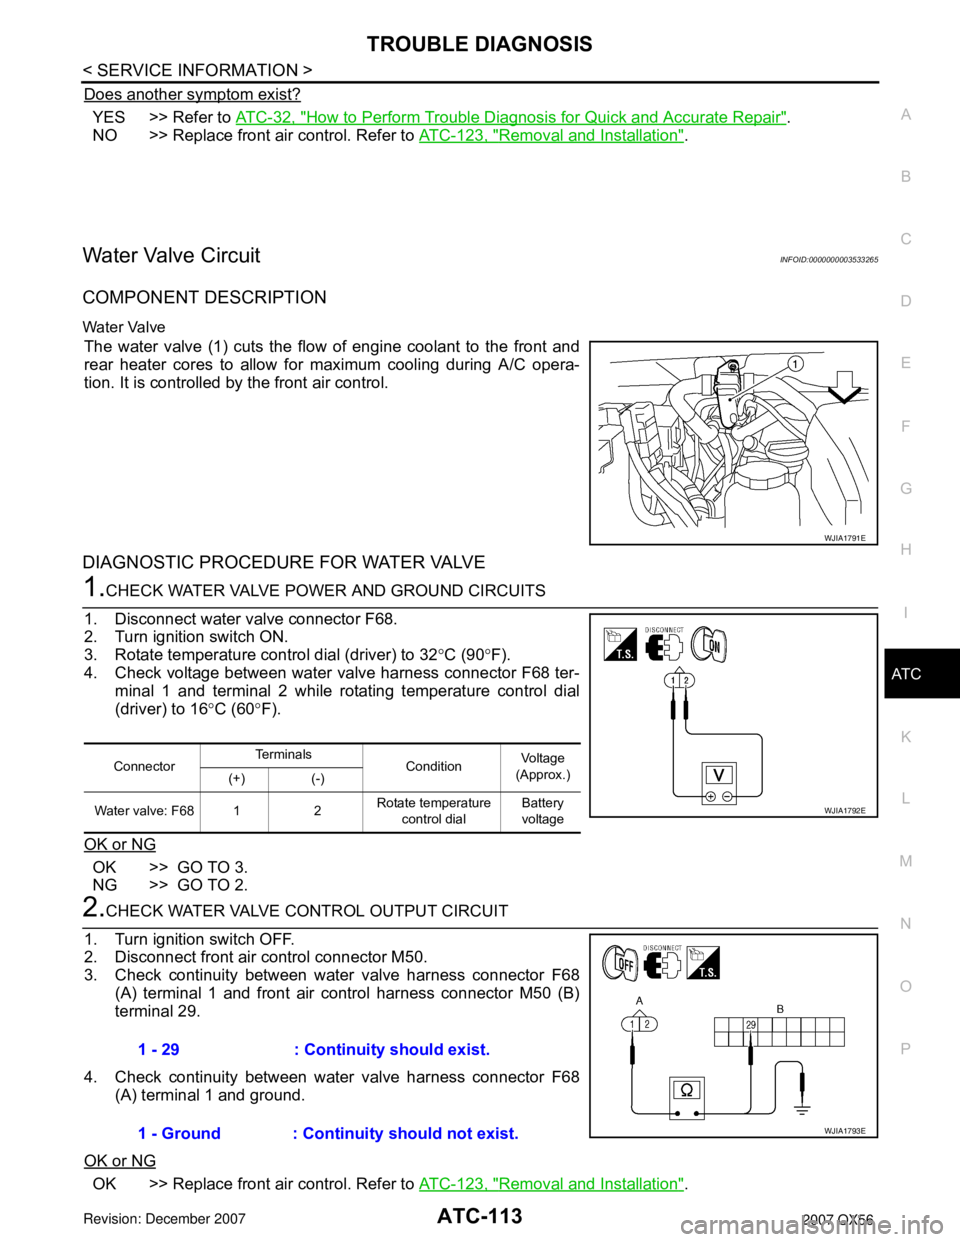
Water Valve CircuitINFOID:0000000003533265
COMPONENT DESCRIPTION
Water Valve
The water valve (1) cuts the flow of engine coolant to the front and
rear heater cores to allow for maximum cooling during A/C opera-
tion. It is controlled by the front air control.
DIAGNOSTIC PROCEDURE FOR WATER VALVE
1.CHECK WATER VALVE POWER AND GROUND CIRCUITS
1. Disconnect water valve connector F68.
2. Turn ignition switch ON.
3. Rotate temperature control dial (driver) to 32 °C (90 °F).
4. Check voltage between water valve harness connector F68 ter- minal 1 and terminal 2 while rotating temperature control dial
(driver) to 16 °C (60 °F).
OK or NG
OK >> GO TO 3.
NG >> GO TO 2.
2.CHECK WATER VALVE CONTROL OUTPUT CIRCUIT
1. Turn ignition switch OFF.
2. Disconnect front air control connector M50.
3. Check continuity between water valve harness connector F68 (A) terminal 1 and front air control harness connector M50 (B)
terminal 29.
4. Check continuity between water valve harness connector F68 (A) terminal 1 and ground.
OK or NG
OK >> Replace front air control. Refer to ATC-123, "Removal and Installation".
WJIA1791E
ConnectorTe r m i n a l s
Condition Voltage
(Approx.)
(+) (-)
Water valve: F68 1 2 Rotate temperature
control dial Battery
voltage
WJIA1792E
1 - 29 : Continuity should exist.
1 - Ground : Continuity should not exist.
WJIA1793E
Page 484 of 3061

ATC-114
< SERVICE INFORMATION >
TROUBLE DIAGNOSIS
NG >> Repair harness or connector.
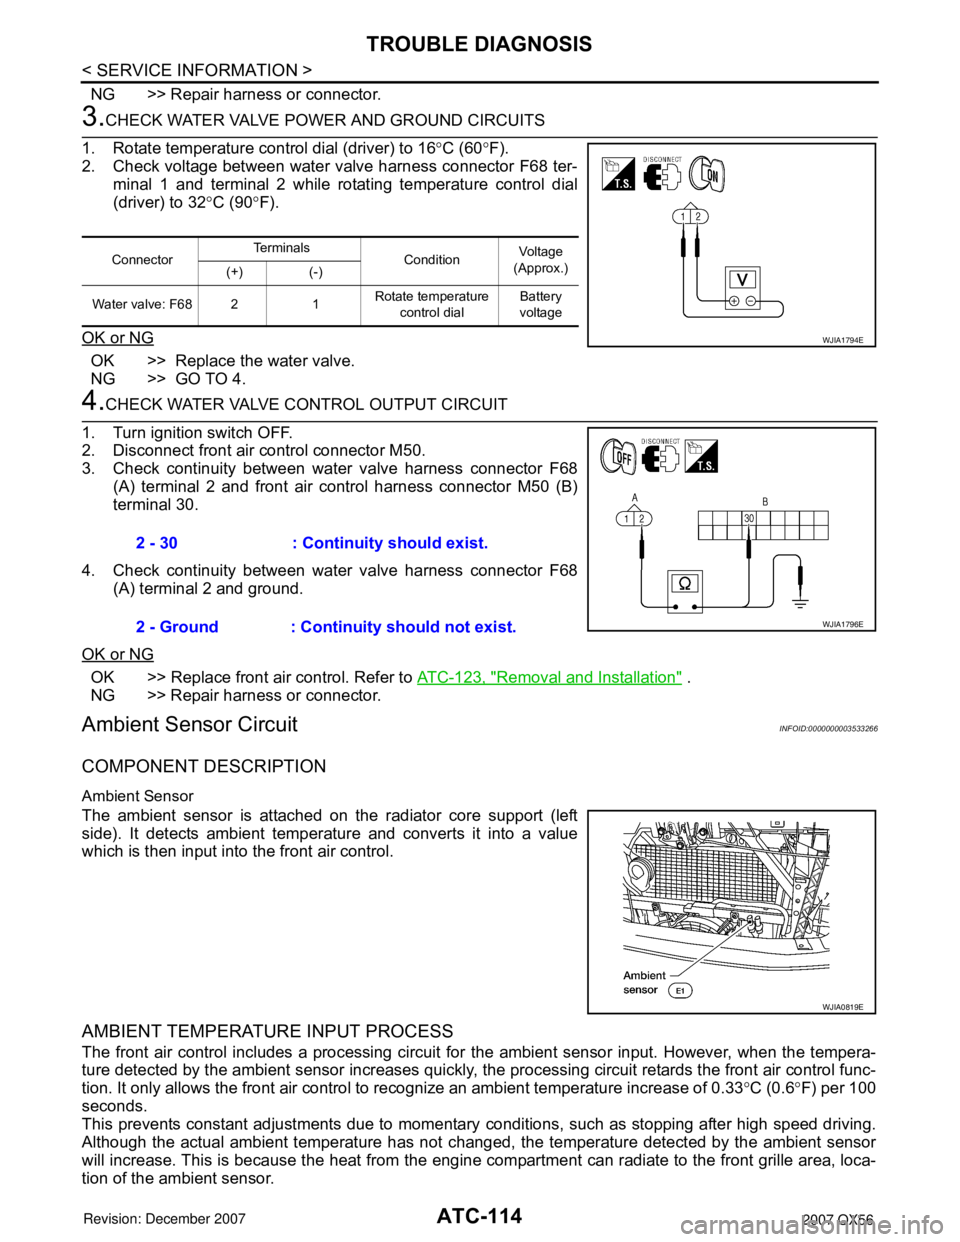
3.CHECK WATER VALVE POWER AND GROUND CIRCUITS
1. Rotate temperature control dial (driver) to 16 °C (60 °F).
2. Check voltage between water valve harness connector F68 ter- minal 1 and terminal 2 while rotating temperature control dial
(driver) to 32 °C (90 °F).
OK or NG
OK >> Replace the water valve.
NG >> GO TO 4.
4.CHECK WATER VALVE CONTROL OUTPUT CIRCUIT
1. Turn ignition switch OFF.
2. Disconnect front air control connector M50.
3. Check continuity between water valve harness connector F68 (A) terminal 2 and front air control harness connector M50 (B)
terminal 30.
4. Check continuity between water valve harness connector F68 (A) terminal 2 and ground.
OK or NG
OK >> Replace front air control. Refer to ATC-123, "Removal and Installation" .
NG >> Repair harness or connector.
Ambient Sensor CircuitINFOID:0000000003533266
COMPONENT DESCRIPTION
Ambient Sensor
The ambient sensor is attached on the radiator core support (left
side). It detects ambient temperature and converts it into a value
which is then input into the front air control.
AMBIENT TEMPERATURE INPUT PROCESS
The front air control includes a processing circuit for the ambient sensor input. However, when the tempera-
ture detected by the ambient sensor increases quickly, t he processing circuit retards the front air control func-
tion. It only allows the front air control to recognize an ambient temperature increase of 0.33 °C (0.6 °F) per 100
seconds.
This prevents constant adjustments due to momentary conditions, such as stopping after high speed driving.
Although the actual ambient temperature has not changed, the temperature detected by the ambient sensor
will increase. This is because the heat from the engine co mpartment can radiate to the front grille area, loca-
tion of the ambient sensor.
Connector Te r m i n a l s
Condition Voltage
(Approx.)
(+) (-)
Water valve: F68 2 1 Rotate temperature
control dial Battery
voltage
WJIA1794E
2 - 30 : Continuity should exist.
2 - Ground : Continuity should not exist.
WJIA1796E
WJIA0819E
Page 500 of 3061

ATC-130
< SERVICE INFORMATION >
IN-CABIN MICROFILTER
IN-CABIN MICROFILTER
Removal and InstallationINFOID:0000000003533277
FUNCTION
The air inside the passenger compartment is filtered by the in-cabin
microfilters when the heater or A/C controls are set on either the
recirculation or fresh mode. The two in-cabin microfilters are located
in the front heater and cooling unit assembly. The rear heater and
cooling unit assembly only draws in air from the passenger compart-
ment to recirculate into the passenger compartment, so the rear
heater and cooling unit assembly is not equipped with in-cabin
microfilters.
REPLACEMENT TIMING
Replacement of the two in-cabin microfilters is recommended on a regular interval depending on the driving
conditions. Refer to MA-6
. It may also be necessary to replace the tw o in-cabin microfilters as part of a compo-
nent replacement if the in-cabin microfilters are damaged.
REPLACEMENT PROCEDURE
1. Remove the two lower glove box hinge pins to remove the glove box from the instrument panel and let it hang from the cord.
2. Remove the screw and remove the in-cabin microfilter cover.
3. Remove the in-cabin microfilters from the front heater and cool- ing unit assembly housing.
4. Insert the first new in-cabin micr ofilter into the front heater and
cooling unit assembly housing and slide it over to the right.
Insert the second new in-cabin mi crofilter into the front heater
and cooling unit assembly housing.
NOTE:
The in-cabin microfilters are marked with air flow arrows. The
end of the microfilter with the arro w should face the rear of the
vehicle. The arrows should point downward.
LJIA0012E
WLIA0027E
LJIA0134E
LJIA0148E
Page 537 of 3061

REFRIGERANT LINESATC-167
< SERVICE INFORMATION >
C
DE
F
G H
I
K L
M A
B
AT C
N
O P
If repairing the A/C system or replacing a com ponent, pour the HFC-134a (R-134a) fluorescent leak
detection dye (J-41447) directly into the open system connection and proceed with the service
procedures.
3. Connect the refrigerant dye injector (J- 41459) to the low-pressure service valve.
4. Start the engine and switch the A/C system ON.
5. When the A/C system is operating (compressor runni ng), inject one bottle 7.4 cc (1/4 ounce) of HFC-134a
(R-134a) fluorescent leak detection dye (J-41447) th rough the low-pressure service valve using HFC-
134a (R-134a) dye injector (J-41459). Refer to the manufacturer's operating instructions.
6. With the engine still running, disconnect the HFC-134a (R -134a) dye injector (J-41459) from the low-pres-
sure service valve.
7. Operate the A/C system for a minimum of 20 minut es to mix the HFC-134a (R-134a) fluorescent leak
detection dye (J-41447) with the A/C system oil. Depending on the leak size, operating conditions and
location of the leak, it may take from minutes to days for the HFC-134a (R-134a) fluorescent leak detec-
tion dye to penetrate an A/C system leak and become visible.
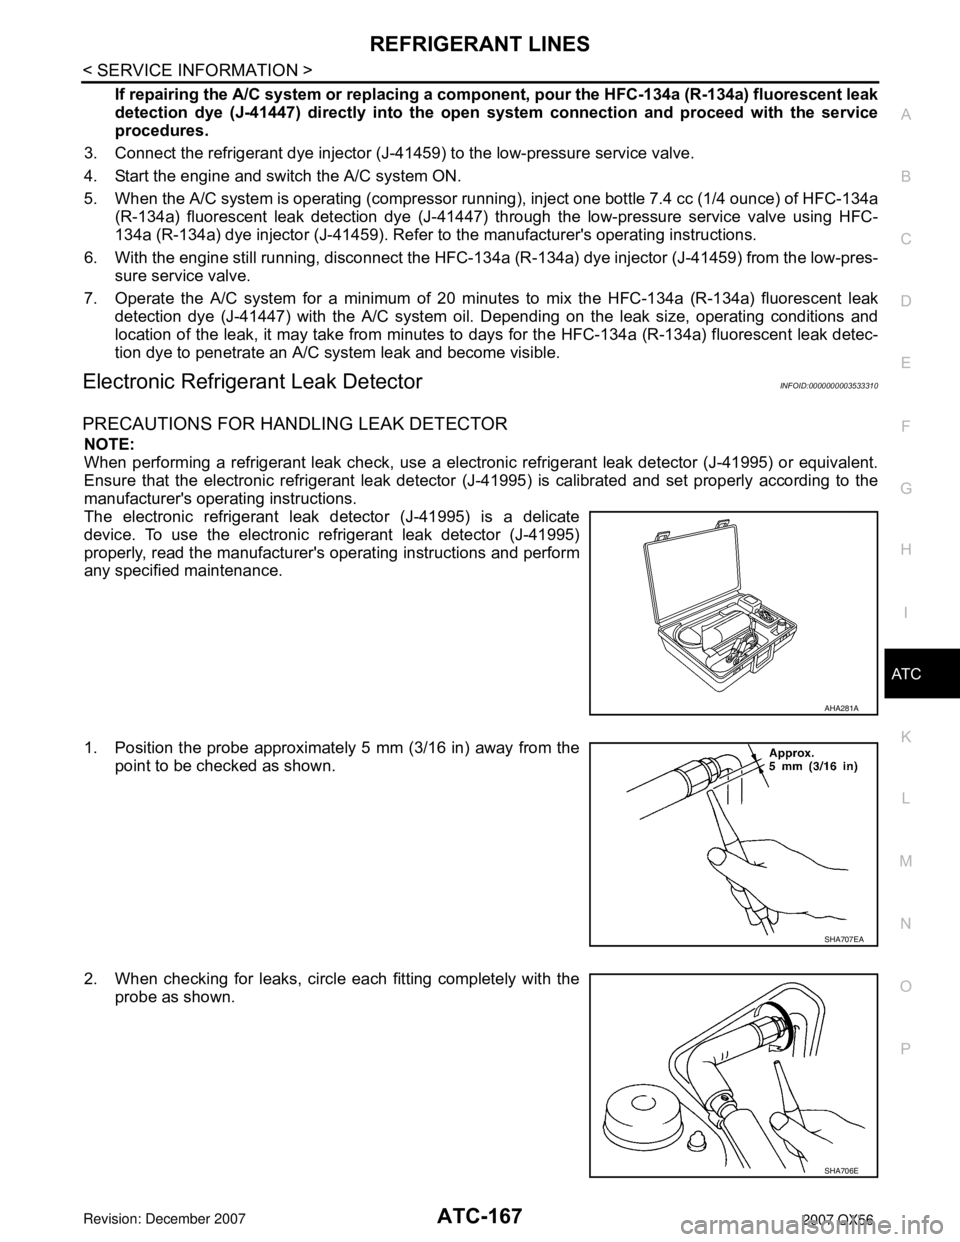
Electronic Refrigerant Leak DetectorINFOID:0000000003533310
PRECAUTIONS FOR HANDLING LEAK DETECTOR
NOTE:
When performing a refrigerant leak check, use a electr onic refrigerant leak detector (J-41995) or equivalent.
Ensure that the electronic refrigerant leak detector (J-41995) is calibrated and set properly according to the
manufacturer's operating instructions.
The electronic refrigerant leak detector (J-41995) is a delicate
device. To use the electronic refrigerant leak detector (J-41995)
properly, read the manufacturer's operating instructions and perform
any specified maintenance.
1. Position the probe approximately 5 mm (3/16 in) away from the point to be checked as shown.
2. When checking for leaks, circle each fitting completely with the probe as shown.
AHA281A
SHA707EA
SHA706E
Page 578 of 3061

AV-38
< SERVICE INFORMATION >
AUDIO
2. Check continuity between spiral cable terminals.
OK or NG
OK >> GO TO 4.
NG >> Replace spiral cable. Refer to SRS-37, "
Removal and Installation".
4.CHECK STEERING SWITCH RESISTANCE
Check resistance between steering switch terminals.
OK or NG
OK >> Inspection End.
NG >> Replace steering switch. Refer to AV-46, "
Removal and Installation".
AV Switch CheckINFOID:0000000003533681
1.AV SWITCH SELF-DIAGNOSIS FUNCTION CHECK
1. Perform AV switch self-diagnosis function. Refer to AV-28, "
AV Switch Self-Diagnosis Function".
Does AV switch operate normally?
YES >> Inspection End.
NO >> GO TO 2.
2.CHECK AV SWITCH POWER SUPPLY AND GROUND CIRCUIT
1. Check AV switch power supply and ground circuit. Refer to AV-113, "
Power Supply and Ground Circuit
Inspection for AV Switch".
OK or NG
YES >> Replace AV switch. Refer to AV-145, "Removal and Installation".
NO >> Repair malfunctioning part.
Audio Communication Line CheckINFOID:0000000003533682
1.CHECK AUDIO COMMUNICATION LINE
Start audio communication line check. Refer to AV-119, "
Audio Communication Line Check (Between Display
Control Unit and Audio Unit)".
OK or NG
OK >> Inspection End.
NG >> Replace malfunctioning part.
Te r m i n a l s
Continuity Spiral cable
Connector Terminal Connector Terminal
M3032
M10216
Ye s 31 17
24 20
WKIA4424E
Terminal Signal name ConditionResistance
(Ω)
(Approx.)
16 17Seek (down) Depress (station) down switch. 165
Power Depress power switch. 0
Volume (down) Depress volume down switch. 652
20 17Seek (up) Depress (station) up switch. 165
Mode Depress mode switch. 0
Volume (up) Depress volume up switch. 652
WKIA4457E
Page 597 of 3061

TELEPHONE
AV-57
< SERVICE INFORMATION >
C
D
E
F
G
H
I
J
L
MA
B
AV
N
O
P
Bluetooth telephone system allows users who have a Bluetooth cellular telephone to make a wireless connec-
tion between their cellular telephone and the Bluetooth control unit. Hands-free cellular telephone calls can be
sent and received. Personal memos can be created using the Infinity Voice Recognition system. Some Blue-
tooth cellular telephones may not be recognized by the Bluetooth control unit. When a cellular telephone or
the Bluetooth control unit is replaced, the telephone must be paired with the Bluetooth control unit. Different
cellular telephones may have different pairing procedures. Refer to the cellular telephone operating manual.
Bluetooth Telephone System Diagram
Bluetooth Control Unit
When the ignition switch is turned to ACC or ON, the Bluetooth control unit will power up. During power up, the
Bluetooth control unit is initialized and performs various self checks. Initialization may take up to 10 seconds.
During this time the Bluetooth ON indicator will flash until initialization is complete. Infinity Voice Recognition
will then become active and the Bluetooth ON indicator will remain on. Bluetooth telephone functions can be
turned off using the voice recognition system.
BCM
The BCM supplies power for the Bluetooth ON indicator.
Steering Wheel Audio Control Switches
When buttons on the steering wheel audio control switch are pushed, the resistance in steering wheel audio
control switch circuit changes depending on which button is pushed. The Bluetooth control module uses this
signal to perform various functions while navigating through the voice recognition system.
The following functions can be performed using the steering wheel audio control switch:
• Initiate Self Diagnosis of the Bluetooth telephone system
• Start a voice recognition session
• Answer and end telephone calls
• Adjust the volume of calls
• Record memos
AV Switch
Call volume can be adjusted using the AV switch.
Microphone
The microphone is located in the roof console assembly. The microphone sends a signal to the Bluetooth con-
trol unit.
Combination Meter
The combination meter supplies speed signals to the Bluetooth control unit. Vehicle speed signals are used to
determine which voice command functions will be disabled based on driving conditions.
Bluetooth ON Indicator
The Bluetooth ON indicator is located in the overhead console. The indicator will flash during power up while
the Bluetooth control unit is initializing. This process may take up to 10 seconds. After initialization, the indica-
tor will remain on to indicate that the system is ready for voice commands.
WKIA4569E