service indicator INFINITI QX56 2007 Factory User Guide
[x] Cancel search | Manufacturer: INFINITI, Model Year: 2007, Model line: QX56, Model: INFINITI QX56 2007Pages: 3061, PDF Size: 64.56 MB
Page 78 of 3061
AT-8
< SERVICE INFORMATION >
PRECAUTIONS
PRECAUTIONS
Precaution for Supplemental Restraint System (SRS) "AIR BAG" and "SEAT BELT
PRE-TENSIONER"
INFOID:0000000003532218
The Supplemental Restraint System such as “AIR BAG” and “SEAT BELT PRE-TENSIONER”, used along
with a front seat belt, helps to reduce the risk or severity of injury to the driver and front passenger for certain
types of collision. This system includes seat belt switch inputs and dual stage front air bag modules. The SRS
system uses the seat belt switches to determine the front air bag deployment, and may only deploy one front
air bag, depending on the severity of a collision and whether the front occupants are belted or unbelted.
Information necessary to service the system safely is included in the SRS and SB section of this Service Man-
ual.
WARNING:
• To avoid rendering the SRS inoperative, which could increase the risk of personal injury or death in
the event of a collision which would result in air bag inflation, all maintenance must be performed by
an authorized NISSAN/INFINITI dealer.
• Improper maintenance, including incorrect removal and installation of the SRS, can lead to personal
injury caused by unintentional activation of the system. For removal of Spiral Cable and Air Bag
Module, see the SRS section.
• Do not use electrical test equipment on any circuit related to the SRS unless instructed to in this
Service Manual. SRS wiring harnesses can be identified by yellow and/or orange harnesses or har-
ness connectors.
Precaution for On Board Diagnosis (OBD) System of A/T and EngineINFOID:0000000003532219
The ECM has an on board diagnostic system. It will light up the malfunction indicator lamp (MIL) to warn the
driver of a malfunction causing emission deterioration.
CAUTION:
• Be sure to turn the ignition switch “OFF” and disconnect the negative battery cable before any repair
or inspection work. The open/short circuit of related switches, sensors, solenoid valves, etc. Will
cause the MIL to light up.
• Be sure to connect and lock the connectors securely after work. A loose (unlocked) connector will
cause the MIL to light up due to an open circuit. (Be sure the connector is free from water, grease,
dirt, bent terminals, etc.)
• Be sure to route and secure the harnesses properly after work. Interference of the harness with a
bracket, etc. May cause the MIL to light up due to a short circuit.
• Be sure to connect rubber tubes properly after work. A misconnected or disconnected rubber tube
may cause the MIL to light up due to a malfunction of the EGR system or fuel injection system, etc.
• Be sure to erase the unnecessary malfunction information (repairs completed) from the TCM and
ECM before returning the vehicle to the customer.
PrecautionINFOID:0000000003532220
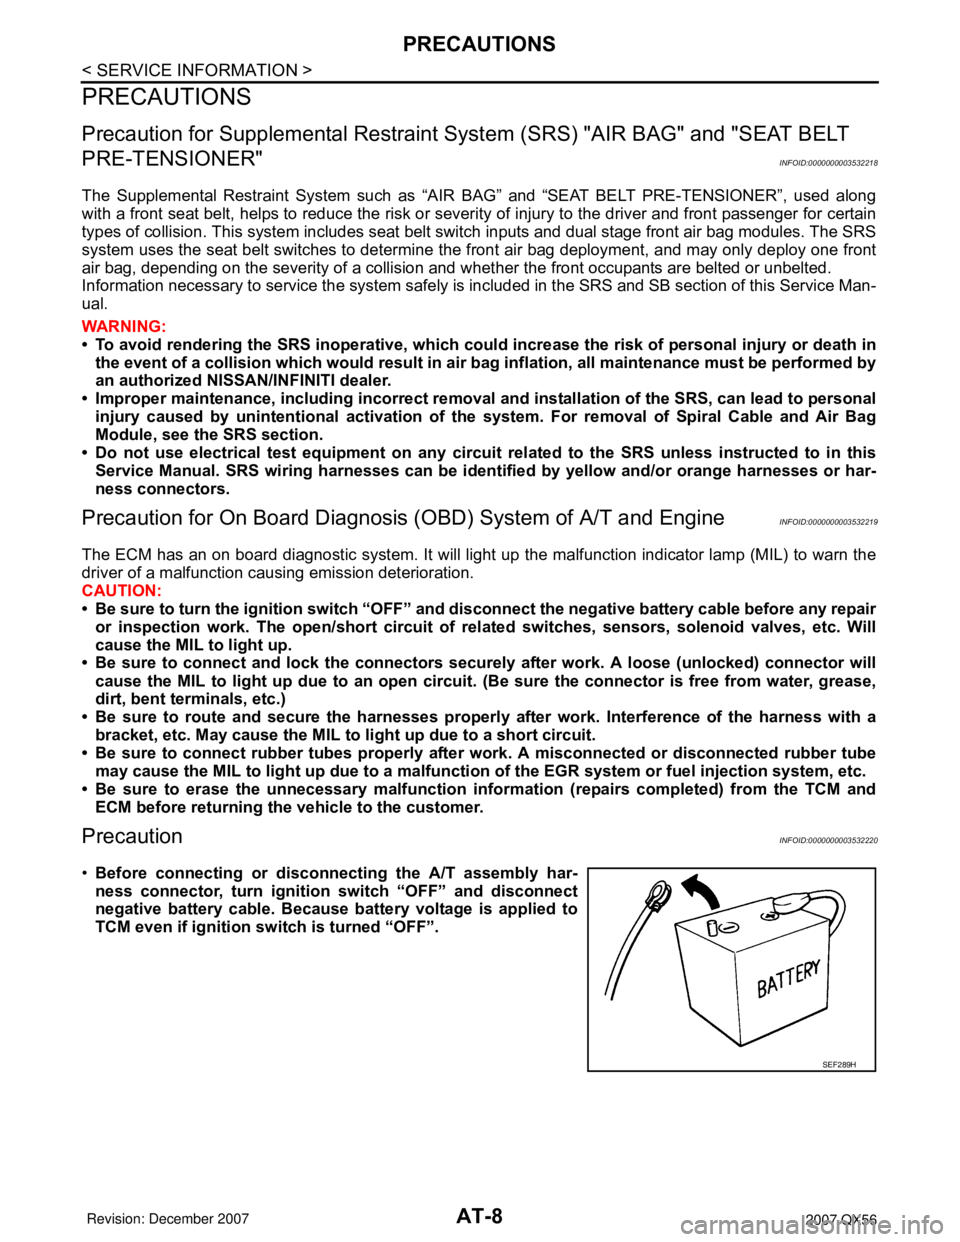
•Before connecting or disconnecting the A/T assembly har-
ness connector, turn ignition switch “OFF” and disconnect
negative battery cable. Because battery voltage is applied to
TCM even if ignition switch is turned “OFF”.
SEF289H
Page 79 of 3061
PRECAUTIONS
AT-9
< SERVICE INFORMATION >
D
E
F
G
H
I
J
K
L
MA
B
AT
N
O
P
•After performing each TROUBLE DIAGNOSIS, perform “DTC
(Diagnostic Trouble Code) CONFIRMATION PROCEDURE”.
If the repair is completed the DTC should not be displayed in
the “DTC CONFIRMATION PROCEDURE”.
• Always use the specified brand of ATF. Refer to MA-10
.
• Use paper rags not cloth rags during work.
• After replacing the ATF, dispose of the waste oil using the methods prescribed by law, ordinance, etc.
• Before proceeding with disassembly, thoroughly clean the outside of the transmission. It is important to pre-
vent the internal parts from becoming contaminated by dirt or other foreign matter.
• Disassembly should be done in a clean work area.
• Use lint-free cloth or towels for wiping parts clean. Common shop rags can leave fibers that could interfere
with the operation of the transmission.
• Place disassembled parts in order for easier and proper assembly.
• All parts should be carefully cleaned with a general purpose, non-flammable solvent before inspection or
reassembly.
• Gaskets, seals and O-rings should be replaced any time the transmission is disassembled.
• It is very important to perform functional tests whenever they are indicated.
• The valve body contains precision parts and requires extreme care when parts are removed and serviced.
Place disassembled valve body parts in order for easier and proper assembly. Care will also prevent springs
and small parts from becoming scattered or lost.
• Properly installed valves, sleeves, plugs, etc. will slide along bores in valve body under their own weight.
• Before assembly, apply a coat of recommended ATF to all parts. Apply petroleum jelly to protect O-rings and
seals, or hold bearings and washers in place during assembly. Do not use grease.
• Extreme care should be taken to avoid damage to O-rings, seals and gaskets when assembling.
• Clean or replace ATF cooler if excessive foreign material is found in oil pan or clogging strainer. Refer to AT-
15, "A/T Fluid Cooler Cleaning".
• After overhaul, refill the transmission with new ATF.
• When the A/T drain plug is removed, only some of the fluid is drained. Old A/T fluid will remain in torque con-
verter and ATF cooling system.
Always follow the procedures under “Changing A/T Fluid” in the AT section when changing A/T fluid. Refer to
AT-13, "
Changing Automatic Transmission Fluid (ATF)", AT-13, "Checking Automatic Transmission Fluid
(ATF)".
Service Notice or PrecautionINFOID:0000000003532221
ATF COOLER SERVICE
If A/T fluid contains frictional material (clutches, bands, etc.), or if an A/T is repaired, overhauled, or replaced,
inspect and clean the A/T fluid cooler mounted in the radiator or replace the radiator. Flush cooler lines using
cleaning solvent and compressed air after repair. For A/T fluid cooler cleaning procedure, refer to AT-15, "
A/T
Fluid Cooler Cleaning". For radiator replacement, refer to CO-13.
CHECKING AND CHANGING A/T FLUID SERVICE
Increase ATF temperature by 80°C (176°F) once, and then check ATF level in 65°C (149°F) when adjusting
ATF level.
NOTE:
JA60 uses both systems of a water-cooling and of an air-cooling. Air-cooling system has a by-pass valve.
When ATF temperature is not over 50°C (122°F) with water-cooling system OFF, it does not flow to air-cooling
system. If ATF level is set without the flow of ATF, the level will be 10mm lower than the standard. Therefore,
piping should be filled with ATF when adjusting level.
OBD-II SELF-DIAGNOSIS
• A/T self-diagnosis is performed by the TCM in combination with the ECM. Refer to the table on AT-83,
"CONSULT-II Function (A/T)" for the indicator used to display each self-diagnostic result.
SEF217U
Page 102 of 3061
AT-32
< SERVICE INFORMATION >
A/T CONTROL SYSTEM
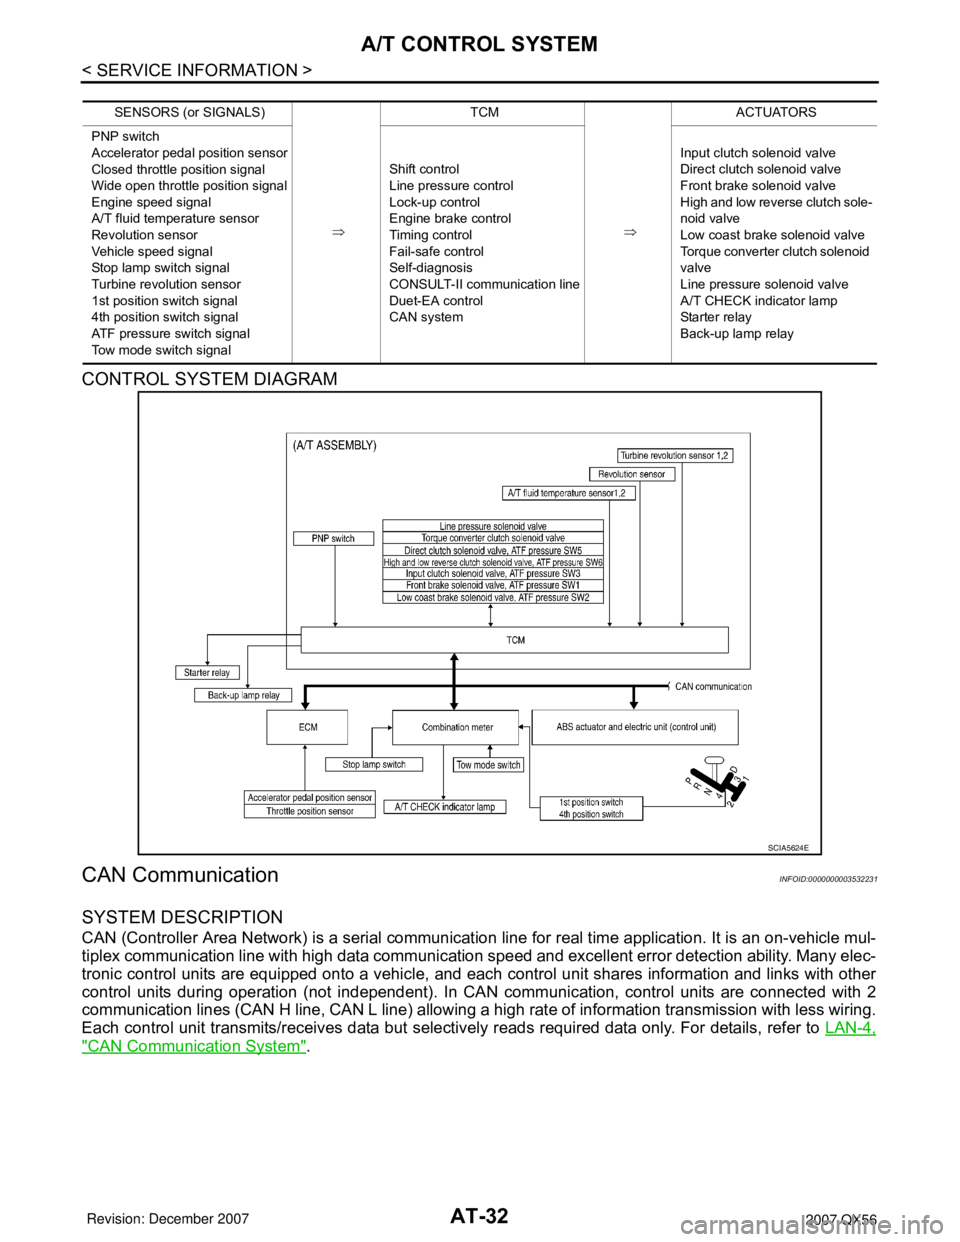
CONTROL SYSTEM DIAGRAM
CAN CommunicationINFOID:0000000003532231
SYSTEM DESCRIPTION
CAN (Controller Area Network) is a serial communication line for real time application. It is an on-vehicle mul-
tiplex communication line with high data communication speed and excellent error detection ability. Many elec-
tronic control units are equipped onto a vehicle, and each control unit shares information and links with other
control units during operation (not independent). In CAN communication, control units are connected with 2
communication lines (CAN H line, CAN L line) allowing a high rate of information transmission with less wiring.
Each control unit transmits/receives data but selectively reads required data only. For details, refer to LAN-4,
"CAN Communication System".
SENSORS (or SIGNALS)
⇒TCM
⇒ACTUATORS
PNP switch
Accelerator pedal position sensor
Closed throttle position signal
Wide open throttle position signal
Engine speed signal
A/T fluid temperature sensor
Revolution sensor
Vehicle speed signal
Stop lamp switch signal
Turbine revolution sensor
1st position switch signal
4th position switch signal
ATF pressure switch signal
Tow mode switch signalShift control
Line pressure control
Lock-up control
Engine brake control
Timing control
Fail-safe control
Self-diagnosis
CONSULT-II communication line
Duet-EA control
CAN systemInput clutch solenoid valve
Direct clutch solenoid valve
Front brake solenoid valve
High and low reverse clutch sole-
noid valve
Low coast brake solenoid valve
Torque converter clutch solenoid
valve
Line pressure solenoid valve
A/T CHECK indicator lamp
Starter relay
Back-up lamp relay
SCIA5624E
Page 109 of 3061

ON BOARD DIAGNOSTIC (OBD) SYSTEM
AT-39
< SERVICE INFORMATION >
D
E
F
G
H
I
J
K
L
MA
B
AT
N
O
P
ON BOARD DIAGNOSTIC (OBD) SYSTEM
IntroductionINFOID:0000000003532238
The A/T system has two self-diagnostic systems.
The first is the emission-related on board diagnostic system (OBD-II) performed by the TCM in combination
with the ECM. The malfunction is indicated by the MIL (malfunction indicator lamp) and is stored as a DTC in
the ECM memory but not the TCM memory.
The second is the TCM original self-diagnosis indicated by the A/T CHECK indicator lamp. The malfunction is
stored in the TCM memory. The detected items are overlapped with OBD-II self-diagnostic items. For detail,
refer to AT-83, "
CONSULT-II Function (A/T)".
OBD-II Function for A/T SystemINFOID:0000000003532239
The ECM provides emission-related on board diagnostic (OBD-II) functions for the A/T system. One function
is to receive a signal from the TCM used with OBD-related parts of the A/T system. The signal is sent to the
ECM when a malfunction occurs in the corresponding OBD-related part. The other function is to indicate a
diagnostic result by means of the MIL (malfunction indicator lamp) on the instrument panel. Sensors, switches
and solenoid valves are used as sensing elements.
The MIL automatically illuminates in One or Two Trip Detection Logic when a malfunction is sensed in relation
to A/T system parts.
One or Two Trip Detection Logic of OBD-IIINFOID:0000000003532240
ONE TRIP DETECTION LOGIC
If a malfunction is sensed during the first test drive, the MIL will illuminate and the malfunction will be stored in
the ECM memory as a DTC. The TCM is not provided with such a memory function.
TWO TRIP DETECTION LOGIC
When a malfunction is sensed during the first test drive, it is stored in the ECM memory as a 1st trip DTC
(diagnostic trouble code) or 1st trip freeze frame data. At this point, the MIL will not illuminate. — 1st Trip
If the same malfunction as that experienced during the first test drive is sensed during the second test drive,
the MIL will illuminate. — 2nd Trip
The “Trip” in the “One or Two Trip Detection Logic” means a driving mode in which self-diagnosis is performed
during vehicle operation.
OBD-II Diagnostic Trouble Code (DTC)INFOID:0000000003532241
HOW TO READ DTC AND 1ST TRIP DTC
DTC and 1st trip DTC can be read by the following methods.
( with CONSULT-II or GST) CONSULT-II or GST (Generic Scan Tool) Examples: P0705, P0720 etc.
These DTC are prescribed by SAE J2012.
(CONSULT-II also displays the malfunctioning component or system.)
•1st trip DTC No. is the same as DTC No.
•Output of the diagnostic trouble code indicates that the indicated circuit has a malfunction. How-
ever, in case of the Mode II and GST, they do not indicate whether the malfunction is still occurring or
occurred in the past and returned to normal.
CONSULT-II can identify them as shown below, therefore, CONSULT-II (if available) is recommended.
A sample of CONSULT-II display for DTC and 1st trip DTC is shown
on the next page. DTC or 1st trip DTC of a malfunction is displayed
in SELF-DIAGNOSTIC RESULTS mode for “ENGINE” with CON-
SULT-II. Time data indicates how many times the vehicle was driven
after the last detection of a DTC.
BCIA0030E
Page 111 of 3061

ON BOARD DIAGNOSTIC (OBD) SYSTEM
AT-41
< SERVICE INFORMATION >
D
E
F
G
H
I
J
K
L
MA
B
AT
N
O
P
•System readiness test (SRT) codes
•Test values
HOW TO ERASE DTC (WITH CONSULT-II)
•If a DTC is displayed for both ECM and TCM, it is necessary to be erased for both ECM and TCM.
1. If the ignition switch stays “ON” after repair work, be sure to turn ignition switch “OFF” once. Wait at least
10 seconds and then turn it “ON” (engine stopped) again.
2. Turn CONSULT-II “ON” and touch “A/T”.
3. Touch “SELF-DIAG RESULTS”.
4. Touch “ERASE”. (The DTC in the TCM will be erased.) Then touch “BACK” twice.
5. Touch “ENGINE”.
6. Touch “SELF-DIAG RESULTS”.
7. Touch “ERASE”. (The DTC in the ECM will be erased.)
HOW TO ERASE DTC (WITH GST)
1. If the ignition switch stays “ON” after repair work, be sure to turn ignition switch “OFF” once. Wait at least
10 seconds and then turn it “ON” (engine stopped) again.
2. Select Mode 4 with the Generic Scan Tool (GST). For details refer to EC-122, "
Generic Scan Tool (GST)
Function".
HOW TO ERASE DTC (NO TOOLS)
1. Disconnect battery for 24 hours.
2. Reconnect battery.
Malfunction Indicator Lamp (MIL)INFOID:0000000003532242
DESCRIPTION
SCIA5671E
Page 113 of 3061
TROUBLE DIAGNOSIS
AT-43
< SERVICE INFORMATION >
D
E
F
G
H
I
J
K
L
MA
B
AT
N
O
P
TROUBLE DIAGNOSIS
DTC Inspection Priority ChartINFOID:0000000003532243
If some DTCs are displayed at the same time, perform inspections one by one based on the following priority
chart.
NOTE:
If DTC U1000 is displayed with other DTCs, first perform the trouble diagnosis for DTC U1000. Refer to
AT- 9 1
.
Fail-SafeINFOID:0000000003532244
The TCM has an electrical fail-safe mode. This mode makes it possible to operate even if there is an error in a
main electronic control input/output signal circuit. In fail-safe mode the transmission is fixed in 2nd, 4th or 5th
(depending on the breakdown position), so the customer should feel “slipping” or “poor acceleration”.
Even when the electronic circuits are normal, under special conditions (for example, when slamming on the
brake with the wheels spinning drastically and stopping the tire rotation), the transmission can go into fail-safe
mode. If this happens, switch “OFF” the ignition switch for 10 seconds, then switch it “ON” again to return to
the normal shift pattern. Therefore, the customer's vehicle has returned to normal, so handle according to the
“diagnostics flow” (Refer to AT-44, "
How To Perform Trouble Diagnosis for Quick and Accurate Repair").
FAIL-SAFE FUNCTION
If any malfunction occurs in a sensor or solenoid, this function controls the A/T to mark driving possible.
Vehicle Speed Sensor
• Signals are input from two systems - from vehicle speed sensor A/T (revolution sensor) installed on the
transmission and from combination meter so normal driving is possible even if there is a malfunction in one
of the systems. And if vehicle speed sensor A/T (revolution sensor) has unusual cases, 5th gear is prohib-
ited.
Accelerator Pedal Position Sensor
• If there is a malfunction in one of the systems, the accelerator opening angle is controlled by ECM according
to a pre-determined accelerator angle to make driving possible. And if there are malfunctions in tow sys-
tems, the engine speed is fixed by ECM to a pre-determined engine speed to make driving possible.
Throttle Position Sensor
• If there is a malfunction in one of the systems, the accelerator opening angle is controlled by ECM according
to a pre-determined accelerator angle to make driving possible. And if there are malfunctions in tow sys-
tems, the accelerator opening angle is controlled by the idle signal sent from the ECM which is based on
input indicating either idle condition or off-idle condition (pre-determined accelerator opening) in order to
make driving possible.
PNP Switch
• In the unlikely event that a malfunction signal enters the TCM, the position indicator is switched “OFF”, the
starter relay is switched “OFF” (starter starting is disabled), the back-up lamp relay switched “OFF” (back-up
lamp is OFF) and the position is fixed to the “D” range to make driving possible.
Starter Relay
• The starter relay is switched “OFF”. (Starter starting is disabled.)
A/T Interlock
• If there is an A/T interlock judgment malfunction, the transmission is fixed in 2nd gear to make driving possi-
ble.
NOTE:
When the vehicle is driven fixed in 2nd gear, a turbine revolution sensor malfunction is displayed,
but this is not a turbine revolution sensor malfunction.
• When the coupling pattern below is detected, the fail-safe action corresponding to the pattern is performed.
A/T INTERLOCK COUPLING PATTERN TABLE
Priority Detected items (DTC)
1 U1000 CAN communication line
2 Except above
Page 117 of 3061

TROUBLE DIAGNOSIS
AT-47
< SERVICE INFORMATION >
D
E
F
G
H
I
J
K
L
MA
B
AT
N
O
P Diagnostic Worksheet Chart
Customer name MR/MS Model & Year VIN
Trans. Model Engine Mileage
Malfunction Date Manuf. Date In Service Date
Frequencyo Continuouso Intermittent ( times a day)
Symptomso Vehicle does not move. (o Any positiono Particular position)
o No up-shift (o 1st → 2ndo 2nd → 3rdo 3rd → 4th o 4th → 5th)
o No down-shift (o 5th → 4th o 4th → 3rdo 3rd → 2ndo 2nd → 1st)
o Lock-up malfunction
o Shift point too high or too low.
o Shift shock or slip (o N → Do Lock-upo Any drive position)
o Noise or vibration
o No kick down
o No pattern select
o Others
()
Malfunction indicator lamp (MIL)o Continuously lito Not lit
1o Read the item on cautions concerning fail-safe and understand the customer's complaint.AT- 4 3
2o ATF inspection
AT- 5 1o Leak (Repair leak location.)
o Sta te
o Amount
3o Stall test and line pressure test
AT- 5 1
, AT-
51
o Stall test
o Torque converter one-way clutch
o Front brake
o High and low reverse clutch
o Low coast brake
o Forward brake
o Reverse brake
o Forward one-way clutcho 1st one-way clutch
o 3rd one-way clutch
o Engine
o Line pressure low
o Except for input clutch and direct
clutch, clutches and brakes OK
o Line pressure inspection - Suspected part:
Page 118 of 3061
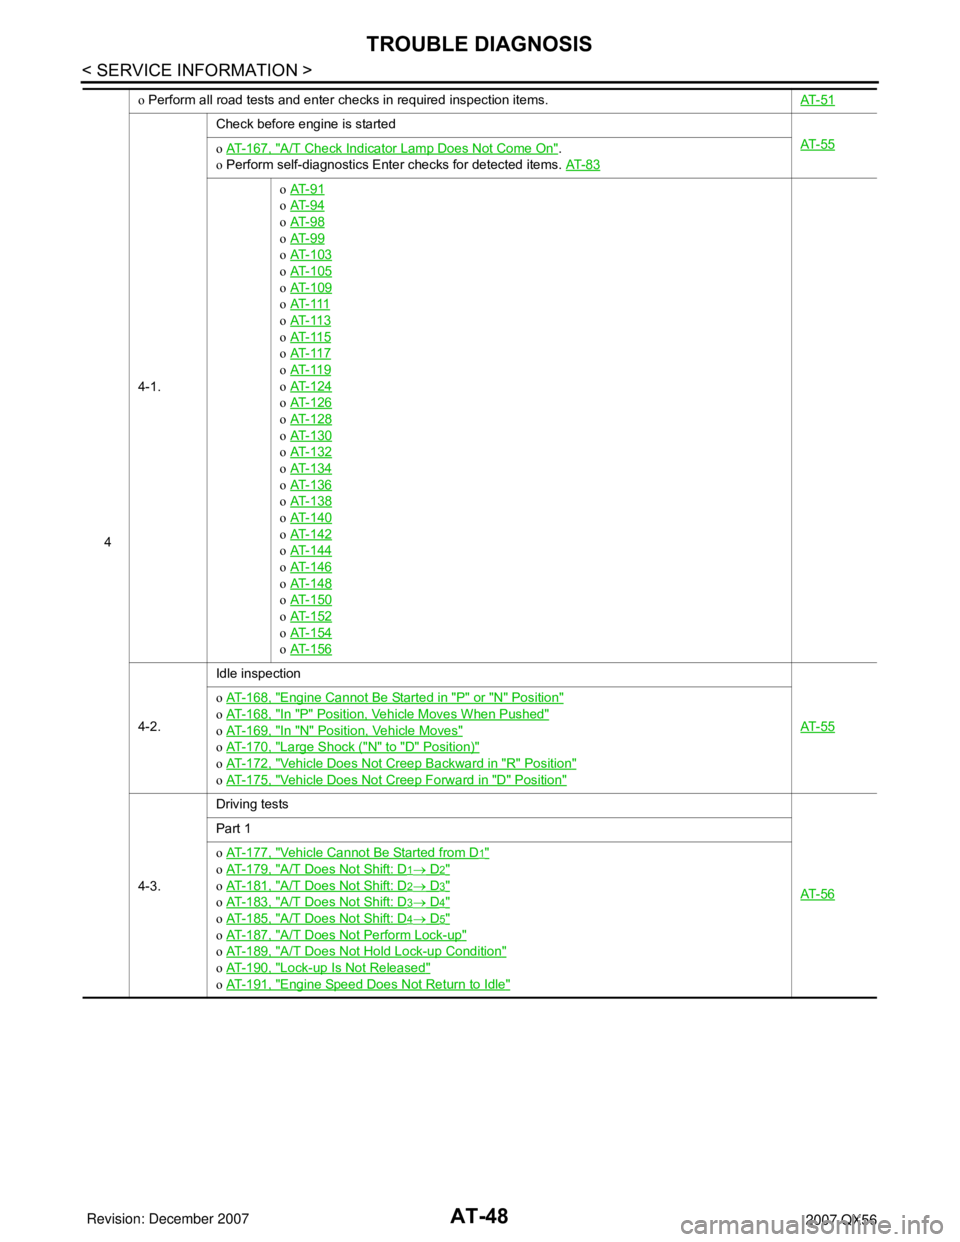
AT-48
< SERVICE INFORMATION >
TROUBLE DIAGNOSIS
4o Perform all road tests and enter checks in required inspection items.AT- 5 1
4-1.Check before engine is started
AT- 5 5
o AT- 1 6 7 , "A/T Check Indicator Lamp Does Not Come On".
o Perform self-diagnostics Enter checks for detected items. AT- 8 3
o AT- 9 1
o AT- 9 4
o AT- 9 8
o AT- 9 9
o AT- 1 0 3
o AT- 1 0 5
o AT- 1 0 9
o AT- 111
o AT- 11 3
o AT- 11 5
o AT- 11 7
o AT- 11 9
o AT- 1 2 4
o AT- 1 2 6
o AT- 1 2 8
o AT- 1 3 0
o AT- 1 3 2
o AT- 1 3 4
o AT- 1 3 6
o AT- 1 3 8
o AT- 1 4 0
o AT- 1 4 2
o AT- 1 4 4
o AT- 1 4 6
o AT- 1 4 8
o AT- 1 5 0
o AT- 1 5 2
o AT- 1 5 4
o AT- 1 5 6
4-2.Idle inspection
AT- 5 5
o AT- 1 6 8 , "Engine Cannot Be Started in "P" or "N" Position"
o AT- 1 6 8 , "In "P" Position, Vehicle Moves When Pushed"
o AT- 1 6 9 , "In "N" Position, Vehicle Moves"
o AT- 1 7 0 , "Large Shock ("N" to "D" Position)"
o AT- 1 7 2 , "Vehicle Does Not Creep Backward in "R" Position"
o AT- 1 7 5 , "Vehicle Does Not Creep Forward in "D" Position"
4-3.Driving tests
AT- 5 6
Part 1
o AT- 1 7 7 , "
Vehicle Cannot Be Started from D1"
o AT- 1 7 9 , "A/T Does Not Shift: D1→ D2"
o AT- 1 8 1 , "A/T Does Not Shift: D2→ D3"
o AT- 1 8 3 , "A/T Does Not Shift: D3→ D4"
o AT- 1 8 5 , "A/T Does Not Shift: D4→ D5"
o AT- 1 8 7 , "A/T Does Not Perform Lock-up"
o AT- 1 8 9 , "A/T Does Not Hold Lock-up Condition"
o AT- 1 9 0 , "Lock-up Is Not Released"
o AT- 1 9 1 , "Engine Speed Does Not Return to Idle"
Page 125 of 3061
TROUBLE DIAGNOSIS
AT-55
< SERVICE INFORMATION >
D
E
F
G
H
I
J
K
L
MA
B
AT
N
O
P
ROAD TEST
Description
• The road test inspects overall performance of the A/T and analyzes possible malfunction causes.
• The road test is carried out in the following three stages.
1. Check before engine is started. Refer to AT- 5 5
.
2. Check at idle. Refer to AT- 5 5
3. Cruise test
• Inspect all the items from Part 1 to Part 3. Refer to AT- 5 6
, AT- 5 8, AT- 5 9.
• Before beginning the road test, check the test procedure and inspection items.
• Test all inspection items until the symptom is uncovered. Diagnose NG items when all road tests are com-
plete.
Check Before Engine Is StartedINFOID:0000000003532249
1.CHECK AT CHECK INDICATOR LAMP
1. Park vehicle on level surface.
2. Move selector lever to “P” position.
3. Turn ignition switch to “OFF” position and wait at least 10 seconds.
4. Turn ignition switch to “ON” position. (Do not start engine.)
Does AT CHECK indicator lamp light up for about 2 seconds?
YES >> 1. Turn ignition switch to “OFF” position.
2. Carry out the self-diagnostics and record all NG items on the diagnostics worksheet. Refer to
AT-83, "
CONSULT-II Function (A/T)".
3. Go to AT-55, "
Check at Idle".
NO >> Stop the road test and go to AT-167, "
A/T Check Indicator Lamp Does Not Come On".
Check at IdleINFOID:0000000003532250
1.CHECK STARTING THE ENGINE
1. Park vehicle on level surface.
2. Move selector lever to “P” or “N” position.
3. Turn ignition switch to “OFF” position.
4. Turn ignition switch to “START” position.
Does the engine start?
YES >> GO TO 2.
NO >> Stop the road test and go to AT-168, "
Engine Cannot Be Started in "P" or "N" Position".
2.CHECK STARTING THE ENGINE
1. Turn ignition switch to “ON” position.
2. Move selector lever in “D”,“4”, “3”, “2”, “1” or “R” position.
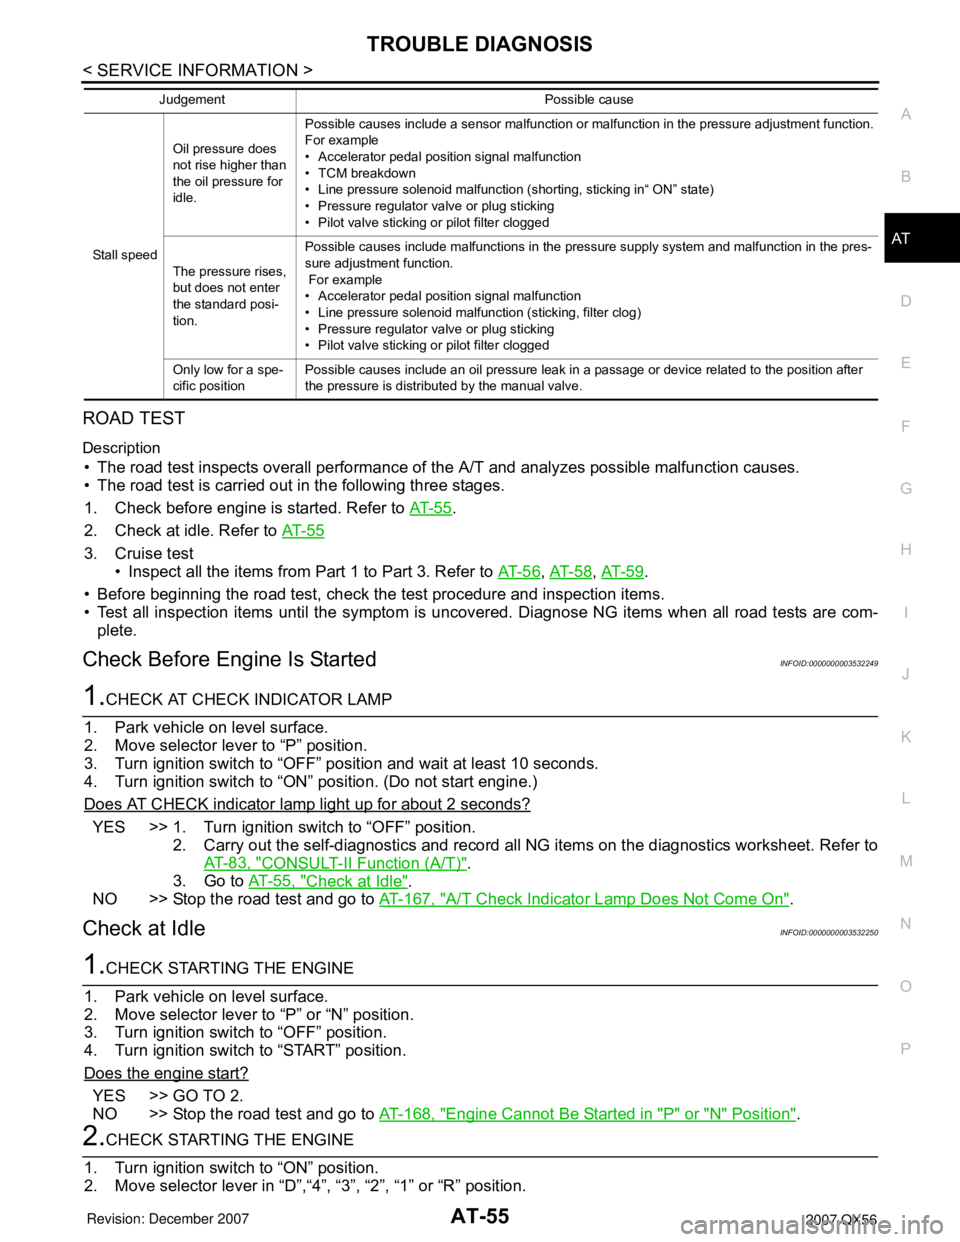
Stall speedOil pressure does
not rise higher than
the oil pressure for
idle.Possible causes include a sensor malfunction or malfunction in the pressure adjustment function.
For example
• Accelerator pedal position signal malfunction
• TCM breakdown
• Line pressure solenoid malfunction (shorting, sticking in“ ON” state)
• Pressure regulator valve or plug sticking
• Pilot valve sticking or pilot filter clogged
The pressure rises,
but does not enter
the standard posi-
tion.Possible causes include malfunctions in the pressure supply system and malfunction in the pres-
sure adjustment function.
For example
• Accelerator pedal position signal malfunction
• Line pressure solenoid malfunction (sticking, filter clog)
• Pressure regulator valve or plug sticking
• Pilot valve sticking or pilot filter clogged
Only low for a spe-
cific positionPossible causes include an oil pressure leak in a passage or device related to the position after
the pressure is distributed by the manual valve. Judgement Possible cause
Page 155 of 3061

TROUBLE DIAGNOSIS
AT-85
< SERVICE INFORMATION >
D
E
F
G
H
I
J
K
L
MA
B
AT
N
O
P
X: Applicable, —: Not applicable
Items (CONSULT-II
screen terms)Malfunction is detected when...TCM self-di-
agnosisOBD-II (DTC)
“A/T” with
CONSULT-IIMIL indicator
lamp*1, “EN-
GINE” with
CONSULT-II or
GST
CAN COMM CIRCUIT • When a malfunction is detected in CAN communications U1000 U1000
STARTER RELAY/
CIRC• If this signal is ON other than in P or N position, this is judged to be a
malfunction.
(And if it is OFF in P or N position, this too is judged to be a malfunction.)P0615 —
TCM • TCM is malfunctioning. P0700 P0700
PNP SW/CIRC• PNP switch 1-4 signals input with impossible pattern
• “P” position is detected from N position without any other position being
detected in between.P0705 P0705
TURBINE REV S/CIRC• TCM does not receive the proper voltage signal from the sensor.
• TCM detects an irregularity only at position of 4th gear for turbine revo-
lution sensor 2.P0717 P0717
VEH SPD SEN/CIR AT
(Revolution sensor)• Signal from vehicle speed sensor A/T (Revolution sensor) not input due
to cut line or the like
• Unexpected signal input during running
• After ignition switch is turned ON, unexpected signal input from vehicle
speed sensor MTR before the vehicle starts movingP0720 P0720
ENGINE SPEED SIG • TCM does not receive the CAN communication signal from the ECM. P0725 —
TCC SOLENOID/CIRC • Normal voltage not applied to solenoid due to cut line, short, or the like P0740 P0740
A/T TCC S/V FNCTN• A/T cannot perform lock-up even if electrical circuit is good.
• TCM detects as irregular by comparing difference value with slip rota-
tion.P0744 P0744*2
L/PRESS SOL/CIRC• Normal voltage not applied to solenoid due to cut line, short, or the like
• TCM detects as irregular by comparing target value with monitor value.P0745 P0745
TP SEN/CIRC A/T• TCM does not receive the proper accelerator pedal position signals (in-
put by CAN communication) from ECM.P1705 P1705
ATF TEMP SEN/CIRC• During running, the ATF temperature sensor signal voltage is exces-
sively high or lowP1710 P0710
VEH SPD SE/CIR·MTR• Signal (CAN communication) from vehicle speed sensor MTR not input
due to cut line or the like
• Unexpected signal input during runningP1721 —
A/T INTERLOCK• Except during shift change, the gear position and ATF pressure switch
states are monitored and comparative judgement made.P1730 P1730
A/T 1ST E/BRAKING• Each ATF pressure switch and solenoid current is monitored and if a
pattern is detected having engine braking 1st gear other than in the "1"
position, a malfunction is detected.P1731 —
I/C SOLENOID/CIRC• Normal voltage not applied to solenoid due to functional malfunction,
cut line, short, or the like
• TCM detects as irregular by comparing target value with monitor value.P1752 P1752
I/C SOLENOID FNCTN • TCM detects that actual gear ratio is irregular, and relation between
gear position and condition of ATF pressure switch 3 is irregular during
depressing accelerator pedal. (Other than during shift change)
• TCM detects that relation between gear position and condition of ATF
pressure switch 3 is irregular during releasing accelerator pedal. (Other
than during shift change)P1754 P1754*2
FR/B SOLENOID/CIRC• Normal voltage not applied to solenoid due to functional malfunction,
cut line, short, or the like
• TCM detects as irregular by comparing target value with monitor value.P1757 P1757