INFINITI QX56 2007 Factory Service Manual
QX56 2007
INFINITI
INFINITI
https://www.carmanualsonline.info/img/42/57029/w960_57029-0.png
INFINITI QX56 2007 Factory Service Manual
Trending: boot, air filter, rear view mirror, alternator belt, dimensions, headlights, alarm
Page 311 of 3061
DISASSEMBLY
AT-241
< SERVICE INFORMATION >
D
E
F
G
H
I
J
K
L
MA
B
AT
N
O
P
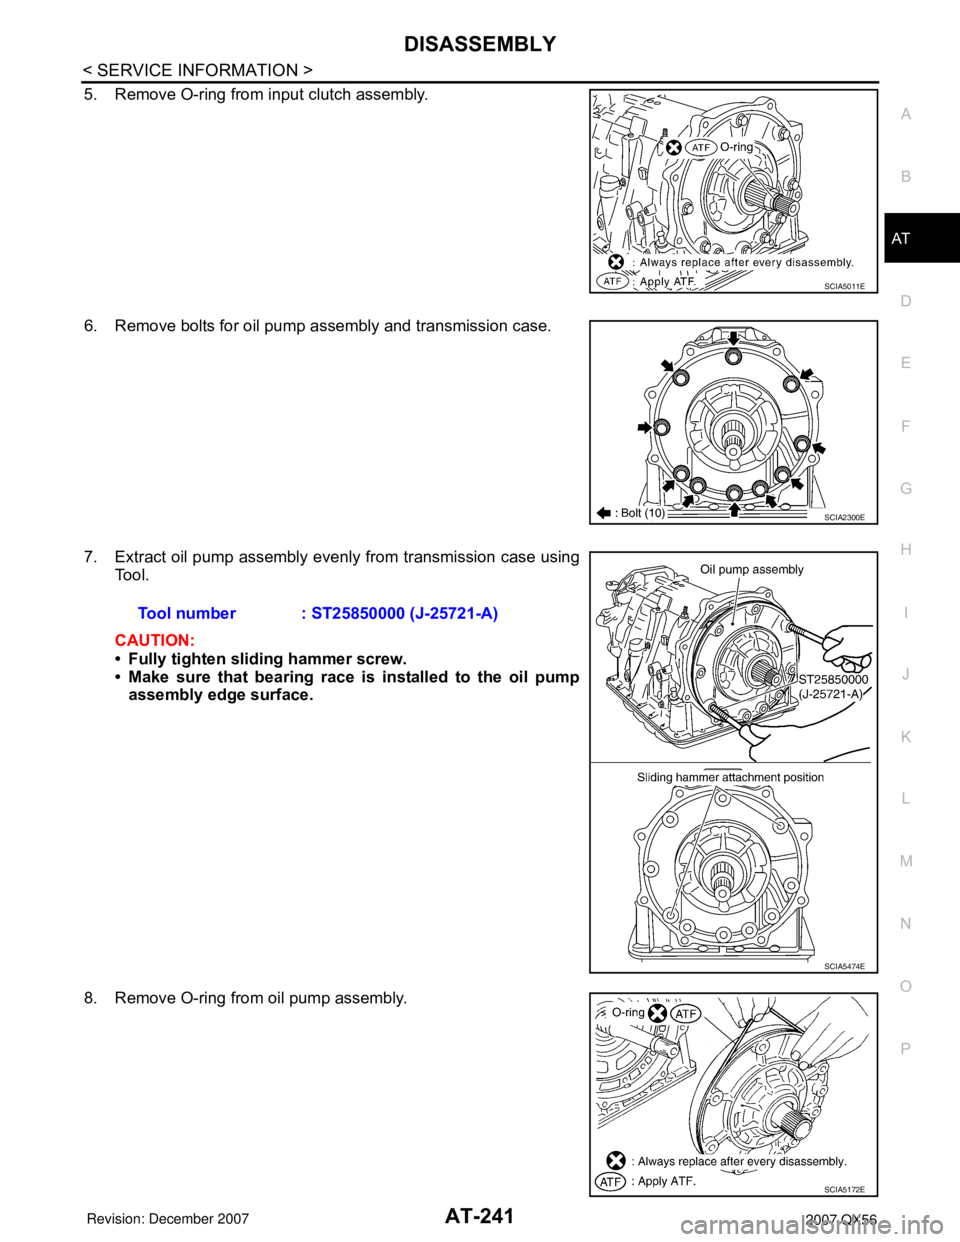
5. Remove O-ring from input clutch assembly.
6. Remove bolts for oil pump assembly and transmission case.
7. Extract oil pump assembly evenly from transmission case using
Tool.
CAUTION:
• Fully tighten sliding hammer screw.
• Make sure that bearing race is installed to the oil pump
assembly edge surface.
8. Remove O-ring from oil pump assembly.
SCIA5011E
SCIA2300E
Tool number : ST25850000 (J-25721-A)
SCIA5474E
SCIA5172E
Page 312 of 3061
AT-242
< SERVICE INFORMATION >
DISASSEMBLY
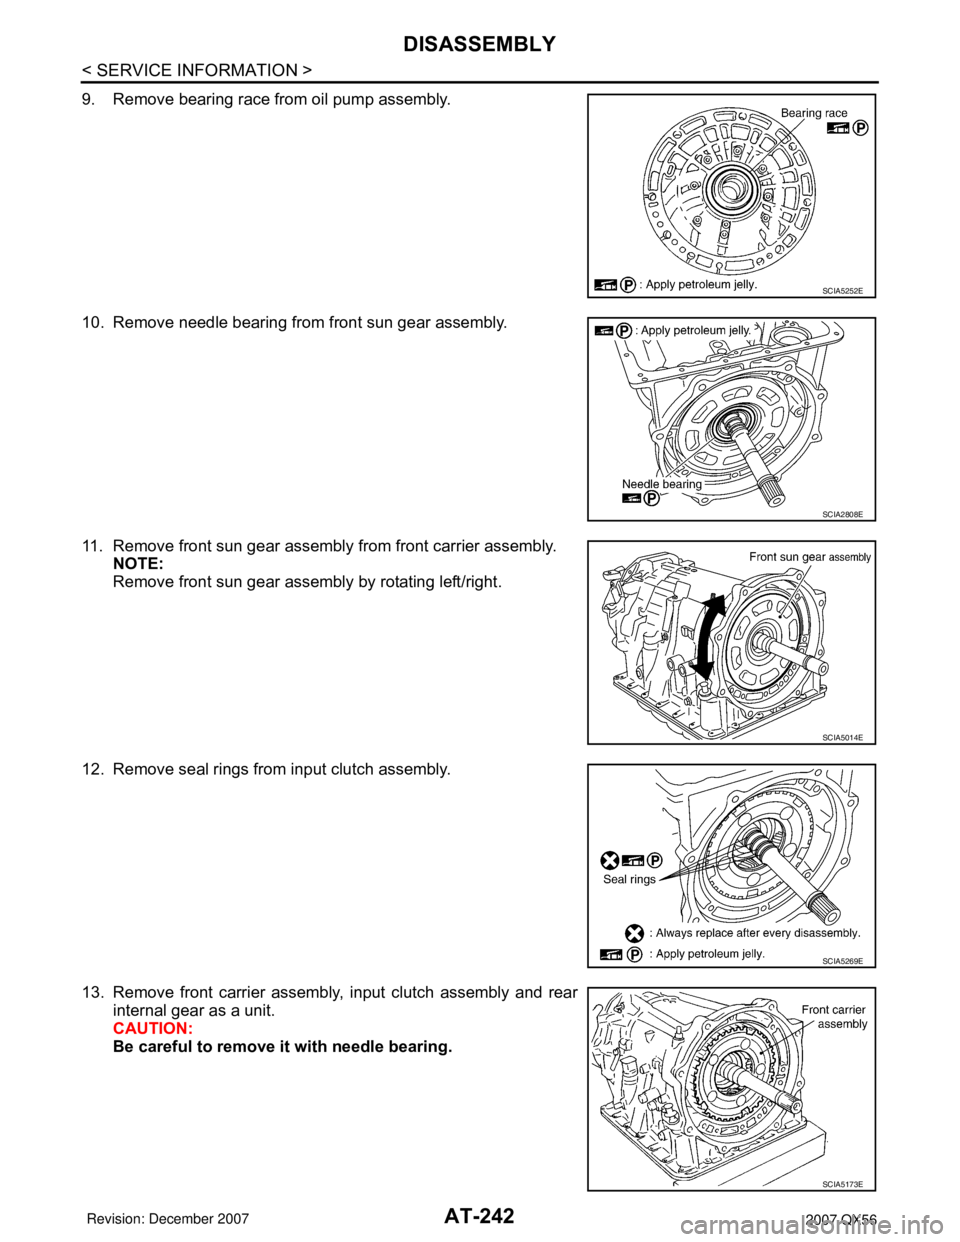
9. Remove bearing race from oil pump assembly.
10. Remove needle bearing from front sun gear assembly.
11. Remove front sun gear assembly from front carrier assembly.
NOTE:
Remove front sun gear assembly by rotating left/right.
12. Remove seal rings from input clutch assembly.
13. Remove front carrier assembly, input clutch assembly and rear
internal gear as a unit.
CAUTION:
Be careful to remove it with needle bearing.
SCIA5252E
SCIA2808E
SCIA5014E
SCIA5269E
SCIA5173E
Page 313 of 3061
DISASSEMBLY
AT-243
< SERVICE INFORMATION >
D
E
F
G
H
I
J
K
L
MA
B
AT
N
O
P
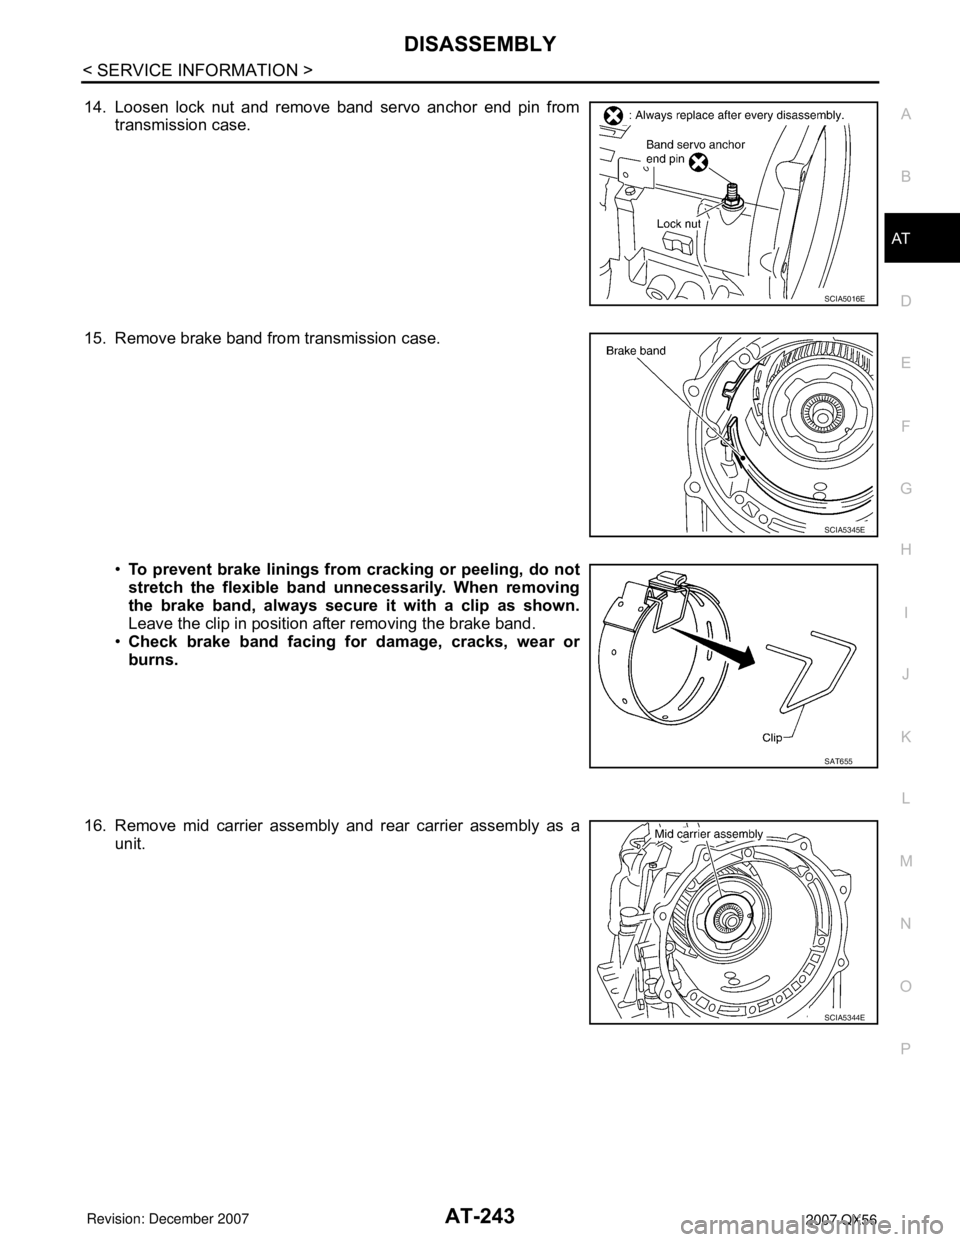
14. Loosen lock nut and remove band servo anchor end pin from
transmission case.
15. Remove brake band from transmission case.
•To prevent brake linings from cracking or peeling, do not
stretch the flexible band unnecessarily. When removing
the brake band, always secure it with a clip as shown.
Leave the clip in position after removing the brake band.
•Check brake band facing for damage, cracks, wear or
burns.
16. Remove mid carrier assembly and rear carrier assembly as a
unit.
SCIA5016E
SCIA5345E
SAT655
SCIA5344E
Page 314 of 3061
AT-244
< SERVICE INFORMATION >
DISASSEMBLY
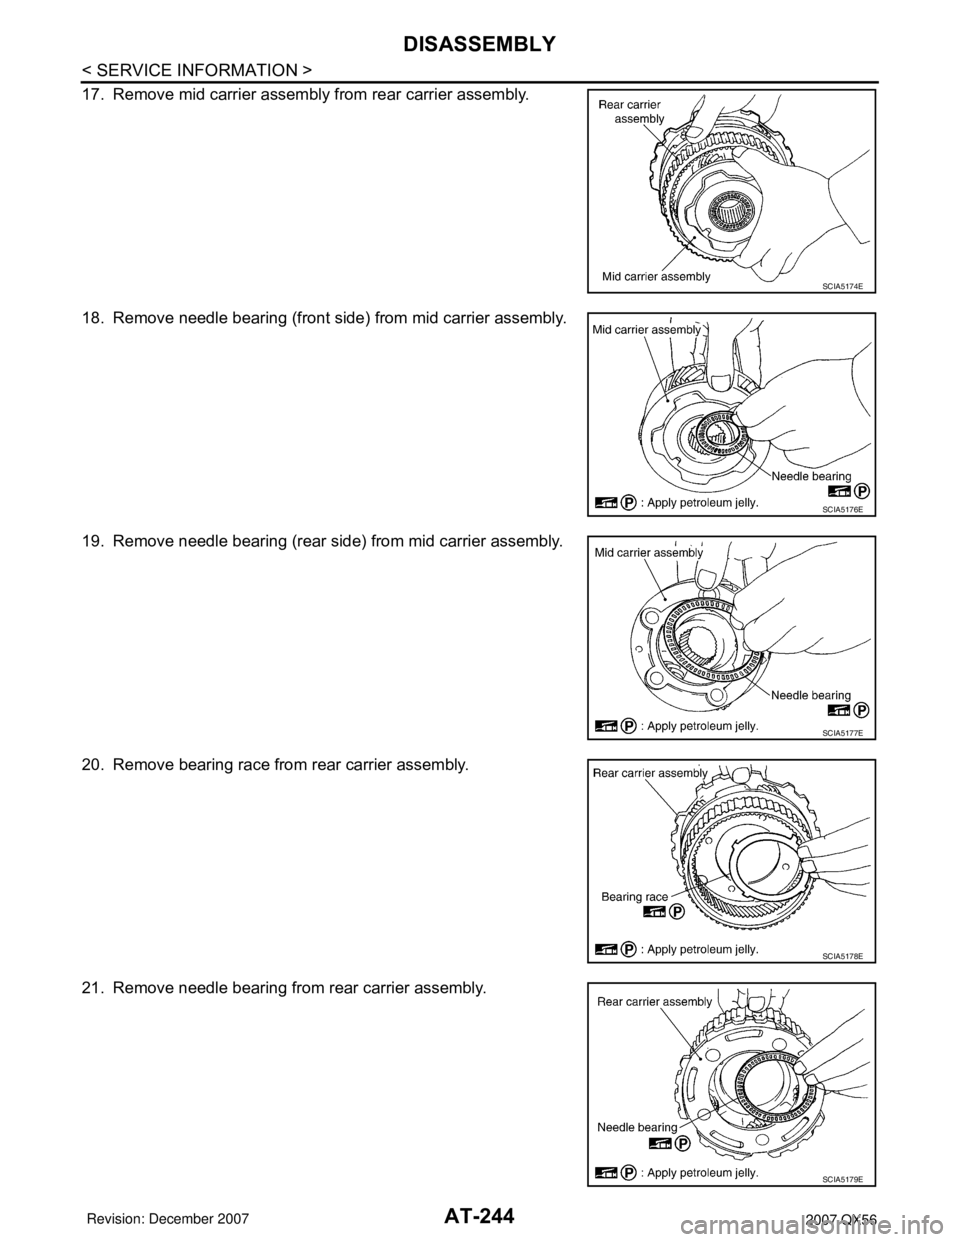
17. Remove mid carrier assembly from rear carrier assembly.
18. Remove needle bearing (front side) from mid carrier assembly.
19. Remove needle bearing (rear side) from mid carrier assembly.
20. Remove bearing race from rear carrier assembly.
21. Remove needle bearing from rear carrier assembly.
SCIA5174E
SCIA5176E
SCIA5177E
SCIA5178E
SCIA5179E
Page 315 of 3061
DISASSEMBLY
AT-245
< SERVICE INFORMATION >
D
E
F
G
H
I
J
K
L
MA
B
AT
N
O
P
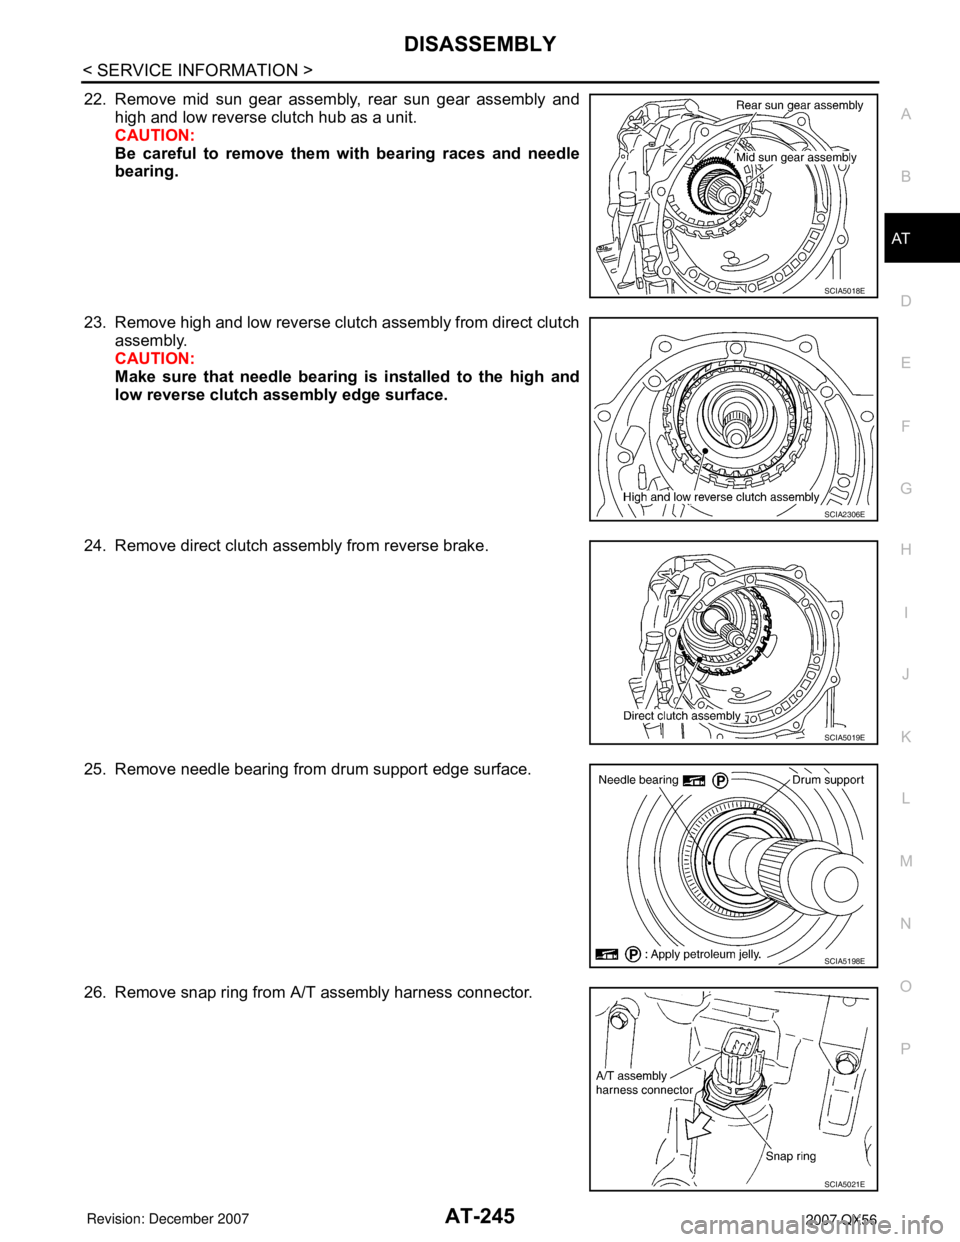
22. Remove mid sun gear assembly, rear sun gear assembly and
high and low reverse clutch hub as a unit.
CAUTION:
Be careful to remove them with bearing races and needle
bearing.
23. Remove high and low reverse clutch assembly from direct clutch
assembly.
CAUTION:
Make sure that needle bearing is installed to the high and
low reverse clutch assembly edge surface.
24. Remove direct clutch assembly from reverse brake.
25. Remove needle bearing from drum support edge surface.
26. Remove snap ring from A/T assembly harness connector.
SCIA5018E
SCIA2306E
SCIA5019E
SCIA5198E
SCIA5021E
Page 316 of 3061
AT-246
< SERVICE INFORMATION >
DISASSEMBLY
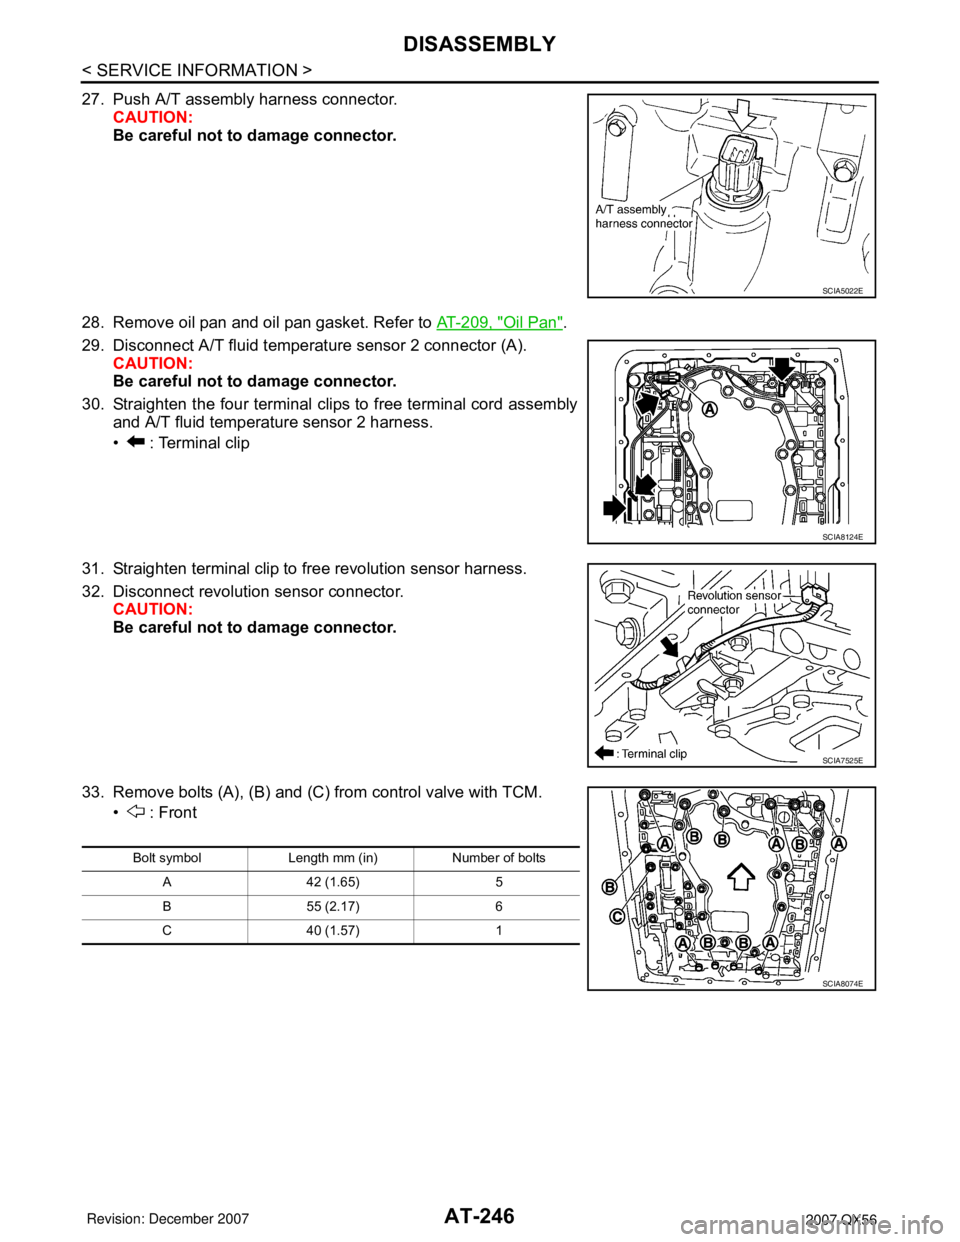
27. Push A/T assembly harness connector.
CAUTION:
Be careful not to damage connector.
28. Remove oil pan and oil pan gasket. Refer to AT-209, "
Oil Pan".
29. Disconnect A/T fluid temperature sensor 2 connector (A).
CAUTION:
Be careful not to damage connector.
30. Straighten the four terminal clips to free terminal cord assembly
and A/T fluid temperature sensor 2 harness.
• : Terminal clip
31. Straighten terminal clip to free revolution sensor harness.
32. Disconnect revolution sensor connector.
CAUTION:
Be careful not to damage connector.
33. Remove bolts (A), (B) and (C) from control valve with TCM.
• : Front
SCIA5022E
SCIA8124E
SCIA7525E
Bolt symbol Length mm (in) Number of bolts
A 42 (1.65) 5
B 55 (2.17) 6
C 40 (1.57) 1
SCIA8074E
Page 317 of 3061
DISASSEMBLY
AT-247
< SERVICE INFORMATION >
D
E
F
G
H
I
J
K
L
MA
B
AT
N
O
P
34. Remove control valve with TCM from transmission case.
CAUTION:
When removing, be careful with transmission assembly ter-
minal connector and the manual valve notch and manual
plate height. Remove it vertically.
35. Remove A/T fluid temperature sensor 2 with bracket from con-
trol valve with TCM.
36. Remove bracket from A/T fluid temperature sensor 2.
37. Remove O-ring from A/T assembly harness connector.
38. Disconnect TCM connectors.
CAUTION:
Be careful not to damage connectors.
SCIA5308E
SCIA5253E
SCIA5264E
SCIA5155E
SCIA5447E
Page 318 of 3061
AT-248
< SERVICE INFORMATION >
DISASSEMBLY
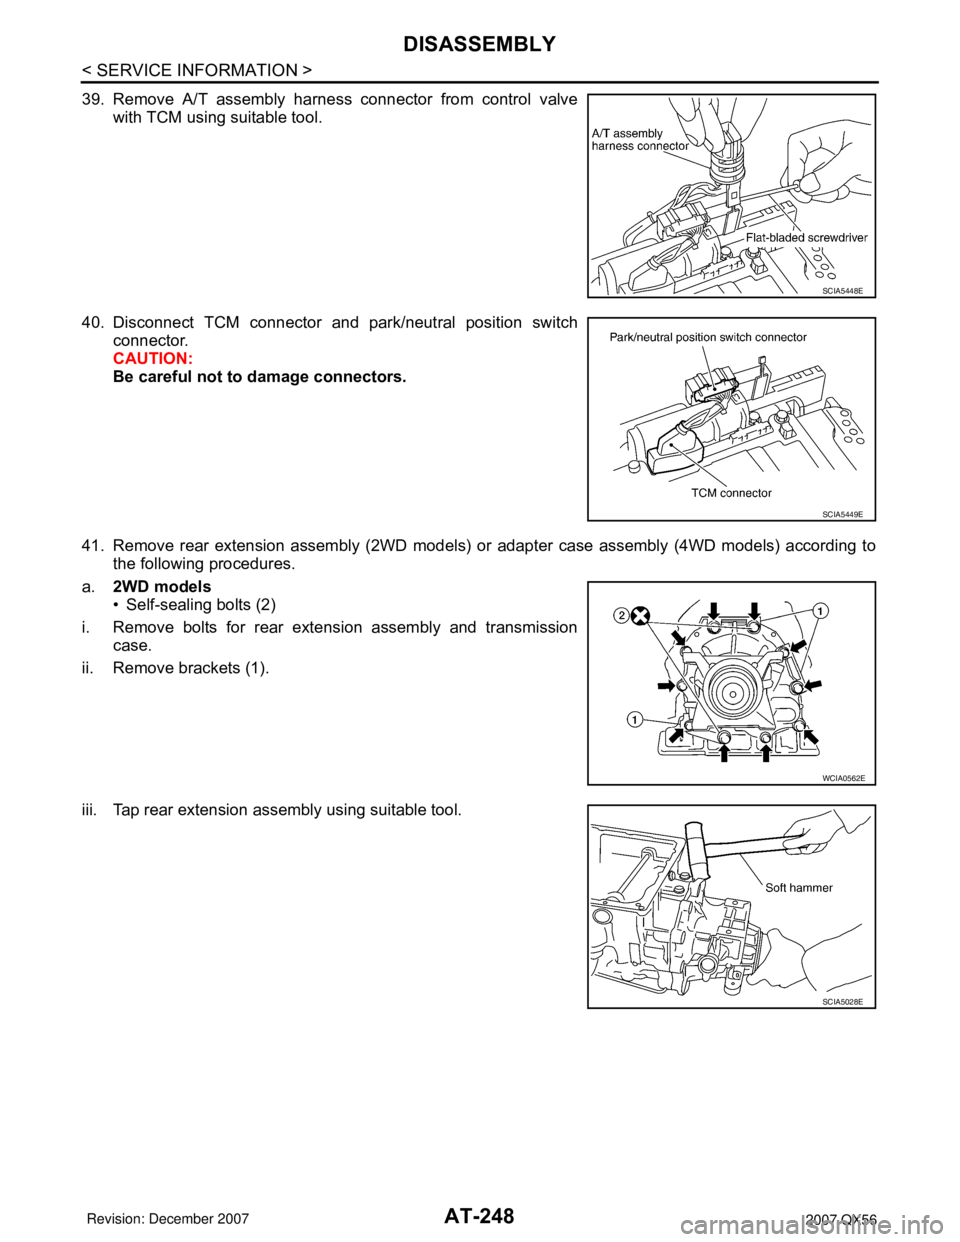
39. Remove A/T assembly harness connector from control valve
with TCM using suitable tool.
40. Disconnect TCM connector and park/neutral position switch
connector.
CAUTION:
Be careful not to damage connectors.
41. Remove rear extension assembly (2WD models) or adapter case assembly (4WD models) according to
the following procedures.
a.2WD models
• Self-sealing bolts (2)
i. Remove bolts for rear extension assembly and transmission
case.
ii. Remove brackets (1).
iii. Tap rear extension assembly using suitable tool.
SCIA5448E
SCIA5449E
WCIA0562E
SCIA5028E
Page 319 of 3061
DISASSEMBLY
AT-249
< SERVICE INFORMATION >
D
E
F
G
H
I
J
K
L
MA
B
AT
N
O
P
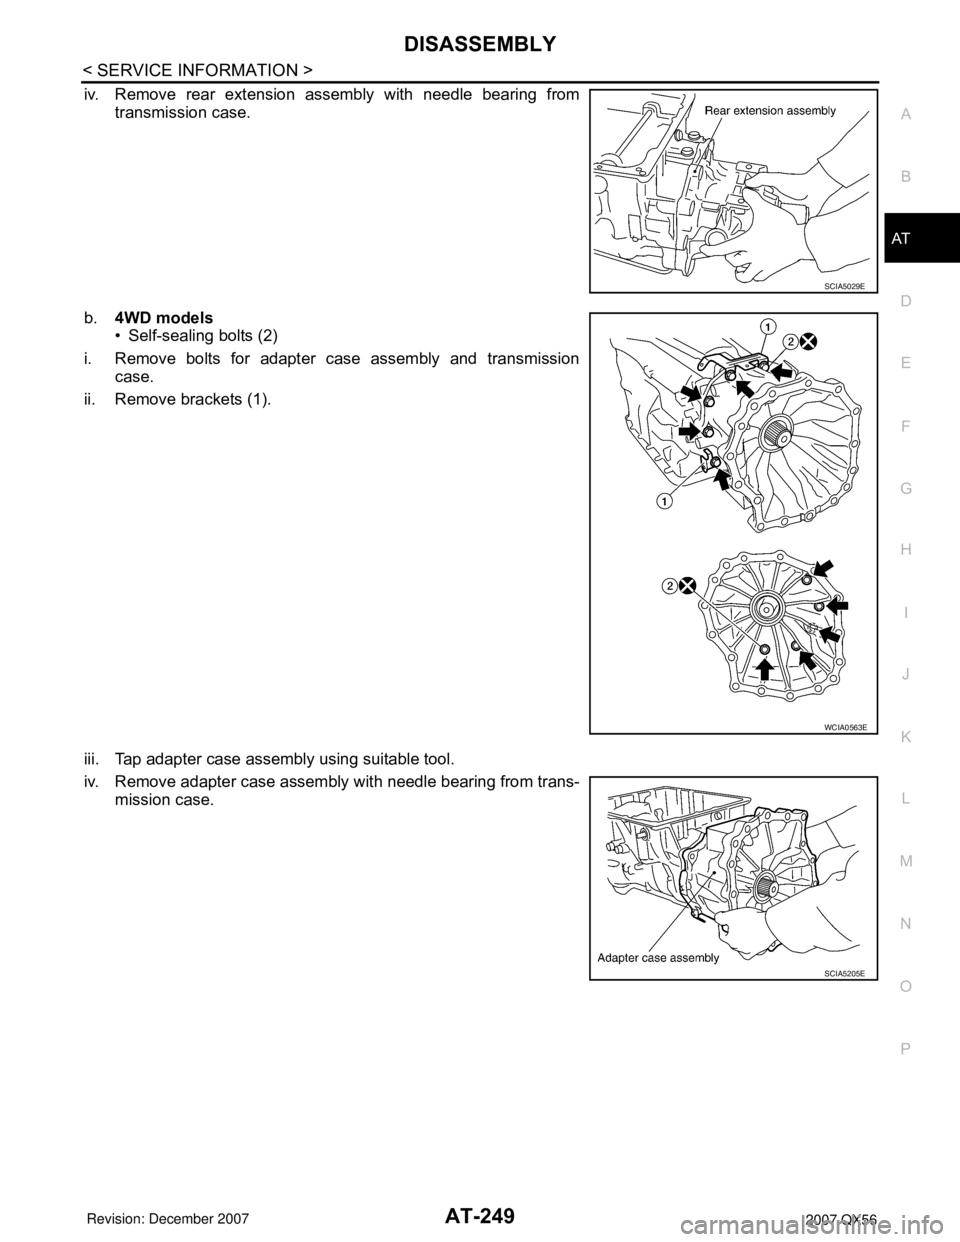
iv. Remove rear extension assembly with needle bearing from
transmission case.
b.4WD models
• Self-sealing bolts (2)
i. Remove bolts for adapter case assembly and transmission
case.
ii. Remove brackets (1).
iii. Tap adapter case assembly using suitable tool.
iv. Remove adapter case assembly with needle bearing from trans-
mission case.
SCIA5029E
WCIA0563E
SCIA5205E
Page 320 of 3061
AT-250
< SERVICE INFORMATION >
DISASSEMBLY
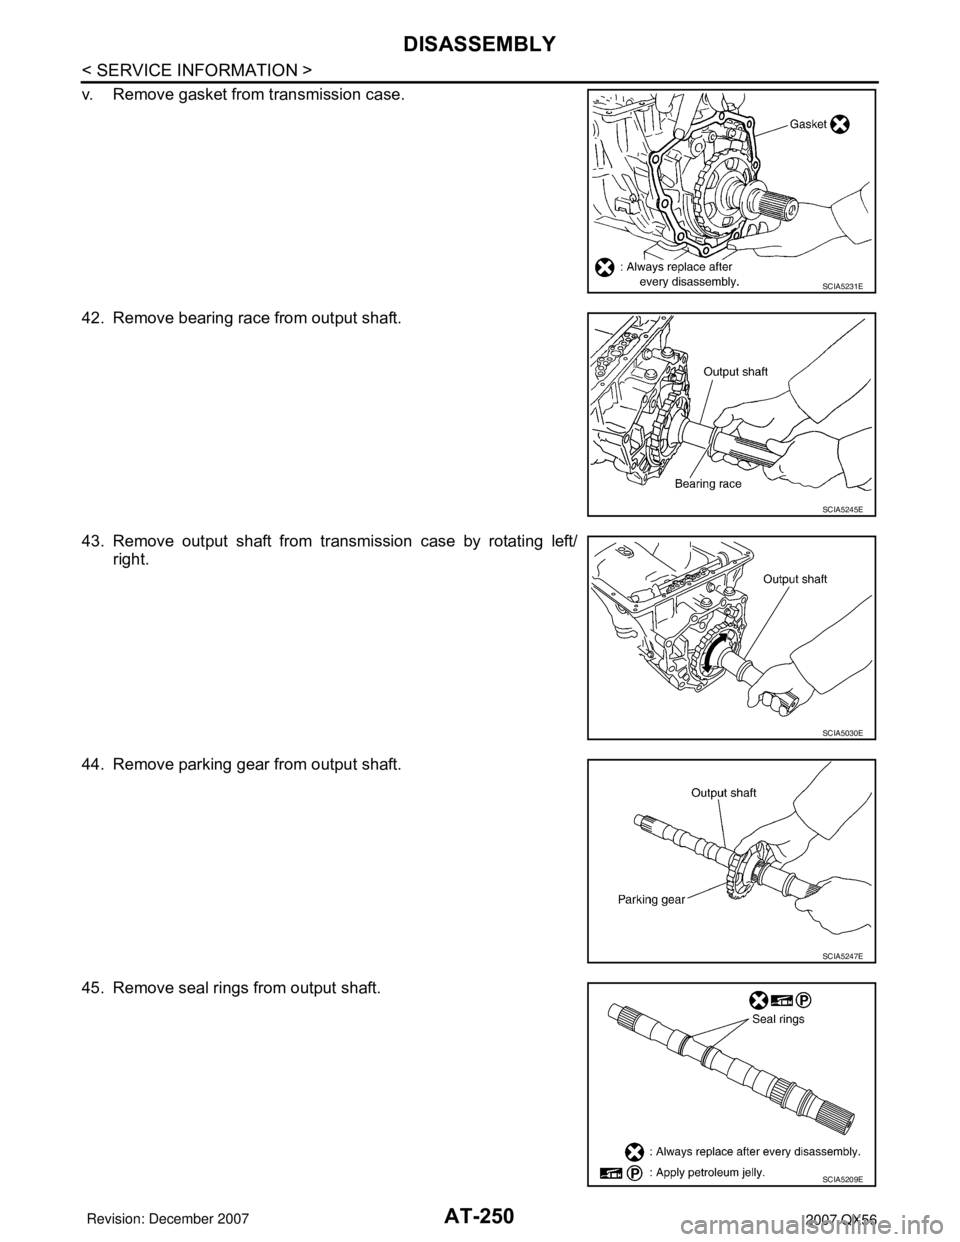
v. Remove gasket from transmission case.
42. Remove bearing race from output shaft.
43. Remove output shaft from transmission case by rotating left/
right.
44. Remove parking gear from output shaft.
45. Remove seal rings from output shaft.
SCIA5231E
SCIA5245E
SCIA5030E
SCIA5247E
SCIA5209E
Trending: wiper fluid, pairing phone, fuel reserve, wheel, rear view mirror, brake fluid, oil dipstick
