boot INFINITI QX56 2007 Factory Service Manual
[x] Cancel search | Manufacturer: INFINITI, Model Year: 2007, Model line: QX56, Model: INFINITI QX56 2007Pages: 3061, PDF Size: 64.56 MB
Page 916 of 3061

BR-18
< SERVICE INFORMATION >
FRONT DISC BRAKE
FRONT DISC BRAKE
On-vehicle InspectionINFOID:0000000003532738
PAD WEAR INSPECTION
• Inspect the thickness of pad through cylinder body inspection hole.
Use a scale for inspection if necessary. Refer to BR-30, "
Front Disc
Brake".
ComponentINFOID:0000000003532739
BRA0010D
1. Upper sliding pin 2. Sliding pin boot 3. Torque member bolt
4. Torque member 5. Piston seal 6. Piston
7. Inner pad 8. Pad retainer 9. Outer pad
10. Piston boot 11. Union bolt 12. Copper washer
13. Sliding pin bolt 14. Bleed valve 15. Cylinder body
16. Cap 17. Brake hose 18. Lower sliding pin
19. Outer shim 20. Inner shim A. Wear indicator
WFIA0451E
Page 917 of 3061

FRONT DISC BRAKE
BR-19
< SERVICE INFORMATION >
C
D
E
G
H
I
J
K
L
MA
B
BR
N
O
P
WARNING:
Clean dust on cylinder body and brake pads with a vacuum dust collector to minimize the hazard of
airborne particles or other materials.
CAUTION:
• While removing cylinder body never depress brake pedal because piston will pop out.
• It is not necessary to remove bolts on torque member and brake hose except for disassembly or
replacement of cylinder body. In this case, hang cylinder body with a wire so as not to stretch brake
hose.
• Do not damage piston boot.
• Burnish brake contact surface after refinishing or replacing rotors, after replacing pads, or if a soft
pedal occurs at very low mileage. Refer to BR-20, "
Disassembly and Assembly of Brake Caliper".
Removal and Installation of Brake PadINFOID:0000000003532740
REMOVAL
1. Remove tires from vehicle using power tool.
2. Remove lower sliding pin bolt.
3. Suspend cylinder body with a wire and remove pads, shims and pad retainers from torque member.
INSTALLATION
1. Push pistons in so that pad is firmly installed and mount cylinder body to torque member.
CAUTION:
By pushing in piston, brake fluid returns to master cylinder reservoir tank. Watch the level of the
surface of reservoir tank.
NOTE:
Using a disc brake piston tool (commercial service tool), makes it easier to push in piston.
2. Attach pad retainers, pads and shims to torque member.
• Apply Molykote M-77 grease to pad retainer where brake pad
contacts and between pad and shim.
CAUTION:
• When attaching pad retainer, attach it firmly so that it is
seated fully in the torque member as shown.
• Do not get grease on the brake rotor friction surface.
3. Install lower sliding pin bolt and tighten it to the specified torque. Refer to BR-18, "
Component" .
4. Check brake for drag.
5. Install tires to the vehicle. Refer to WT-7, "
Rotation".
Removal and Installation of Brake Caliper and Disc RotorINFOID:0000000003532741
REMOVAL
1. Remove tires from vehicle using power tool.
2. Drain brake fluid as necessary. Refer to BR-8, "
Drain and Refill".
NOTE:
Do not remove union bolt unless removing cylinder body from vehicle.
3. Remove torque member bolts.
NOTE:
Position cylinder body aside using suitable wire, as necessary.
NOTE:
When servicing cylinder body, remove sliding pin bolts and torque member from cylinder body.
B. Brake fluid M. Molykote M-77 grease R. Rubber grease
⇐Vehicle front
PFIA0273E
Page 918 of 3061

BR-20
< SERVICE INFORMATION >
FRONT DISC BRAKE
4. Remove disc rotor.
INSTALLATION
CAUTION:
• Refill with new brake fluid. Refer to MA-10
.
• Do not reuse drained brake fluid.
1. Install disc rotor.
2. Install sliding pin bolts and torque member to caliper, if removed. Refer to BR-18, "
Component" .
3. Install caliper assembly to the vehicle, then tighten the torque
member bolts to the specified torque. Refer to BR-18, "
Compo-
nent" .
CAUTION:
• When attaching caliper assembly to the vehicle, wipe any
oil off knuckle spindle, washers and caliper assembly
attachment surfaces.
• Do not reuse caliper torque member bolts.
4. Install brake hose to cylinder body, then tighten union bolt to
specification, as necessary. Refer to BR-18, "
Component" .
CAUTION:
• Do not reuse copper washer.
• Install brake hose to caliper assembly together with union
bolt and washers.
5. Refill with new brake fluid and bleed air. Refer to BR-8, "
Bleeding Brake System" .
6. Install tires to the vehicle. Refer to WT-7, "
Rotation" .
Disassembly and Assembly of Brake CaliperINFOID:0000000003532742
DISASSEMBLY
1. Remove sliding pin bolt, and then remove the pad, shim, shim cover, and pad retainer from the torque
member.
2. Remove sliding pins and sliding pin boots from torque member.
3. Place a wooden block as shown, and blow air from union bolt
mounting hole to remove pistons and piston boots.
CAUTION:
Keep hands away from piston.
LFIA0209E
LFIA0214E
BRB0032D
Page 919 of 3061

FRONT DISC BRAKE
BR-21
< SERVICE INFORMATION >
C
D
E
G
H
I
J
K
L
MA
B
BR
N
O
P
4. Using a flat-bladed screwdriver, remove piston seal from cylin-
der body.
CAUTION:
Be careful not to damage cylinder inner wall.
CALIPER INSPECTION
Cylinder Body
CAUTION:
• Use new brake fluid for cleaning. Do not use mineral oils such as gasoline or kerosene. Refer to MA-
10.
• Check inside surface of cylinder body for score, rust, wear, damage or foreign materials. If any of the
above conditions are observed, replace cylinder body.
• Minor damage from rust or foreign materials may be eliminated by polishing surface with a fine
emery paper. Replace cylinder body if necessary.
Torque Member
Check for wear, cracks, and damage. If damage or deformation is present, replace the affected part.
Piston
Check piston for score, rust, wear, damage or presence of foreign materials. Replace if any of the above con-
ditions are observed.
CAUTION:
Piston sliding surface is plated, do not polish with emery paper even if rust or foreign materials are
stuck to sliding surface.
Sliding Pins, and Sliding Pin Boots
Check sliding pin and sliding pin boot for wear, damage, and cracks. If damage or deformation is present,
replace the affected part.
CAUTION:
Trailing/upper sliding pin must be replaced at each service.
ASSEMBLY
CAUTION:
Do not use NISSAN Rubber Grease (KRE00 00010, KRE00 00010 01) when assembling.
1. Apply clean brake fluid to new piston seal and insert seal in to
groove on cylinder body.
CAUTION:
Do not reuse piston seal.
SFIA0141E
SFIA2399E
Page 920 of 3061

BR-22
< SERVICE INFORMATION >
FRONT DISC BRAKE
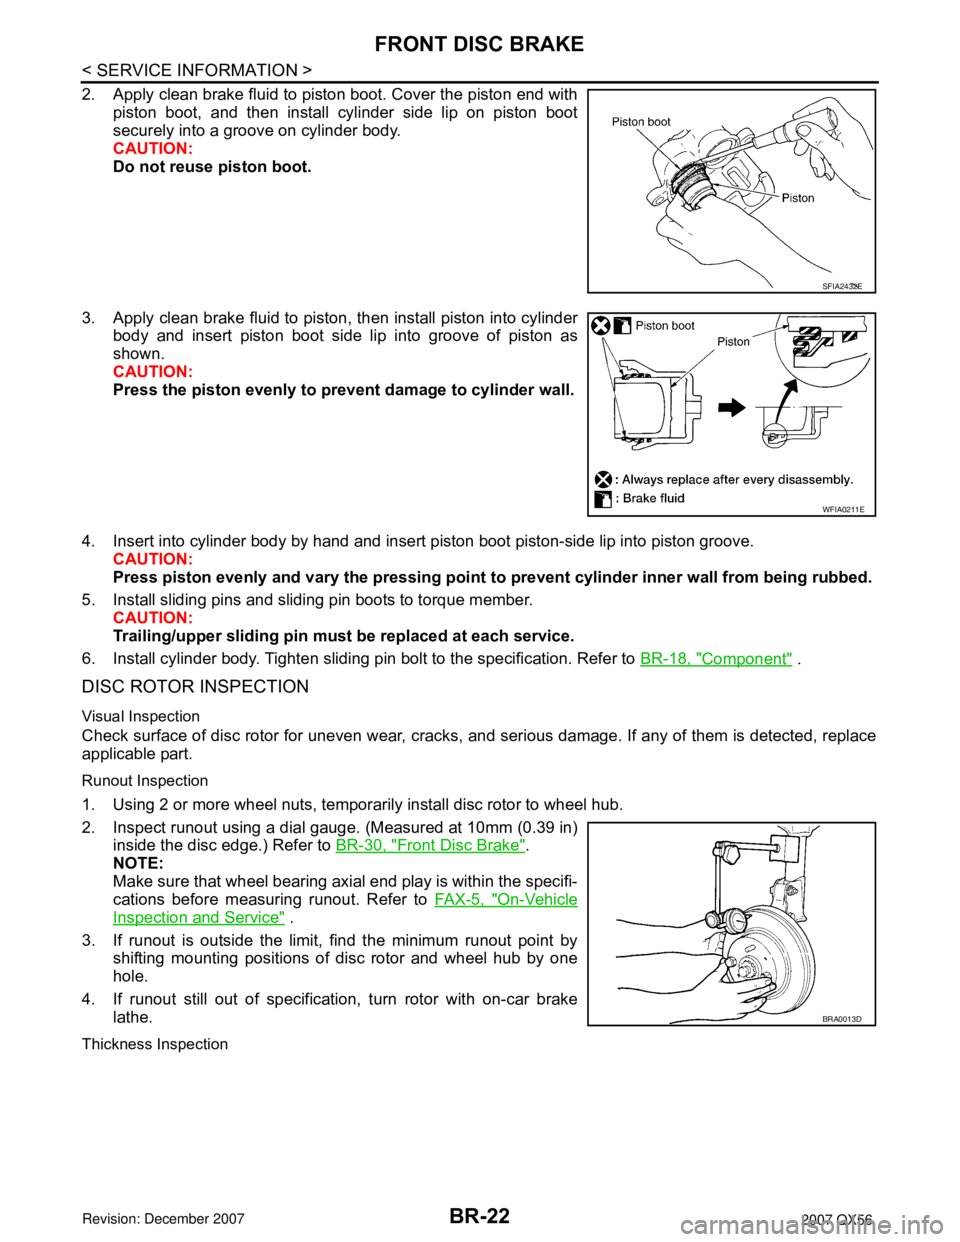
2. Apply clean brake fluid to piston boot. Cover the piston end with
piston boot, and then install cylinder side lip on piston boot
securely into a groove on cylinder body.
CAUTION:
Do not reuse piston boot.
3. Apply clean brake fluid to piston, then install piston into cylinder
body and insert piston boot side lip into groove of piston as
shown.
CAUTION:
Press the piston evenly to prevent damage to cylinder wall.
4. Insert into cylinder body by hand and insert piston boot piston-side lip into piston groove.
CAUTION:
Press piston evenly and vary the pressing point to prevent cylinder inner wall from being rubbed.
5. Install sliding pins and sliding pin boots to torque member.
CAUTION:
Trailing/upper sliding pin must be replaced at each service.
6. Install cylinder body. Tighten sliding pin bolt to the specification. Refer to BR-18, "
Component" .
DISC ROTOR INSPECTION
Visual Inspection
Check surface of disc rotor for uneven wear, cracks, and serious damage. If any of them is detected, replace
applicable part.
Runout Inspection
1. Using 2 or more wheel nuts, temporarily install disc rotor to wheel hub.
2. Inspect runout using a dial gauge. (Measured at 10mm (0.39 in)
inside the disc edge.) Refer to BR-30, "
Front Disc Brake".
NOTE:
Make sure that wheel bearing axial end play is within the specifi-
cations before measuring runout. Refer to FAX-5, "
On-Vehicle
Inspection and Service" .
3. If runout is outside the limit, find the minimum runout point by
shifting mounting positions of disc rotor and wheel hub by one
hole.
4. If runout still out of specification, turn rotor with on-car brake
lathe.
Thickness Inspection
SFIA2432E
WFIA0211E
BRA0013D
Page 922 of 3061

BR-24
< SERVICE INFORMATION >
REAR DISC BRAKE
REAR DISC BRAKE
On-vehicle InspectionINFOID:0000000003532743
PAD WEAR INSPECTION
• Inspect the thickness of pad through cylinder body inspection hole.
Use a scale for inspection if necessary.
Exploded ViewINFOID:0000000003532744
Standard thickness : 12.13 mm (0.478 in)
Repair limit thickness : 1.0 mm (0.039 in)
BRA0010D
1. Union bolt 2. Brake hose 3. Copper washer
4. Cap 5. Bleed valve 6. Bolt
7. Cylinder body 8. Piston seal 9. Piston
10. Piston boot 11. Knuckle slide 12. Sliding sleeve boot
13. Sliding sleeve 14. Inner pad 15. Outer pad
(B) : Brake fluid (R) : Rubber grease (M) : Molykote M-77
⇐: Front
WFIA0453E
Page 923 of 3061

REAR DISC BRAKE
BR-25
< SERVICE INFORMATION >
C
D
E
G
H
I
J
K
L
MA
B
BR
N
O
P
WARNING:
Clean dust on caliper and brake pad with a vacuum dust collector to minimize the hazard of airborne
particles or other materials.
CAUTION:
• While removing cylinder body, never depress brake pedal because piston will pop out.
• It is not necessary to remove bolts on torque member and brake hose except for disassembly or
replacement of cylinder body. In this case, hang cylinder body with a wire so as not to stretch brake
hose.
• Do not damage piston boot.
• Burnish brake contact surface after refinishing or replacing rotors, after replacing pads, or it a soft
pedal occurs at very low mileage. Refer to BR-26, "
Brake Caliper" .
Removal and Installation of Brake PadINFOID:0000000003532745
REMOVAL
1. Remove tires from vehicle with power tool.
2. Remove the top bolt from the cylinder body.
3. Swing cylinder body open, and remove pads.
INSTALLATION
1. Push piston in so that pad is firmly attached and install cylinder body to torque member.
NOTE:
Using a disc brake piston tool (commercial service tool), makes it easier to push in the piston.
CAUTION:
By pushing in piston, brake fluid returns to master cylinder reservoir tank. Watch the level of the
surface of reservoir tank.
2. Apply Molykote M-77 grease to knuckle slide where brake pad contacts.
CAUTION:
Do not get grease on the brake rotor friction surface.
3. Install pads to cylinder body.
4. Install cylinder body top bolt and tighten to specification.
5. Check brake for drag.
6. Install tires to the vehicle. Refer to WT-7, "
Rotation" .
Removal and Installation of Brake Caliper and Disc RotorINFOID:0000000003532746
REMOVAL
1. Remove tires from vehicle with power tool.
2. Drain brake fluid as necessary. Refer to BR-8, "
Drain and Refill" .
NOTE:
Do not remove union bolt unless removing cylinder body from vehicle.
3. Remove mounting bolts and cylinder body.
NOTE:
Position cylinder body aside using suitable wire, as necessary.
4. Remove disc rotor.
INSTALLATION
CAUTION:
• Refill with new brake fluid. Refer to MA-10
.
• Do not reuse drained brake fluid.
1. Install disc rotor.
LFIA0211E
Page 924 of 3061

BR-26
< SERVICE INFORMATION >
REAR DISC BRAKE
2. Install cylinder body and tighten bolts to specification. Refer to BR-24, "Exploded View" .
CAUTION:
Before installing cylinder body to the vehicle, wipe off mating surface of cylinder body.
3. Install brake hose to cylinder body and tighten union bolt to specification as necessary. Refer to BR-24,
"Exploded View".
CAUTION:
• Do not reuse copper washers.
• Securely attach brake hose to protrusion on cylinder body.
4. Refill new brake fluid and bleed air as necessary. Refer to BR-8, "
Bleeding Brake System" .
5. Install tires to the vehicle. Refer to WT-7, "
Rotation" .
Brake CaliperINFOID:0000000003532747
DISASSEMBLY
1. Remove pads from cylinder body.
2. Remove sliding sleeve and boot from cylinder body.
3. Place a wooden block as shown, and blow air into union bolt
hole to remove piston and piston boot.
CAUTION:
Do not get your fingers caught in piston.
4. Using a suitable tool, remove piston seal from cylinder body as
shown.
CAUTION:
Be careful not to damage cylinder body inner wall.
CALIPER INSPECTION
Cylinder Body
CAUTION:
• Use new brake fluid to clean. Do not use mineral oils such as gasoline or kerosene. Refer to MA-10
.
• Check inside surface of cylinder body for score, rust wear, damage or foreign materials. If any of the
above conditions are observed, replace cylinder body.
• Minor damage from rust or foreign materials may be eliminated by polishing surface with a fine
emery paper. Replace cylinder body if necessary.
Torque Member
Check for wear, cracks, and damage. If damage or deformation is present, replace the affected part.
Piston
CAUTION:
• Piston sliding surface is plated, do not polish with emery paper even if rust of foreign materials are
stuck to sliding surface.
• Check piston for score, rust, wear, damage or presence of foreign materials. Replace if any of the
above conditions are observed.
Sliding Pin Bolts and Sliding Pin Boots
BRD0041D
PFIA0269E
Page 925 of 3061

REAR DISC BRAKE
BR-27
< SERVICE INFORMATION >
C
D
E
G
H
I
J
K
L
MA
B
BR
N
O
P
Make sure there is no wear, damage, or cracks in sliding sleeve and sliding sleeve boots, and if there are,
replace them.
ASSEMBLY
CAUTION:
Do not use NISSAN Rubber Grease (KRE00 00010, KRE00 00010 01) when assembling.
1. Apply clean brake fluid to new piston seal and insert in to
groove on cylinder body. Refer to MA-10
.
CAUTION:
Do not reuse piston seal.
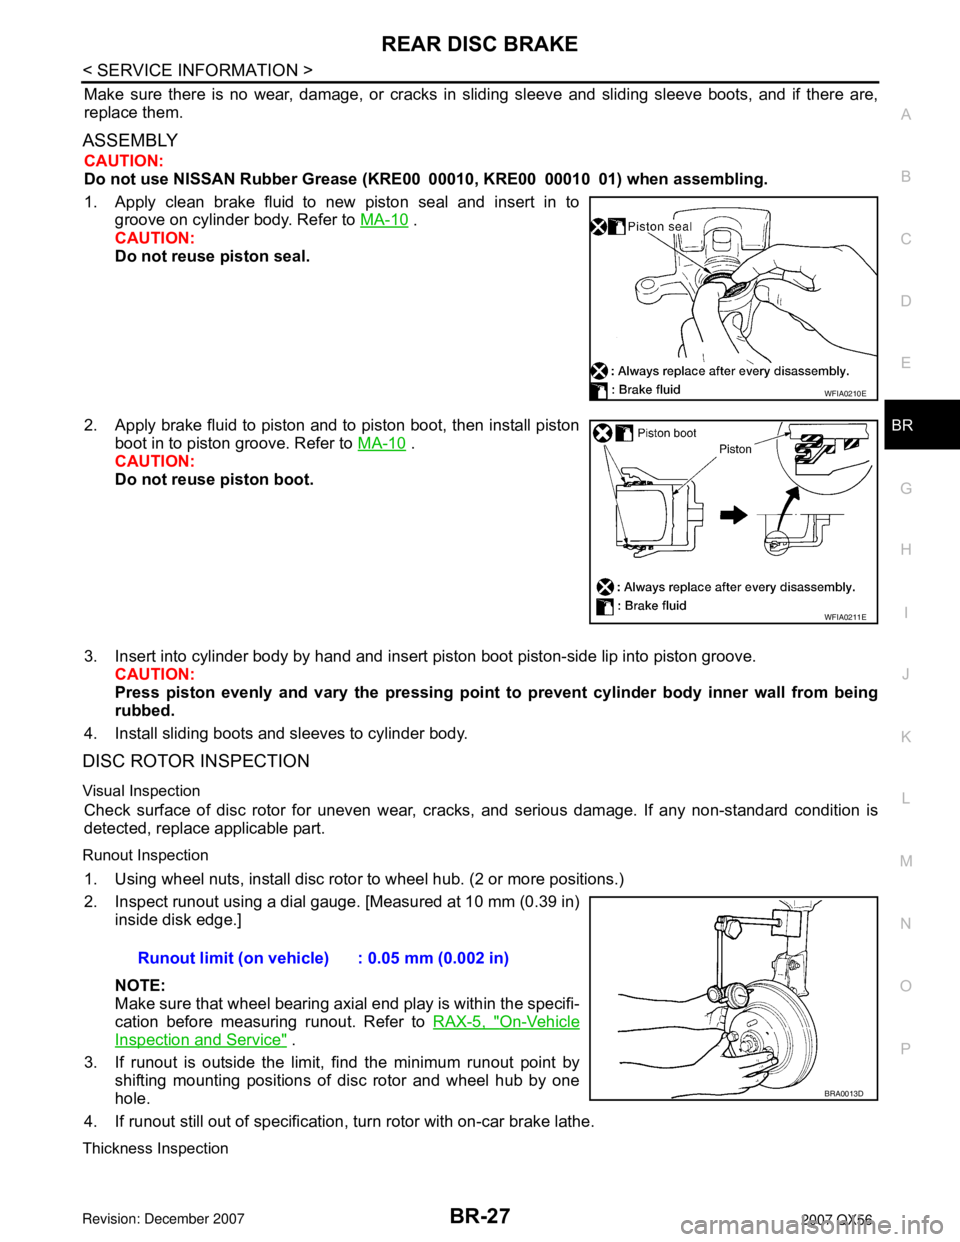
2. Apply brake fluid to piston and to piston boot, then install piston
boot in to piston groove. Refer to MA-10
.
CAUTION:
Do not reuse piston boot.
3. Insert into cylinder body by hand and insert piston boot piston-side lip into piston groove.
CAUTION:
Press piston evenly and vary the pressing point to prevent cylinder body inner wall from being
rubbed.
4. Install sliding boots and sleeves to cylinder body.
DISC ROTOR INSPECTION
Visual Inspection
Check surface of disc rotor for uneven wear, cracks, and serious damage. If any non-standard condition is
detected, replace applicable part.
Runout Inspection
1. Using wheel nuts, install disc rotor to wheel hub. (2 or more positions.)
2. Inspect runout using a dial gauge. [Measured at 10 mm (0.39 in)
inside disk edge.]
NOTE:
Make sure that wheel bearing axial end play is within the specifi-
cation before measuring runout. Refer to RAX-5, "
On-Vehicle
Inspection and Service" .
3. If runout is outside the limit, find the minimum runout point by
shifting mounting positions of disc rotor and wheel hub by one
hole.
4. If runout still out of specification, turn rotor with on-car brake lathe.
Thickness Inspection
WFIA0210E
WFIA0211E
Runout limit (on vehicle) : 0.05 mm (0.002 in)
BRA0013D
Page 1889 of 3061

PREPARATION
FAX-3
< SERVICE INFORMATION >
C
E
F
G
H
I
J
K
L
MA
B
FA X
N
O
P
PREPARATION
Special Service ToolINFOID:0000000003532611
The actual shapes of Kent-Moore tools may differ from those of special service tools illustrated here.
Commercial Service ToolINFOID:0000000003532612
Tool number
(Kent-Moore No.)
Tool nameDescription
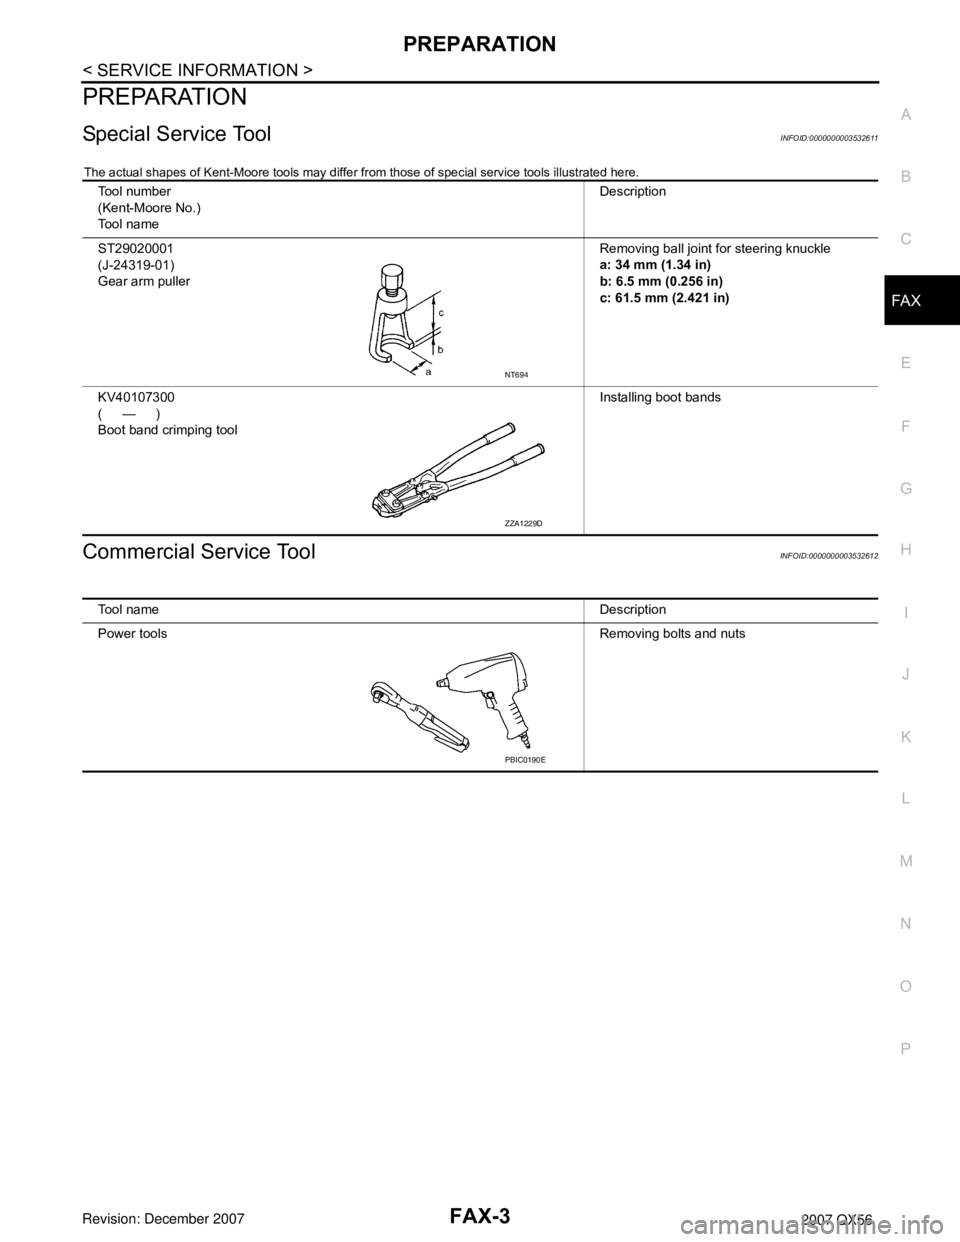
ST29020001
(J-24319-01)
Gear arm pullerRemoving ball joint for steering knuckle
a: 34 mm (1.34 in)
b: 6.5 mm (0.256 in)
c: 61.5 mm (2.421 in)
KV40107300
(—)
Boot band crimping toolInstalling boot bands
NT694
ZZA1229D
Tool nameDescription
Power toolsRemoving bolts and nuts
PBIC0190E