engine oil INFINITI QX56 2007 Factory Workshop Manual
[x] Cancel search | Manufacturer: INFINITI, Model Year: 2007, Model line: QX56, Model: INFINITI QX56 2007Pages: 3061, PDF Size: 64.56 MB
Page 992 of 3061

PRECAUTIONS
CO-3
< SERVICE INFORMATION >
C
D
E
F
G
H
I
J
K
L
MA
CO
N
P O
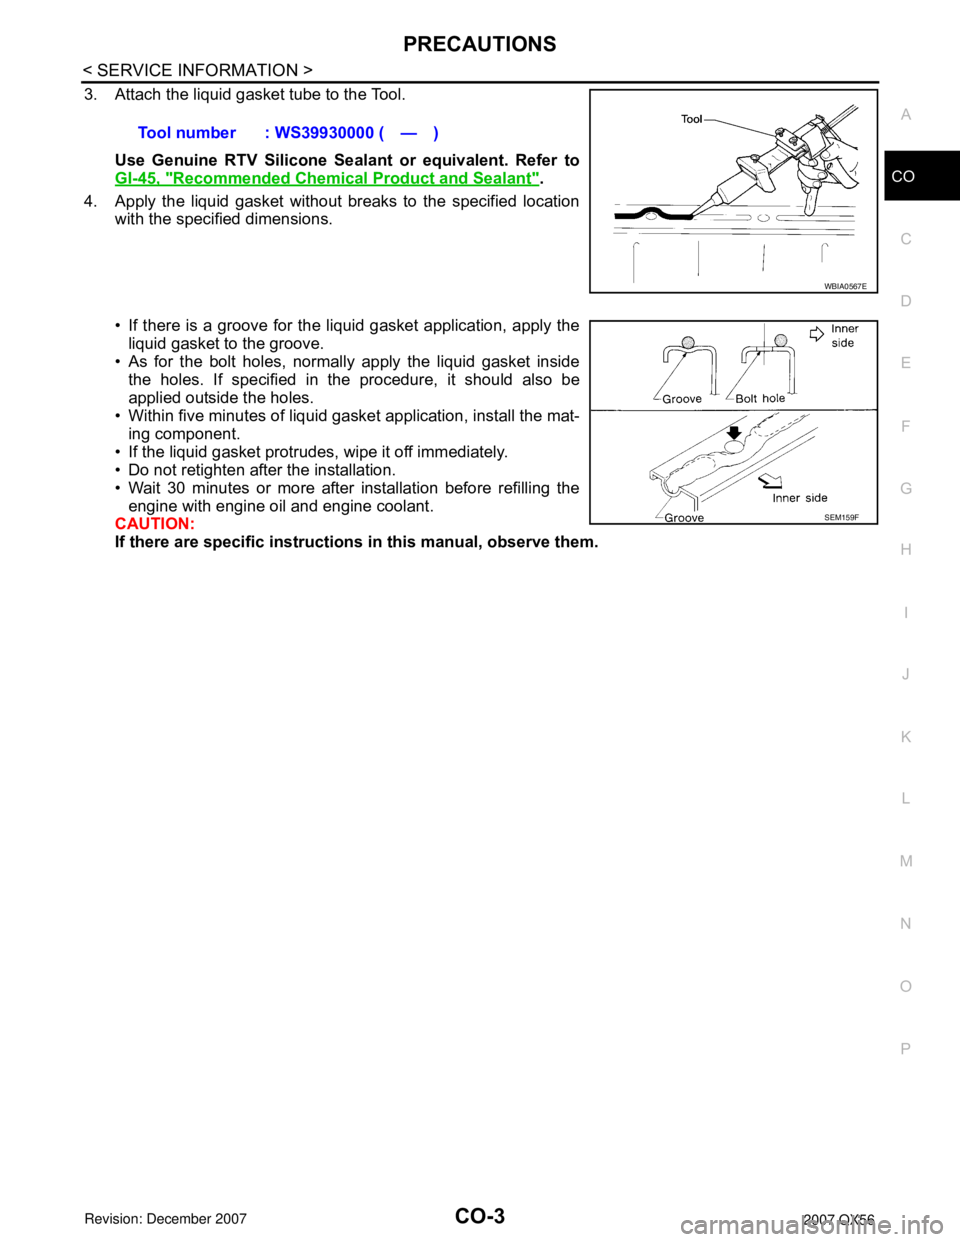
3. Attach the liquid gasket tube to the Tool.
Use Genuine RTV Silicone Sealant or equivalent. Refer to
GI-45, "
Recommended Chemical Product and Sealant".
4. Apply the liquid gasket without breaks to the specified location
with the specified dimensions.
• If there is a groove for the liquid gasket application, apply the
liquid gasket to the groove.
• As for the bolt holes, normally apply the liquid gasket inside
the holes. If specified in the procedure, it should also be
applied outside the holes.
• Within five minutes of liquid gasket application, install the mat-
ing component.
• If the liquid gasket protrudes, wipe it off immediately.
• Do not retighten after the installation.
• Wait 30 minutes or more after installation before refilling the
engine with engine oil and engine coolant.
CAUTION:
If there are specific instructions in this manual, observe them. Tool number : WS39930000 ( — )
WBIA0567E
SEM159F
Page 993 of 3061

CO-4
< SERVICE INFORMATION >
PREPARATION
PREPARATION
Special Service ToolINFOID:0000000003531564
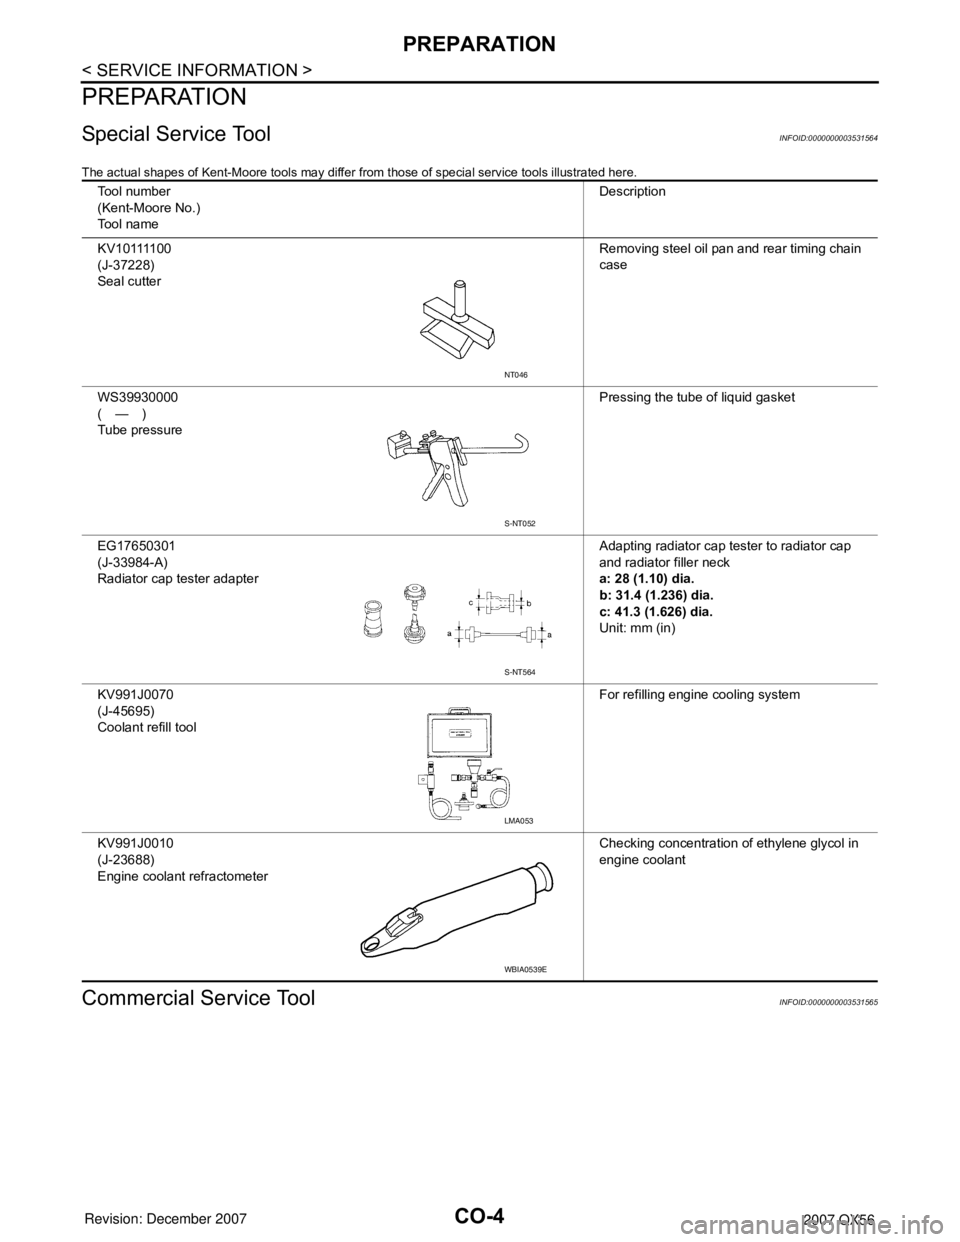
The actual shapes of Kent-Moore tools may differ from those of special service tools illustrated here.
Commercial Service ToolINFOID:0000000003531565
Tool number
(Kent-Moore No.)
Tool nameDescription
K V 1 0 1111 0 0
(J-37228)
Seal cutterRemoving steel oil pan and rear timing chain
case
WS39930000
(—)
Tube pressurePressing the tube of liquid gasket
EG17650301
(J-33984-A)
Radiator cap tester adapterAdapting radiator cap tester to radiator cap
and radiator filler neck
a: 28 (1.10) dia.
b: 31.4 (1.236) dia.
c: 41.3 (1.626) dia.
Unit: mm (in)
KV991J0070
(J-45695)
Coolant refill toolFor refilling engine cooling system
KV991J0010
(J-23688)
Engine coolant refractometerChecking concentration of ethylene glycol in
engine coolant
NT046
S-NT052
S-NT564
LMA053
WBIA0539E
Page 999 of 3061

CO-10
< SERVICE INFORMATION >
ENGINE COOLANT
• Wrap a thick cloth around the cap to carefully remove the cap. First, turn the cap a quarter of a turn
to release any built-up pressure, then push down and turn the cap all the way to remove it.
DRAINING ENGINE COOLANT
1. Turn ignition switch ON and set temperature control lever all the way to HOT position or the highest tem-
perature position. Wait 10 seconds and turn ignition switch OFF.
2. Remove the engine front undercover using power tool.
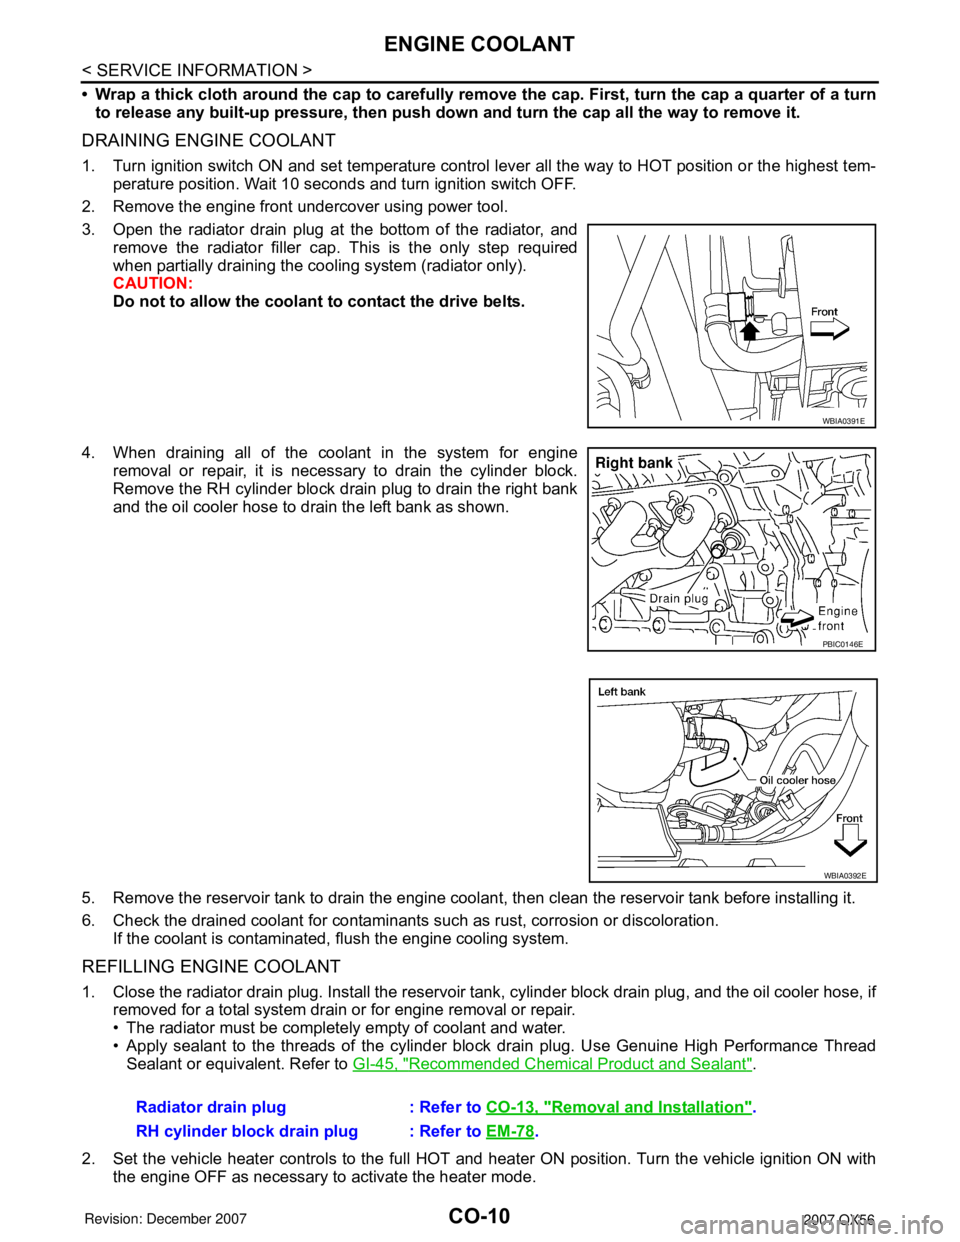
3. Open the radiator drain plug at the bottom of the radiator, and
remove the radiator filler cap. This is the only step required
when partially draining the cooling system (radiator only).
CAUTION:
Do not to allow the coolant to contact the drive belts.
4. When draining all of the coolant in the system for engine
removal or repair, it is necessary to drain the cylinder block.
Remove the RH cylinder block drain plug to drain the right bank
and the oil cooler hose to drain the left bank as shown.
5. Remove the reservoir tank to drain the engine coolant, then clean the reservoir tank before installing it.
6. Check the drained coolant for contaminants such as rust, corrosion or discoloration.
If the coolant is contaminated, flush the engine cooling system.
REFILLING ENGINE COOLANT
1. Close the radiator drain plug. Install the reservoir tank, cylinder block drain plug, and the oil cooler hose, if
removed for a total system drain or for engine removal or repair.
• The radiator must be completely empty of coolant and water.
• Apply sealant to the threads of the cylinder block drain plug. Use Genuine High Performance Thread
Sealant or equivalent. Refer to GI-45, "
Recommended Chemical Product and Sealant".
2. Set the vehicle heater controls to the full HOT and heater ON position. Turn the vehicle ignition ON with
the engine OFF as necessary to activate the heater mode.
WBIA0391E
PBIC0146E
WBIA0392E
Radiator drain plug : Refer to CO-13, "Removal and Installation".
RH cylinder block drain plug : Refer to EM-78
.
Page 1005 of 3061

CO-16
< SERVICE INFORMATION >
ENGINE COOLING FAN
ENGINE COOLING FAN
Removal and Installation (Crankshaft Driven Type)INFOID:0000000003531573
REMOVAL
1. Remove the air duct and resonator assembly. Refer to EM-15, "Removal and Installation".
2. Remove the engine front undercover using power tool.
3. Remove the lower radiator shroud. Refer to CO-13, "
Removal and Installation".
4. Remove the drive belt. Refer to EM-13, "
Removal and Installation".
5. Remove the cooling fan.
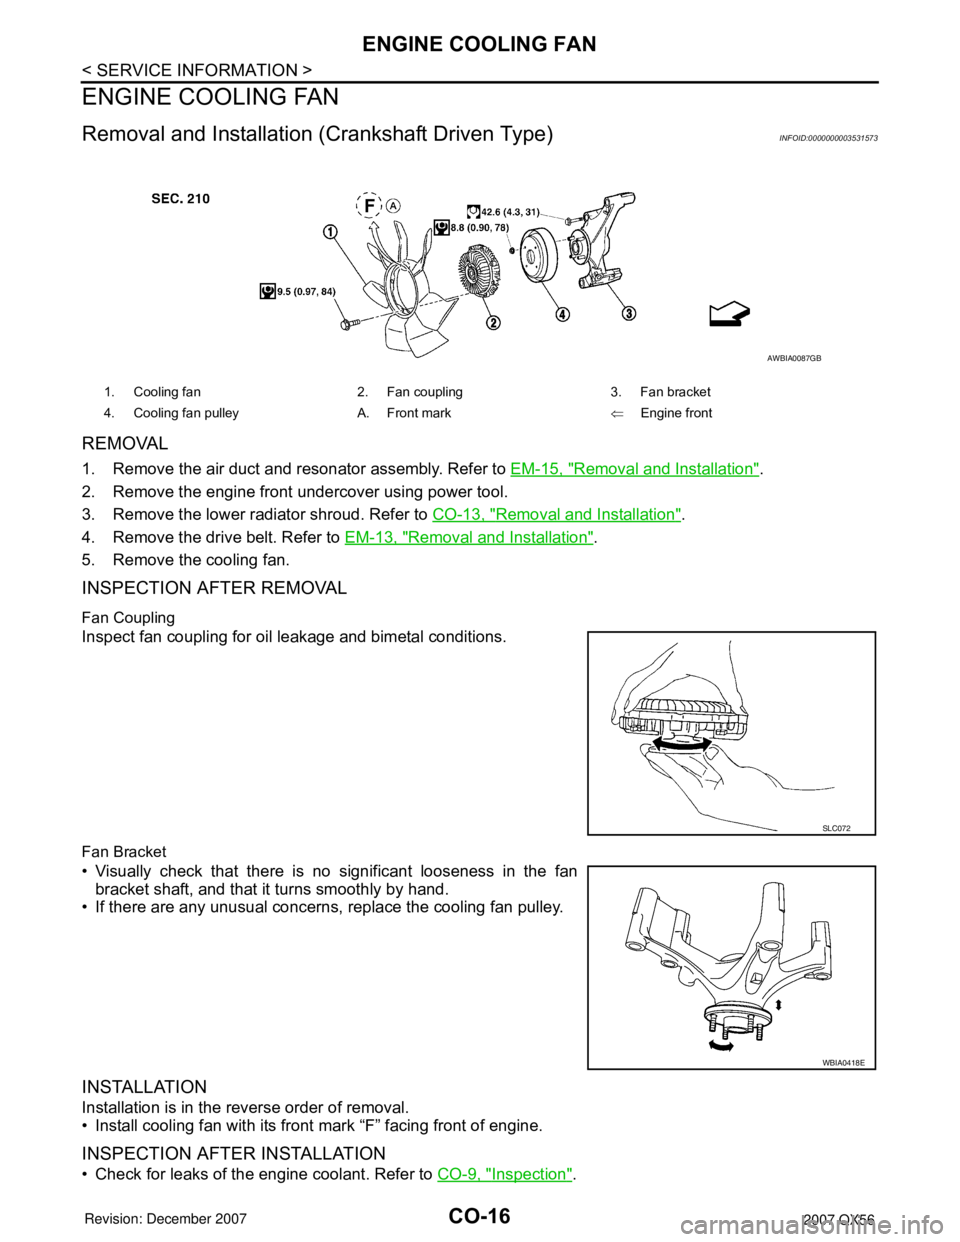
INSPECTION AFTER REMOVAL
Fan Coupling
Inspect fan coupling for oil leakage and bimetal conditions.
Fan Bracket
• Visually check that there is no significant looseness in the fan
bracket shaft, and that it turns smoothly by hand.
• If there are any unusual concerns, replace the cooling fan pulley.
INSTALLATION
Installation is in the reverse order of removal.
• Install cooling fan with its front mark “F” facing front of engine.
INSPECTION AFTER INSTALLATION
• Check for leaks of the engine coolant. Refer to CO-9, "Inspection".
1. Cooling fan 2. Fan coupling 3. Fan bracket
4. Cooling fan pulley A. Front mark⇐Engine front
AWBIA0087GB
SLC072
WBIA0418E
Page 1012 of 3061

DI-1
ELECTRICAL
C
DE
F
G H
I
J
L
M
SECTION DI
A
B
DI
N
O P
CONTENTS
DRIVER INFORMATION SYSTEM
SERVICE INFORMATION .. ..........................3
PRECAUTION ................................................ .....3
Precaution for Supplemental Restraint System
(SRS) "AIR BAG" and "SEAT BELT PRE-TEN-
SIONER" ............................................................. ......
3
PREPARATION ...................................................4
Commercial Service Tool .................................... ......4
COMBINATION METERS ...................................5
Component Parts and Harness Connector Loca-
tion ...................................................................... ......
5
System Description ...................................................5
Arrangement of Combination Meter ..........................7
Internal Circuit ...........................................................8
Wiring Diagram - METER - .......................................9
Combination Meter Harness Connector Terminal
Layout .....................................................................
11
Terminal and Reference Value for Combination
Meter .......................................................................
11
Self-Diagnosis Mode of Combination Meter ........ ....12
How to Proceed with Trouble Diagnosis ............. ....15
Preliminary Check ...................................................15
Symptom Chart .......................................................16
Power Supply and Ground Circuit Inspection .........16
Vehicle Speed Signal Inspection .............................17
Engine Oil Pressure Signal Inspection ....................17
Water Temperature Signal Inspection .....................18
Engine Speed Signal Inspection ......................... ....18
Fuel Level Sensor Unit Inspection ...................... ....18
Fuel Gauge Fluctuates, Indicates Wrong Value, or
Varies .................................................................. ....
20
Fuel Gauge Does Not Move to Full-position ...........20
Electrical Component Inspection ......................... ....21
Removal and Installation of Combination Meter .....21
COMPASS AND THERMOMETER ................ ....22
System Description ............................................. ....22
Wiring Diagram - COMPAS - ..................................23
Trouble Diagnosis ............................................... ....23
Calibration Procedure for Compass .................... ....24
WARNING LAMPS ............................................26
Schematic ............................................................ ....26
Wiring Diagram - WARN - .......................................27
Oil Pressure Warning Lamp Stays Off (Ignition
Switch ON) .......................................................... ....
32
Oil Pressure Warning Lamp Does Not Turn Off
(Oil Pressure Is Normal) ...................................... ....
33
A/T INDICATOR ................................................34
Wiring Diagram - AT/IND - .......................................34
A/T Indicator Does Not Illuminate ............................34
WARNING CHIME .............................................36
Component Parts and Harness Connector Loca-
tion ....................................................................... ....
36
System Description ..................................................36
CAN Communication System Description ...............37
Wiring Diagram - CHIME - .......................................38
Terminal and Reference Value for BCM ..................39
Terminal and Reference Value for Combination
Meter ................................................................... ....
39
How to Proceed with Trouble Diagnosis ..................40
Preliminary Check ............................................... ....40
CONSULT-II Function (BCM) ..................................40
All Warning Chimes Do Not Operate .......................41
Key Warning Chime and Light Warning Chime Do
Not Operate (Seat Belt Warning Chime Does Op-
erate) .......................................................................
41
Key Warning Chime Does Not Operate ...................42
Light Warning Chime Does Not Operate .................44
Seat Belt Warning Chime Does Not Operate ..........44
REAR SONAR SYSTEM ...................................46
Component Parts and Harness Connector Loca-
tion ....................................................................... ....
46
System Description ..................................................46
Wiring Diagram - SONAR - ......................................48
Sonar Control Unit Harness Connector Terminal
Layout ......................................................................
50
Page 1017 of 3061
![INFINITI QX56 2007 Factory Workshop Manual
DI-6
< SERVICE INFORMATION >
COMBINATION METERS
POWER SUPPLY AND GROUND CIRCUIT
Power is supplied at all times
• through 10A fuse [No.19, located in the fuse block (J/B)]
• to combination meter t INFINITI QX56 2007 Factory Workshop Manual
DI-6
< SERVICE INFORMATION >
COMBINATION METERS
POWER SUPPLY AND GROUND CIRCUIT
Power is supplied at all times
• through 10A fuse [No.19, located in the fuse block (J/B)]
• to combination meter t](/img/42/57029/w960_57029-1016.png)
DI-6
< SERVICE INFORMATION >
COMBINATION METERS
POWER SUPPLY AND GROUND CIRCUIT
Power is supplied at all times
• through 10A fuse [No.19, located in the fuse block (J/B)]
• to combination meter terminal 8.
With the ignition switch in the ON or START position, power is supplied
• through 10A fuse [No.14, located in the fuse block (J/B)]
• to combination meter terminal 24.
Ground is supplied
• to combination meter terminal 17
• through body grounds M57, M61 and M79.
WATER TEMPERATURE GAUGE
The water temperature gauge indicates the engine coolant temperature.
ECM provides an engine coolant temperature signal to combination meter via CAN communication lines.
ENGINE OIL PRESSURE GAUGE
The engine oil pressure gauge indicates whether the engine oil pressure is low or normal.
The oil pressure gauge is controlled by the IPDM E/R (intelligent power distribution module engine room). Low
oil pressure causes oil pressure switch terminal 1 to provide ground to IPDM E/R terminal 42. The IPDM E/R
then signals the combination meter (unified meter control unit) via CAN communication lines and a low oil
pressure indication is displayed by the oil pressure gauge.
A/T OIL TEMPERATURE GAUGE
The A/T oil temperature gauge indicates the A/T fluid temperature.
TCM (transmission control module) provides an A/T flui d temperature signal to combination meter via CAN
communication lines.
VOLTAGE GAUGE
The voltage gauge indicates the battery/charging system voltage.
The voltage gauge is regulated by the unified meter control unit.
TA C H O M E T E R
The tachometer indicates engine speed in revolutions per minute (rpm).
ECM provides an engine speed signal to combination meter via CAN communication lines.
FUEL GAUGE
The fuel gauge indicates the approximate fuel level in the fuel tank.
The fuel gauge is regulated by the unified meter control unit and a variable resistor signal supplied
• to combination meter terminal 15.
• through fuel level sensor unit and fuel pump terminal 2
• through fuel level sensor unit and fuel pump terminal 5
• from combination meter terminal 16
SPEEDOMETER
ABS actuator and electric unit (contro l unit) provides a vehicle speed signal to the combination meter via CAN
communication lines.
ODO/TRIP METER
The vehicle speed signal and the memory signals from the meter memory circuit are processed by the combi-
nation meter and the mileage is displayed.
How to Change the Display
Refer to Owner's Manual for odo/tr ip meter operating instructions.
CAN COMMUNICATION SYSTEM DESCRIPTION
Refer to LAN-4.
Page 1024 of 3061

COMBINATION METERSDI-13
< SERVICE INFORMATION >
C
DE
F
G H
I
J
L
M A
B
DI
N
O P
Next test requested EprXX Displays 8-bit software
configuration value in Hex
format.Bit Coding
7-2 = reserved for future use
1 = A/T Oil Temp (gauge)
0 = not present
1 = present
1 = Odo Units 0 = kilometers
1 = miles
Next test requested 1nFXX Displays 8-bit market info
value in Hex format.$31 = USA
$2A = Canada
Next test requested cYLXX Displays 8-bit engine con-
figuration value in Hex for-
mat.$08 = 8 cylinder
$06 = 6 cylinder
Next test requested bulb Illuminates all micro-con-
trolled lamps/LEDs re-
gardless of SW
configuration.
Next test requested D-HI Meter/LCD Illumination.
Next test requested (All segments illuminated) Lights all odometer/trip
meter, fuel, and engine
temperature display seg-
ments.Full daytime brightness all LCD
segments active
Next test requested N-HI Meter/LCD Illumination.
Next test requested (All segments illuminated) Lights all odometer/trip
meter, fuel, and engine
temperature display seg-
ments.Full nighttime brightness all
LCD segments active
Next test requested N-LO Meter/LCD Illumination.
Next test requested (All segments illuminated) Lights all odometer/trip
meter, fuel, and engine
temperature display seg-
ments.Min. nighttime brightness all
LCD segments active
Next test requested dS XX Current dimming step. 1-21
Next test requested EE XX, FAIL Hex EE level. If EE check-
sum fault exists, display
alternates between "EE
XX" and "FAIL".
Next test requested dtXXXX Hex coding of final manu-
facturing test date.
Next test requested GAGE Performs sweep of all
gauges, then displays
present gauge values.
Performs checksum tests
on ROM and EE.Gauges sweep within 10 sec-
onds
Next test requested FFXXXX Displays 16-bit fuel flow
constant "Q" in tenths of
cc/min in Hex format.$0000 - $FFFF
Next test requested tF Displays 16-bit tire factor
"A" in hundredths in Hex
format.$0000 - $FFFF
Next test requested oP Current oil pressure value
in A/D counts in hex for-
mat.
$00 - $FF
Next test requested ot1XX Displays oil pressure tell-
tale "on" threshold in A/D
counts in Hex format.$00 - $FF
Event Odometer Display Description of Test/Data Notes:
Page 1027 of 3061

DI-16
< SERVICE INFORMATION >
COMBINATION METERS
Perform self-diagnosis mode of combination meter. Refer to DI-12, "Self-Diagnosis Mode of Combination
Meter".
Does self-diagnosis mode operate normally?
YES >> GO TO 3.
NO >> Check combination meter power supply and ground circuit. Refer to DI-16, "
Power Supply and
Ground Circuit Inspection".
3.CHECK ODOMETER OPERATION
Check segment display status of odometer.
Is the display normal?
YES >> GO TO 4.
NO >> Replace the combination meter. Refer to IP-10,
"Removal and Installation".
4.CHECK COMBINATION METER CIRCUIT
Check indication of each meter/gauge in self-diagnosis mode.
OK or NG
OK >> Go to DI-16, "Symptom Chart".
NG >> Replace the combination meter. Refer to IP-10,
"Removal and Installation".
Symptom ChartINFOID:0000000003533489
Power Supply and Ground Circuit InspectionINFOID:0000000003533490
1.CHECK FUSES
Check for blown combination meter fuses.
WKIA1531E
WKIA1814E
Trouble phenomenon Possible cause
Improper tachometer indication. Refer to DI-18, "
Engine Speed Signal Inspection".
Improper water temperature gauge indication. Refer to DI-18, "
Water Temperature Signal Inspection".
Improper speedometer or odometer. Refer to DI-17, "
Vehicle Speed Signal Inspection".
Improper fuel gauge indication. Refer to DI-18, "
Fuel Level Sensor Unit Inspection".
Fuel warning lamp indication is irregular.
Improper A/T oil temperature gauge indication Refer to AT- 11 9
.
Improper voltage gauge indication Replace combination meter. Refer to IP-10, "
Removal and Instal-
lation".
More than one gauge does not give proper indication.
Improper A/T position indication. Refer to DI-34
.
Illumination control does not operate properly. Refer to LT- 1 2 0
.
Page 1028 of 3061

COMBINATION METERSDI-17
< SERVICE INFORMATION >
C
DE
F
G H
I
J
L
M A
B
DI
N
O P
Refer to DI-9, "Wiring Diagram - METER -".
OK or NG
OK >> GO TO 2.
NG >> If fuse is blown, be sure to eliminate caus e of malfunction before installing new fuse. Refer to PG-
3.
2.CHECK POWER SUPPLY CIRCUIT
1. Disconnect combination meter connector.
2. Check voltage between combination meter harness connector terminals and ground.
OK or NG
OK >> GO TO 3.
NG >> Check the harness for open between combination meter and fuse.
3.CHECK GROUND CIRCUIT
1. Turn ignition switch OFF.
2. Check continuity between combination meter harness connector terminal and ground.
OK or NG
OK >> Inspection End.
NG >> Repair harness or connector.
Vehicle Speed Signal InspectionINFOID:0000000003533491
1.CHECK ABS ACTUATOR AND ELECTRIC UNIT (CONTROL UNIT) SELF-DIAGNOSIS
Refer to BRC-26, "
CONSULT-II Function (ABS)".
OK or NG
OK >> Replace the combination meter. Refer to IP-10, "Removal and Installation".
NG >> Perform "Diagnostic Procedure" for displayed DTC. Refer to BRC-26, "
CONSULT-II Function
(ABS)".
Engine Oil Pressure Signal InspectionINFOID:0000000003533492
1.CHECK SELF-DIAGNOSTIC RESULTS OF IPDM E/R
Select "IPDM E/R" on CONSULT-II, and perform self-diagnosis of IPDM E/R. Refer to PG-18, "
CONSULT-II
Function (IPDM E/R)".
Unit Power source Fuse No.
Combination meter Battery 19
Ignition switch ON or START 14
Terminals Ignition switch position
(+) (–) OFF ACC ON
Connector Terminal
M24 8
Ground Battery
voltage Battery
voltage Battery
voltage
24 0V 0V Battery
voltage
WKIA5606E
Te r m i n a l s
Continuity
(+)
(–)
Connector Terminal
M24 17 Ground Yes
WKIA1526E
Page 1029 of 3061

DI-18
< SERVICE INFORMATION >
COMBINATION METERS
Self-diagnostic results content
No malfunction detected>>GO TO 2.
Malfunction detected>>GO TO PG-18, "
CONSULT-II Function (IPDM E/R)".
2.CHECK IPDM E/R INPUT SIGNAL
Select "IPDM E/R" on CONSULT-II. Operate ignition switch with "OIL
P SW" of "DATA MONITOR" and check operation status.
OK or NG
OK >> Replace combination meter. Refer to IP-10, "Removal
and Installation".
NG >> GO TO 3.
3.CHECK OIL PRESSURE SWITCH CIRCUIT
1. Turn ignition switch OFF.
2. Disconnect IPDM E/R connector E122 and oil pressure switch
connector F4.
3. Check continuity between IPDM E/R harness connector E122 (A) terminal 42 and oil pressure switch harness connector F4 (B)
terminal 1.
OK or NG
OK >> GO TO 4.
NG >> Repair harness or connector.
4.CHECK OIL PRESSURE SWITCH
Check oil pressure switch. Refer to DI-21, "
Electrical Component Inspection".
OK or NG
OK >> Replace IPDM E/R. Refer to PG-28, "Removal and Installation of IPDM E/R".
NG >> Replace oil pressure switch.
Water Temperature Signal InspectionINFOID:0000000003533493
1.CHECK ECM SELF-DIAGNOSIS
Perform ECM self-diagnosis. Refer to E C - 111 , "
CONSULT-II Function (ENGINE)".
OK or NG
OK >> Replace the combination meter. Refer to IP-10, "Removal and Installation".
NG >> Perform "Diagnostic procedure" for displayed DTC. Refer to EC-82
.
Engine Speed Signal InspectionINFOID:0000000003533494
1.CHECK ECM SELF-DIAGNOSIS
Perform ECM self-diagnosis. Refer to E C - 111 , "
CONSULT-II Function (ENGINE)".
OK or NG
OK >> Replace the combination meter. Refer to IP-10, "Removal and Installation".
NG >> Perform "Diagnostic procedure" for displayed DTC. Refer to EC-82
.
Fuel Level Sensor Unit InspectionINFOID:0000000003533495
FUEL LEVEL SENSOR UNIT
The following symptoms do not indicate a malfunction.When ignition switch is in ON
position (Engine stopped)
: OIL P SW CLOSE
When engine running : OIL P SW OPEN
LKIA0403E
Continuity should exist.
WKIA5607E