display INFINITI QX60 2020 Infiniti Connection
[x] Cancel search | Manufacturer: INFINITI, Model Year: 2020, Model line: QX60, Model: INFINITI QX60 2020Pages: 276, PDF Size: 1.17 MB
Page 60 of 276

3. Audio system
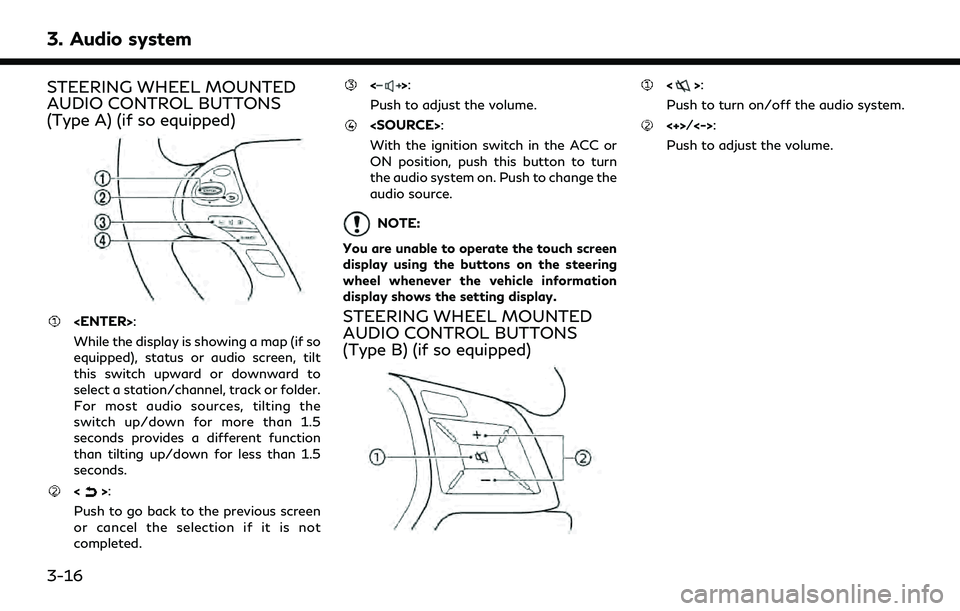
STEERING WHEEL MOUNTED
AUDIO CONTROL BUTTONS
(Type A) (if so equipped)
While the display is showing a map (if so
equipped), status or audio screen, tilt
this switch upward or downward to
select a station/channel, track or folder.
For most audio sources, tilting the
switch up/down for more than 1.5
seconds provides a different function
than tilting up/down for less than 1.5
seconds.
<>:
Push to go back to the previous screen
or cancel the selection if it is not
completed.
<>:
Push to adjust the volume.
With the ignition switch in the ACC or
ON position, push this button to turn
the audio system on. Push to change the
audio source.
NOTE:
You are unable to operate the touch screen
display using the buttons on the steering
wheel whenever the vehicle information
display shows the setting display.
STEERING WHEEL MOUNTED
AUDIO CONTROL BUTTONS
(Type B) (if so equipped)
<>:
Push to turn on/off the audio system.
<+>/<->:
Push to adjust the volume.
3-16
Page 61 of 276

AUDIO OPERATIONS
AUDIO MAIN OPERATION
Turning audio system on/off
The ignition switch must be in the ACC or
ON position to turn on the audio system.
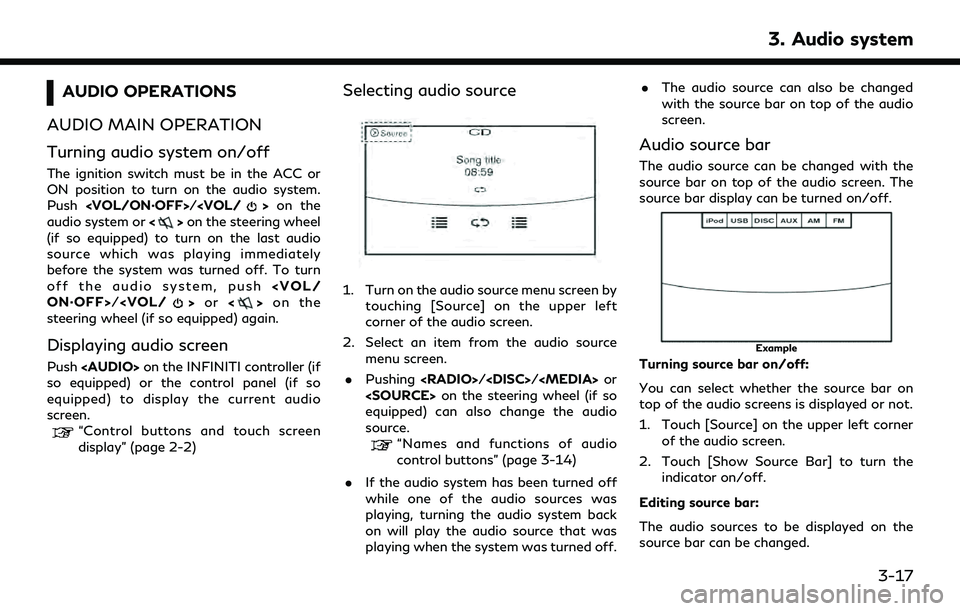
Push
audio system or <>on the steering wheel
(if so equipped) to turn on the last audio
source which was playing immediately
before the system was turned off. To turn
off the audio system, push
steering wheel (if so equipped) again.
Displaying audio screen
Push
Page 63 of 276
![INFINITI QX60 2020 Infiniti Connection The radio screen can be viewed and oper-
ated on the touch screen display.
Radio mode indicator:
The current radio mode is displayed.
[Source]:
Touch to switch to the source select
screen.
“Selectin INFINITI QX60 2020 Infiniti Connection The radio screen can be viewed and oper-
ated on the touch screen display.
Radio mode indicator:
The current radio mode is displayed.
[Source]:
Touch to switch to the source select
screen.
“Selectin](/img/42/35140/w960_35140-62.png)
The radio screen can be viewed and oper-
ated on the touch screen display.
Radio mode indicator:
The current radio mode is displayed.
[Source]:
Touch to switch to the source select
screen.
“Selecting audio source”
(page 3-17)
[Control]:
Touch to display the control screen.
“Radio controls” (page 3-21)
Radio band indicator:
Current radio band (AM, FM or SXM®)
is displayed.
Reception information display:
Reception information available at the
time such as frequency, station/channel
name, etc. are displayed.
On the SXM® screen, touch this area to
display the category list.
HD Radio reception status indicator (for
AM and FM) (if so equipped):
The icon is displayed when HD Radio
digital signal is received. The icon
flashes when the radio is acquiring thedigital signal but the sound output is not
yet in the HD Radio mode.
Preset list:
36 stations/channels (FM/AM/SXM®)
can be registered in the preset list.
“Radio operation” (page 3-19)
INFO:
HD Radio (if so equipped) reception needs to
be activated to receive HD Radio broad-
casts. This enables you to receive radio
broadcasts digitally (where available), pro-
viding a better quality sound with clear
reception. When this feature is not activated
or HD Radio broadcasts are not available,
you will receive analog radio (AM/FM)
broadcasts.
Radio operation
Available functions and items displayed on
the screen may vary depending on models
and specifications.
Radio activation and band selection:
Push
band (AM, FM or SXM®) from the audio
source list to turn on the radio. Each time
“Names and functions of audio control
buttons” (page 3-14)
“Selecting audio source” (page 3-17)
INFO:
When the stereo broadcast signal is weak,
the radio will automatically change from
stereo to monaural reception.
Seeking stations/channels:
AM and FM radio
Push
to high or high to low frequencies and to
stop at the next broadcasting station.
Tilting and holding
wheel (if so equipped) will also seek up/
down to the next station.
SiriusXM® Satellite Radio
Push
first channel of the next or previous
category.
Tilting and holding
wheel (if so equipped) will also fast tune the
channels.
3. Audio system
3-19
Page 64 of 276

3. Audio system
Manual tuning:
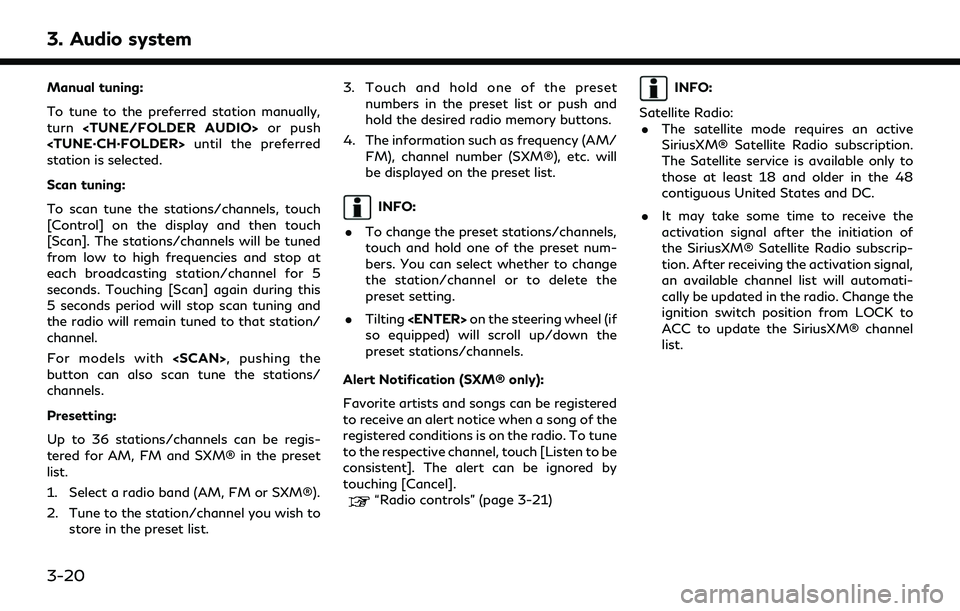
To tune to the preferred station manually,
turn
station is selected.
Scan tuning:
To scan tune the stations/channels, touch
[Control] on the display and then touch
[Scan]. The stations/channels will be tuned
from low to high frequencies and stop at
each broadcasting station/channel for 5
seconds. Touching [Scan] again during this
5 seconds period will stop scan tuning and
the radio will remain tuned to that station/
channel.
For models with
button can also scan tune the stations/
channels.
Presetting:
Up to 36 stations/channels can be regis-
tered for AM, FM and SXM® in the preset
list.
1. Select a radio band (AM, FM or SXM®).
2. Tune to the station/channel you wish to
store in the preset list. 3. Touch and hold one of the preset
numbers in the preset list or push and
hold the desired radio memory buttons.
4. The information such as frequency (AM/ FM), channel number (SXM®), etc. will
be displayed on the preset list.
INFO:
. To change the preset stations/channels,
touch and hold one of the preset num-
bers. You can select whether to change
the station/channel or to delete the
preset setting.
. Tilting
so equipped) will scroll up/down the
preset stations/channels.
Alert Notification (SXM® only):
Favorite artists and songs can be registered
to receive an alert notice when a song of the
registered conditions is on the radio. To tune
to the respective channel, touch [Listen to be
consistent]. The alert can be ignored by
touching [Cancel].
“Radio controls” (page 3-21)
INFO:
Satellite Radio: . The satellite mode requires an active
SiriusXM® Satellite Radio subscription.
The Satellite service is available only to
those at least 18 and older in the 48
contiguous United States and DC.
. It may take some time to receive the
activation signal after the initiation of
the SiriusXM® Satellite Radio subscrip-
tion. After receiving the activation signal,
an available channel list will automati-
cally be updated in the radio. Change the
ignition switch position from LOCK to
ACC to update the SiriusXM® channel
list.
3-20
Page 65 of 276
![INFINITI QX60 2020 Infiniti Connection Radio controls
Touch [Control] on the AM, FM or SXM® screen to display the control screen.
The following items are available.
Available setting items may vary depending on the models and specificatio INFINITI QX60 2020 Infiniti Connection Radio controls
Touch [Control] on the AM, FM or SXM® screen to display the control screen.
The following items are available.
Available setting items may vary depending on the models and specificatio](/img/42/35140/w960_35140-64.png)
Radio controls
Touch [Control] on the AM, FM or SXM® screen to display the control screen.
The following items are available.
Available setting items may vary depending on the models and specifications.
FM/AM:
[Station List]Touch to display the available station list.
While listening to FM radio, Auto Update is not performed.
[Scan] Touch to scan tune the stations.
“Radio operation” (page 3-19)
[HD Radio Mode] When this item is turned on, the analog and digital reception switches automatically. When
this item is turned off, the reception is fixed in the analog mode.
[HD Radio Info] Touch to display the HD Radio information such as name of song, artist and album.
This item is available when [RDS-Info] is not active.
[Tag]
(HD Radio broadcasts only) Touch to register the tag information for iTunes® Tagging. If an iPod® is plugged in after
the registration, the tag information can be stored in an iPod® and be used to purchase the
songs via iTunes®.
[RDS-Info] (FM only) Touch to display the RDS information.
This item is available when [HD Radio Info] is not active.
SXM®:
[Categories] Touch to display the category list.
[Direct Tune] Touch to display the keypad to enter the frequency and directly tune to the channel.
“Radio operation” (page 3-19)
[Scan] Touch to scan tune the channels.
“Radio operation” (page 3-19)
3. Audio system
3-21
Page 66 of 276
![INFINITI QX60 2020 Infiniti Connection 3. Audio system
[Instant Replay]Up to 30 minutes of the broadcast of the channel that has been tuned in to can be replayed.
Touch to select from [], [], [], [], [] and [].
[Tag] Touch to register the INFINITI QX60 2020 Infiniti Connection 3. Audio system
[Instant Replay]Up to 30 minutes of the broadcast of the channel that has been tuned in to can be replayed.
Touch to select from [], [], [], [], [] and [].
[Tag] Touch to register the](/img/42/35140/w960_35140-65.png)
3. Audio system
[Instant Replay]Up to 30 minutes of the broadcast of the channel that has been tuned in to can be replayed.
Touch to select from [], [], [], [], [] and [].
[Tag] Touch to register the tag information for iTunes® Tagging. If an iPod® is plugged in after the registration, the tag information can be stored in an iPod® and be used to purchase the
songs via iTunes®.
[Other] [Favorite Artists] Touch to set a favorite artists alert notification. Up to 8 artists can be registered. While a song of your favorite artist is playing, touch the list and touch [Add]/[Update]. To receive
the alert notification, select [Alert ON].
[Favorite Songs] Touch to set a favorite songs alert notification. Up to 8 songs can be registered. While your favorite song is playing, touch the list and touch [Add]/[Update]. To receive the alert
notification, select [Alert ON].
[Customize Channel List] Touch to customize the channel list. Only the selected channels will be tuned in to when you seek or scan the channels. You can select each item or select [All Select]/[Deselect All].
[Artist Alert History] Touch to display the artist list for an alert notice.
[Song Alert History] Touch to display the song list for an alert notice.
[Favorite Alert Settings] Touch to turn on/off the alert notice for the registered favorite artists and songs.
[Channel Locking Settings] Touch to select or unselect the channel that you wish to lock out. A passcode is required to change the settings. The default passcode is 1234.
3-22
Page 67 of 276
![INFINITI QX60 2020 Infiniti Connection COMPACT DISC (CD) PLAYER
How to view CD operation screen
[Source]:
Touch to switch to the source list
screen.
“Selecting audio source”
(page 3-17)
[Scan]:
Touch to play the first 10 seconds of the INFINITI QX60 2020 Infiniti Connection COMPACT DISC (CD) PLAYER
How to view CD operation screen
[Source]:
Touch to switch to the source list
screen.
“Selecting audio source”
(page 3-17)
[Scan]:
Touch to play the first 10 seconds of the](/img/42/35140/w960_35140-66.png)
COMPACT DISC (CD) PLAYER
How to view CD operation screen
[Source]:
Touch to switch to the source list
screen.
“Selecting audio source”
(page 3-17)
[Scan]:
Touch to play the first 10 seconds of the
tracks. Touch again to stop scanning.
Track information:
Track information such as the song title,
artist name and album name is dis-
played.
Audio source indicator:
Indicates that CD is currently selected.
Play time:
The play time of the track is displayed.
Track number:
This indicates the current track number
and the total number of tracks.
CD menu:
CD menu items are displayed. Touch an
icon to display the list or to change the
setting.
- [Track]
- [Folder] (for MP3, WMA, AAC)
- [Play Mode]
Play Mode indicator:
This indicates the current play mode.
Touch to change the play mode.
For CDs without compressed audio files:
Mode Screen display
[Disc Repeat]
Disc
[1 Track Repeat]
1 Track
[Disc Random]
Disc
3. Audio system
3-23
Page 68 of 276
![INFINITI QX60 2020 Infiniti Connection 3. Audio system
For CDs with compressed audio files:
ModeScreen display
[Disc Repeat]
Disc
[1 Folder Repeat]
1 Folder
[1 Track Repeat]
1 Track
[Disc Random]
Disc
[1 Folder Random]
1 Folder
Folder numb INFINITI QX60 2020 Infiniti Connection 3. Audio system
For CDs with compressed audio files:
ModeScreen display
[Disc Repeat]
Disc
[1 Folder Repeat]
1 Folder
[1 Track Repeat]
1 Track
[Disc Random]
Disc
[1 Folder Random]
1 Folder
Folder numb](/img/42/35140/w960_35140-67.png)
3. Audio system
For CDs with compressed audio files:
ModeScreen display
[Disc Repeat]
Disc
[1 Folder Repeat]
1 Folder
[1 Track Repeat]
1 Track
[Disc Random]
Disc
[1 Folder Random]
1 Folder
Folder number (for MP3, WMA, AAC):
This indicates the folder number when a
CD with compressed audio files is
loaded.
CD player operation
Loading:
Insert the CD into the slot with the label side
facing up. The CD will be guided automati-
cally into the slot and starts playing.
After loading the CD, the CD screen will
appear on the display.
Activation and playing:
The CD mode can be selected from the
source list or by pushing the
“Names and functions of audio control
buttons” (page 3-14)
“Selecting audio source” (page 3-17)
If the audio system has been turned off while
the CD was playing, pushing
steering wheel (if so equipped) will start
playing the CD again.
Selecting track/folder:
Touch [Track] or [Folder] in the CD menu
and select a preferred track or folder from
the list.
Push
next or previous track.
Tilting up/down the
steering wheel (if so equipped) can also
move the tracks.
For CDs with compressed audio files, turn
equipped) to move to the next or previous
folder.
“Names and functions of audio control
buttons” (page 3-14) Fast-forwarding or rewind:
Push and hold
forward or rewind the track. Release to play
the track at normal speed.
Scanning:
Touch [Scan] on the display or push
(if so equipped) to scan the tracks in the CD.
While scanning, the CD will play the first 10
seconds of each track and move on to the
next track. Touching [Scan] or pushing
10 seconds will stop scanning.
Changing play mode:
Touch [Play Mode], [
]or[] to select
the play mode.
For models with
button can also change the play mode.
Ejecting CD:
Push <
>to eject the CD. If the CD is
ejected and left unremoved, it will be
reloaded into the slot to protect the CD.
3-24
Page 69 of 276

DIGITAL VERSATILE DISC (DVD)
PLAYER (if so equipped)
Precautions
.Use DVDs with the region code “ALL” or
the code applicable to the DVD player.
(The region code is displayed as a small
symbol printed on the top of the DVD).
This vehicle-installed DVD player can
only play DVDs with the applicable
region code.
. Images cannot be displayed when the
ignition switch is in the ON position.
. Some VIDEO-CD functions may not be
supported with this system.
. Available menus and functions may vary
depending on the type of disc.
How to view DVD operation screen
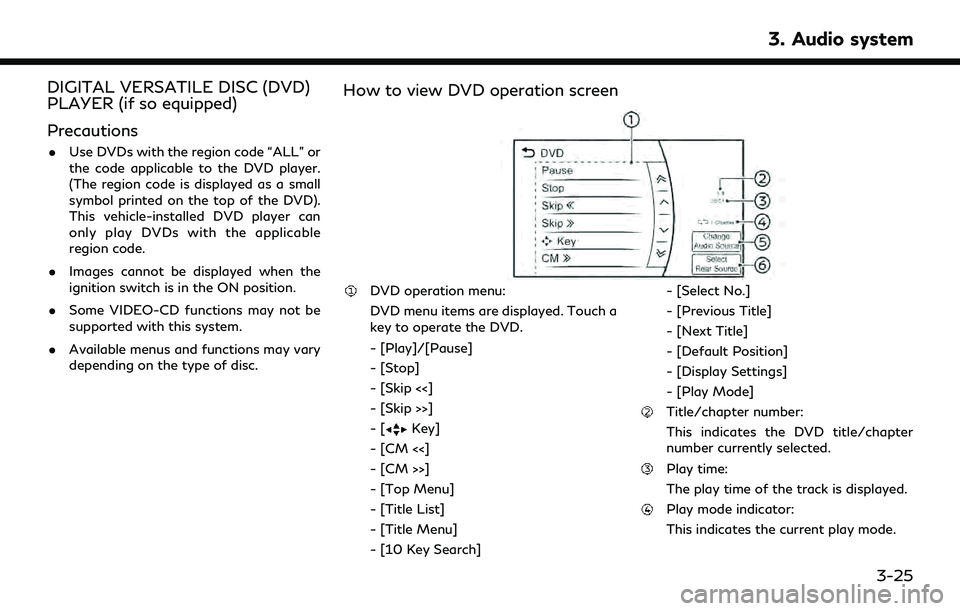
DVD operation menu:
DVD menu items are displayed. Touch a
key to operate the DVD.
- [Play]/[Pause]
- [Stop]
- [Skip <<]
- [Skip >>]
-[
Key]
- [CM <<]
- [CM >>]
- [Top Menu]
- [Title List]
- [Title Menu]
- [10 Key Search] - [Select No.]
- [Previous Title]
- [Next Title]
- [Default Position]
- [Display Settings]
- [Play Mode]
Title/chapter number:
This indicates the DVD title/chapter
number currently selected.
Play time:
The play time of the track is displayed.
Play mode indicator:
This indicates the current play mode.
3. Audio system
3-25
Page 70 of 276
![INFINITI QX60 2020 Infiniti Connection 3. Audio system
ModeScreen display
[OFF]
OFF
[1 Disc Repeat]
Disc
[1 Chapter Repeat]
1 Chapter
[Disc Random]
Disc
[Change Audio Source]
Touch to display the source select
screen.
“Selecting audio so INFINITI QX60 2020 Infiniti Connection 3. Audio system
ModeScreen display
[OFF]
OFF
[1 Disc Repeat]
Disc
[1 Chapter Repeat]
1 Chapter
[Disc Random]
Disc
[Change Audio Source]
Touch to display the source select
screen.
“Selecting audio so](/img/42/35140/w960_35140-69.png)
3. Audio system
ModeScreen display
[OFF]
OFF
[1 Disc Repeat]
Disc
[1 Chapter Repeat]
1 Chapter
[Disc Random]
Disc
[Change Audio Source]
Touch to display the source select
screen.
“Selecting audio source”
(page 3-17)
[Select Rear Source] (if so equipped)
Touch to display the Mobile Entertain-
ment System screen.
“Controlling the rear system on the
front display” (page 3-60)
INFO:
. The DVD menu list will appear when the
screen is touched while a movie is
playing.
. The availability of the DVD menu items
depend on the type of DVD.
DVD player operation
Loading:
Insert the DVD into the slot with the label
side facing up. The DVD will be guided
automatically into the slot and start play-
back.
When a DVD is loaded, the DVD operation
screen is displayed on the display.
Activation and playing:
Inserting the DVD into the slot will activate
the DVD mode. The DVD mode can also be
selected from the source list or by pushing
“Names and functions of audio control
buttons” (page 3-14)
“Selecting audio source” (page 3-17)
Touch [Play] in the DVD menu to start
playing. Touch [Pause] to pause and touch
[Stop] to stop playing the DVD.
Skipping:
Touch [Skip <<] or [Skip >>] in the DVD menu
to skip to the next or previous track/chapter.
Displaying keys:
Touch [
Key] in the DVD menu to display
operation keys such as [Enter] or [Return], etc. on the display.
Skipping commercial messages:
Touch [CM <<] or [CM >>] in the DVD menu
to skip commercials.
Displaying top menu:
Touch [Top Menu] in the DVD menu to
display the top menu specific to each disc.
For additional information, refer to the disc
instructions.
Displaying title list:
Touch [Title List] in the DVD menu to display
the title list.
Displaying title menu:
Touch [Title Menu] in the DVD menu to
display the title menu specific to each disc.
For additional information, refer to the disc
instructions.
Selecting track/chapter/menu number:
Touch [10 Key Search] or [Select No.] in the
DVD menu to display the keyboard screen.
Enter the track/chapter or menu number
you wish to play.
3-26