display INFINITI QX80 2022 Owner's Manual
[x] Cancel search | Manufacturer: INFINITI, Model Year: 2022, Model line: QX80, Model: INFINITI QX80 2022Pages: 192, PDF Size: 0.74 MB
Page 33 of 192
![INFINITI QX80 2022 Owners Manual [Favorite Audio] A Bluetooth® device canbe registered as a favorite
audio device.
If the Bluetooth® audio
device is within the range
with Bluetooth® turned
on, the device registered
as favorite wil INFINITI QX80 2022 Owners Manual [Favorite Audio] A Bluetooth® device canbe registered as a favorite
audio device.
If the Bluetooth® audio
device is within the range
with Bluetooth® turned
on, the device registered
as favorite wil](/img/42/41149/w960_41149-32.png)
[Favorite Audio] A Bluetooth® device canbe registered as a favorite
audio device.
If the Bluetooth® audio
device is within the range
with Bluetooth® turned
on, the device registered
as favorite will automati-
cally be connected to the
in-vehicle system with
priority upon the system
activation.
Favorite audio device is
marked with “$” in the
device list.
[Device Name] The device name can be changed.
[PIN] The PIN code can be changed.
INFO:
With [Device Name], the device name that
appears on the screen can be changed and
be renamed from the name set as default to
the preferred name (such as “Steve’s Car” for
example). Device information:
You can display the information of the
devices connected to the vehicle.
1. Push
Page 34 of 192
2. Getting started
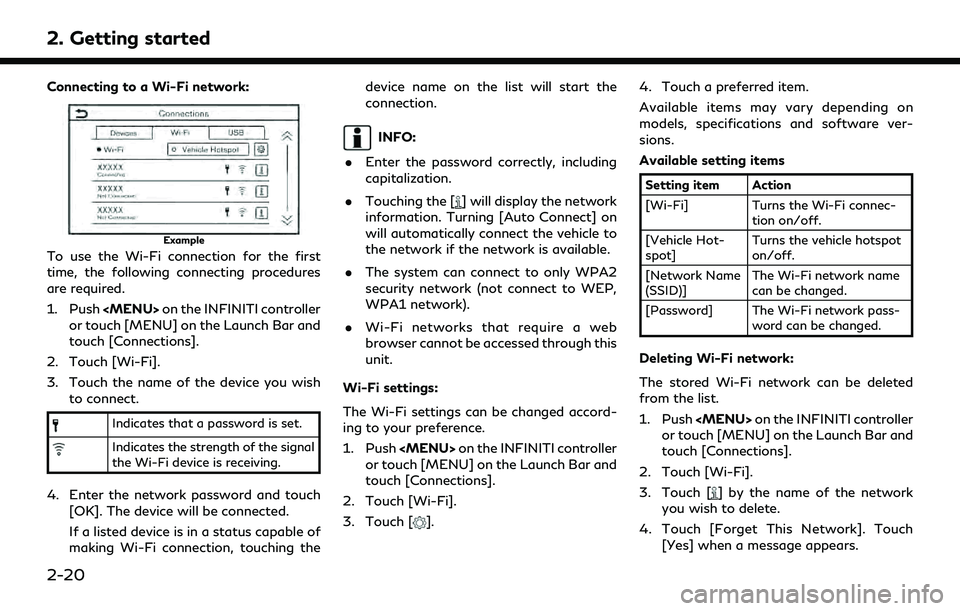
Connecting to a Wi-Fi network:
Example
To use the Wi-Fi connection for the first
time, the following connecting procedures
are required.
1. Push
or touch [MENU] on the Launch Bar and
touch [Connections].
2. Touch [Wi-Fi].
3. Touch the name of the device you wish to connect.
Indicates that a password is set.
Indicates the strength of the signal
the Wi-Fi device is receiving.
4. Enter the network password and touch
[OK]. The device will be connected.
If a listed device is in a status capable of
making Wi-Fi connection, touching the device name on the list will start the
connection.
INFO:
. Enter the password correctly, including
capitalization.
. Touching the [
] will display the network
information. Turning [Auto Connect] on
will automatically connect the vehicle to
the network if the network is available.
. The system can connect to only WPA2
security network (not connect to WEP,
WPA1 network).
. Wi-Fi networks that require a web
browser cannot be accessed through this
unit.
Wi-Fi settings:
The Wi-Fi settings can be changed accord-
ing to your preference.
1. Push
or touch [MENU] on the Launch Bar and
touch [Connections].
2. Touch [Wi-Fi].
3. Touch [
]. 4. Touch a preferred item.
Available items may vary depending on
models, specifications and software ver-
sions.
Available setting items
Setting item Action
[Wi-Fi] Turns the Wi-Fi connec-
tion on/off.
[Vehicle Hot-
spot] Turns the vehicle hotspot
on/off.
[Network Name
(SSID)] The Wi-Fi network name
can be changed.
[Password] The Wi-Fi network pass- word can be changed.
Deleting Wi-Fi network:
The stored Wi-Fi network can be deleted
from the list.
1. Push
or touch [MENU] on the Launch Bar and
touch [Connections].
2. Touch [Wi-Fi].
3. Touch [
] by the name of the network
you wish to delete.
4. Touch [Forget This Network]. Touch [Yes] when a message appears.
2-20
Page 35 of 192
Using Wi-Fi hotspot (if so equipped):
The Wi-Fi hotspot function enables you to
connect devices such as a laptop computer
or a tablet computer to the vehicle. You can
access the Internet using TCU (Telematics
Control Unit) installed in your vehicle when a
service provider’s subscription is active. Up
to 7 devices can be connected to the Wi-Fi
hotspot.
INFO:
To use the Internet, a subscription with the
service provider is required in advance.
Consult your cellular provider for details.
1. Push
or touch [MENU] on the Launch Bar and
touch [Connections].
2. Touch [Wi-Fi].
3. Touch [Vehicle Hotspot]. Network Name (SSID) and password will be displayed.
4. Select the in-vehicle Network Name (SSID) on your device.
5. Enter the network password on the device to connect to the in-vehicle Wi-
Fi network.
INFO:
. Enabling the Wi-Fi hotspot functionality
of your device may incur additional
charges from your cellular provider.
Consult your cellular provider contract
regarding the communication fee.
. The data transfer may be limited de-
pending on the contents.
. Accessibility may be disabled depending
on radio wave reception.
. When the automatic connection is active
on your device and the Network Name
(SSID) is already registered, turning
[Vehicle Hotspot] on will automatically
connect the device to the vehicle.
. When using wireless Apple CarPlay® (if
so equipped), the Wi-Fi hotspot function
cannot be used.
. The other wireless communication may
cause interference with the Wi-Fi Hot-
spot function and a delay may occur.
. When operating the device in the vehicle,
always obey the legal requirements in
the state or province where you are
driving.Displaying USB device information
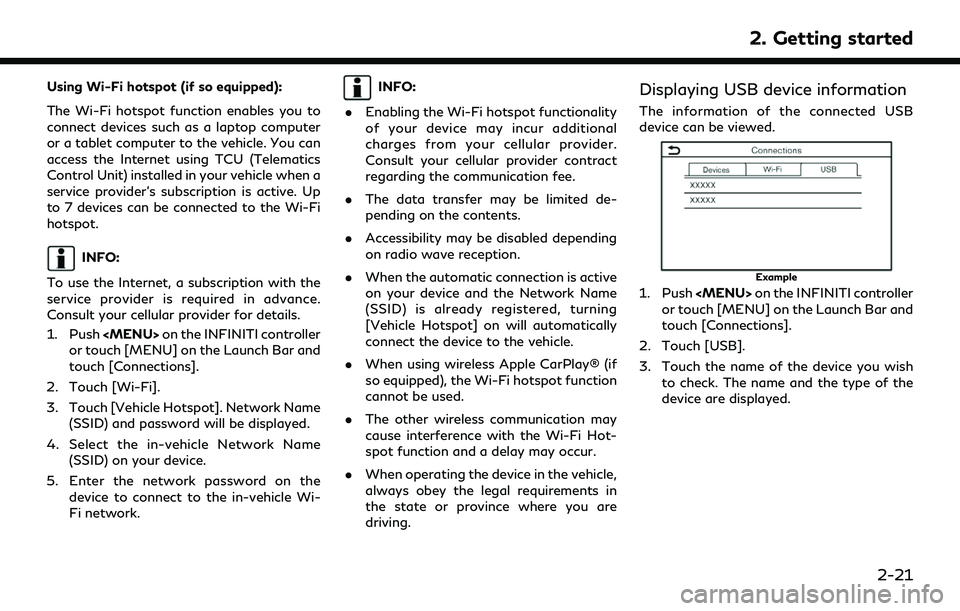
The information of the connected USB
device can be viewed.
Example
1. Push
or touch [MENU] on the Launch Bar and
touch [Connections].
2. Touch [USB].
3. Touch the name of the device you wish to check. The name and the type of the
device are displayed.
2. Getting started
2-21
Page 40 of 192
3. Audio system
the USB device is connected correctly
into the USB connection port.
. Do not grab the USB connection port
cover (if so equipped) when pulling
the USB device out of the port. This
could damage the port and the cover.
. Do not leave the USB cable in a place
where it can be pulled unintentionally.
Pulling the cable may damage the
port.
The vehicle is not equipped with a USB
device. USB devices should be purchased
separately as necessary.
This system cannot be used to format USB
devices. To format a USB device, use a
personal computer.
This system supports various USB memory
devices, USB hard drives and iPod® players.
Some USB devices may not be supported by
this system. . Partitioned USB devices may not be
played correctly.
. Some characters used in other languages
(Chinese, Japanese, etc.) are not dis-
played properly on the display. Using
English language characters with a USB device is recommended.
General notes for USB use:
Refer to your device manufacturer’s owner
information regarding the proper care of the
device.
Notes for iPod® use:
iPod® is a trademark of Apple Inc., regis-
tered in the U.S. and other countries. . Improperly plugging in the iPod® may
cause a checkmark to be displayed on
and off (flickering). Always make sure
that the iPod® is connected properly.
. Audiobooks may not play in the same
order as they appear on an iPod®.
Compatibility: . iPhone® 12 Pro Max
. iPhone® 12 Pro
. iPhone® 12
. iPhone® 12 mini
. iPhone® SE (2nd generation)
. iPhone® 11 Pro Max
. iPhone® 11 Pro
. iPhone® 11 .
iPhone® XS Max
. iPhone® XS
. iPhone® XR
. iPhone® X
. iPhone® 8 Plus
. iPhone® 8
. iPhone® 7 Plus
. iPhone® 7
. iPhone® SE
. iPhone® 6s Plus
. iPhone® 6s
. iPhone® 6 Plus
. iPhone® 6
. iPhone® 5s
. iPhone® 5c
. iPhone® 5
. iPod touch® (7th generation)
. iPod touch® (6th generation)
3-4
Page 41 of 192
INFO:
. Make sure that iOS is updated.
. Refer to your device manufacturer’s
owner information regarding the proper
use and care of the device.
COMPRESSED AUDIO FILES
(MP3/WMA/AAC)
Explanation of terms
.MP3 — MP3 is short for Moving Pictures
Experts Group Audio Layer 3. MP3 is the
most well-known compressed digital
audio file format. This format allows for
near “CD quality” sound, but at a fraction
of the size of normal audio files. MP3
conversion of an audio track can reduce
the file size by approximately a 10:1 ratio
(Sampling: 44.1 kHz, Bit rate: 128 kbps)
with virtually no perceptible loss in
quality. The compression reduces certain
parts of sound that seem inaudible to
most people.
. WMA — Windows Media Audio (WMA)
is a compressed audio format created by
Microsoft as an alternative to MP3. The
WMA codec offers greater file compres-
sion than the MP3 codec, enabling storage of more digital audio tracks in
the same amount of space when com-
pared to MP3s at the same level of
quality.
This product is protected by certain
intellectual property rights of Microsoft
Corporation and third parties. Use or
distribution of such technology outside
of this product is prohibited without a
license from Microsoft or an authorized
Microsoft subsidiary and third parties.
. Bit rate — Bit rate denotes the number of
bits per second used by a digital music
file. The size and quality of a compressed
digital audio file is determined by the bit
rate used when encoding the file.
. Sampling frequency — Sampling fre-
quency is the rate at which the samples
of a signal are converted from analog to
digital (A/D conversion) per second.
. Multisession — Multisession is one of the
methods for writing data to media.
Writing data once to the media is called
a single session, and writing more than
once is called a multisession.
. ID3/WMA tag — The ID3/WMA tag is
the part of the encoded MP3 or WMA
file that contains information about the digital music file such as song title, artist,
album title, encoding bit rate, track time
duration, etc. ID3 tag information is
displayed on the Album/Artist/Track
title line on the display.
. AAC — Advanced Audio Coding (AAC) is
a compressed audio format. AAC offers
greater file compression than MP3 and
enables music file creation and storage
at the same quality as MP3.
* Windows® and Windows Media® are
registered trademarks or trademarks of
Microsoft Corporation in the United States
of America and/or other countries.
3. Audio system
3-5
Page 42 of 192
3. Audio system
Playback order
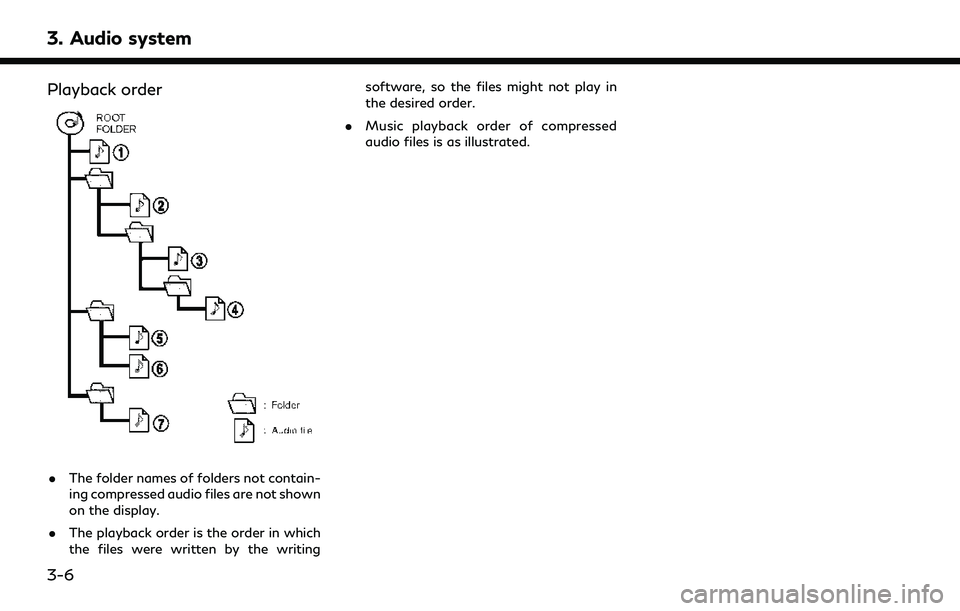
.The folder names of folders not contain-
ing compressed audio files are not shown
on the display.
. The playback order is the order in which
the files were written by the writing software, so the files might not play in
the desired order.
. Music playback order of compressed
audio files is as illustrated.
3-6
Page 45 of 192
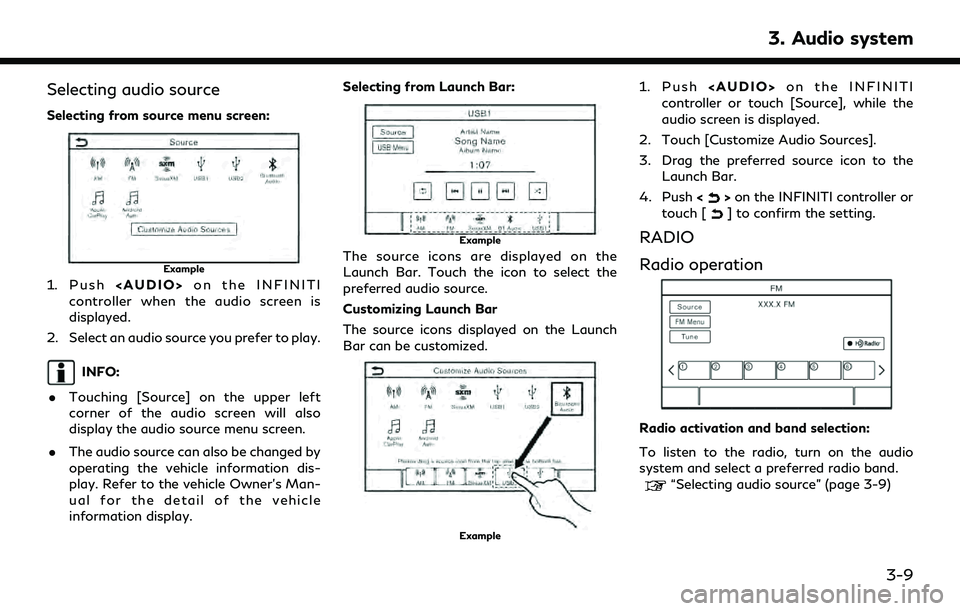
Selecting audio source
Selecting from source menu screen:
Example
1. Push
Page 46 of 192
3. Audio system
INFO:
When the stereo broadcast signal is weak,
the radio will automatically change from
stereo to monaural reception.
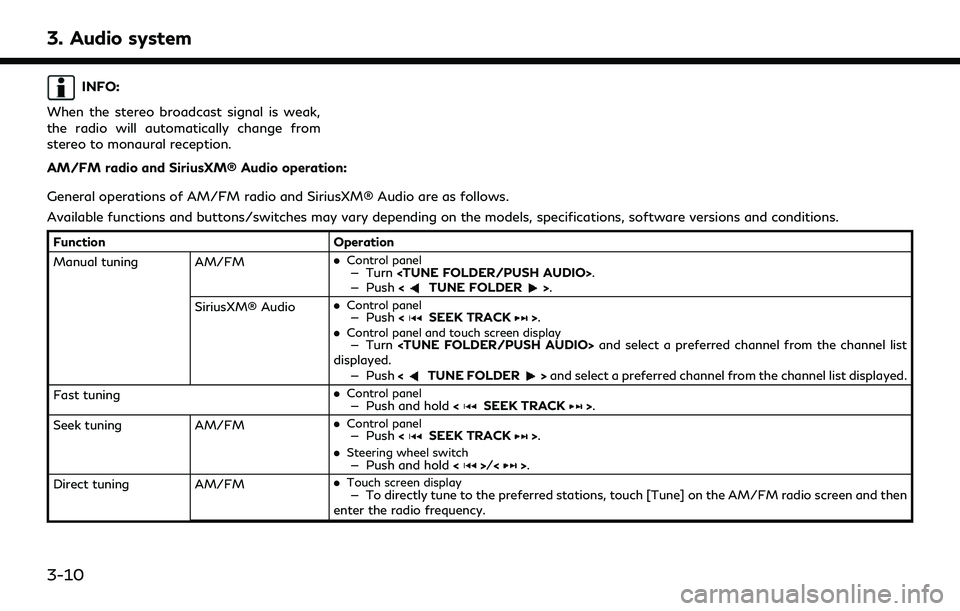
AM/FM radio and SiriusXM® Audio operation:
General operations of AM/FM radio and SiriusXM® Audio are as follows.
Available functions and buttons/switches may vary depending on the models, specifications, software versions and conditions.
Function Operation
Manual tuning AM/FM .
Control panel— Turn
— Push
SiriusXM® Audio .
Control panel— Push
.Control panel and touch screen display— Turn
displayed.
— Push <
TUNE FOLDER>and select a preferred channel from the channel list displayed.
Fast tuning .
Control panel— Push and hold
Seek tuning AM/FM.
Control panel— Push
.
Steering wheel switch— Push and hold <>/<>.
Direct tuning AM/FM.
Touch screen display— To directly tune to the preferred stations, touch [Tune] on the AM/FM radio screen and then
enter the radio frequency.
3-10
Page 47 of 192
![INFINITI QX80 2022 Owners Manual FunctionOperation
SiriusXM® Audio .
Control panel and touch screen display— Turn
<TUNE FOLDER/PUSH AUDIO> to display the channel list screen. Touch [Direct Tune]
and then enter the channel number.
INFINITI QX80 2022 Owners Manual FunctionOperation
SiriusXM® Audio .
Control panel and touch screen display— Turn
<TUNE FOLDER/PUSH AUDIO> to display the channel list screen. Touch [Direct Tune]
and then enter the channel number.](/img/42/41149/w960_41149-46.png)
FunctionOperation
SiriusXM® Audio .
Control panel and touch screen display— Turn
and then enter the channel number.
— Push <
TUNE FOLDER>to display the channel list screen. Touch [Direct Tune] and then
enter the channel number.
Presetting stations/channels .
Touch screen display
Up to 36 stations/channels of AM/FM radio and/or SiriusXM® Audio can be registered in the preset
list.
1.Select a radio band (AM, FM or SiriusXM®).
2.Tune to the station/channel you wish to store.
3.Touch and hold one of the preset numbers in the preset list on the radio screen.
The information such as frequency (AM/FM), channel number (SiriusXM®), etc. will be displayed on
the preset list.
Stations/channels registered in the presets can be deleted using [Manage Presets] on the [AM
Menu], [FM Menu] and [SXM Menu] screens.
“Radio Menu” (page 3-12)
Selecting preset stations/channels .
Steering wheel switch— Push
<>/<>.
.
Touch screen display— Briefly touch a preferred station/channel on the preset list on the radio screen.
Replay SiriusXM® Audio.
Touch screen display— Touch the operation keys on the SiriusXM® Audio screen to store the channel currently
playing, and to operate (fast forward, rewind, pause, etc.) the stored content.
Setting notifications SiriusXM® Audio .
Touch screen display— Touch [Notify] on the Sirius XM® Audio screen to display a list of artists, songs or teams
registered as favorites. Notification settings can be turned on/off on the list. Touch [Manage
Notifications] to display the notification settings management screen.
3. Audio system
3-11
Page 48 of 192
![INFINITI QX80 2022 Owners Manual 3. Audio system
FunctionOperation
Viewing related chan-
nels SiriusXM® Audio
.
Touch screen display— Touch [Related] on the SiriusXM® Audio screen to view the channel information related to the
on INFINITI QX80 2022 Owners Manual 3. Audio system
FunctionOperation
Viewing related chan-
nels SiriusXM® Audio
.
Touch screen display— Touch [Related] on the SiriusXM® Audio screen to view the channel information related to the
on](/img/42/41149/w960_41149-47.png)
3. Audio system
FunctionOperation
Viewing related chan-
nels SiriusXM® Audio
.
Touch screen display— Touch [Related] on the SiriusXM® Audio screen to view the channel information related to the
one that is currently playing.
Selecting categories SiriusXM® Audio .
Touch screen display— Touch [Categories] on the SiriusXM® Audio screen to choose a channel by selecting from
category list.
INFO:
. To turn on the HD Radio mode, touch the HD Radio mode on/off key on the radio screen.
. HD Radio reception needs to be enabled to receive HD Radio broadcasts. This enables you to receive radio broadcasts digitally (where
available), providing a better quality sound with clear reception. When this feature is not enabled or HD Radio broadcasts are not available,
you will receive analog radio (AM/FM) broadcasts.
Radio Menu
Touch [AM Menu], [FM Menu] and [SXM Menu] on each radio screen to display the corresponding menu screen.
Available menu items may vary depending on models, specifications and software versions.
[AM Menu]/[FM Menu]:
Menu Action
[SCAN] Touch to scan tune the stations. The stations will be tuned from low to high frequencies
and stop at each broadcasting station for several seconds. Touching [SCAN] again
during this period of several seconds will stop scan tuning and the radio will remain tuned
to that station.
[Radio Text] Displays the radio text information.
[Refresh] Touch to update the station list displayed on the right side of the AM or FM menu screen.
3-12