engine ISUZU KB P190 2007 Workshop Repair Manual
[x] Cancel search | Manufacturer: ISUZU, Model Year: 2007, Model line: KB P190, Model: ISUZU KB P190 2007Pages: 6020, PDF Size: 70.23 MB
Page 3045 of 6020
Engine Mechanical – V6 Page 6A1–268
Page 6A1–268
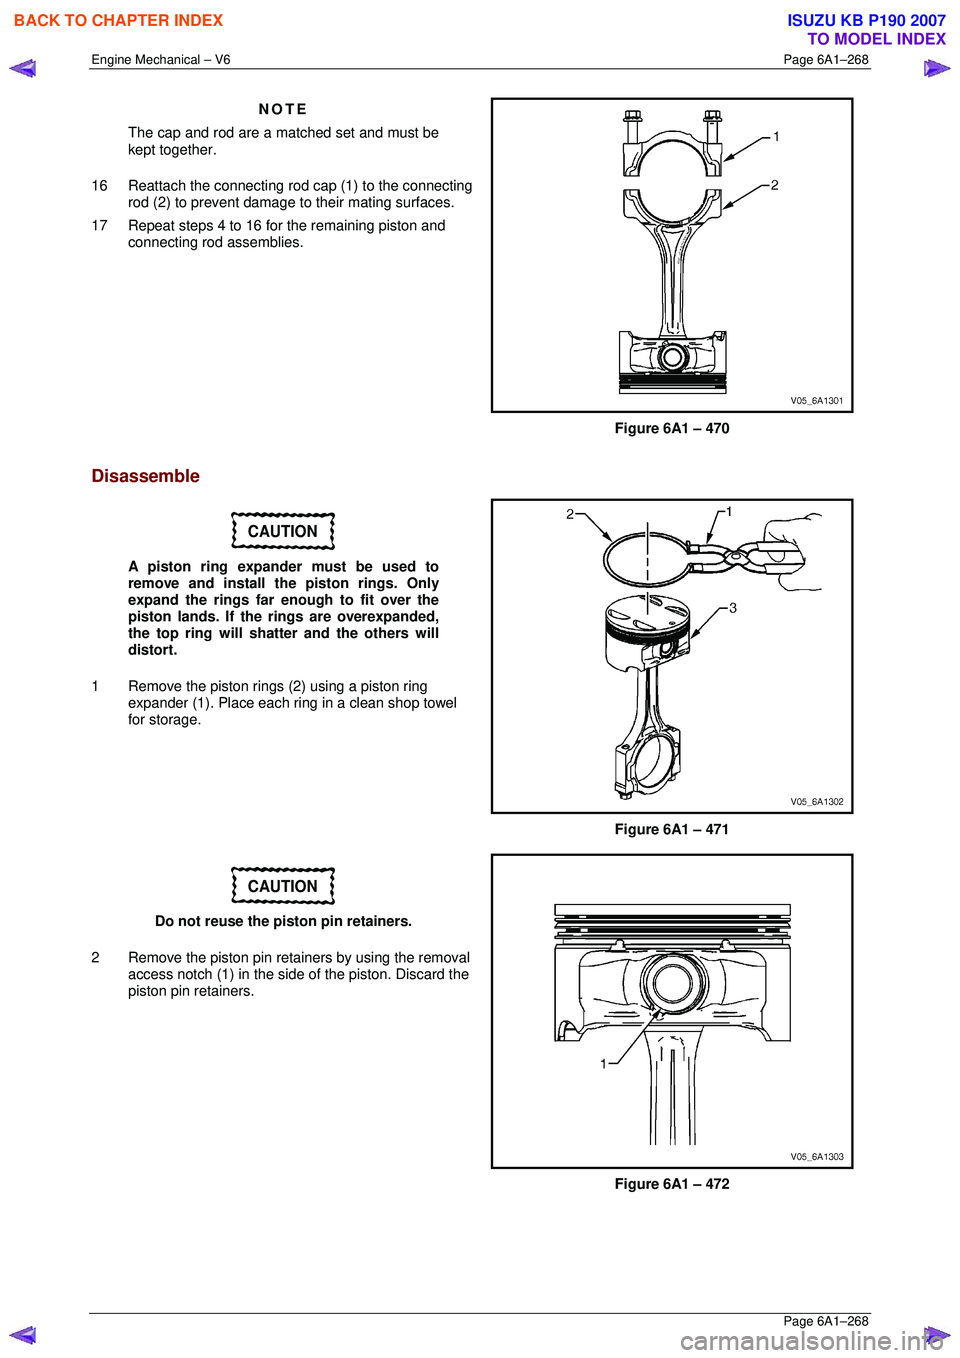
NOTE
The cap and rod are a matched set and must be
kept together.
16 Reattach the connecting rod cap (1) to the connecting rod (2) to prevent damage to their mating surfaces.
17 Repeat steps 4 to 16 for the remaining piston and connecting rod assemblies.
Figure 6A1 – 470
Disassemble
CAUTION
A piston ring expander must be used to
remove and install the piston rings. Only
expand the rings far enough to fit over the
piston lands. If the rings are overexpanded,
the top ring will shatter and the others will
distort.
1 Remove the piston rings (2) using a piston ring expander (1). Place each ring in a clean shop towel
for storage.
Figure 6A1 – 471
CAUTION
Do not reuse the piston pin retainers.
2 Remove the piston pin retainers by using the removal access notch (1) in the side of the piston. Discard the
piston pin retainers.
Figure 6A1 – 472
BACK TO CHAPTER INDEX
TO MODEL INDEX
ISUZU KB P190 2007
Page 3046 of 6020
Engine Mechanical – V6 Page 6A1–269
Page 6A1–269
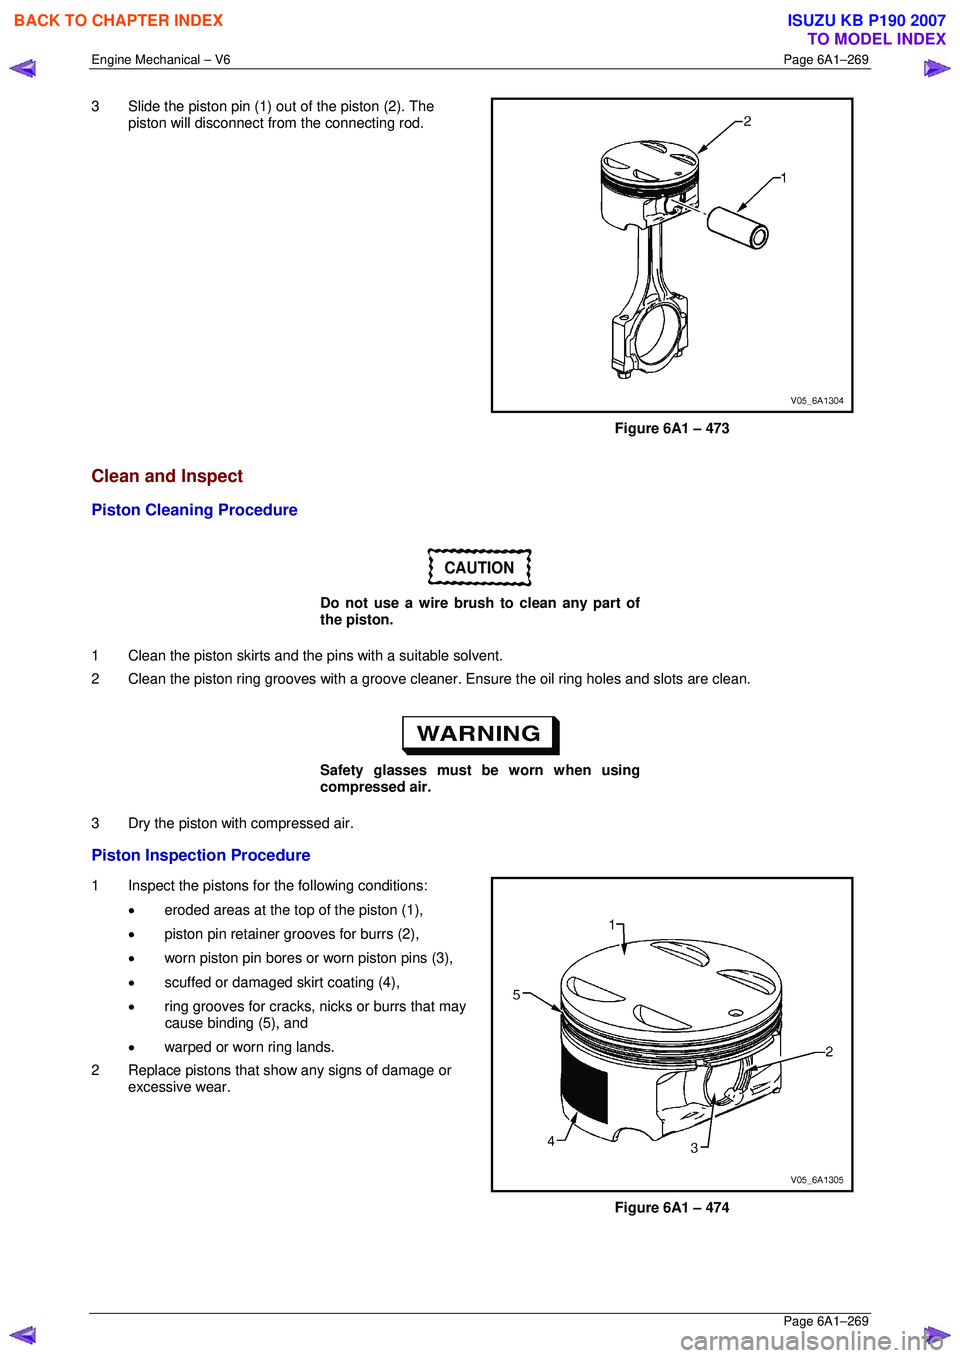
3 Slide the piston pin (1) out of the piston (2). The
piston will disconnect from the connecting rod.
Figure 6A1 – 473
Clean and Inspect
Piston Cleaning Procedure
CAUTION
Do not use a wire brush to clean any part of
the piston.
1 Clean the piston skirts and the pi ns with a suitable solvent.
2 Clean the piston ring grooves with a groove cleaner . Ensure the oil ring holes and slots are clean.
Safety glasses must be worn when using
compressed air.
3 Dry the piston with compressed air.
Piston Inspection Procedure
1 Inspect the pistons for the following conditions: • eroded areas at the top of the piston (1),
• piston pin retainer grooves for burrs (2),
• worn piston pin bores or worn piston pins (3),
• scuffed or damaged skirt coating (4),
• ring grooves for cracks, nicks or burrs that may
cause binding (5), and
• warped or worn ring lands.
2 Replace pistons that s how any signs of damage or
excessive wear.
Figure 6A1 – 474
BACK TO CHAPTER INDEX
TO MODEL INDEX
ISUZU KB P190 2007
Page 3047 of 6020
Engine Mechanical – V6 Page 6A1–270
Page 6A1–270
Piston Measurement
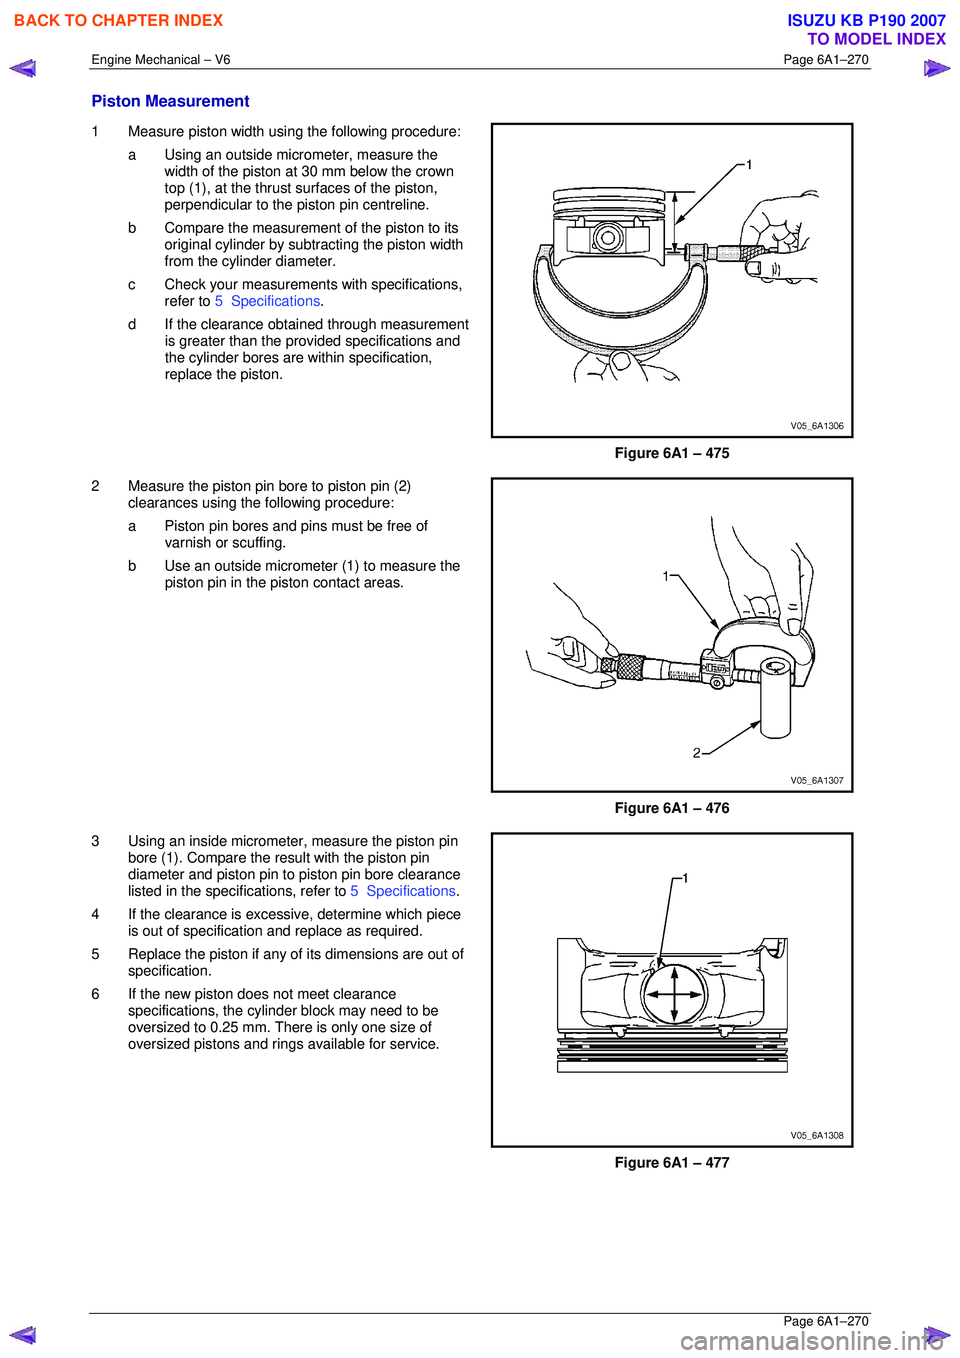
1 Measure piston width using the following procedure:
a Using an outside micr ometer, measure the
width of the piston at 30 mm below the crown
top (1), at the thrust surfaces of the piston,
perpendicular to the piston pin centreline.
b Compare the measurement of the piston to its
original cylinder by subtracting the piston width
from the cylinder diameter.
c Check your measurements with specifications, refer to 5 Specifications .
d If the clearance obtai ned through measurement
is greater than the prov ided specifications and
the cylinder bores are wi thin specification,
replace the piston.
Figure 6A1 – 475
2 Measure the piston pin bore to piston pin (2) clearances using the following procedure:
a Piston pin bores and pins must be free of varnish or scuffing.
b Use an outside micrometer (1) to measure the
piston pin in the piston contact areas.
Figure 6A1 – 476
3 Using an inside micrometer , measure the piston pin
bore (1). Compare the resu lt with the piston pin
diameter and piston pin to piston pin bore clearance
listed in the specifications, refer to 5 Specifications.
4 If the clearance is excessive, determine which piece is out of specification and replace as required.
5 Replace the piston if any of its dimensions are out of
specification.
6 If the new piston does not meet clearance specifications, the cylinder block may need to be
oversized to 0.25 mm. There is only one size of
oversized pistons and rings available for service.
Figure 6A1 – 477
BACK TO CHAPTER INDEX
TO MODEL INDEX
ISUZU KB P190 2007
Page 3048 of 6020
Engine Mechanical – V6 Page 6A1–271
Page 6A1–271
Piston Ring Measurement
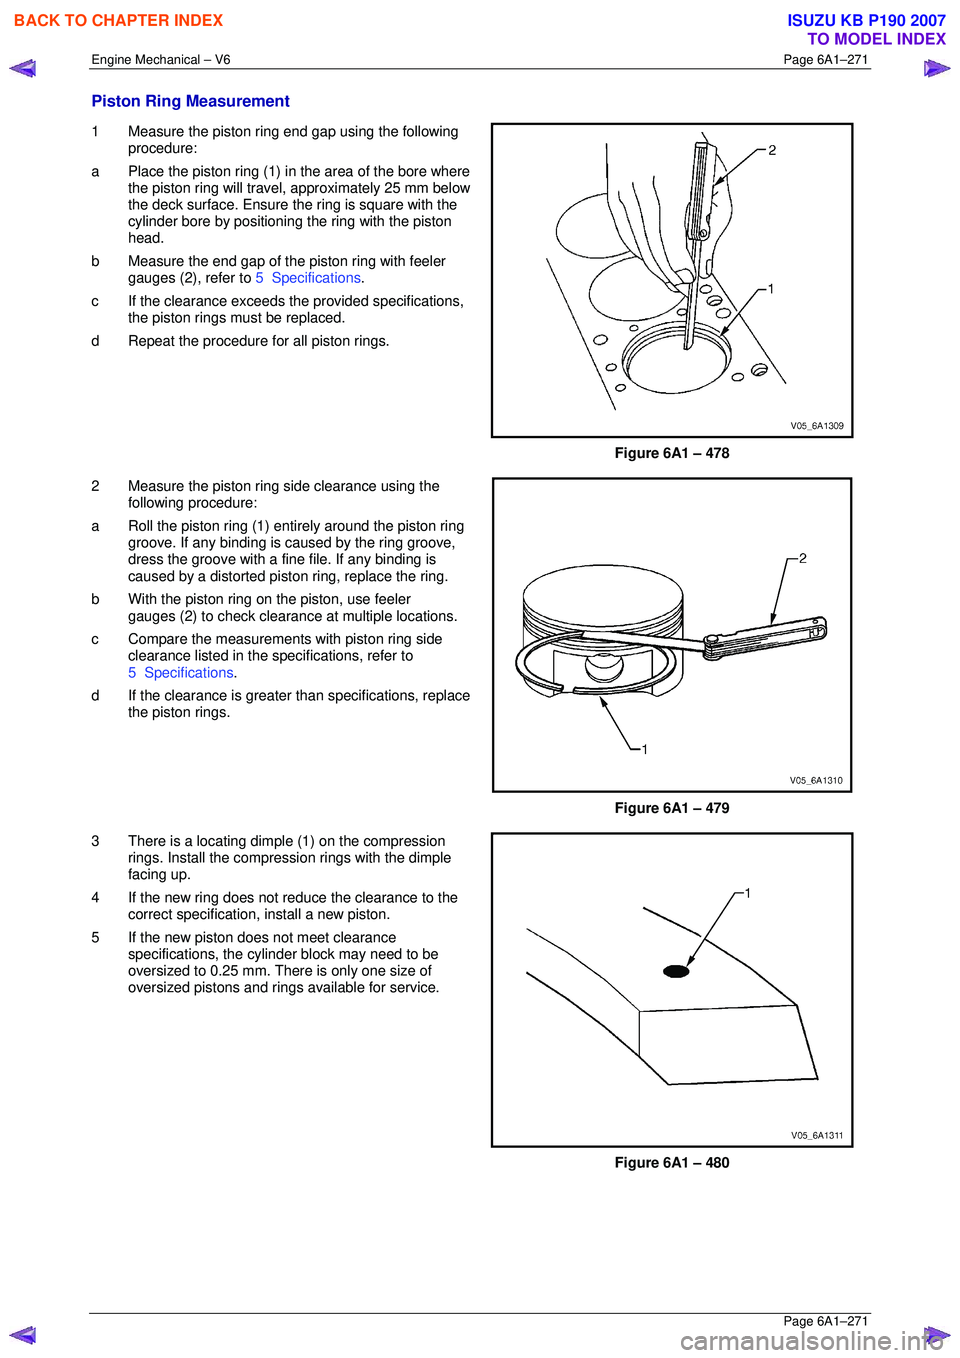
1 Measure the piston ring end gap using the following
procedure:
a Place the piston ring (1) in the area of the bore where
the piston ring will travel, approximately 25 mm below
the deck surface. Ensure t he ring is square with the
cylinder bore by positioning the ring with the piston
head.
b Measure the end gap of the piston ring with feeler
gauges (2), refer to 5 Specifications.
c If the clearance exceeds t he provided specifications,
the piston rings must be replaced.
d Repeat the procedure for all piston rings.
Figure 6A1 – 478
2 Measure the piston ring side clearance using the
following procedure:
a Roll the piston ring (1) ent irely around the piston ring
groove. If any binding is c aused by the ring groove,
dress the groove with a fine file. If any binding is
caused by a distorted piston ring, replace the ring.
b With the piston ring on the piston, use feeler
gauges (2) to check clearance at multiple locations.
c Compare the measurement s with piston ring side
clearance listed in the spec ifications, refer to
5 Specifications .
d If the clearance is greater than specifications, replace
the piston rings.
Figure 6A1 – 479
3 There is a locating dimple (1) on the compression rings. Install the compression rings with the dimple
facing up.
4 If the new ring does not r educe the clearance to the
correct specification, install a new piston.
5 If the new piston does not meet clearance specifications, the cylinder block may need to be
oversized to 0.25 mm. There is only one size of
oversized pistons and rings available for service.
Figure 6A1 – 480
BACK TO CHAPTER INDEX
TO MODEL INDEX
ISUZU KB P190 2007
Page 3049 of 6020
Engine Mechanical – V6 Page 6A1–272
Page 6A1–272
Connecting Rod Cleaning Procedure
1 Clean the connecting rods in solvent.
Safety glasses must be worn when using
compressed air.
2 Dry the connecting rod using compressed air.
3 Remove the connecting rod cap and clean the threads.
4 Remove the connecting rod bearing and discard. Never reuse a connecting rod bearing that has been used in a
running engine.
Connecting Rod Visual Inspection Procedure
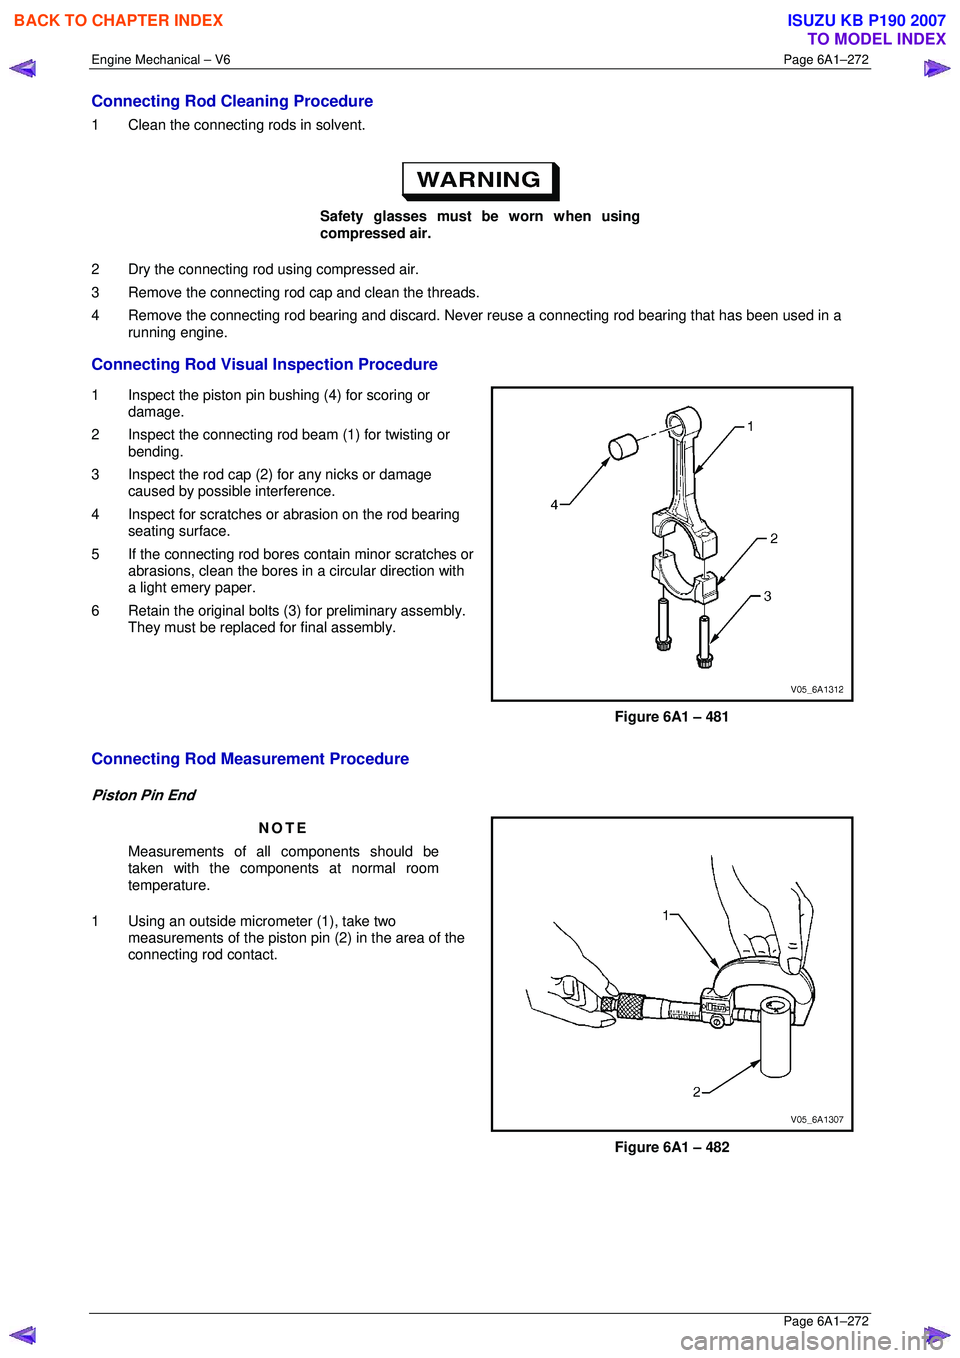
1 Inspect the piston pin bushing (4) for scoring or damage.
2 Inspect the connecting rod beam (1) for twisting or bending.
3 Inspect the rod cap (2) for any nicks or damage caused by possible interference.
4 Inspect for scratches or abrasion on the rod bearing
seating surface.
5 If the connecting rod bores c ontain minor scratches or
abrasions, clean the bores in a circular direction with
a light emery paper.
6 Retain the original bolts (3) for preliminary assembly. They must be replaced for final assembly.
Figure 6A1 – 481
Connecting Rod Measurement Procedure
Piston Pin End
NOTE
Measurements of a ll components should be
taken with the components at normal room
temperature.
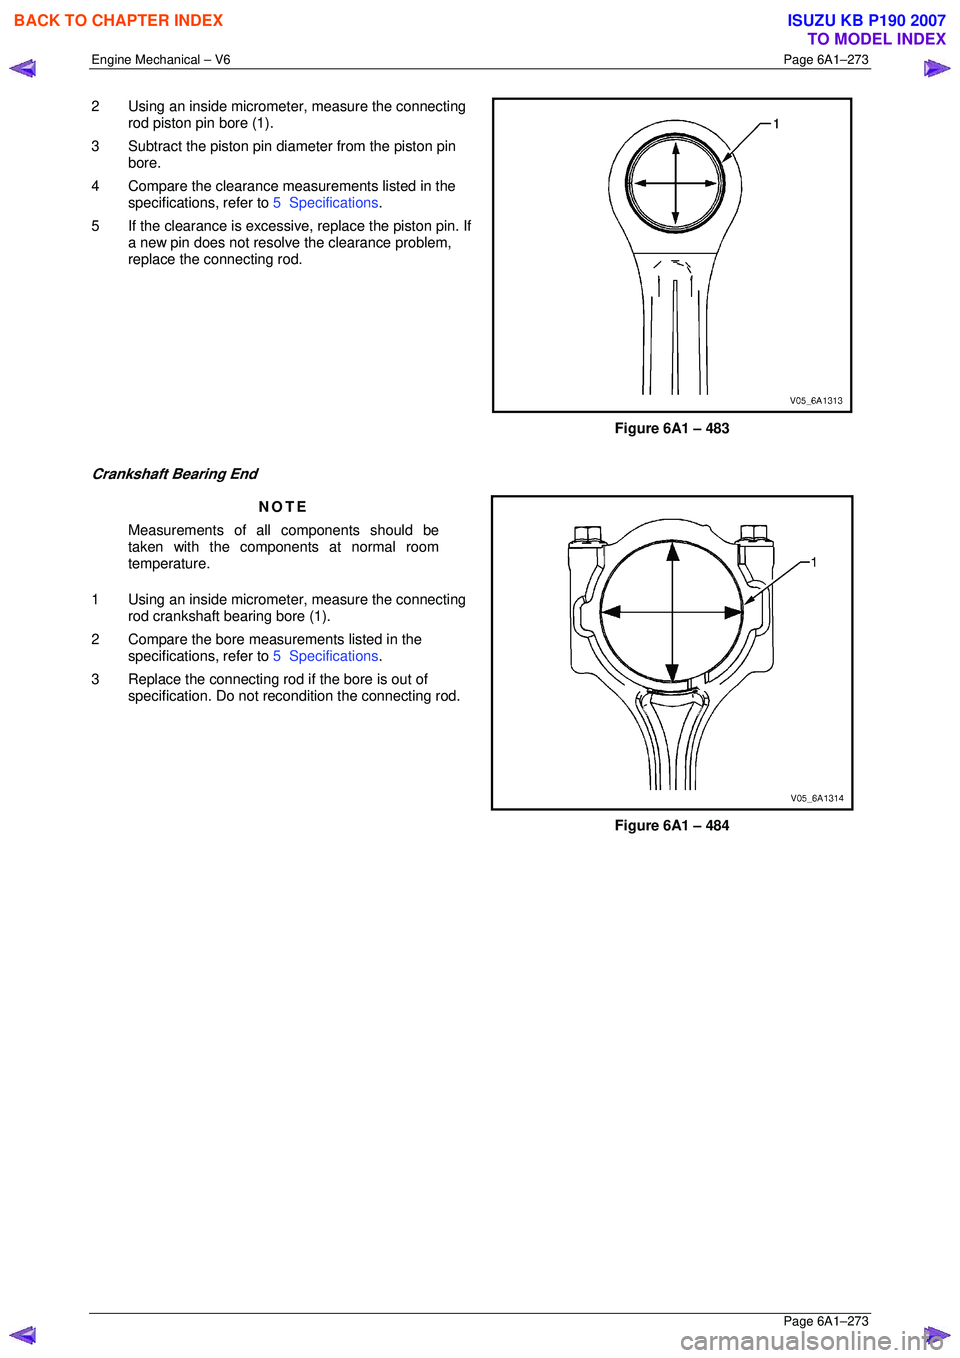
1 Using an outside micrometer (1), take two measurements of the piston pi n (2) in the area of the
connecting rod contact.
Figure 6A1 – 482
BACK TO CHAPTER INDEX
TO MODEL INDEX
ISUZU KB P190 2007
Page 3050 of 6020
Engine Mechanical – V6 Page 6A1–273
Page 6A1–273
2 Using an inside micrometer, measure the connecting
rod piston pin bore (1).
3 Subtract the piston pin di ameter from the piston pin
bore.
4 Compare the clearance m easurements listed in the
specifications, refer to 5 Specifications.
5 If the clearance is excessive, replace the piston pin. If a new pin does not resolve the clearance problem,
replace the connecting rod.
Figure 6A1 – 483
Crankshaft Bearing End
NOTE
Measurements of a ll components should be
taken with the components at normal room
temperature.
1 Using an inside micromet er, measure the connecting
rod crankshaft bearing bore (1).
2 Compare the bore meas urements listed in the
specifications, refer to 5 Specifications.
3 Replace the connecting rod if the bore is out of
specification. Do not re condition the connecting rod.
Figure 6A1 – 484
BACK TO CHAPTER INDEX
TO MODEL INDEX
ISUZU KB P190 2007
Page 3051 of 6020
Engine Mechanical – V6 Page 6A1–274
Page 6A1–274
Reassemble
Piston and Piston Pin
CAUTION
The arrow located on top of the piston must
point toward the front of the engine.
NOTE
The connecting rod is non-directional and may
be assembled/reassembled to the piston in
either direction.
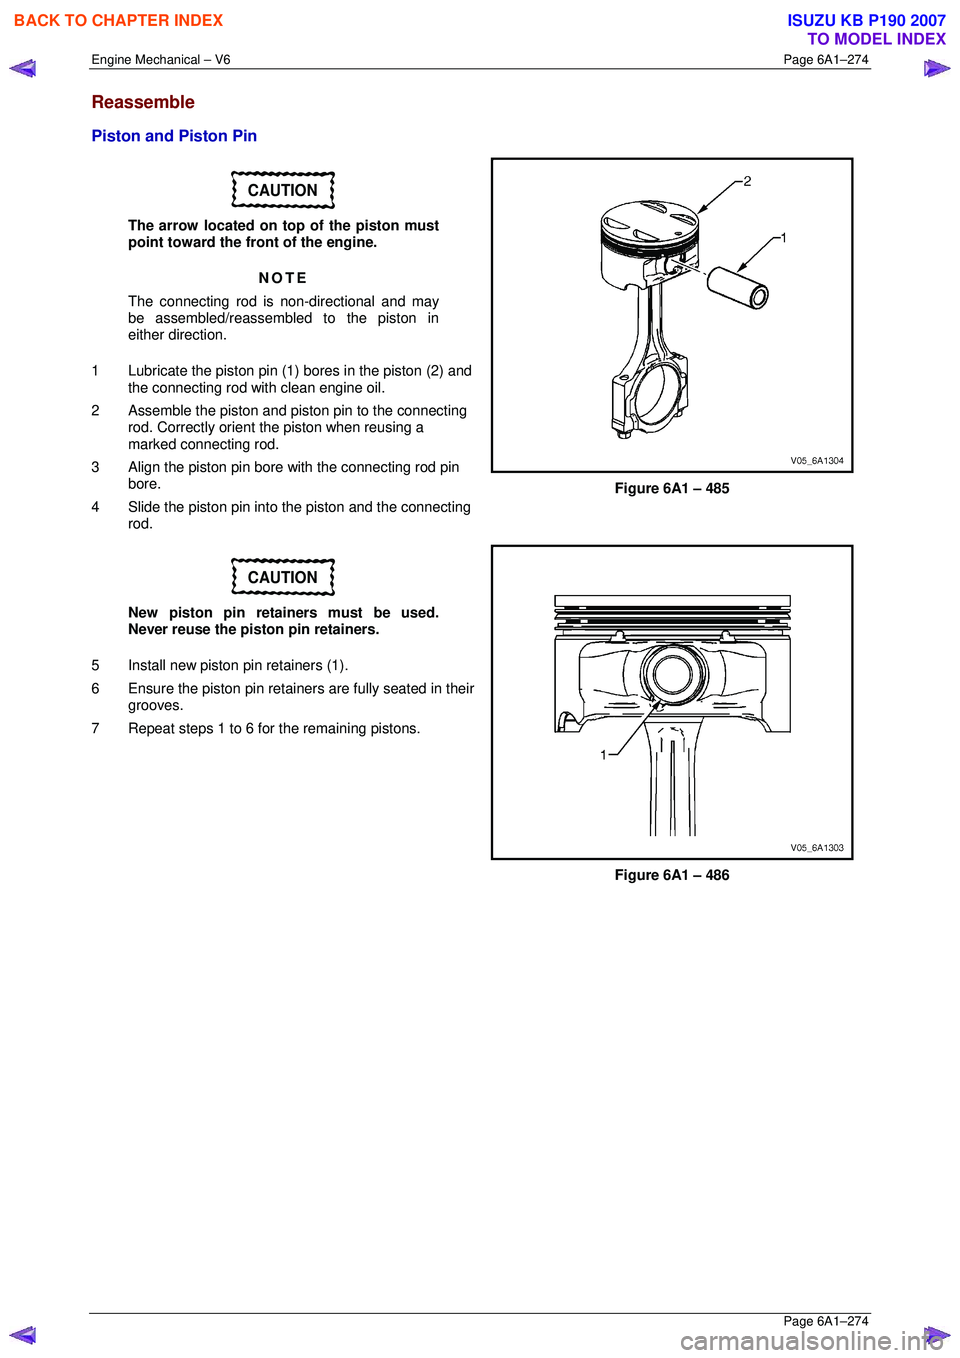
1 Lubricate the piston pin (1) bores in the piston (2) and
the connecting rod with clean engine oil.
2 Assemble the piston and piston pin to the connecting rod. Correctly orient the piston when reusing a
marked connecting rod.
3 Align the piston pin bore with the connecting rod pin
bore.
4 Slide the piston pin into the piston and the connecting
rod.
Figure 6A1 – 485
CAUTION
New piston pin retainers must be used.
Never reuse the piston pin retainers.
5 Install new piston pin retainers (1).
6 Ensure the piston pin retainers are fully seated in their grooves.
7 Repeat steps 1 to 6 for the remaining pistons.
Figure 6A1 – 486
BACK TO CHAPTER INDEX
TO MODEL INDEX
ISUZU KB P190 2007
Page 3052 of 6020
Engine Mechanical – V6 Page 6A1–275
Page 6A1–275
Piston Ring
NOTE
The ends of the expander must be facing
toward the top of the piston.
1 Correctly orient the oil control ring expander (1) before installation.
Figure 6A1 – 487
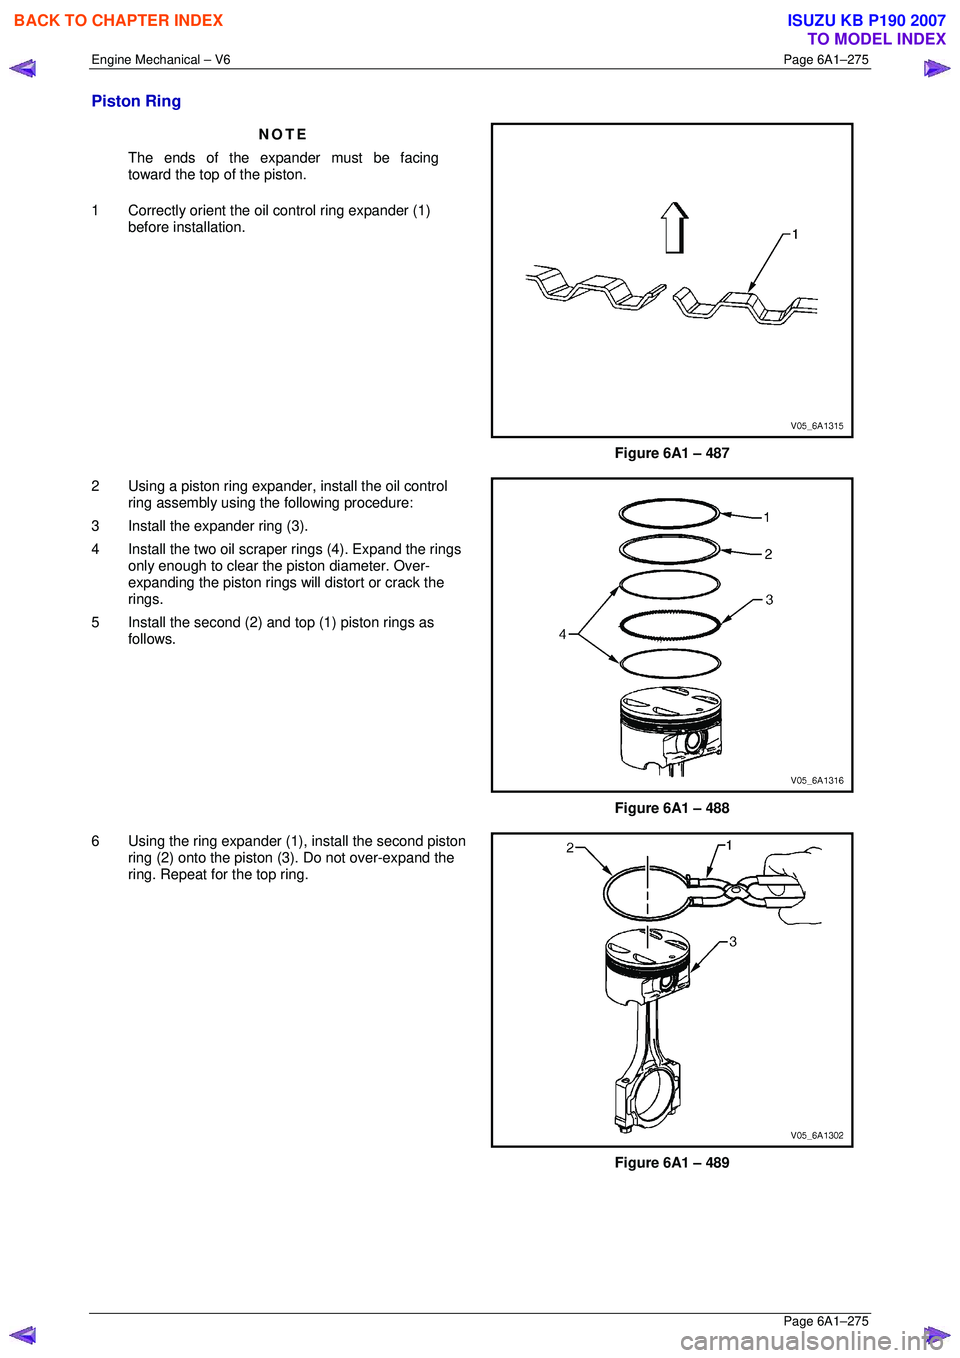
2 Using a piston ring expander, install the oil control
ring assembly using the following procedure:
3 Install the expander ring (3).
4 Install the two oil scraper rings (4). Expand the rings only enough to clear the piston diameter. Over-
expanding the piston rings w ill distort or crack the
rings.
5 Install the second (2) and top (1) piston rings as follows.
Figure 6A1 – 488
6 Using the ring expander (1), install the second piston
ring (2) onto the piston (3). Do not over-expand the
ring. Repeat for the top ring.
Figure 6A1 – 489
BACK TO CHAPTER INDEX
TO MODEL INDEX
ISUZU KB P190 2007
Page 3053 of 6020
Engine Mechanical – V6 Page 6A1–276
Page 6A1–276
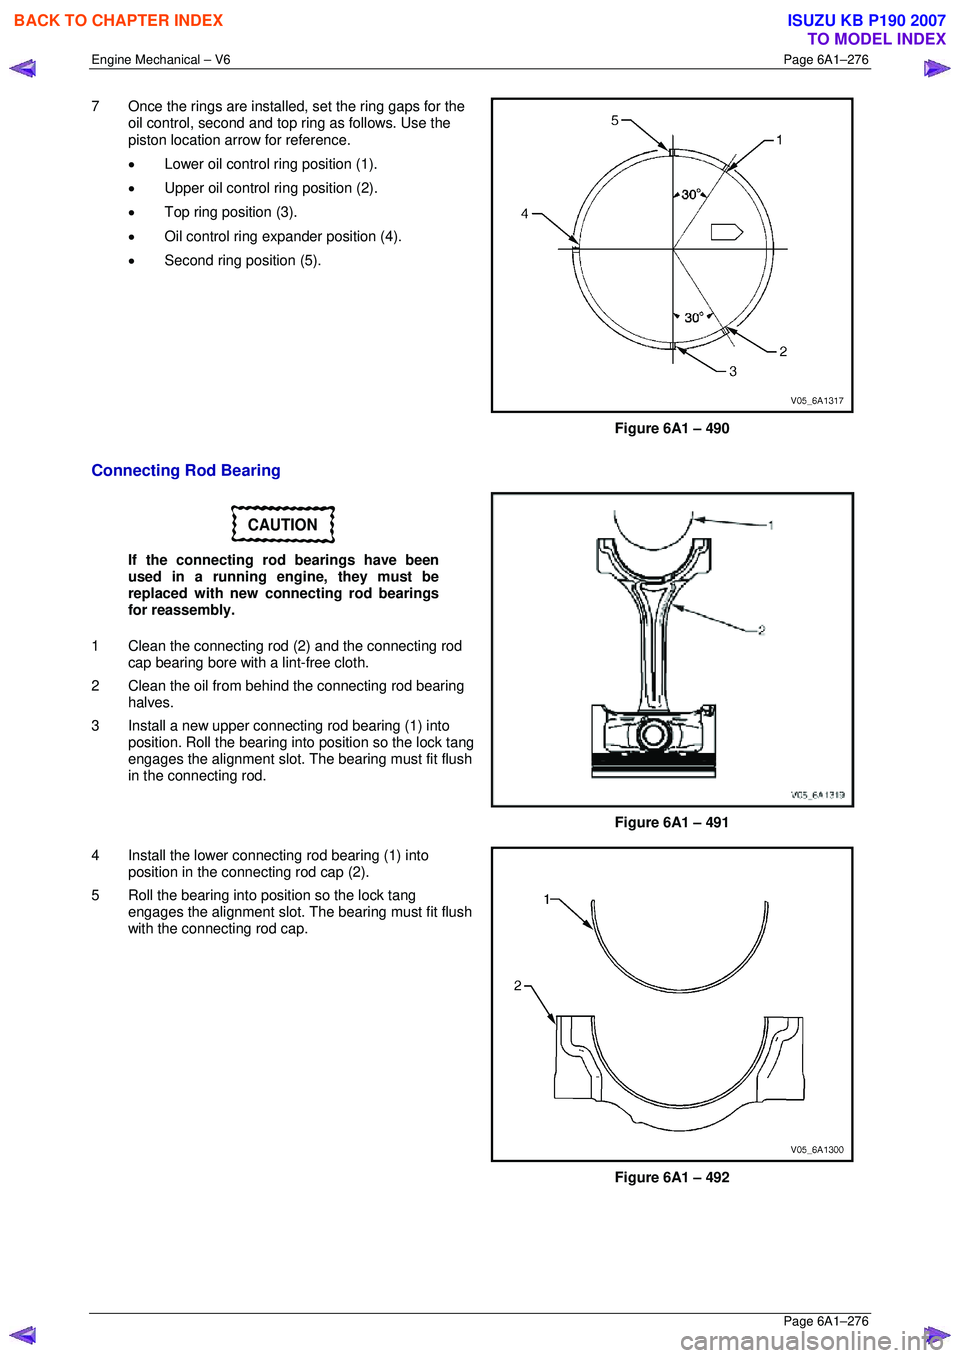
7 Once the rings are installed, set the ring gaps for the
oil control, second and top ring as follows. Use the
piston location arrow for reference.
• Lower oil control ring position (1).
• Upper oil control ring position (2).
• Top ring position (3).
• Oil control ring ex pander position (4).
• Second ring position (5).
Figure 6A1 – 490
Connecting Rod Bearing
CAUTION
If the connecting rod bearings have been
used in a running engine, they must be
replaced with new connecting rod bearings
for reassembly.
1 Clean the connecting rod (2) and the connecting rod
cap bearing bore with a lint-free cloth.
2 Clean the oil from behind the connecting rod bearing halves.
3 Install a new upper connecting rod bearing (1) into position. Roll the bearing into position so the lock tang
engages the alignment slot. The bearing must fit flush
in the connecting rod.
Figure 6A1 – 491
4 Install the lower connecting rod bearing (1) into position in the connecting rod cap (2).
5 Roll the bearing into position so the lock tang engages the alignment slot. The bearing must fit flush
with the connecting rod cap.
Figure 6A1 – 492
BACK TO CHAPTER INDEX
TO MODEL INDEX
ISUZU KB P190 2007
Page 3054 of 6020
Engine Mechanical – V6 Page 6A1–277
Page 6A1–277
Reinstall
Piston Connecting Rod and Connecting Rod Bearing Installation
CAUTION
The piston is directional and must be
installed in the engine block in the correct
direction. The locating arrow on the top of
each piston must be pointing toward the
front of the engine.
1 Liberally lubricate the cy linder walls, piston rings and
piston skirts with engine oil.
2 Select the correctly numbered piston/connecting rod
assembly for the cylinder. A dot (1) showing correct
piston orientation is locat ed on the top of the piston.
Figure 6A1 – 493
3 Install connecting rod guide pin set, Tool No. EN-46121 (1) into the connecting rod bolt holes.
Figure 6A1 – 494
4 Compress the piston rings using a commercially available ring compressor.
CAUTION
Extreme care must be used when installing
the piston and connecting rod to ensure the
rod does not scrape or nick the cylinder
bore, oil jets, or crankshaft surfaces.
5 Using both hands from the top and bottom of the cylinder, slowly guide the piston (2) and connecting
rod assembly into the cylinder. Do not allow the
connecting rod to contact the cylinder wall.
6 When the ring compressor c ontacts the deck surface,
gently tap the piston into the cylinder using the handle
end of a dead-blow hammer. Guide the connecting
rod onto the crankshaft bearing journal using
connecting rod guide pin set, Tool No. EN-46121 (1)
while gently tapping the piston into the cylinder with a
soft-blow hammer.
Figure 6A1 – 495
BACK TO CHAPTER INDEX
TO MODEL INDEX
ISUZU KB P190 2007