engine ISUZU KB P190 2007 Workshop Repair Manual
[x] Cancel search | Manufacturer: ISUZU, Model Year: 2007, Model line: KB P190, Model: ISUZU KB P190 2007Pages: 6020, PDF Size: 70.23 MB
Page 3075 of 6020
Engine Mechanical – V6 Page 6A1–298
Page 6A1–298
Measuring Cylinder Bore Taper
1 Measure the cylinder bore along the thrust surfaces, perpendicular to the crankshaft centreline, at 10 mm below the
deck surface and record the measurement.
2 Measure the cylinder bore along the th rust surfaces, perpendicular to the crankshaft centreline, at 100 mm below
the deck surface and record the measurement.
3 Calculate the difference betw een the two measurements. The re sult will be the cylinder taper.
4 Compare the results with the dimensions listed in the specifications, refer to 5 Specifications.
NOTE
If the cylinder diameter exceeds the
specifications, the cylinder block may be
oversized to 0.25 mm. Only one size of oversized
pistons and rings are available for service. If the
cylinder bore diameter ex ceeds specification by
more than 0.25 mm, the cylinder block must be
replaced.
Measuring Cylinder Bore Out-of-Round
1 Measure both the thrust and non-thrust cylinder diameter at 10 mm below the deck. Record your measurements.
2 Calculate the difference bet ween the two measurements. The result will indicate out-of-r ound at the upper end of
the cylinder.
3 Measure both the thrust and non-thru st cylinder diameter at 100 mm below the deck surface. Record your
measurements.
4 Calculate the difference between the tw o measurements. The result will indicate out-of-round at the lower end of
the cylinder.
5 Compare your results with the dimensions listed in the specifications, refer to 5 Specifications.
NOTE
If the cylinder diameter exceeds the
specifications, the cylinder block may be
oversized to 0.25 mm. Only one size of oversized
pistons and rings are available for service. If the
cylinder bore diameter ex ceeds specification by
more than 0.25 mm, the cylinder block must be
replaced.
Deck Flatness Inspection
1 Ensure the engine block decks are clean and free of gasket material.
2 Inspect the surface for any imperfections or scratches
that could inhibit correct cylinder head gasket sealing.
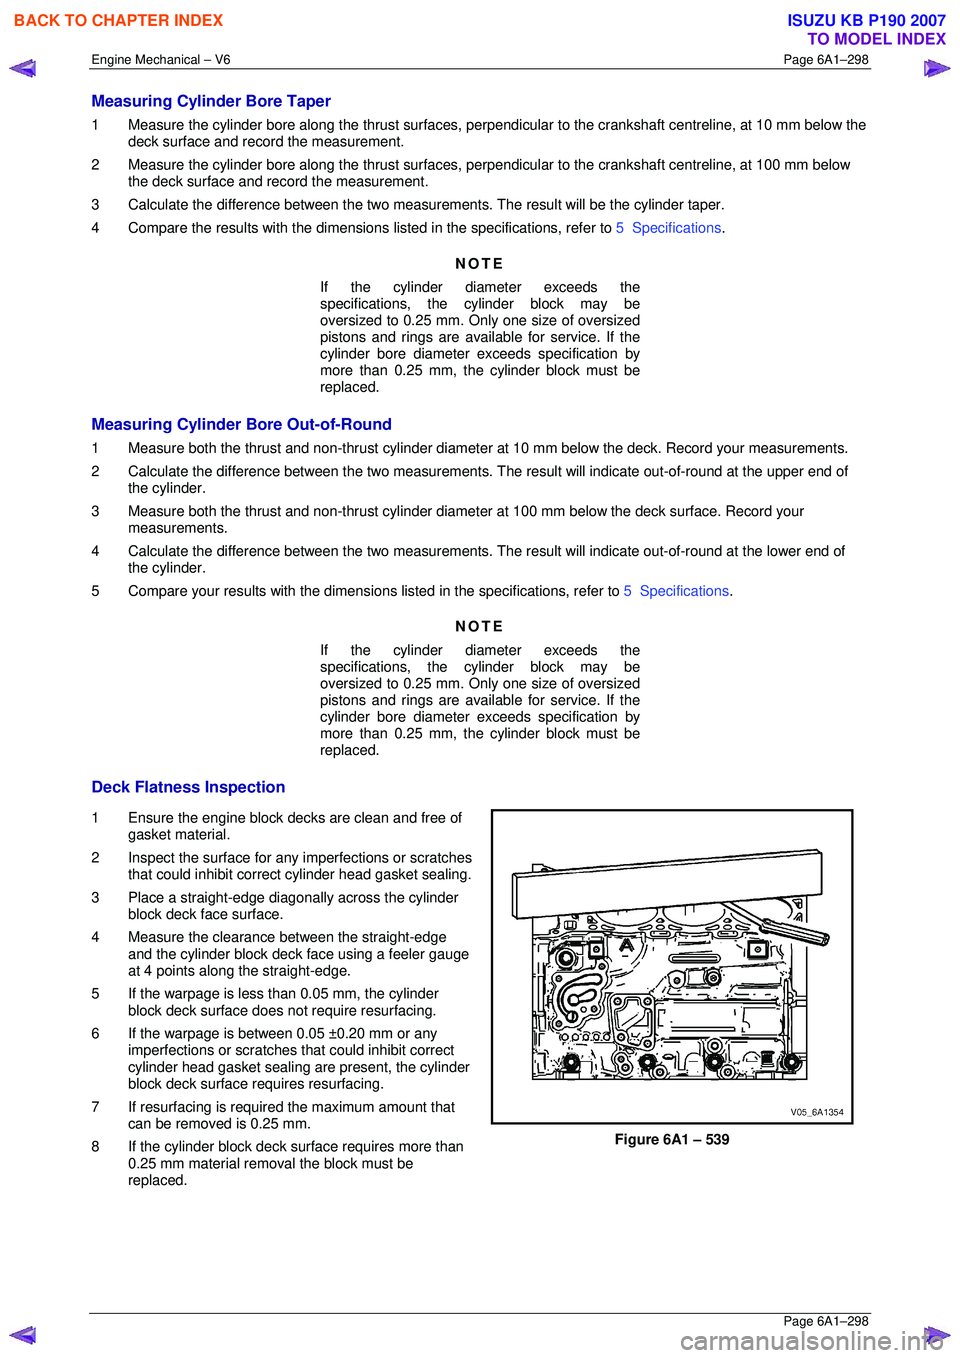
3 Place a straight-edge diagonally across the cylinder block deck face surface.
4 Measure the clearance between the straight-edge
and the cylinder block deck face using a feeler gauge
at 4 points along the straight-edge.
5 If the warpage is less t han 0.05 mm, the cylinder
block deck surface does not require resurfacing.
6 If the warpage is between 0.05 ±0.20 mm or any imperfections or scratches that could inhibit correct
cylinder head gasket sealing are present, the cylinder
block deck surface requires resurfacing.
7 If resurfacing is requir ed the maximum amount that
can be removed is 0.25 mm.
8 If the cylinder block deck surface requires more than 0.25 mm material removal the block must be
replaced.
Figure 6A1 – 539
BACK TO CHAPTER INDEX
TO MODEL INDEX
ISUZU KB P190 2007
Page 3076 of 6020
Engine Mechanical – V6 Page 6A1–299
Page 6A1–299
Reassemble
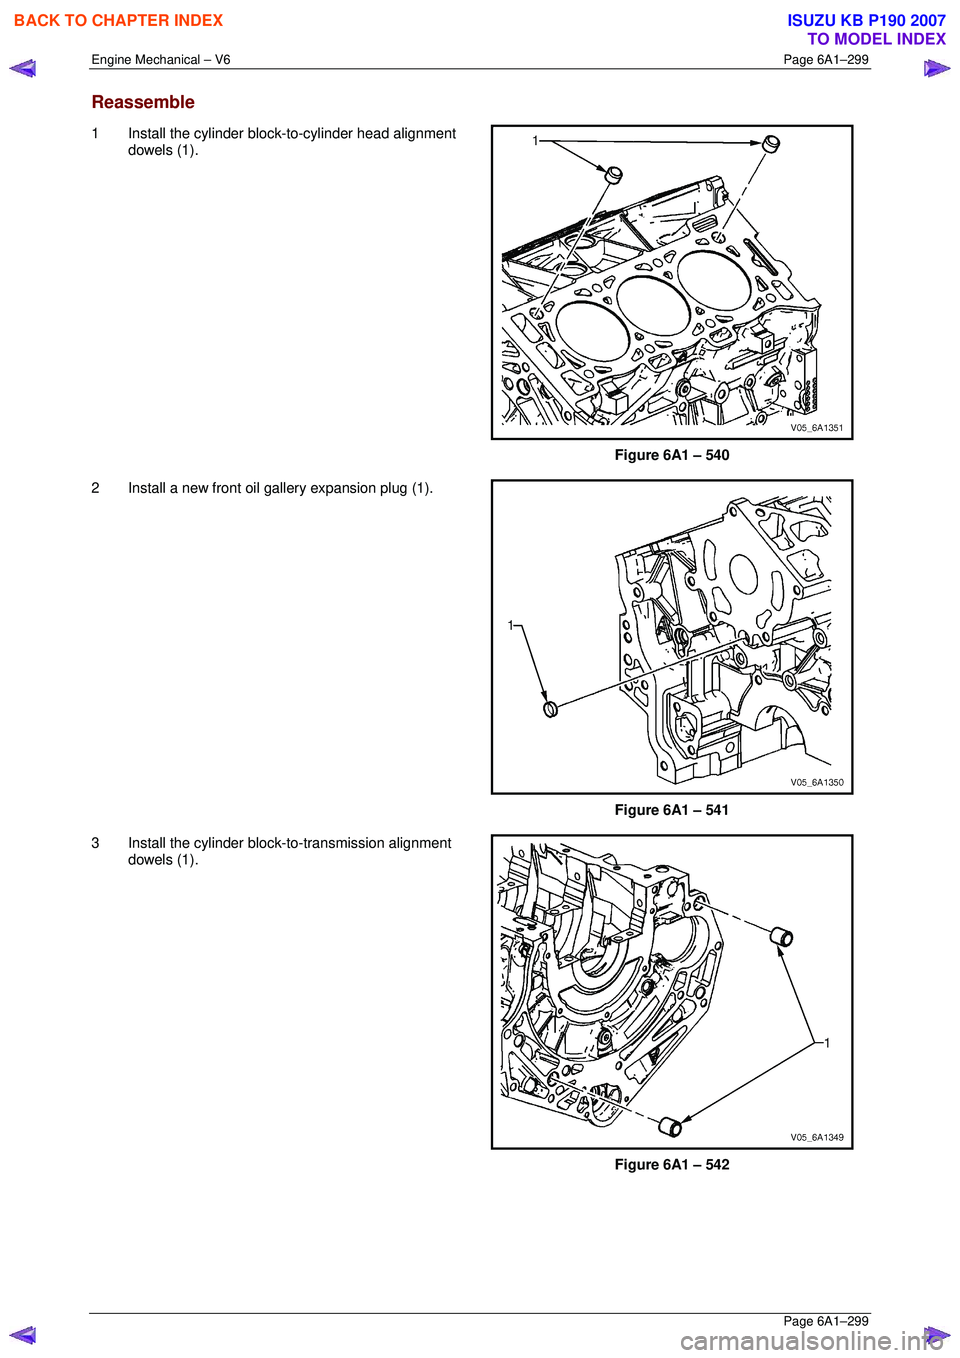
1 Install the cylinder block-to-cylinder head alignment
dowels (1).
Figure 6A1 – 540
2 Install a new front oil gallery expansion plug (1).
Figure 6A1 – 541
3 Install the cylinder blo ck-to-transmission alignment
dowels (1).
Figure 6A1 – 542
BACK TO CHAPTER INDEX
TO MODEL INDEX
ISUZU KB P190 2007
Page 3077 of 6020

Engine Mechanical – V6 Page 6A1–300
Page 6A1–300
4 Place RTV sealant on new coolant expansion plugs
(1) and install the new coolant expansion plugs.
Figure 6A1 – 543
5 Install the left-hand side M20 oil gallery threaded plug (1) and tighten to the correct torque specification.
Left-hand side M20 cylinder block
oil gallery threaded plug
torque specificatio n ................................. 27. 0 – 35.0 Nm
Figure 6A1 – 544
6 Install the left-hand side M14 coolant drain threaded
plug (1) and tighten to the co rrect torque specification.
Left-hand side M14 cylinder block
coolant drain threaded plug
torque specificatio n ................................. 27. 0 – 35.0 Nm
Figure 6A1 – 545
BACK TO CHAPTER INDEX
TO MODEL INDEX
ISUZU KB P190 2007
Page 3078 of 6020

Engine Mechanical – V6 Page 6A1–301
Page 6A1–301
7 Install the M14 rear oil gallery threaded plug (1) and
tighten to the correct torque specification.
M14 cylinder block rear oil gallery
threaded plug torque specif ication .......... 27.0 – 35.0 Nm
Figure 6A1 – 546
8 Install the right-hand side M14 coolant drain threaded
plug (1) and tighten to the co rrect torque specification.
Right-hand side M14 cylinder block
coolant drain threaded plug
torque specificatio n ................................. 27. 0 – 35.0 Nm
Figure 6A1 – 547
9 Install the right-hand side M14 oil gallery threaded plug (1) and tighten to the co rrect torque specification.
Right-hand side M14 cylinder block
oil gallery threaded plug
torque specificatio n ................................. 27. 0 – 35.0 Nm
Figure 6A1 – 548
BACK TO CHAPTER INDEX
TO MODEL INDEX
ISUZU KB P190 2007
Page 3079 of 6020
Engine Mechanical – V6 Page 6A1–302
Page 6A1–302
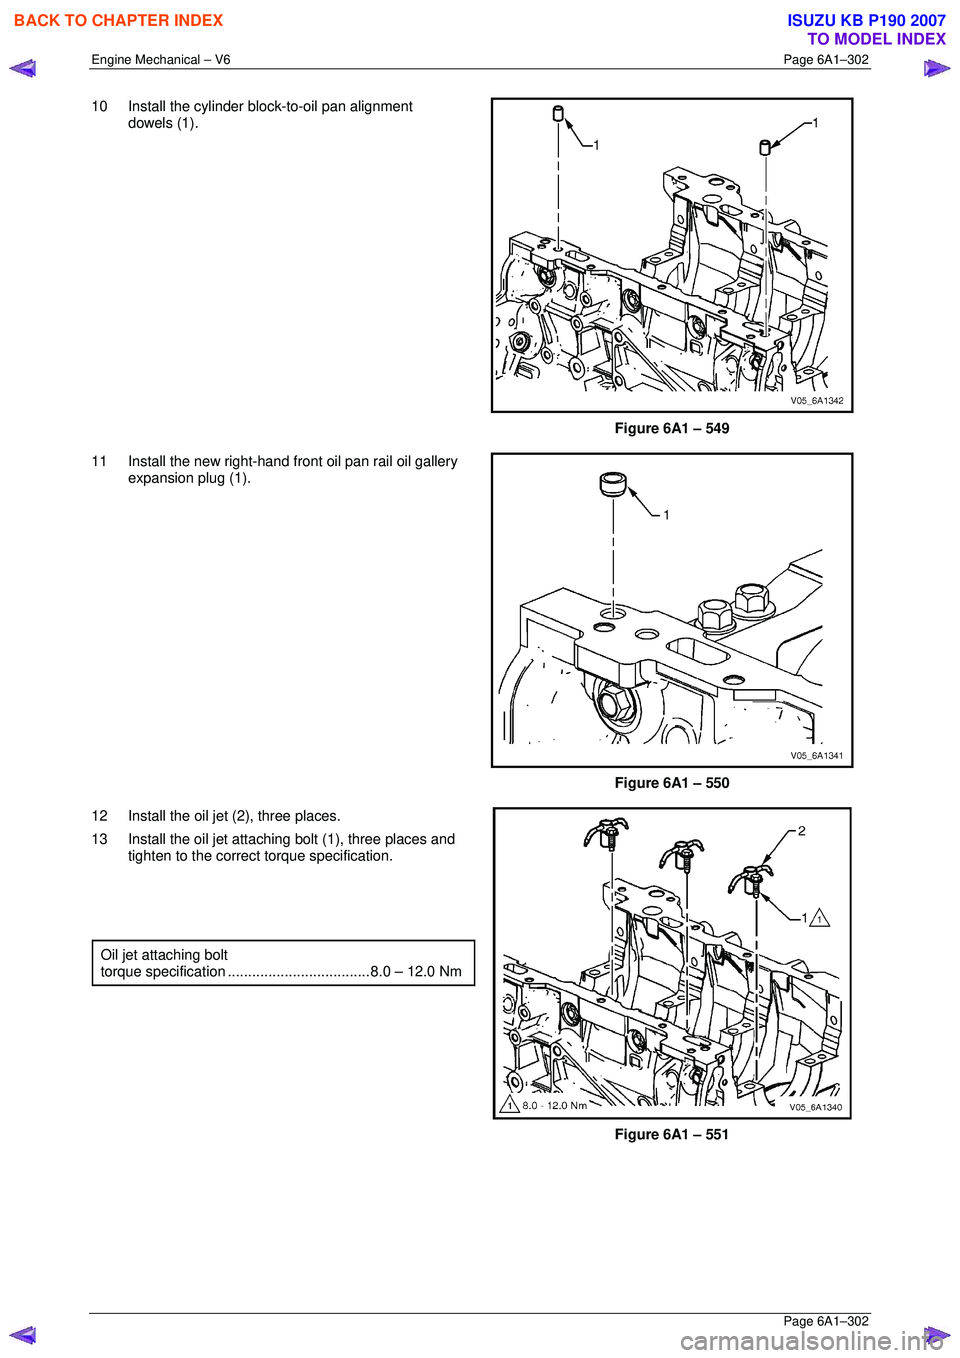
10 Install the cylinder block-to-oil pan alignment
dowels (1).
Figure 6A1 – 549
11 Install the new right-hand front oil pan rail oil gallery expansion plug (1).
Figure 6A1 – 550
12 Install the oil jet (2), three places.
13 Install the oil jet attaching bolt (1), three places and tighten to the correct torque specification.
Oil jet attaching bolt
torque specificatio n ................................... 8. 0 – 12.0 Nm
Figure 6A1 – 551
BACK TO CHAPTER INDEX
TO MODEL INDEX
ISUZU KB P190 2007
Page 3080 of 6020
Engine Mechanical – V6 Page 6A1–303
Page 6A1–303
4.8 Thread Repairs
General Information
The thread repair process involves a solid, thin walled, self-locking, carbon steel, bushing type insert. During the insert
installation process, the installation dr iver tool cold-rolls the bottom internal threads and expands the bottom external
threads of the insert into the base material. This action mechanically locks the insert into place.
This Section describes the recomm ended method of repairing threads in three specific areas of the engine.
• general thread repair,
• cylinder block main bearing cap bolt hole thread repair, and
• cylinder head bolt hole thread repair.
For detailed descriptions of all th read specifications used refer to 4.9 Thread Repair Specifications .
The drill-bit and counter-bore tool from the thread repair kit, Tool No. J-42385-700 and J-42385-2000 are designed for
use with either a suitable tap wrench or drill motor. Limited access and larger hol e repair may process better using a tap
wrench. An extension from Tool J 43965 may also be required to drive the thread repair tooling dependent on access to
the hole being repaired. Use only a tap wrench when tapping the hole and dur ing installation of the insert.
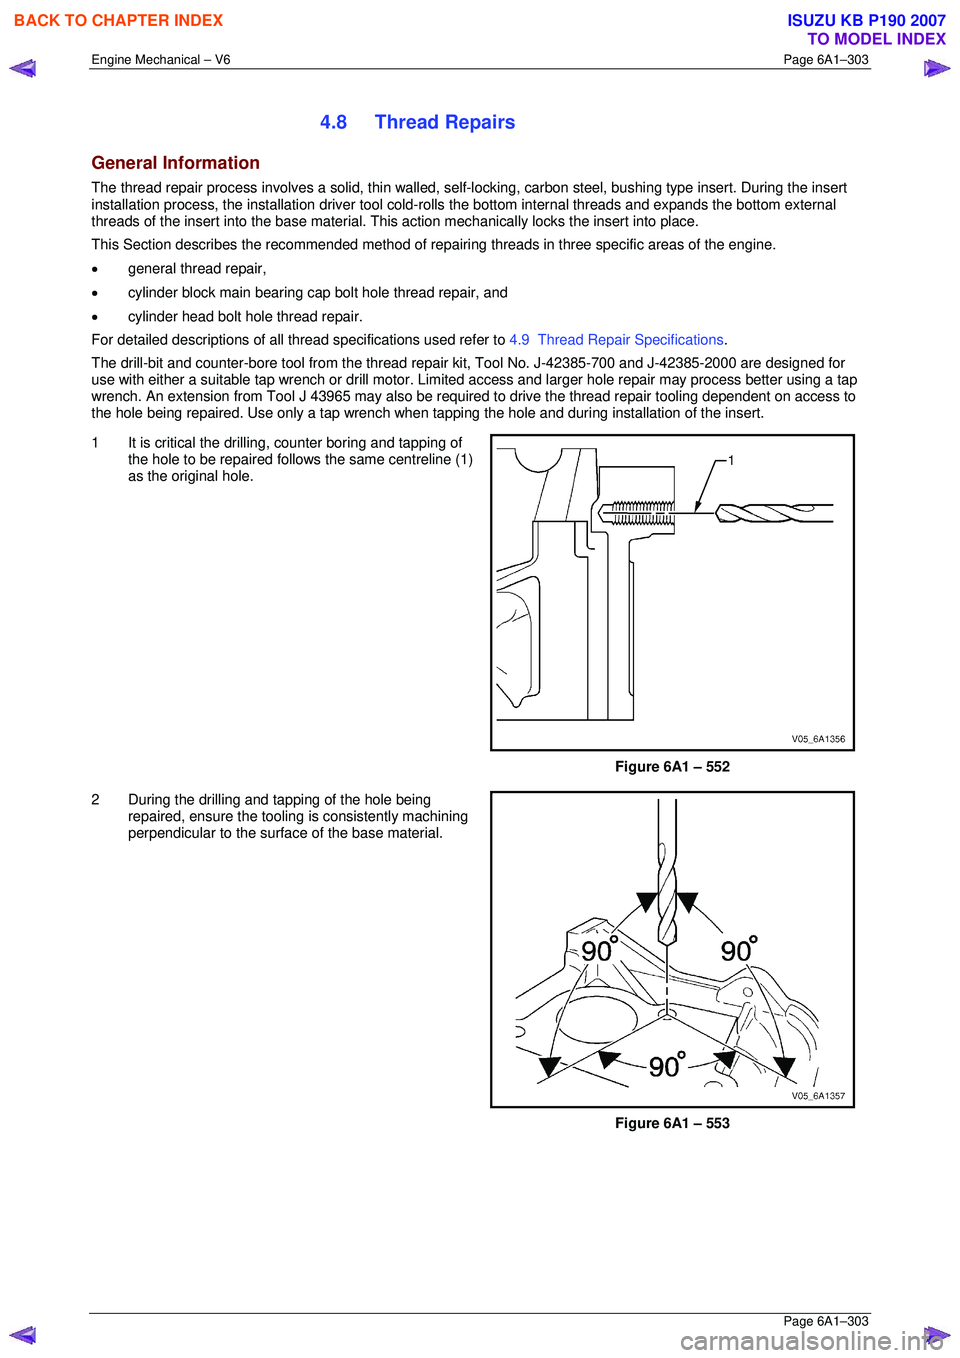
1 It is critical the drilling, counter boring and tapping of
the hole to be repaired follows the same centreline (1)
as the original hole.
Figure 6A1 – 552
2 During the drilling and tapping of the hole being repaired, ensure the tooling is consistently machining
perpendicular to the surface of the base material.
Figure 6A1 – 553
BACK TO CHAPTER INDEX
TO MODEL INDEX
ISUZU KB P190 2007
Page 3081 of 6020
Engine Mechanical – V6 Page 6A1–304
Page 6A1–304
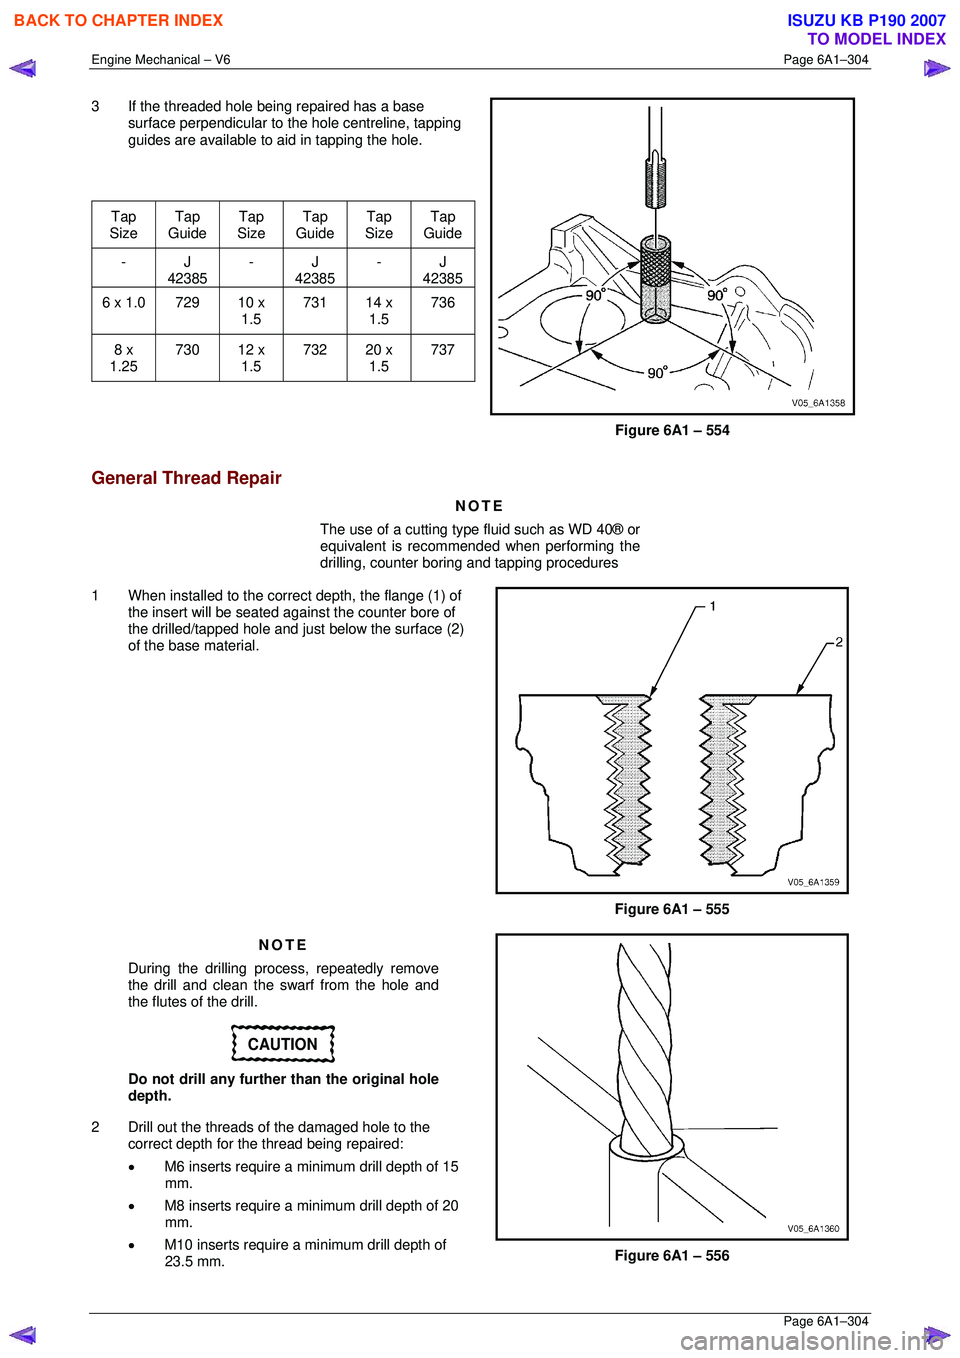
3 If the threaded hole being repaired has a base
surface perpendicular to t he hole centreline, tapping
guides are available to aid in tapping the hole.
Tap
Size Tap
Guide Tap
Size Tap
Guide Tap
Size Tap
Guide
- J 42385 - J
42385 - J
42385
6 x 1.0 729 10 x
1.5 731
14 x
1.5 736
8 x
1.25 730
12 x
1.5 732
20 x
1.5 737
Figure 6A1 – 554
General Thread Repair
NOTE
The use of a cutting type fluid such as WD 40® or
equivalent is recommended when performing the
drilling, counter bori ng and tapping procedures
1 When installed to the corre ct depth, the flange (1) of
the insert will be seated agai nst the counter bore of
the drilled/tapped hole and just below the surface (2)
of the base material.
Figure 6A1 – 555
NOTE
During the drilling process, repeatedly remove
the drill and clean the swarf from the hole and
the flutes of the drill.
CAUTION
Do not drill any further than the original hole
depth.
2 Drill out the threads of the damaged hole to the
correct depth for the thread being repaired:
• M6 inserts require a minimum drill depth of 15
mm.
• M8 inserts require a minimum drill depth of 20
mm.
• M10 inserts require a minimum drill depth of
23.5 mm.
Figure 6A1 – 556
BACK TO CHAPTER INDEX
TO MODEL INDEX
ISUZU KB P190 2007
Page 3082 of 6020
Engine Mechanical – V6 Page 6A1–305
Page 6A1–305
NOTE
All swarf must be removed from the drilled hole
prior to tapping.
Safety glasses must be worn when using
compressed air.
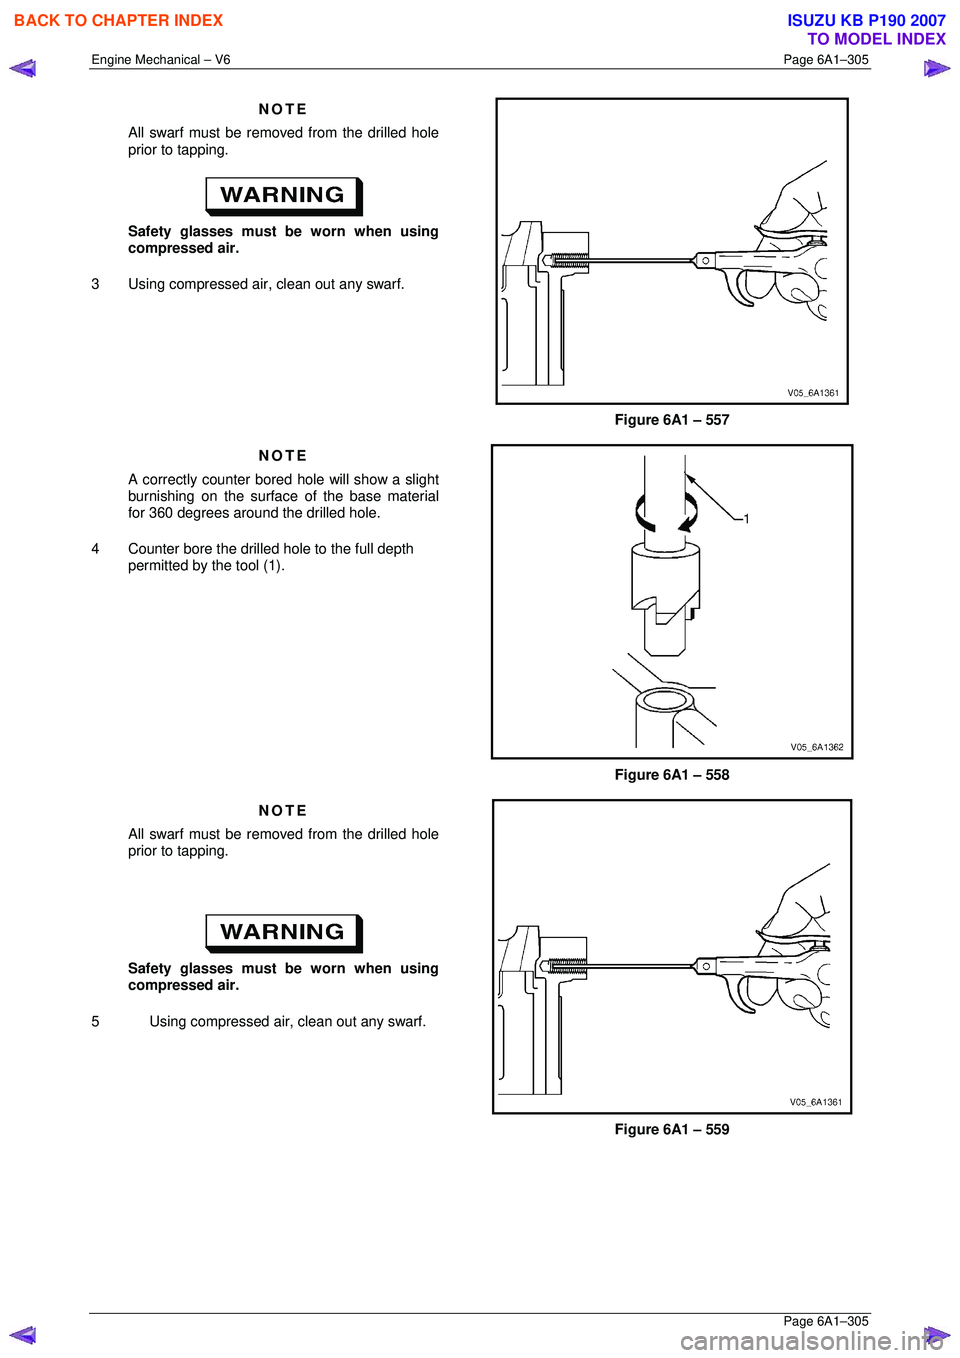
3 Using compressed air, clean out any swarf.
Figure 6A1 – 557
NOTE
A correctly counter bored hole will show a slight
burnishing on the surface of the base material
for 360 degrees around the drilled hole.
4 Counter bore the drilled hole to the full depth permitted by the tool (1).
Figure 6A1 – 558
NOTE
All swarf must be removed from the drilled hole
prior to tapping.
Safety glasses must be worn when using
compressed air.
5 Using compressed air, clean out any swarf.
Figure 6A1 – 559
BACK TO CHAPTER INDEX
TO MODEL INDEX
ISUZU KB P190 2007
Page 3083 of 6020
Engine Mechanical – V6 Page 6A1–306
Page 6A1–306
NOTE
• During the tapping pr ocess, repeatedly
remove the tap and clean the swarf from the
hole and the flutes of the tap.
• Ensure the tap has created full threads at
least to the depth equal to the insert length.
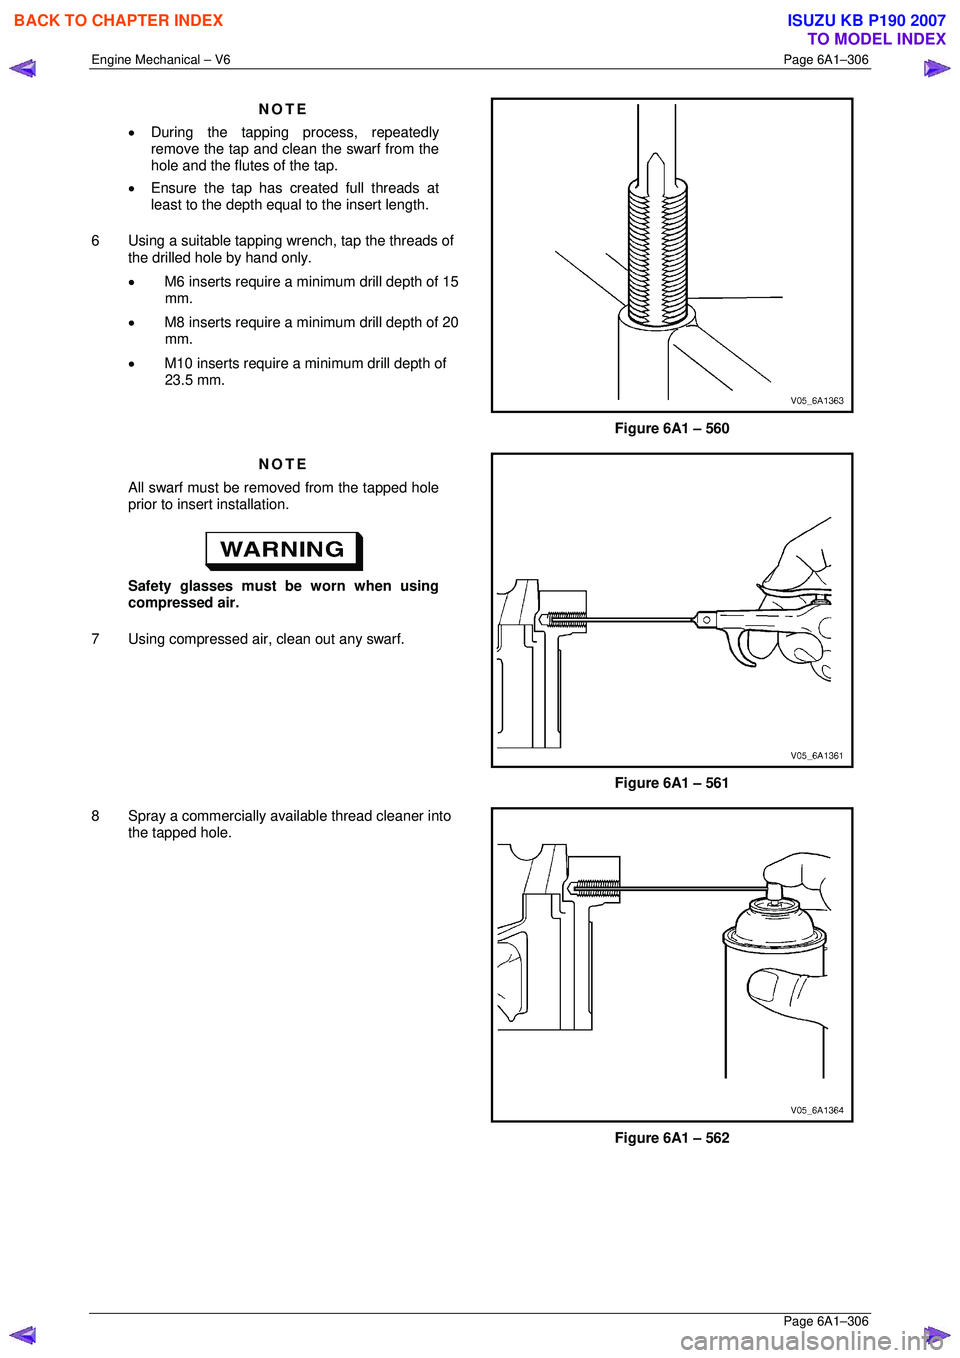
6 Using a suitable tapping wr ench, tap the threads of
the drilled hole by hand only.
• M6 inserts require a minimum drill depth of 15
mm.
• M8 inserts require a minimum drill depth of 20
mm.
• M10 inserts require a minimum drill depth of
23.5 mm.
Figure 6A1 – 560
NOTE
All swarf must be removed from the tapped hole
prior to insert installation.
Safety glasses must be worn when using
compressed air.
7 Using compressed air, clean out any swarf.
Figure 6A1 – 561
8 Spray a commercially available thread cleaner into the tapped hole.
Figure 6A1 – 562
BACK TO CHAPTER INDEX
TO MODEL INDEX
ISUZU KB P190 2007
Page 3084 of 6020
Engine Mechanical – V6 Page 6A1–307
Page 6A1–307
NOTE
All swarf must be removed from the tapped hole
prior to insert installation.
Safety glasses must be worn when using
compressed air.
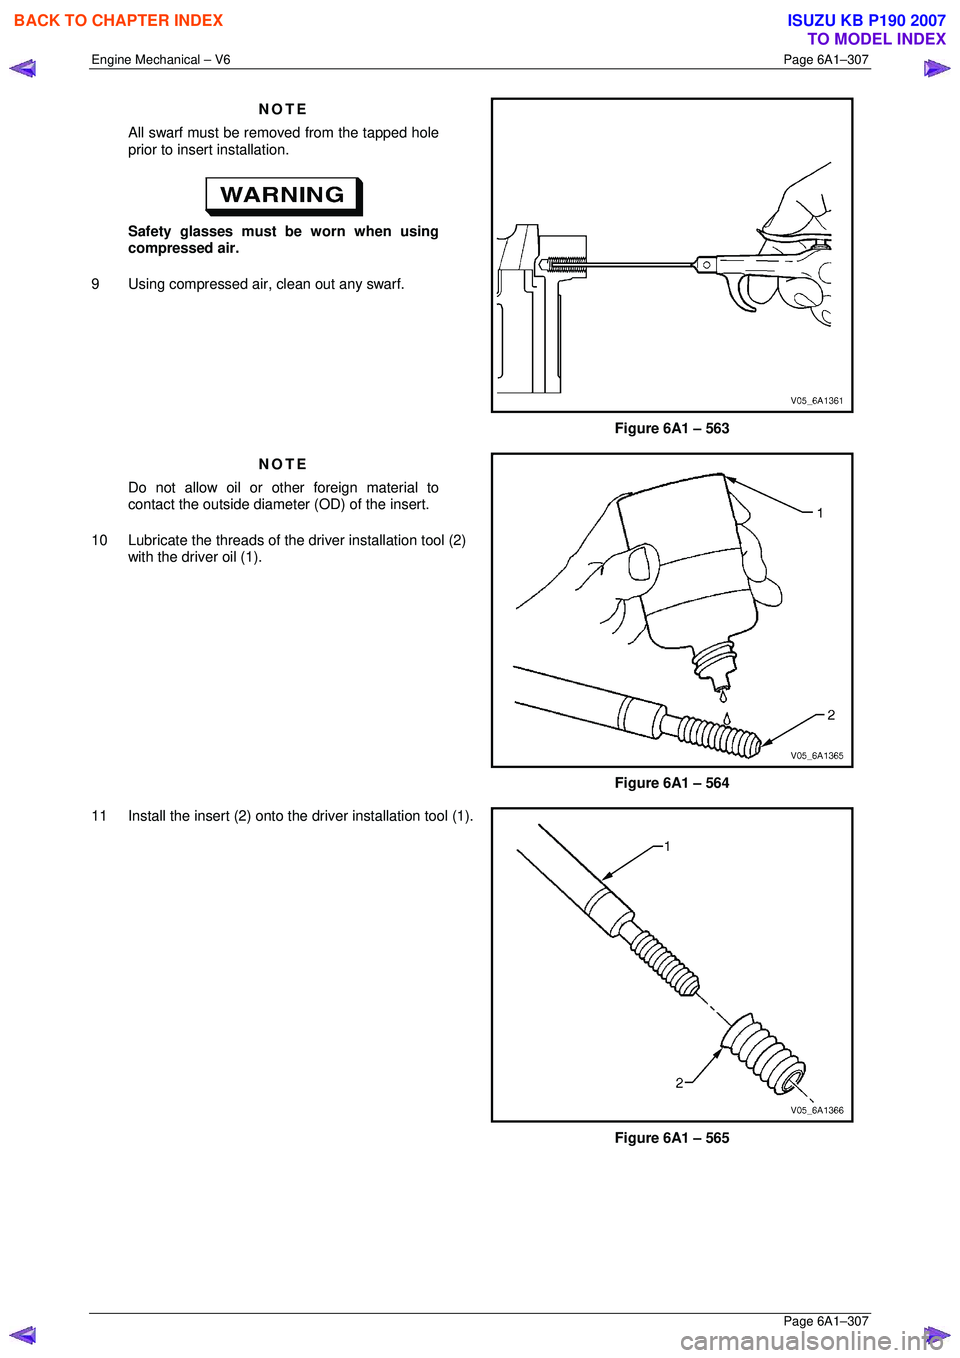
9 Using compressed air, clean out any swarf.
Figure 6A1 – 563
NOTE
Do not allow oil or other foreign material to
contact the outside diameter (OD) of the insert.
10 Lubricate the threads of the driver installation tool (2)
with the driver oil (1).
Figure 6A1 – 564
11 Install the insert (2) onto t he driver installation tool (1).
Figure 6A1 – 565
BACK TO CHAPTER INDEX
TO MODEL INDEX
ISUZU KB P190 2007