differential ISUZU KB P190 2007 Workshop Owner's Manual
[x] Cancel search | Manufacturer: ISUZU, Model Year: 2007, Model line: KB P190, Model: ISUZU KB P190 2007Pages: 6020, PDF Size: 70.23 MB
Page 475 of 6020

REAR AXLE 4B-31
φ
φφ
φ
194mm
RTW 54BSH000201
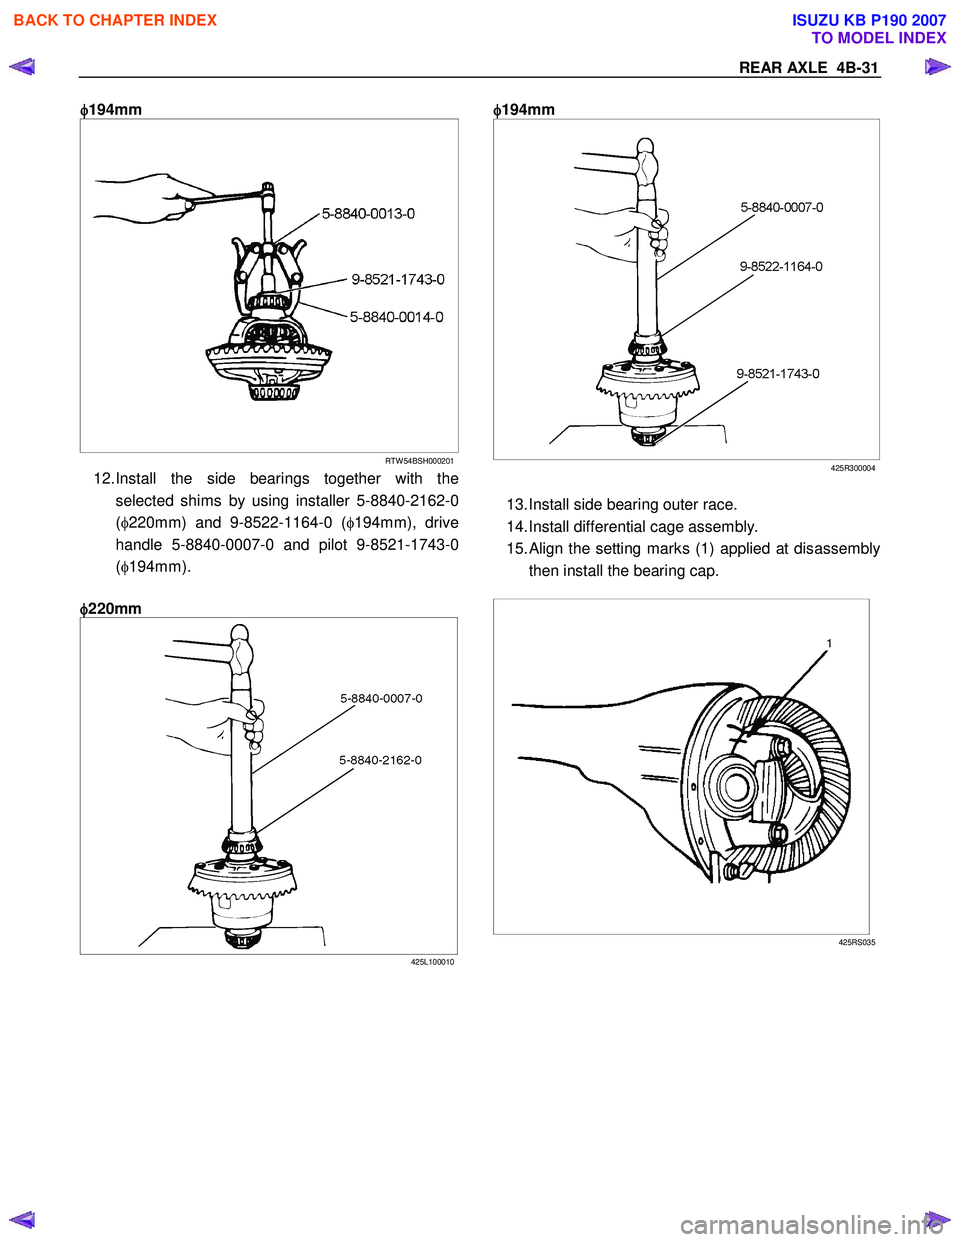
12. Install the side bearings together with the
selected shims by using installer 5-8840-2162-0
( φ 220mm) and 9-8522-1164-0 ( φ194mm), drive
handle 5-8840-0007-0 and pilot 9-8521-1743-0
( φ 194mm).
φ
φφ
φ
220mm
425L100010
φ
φφ
φ
194mm
425R300004
13. Install side bearing outer race.
14. Install differential cage assembly.
15.
Align the setting marks (1) applied at disassembly
then install the bearing cap.
425RS035
BACK TO CHAPTER INDEX
TO MODEL INDEX
ISUZU KB P190 2007
Page 478 of 6020

4B-34 REAR AXLE
Differential Cage Assembly
Disassembled View
425R300005
Legend
1. Bolt
2. Ring Gear
3. Lock Pin
4. Cross Pin
5. Pinion Gear
6. Side Gear
7. Thrust W asher (for Side Gear)
8. Differential Cage
BACK TO CHAPTER INDEX
TO MODEL INDEX
ISUZU KB P190 2007
Page 479 of 6020

REAR AXLE 4B-35
Disassembly
1. Remove bolt.
2. Remove ring gear.
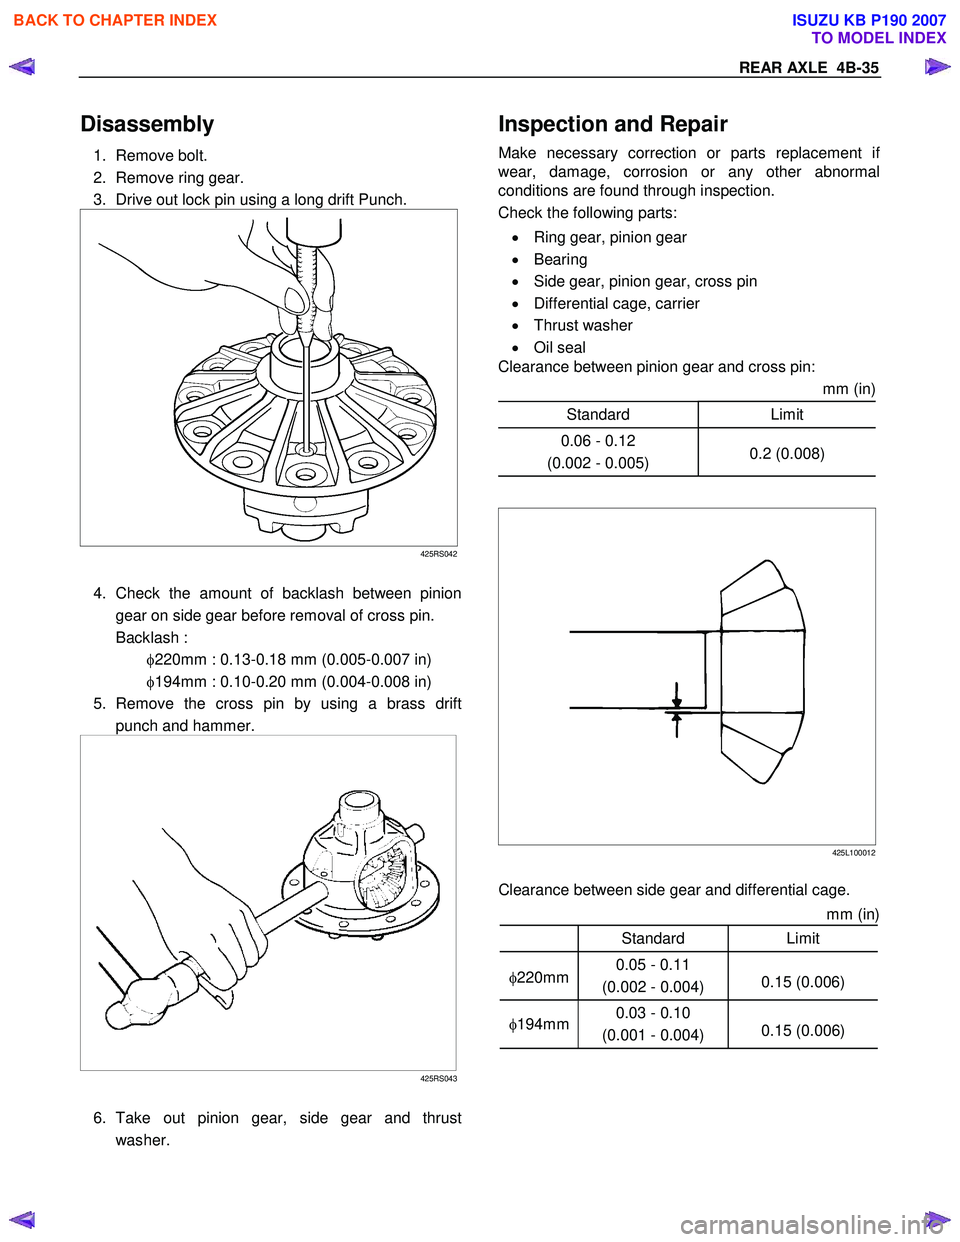
3. Drive out lock pin using a long drift Punch.
425RS042
4. Check the amount of backlash between pinion gear on side gear before removal of cross pin.
Backlash : φ220mm : 0.13-0.18 mm (0.005-0.007 in)
φ194mm : 0.10-0.20 mm (0.004-0.008 in)
5. Remove the cross pin by using a brass drift punch and hammer.
425RS043
6. Take out pinion gear, side gear and thrust washer.
Inspection and Repair
Make necessary correction or parts replacement if
wear, damage, corrosion or any other abnormal
conditions are found through inspection.
Check the following parts:
• Ring gear, pinion gear
• Bearing
• Side gear, pinion gear, cross pin
• Differential cage, carrier
• Thrust washer
• Oil seal
Clearance between pinion gear and cross pin:
mm (in)
Standard Limit
0.06 - 0.12
(0.002 - 0.005) 0.2 (0.008)
425L100012
Clearance between side gear and differential cage.
mm (in)
Standard Limit
φ220mm 0.05 - 0.11
(0.002 - 0.004) 0.15 (0.006)
φ
194mm 0.03 - 0.10
(0.001 - 0.004) 0.15 (0.006)
BACK TO CHAPTER INDEX
TO MODEL INDEX
ISUZU KB P190 2007
Page 480 of 6020

4B-36 REAR AXLE
425R300010
Play in splines between the side gear and axle shafts. mm(in)
Standard Limit
φ220mm 0.08 - 0.38
(0.003 - 0.015) 0.5 (0.02)
φ
194mm 0.08 - 0.36
(0.003 - 0.014) 0.5 (0.02)
425L100014
Differential cage
Check the ring gear the side gear fitting faces and the
cross pin hole for scores or roughness. Correct as
necessary. Slight scores or roughness may be
corrected with an oil stone or fine sand paper.
425R300006
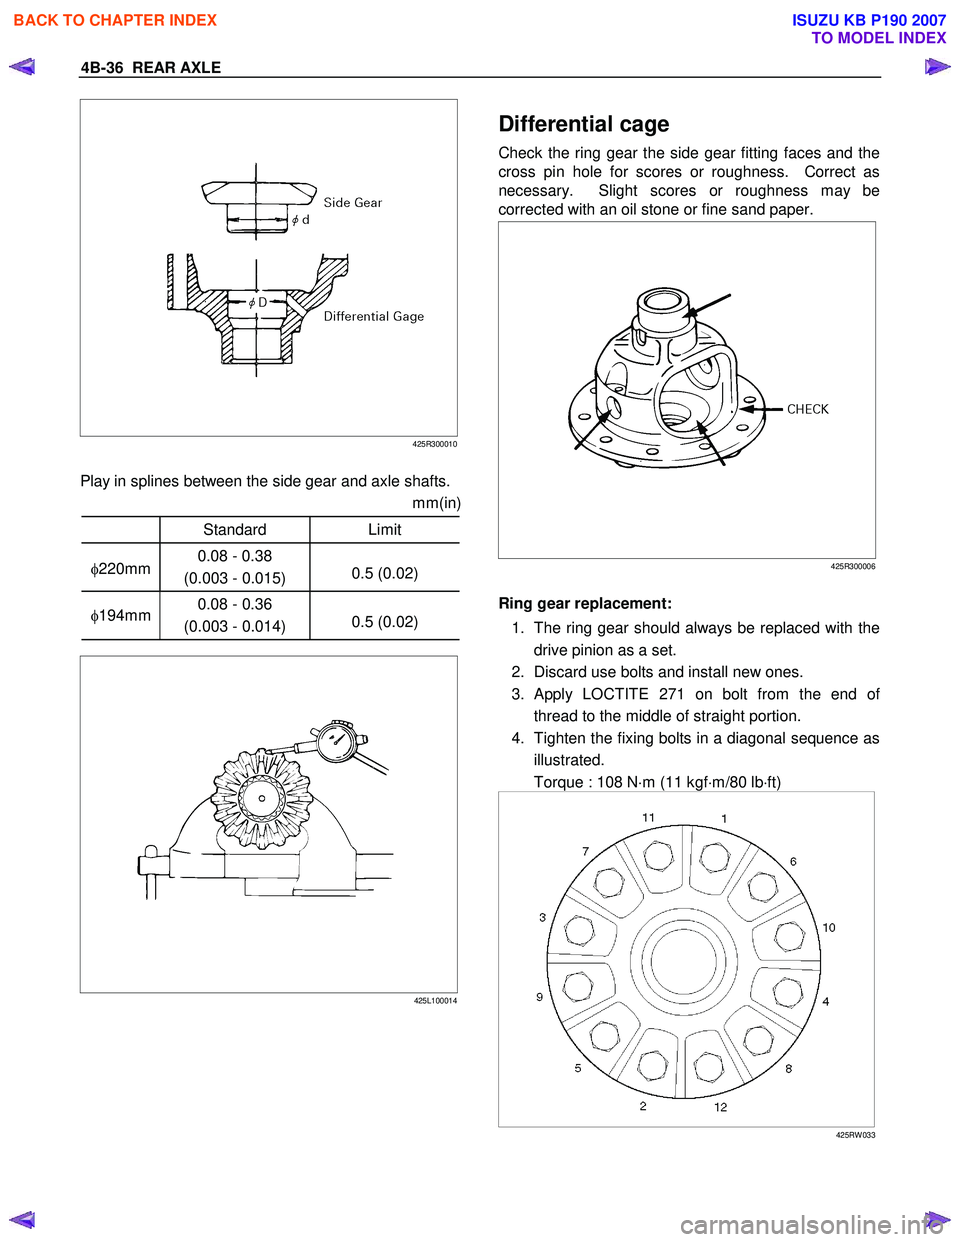
Ring gear replacement:
1. The ring gear should always be replaced with the drive pinion as a set.
2. Discard use bolts and install new ones.
3.
Apply LOCTITE 271 on bolt from the end of
thread to the middle of straight portion.
4. Tighten the fixing bolts in a diagonal sequence as illustrated.
Torque : 108 N ⋅m (11 kgf ⋅m/80 lb ⋅ft)
425RW 033
BACK TO CHAPTER INDEX
TO MODEL INDEX
ISUZU KB P190 2007
Page 481 of 6020

REAR AXLE 4B-37
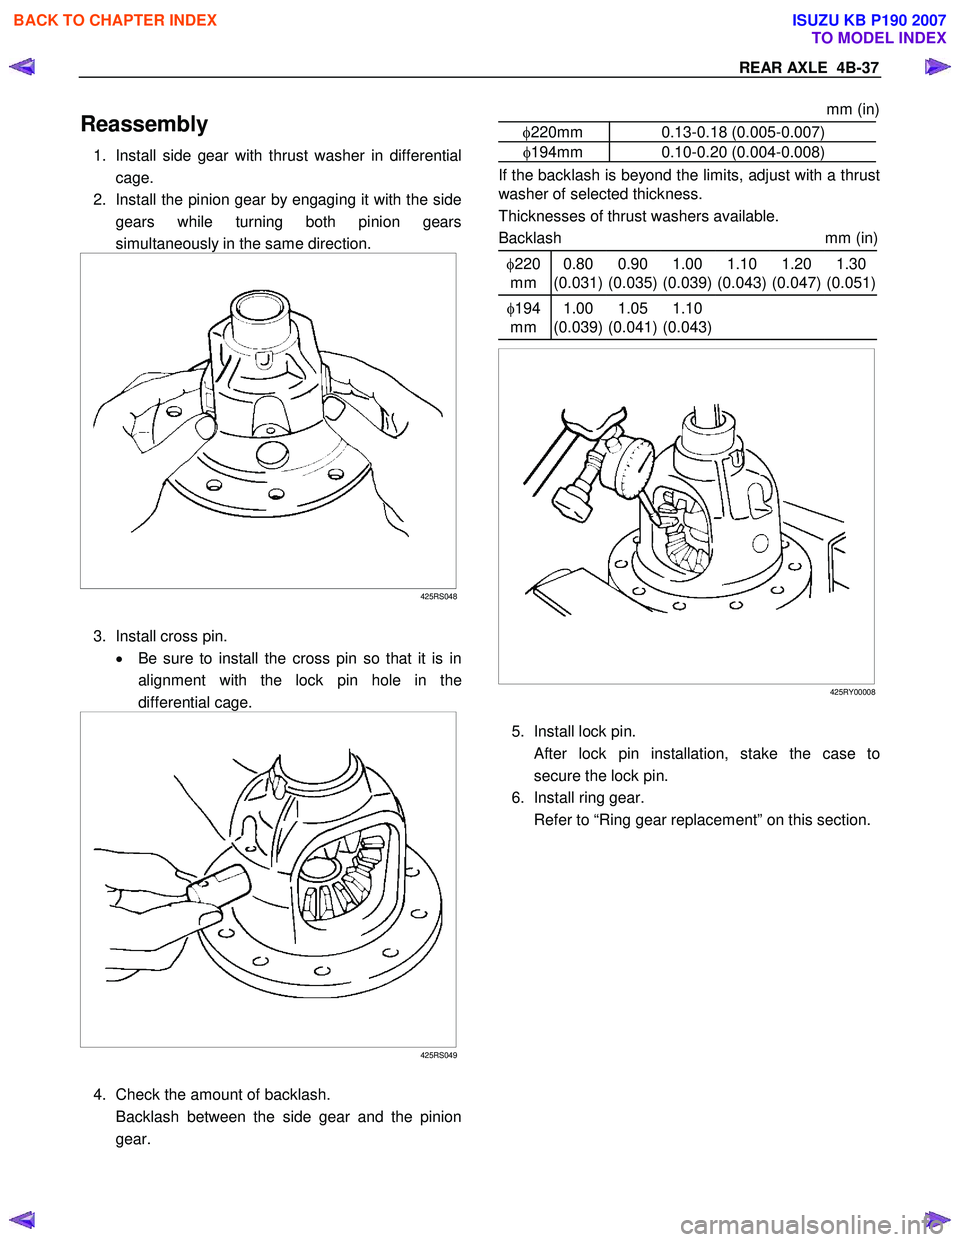
Reassembly
1. Install side gear with thrust washer in differential
cage.
2. Install the pinion gear by engaging it with the side gears while turning both pinion gears
simultaneously in the same direction.
425RS048
3. Install cross pin. • Be sure to install the cross pin so that it is in
alignment with the lock pin hole in the
differential cage.
425RS049
4. Check the amount of backlash.
Backlash between the side gear and the pinion gear.
mm (in)
φ220mm 0.13-0.18 (0.005-0.007)
φ194mm 0.10-0.20 (0.004-0.008)
If the backlash is beyond the limits, adjust with a thrust
washer of selected thickness.
Thicknesses of thrust washers available.
Backlash mm (in)
φ220
mm 0.80
(0.031) 0.90
(0.035) 1.00
(0.039) 1.10
(0.043) 1.20
(0.047) 1.30
(0.051)
φ 194
mm 1.00
(0.039) 1.05
(0.041) 1.10
(0.043)
425RY00008
5. Install lock pin.
After lock pin installation, stake the case to
secure the lock pin.
6. Install ring gear.
Refer to “Ring gear replacement” on this section.
BACK TO CHAPTER INDEX
TO MODEL INDEX
ISUZU KB P190 2007
Page 482 of 6020

4B-38 REAR AXLE
LIMITED SLIP DIFFERENTIAL (LSD)
Disassembled View
425R300007
Legend
1. Screw
2. Differential Cage B
3. Thrust W asher
4. Spring Plate
5. Spring Plate
6. Friction plate
7. Friction disc
8. Friction plate
9. Friction disc
10. Pressure Ring
11. Side Gear
12. Pinion and Pinion Shaft
13. Side Gear
14. Pressure Ring
15. Friction Disc
16. Friction Plate
17. Friction Disc
18. Friction Plate
19. Spring Plate
20. Spring Plate
21. Thrust W asher
22. Differential Cage A
BACK TO CHAPTER INDEX
TO MODEL INDEX
ISUZU KB P190 2007
Page 483 of 6020

REAR AXLE 4B-39
Disassembly
• Prepare a side gear holder : 5-8840-2682-0 as
shown in the left figure, clamp it with a stock vice,
and set a differential.
425R300008
1. Screw • Apply a setting mark to the differential cage A
and differential cage B remove the bolt using
the press.
• Loosen four screws fixing differential cage A
to cage B equally and remove them.
425RS055
2. Remove differential cage A and B.
3. Remove thrust washer and two spring plates.
4. Remove friction plate and friction disc.
5. Remove friction plate and friction disc.
6. Remove pressure ring and side gear.
7. Remove pinion and pinion shaft.
8. Remove side gear and pressure ring.
9. Remove friction disc and friction plate.
10. Remove friction disc and friction plate.
11. Remove two spring plates and thrust washer.
BACK TO CHAPTER INDEX
TO MODEL INDEX
ISUZU KB P190 2007
Page 484 of 6020

4B-40 REAR AXLE
Inspection and Repair
Make all necessary adjustments, repairs, and part
replacements if wear, damage, rust or other problems
are discovered during inspection.
Visual Check
Inspect the following parts for wear, damage or other
abnormal conditions.
• Friction disc
• Friction plate
• Spring plate
1 Sliding surface
2 Protrusion
425RS056
Pressure ring
Check the parts for damage or other abnormal
conditions.
3 Sliding surface for friction disc
If dents or damages are discovered, grind them with oil stone, and repair them with compound on
surface plate.
4 Sliding surface of pressure ring inner surface and pinion gear.
5 Sliding surface of pressure ring bore and sidegear.
6 sliding surface of pressure ring and side gear.
7 Sliding surface of pressure ring and pinion shaft.
8 Mating surface to differential cage A.
9 Burrs or dents on sliding surface of pressure ringand rear differential cage should be repaired,
using oil stone.
425RY00022
• Thrust W asher
10 Groove on side gear circumference small burrs of
dens should be repaired, using oil stone.
11 Sliding surface between side gear and thrust washer.
425RY00024
• Differential cage A and B
12 Contact surface to spring plate
13 Differential cage A and B contact surfaces to
thrust washers Small burrs or dents should be
repair, using oil stone.
BACK TO CHAPTER INDEX
TO MODEL INDEX
ISUZU KB P190 2007
Page 486 of 6020

4B-42 REAR AXLE
425RS063
Reassembly
Adjustment of Clearance between
Friction Disc and Plate
1. Measuring depth of differential case
mm(in)
Standard (A-B) 80.58 (3.17)
(C) 10.58 (0.42)
425RS064
2. Measuring overall length of pressure ring, friction disc and plate assembly
• Assemble pinion shaft with pressure ring, then
friction disc and plate.
• Measure length between plates at both ends
over V-shape groove. (D)
425 RS065
3.
After A, B, C and D dimensions are measured,
perform adjustment with the following procedure.
• Measure spring plate :
1.75 mm (0.069 in) × 4 pcs (E)
• Measure thickness of plate spring
Standard dimension :
1.75 mm (0.069 in) × 2 pcs (F)
4. Select a friction disc or plate so that ((A-B+C) - (D+E) = 0.06 to 0.20 mm (0.002 to 0.008 in.) and
also the difference in total dimension of friction
disc and plate and spring plate (left/right side)
does not exceed 0.05 mm (0.002 in.).
Thickness : 1.65, 1.75, 1.85 mm (0.065, 0.069, 0.073 in)
Adjusting Backlash of Side Gear in
Axial Direction
1. Measuring depth of differential case mm(in)
Standard (F-B) 82.03 (3.23)
(G) 12.03 (0.47)
BACK TO CHAPTER INDEX
TO MODEL INDEX
ISUZU KB P190 2007
Page 487 of 6020

REAR AXLE 4B-43
425RS066
2. Measuring dimension between thrust washers at both ends.
Assemble side gear, pinion, pinion shaft pressure
ring and thrust washer.
• Eliminate clearance by pushing pressure ring
against the pinion shaft in axial direction.
• Eliminate backlash by connecting side gear to
the pinion.
• Measure dimension between thrust washers
at both ends. (H)
425RS067
3. After each dimension is measured, perform adjustment with the following procedure.
Adjust so that ((F-B) + G-H) = 0.05 to 0.2 mm (0.002 to 0.008 in).
Also, select a proper thrust
washer so that the dimension difference from
back face of the pressure ring to thrust washer
(left/right side) does not exceed 0.05 mm (0.002
in).
Thickness : 1.5, 1.6, 1.7 mm (0.059, 0.063, 0.067 in)
Note :
When reassembling, sufficiently apply gear oil on
every part, especially on sliding surface.
1. Install thrust washer in differential cage A and B.
2.
Assemble spring plate, friction plate and
friction disc as following illustration.
• Install spring plate with dished side turned
to the differential cage side.
425R300009
Legend
1. Friction Plate
2. Spring Plate
3. Friction Disc
4. Install pressure ring and side gear. • Fit two side gears in two pressure rings, one
from under a ring and the other from above a
ring.
• Fit two pairs of a friction disc and a friction
plate under it on and under these two
pressure rings.
5. Set pinion and pinion shaft on differential cage
A
assembly.
6. Assemble differential cage A and B.
7.
Align the setting marks on differential cage A and
B and tighten screws in diagonal order evenly.
BACK TO CHAPTER INDEX
TO MODEL INDEX
ISUZU KB P190 2007