ESP ISUZU KB P190 2007 Workshop Repair Manual
[x] Cancel search | Manufacturer: ISUZU, Model Year: 2007, Model line: KB P190, Model: ISUZU KB P190 2007Pages: 6020, PDF Size: 70.23 MB
Page 356 of 6020

FRONT SUSPENSION 3C-35
3. Apply the setting marks (2) to the height control
arm and torsion bar, then remove height control
arm.
NOTE: “Besco chassis grease” should be applied on
contact area of height control arm with frame.
(RH & LH Both side)
410RS005
4. Apply the setting marks (3) to the torsion bar and
lower control arm, and then remove torsion bar.
RTW 340SH000301
Inspection and Repair
Make necessary correction or replace parts if wear,
damage, corrosion or any other abnormal condition is
found through inspection.
Check the following parts:
• Torsion bar
• Height control arm
• Adjust bolt
• Rubber seat
Installation
1. Apply grease to the serrated portions, then install
torsion bar. Make sure the bars are on their correct
respective sides and align the setting marks (3).
410RS007
RTW 340SH000301
BACK TO CHAPTER INDEX
TO MODEL INDEX
ISUZU KB P190 2007
Page 393 of 6020

REAR SUSPENSION 3D-9
Installation
1. Install the bump rubber and bolt and tighten it to thespecified torque.
Torque N ⋅m (kgf ⋅m/lb ⋅ft)
42 (4.3/31)
2. Install the leaf spring. • The leaf spring assembly should be installed so that the
built-in rubber bush is toward the front.
• Align the holes of the spring eye and frame bracket.
• Insert the spring pin toward vehicle inner side, through
the frame bracket holes and the spring bush hole.
• Tighten the nut a little and, after the vehicle is lowered,
tighten it to the specified torque.
Torque N ⋅m (kgf ⋅m/lb ⋅ft)
152 (15.5/112)
RTW 340LF000101
RTW 63DSH000101
• Apply rubber grease to inside and outside of the rubber
bushing.
• Install the rubber bushings into the hole in the frame
side bracket and the spring rear eye.
• Install the shackle pin and shackle plate.
• Tighten the nuts a little and, after vehicle is lowered,
tighten it to the specified torque.
Torque N ⋅m (kgf ⋅m/lb ⋅ft)
98 (10.0/72)
3. Support the lower clamp under the leaf spring.
4. Apply oil to the thread portion of U bolt.
Install the U bolt (1) and seat (2) on the rear axle and insert
the U bolt in the lower clamp holes.
Tolerance of assembling the seat
A
90° ±2°
5. Tighten the nut to the specified torque.
NOTE: Apply oil to the thread.
Torque N⋅m (kgf ⋅m/lb ⋅ft)
78 (8.0/58)
6. Install the shock absorber and inner washer on the lower clamp pin and frame side pin.
7. Install the washer and nut on the frame side pin and tighten the nut to the specified torque.
Torque N ⋅m (kgf ⋅m/lb ⋅ft)
39 (4.0/29)
8. Install the washer and nut on the lower clamp pin and tighten the nut to the specified torque.
Torque N ⋅m (kgf ⋅m/lb ⋅ft)
39 (4.0/29)
BACK TO CHAPTER INDEX
TO MODEL INDEX
ISUZU KB P190 2007
Page 487 of 6020

REAR AXLE 4B-43
425RS066
2. Measuring dimension between thrust washers at both ends.
Assemble side gear, pinion, pinion shaft pressure
ring and thrust washer.
• Eliminate clearance by pushing pressure ring
against the pinion shaft in axial direction.
• Eliminate backlash by connecting side gear to
the pinion.
• Measure dimension between thrust washers
at both ends. (H)
425RS067
3. After each dimension is measured, perform adjustment with the following procedure.
Adjust so that ((F-B) + G-H) = 0.05 to 0.2 mm (0.002 to 0.008 in).
Also, select a proper thrust
washer so that the dimension difference from
back face of the pressure ring to thrust washer
(left/right side) does not exceed 0.05 mm (0.002
in).
Thickness : 1.5, 1.6, 1.7 mm (0.059, 0.063, 0.067 in)
Note :
When reassembling, sufficiently apply gear oil on
every part, especially on sliding surface.
1. Install thrust washer in differential cage A and B.
2.
Assemble spring plate, friction plate and
friction disc as following illustration.
• Install spring plate with dished side turned
to the differential cage side.
425R300009
Legend
1. Friction Plate
2. Spring Plate
3. Friction Disc
4. Install pressure ring and side gear. • Fit two side gears in two pressure rings, one
from under a ring and the other from above a
ring.
• Fit two pairs of a friction disc and a friction
plate under it on and under these two
pressure rings.
5. Set pinion and pinion shaft on differential cage
A
assembly.
6. Assemble differential cage A and B.
7.
Align the setting marks on differential cage A and
B and tighten screws in diagonal order evenly.
BACK TO CHAPTER INDEX
TO MODEL INDEX
ISUZU KB P190 2007
Page 556 of 6020

4C1-52 FRONT WHEEL DRIVE
Preload Adjustment
Tighten the hub nut at 29.4 N⋅m (3 kgf ⋅m / 2 1.7 lb·ft), then
loosen the nut to the full.
Tighten the hub nut at the value given below, using a spring
scale on the wheel pin.
Bearing Preload N (kgf/lb)
New bearing and New oil seal 22 - 27
(2.2 - 2.8 / 4.9 - 6.2)
Used bearing and New oil seal 1
4 - 20
( 1 .4 - 2.0 / 3. 1 - 4.5)
If the measured bearing preload is outside the specifications,
adjust it by loosening or tightening the bearing nut.
9. Lock Washer
Turn the side with larger diameter of the tapered bore to the
vehicle outer side, and attach the washer.
If the bolt holes in the lock plate are not aligned with the
corresponding holes in the nut, reverse the lock plate.
If the bolt holes are still out of alignment, turn in the nut just
enough to obtain alignment,. Screw is to be fastened tightly so
its head may come lower than the surface of the washer.
10. Flange (4×4 model only)
Apply adhesive (LOCTITE 5 15 or equivalent) to both joining
flange faces then install hub flange.
11. Snap ring, shims (4×4 model only)
Adjust the clearance between the flange and the snap ring.
Clearance mm(in) 0 - 0.2 (0 - 0.008)
Adjust shims available mm(in)
0.2, 0.3, 0.5, 1.0
(0.008, 0.0 12, 0.020, 0.039)
RTW 440SH00090 1
13. Bolt
Torque N ⋅m (kgf ⋅m/lb ⋅ft
)
59 (6.0 / 43)
• Refer to SECTION 3E “W HEELS AND TIRES” for wheel
install procedure.
BACK TO CHAPTER INDEX
TO MODEL INDEX
ISUZU KB P190 2007
Page 565 of 6020

FRONT WHEEL DRIVE 4C1-61
Preload Adjustment
Tighten the hub nut at 29 N⋅m (3.0 kgf ⋅m / 22 lb ⋅ft), then loosen
the nut to the full.
Tighten the hub nut at the value given below, using a spring
scale on the wheel pin.
Bearing Preload N (kgf/lb)
New bearing and New oil seal 22 - 27
(2.2 - 2.8 / 4.9 - 6.2)
Used bearing and New oil seal 1
4 - 20
( 1 .4 - 2.0 / 3. 1 - 4.5)
If the measured bearing preload is outside the specifications,
adjust it by loosening or tightening the bearing nut.
21. Lock Washer
Turn the side with larger diameter of the tapered bore to the
vehicle outer side, and attach the washer.
If the bolt holes in the lock plate are not aligned with the
corresponding holes in the nut, reverse the lock plate.
If the bolt holes are still out of alignment, turn in the nut just
enough to obtain alignment,. Screw is to be fastened tightly so
its head may come lower than the surface of the washer.
22. Body Assembly
Apply adhesive (Loctite 5 15 or equivalent) to the both joining
faces.
23. Snap Ring and Shims
Adjust the clearance between the free wheeling hub body and
the snap ring.
Clearance mm(in) 0 - 0.2 (0 - 0.08)
Adjust Shims Available mm(in)
0.2, 0.3, 0.5, 1.0
(0.008, 0.0 11, 0.020, 0.039)
BACK TO CHAPTER INDEX
TO MODEL INDEX
ISUZU KB P190 2007
Page 618 of 6020
BRAKE CONTROL SYSTEM 5A-25
“ABS” Warning Lamp
W hen ABS and problems occur that actuate the “ABS”
warning lamp, the code corresponding to the problem is
stored in the EHCU. Only ordinary braking is available
when the ABS is deactivated. Even when the “ABS”
warning lamp is actuated, if the starter switch is set ON
after setting it OFF once, the EHCU checks up on the
entire system. If there is no abnormality, the EHCU
judges ABS to work correctly and the warning lamp is lit
normally, even though the problem code is stored.
NOTE: Illumination of the “ABS” warning lamp indicates
that anti-lock braking is no longer available. Power
assisted braking without anti-lock control is still
available.
Normal Operation
“ABS ” Warning Lamp
W hen the ignition is first moved from “OFF” to “RUN”,
the amber “ABS” warning lamp will turn “ON”. The
“ABS” warning lamp will turn “ON” during engine
starting and will usually stay “ON” for approximately
three seconds after the ignition switch is returned to the
“ON” position. The warning lamp should remain “OFF”
at all other times.
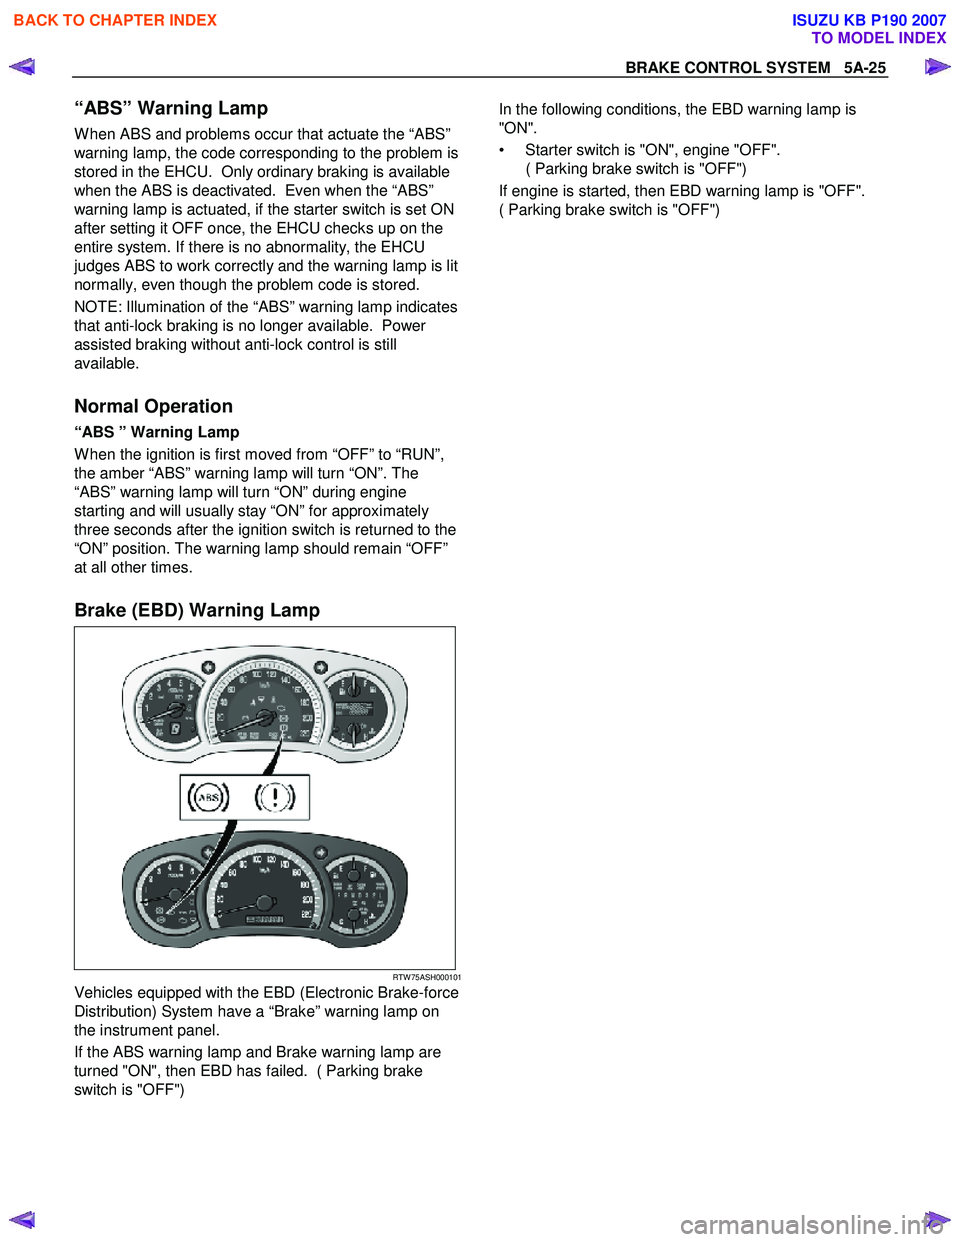
Brake (EBD) Warning Lamp
RTW 75ASH000101
Vehicles equipped with the EBD (Electronic Brake-force
Distribution) System have a “Brake” warning lamp on
the instrument panel.
If the ABS warning lamp and Brake warning lamp are
turned "ON", then EBD has failed. ( Parking brake
switch is "OFF")
In the following conditions, the EBD warning lamp is
"ON".
• Starter switch is "ON", engine "OFF". ( Parking brake switch is "OFF")
If engine is started, then EBD warning lamp is "OFF".
( Parking brake switch is "OFF")
BACK TO CHAPTER INDEX
TO MODEL INDEX
ISUZU KB P190 2007
Page 620 of 6020
BRAKE CONTROL SYSTEM 5A-27
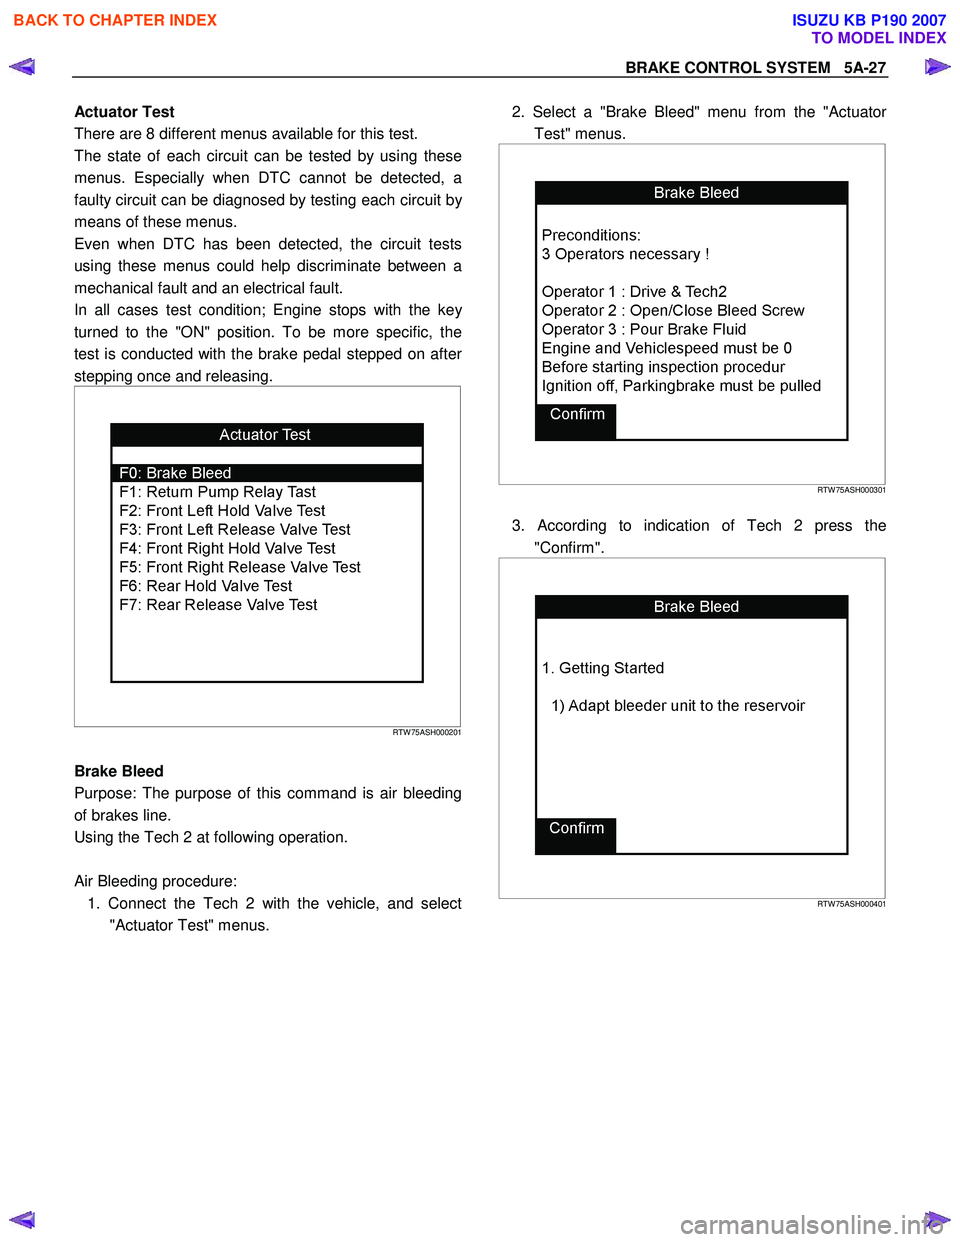
Actuator Test
There are 8 different menus available for this test.
The state of each circuit can be tested by using these
menus. Especially when DTC cannot be detected, a
faulty circuit can be diagnosed by testing each circuit b
y
means of these menus.
Even when DTC has been detected, the circuit tests
using these menus could help discriminate between a
mechanical fault and an electrical fault.
In all cases test condition; Engine stops with the ke
y
turned to the "ON" position. To be more specific, the
test is conducted with the brake pedal stepped on afte
r
stepping once and releasing.
RTW 75ASH000201
Brake Bleed
Purpose: The purpose of this command is air bleeding
of brakes line.
Using the Tech 2 at following operation.
Air Bleeding procedure: 1. Connect the Tech 2 with the vehicle, and select "Actuator Test" menus.
2. Select a "Brake Bleed" menu from the "Actuato
r
Test" menus.
RTW 75ASH000301
3. According to indication of Tech 2 press the
"Confirm".
RTW 75ASH000401
BACK TO CHAPTER INDEX
TO MODEL INDEX
ISUZU KB P190 2007
Page 836 of 6020
ENGINE MECHANICAL 6A – 31
VALVE CLEARANCE ADJUSTMENT
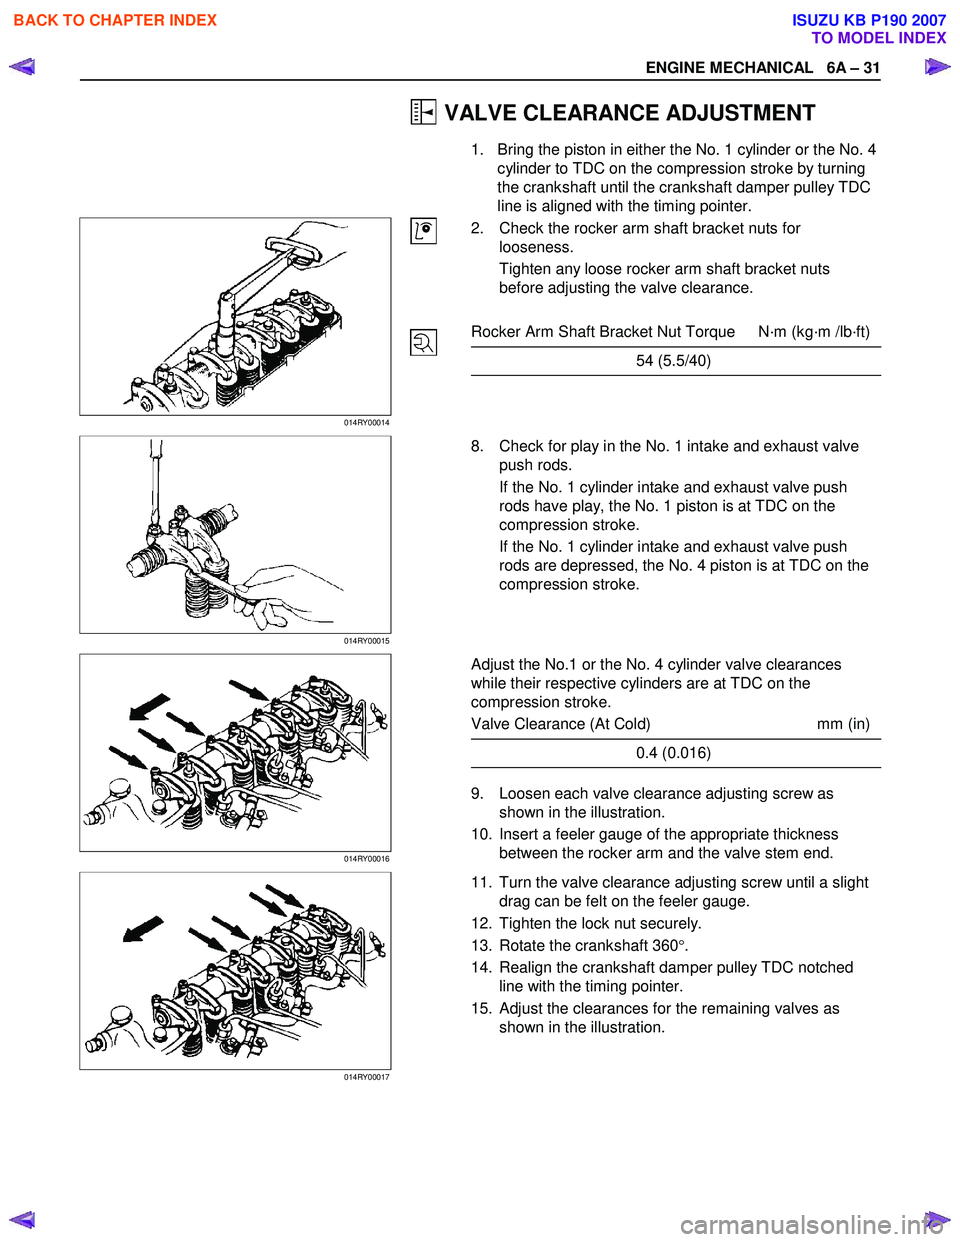
1. Bring the piston in either the No. 1 cylinder or the No. 4 cylinder to TDC on the compression stroke by turning
the crankshaft until the crankshaft damper pulley TDC
line is aligned with the timing pointer.
014RY00014
2. Check the rocker arm shaft bracket nuts for
looseness.
Tighten any loose rocker arm shaft bracket nuts
before adjusting the valve clearance.
Rocker Arm Shaft Bracket Nut Torque N·m (kg·m /lb·ft)
54 (5.5/40)
014RY00015
8. Check for play in the No. 1 intake and exhaust valve
push rods.
If the No. 1 cylinder intake and exhaust valve push
rods have play, the No. 1 piston is at TDC on the
compression stroke.
If the No. 1 cylinder intake and exhaust valve push
rods are depressed, the No. 4 piston is at TDC on the
compression stroke.
014RY00016
Adjust the No.1 or the No. 4 cylinder valve clearances
while their respective cylinders are at TDC on the
compression stroke.
Valve Clearance (At Cold) mm (in)
0.4 (0.016)
9. Loosen each valve clearance adjusting screw as
shown in the illustration.
10. Insert a feeler gauge of the appropriate thickness between the rocker arm and the valve stem end.
014RY00017
11. Turn the valve clearance adjusting screw until a slight
drag can be felt on the feeler gauge.
12. Tighten the lock nut securely.
13. Rotate the crankshaft 360 °.
14. Realign the crankshaft damper pulley TDC notched line with the timing pointer.
15. Adjust the clearances for the remaining valves as shown in the illustration.
BACK TO CHAPTER INDEX
TO MODEL INDEX
ISUZU KB P190 2007
Page 970 of 6020
6C – 6 FUEL SYSTEM
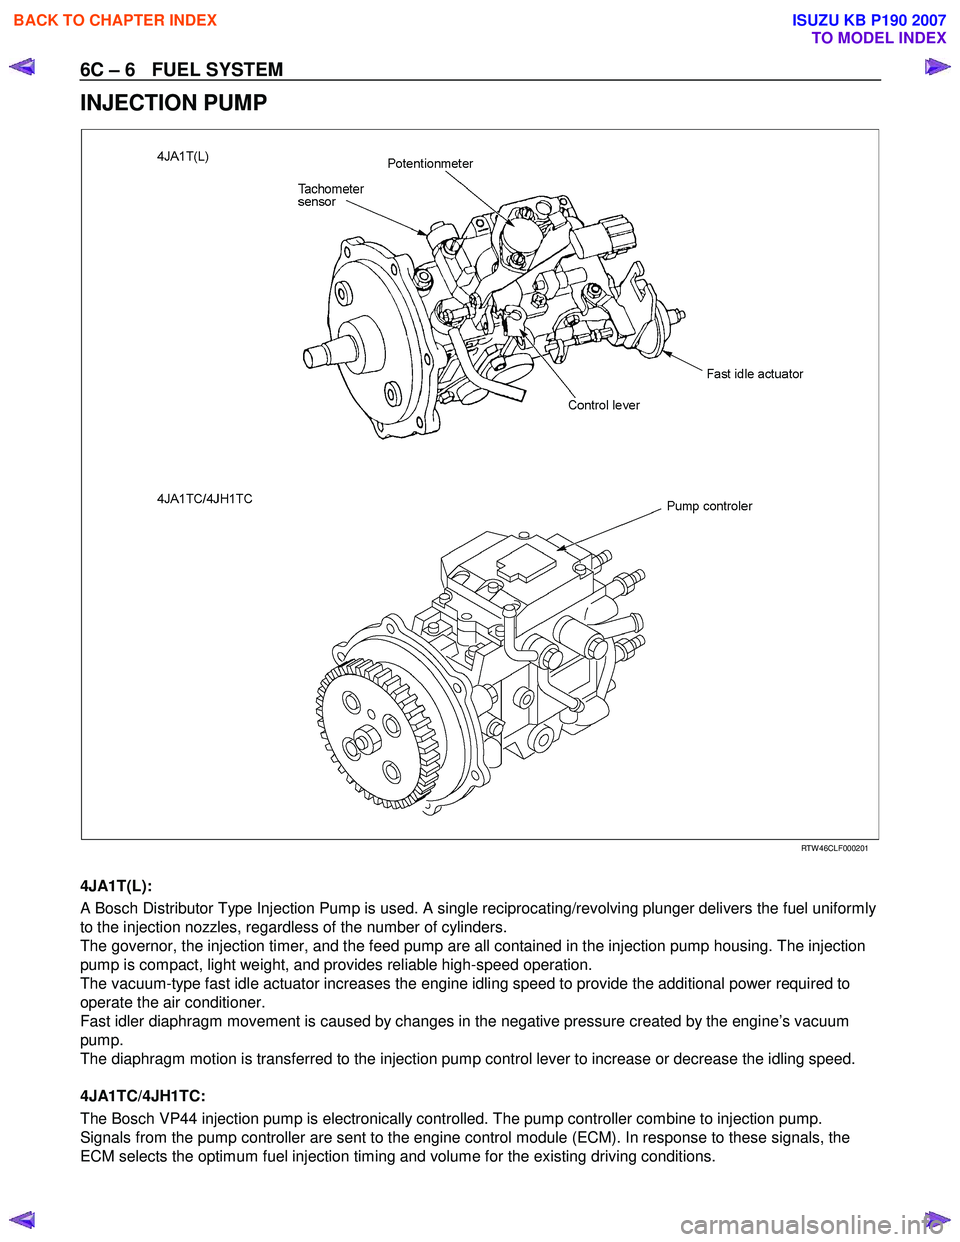
INJECTION PUMP
RTW 46CLF000201
4JA1T(L):
A Bosch Distributor Type Injection Pump is used. A single reciprocating/revolving plunger delivers the fuel uniformly
to the injection nozzles, regardless of the number of cylinders.
The governor, the injection timer, and the feed pump are all contained in the injection pump housing. The injection
pump is compact, light weight, and provides reliable high-speed operation.
The vacuum-type fast idle actuator increases the engine idling speed to provide the additional power required to
operate the air conditioner.
Fast idler diaphragm movement is caused by changes in the negative pressure created by the engine’s vacuum
pump.
The diaphragm motion is transferred to the injection pump control lever to increase or decrease the idling speed.
4JA1TC/4JH1TC:
The Bosch VP44 injection pump is electronically controlled. The pump controller combine to injection pump.
Signals from the pump controller are sent to the engine control module (ECM). In response to these signals, the
ECM selects the optimum fuel injection timing and volume for the existing driving conditions.
BACK TO CHAPTER INDEX
TO MODEL INDEX
ISUZU KB P190 2007
Page 1097 of 6020
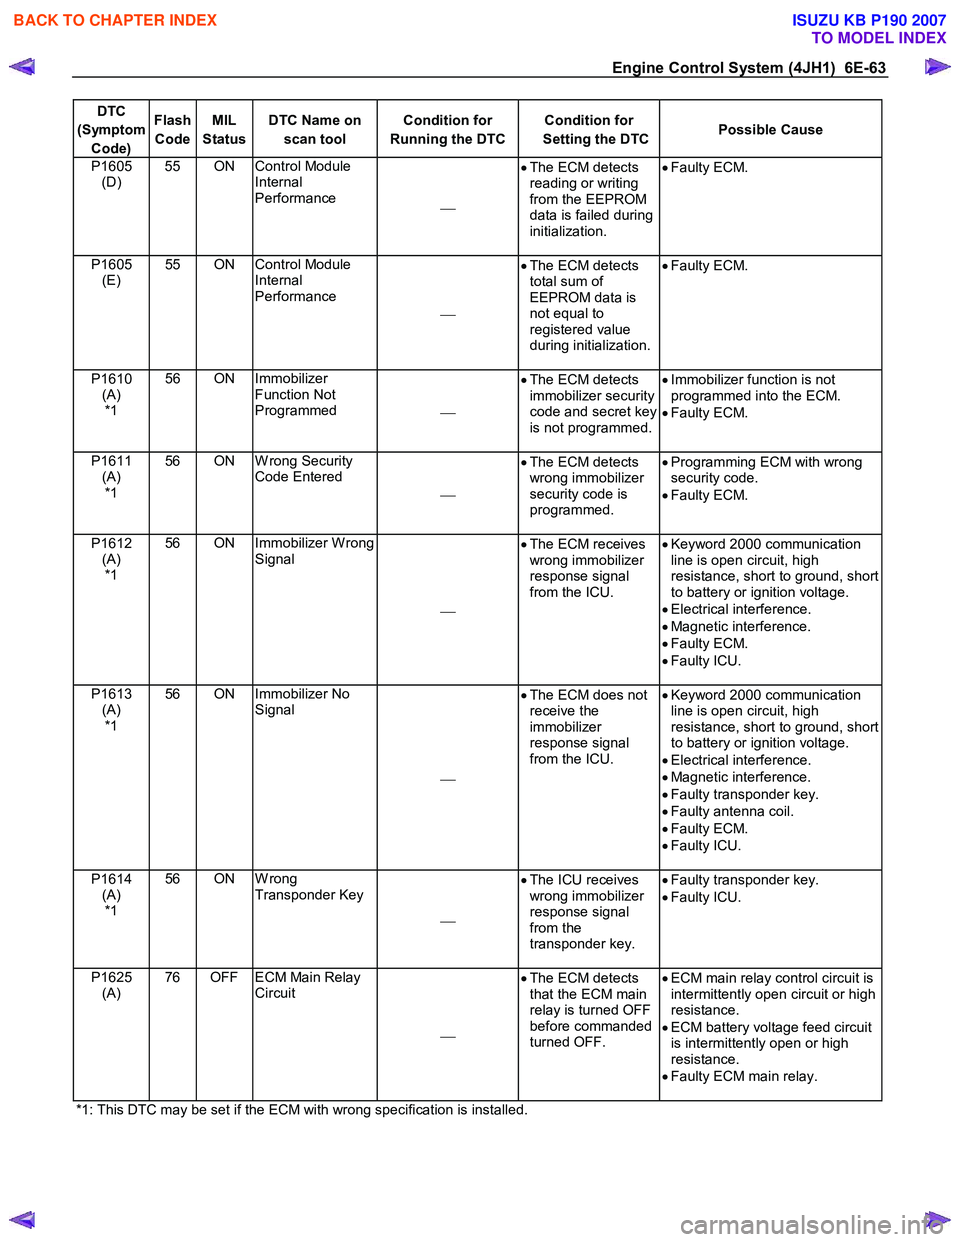
Engine Control System (4JH1) 6E-63
DTC
(Symptom Code) Flash
Code MIL
Status DTC Name on
scan tool Condition for
Running the DTC Condition for
Setting the DTC Possible Cause
P1605
(D) 55 ON Control Module
Internal
Performance •
The ECM detects
reading or writing
from the EEPROM
data is failed during
initialization.
•
Faulty ECM.
P1605
(E) 55 ON Control Module
Internal
Performance
•
The ECM detects
total sum of
EEPROM data is
not equal to
registered value
during initialization.
•
Faulty ECM.
P1610
(A) *1 56 ON Immobilizer
Function Not
Programmed •
The ECM detects
immobilizer security
code and secret key
is not programmed.
•
Immobilizer function is not
programmed into the ECM.
• Faulty ECM.
P1611 (A) *1 56 ON W rong Security
Code Entered
•
The ECM detects
wrong immobilizer
security code is
programmed.
•
Programming ECM with wrong
security code.
• Faulty ECM.
P1612 (A) *1 56 ON Immobilizer W rong
Signal
•
The ECM receives
wrong immobilizer
response signal
from the ICU.
•
Keyword 2000 communication
line is open circuit, high
resistance, short to ground, short
to battery or ignition voltage.
• Electrical interference.
• Magnetic interference.
• Faulty ECM.
• Faulty ICU.
P1613 (A) *1 56 ON Immobilizer No
Signal
•
The ECM does not
receive the
immobilizer
response signal
from the ICU.
•
Keyword 2000 communication
line is open circuit, high
resistance, short to ground, short
to battery or ignition voltage.
• Electrical interference.
• Magnetic interference.
• Faulty transponder key.
• Faulty antenna coil.
• Faulty ECM.
• Faulty ICU.
P1614 (A) *1 56 ON W rong
Transponder Key
•
The ICU receives
wrong immobilizer
response signal
from the
transponder key.
•
Faulty transponder key.
• Faulty ICU.
P1625 (A) 76 OFF ECM Main Relay
Circuit
•
The ECM detects
that the ECM main
relay is turned OFF
before commanded
turned OFF.
•
ECM main relay control circuit is
intermittently open circuit or high
resistance.
• ECM battery voltage feed circuit
is intermittently open or high
resistance.
• Faulty ECM main relay.
*1: This DTC may be set if the ECM with wrong specification is installed.
BACK TO CHAPTER INDEX
TO MODEL INDEX
ISUZU KB P190 2007