ISUZU TFS SERIES 1997 Workshop Manual
Manufacturer: ISUZU, Model Year: 1997, Model line: TFS SERIES, Model: ISUZU TFS SERIES 1997Pages: 1600, PDF Size: 40.98 MB
Page 451 of 1600

Page 452 of 1600

Page 453 of 1600

WORKSHOP MANUAL
TF SERIES
CAB
SECTION 10
Page 454 of 1600

NOTICE
Before using this Workshop Manual to assist you in performing vehicle
service and maintenance operations, it is recommended that you
carefully read and thoroughly understand the information contained in
Section -
A under the headings "GENERAL REPAIR
INSTRUCTIONS" and "HOW TO USE THIS MANUAL".
All material contained in this Manual is based on the latest product
information available at the time of publication.
All rights are reserved to make changes at any time without prior
notice.
Page 455 of 1600

CAB 10-1
SECTION 10
CAB
TABLE OF CONTENTS
PAGE
Servicing<0011001100110011001100110011001100110011001100110011001100110011001100110011001100110011001100110011001100110011001100110011001100110011001100110011001100110011001100110011001100110011001100110011001100
11001100110011[<0011001100110011001100110011001100110011001100110011001100110011001100110011001100110011001100110011001100110011001100110011001100110011001100110011001100110011001100110011001100110011001100110011001100
11001100110011001100110011001100110011001100110011[........ 10- 2
Windshield and Back Light Glasses ................................................................................ 10- 3
Sliding Rear Window Assembly ....................................................................................... 10- 8
Doors .................................................................................................................................. 10- 12
Instrument Panel...............................................<0011001100110011001100110011001100110011001100110011001100110011001100110011001100110011001100110011001100110011001100110011001100110011001100110011001100110011001100110011001100110011001100110011001100
11001100110011001100110011001100110011001100110011[.. 10- 26
Console Box ....................................................................................................................... 10- 31
Head Lining ........................................................................................................................ 10- 33
Quarter Glass (Space Cab) ............................................................................................... 10- 36
Front Seat ........................................................................................................................... 10- 37
Front and Rear Seat Belt ................................................................................................... 10-39
<002d005800500053000300360048004400570011001100110011001100110011001100110011001100110011001100110011001100110011001100110011001100110011001100110011001100110011001100110011001100110011001100110011001100
11001100110011001100110011001100110011001100110011[<0011001100110011001100110011001100110011001100110011001100110011001100110011001100110011001100110011001100110011001100110011001100110011001100110011001100110011001100110011001100110011001100110011001100
11001100110011001100110011001100110011001100110011[...... 10- 40
Jump Seat Belt .................................................<0011001100110011001100110011001100110011001100110011001100110011001100110011001100110011001100110011001100110011001100110011001100110011001100110011001100110011001100110011001100110011001100110011001100
11001100110011001100110011001100110011001100110011[... 10- 41
INDEX
Page 456 of 1600

10-2 CAB
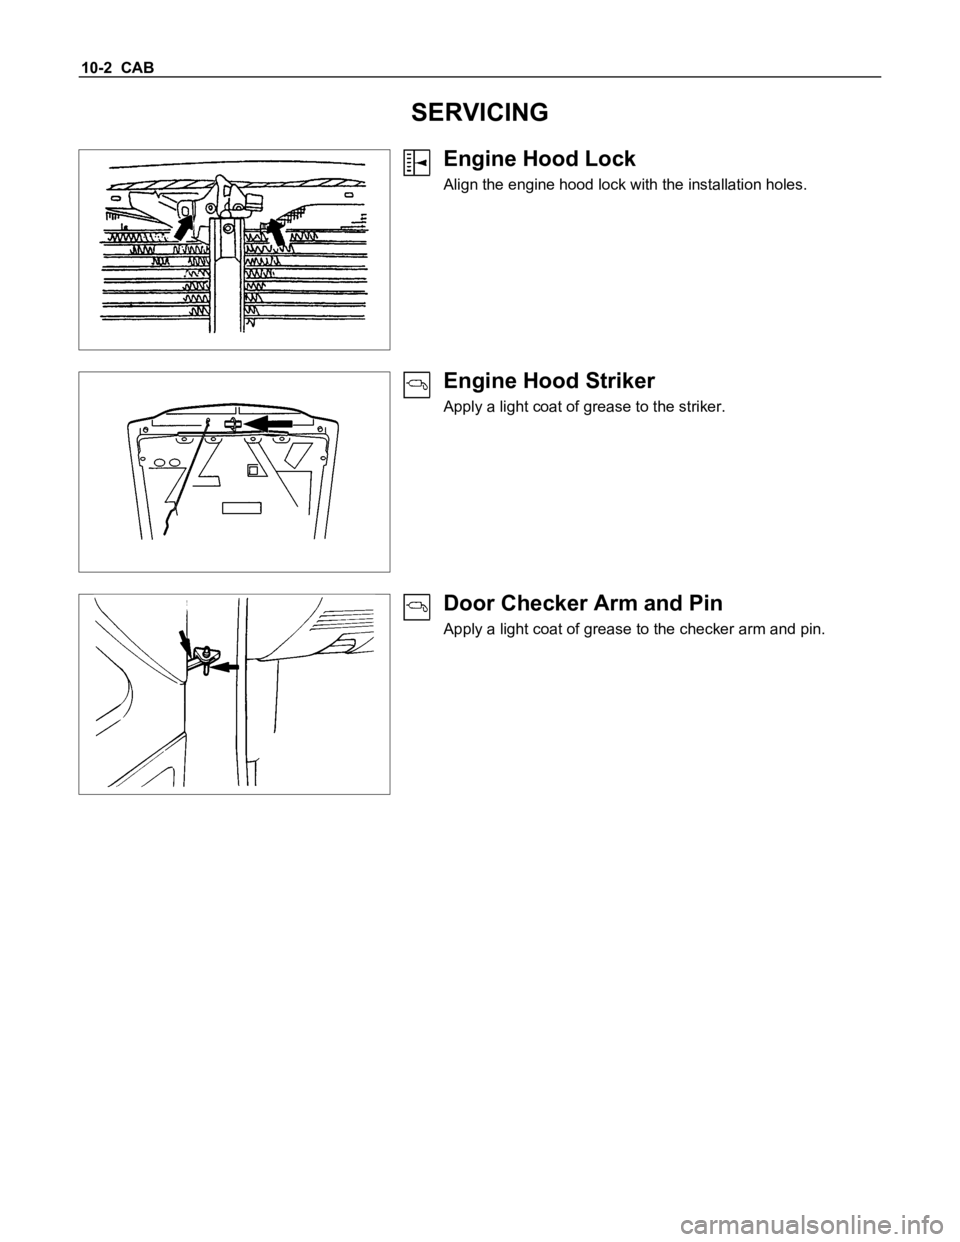
SERVICING
Engine Hood Lock
Align the engine hood lock with the installation holes.
Engine Hood Striker
Apply a light coat of grease to the striker.
Door Checker Arm and Pin
Apply a light coat of grease to the checker arm and pin.
Page 457 of 1600

CAB 10-3
WINDSHIELD AND BACK LIGHT GLASSES
GENERAL DESCRIPTION
This vehicle uses two types of safety glass: (1) laminated safety plate, for the windshield, and (2) solid tempered
safety plate, for the back glass.
The windshield glass is one-piece and is directly retained in the windshield opening by the adhesive.
When replacing a cracked windshield glass, it is very important that the cause of the glass breakage be determined
and the condition corrected before a new glass is installed. Otherwise, it is possible that a small obstruction or high
spot somewhere around the windshield opening will continue to crack or break the newly installed windshield. This
is especially true when the strain on the glass caused by this obstruction is increased by such conditions as wind
pressures, extremes of temperature, motion of the vehicle, etc. The procedure for removal of the windshield
applies to the complete windshield assembly.
WINDSHIELD GLASS BACK LIGHT GLASS
Page 458 of 1600

10-4 CAB
REMOVAL AND INSTALLATION
For RHD model For LHD model
Removal Steps
1. Wiper arm assembly
2. Side moulding
3. Vent cowl cover
4. Windshield stopper
5. Upper moulding
6. Windshield glass
7. Engine hood rear seal
Installation Steps
7. Engine hood rear seal
6. Windshield glass
5. Upper moulding
4. Windshield stopper
3. Vent cowl cover
2. Side moulding
1. Wiper arm assembly
Page 459 of 1600

CAB 10-5
Important Operation - Removal
6. Windshield Glass
Remove the windshield glass, carefully following the steps
listed below :
1) Use a knife to cut through part of the adhesive caulking
material.
2) Secure one end of a piece of steel piano wire (0.02 inches
in diameter) to a piece of wood that can serve as a handle.
3) Use a pair of needle nose pliers to insert the other end of
the piano wire through the adhesive caulking material at the
edge of the windshield glass.
4) Secure the other end of the piano wire to another piece of
wood.
5) W ith the aid of an assistant, carefully move the piano wire
with a sawing motion to cut through the adhesive caulking
material around the entire circumferance of the windshield
glass.
6) Lift the windshield from the body.
7) Clean any remaining adhesive caulking material from the
area of the body which holds the windshield.
8) Use a soft rag and unleaded gasoline to wipe off any
adhesive remaining on the windshield glass.
Important Operations - Installation
7. Engine Hood Rear Seal
Install the engine hood rear seal as shown in the illustration.
1 : Seal
2 : Clip
3 : Rear (windshield glass side)
4 : Front
6. Windshield Glass
1) Clean the windshield glass bonding surface.
2) Use a soft rag and unleaded gasoline to wipe off any
adhesive remaining on the body.
3) Mount the body window glass as shown in the illustration.
Attach spacers at seven (7) locations.
Page 460 of 1600

10-6 CAB
4) Apply primer 1 #435-95 or equivalent to the body side
bonding surface. The primer should extend 25 mm (1 in.).
Apply primer #435-40 or equivalent to the windshield glass
side bonding surface.
The primer should extend 15 mm (0.6 in.) from end of the
glass.
Apply the window glass sealing adhesive 2.
If you are using an air gun, air pressure should be maintained
at 147 - 294 kpa.
Note :
Open time (1 min. or more) should be set after application
of the primer.
Bonding shall be done within 5 minutes after the sealer
has been applied.
Adjust the setting of the windshield glass with suction discs.
The center of the windshield glass should be in alignment with
the center of the windshield glass opening.
The clearance between body and upper moulding should be
within 0.5 mm (A).
Both of the clearance for RH and LH should be same. (6 mm
2 mm)
Note:
It is a good idea to perform the windshield installation
procedure from beginning to end without pausing. If you
allow time to elapse between steps, excessive amounts of
adhesive may be extruded from around the windshield.