ISUZU TFS SERIES 1997 Workshop Manual
TFS SERIES 1997
ISUZU
ISUZU
https://www.carmanualsonline.info/img/61/57182/w960_57182-0.png
ISUZU TFS SERIES 1997 Workshop Manual
Trending: ESP, belt, brake rotor, oil level, change time, service, check engine light
Page 481 of 1600
CAB 10-27
Important Operations
1. Center Console Assembly
Remove shift knob and 2 fixing screws (front side).
Open the grommet and remove 2 fixing screws (rear
side).
2. ECM cover
3. Glove Box
Remove 2 fixing screws and pulling the handle.
4. Glove Box Cover
Remove 4 fixing screws and pull the cover toward you
and remove the clips at 2 positions.
5. Instrument Panel Passenger Lower Cover Assembly
Remove 3 fixing screws and 1 clip.
6. Instrument Panel Driver Lower Cover Assembly
Remove the engine hood opener 2 fixing screws and 6
fixing screws.
Disconnect the connector of the illumination.
7. Lower Cluster Assembly
Remove 3 fixing clips.
8. Meter Cluster Assembly
Remove 3 fixing screws, 7 clips and switch connectors.
9. Instrument Panel Lower Center Cover Assembly
Remove 7 fixing screws and disconnect the connector of
the cigarette lighter.
Page 482 of 1600
10-28 CAB
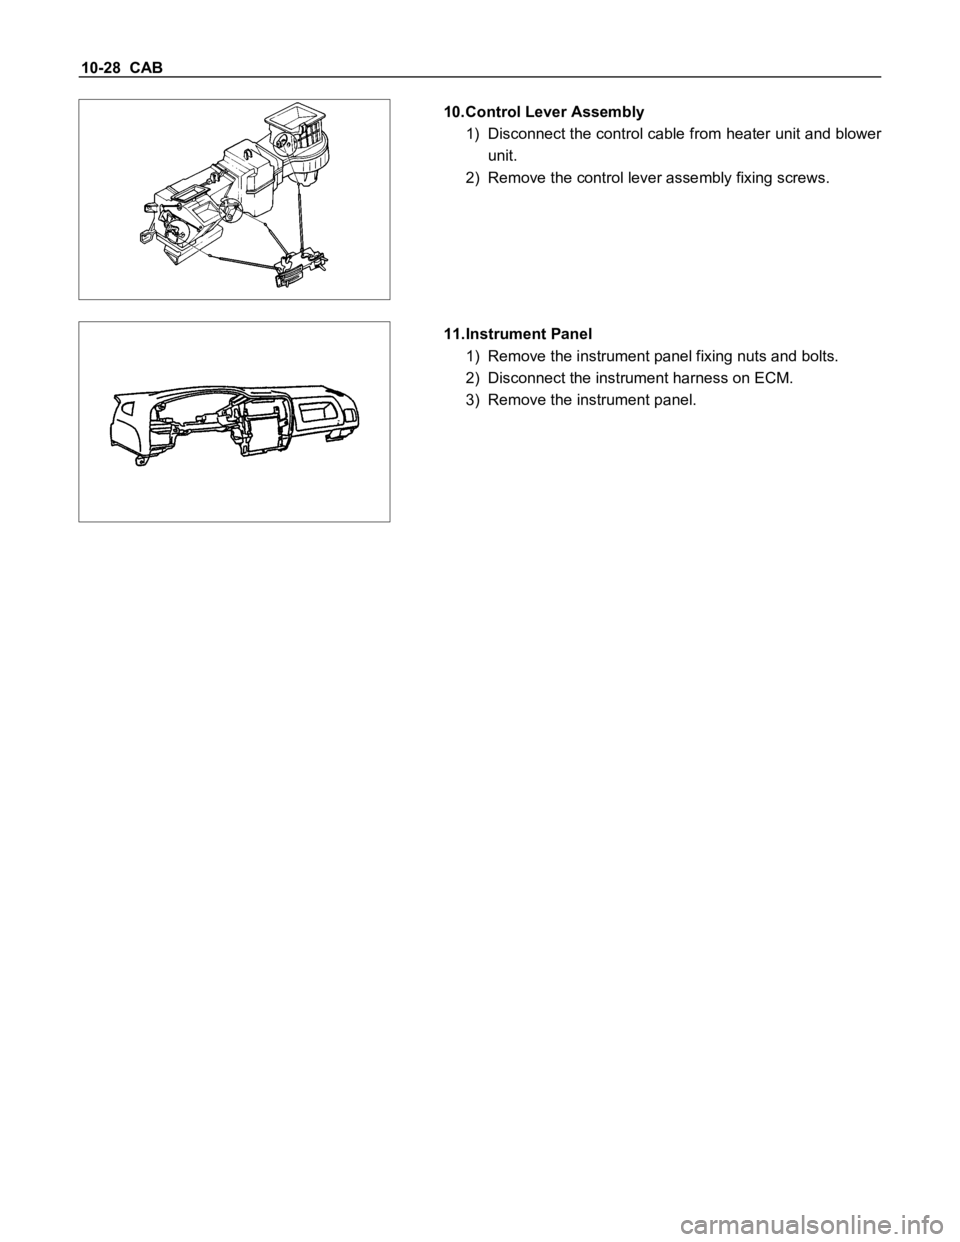
10.Control Lever Assembly
1) Disconnect the control cable from heater unit and blower
unit.
2) Remove the control lever assembly fixing screws.
11.Instrument Panel
1) Remove the instrument panel fixing nuts and bolts.
2) Disconnect the instrument harness on ECM.
3) Remove the instrument panel.
Page 483 of 1600
CAB 10-29
INSTALLATION
12
Installation Steps
1. Radio assembly
2. Meter assembly
3. Instrument panel assembly
4. Control lever assembly
5. Instrument panel lower center cover
assembly
6. Meter cluster assembly7. Lower cluster assembly
8. Instrument panel driver lower cover
assembly
9. Instrument panel passenger lower cover
assembly
10. Glove box cover
11. Glove box
12. ECM cover (M/T Remote only)
13. Center console assembly
Page 484 of 1600
10-30 CAB
4. Control Lever Assembly
1) Set the temperature control lever and the airsource
select lever at the left-hand side end.
2) Set the air selector lever at the right-hand side end.
1 : Temperature control cable
2: Air source select cable
3: Air selector
3) Attach the cable, after the work 1) and 2) have been
completed.
Page 485 of 1600
CAB 10-31
CONSOLE BOX
REMOVAL AND INSTALLATION
6 51 2 4
3
44 S Model
Removal Steps
1. Hole cover 2
2. Screw
2
3. Screw
2
4. Center console
5. Screw
4
6. Rear console
Installation Steps
6. Rear console
5. Screw
4
4. Center console
3. Screw
2
2. Screw
2
1. Hole cover
2
Page 486 of 1600
10-32 CAB
CONSOLE BOX
REMOVAL AND INSTALLATION
4 5
3
2 1
4
2 LS Model 44 LS Model
42 LS AND 44 LS Model
Removal Steps
1. Screw 4
2. Rear console
3. Screw
2
4. Screw
2
5. Center console
Installation Steps
5. Center console
4. Screw
2
3. Screw
2
2. Rear console
1. Screw
4
Page 487 of 1600
CAB 10-33
HEAD LINING
GENERAL DESCRIPTION
STANDARD CAB
SPACE CAB (SPORTS CAB)
Page 488 of 1600
10-34 CAB
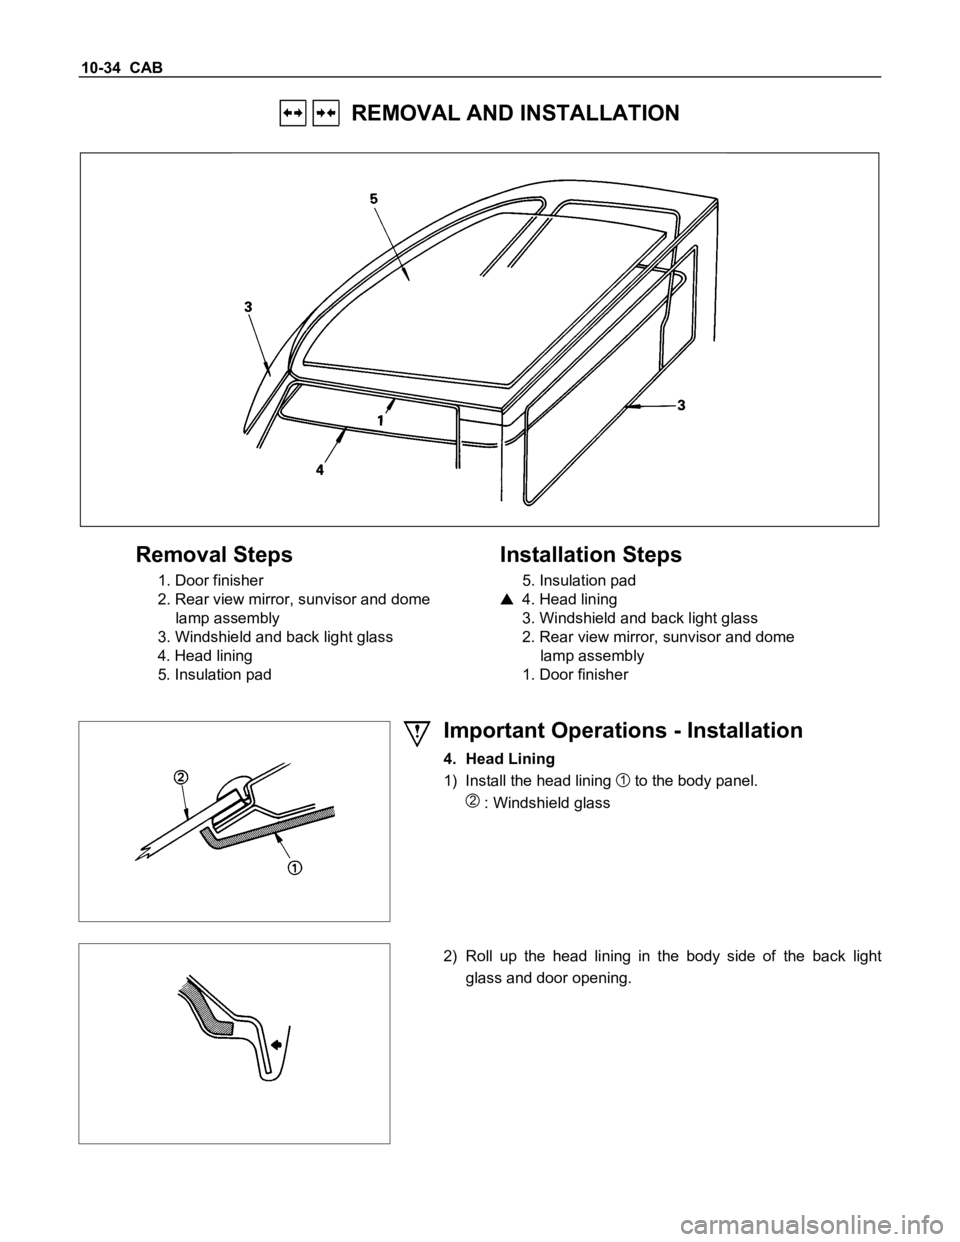
REMOVAL AND INSTALLATION
Removal Steps
1. Door finisher
2. Rear view mirror, sunvisor and dome
lamp assembly
3. Windshield and back light glass
4. Head lining
5. Insulation pad
Installation Steps
5. Insulation pad
4. Head lining
3. Windshield and back light glass
2. Rear view mirror, sunvisor and dome
lamp assembly
1. Door finisher
Important Operations - Installation
4. Head Lining
1) Install the head lining
1 to the body panel.
2 : Windshield glass
2) Roll up the head lining in the body side of the back light
glass and door opening.
Page 489 of 1600
CAB 10-35
3) Roll up the head lining provided with slits, in the corner.
4) Roll up the head lining 1 in the body side of door opening.
5) Fix to the door side, using the finisher
2.
Page 490 of 1600
10-36 CAB
QUARTER GLASS (SPACE CAB)
REMOVAL AND INSTALLATION
Removal Steps
1. Screw bolt
2. Quarter glass
3. Screw bolt
4. Screw bolt
5. Fastener assembly
Installation Steps
5. Fastener assembly
4. Screw bolt
3. Screw bolt
2. Quarter glass
1. Screw bolt
Important Operations - Removal
2. Quarter Glass
Pull out the glass assembly towards the rear of the vehicle.
Trending: roof rack, clutch, brake fluid, brake pads, maintenance, glove box, ECO mode


