ISUZU TFS SERIES 1997 Workshop Manual
TFS SERIES 1997
ISUZU
ISUZU
https://www.carmanualsonline.info/img/61/57182/w960_57182-0.png
ISUZU TFS SERIES 1997 Workshop Manual
Trending: air condition, oil level, light, oil capacity, wheel size, mirror, check oil
Page 461 of 1600
CAB 10-7
5. Upper Moulding
1) Before installing the windshield moulding (at the upper part
of the windshield), spray hot water at a temperature of
about 140
F (60C) onto the windshield glass and the
adhesive. This will cause curing.
2) Install the upper moulding as soon as hot water has been
applied. Using a roller push moulding in until it bottoms.
4. Windshield Stopper
Do this immediately after completing the gap adjustment.
2. Side Moulding
Use unleaded gasoline and a soft cloth to wipe away any
excess adhesive.
Cure the bonding at a temperature of 68
- 86F (20 - 30C)
for twenty-four hours.
Check that the windshield does not leak water.
Page 462 of 1600
10-8 CAB
SLIDING REAR WINDOW ASSEMBLY
DISASSEMBLY
Disassembly Steps
1. Weather strip
2. Packing ; rear window
3. Screw; binding
4. Frame ; rear window
5. Stopper
6. Rear window ; slide
7. Lock assembly with catchback window
8. Glass run
9. Glass ; rear window corner
10. Weather strip ; rear window corner
Page 463 of 1600
CAB 10-9
Important Operation - Removal
1. Weather Strip
Remove the weather strip with a knife.
2. Packing ; Rear Window
With a screwdriver or similar tool, remove the window stop.
4. Frame ; Rear Window
Place the window channel in a vertical position and remove the
frame rear by pulling on one end of it with your hand.
6. Rear Window ; Slide
With the window channel held in a vertical position, remove the
rear window ; slide.
9. Glass ; Rear Window Corner
Stand the window channel up and remove the glass ; rear
window corner.
Page 464 of 1600
10-10 CAB
REASSEMBLY
Riassembly Steps
1. Weather strip ; rear window corner
2. Glass ; rear window corner
3. Glass run
4. Frame ; rear window
5. Screw; binding
6. Rear window ; slide
7. Stopper
8. Packing ; rear window
9. Lock assembly with catchback window
10. Weather strip
Page 465 of 1600

CAB 10-11
Important Operation - Installation
1. Weather Strip ; Rear Window Corner
Using Semedain #560 (or equivalent) adhesive, glue the
weather strip to the complete circumference of the frame,
paying close attention to the corner areas.
2. Glass ; Rear Window Corner
Apply soap and water to the rim as a lubricant.
Place the channel in a vertical position. With your hand, apply
pressure to expand the channel. Insert the window glass in the
center of the channel.
3. Glass Run
Apply Semedain #560 (or equivalent) adhesive to the entire
length of both the upper window glass and the weather strip.
Apply adhesive to both sides of the extreme ends of the lower
portion for a distance of about 50 mm.
There should be no gap between the weather strip rear window
glass channel and the channel.
6. Rear Window ; Slide
Hold the window vertically. Apply an upward pressure to the
channel and insert the rear window slide.
8. Packing ; Rear Window
Apply a fast setting adhesive agent to both sides of the window
atop and insert it into the channel.
Page 466 of 1600
10-12 CAB
DOORS
GENERAL DESCRIPTION
Page 467 of 1600
CAB 10-13
REMOVAL AND INSTALLATION
Removal Steps
1. Door harness
2. Checker pin
3. Lower hinge
4. Upper hinge
5. Door assembly
Installation Steps
5. Door assembly
4. Upper hinge
3. Lower hinge
2. Checker pin
1. Door harness
Important Operation - Removal
1. Door Harness
Disconnect the door harness.
2. Checker Pin
Page 468 of 1600
10-14 CAB
3. Lower Hinge
Position a wood block under the door for protection and
support the door assembly with hands at removal or
installation.
Page 469 of 1600
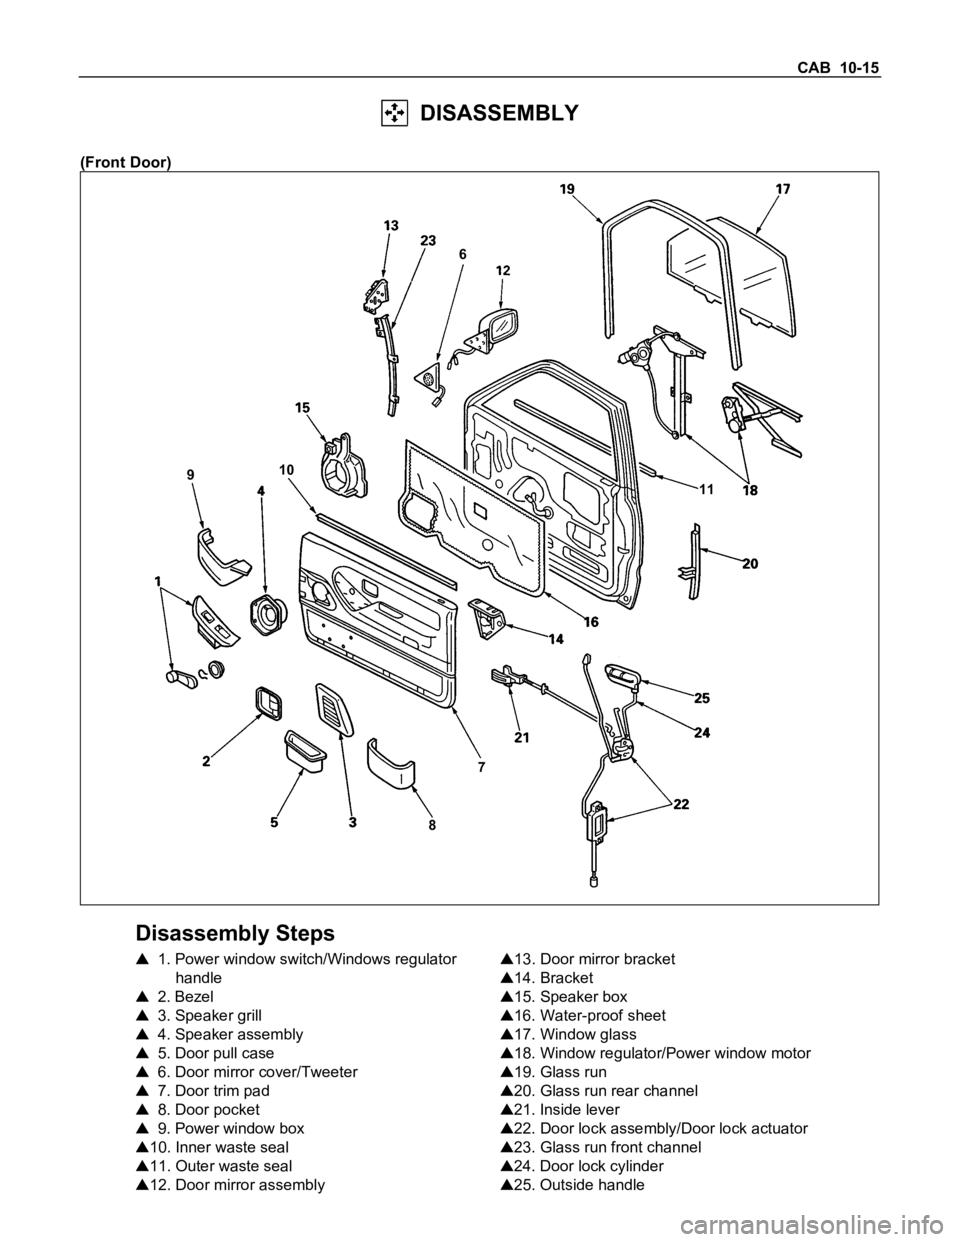
CAB 10-15
DISASSEMBLY
(Front Door)
87 910
11 6
Disassembly Steps
1. Power window switch/Windows regulator
handle
2. Bezel
3. Speaker grill
4. Speaker assembly
5. Door pull case
6. Door mirror cover/Tweeter
7. Door trim pad
8. Door pocket
9. Power window box
10. Inner waste seal
11. Outer waste seal
12. Door mirror assembly
13. Door mirror bracket
14. Bracket
15. Speaker box
16. Water-proof sheet
17. Window glass
18. Window regulator/Power window motor
19. Glass run
20. Glass run rear channel
21. Inside lever
22. Door lock assembly/Door lock actuator
23. Glass run front channel
24. Door lock cylinder
25. Outside handle
Page 470 of 1600
10-16 CAB
Important Operations
1. Power Window Switch/Window Regulator Handle
Prise out the power window switch and remove the
connectors.
To remove the regulator handle, remove the clip at the
root of the handle by using wire.
2. Bezel
Remove the screw while pulling the inside lever toward
you.
3. Speaker Grill
Pull out the clips.
4. Speaker Assembly
Remove 4 screws and disconnect the speaker harness
connector.
5. Door Pull Case
Remove the screw at the bottom of the case.
Trending: air bleeding, check oil, four wheel drive, clutch, spare wheel, wheel bolt torque, battery


