warning ISUZU TROOPER 1995 Workshop Manual
[x] Cancel search | Manufacturer: ISUZU, Model Year: 1995, Model line: TROOPER, Model: ISUZU TROOPER 1995Pages: 1928
Page 1659 of 1928
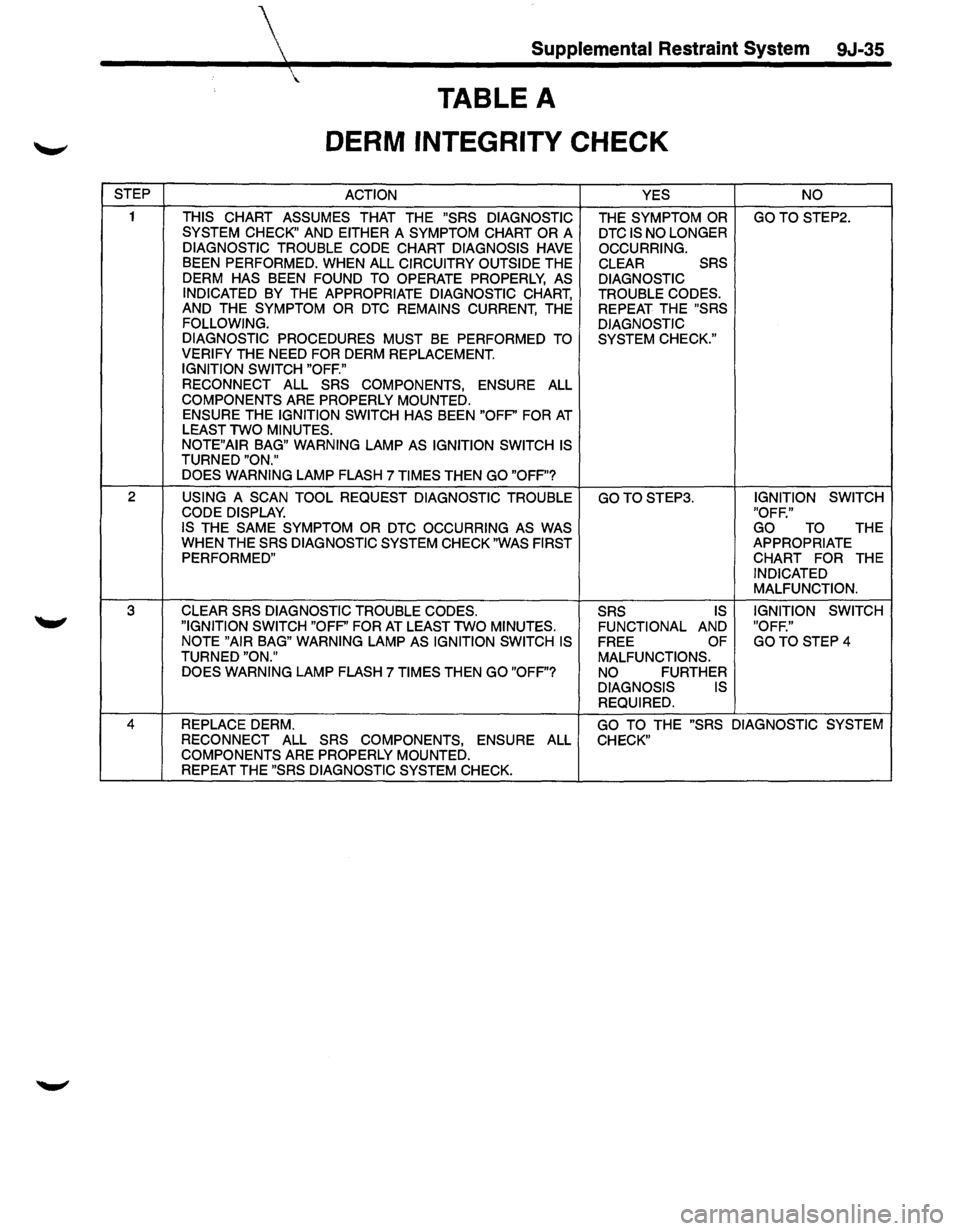
STEP
2
3
Supplemental Restraint System 9J-35
TABLE A
DERM INTEGRITY CHECK
ACTION
THIS
CHART ASSUMES THAT THE "SRS DIAGNOSTIC
SYSTEM CHECK" AND EITHER A SYMPTOM CHART OR A
DIAGNOSTIC TROUBLE CODE CHART DIAGNOSIS HAVE BEEN PERFORMED. WHEN ALL CIRCUITRY OUTSIDE THE
DERM HAS BEEN FOUND TO OPERATE PROPERLY, AS
INDICATED BY THE APPROPRIATE DIAGNOSTIC CHART, AND THE SYMPTOM OR DTC REMAINS CURRENT, THE FOLLOWING.
DIAGNOSTIC PROCEDURES MUST BE PERFORMED TO VERIFY THE NEED FOR DERM REPLACEMENT. IGNITION SWITCH "OFF."
RECONNECT
ALL SRS COMPONENTS, ENSURE ALL
COMPONENTS ARE PROPERLY MOUNTED.
ENSURE THE IGNITION SWITCH HAS BEEN "OFP' FOR AT LEAST TWO MINUTES.
NOTE"AIR BAG" WARNING LAMP AS IGNITION SWITCH IS TURNED "ON."
DOES WARNING LAMP FLASH 7 TIMES THEN GO "OFF"?
USING
A SCAN TOOL REQUEST DIAGNOSTIC TROUBLE CODE DISPLAY. IS THE SAME SYMPTOM OR DTC OCCURRING AS WAS WHEN THE SRS DIAGNOSTIC SYSTEM CHECK "WAS FIRST
PERFORMED"
CLEAR SRS DIAGNOSTIC TROUBLE CODES.
"IGNITION SWITCH "OFP' FOR AT LEAST TWO MINUTES.
NOTE "AIR BAG" WARNING LAMP AS IGNITION SWITCH IS TURNED "ON."
DOES WARNING LAMP FLASH 7 TIMES THEN GO "OFF"? YES
THE SYMPTOM OR DTC IS NO LONGER
OCCURRING. CLEAR SRS
DIAGNOSTIC
TROUBLE CODES. REPEAT THE "SRS
DIAGNOSTIC SYSTEM CHECK."
GOTOSTEP3.
SRS IS
FUNCTIONAL AND
FREE OF
MALFUNCTIONS.
NO FURTHER DIAGNOSIS IS REQUIRED. NO
GOTO STEP2.
IGNITION
SWITCH
"OFF." GO
TO THE APPROPRIATE CHART FOR THE INDICATED MALFUNCTION.
IGNITION SWITCH
"OFF."
GOTO STEP4
4 REPLACE DERM. GO TO THE "SRS DIAGNOSTIC SYSTEM
RECONNECT ALL SRS COMPONENTS, ENSURE ALL CHECK"
COMPONENTS ARE PROPERLY MOUNTED.
REPEAT THE "SRS DIAGNOSTIC SYSTEM CHECK.
Page 1660 of 1928
9J-36 Supplemental Restraint System
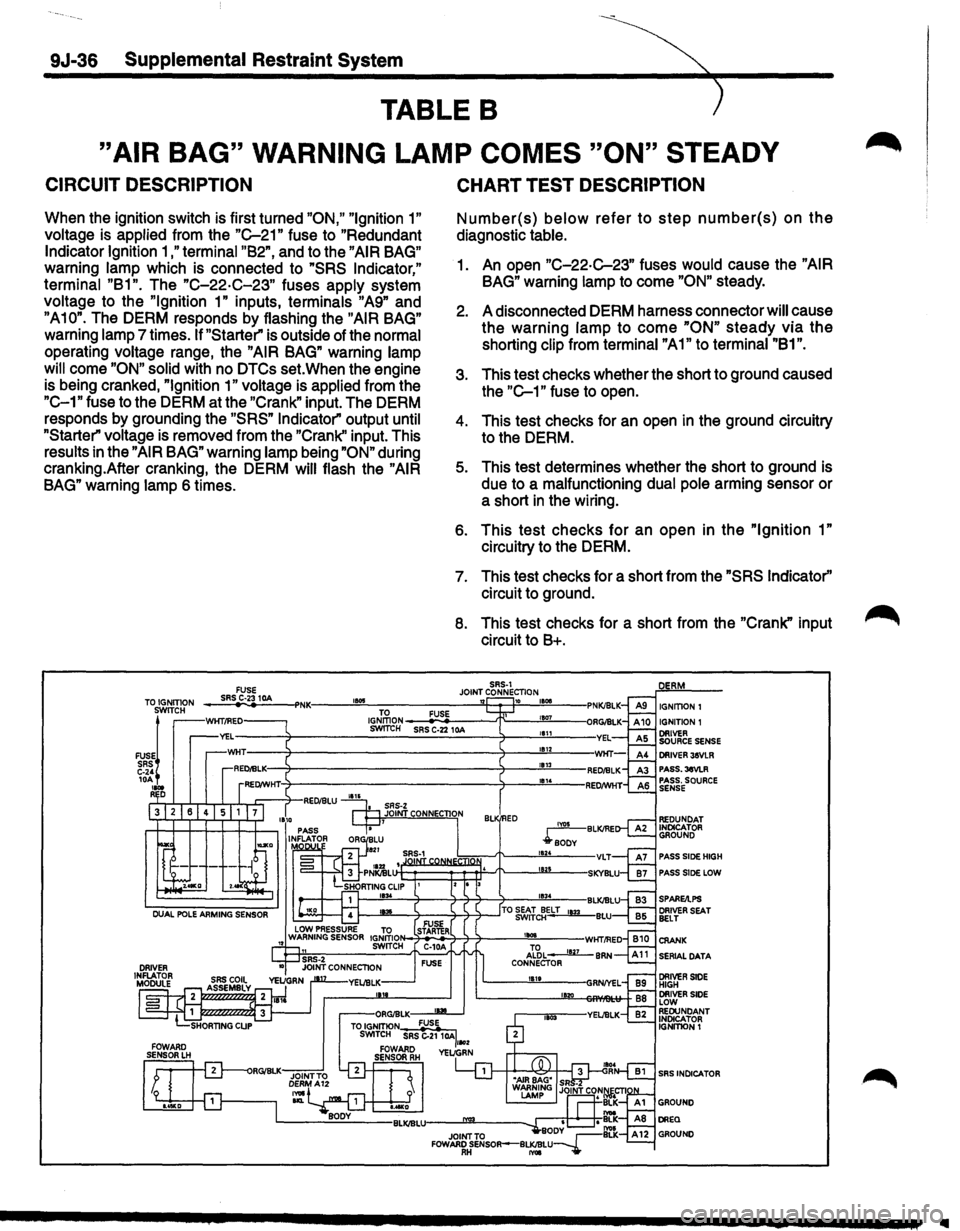
TABLE B
"AIR BAG" WARNING LAMP COMES "ON" STEADY
CIRCUIT DESCRIPTION
When the ignition switch is first turned "ON," "Ignition 1"
voltage is applied from the "C-21" fuse to "Redundant
Indicator Ignition 1 ,"terminal "B2", and to the "AIR BAG"
warning lamp which is connected to "SRS Indicator,"
terminal "B1". The "C-22·C-23" fuses apply system
voltage to the
"Ignition 1" inputs, terminals "A9" and
"A10". The DERM responds by flashing the "AIR BAG"
warning lamp 7 times. If "Starter" is outside of the normal
operating voltage range, the
"AIR BAG" warning lamp
will
come "ON" solid with no DTCs set. When the engine
is being cranked,
"Ignition 1" voltage is applied from the
"C-1" fuse to the DERM at the "Crank" input. The DERM
responds by grounding the
"SRS" Indicator" output until
"Starter" voltage is removed from the "Crank'' input. This
results in the
"AIR BAG" warning lamp being "ON" during
cranking.After cranking, the DERM
will flash the "AIR
BAG" warning lamp 6 times.
CHART TEST DESCRIPTION
Number(s) below refer to step number(s) on the
diagnostic table.
1. An open "C-22-C-23" fuses would cause the "AIR
BAG" warning lamp to come "ON" steady.
2. A disconnected DERM harness connector will cause
the warning
lamp to come "ON" steady via the
shorting clip from terminal "A1" to terminal "81".
3. This test checks whether the short to ground caused
the
"C-1" fuse to open.
4. This test checks for an open in the ground circuitry
to the DERM.
5. This test determines whether the short to ground is
due to a malfunctioning dual pole arming sensor or
a short
in the wiring.
6. This test checks for an open in the "Ignition 1"
circuitry to the DERM.
7. This test checks for a short from the "SRS Indicator''
circuit to ground.
8. This test checks for a short from the "Crank" input
circuit to 8+.
SRS-1 JOINT CONNECTION TO IGNITION FUSE SRS C·23 10A 1!015 '12 10 IGNITION I IGNITION 1 SWITCH
FUSE~ SRS C-24 10A .... R D
PASS.3eVLR PASS. SOURCE SENSE
PASS SlOE HIGH
PASS SlOE LOW
SERIAL DATA
SRS INDICATOR
..
Page 1661 of 1928
Supplemental Restraint S~m 9J-37
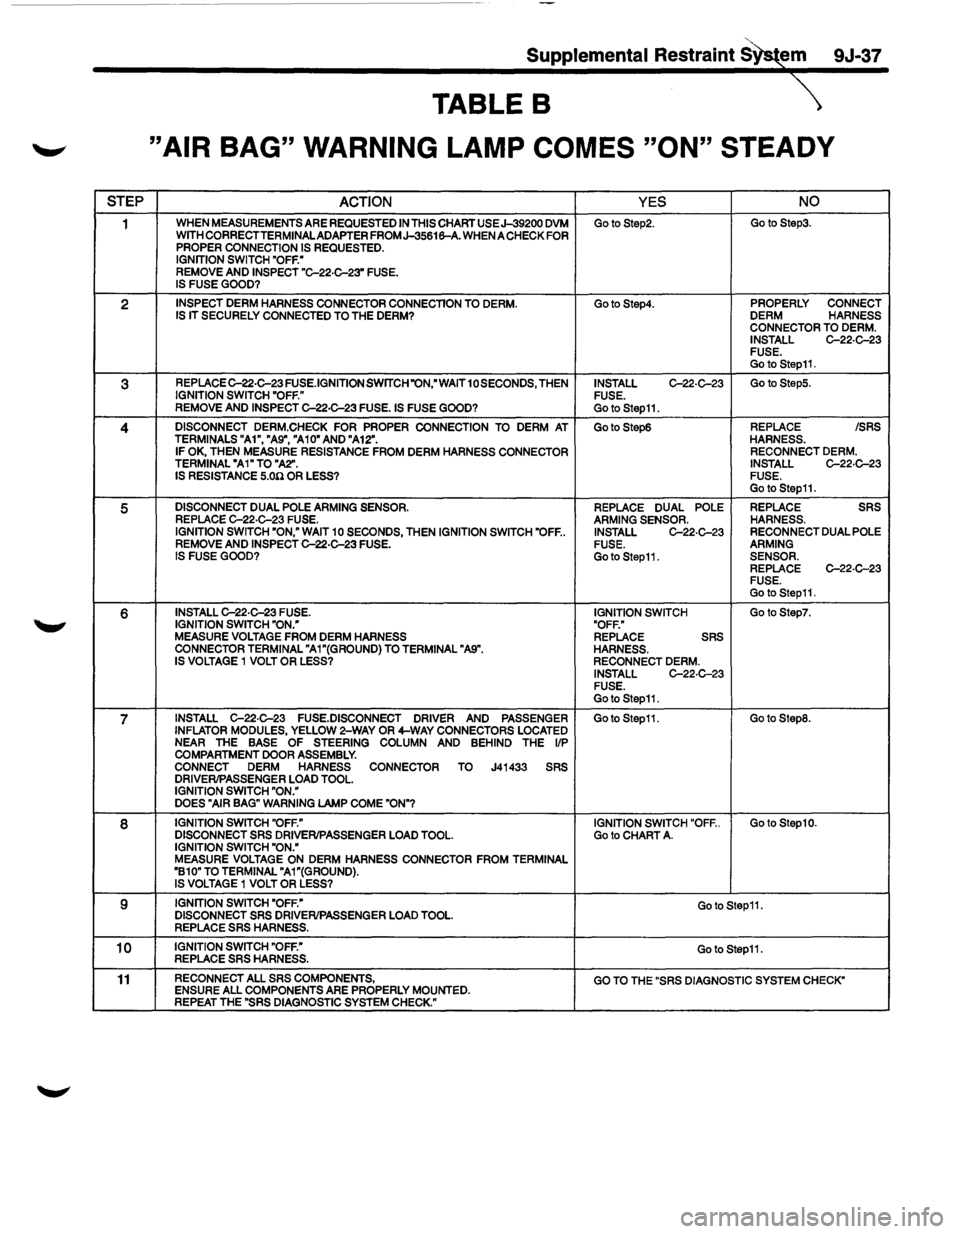
TABLE B
"AIR BAG" WARNING LAMP COMES "ON" STEADY
STEP ACTION YES NO
1 WHEN MEASUREMENTS ARE REQUESTED IN THIS CHART USEJ-39200 DVM GotoStep2. GotoStep3. WITH CORRECTTERMINALADAPTER FROMJ-35616-A. WHEN A CHECK FOR PROPER CONNECTION IS REQUESTED. IGNITION SWITCH "OFF."
REMOVE AND INSPECT "C-22·C-23" FUSE.
IS FUSE GOOD?
2 INSPECT DERM HARNESS CONNECTOR CONNECTION TO DERM. GotoStep4. PROPERLY CONNECT
IS IT SECURELY CONNECTED TO THE DERM? DERM HARNESS
CONNECTOR TO DERM. INSTALL C-22·C-23 FUSE. GotoStep11.
3 REPLACEC-22·C-23 FUSE.JGNITION SWITCH "ON," WAIT 10SECONDS, THEN INSTALL C-22·C-23 Go to StepS.
IGNITION SWITCH "OFF."
FUSE.
REMOVE
AND INSPECT C-22·C-23 FUSE. IS FUSE GOOD? GotoStep11.
4 DISCONNECT DERM.CHECK FOR PROPER CONNECTION TO DERM AT Go to StepS REPLACE /SRS
TERMINALS "A1", "A9", "A10" AND "A12". HARNESS. IF OK, THEN MEASURE RESISTANCE FROM DERM HARNESS CONNECTOR RECONNECT DERM. TERMINAL "A1" TO "A2". INSTALL C-22·C-23 IS
RESISTANCE 5.00 OR LESS?
FUSE. Go to Step11.
5 DISCONNECT DUAL POLE ARMING SENSOR. REPLACE DUAL POLE REPLACE SRS REPLACE C-22·C-23 FUSE.
ARMING SENSOR. HARNESS.
IGNITION SWITCH "ON," WAIT 10 SECONDS, THEN IGNITION SWITCH "OFF .. INSTALL C-22·C-23 RECONNECT DUAL POLE
REMOVE AND INSPECT C-22·C-23 FUSE. FUSE. ARMING
IS FUSE GOOD? GotoStep11. SENSOR. REPLACE C-22·C-23 FUSE. Go to Step11.
6 INSTALL C-22·C-23 FUSE. IGNITION SWITCH GotoStep7. IGNITION SWITCH "ON."
"OFF."
MEASURE VOLTAGE FROM DERM HARNESS REPLACE SRS
CONNECTOR TERMINAL "A1"(GROUND) TO TERMINAL "A9". HARNESS.
IS VOLTAGE 1 VOLT OR LESS? RECONNECT DERM. INSTALL C-22·C-23 FUSE. GotoStep11.
7 INSTALL C-22·C-23 FUSE.DISCONNECT DRIVER AND PASSENGER GotoStep11. Go to StepS.
INFLATOR MODULES, YELLOW 2-WAY OR 4-WAY CONNECTORS LOCATED NEAR THE BASE OF STEERING COLUMN AND BEHIND THE liP COMPARTMENT DOOR ASSEMBLY.
CONNECT DERM HARNESS CONNECTOR TO J41433 SRS
DRIVER/PASSENGER LOAD TOOL.
IGNITION SWITCH "ON."
DOES "AIR
BAG" WARNING LAMP COME "ON"?
8 IGNITION SWITCH "OFF."
IGNITION SWITCH "OFF .. Go to Step10.
DISCONNECT SRS DRIVER/PASSENGER LOAD TOOL. Go to CHART A. IGNITION SWITCH "ON."
MEASURE VOLTAGE ON DERM HARNESS CONNECTOR FROM TERMINAL
"B10" TO TERMINAL "A1"(GROUND). IS VOLTAGE 1 VOLT OR LESS?
9 IGNITION SWITCH "OFF." GotoStep11. DISCONNECT SRS DRIVER/PASSENGER LOAD TOOL. REPLACE SRS HARNESS.
10 IGNITION SWITCH "OFF." Go to Step11. REPLACE SRS HARNESS.
11 RECONNECT ALL SRS COMPONENTS,
GO TO THE "SRS DIAGNOSTIC SYSTEM CHECK" ENSURE ALL COMPONENTS ARE PROPERLY MOUNTED.
REPEAT THE "SRS DIAGNOSTIC SYSTEM CHECK."
Page 1662 of 1928
9J-38-~tal Restraint System
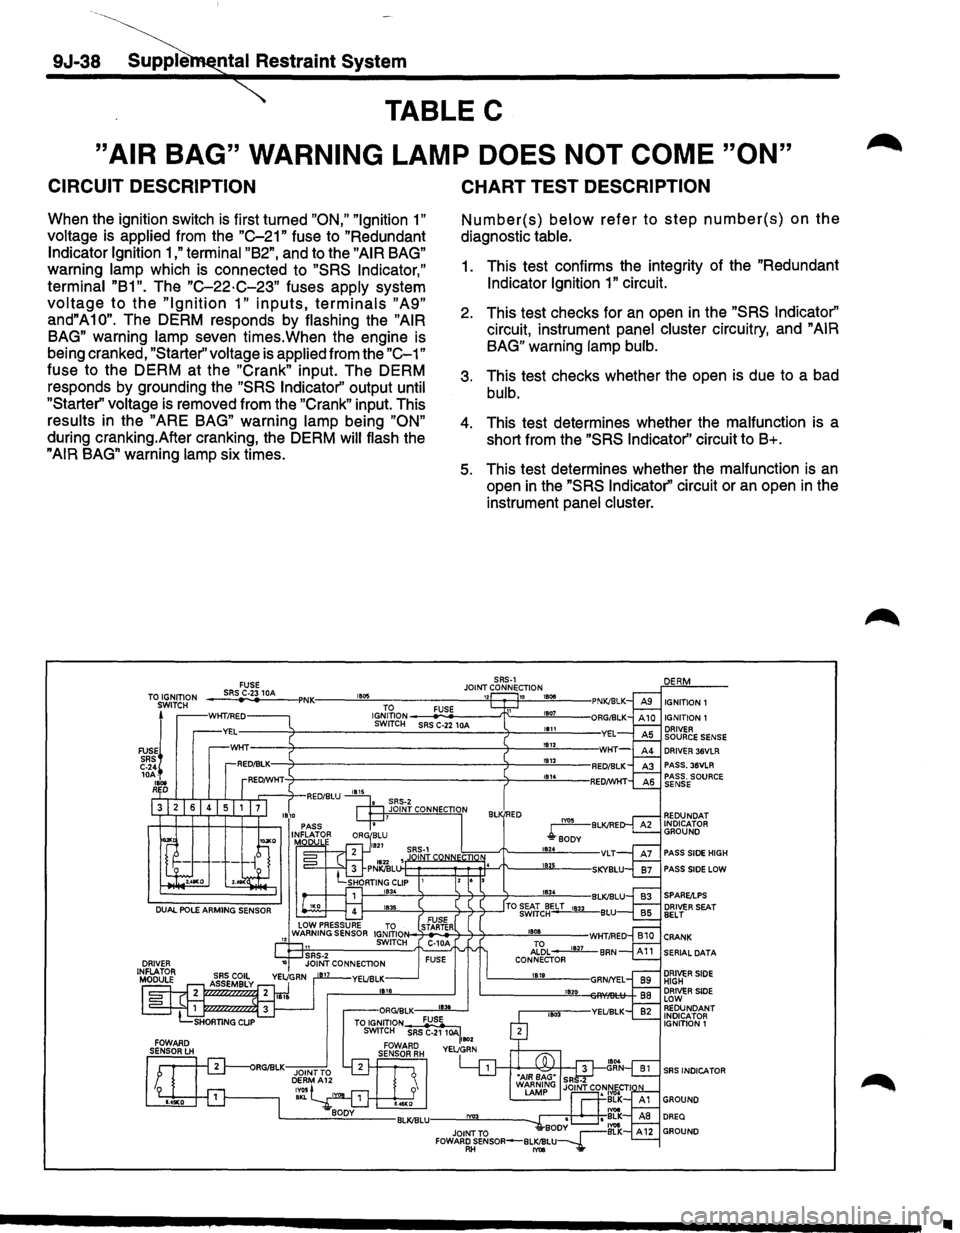
TABLE C
"AIR BAG" WARNING LAMP DOES NOT COME "ON"
CIRCUIT DESCRIPTION
When the ignition switch is first turned "ON," "Ignition 1"
voltage is applied from the "C-21" fuse to "Redundant
Indicator Ignition 1 ,"terminal "B2", and to the "AIR BAG"
warning lamp which is connected to "SRS Indicator,"
terminal "B1".
The "C-22·C-23" fuses apply system
voltage to the "Ignition 1" inputs, terminals "A9"
and"A10". The DERM responds by flashing the "AIR
BAG"
warning lamp seven times.When the engine is
being cranked,
"Starter'' voltage is applied from the "C-1"
fuse to the DERM at the "Crank" input. The DERM
responds by grounding the
"SRS Indicator'' output until
"Starter" voltage
is removed from the "Crank" input. This
results in the "ARE BAG" warning lamp being "ON"
during cranking.After cranking, the DERM will flash the
"AIR BAG" warning lamp six times.
TO IGNITION
SWITCH
FUSEj
SRS C-24 10A-
1Bot RD
FUSE SRS C-23 10A ,. ..
CHART TEST DESCRIPTION
Number(s) below refer to step number(s) on the
diagnostic table.
1. This test confirms the integrity of the "Redundant
Indicator Ignition 1" circuit.
2. This test checks for an open in the "SRS Indicator"
circuit, instrument panel cluster circuitry, and "AIR
BAG"
warning lamp bulb.
3. This test checks whether the open is due to a bad
bulb.
4. This test determines whether the malfunction is a
short from the
"SRS Indicator'' circuit to B+.
5. This test determines whether the malfunction is an
open in the "SRS Indicator'' circuit or an open in the
instrument
panel cluster.
SRS-1 JOINT CONNECTION
1834
IGNITION 1 IGNITION 1 DRIVER SOURCE SENSE DRIVER 36VLR PASS. 36VLR
REDUNDAT
INDICATOR GROUND
PASS
SIDE HIGH
PASS
SIDE LOW
1---''""""'-------'l-----l--'1-~--'TO ~&'Jc~ELT 1833 BLU FUSE N-7-ST.,AR_TE.,_R+-'l---'1----"''"'"'-"---WHT/RED C-1 0A Al'6L ____.Jill_ BAN FUSE CONNECTOR 1819
1820
SERIAL DATA
DRIVER SIDE HIGH DRIVER SIDE LOW REDUNDANT INDICATOR
IGNITION 1
SRS INDICA TOR
•
Page 1663 of 1928
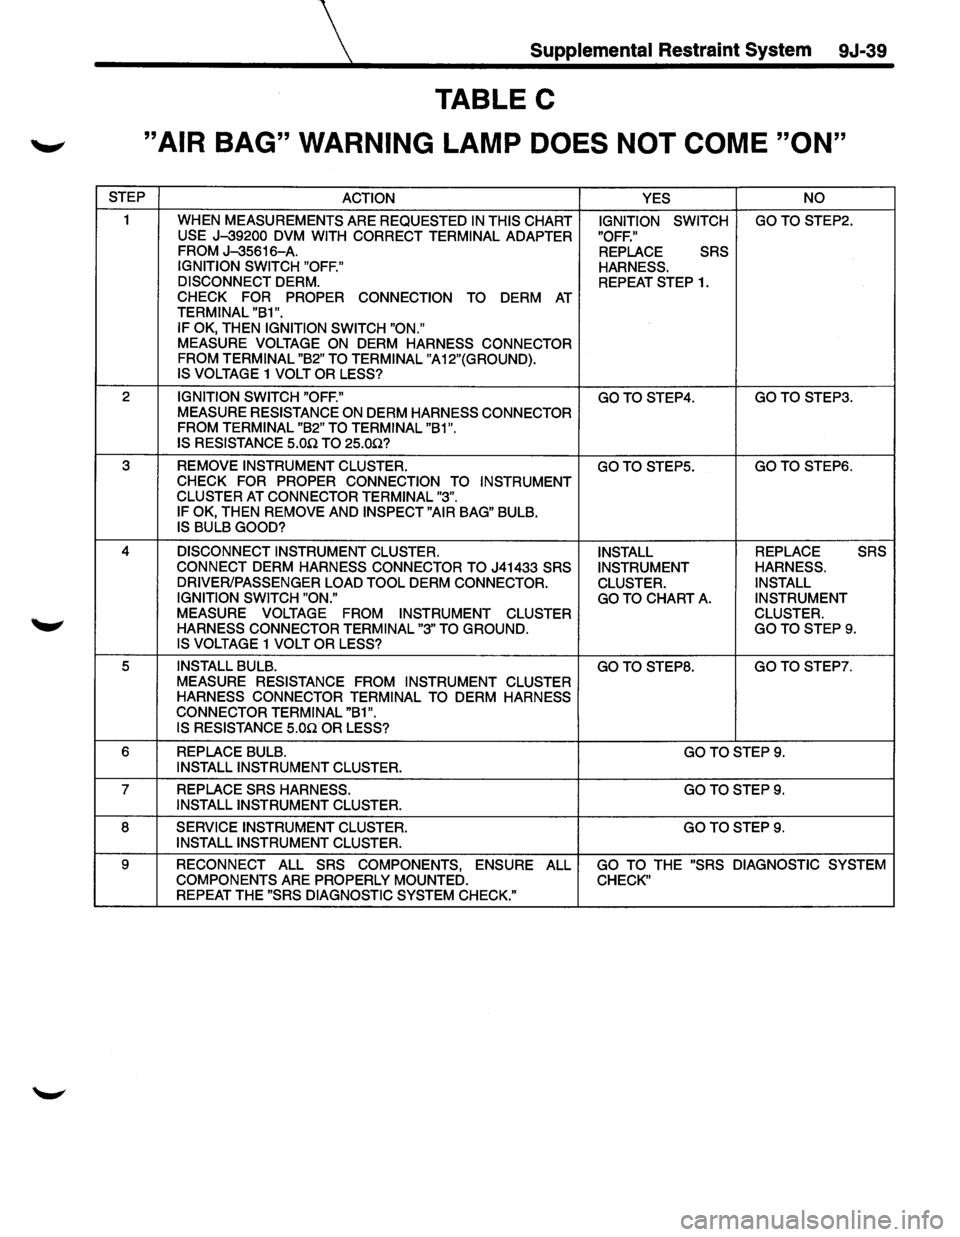
Supplemental Restraint System 9J-39
TABLE C
._, "AIR BAG" WARNING LAMP DOES NOT COME "ON"
STEP
ACTION YES NO
1
WHEN MEASUREMENTS ARE REQUESTED IN THIS CHART IGNITION SWITCH GOTOSTEP2. USE J-39200 DVM
WITH CORRECT TERMINAL ADAPTER "OFF."
FROM J-35616-A. REPLACE SRS
IGNITION SWITCH "OFF."
HARNESS.
DISCONNECT
DERM. REPEAT STEP 1. CHECK FOR PROPER CONNECTION TO DERM AT TERMINAL "B1 ".
IF OK, THEN IGNITION SWITCH "ON." MEASURE VOLTAGE ON DERM HARNESS CONNECTOR
FROM TERMINAL "B2" TO TERMINAL "A12"(GROUND).
IS VOLTAGE
1 VOLT OR LESS?
2 IGNITION SWITCH "OFF." GOTOSTEP4. GOTO STEP3.
MEASURE RESISTANCE ON DERM HARNESS CONNECTOR
FROM TERMINAL "B2" TO TERMINAL "B1".
IS RESISTANCE
5.0.Q TO 25.0.Q?
3 REMOVE INSTRUMENT CLUSTER. GOTOSTEP5. GOTOSTEP6. CHECK FOR PROPER CONNECTION TO
INSTRUMENT
CLUSTER AT CONNECTOR TERMINAL "3".
IF OK, THEN REMOVE AND INSPECT "AIR BAG" BULB. IS BULB GOOD?
4 DISCONNECT INSTRUMENT CLUSTER.
INSTALL REPLACE SRS
CONNECT DERM HARNESS CONNECTOR TO J41433 SRS
INSTRUMENT HARNESS.
DRIVER/PASSENGER LOAD TOOL
DERM CONNECTOR.
CLUSTER. INSTALL
IGNITION SWITCH "ON."
GO TO
CHART A. INSTRUMENT
MEASURE VOLTAGE FROM INSTRUMENT
CLUSTER CLUSTER.
HARNESS CONNECTOR TERMINAL "3" TO
GROUND. GOTOSTEP9. IS VOLTAGE 1 VOLT OR LESS?
5 INSTALL BULB. GOTO STEPS. GO
TO STEP?.
MEASURE RESISTANCE FROM INSTRUMENT CLUSTER
HARNESS CONNECTOR TERMINAL TO
DERM HARNESS
CONNECTOR TERMINAL "B1".
IS RESISTANCE 5.0n OR LESS?
6 REPLACE BULB. GOTOSTEP9. INSTALL INSTRUMENT CLUSTER.
7 REPLACE SRS HARNESS. GOTOSTEP9. INSTALL INSTRUMENT CLUSTER.
8 SERVICE INSTRUMENT CLUSTER. GOTOSTEP9. INSTALL INSTRUMENT CLUSTER.
9
RECONNECT ALL SRS COMPONENTS, ENSURE ALL GO TO THE "SRS DIAGNOSTIC SYSTEM
COMPONENTS ARE PROPERLY MOUNTED. CHECK" REPEAT THE "SRS DIAGNOSTIC SYSTEM CHECK."
Page 1664 of 1928
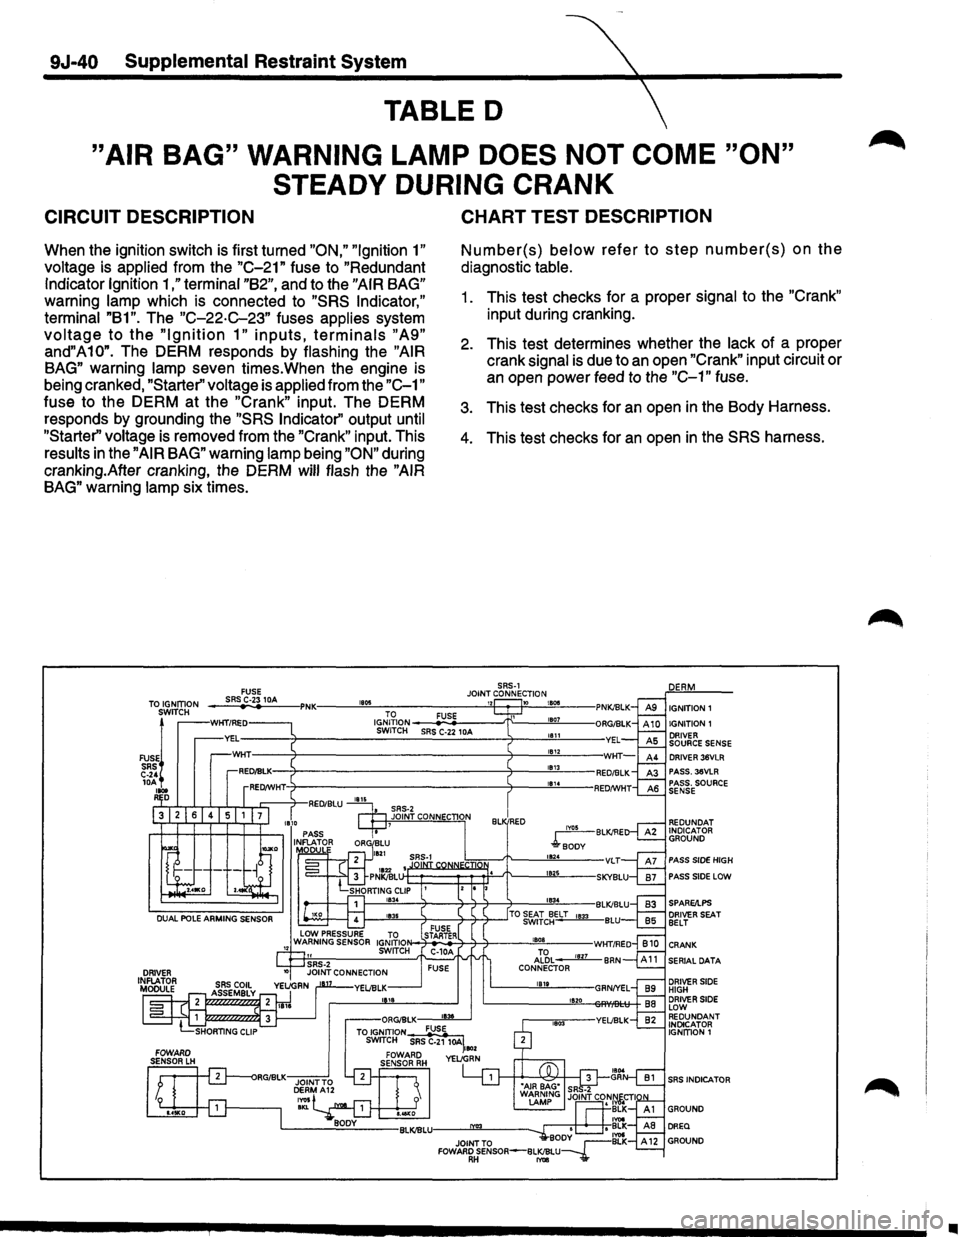
9J-40 Supplemental Restraint System
TABLED
"AIR BAG" WARNING LAMP DOES NOT COME "ON"
STEADY DURING
CRANK
CIRCUIT DESCRIPTION
When the ignition switch is first turned "ON," "Ignition 1"
voltage is applied from the "C-21" fuse to "Redundant
Indicator Ignition
1 ,"terminal "B2", and to the "AIR BAG"
warning lamp which is connected to "SRS Indicator,"
terminal "B1". The "C-22-C-23" fuses applies system
voltage to the "Ignition 1" inputs, terminals "A9"
and"A10". The DERM responds by flashing the "AIR
BAG"
warning lamp seven times.When the engine is
being cranked,
"Starter'' voltage is applied from the "C-1"
fuse to the DERM at the "Crank" input. The DERM
responds by grounding the
"SRS Indicator'' output until
"Starter'' voltage is removed from the "Crank" input. This
results
in the "AIR BAG" warning lamp being "ON" during
cranking.After cranking, the DERM
will flash the "AIR
BAG"
warning lamp six times.
FUSE
CHART TEST DESCRIPTION
Number(s) below refer to step number(s) on the
diagnostic table.
1. This test checks for a proper signal to the "Crank"
input during cranking.
2. This test determines whether the lack of a proper
crank signal
is due to an open "Crank" input circuit or
an open power feed to the "C-1" fuse.
3. This test checks for an open in the Body Harness.
4. This test checks for an open in the SRS harness.
SRS-1
TO IGNITION SWITCH
JOINT CONNECTION ___ sR_S~C-·23~1-~---PNK.----~"~~------------~~~--~~~~---IGNITION1
IGNITION 1
FUSE~ SRS C-24 lOA loot R D
IGJ;~ION __ __.,;FU.:;.SE0------'!"------"'""""---------:1-----------S-W_IT_CH ___ SR_S_C-_22_1_DA ____ -7-----"'a"-'"-----YEL
IYOS BLK/RE
l"soDv
DRIVER 36VLR PASS. 36VLA PASS. SOURCE SENSE
REDUNDAT INDICATOR GROUND
PASS SIDE HIGH
PASS SIDE LOW
SERIAL DATA
DRIVER SIDE HIGH DRIVER SIDE LOW REDUNDANT INDICATOR IGNITION 1
SRS INDICATOR
•
Page 1665 of 1928
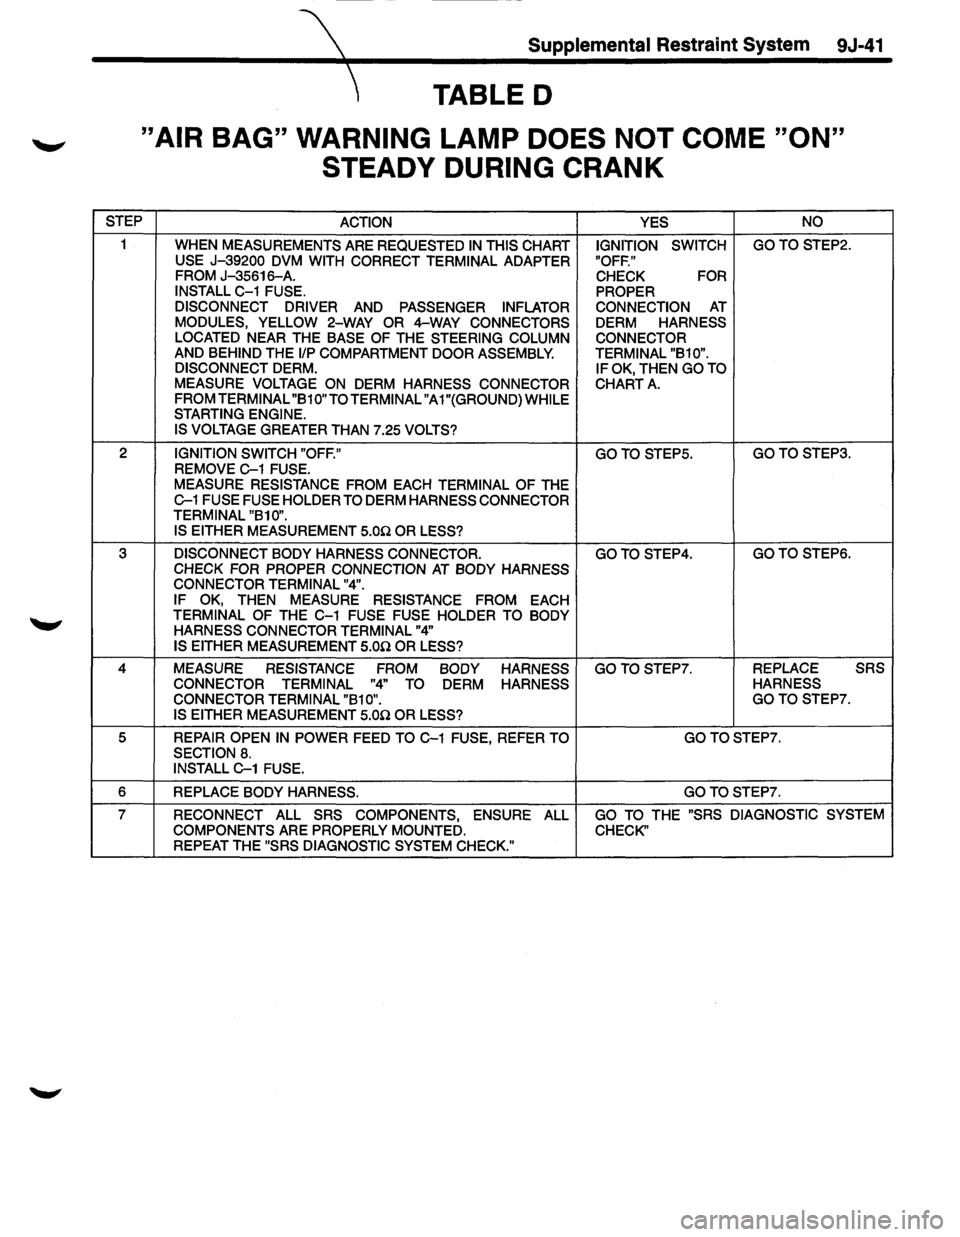
Supplemental Restraint System 9J-41
TABLED
"AIR BAG" WARNING LAMP DOES NOT COME "ON"
STEADY DURING
CRANK
STEP
ACTION YES NO
1
WHEN MEASUREMENTS ARE REQUESTED IN THIS CHART IGNITION SWITCH GOTO STEP2.
USE
J-39200 DVM WITH CORRECT TERMINAL ADAPTER "OFF."
FROM J-35616-A. CHECK FOR
INSTALL C-1 FUSE.
PROPER
DISCONNECT DRIVER
AND PASSENGER INFLATOR CONNECTION AT
MODULES, YELLOW 2-WAY OR 4-WAY CONNECTORS DERM HARNESS
LOCATED NEAR THE BASE OF THE STEERING COLUMN CONNECTOR AND BEHIND THE liP COMPARTMENT DOOR ASSEMBLY. TERMINAL "B10".
DISCONNECT DERM. IF OK, THEN GO TO MEASURE VOLTAGE ON DERM HARNESS CONNECTOR CHARTA. FROM TERMINAL "B1 0" TO TERMINAL "A 1"(GROUND) WHILE
STARTING ENGINE.
IS VOLTAGE
GREATER THAN 7.25 VOLTS?
2 IGNITION SWITCH "OFF." GOTOSTEP5. GOTOSTEP3.
REMOVE G-1 FUSE.
MEASURE RESISTANCE FROM
EACH TERMINAL OF THE G-1 FUSE FUSE HOLDER TO DERM HARNESS CONNECTOR
TERMINAL "B10".
IS EITHER
MEASUREMENT 5.00 OR LESS?
3 DISCONNECT BODY HARNESS CONNECTOR. GOTOSTEP4. GOTOSTEP6.
CHECK FOR PROPER CONNECTION AT BODY HARNESS
CONNECTOR TERMINAL "4".
IF OK,
THEN MEASURE
RESISTANCE FROM EACH TERMINAL OF THE C-1 FUSE FUSE HOLDER TO BODY
HARNESS CONNECTOR TERMINAL "4"
IS EITHER
MEASUREMENT 5.00 OR LESS?
4 MEASURE
RESISTANCE FROM BODY HARNESS GOTOSTEP7. REPLACE SRS
CONNECTOR TERMINAL
"4" TO DERM HARNESS HARNESS
CONNECTOR TERMINAL "B10". GOTOSTEP7.
IS EITHER MEASUREMENT 5.00 OR LESS?
5 REPAIR OPEN IN POWER FEED TO C-1 FUSE, REFER TO GO
TO STEP?.
SECTION 8. INSTALL G-1 FUSE.
6 REPLACE BODY HARNESS. GOTOSTEP7.
7 RECONNECT ALL SRS COMPONENTS, ENSURE ALL GO TO THE "SRS DIAGNOSTIC SYSTEM
COMPONENTS
ARE PROPERLY MOUNTED. CHECK" REPEAT THE "SRS DIAGNOSTIC SYSTEM CHECK."
Page 1666 of 1928
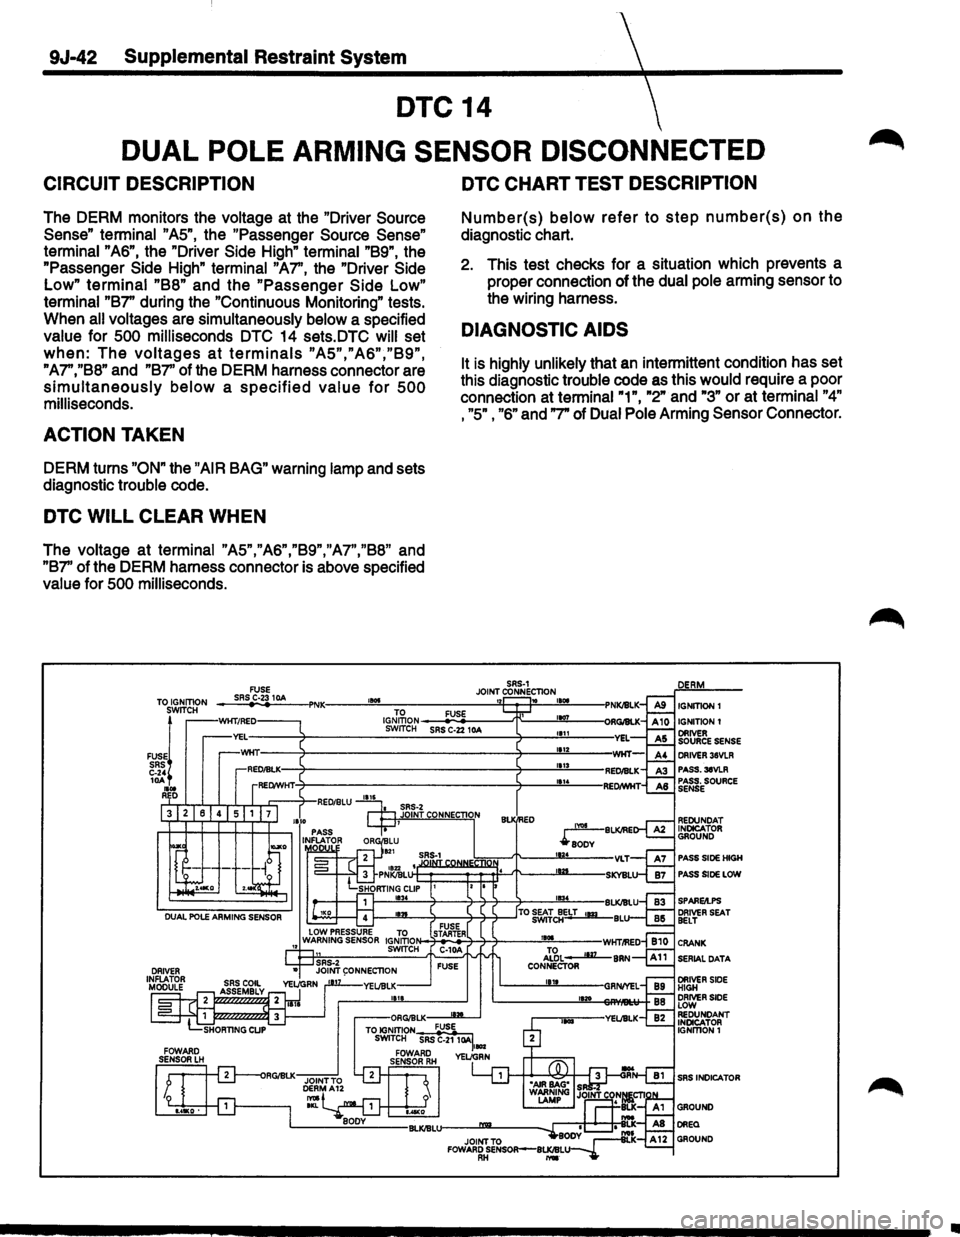
9J-42 Supplemental Restraint System
DTC 14
DUAL
POLE ARMING SENSOR DISCONNECTED
CIRCUIT DESCRIPTION
The DERM monitors the voltage at the "Driver Source
Sense" terminal
"AS", the "Passenger Source Sense"
terminal "AS",
the "Driver Side High" terminal "B9", the
"Passenger
Side High" terminal "A7'', the "Driver Side
Low" terminal
"88" and the "Passenger Side Low"
terminal "87" during the "Continuous Monitoring" tests.
When
all voltages are simultaneously below a specified
value for 500 milliseconds DTC 14 sets.DTC will set
when: The voltages at terminals "A5","A6","B9",
"A7","B8" and "B7'' of the DERM harness connector are
simultaneously below a specified value for 500
milliseconds.
ACTION TAKEN
DERM turns "ON" the "AIR BAG" warning lamp and sets
diagnostic
trouble code.
DTC WILL CLEAR WHEN
The voltage at terminal "A5","A6","B9","A7","B8" and
"87'' of the DERM harness connector is above specified
value for 500 milliseconds.
~~ 10A 1101 RD
DTC CHART TEST DESCRIPTION
Number(s) below refer to step number(s) on the
diagnostic chart.
2. This test checks for a situation which prevents a
proper connection of the
dual pole arming sensor to
the wiring harness.
DIAGNOSTIC AIDS
It is highly unlikely that an intermittent condition has set
this diagnostic
trouble code as this would require a poor
connection at
terminal"1", "2" and "3" or at terminal "4"
, "5" ,
"6" and "7" of Dual Pole Arming Sensor Connector.
IGNmDNt
PASS.38VLR PASS. SOURCE SENSE
PASS SIDE HIGH
PASS SIDE LOW
SERIAL DATA
SRS INDICATOR
Ill
Page 1668 of 1928
9J-44 Supplemental Restraint System
DTC 15
PASSENGER INITIATOR CIRCUIT RESISTANCE HIGH
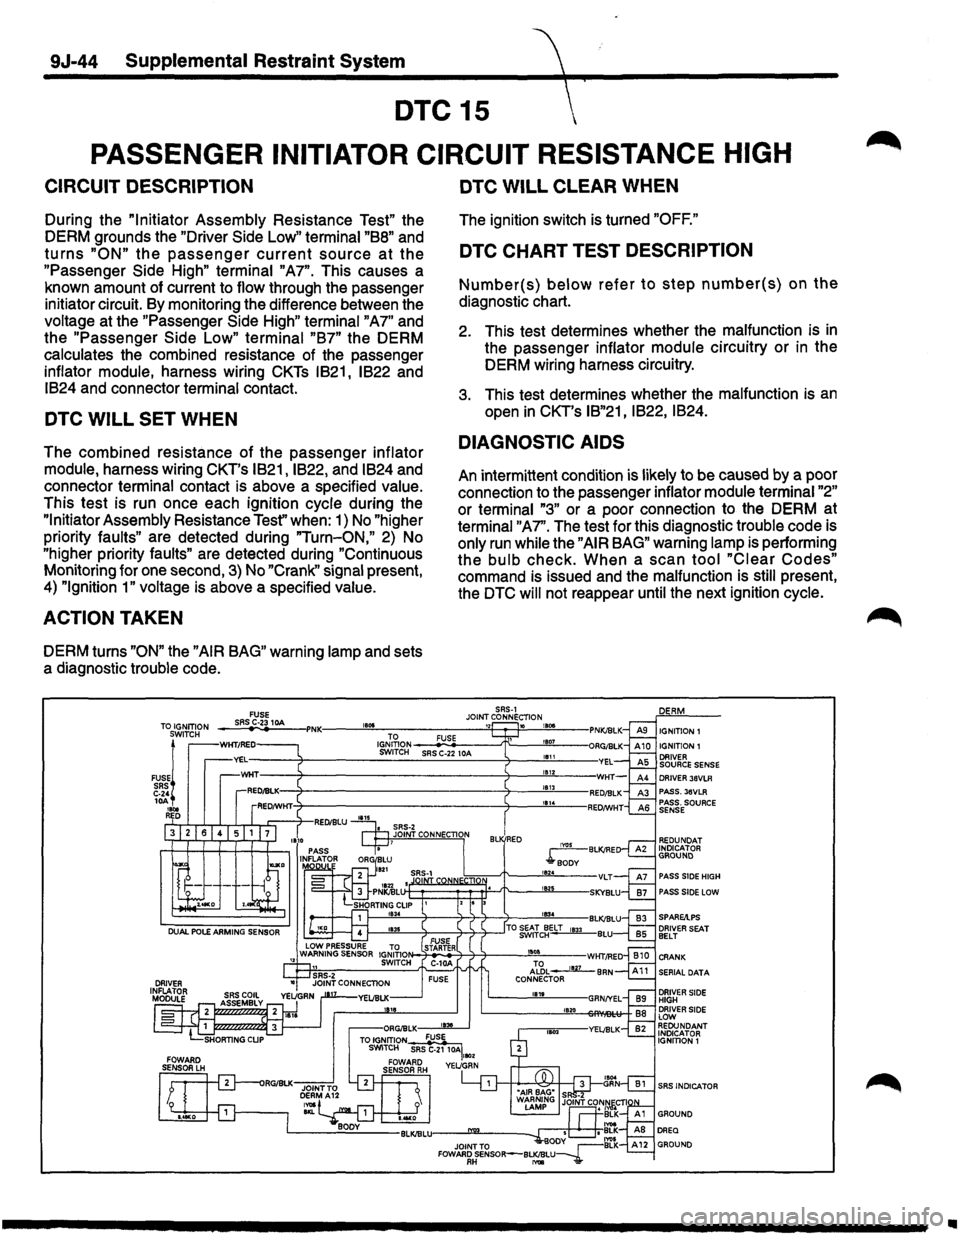
CIRCUIT DESCRIPTION
During the "Initiator Assembly Resistance Test" the
DERM grounds the
"Driver Side Low" terminal "BB" and
turns "ON" the passenger current source at the
"Passenger Side High" terminal "A7". This causes a
known amount of current to
flow through the passenger
initiator circuit. By monitoring the difference between the
voltage at the "Passenger Side High" terminal "A7" and
the "Passenger
Side Low" terminal "B7" the DERM
calculates the combined resistance of the passenger
inflator module, harness wiring CKTs IB21, IB22 and
IB24 and connector terminal contact.
DTC WILL SET WHEN
The combined resistance of the passenger inflator
module,
harness wiring CKT's IB21, IB22, and IB24 and
connector
terminal contact is above a specified value.
This test is run once each ignition cycle during the
"Initiator Assembly Resistance Tesf' when: 1) No "higher
priority faults" are detected during "Turn-ON," 2) No
"higher priority faults" are detected during "Continuous
Monitoring for one second, 3) No "Crank" signal present,
4) "Ignition 1" voltage is above a specified value.
ACTION TAKEN
DERM turns "ON" the "AIR BAG" warning lamp and sets
a diagnostic
trouble code.
DTC WILL CLEAR WHEN
The ignition switch is turned "OFF."
DTC CHART TEST DESCRIPTION
Number(s) below refer to step number(s) on the
diagnostic chart.
2. This test determines whether the malfunction is in
the passenger inflator module circuitry or in the
DERM wiring harness circuitry.
3. This test determines whether the malfunction is an
open in CKT's IB"21, IB22, IB24.
DIAGNOSTIC AIDS
An intermittent condition is likely to be caused by a poor
connection to the passenger
inflator module terminal "2"
or terminal "3" or a poor connection to the DERM at
terminal "A7''. The test for this diagnostic trouble code is
only run while the "AIR BAG" warning lamp is performing
the
bulb check. When a scan tool "Clear Codes"
command is issued and the malfunction is still present,
the
DTC will not reappear until the next ignition cycle.
DRIVER 36VLR PASS. 36VLR PASS. SOURCE SENSE
REDUNDAT INDICATOR GROUND
PASS SIDE HIGH
PASS SIDE LOW
SERIAL DATA
SRS INDICATOR
Ill
Page 1670 of 1928
9J-46 Supplemental Restraint System
DTC 16
PASSENGER INITIATOR CIRCUIT RESISTANCE LOW
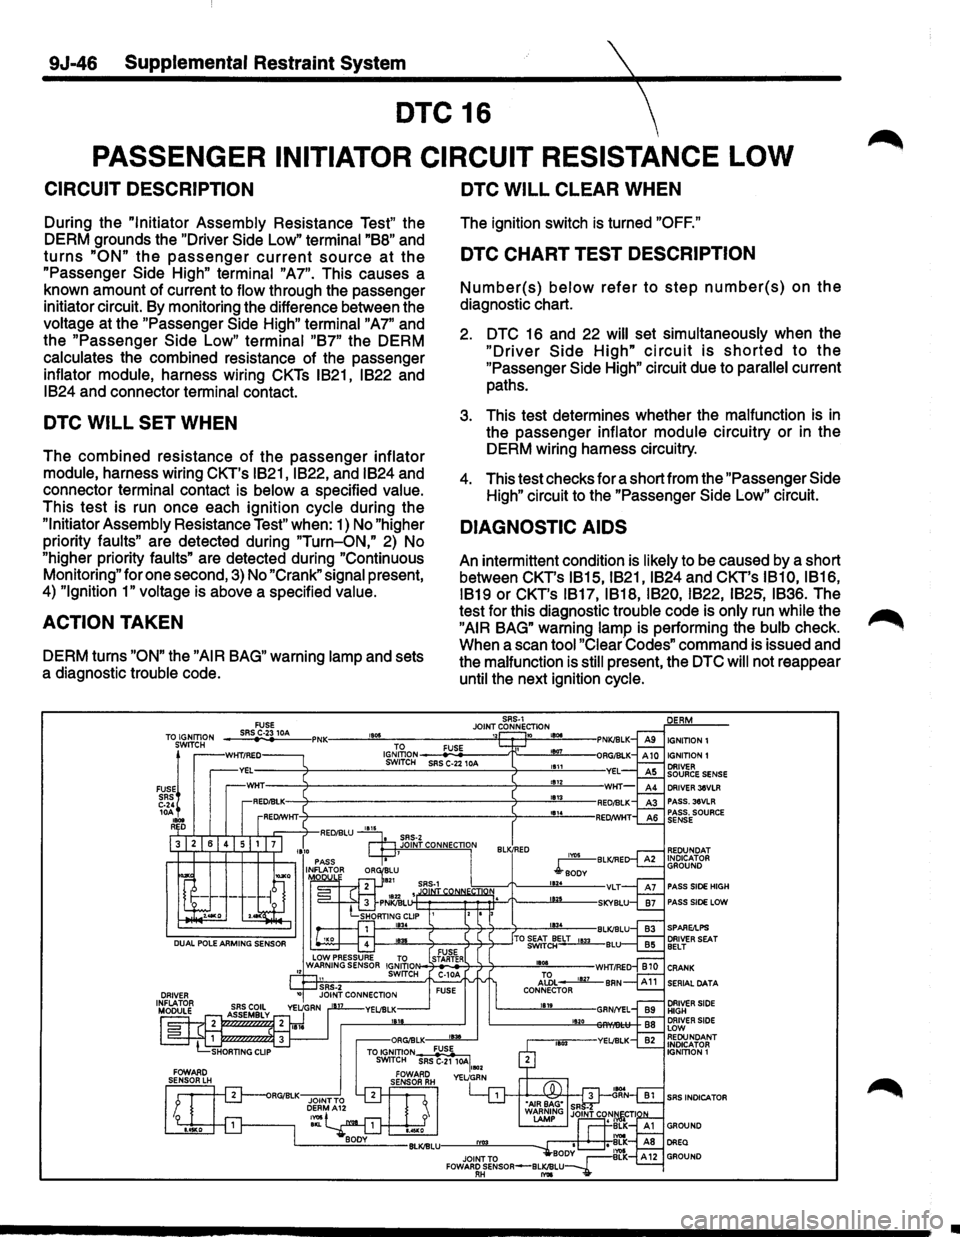
CIRCUIT DESCRIPTION
During the "Initiator Assembly Resistance Test" the
DERM grounds the "Driver
Side Low" terminal "B8" and
turns "ON" the passenger current source at the
"Passenger Side High" terminal "A7". This causes a
known amount of current to
flow through the passenger
initiator circuit. By monitoring the difference between the
voltage at the "Passenger Side High" terminal "A7" and
the "Passenger
Side Low" terminal "B7" the DERM
calculates the combined resistance of the passenger
inflator module, harness wiring CKTs IB21, IB22 and
IB24 and connector terminal contact.
DTC WILL SET WHEN
The combined resistance of the passenger inflator
module,
harness wiring CKT's IB21, IB22, and IB24 and
connector
terminal contact is below a specified value.
This test is run once each ignition cycle during the
"Initiator Assembly Resistance Test" when: 1) No "higher
priority
faults" are detected during "Turn-ON," 2) No
"higher priority
faults" are detected during "Continuous
Monitoring" for one second,
3) No "Crank" signal present,
4)
"Ignition 1" voltage is above a specified value.
ACTION TAKEN
DERM turns "ON" the "AIR BAG" warning lamp and sets
a diagnostic
trouble code.
1805
DTC WILL CLEAR WHEN
The ignition switch is turned "OFF."
DTC CHART TEST DESCRIPTION
Number(s) below refer to step number(s) on the
diagnostic chart.
2. DTC 16 and 22 will set simultaneously when the
"Driver Side High" circuit is shorted to the
"Passenger Side High" circuit due to parallel current
paths.
3. This test determines whether the malfunction is in
the passenger inflator module circuitry or in the
DERM wiring harness circuitry.
4. This test checks for a short from the "Passenger Side
High" circuit to the "Passenger Side Low" circuit.
DIAGNOSTIC AIDS
An intermittent condition is likely to be caused by a short
between CKT's
IB15, IB21, IB24 and CKT's IB10, IB16,
IB19
or CKT's IB17, IB18, IB20, IB22, IB25, IB36. The
test for this diagnostic
trouble code is only run while the
"AIR BAG" warning lamp is performing the bulb check.
When a scan
tool "Clear Codes" command is issued and
the
malfunction is still present, the DTC will not reappear
until the next ignition cycle.
SRS·1 JOINT CONNECTION 12 10 LBOe TO FUSE 1807 ~~~2~--SR~SC~-2+21-0A--~~--~---
IGNITION 1 IGNITION1 1111 1812 1813 DRIVER JeVLR
PASS. 36VLR
PASS. SOURCE
SENSE
REDUNDAT
INDICATOR
GROUND
PASS SIDE HIGH
PASS SIDE LOW
SERIAL DATA
SRS INDICATOR
•