radiator cap ISUZU TROOPER 1995 Workshop Manual
[x] Cancel search | Manufacturer: ISUZU, Model Year: 1995, Model line: TROOPER, Model: ISUZU TROOPER 1995Pages: 1928
Page 21 of 1928

FLUID LEVEL CHECK
A fluid loss in any system (except windshield
washer) may indicate a problem. Repair the system
at once.
Engine
oil level -Check level and add if
necessary. The best time to check the engine oil
level is
when the oil is warm. After stopping the
engine with the vehicle on a level surface, wait a
few minutes for the oil to drain back to the oil pan.
Pull
out the oil level indicator (dipstick). Wipe it
clean and push the oil level indicator back down all
the
way. Pull out the oil level indicator, keeping the
tip down, and look at the oil level on it.
Add oil, if needed, to keep the oil level above
the
"ADD" mark and between the "ADD" and
"FULL" marks in the operating range area. Avoid
overfilling the engine since this may cause engine
damage. Push
the oil level indicator back down all
the
way after taking the reading.
If you check the oil level when the oil is cold, do
not run the engine first. The cold oil will not drain
back
to the pan fast enough to give a true oil level.
Engine coolant level and condition -Check
engine coolant level in the coolant reservoir and
add engine
coolant if necessary. Inspect the engine
coolant and replace it if dirty or rusty.
Windshield washer fluid level -Check washer
fluid level in reservoir and add if necessary.
Power steering system reservoir level-Check
and keep at
proper level.
Brake master cylinder reservoir level -Check
fluid. Keep fluid at proper level. A low fluid level
can indicate
worn disc brake pads which may need
to be serviced.
Hydraulic clutch system -Check fluid l~vel in
the reservoir.
Add fluid as required.
Battery fluid level -Check fluid level in the
battery.
FLUID LEAK CHECK
Check for fuel, water, oil or other fluid leaks by
looking at the surface beneath the vehicle after it
has been parked for a while. Water dripping from
the air conditioning system after use is normal. If
you notice gasoline fumes or fluid at any time,
locate the source and correct it at once.
ENGINE OIL AND OIL FILTER
REPLACEMENT
Always use API SE, SF, SG, SH or ILSAC GF-1
quality oils of the proper viscosity.
When choosing an oil, consider the range of
temperatures the car will be operated in before the
next oil change. Then, select the recommended oil
viscosity
from the chart (Fig. OB-1).
Always change the oil and the oil filter as soon as
possible after driving in a dust storm.
MAINTENANCE AND LUBRICATION OB-5
ENGINE COOLING SYSTEM INSPECTION
Inspect coolant/anti-freeze. If coolant is dirty or
rusty, drain, flush and refill with new coolant. Keep
coolant at the proper mixture for proper freeze
protection,
corrosion inhibitor level and best engine
operating temperature.
Inspect hoses and replace if
cracked, swollen or deteriorated. Tighten hose
clamps if equipped with screw-type clamps. Clean
outside of radiator and air conditioning condenser.
Wash
filler cap and neck. To help ensure proper
operation, a pressure test of both the cooling
system and cap is also recommended.
EXHAUST SYSTEM INSPECTION
Visually inspect the exhaust pipes, muffler, heat
shields and hangers
for cracks, deterioration, or
damage.
Be alert to any changes in the sound of the exhaust
system
or any smell of fumes. These are signs the
system may be leaking or overheating. Repair the
system at once,
if these conditions exist. (See also
"Engine Exhaust Gas Safety" and "Three Way
Catalytic Converter" in Owner's manual.)
FUEL CAP, FUEL LINES, AND FUEL TANK
INSPECTION
Inspect the fuel tank, the fuel cap and the fuel lines
every
60,000 miles (96,000 km) for damage which
could cause leakage.
Inspect the fuel cap and the gasket for correct sealing
and physical damage. Replace any damaged parts.
DRIVE BELT INSPECTION
Check the belts driving the steering oil pump, the air
conditioning compressor, and the generator
for
cracks, fraying, wear, and correct tension every 30,000
miles (48,000 km). Adjust or replace as necessary.
WHEEL ALIGNMENT, BALANCE AND
TIRES OPERATION
Uneven or abnormal tire wear, or a pull right or left
on a straight and level road may show the need for
a wheel alignment. A vibration of the steering
wheel or seat at normal highway speeds means a
wheel balancing is needed. Check tire pressure
when the tires are "cold" (include the spare).
Maintain pressure as shown in the tire placard,
which is located on the driver's door lock pillar.
STEERING SYSTEM OPERATION
Be alert for any changes in steering action. An
inspection
or service is needed when the steering
wheel is harder
to turn or has too much free play, or
if there are unusual sounds when turning or parking.
Page 58 of 1928
1 B - 4 AIR CONDITIONING
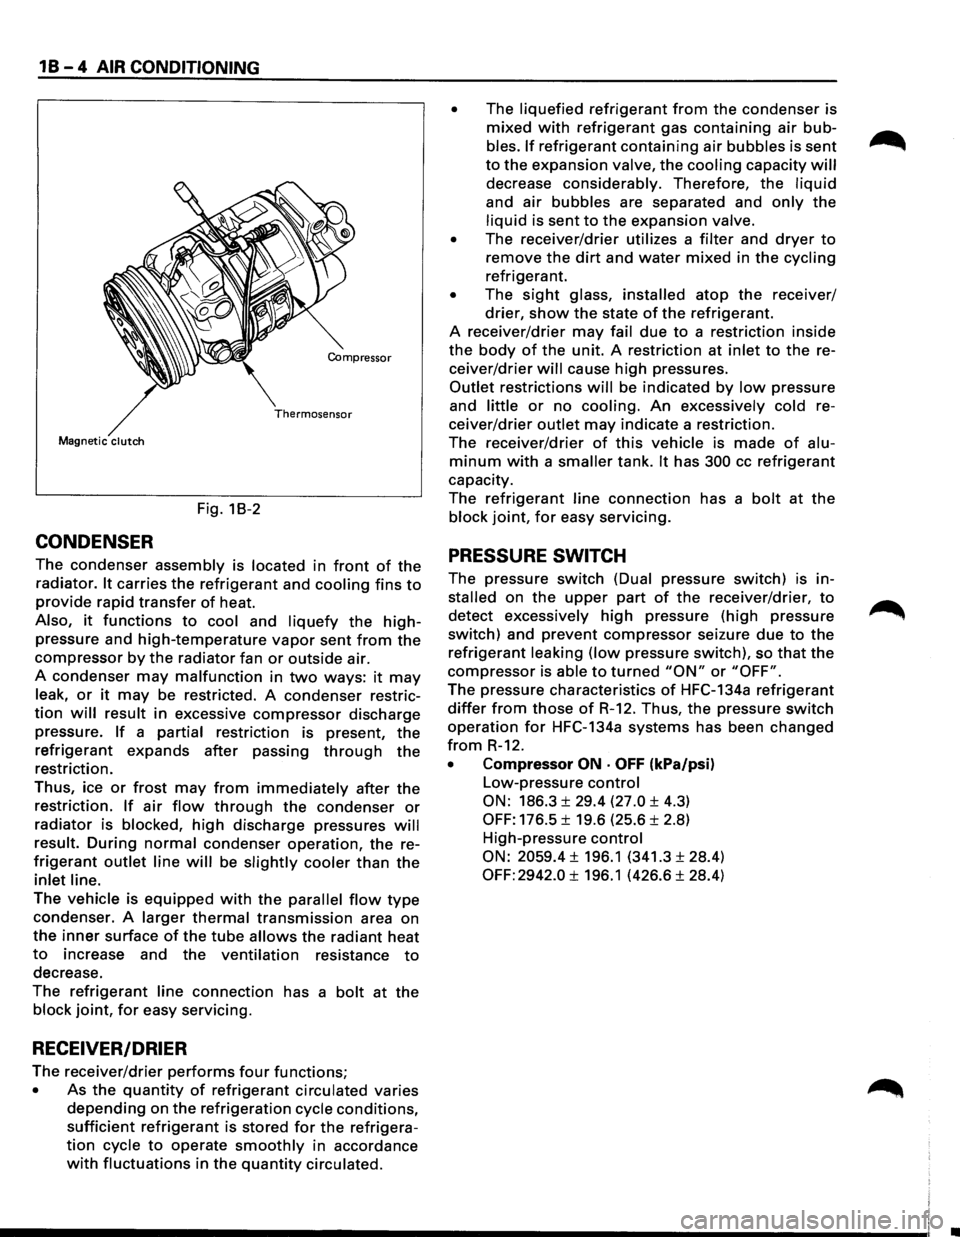
Compressor
Thermosensor
Magnetic clutch
Fig. 18-2
CONDENSER
The condenser assembly is located in front of the
radiator. It carries the refrigerant and cooling fins to
provide rapid transfer of heat.
Also, it functions to cool and liquefy the high
pressure and high-temperature vapor sent from the
compressor by the radiator fan or outside air.
A condenser
may malfunction in two ways: it may
leak, or it may be restricted. A condenser restric
tion will result in excessive compressor discharge
pressure.
If a partial restriction is present, the
refrigerant expands after passing through the
restriction.
Thus, ice
or frost may from immediately after the
restriction. If air flow through the condenser or
radiator is blocked, high discharge pressures will
result. During normal condenser operation, the re
frigerant outlet line will be slightly cooler than the
inlet line.
The vehicle is equipped with the parallel flow type
condenser. A larger thermal transmission area on
the inner surface of the tube allows the radiant heat
to increase and the ventilation resistance to
decrease.
The
refrigerant line connection has a bolt at the
block joint, for easy servicing.
RECEIVER/DRIER
The receiver/drier performs four functions;
• As the quantity of refrigerant circulated varies
depending on the refrigeration cycle conditions,
sufficient refrigerant is stored for the refrigera
tion cycle to operate smoothly in accordance
with fluctuations in the quantity circulated. •
The liquefied refrigerant from the condenser
is
mixed with refrigerant gas containing air bub
bles. If refrigerant containing air bubbles is sent
to the expansion valve, the cooling capacity will
decrease considerably. Therefore, the liquid
and air bubbles are separated and only the
liquid is sent to the expansion valve.
•
The receiver/drier utilizes a filter and dryer to
remove the dirt and water mixed in the cycling
refrigerant.
• The sight glass, installed atop the receiver/
drier, show the state of the refrigerant.
A receiver/drier may fail due to a restriction inside
the body of the unit. A restriction at inlet to the re
ceiver/drier
will cause high pressures.
Outlet restrictions will be indicated by low pressure
and
little or no cooling. An excessively cold re
ceiver/drier
outlet may indicate a restriction.
The receiver/drier
of this vehicle is made of alu
minum with a smaller tank. It has 300 cc refrigerant
capacity.
The
refrigerant line connection has a bolt at the
block joint, for easy servicing.
PRESSURE SWITCH
The pressure switch (Dual pressure switch) is in
stalled on the upper part of the receiver/drier, to
detect excessively high pressure (high pressure
switch) and prevent compressor seizure due to the
refrigerant leaking (low pressure switch), so that the
compressor is able to turned "ON" or "OFF".
The pressure characteristics of HFC-134a refrigerant
differ from those of R-12. Thus, the pressure switch
operation for HFC-134a systems has been changed
from R-12.
• Compressor ON · OFF (kPa/psi)
Low-pressure control
ON: 186.3 ± 29.4 (27.0 ± 4.3)
OFF: 176.5 ± 19.6 (25.6 ± 2.8)
High-pressure
control
ON: 2059.4 ± 196.1 (341.3 ± 28.4)
OFF: 2942.0 ± 196.1 (426.6 ± 28.4)
Page 79 of 1928
5. Refrigerant line connector
• When removing the line connector, the con
necting part
should immediately be plugged
or capped to prevent foreign matter from
being mixed into the line.
6. Compressor
l••liNSTALLATION
6. Compressor
• Tighten the compressor fixing bolts to the
specified torque.
~~~ Torque N·m (lb·ft) 19 (14)
5. Refrigerant line connector
• Tighten the refrigerant line connector fixing
bolts to the specified torque.
~~~ Torque N·m (lb.ft) 15 (11)
• 0-rings cannot be reused. Always replace
with new ones.
1~1 • Be sure to apply new compressor oil to the 0-
rings when connecting refrigerant lines.
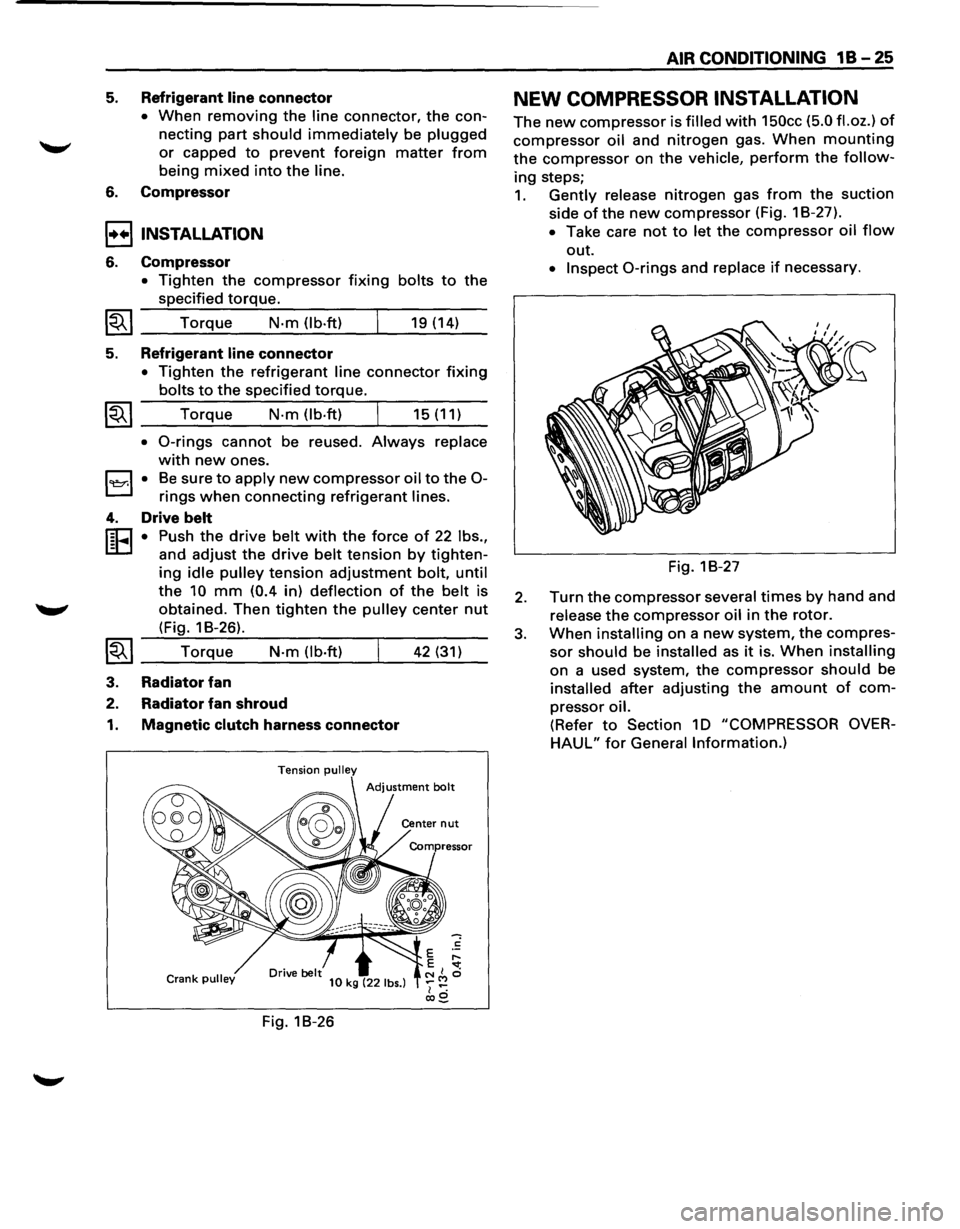
4. Drive belt
r:cJ • Push the drive belt with the force of 22 lbs.,
L:D and adjust the drive belt tension by tighten-
ing idle pulley tension adjustment bolt, until
the 10 mm (0.4 in) deflection of the belt is
obtained. Then
tighten the pulley center nut
(Fig. 1 B-26).
~~I __ T_o_r_!q_ue.:...._ __ N_·m__;_(l_b_·ft....:..) _ __,_ __ 4_2....:..(_31_)_
3. Radiator fan
2. Radiator fan shroud
1. Magnetic clutch harness connector
Tension pulley
Crank pulley 10 kg (22 lbs.)
Fig. 18-26
AIR CONDITIONING 1 B -25
NEW COMPRESSOR INSTALLATION
The new compressor is filled with 150cc (5.0 fl.oz.) of
compressor oil and nitrogen gas. When mounting
the compressor on the vehicle, perform the follow
ing steps;
1. Gently release nitrogen gas from the suction
side
ofthe new compressor (Fig. 18-27).
• Take care not to let the compressor oil flow
out.
• Inspect 0-rings and replace if necessary.
Fig. 18-27
2. Turn the compressor several times by hand and
release
the compressor oil in the rotor.
3. When installing on a new system, the compres
sor should be installed as it is. When installing
on a used system, the compressor should be
installed after adjusting the amount of com
pressor oil.
(Refer to Section 10 "COMPRESSOR OVER
HAUL" for General Information.)
Page 80 of 1928
1 B -26 AIR CONDITIONING
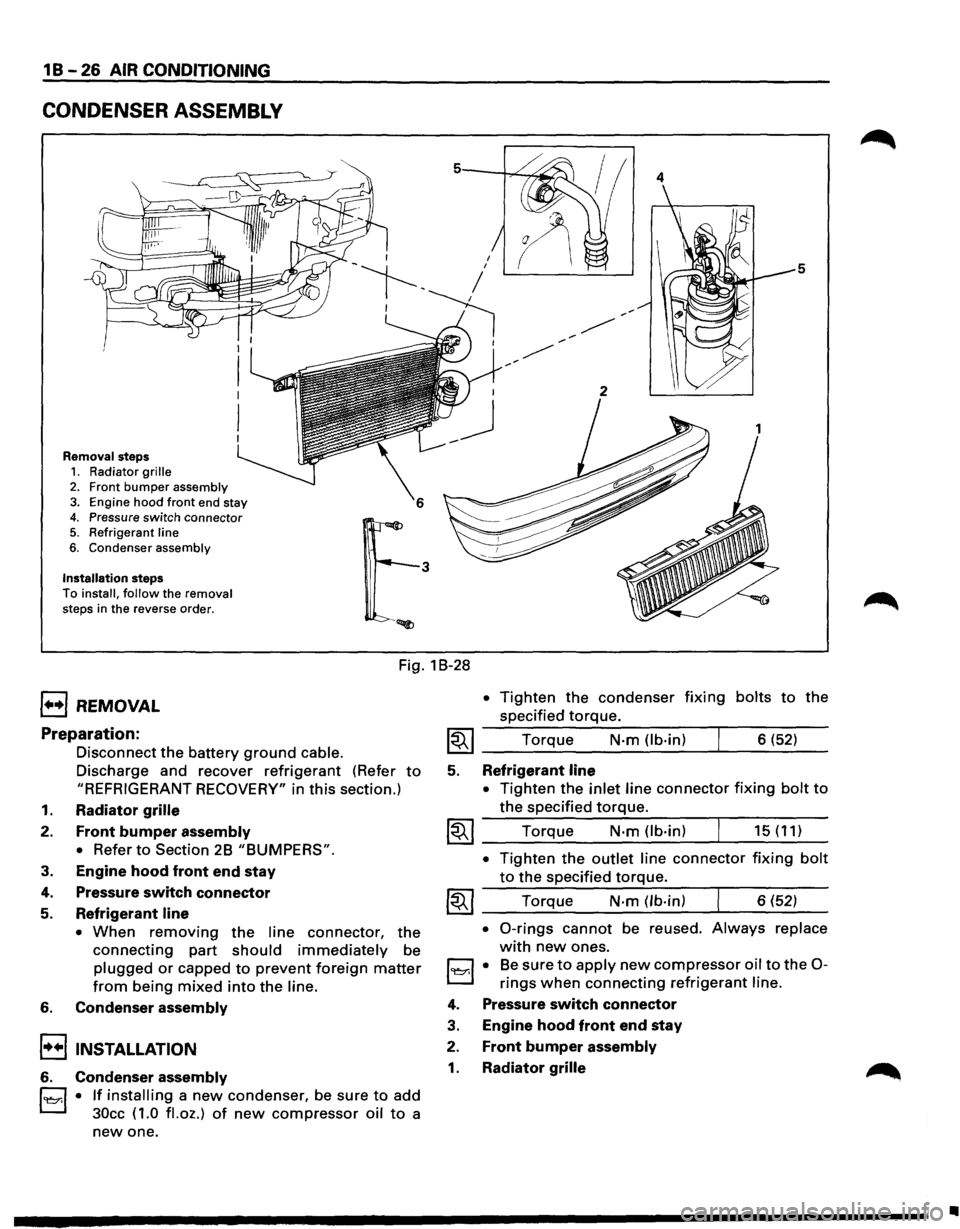
CONDENSER ASSEMBLY
Removal steps 1. Radiator grille
2. Front bumper assembly 3. Engine hood front end stay
4. Pressure switch connector 5. Refrigerant line
6. Condenser assembly
Installation steps To install, follow the removal
steps in the reverse order.
4
5
Fig. 1 B-28
1••1 REMOVAL
Preparation:
Disconnect the battery ground cable.
Discharge and recover refrigerant (Refer to
"REFRIGERANT RECOVERY" in this section.)
1. Radiator grille
2. Front bumper assembly
•
Refer to Section 2B "BUMPERS".
3. Engine hood front end stay
4. Pressure switch connector
5. Refrigerant line
• When removing the line connector, the
connecting part should immediately be
plugged or capped to prevent foreign matter
from being mixed into the line.
6. Condenser assembly
!••I INSTALLATION
6. Condenser assembly
l'l::r.l • If installing a new condenser, be sure to add
30cc ( 1.0
fl. oz.) of new compressor oil to a
new one.
• Tighten the condenser fixing bolts to the
specified
torque.
~~~ Torque N·m (lb-in) 6 (52)
5. Refrigerant line
•
Tighten the inlet line connector fixing bolt to
the specified torque.
~~~ Torque N·m (lb-in) 15 (11)
• Tighten the outlet line connector fixing bolt
to the specified torque.
~~~ Torque N-m (lb-in) 6 (52)
• 0-rings cannot be reused. Always replace
with new ones.
l'l::r.l • Be sure to apply new compressor oil to the 0-
rings when connecting refrigerant line.
4. Pressure switch connector
3. Engine hood front end stay
2. Front bumper assembly
1. Radiator grille
•
Page 81 of 1928
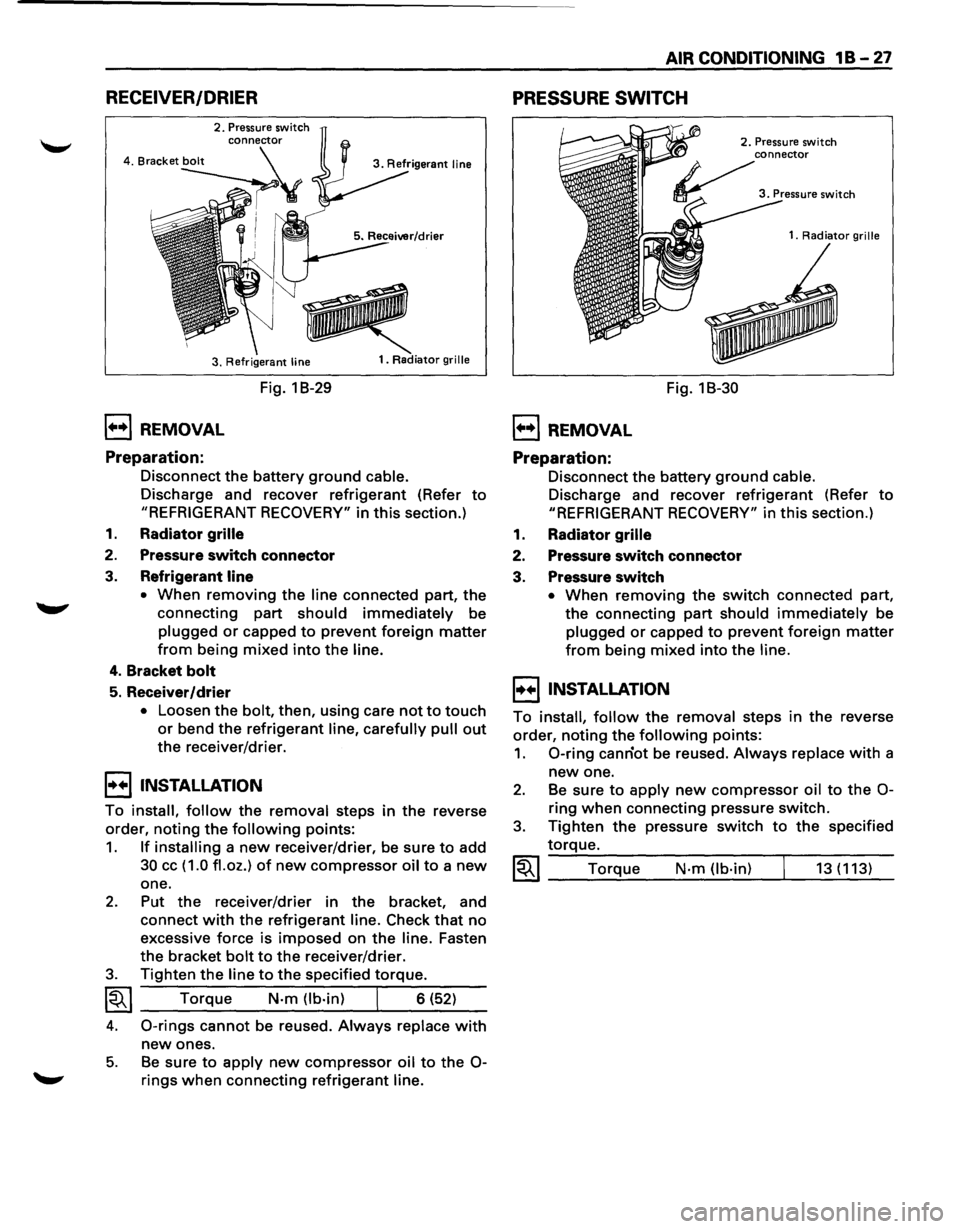
RECEIVER/DRIER
2. Pressure switch
3. Refrigerant
line
1••1 REMOVAL
Preparation:
Fig. 1 B-29
1. Radiator grille
Disconnect the battery ground cable.
Discharge and recover refrigerant (Refer to
"REFRIGERANT RECOVERY" in this section.)
1. Radiator grille
2. Pressure switch connector
3. Refrigerant line
•
When removing the line connected part, the
connecting part
should immediately be
plugged or capped to prevent foreign matter
from being mixed into the line.
4. Bracket bolt
5. Receiver/drier
• Loosen the bolt, then, using care not to touch
or bend the refrigerant line, carefully pull out
the receiver/drier.
I••I•NSTALLATION
To install, follow the removal steps in the reverse
order,
noting the following points:
1. If installing a new receiver/drier, be sure to add
30 cc ( 1.0 fl. oz.) of new compressor oil to a new
one.
2. Put the receiver/drier in the bracket, and
connect
with the refrigerant line. Check that no
excessive force is imposed on the line. Fasten
the bracket
bolt to the receiver/drier.
3. Tighten the line to the specified torque.
~~~ Torque N-m (lb-in) I 6 (52)
4. 0-rings cannot be reused. Always replace with
new ones.
5. Be sure to apply new compressor oil to the 0-
rings when connecting refrigerant line.
AIR CONDITIONING 1 B -27
PRESSURE SWITCH
1••1 REMOVAL
Preparation:
Fig. 18-30
2. Pressure switch
1.
Radiator grille
Disconnect the battery ground cable.
Discharge and recover refrigerant (Refer to
"REFRIGERANT RECOVERY" in this section.)
1. Radiator grille
2. Pressure switch connector
3. Pressure switch
• When removing the switch connected part,
the connecting
part should immediately be
plugged or capped to prevent foreign matter
from being mixed into the line.
I••IINSTALLATION
To install, follow the removal steps in the reverse
order,
noting the following points:
1. 0-ring canriot be reused. Always replace with a
new one.
2. Be sure to apply new compressor oil to the 0-
ring when connecting pressure switch.
3. Tighten the pressure switch to the specified
torque.
~~~ Torque N·m (lb-in) 13 (113)
Page 86 of 1928
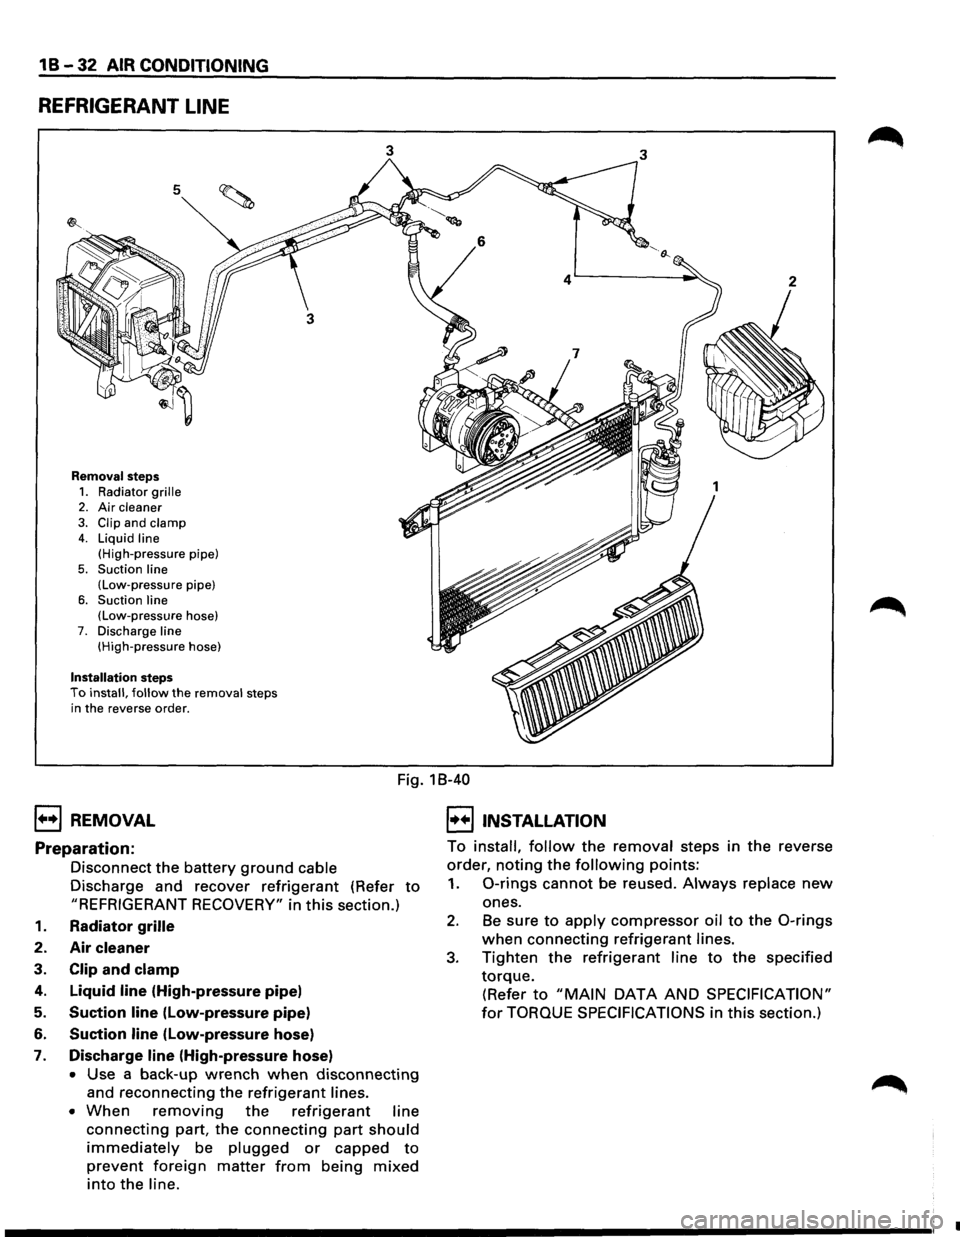
1 B -32 AIR CONDITIONING
REFRIGERANT LINE
5
Removal steps
1. Radiator grille 2. Air cleaner
3. Clip and clamp 4. Liquid line
(High-pressure pipe)
5. Suction line (Low-pressure pipe)
6. Suction line (Low-pressure hose) 7. Discharge line (High-pressure hose)
Installation steps To install, follow the removal steps
in the reverse order.
3 3
1++1 REMOVAL
Fig. 18-40
I••IINSTALLATION
Preparation:
Disconnect the battery ground cable
Discharge and recover
refrigerant (Refer to
"REFRIGERANT RECOVERY" in this section.)
1. Radiator grille
2. Air cleaner
3. Clip and clamp
4. Liquid line (High-pressure pipe)
5. Suction line (Low-pressure pipe)
6. Suction line (low-pressure hose)
7. Discharge line (High-pressure hose)
• Use a back-up wrench when disconnecting
and reconnecting the refrigerant lines.
• When removing the refrigerant line
connecting part, the connecting part should
immediately be plugged or capped to
prevent foreign matter from being mixed
into the line. To
install,
follow the removal steps in the reverse
order,
noting the following points:
1. 0-rings cannot be reused. Always replace new
ones.
2. Be sure to apply compressor oil to the 0-rings
when connecting refrigerant lines.
3. Tighten the refrigerant line to the specified
torque.
(Refer to "MAIN DATA AND SPECIFICATION"
for TORQUE SPECIFICATIONS in this section.)
•
Page 339 of 1928
HYDRAULIC BRAKES SA-19
UNIT REPAIR
MASTER CYLINDER
• The master cylinder is not repairable and must
be replaced as complete assembly if found
defective.
INSPECTION
Excessive brake pedal travel, malfunction or dragging
brake suggests
that the master cylinder is defective. In
such cases perform the following visual check.
IL•I Visual check
Make parts replacement as required if wear, distortion,
nicks, cuts, corrosion,
or other abnormal conditions
are
found through the following parts inspection;
• Master cylinder body
• Fluid reservoir
• 0-ring
rfil FUNCTIONAL INSPECTION OF MASTER
l..!aJ CYLINDER PISTON (Fig. SA-20)
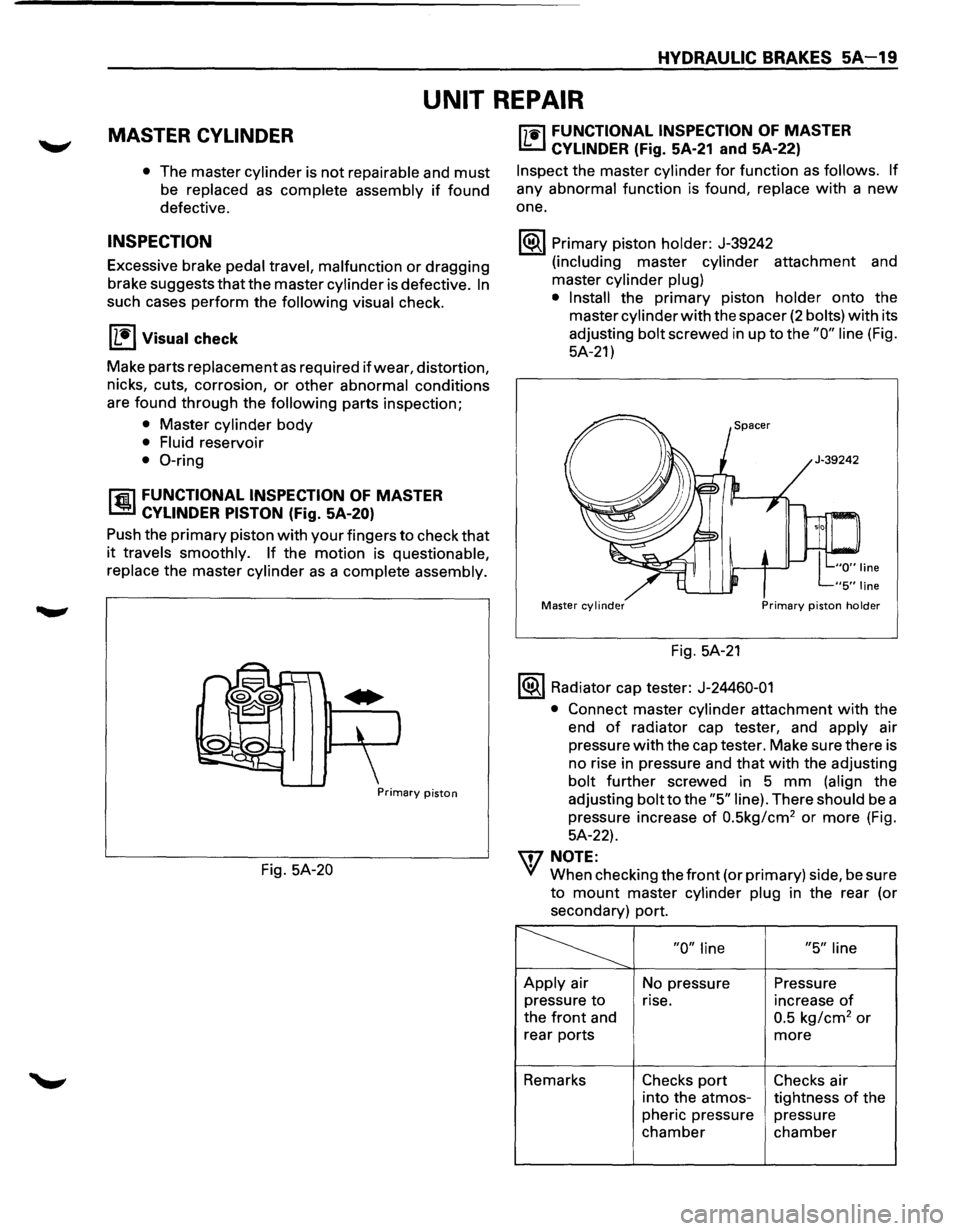
Push the primary piston with your fingers to check that
it travels smoothly. If the motion is questionable,
replace
the master cylinder as a complete assembly.
Primary piston
Fig. 5A-20
["j"1i"l FUNCTIONAL INSPECTION OF MASTER
I..!:::..J CYLINDER (Fig. 5A-21 and 5A-22)
Inspect the master cylinder for function as follows. If
any abnormal function is found, replace with a new
one.
1®.1 Primary piston holder: J-39242
(including master cylinder attachment and
master
cylinder plug)
• Install
the primary piston holder onto the
master
cylinder with the spacer (2 bolts) with its
adjusting
bolt screwed in up to the "0" line (Fig.
5A-21)
Master cylinder Primary piston holder
Fig. 5A-21
1®.1 Radiator cap tester: J-24460-01
•
Connect master cylinder attachment with the
end
of radiator cap tester, and apply air
pressure
with the cap tester. Make sure there is
no rise in pressure and
that with the adjusting
bolt further screwed in 5 mm (align the
adjusting
bolt to the "5" line). There should be a
pressure increase
of 0.5kg/cm2 or more (Fig.
5A-22).
\f7 NOTE:
VI When checking the front (or primary) side, be sure
to mount master cylinder plug in the rear (or
secondary) port.
~ "0" line "5" line
Apply air
No pressure Pressure
pressure
to rise. increase of
the front and 0.5 kg/cm2 or
rear ports more
Remarks Checks port Checks air
into the atmos-
tightness
of the
pheric pressure pressure
chamber chamber
Page 342 of 1928
SA-22 HYDRAULIC BRAKES
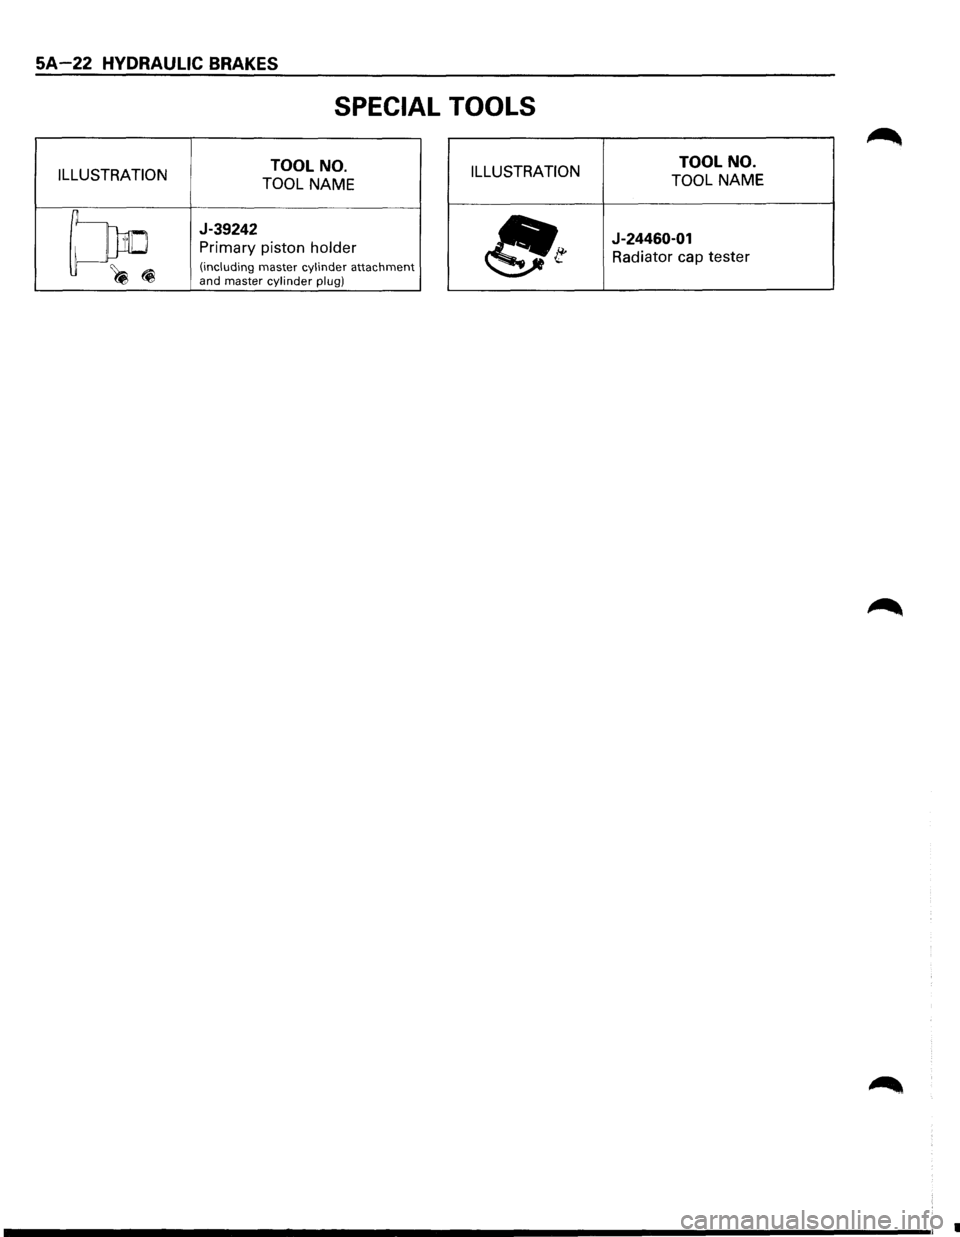
SPECIAL TOOLS
ILLUSTRATION TOOL
NO.
TOOL NAME ILLUSTRATION TOOL
NO.
TOOL NAME
~
J-39242
Primary piston holder
(including master cylinder attachment ~(i and master cylinder plug) ~t
J-24460-01
Radiator cap tester
•
Page 507 of 1928
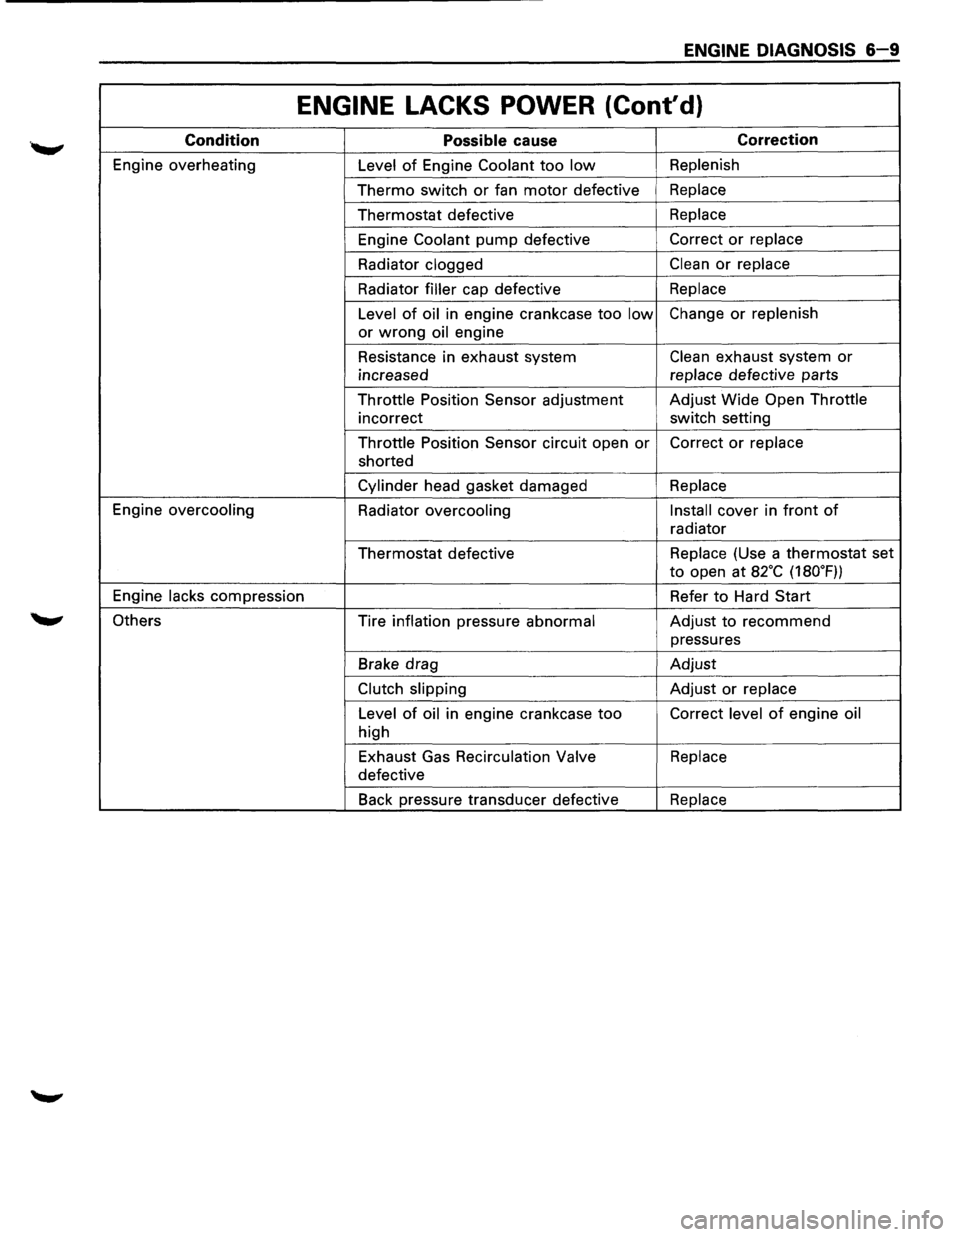
ENGINE DIAGNOSIS 6-9
ENGINE LACKS POWER (Cont'd)
Condition Possible cause Correction
Engine overheating
Level of Engine Coolant too low Replenish
Thermo switch or fan motor defective Replace
Thermostat defective Replace
Engine
Coolant pump defective Correct or replace
Radiator clogged
Clean or replace
Radiator
filler cap defective Replace
Level
of oil in engine crankcase too low Change or replenish
or
wrong oil engine
Resistance in exhaust system
Clean exhaust system or
increased replace
defective parts
Throttle Position Sensor adjustment Adjust
Wide Open Throttle
incorrect switch setting
Throttle Position Sensor circuit open
or Correct or replace
shorted
Cylinder head gasket damaged Replace
Engine overcooling
Radiator
overcooling Install cover
in front of
radiator
Thermostat defective Replace
(Use a thermostat set
to open at a2·c (180.F))
Engine
lacks compression Refer to Hard Start
Others Tire inflation pressure
abnormal Adjust to recommend
pressures
Brake drag Adjust
Clutch slipping Adjust or replace
Level
of oil in engine crankcase too Correct level of engine oil
high
Exhaust Gas
Recirculation Valve Replace
defective
Back pressure transducer defective
Replace
Page 586 of 1928
If! (;
6A 1-28 ENGINE (V6 3.2L DOHC AND SOHC)
21. Fan pulley assembly
• Tighten fixing bolt to the specified torque.
~ Torque N·m (lb·ft) I 22 (16)
20.
Power steering pump
• Tighten pump fixing bolts to the specified
torque.
~ Torque N·m (lb·ft) 56 (41)
19. Generator drive belt
• Engage and adjust.
• Refer to Section 68 "Drive belt adjustment".
18. Air Conditioning compressor drive belt
• Engage and adjust.
• Refer to Section 68 "Drive belt adjustment".
17. Power steering pump drive belt
• Engage and adjust.
• Refer to Section 68 "Drive belt adjustment".
16. Fuelhoses
• Connect surely the hoses and install the bolts
on the head cover.
15. Common chamber
• Tighten bolts and nuts to the specified torque.
Bolts
~~~ Torque N·m (lb·ft) 24 (17)
Nuts
~~~ Torque N·m (lb·ft) 24 (17)
14. Exhaust Gas Recirculation Valve assembly
• Tighten bolts to the specified torque.
Exhaust Gas
Recirculation Valve Side
~~~ Torque N·m (lb·in) I 8 (69)
Exhaust Manifold Side
~~~ Torque N·m (lb·ft) 28 (21)
13. Evaporative Emission Canister Purge hose
12.
Fuel Pressure Control Valve vacuum hose
11. Positive
Crankcase Ventilation hose
9. Throttle body
• Tighten bolts to the specified torque.
~~~ Torque N·m (lb·ft) I 19 (14)
10. Vacuum hoses
• Connect vacuum hoses on canister Vacuum
Switching
Valve and Exhaust Gas Recirculation
Vacuum Switching Valve to the throttle body.
8. Ignition Control Module assembly
• Tighten bolts to the specified torque and
connect connector.
~~~ Torque N·m (lb·ft) 19 (14)
7.
6.
5.
4.
High tension cables
Connectors
• Connect each connector carefully.
Vacuum booster hose
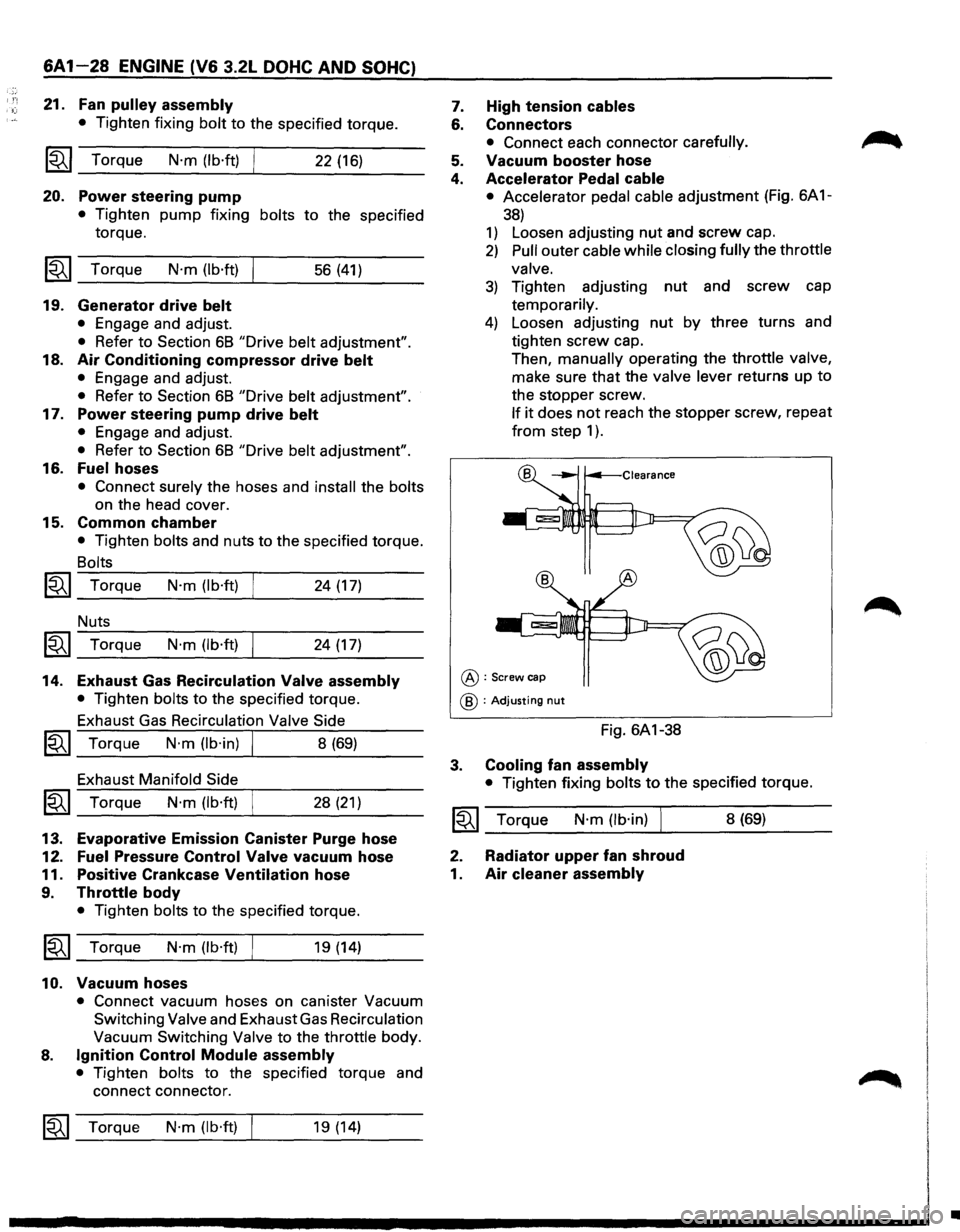
Accelerator Pedal cable
• Accelerator pedal cable adjustment (Fig. 6A 1-
38)
1) Loosen adjusting nut and screw cap.
2) Pull outer cable while closing fully the throttle
valve.
3) Tighten adjusting nut and screw cap
temporarily.
4) Loosen adjusting nut by three turns and
tighten screw cap.
Then,
manually operating the throttle valve,
make sure that the valve lever returns up to
the stopper screw.
If it does not reach the stopper screw, repeat
from step 1 ) .
@:Screw cap
@ :Adjusting nut
Fig. 6A1-38
3. Cooling fan assembly
• Tighten fixing bolts to the specified torque.
~~~ Torque N·m (lb·in) I 8 (69)
2. Radiator upper fan shroud
1. Air
cleaner assembly
•