air conditioning ISUZU TROOPER 1995 User Guide
[x] Cancel search | Manufacturer: ISUZU, Model Year: 1995, Model line: TROOPER, Model: ISUZU TROOPER 1995Pages: 1928
Page 35 of 1928
~~[II] BODY ENG. FRAME
HEATING AND VENTILATION 1A-5
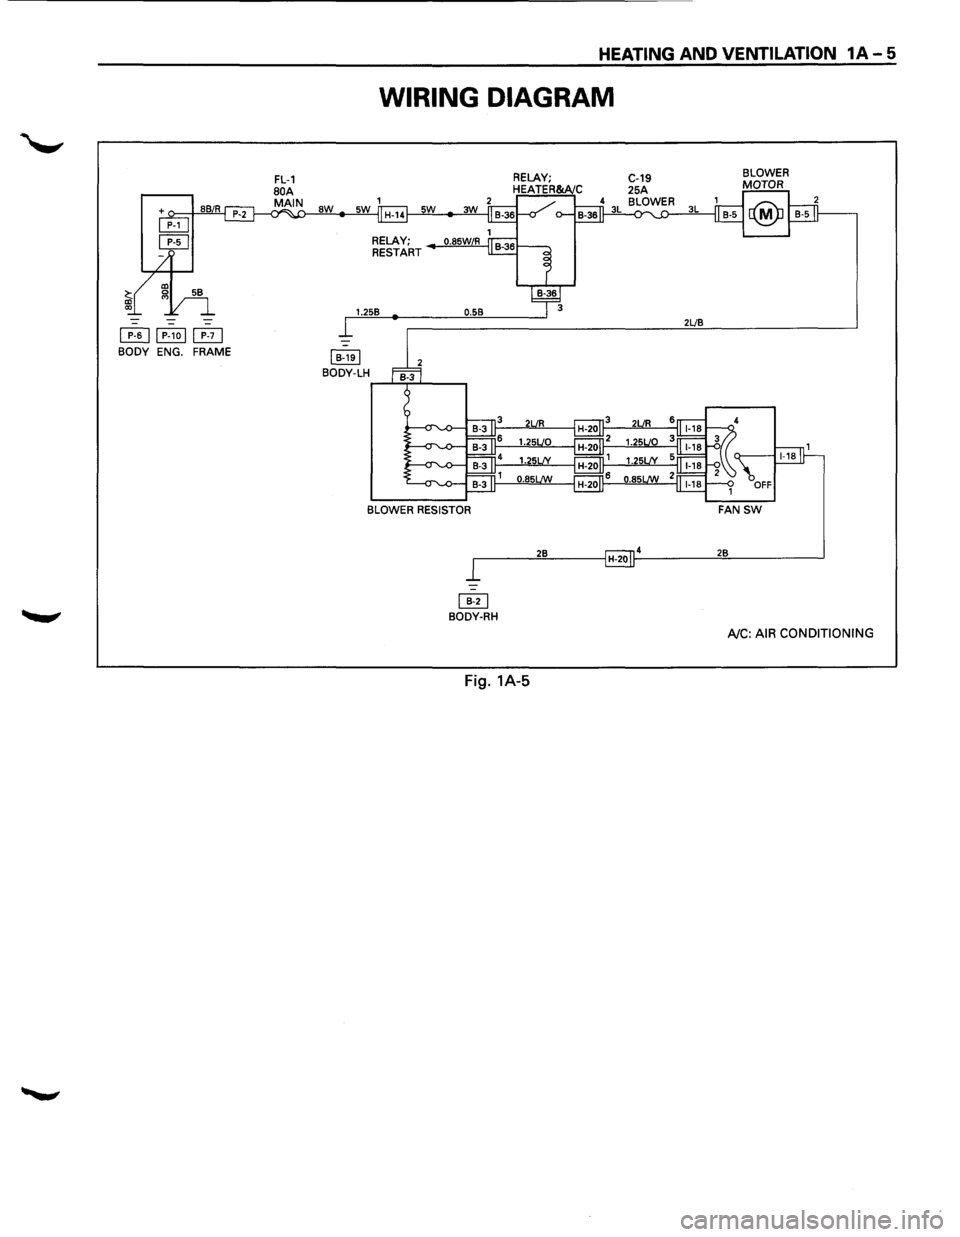
WIRING DIAGRAM
aw
RELAY;
RESTART
1.258
I 8-1el BODY-LH
0.58 2LJ8
BLOWER RESISTOR
r------'2::.::8:,__ __ _,H-201~4 ____ __,2""8 _____ __,
~ BODY-RH
AJC: AIR CONDITIONING
Fig. 1A-5
Page 37 of 1928
FAN CONTROL LEVER (FAN SWITCH)
DIAGNOSIS
HEATING AND VENTILATION 1A-7
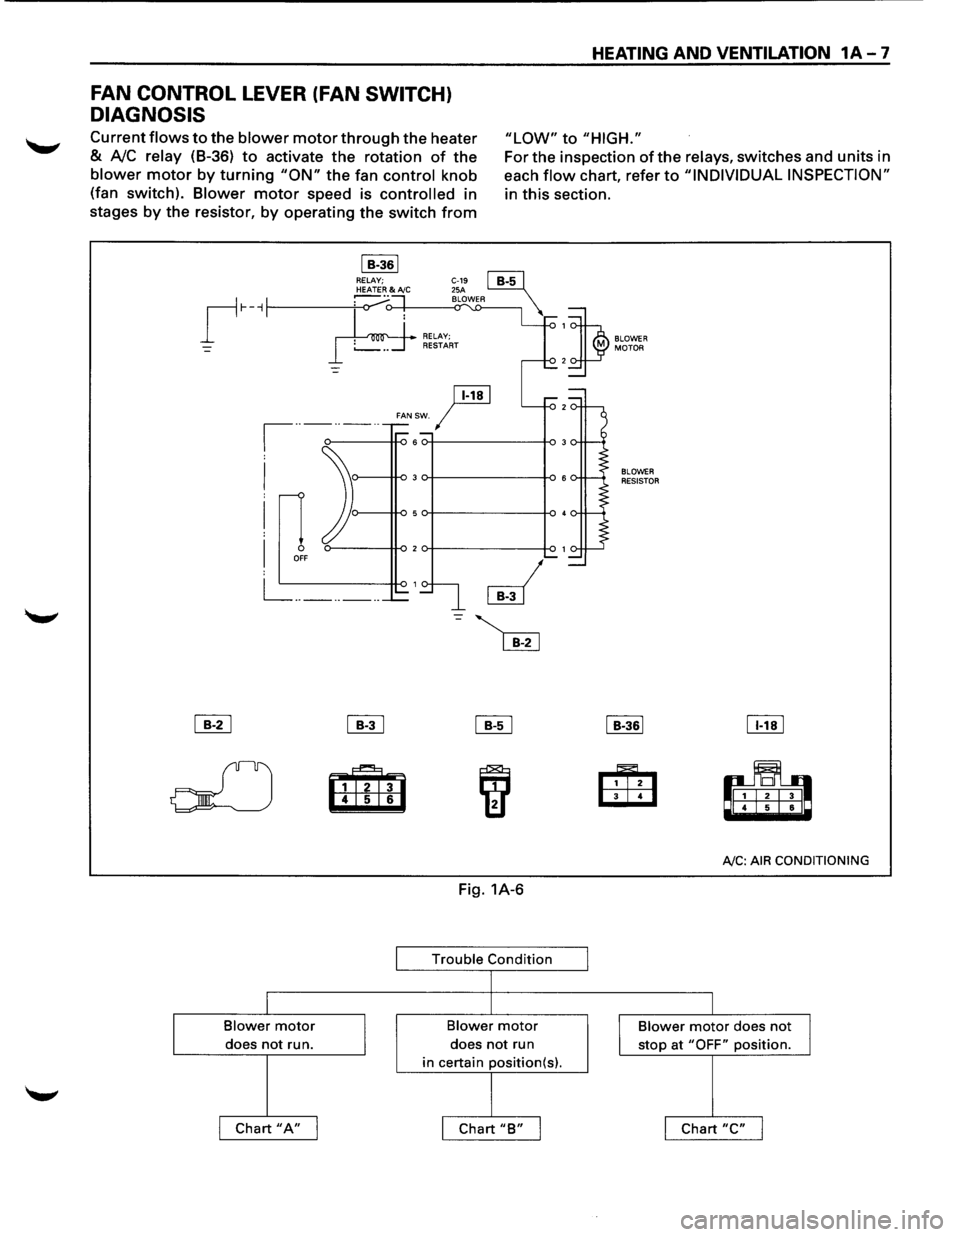
Current flows to the blower motor through the heater
& A!C relay (8-36) to activate the rotation of the
blower motor by turning "ON" the fan control knob
(fan switch).
Blower motor speed is controlled in
stages
by the resistor, by operating the switch from
"LOW" to "HIGH."
I B-361 RELAY;
ji!!J
For the inspection of the relays, switches and units in
each
flow chart, refer to "INDIVIDUAL INSPECTION"
in this section.
1
)
BLOWER MOTOR 2
r-··-··-··
FANSW. I
I
I
I
0 OFF
L= _______ _
~ ~
olJ m 6
I
Blower motor
I does not run.
I Chart "A" I
~
iif1
Fig. 1A-6
Trouble Condition
I
l
Blower motor
does not run
in certain position(s).
I
I Chart "B" I I
BLOWER RESISTOR
I B-361
Eili3 4
IT!!]
rl! 6
AJC: AIR
CONDITIONING
I
Blower motor does not
J stop at "OFF" position.
I Chart "C" I
Page 41 of 1928
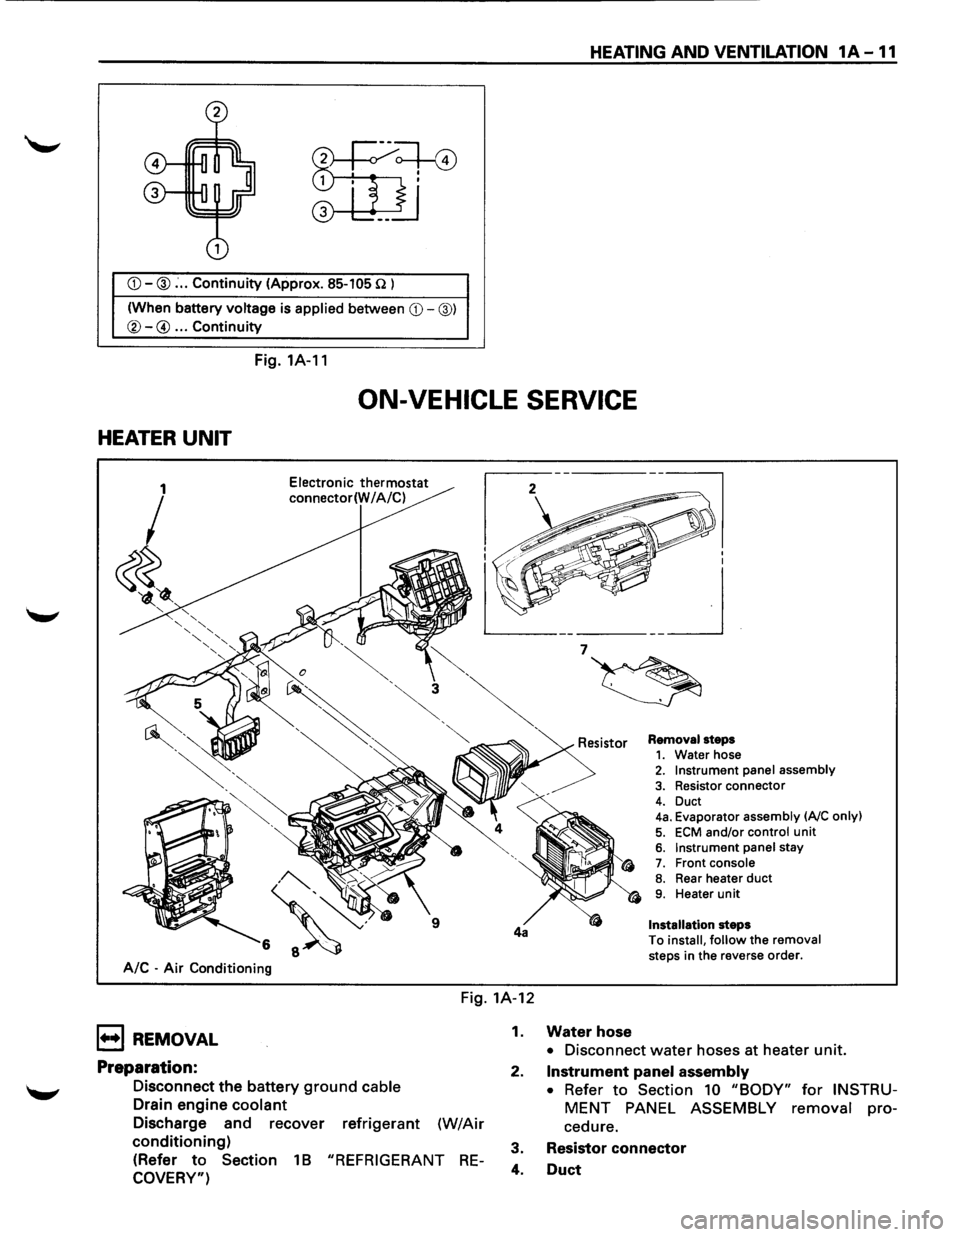
CD-@: .. Continuity (Approx. 85-105 n l
(When battery
voltage is applied between CD-@)
®-@ ... Continuity
Fig. 1A-11
HEATING AND VENTILATION 1A -11
ON-VEHICLE SERVICE
HEATER UNIT
A/C -Air Conditioning
Electronic thermostat
connector(W I A/C)
Removal steps 1. Water hose 2. Instrument panel assembly
3. Resistor connector
4. Duct 4a. Evaporator assembly (AJC only)
5. ECM and/or control unit 6. Instrument panel stay 7. Front console 8. Rear heater duct 9. Heater unit
Installation steps
To
install, follow the removal
steps in the reverse order.
Fig. 1A-12
1••1 REMOVAL
Preparation:
Disconnect the battery ground cable
Drain engine coolant
Discharge and recover refrigerant (W/Air
conditioning)
(Refer to Section 1 B "REFRIGERANT RE
COVERY")
1. Water hose
• Disconnect water hoses at heater unit.
2.
Instrument panel assembly
• Refer to Section 10 "BODY" for INSTRU
MENT PANEL ASSEMBLY removal pro
cedure.
3. Resistor
connector
4. Duct
Page 42 of 1928
1A ";" 12 HEATING AND VENTILATION
4a. Evaporator assembly
• Refer to Section 1 B "AIR CONDITIONING" for
Evaporator Assembly removal procedure.
5. ECM and/or control unit
• Do not disconnect ECM and control unit
connectors.
6. Instrument panel stay
7. Front console
8. Rear heater duct
9. Heater unit
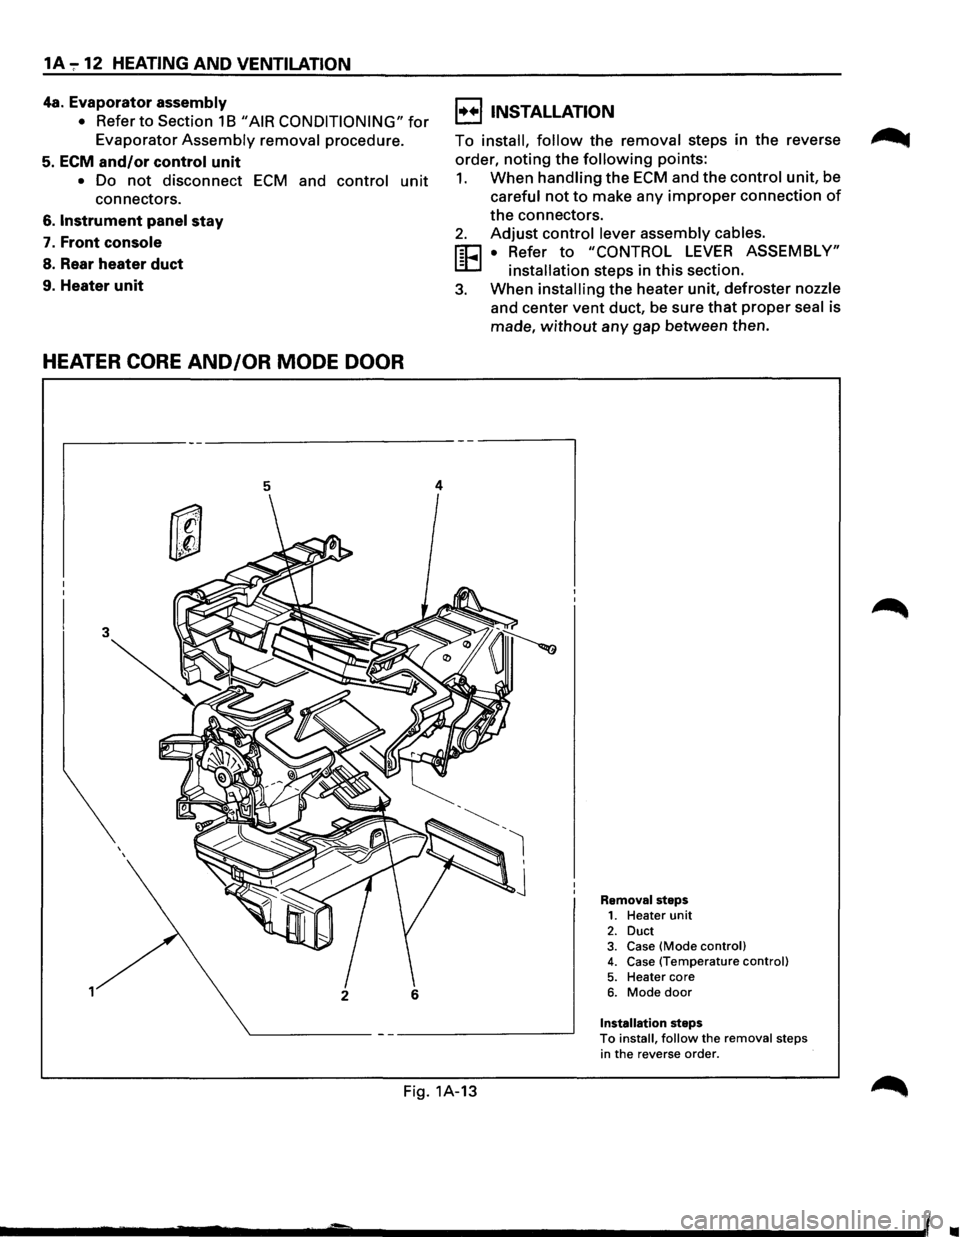
HEATER CORE AND/OR MODE DOOR
3
1
5
2 6
4
I••! INSTALLATION
To install, follow the removal steps in the reverse
order,
noting the following points:
1. When handling the ECM and the control unit, be
careful not to make any improper connection of
the connectors.
2. Adjust control lever assembly cables.
FEI • Refer to "CONTROL LEVER ASSEMBLY"
-installation steps in this section.
3. When installing the heater unit, defroster nozzle
and center vent duct, be sure that proper seal is
made,
without any gap between then.
Removal steps 1. Heater unit 2. Duct 3. Case (Mode control) 4. Case (Temperature control)
5. Heater core 6. Mode door
Installation steps To install, follow the removal steps
in the reverse order.
Fig. 1A-13
..
Page 46 of 1928
1A-16 HEATING AND VENTILATION
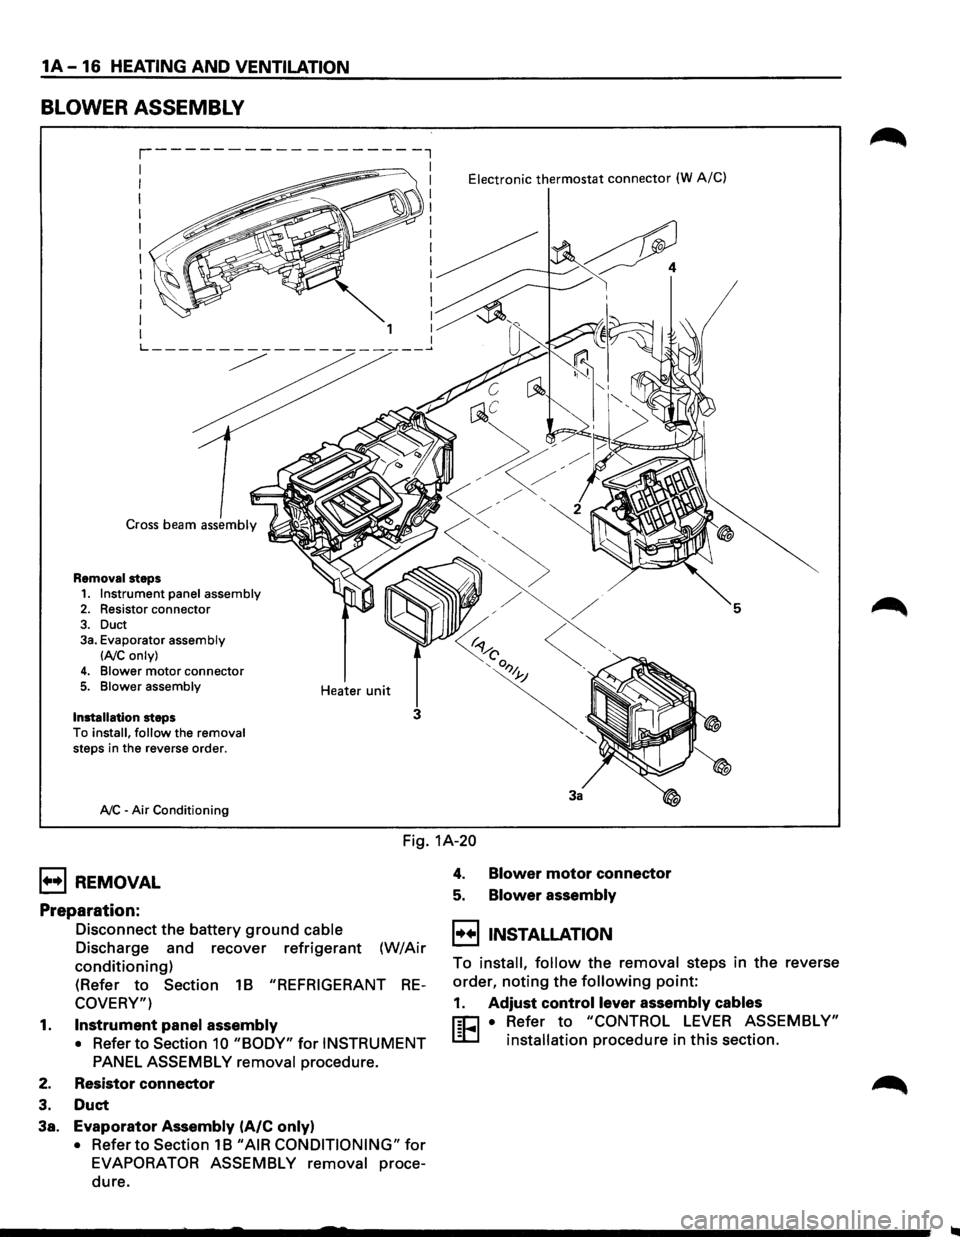
BLOWER ASSEMBLY
Cross beam assembly
Removal steps
1. Instrument panel assembly 2. Resistor connector
3. Duct 3a. Evaporator assembly
lAIC only)
4. Blower motor connector 5. Blower assembly
Installation
steps
To install, follow the removal steps in the reverse order.
A/C -Air Conditioning Heater
unit
Electronic thermostat connector (W A/C)
5
3
3a
Fig.
1A-20
1+•1 REMOVAL
Preparation:
Disconnect the battery ground cable
Discharge and recover refrigerant (W/Air
conditioning)
(Refer to Section 1B "REFRIGERANT RE
COVERY")
1. Instrument panel assembly
• Refer to Section 10 "BODY" for INSTRUMENT
PANEL ASSEMBLY removal
procedure.
2. Resistor connector
3. Duct
3a. Evaporator Assembly (A/C only)
• Refer to Section 1B "AIR CONDITIONING" for
EVAPORATOR ASSEMBLY removal proce
dure.
4. Blower motor connector
5. Blower assembly
I••IINSTALLATION
To install, follow the removal steps in the reverse
order,
noting the following point:
1. Adjust control lever assembly cables
r:C1 • Refer to "CONTROL LEVER ASSEMBLY"
L.:D installation procedure in this section.
Page 51 of 1928
HEATING AND VENTILATION 1A-21
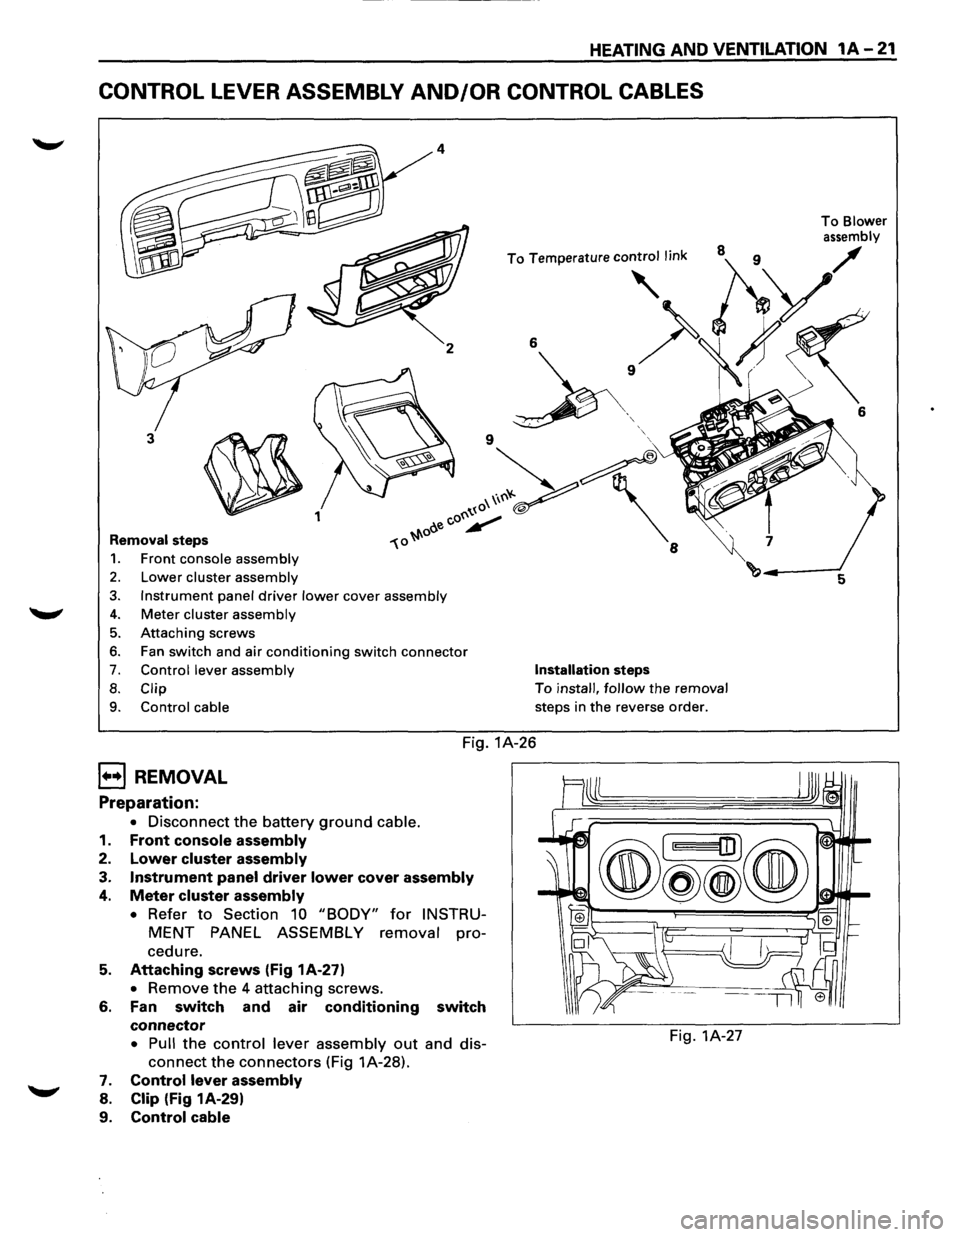
CONTROL LEVER ASSEMBLY AND/OR CONTROL CABLES
2
3
~ 1
Removal steps
1. Front console assembly
2. Lower cluster assembly
3. Instrument panel driver lower cover assembly
4. Meter cluster assembly
5. Attaching screws
6. Fan switch and air conditioning switch connector
7. Control lever assembly
8. Clip
9.
Control cable
6
' '
Installation steps
To install, follow the removal
steps in
the reverse order.
Fig. 1A-26
B REMOVAL
Preparation:
• Disconnect the battery ground cable.
1.
Front console assembly
2. Lower cluster assembly
3. Instrument panel driver lower cover assembly
4. Meter cluster assembly
• Refer to Section 10 "BODY" for INSTRU
MENT PANEL ASSEMBLY removal pro
cedure.
5. Attaching screws (Fig 1A-27)
• Remove the 4 attaching screws.
6. Fan switch and air conditioning switch
connector
• Pull the control lever assembly out and dis-
connect the connectors (Fig 1A-28).
7. Control lever assembly
8. Clip (Fig 1A-29)
9.
Control cable
Fig. 1A-27
To Blower
assembly
6
Page 55 of 1928
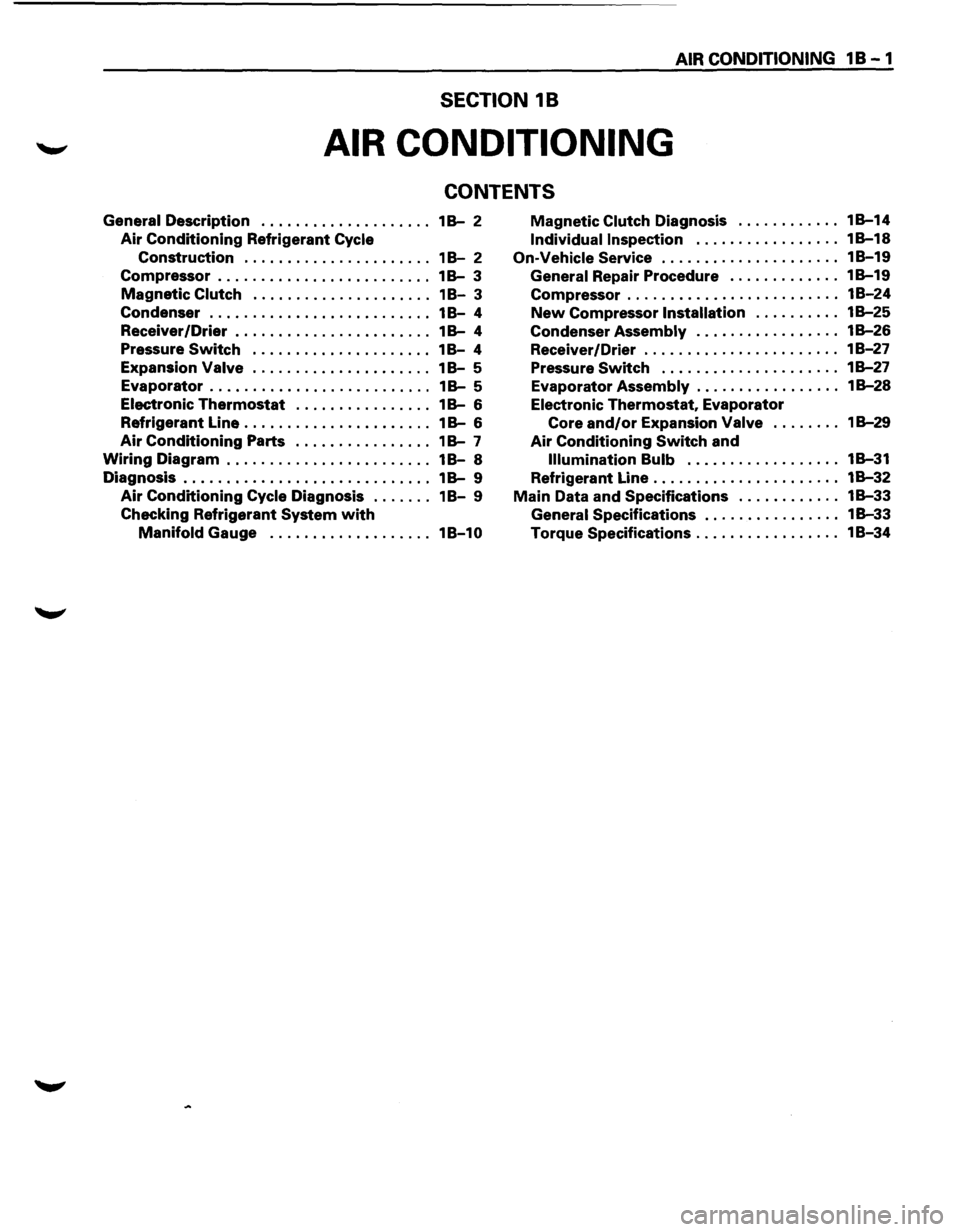
AIR CONDITIONING 1 B - 1
SECTION 18
AIR CONDITIONING
CONTENTS
General Description . . . . . . . . . . . . . . . . . . . . 1 B-2
Air Conditioning Refrigerant Cycle
Construction . . . . . . . . . . . . . . . . . . . . . . 1 8-2
Compressor . . . . . . . . . . . . . . . . . . . . . . . . . 1
B-3
Magnetic Clutch . . . . . . . . . . . . . . . . . . . . . 1 8-3
Condenser . . . . . . . . . . . . . . . . . . . . . . . . . . 1
8-4
Receiver
/Drier . . . . . . . . . . . . . . . . . . . . . . . 1 B-4
Pressure
Switch . . . . . . . . . . . . . . . . . . . . . 1 8-4
Expansion
Valve . .
. . . . . . . . . . . . . . . . . . .
18-5
Evaporator . . . . . . . . . . . . . . . . . . . . . . . . . . 1 B-5
Electronic Thermostat . . . . . . . . . . . . . . . . 1 B-6
Refrigerant Line . . . . . . . . . . . . . . . . . . . . . . 1
B-6
Air Conditioning Parts . . . . . . . . . . . . . . . . 1 B-7
Wiring Diagram . . . . . . . . . . . . . . . . . . . . . . . . 18-8
Diagnosis . . . . . . . . . . . . . . . . . . . . . . . . . . . . . 1
B-9
Air Conditioning Cycle Diagnosis . . . . . . . 18-9
Checking Refrigerant
System with
Manifold Gauge ................... 18-10
Magnetic Clutch Diagnosis ............ 18-14
Individual Inspection ................. 18-18
On-Vehicle Service ..................... 18-19
General Repair Procedure ............. 18-19
Compressor . . . . . . . . . . . . . . . . . . . . . . . . . 18-24
New Compressor Installation . . . . . . . . . . 1 B-25
Condenser Assembly . . . . . . . . . . . . . . . . . 1 B-26
Receiver/Drier ....................... 18-27
Pressure Switch ..................... 18-27
Evaporator Assembly . . . . . . . . . . . . . . . . . 1 B-28
Electronic Thermostat, Evaporator
Core
and/or Expansion Valve ........ 18-29
Air Conditioning Switch and
Illumination Bulb . . . . . . . . . . . . . . . . . . 1 B-31
Refrigerant Line ...................... 18-32
Main Data and Specifications ............ 18-33
General Specifications . . . . . . . . . . . . . . . . 18-33
Torque Specifications ................. 18-34
Page 56 of 1928
1 B - 2 AIR CONDITIONING
GENERAL DESCRIPTION
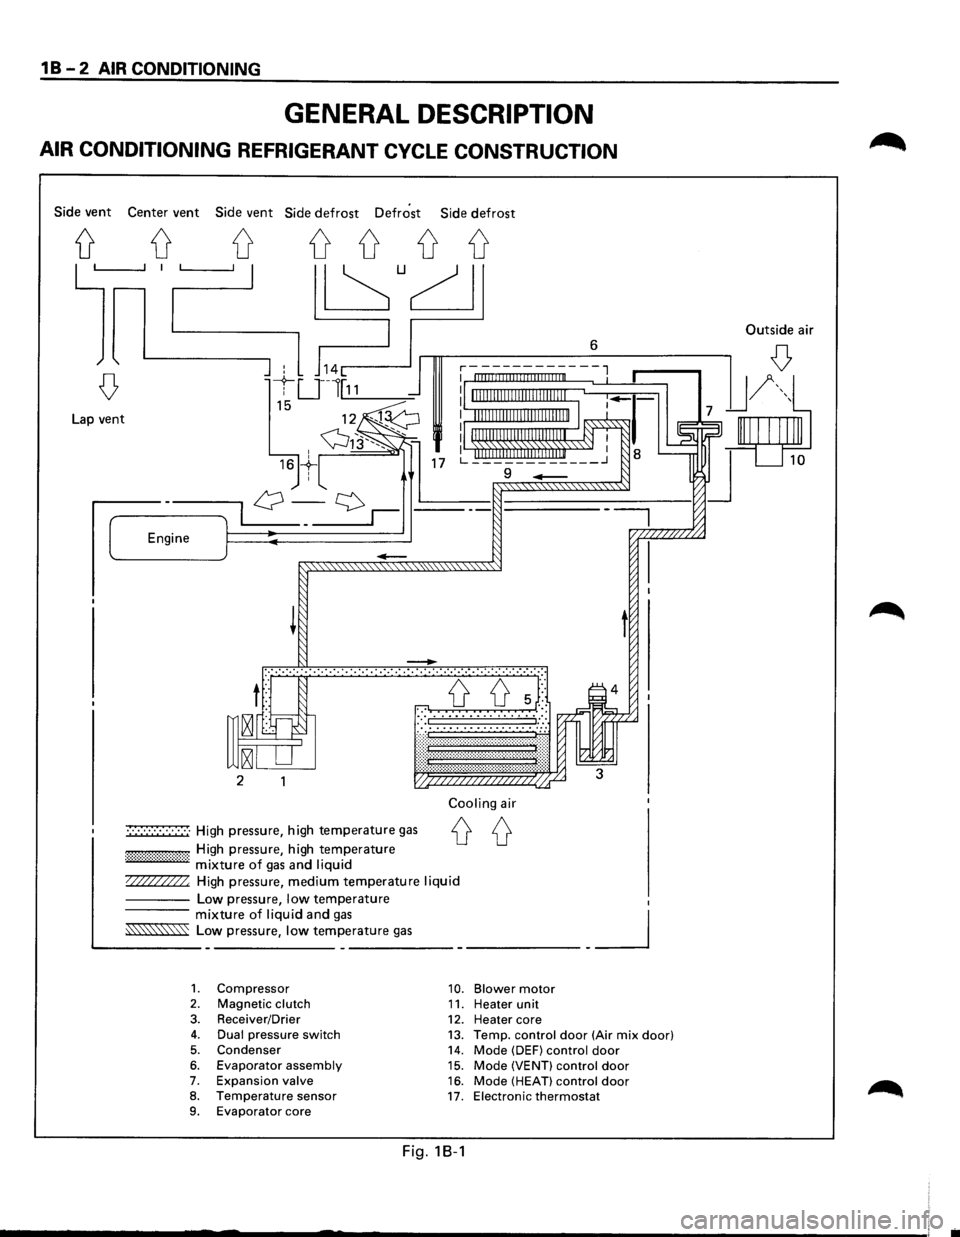
AIR CONDITIONING REFRIGERANT CYCLE CONSTRUCTION
Side vent Center vent Side vent Side defrost Defrost Side defrost
Lap vent
-
-
:-·-·.·.·.·.·.·.·.·.·.·.·.·.·.\
·.·.·.·.·.·.·.·.·.·.·.·.·.·.·\
.·.·.·.·.·.··:·
2
.,.,.,.,.,.,.,.,.,.,.,. High pressure, high temperature gas
................... High pressure, high temperature ,.,.,.,.,.,.,.,.,.,.,.,.,.,.,.,.,.,.,., mixture of gas and liquid
Cooling air
00
1/?//TJZZ High pressure, medium temperature liquid
----Low pressure, low temperature
6
t
mixture of liquid and gas ..,.,§.."\'"":\"':'0:"'":>'""\\":>"'~ Low pressure, low temperature gas __ _j
1. Compressor 10. Blower motor 2. Magnetic clutch 11. Heater unit 3. Receiver/Drier 12. Heater core 4. Dual pressure switch 13. Temp. control door (Air mix door)
5. Condenser
14. Mode (DEF) control door 6. Evaporator assembly 15. Mode (VENT) control door 7.
Expansion valve 16. Mode (HEAT) control door 8. Temperature sensor
17. Electronic thermostat
9. Evaporator core
Fig. 18-1
Outside air
Page 57 of 1928
The refrigeration cycle includes the following four
processes as the refrigerant changes repeatedly
from liquid to gas and back to liquid while circulat
ing.
EVAPORATION
The refrigerant is changed from a liquid to a gas in
side
the evaporator. The refrigerant mist that enters
the evaporator vaporizes readily. The liquid refrige
rant removes
the required quantity of heat (latent
heat of vaporization) from the air around the evap
orator core cooling fins and rapidly vaporizes.
Removing the heat cools the air, which is then
radiated
from the fins and lowers the temperature of
the air inside the vehicle.
The refrigerant liquid sent from the expansion valve
and the vaporized refrigerant gas are both present
inside the
evaporator and the liquid is converted to
gas.
With this change from liquid to gas, the pressure
inside
the evaporator must be kept low enough for
vaporization to occur at a lower temperature.
Because of that, the vaporized refrigerant is sucked
into the compressor.
COMPRESSION
The refrigerant is compressed by the compressor
until it is easily liquefied at normal temperature.
The vaporized
refrigerant in the evaporator is sucked
into the compressor. This action maintains the
refrigerant inside the evaporator at a low pressure
so
that it can easily vaporize, even at low tempera
tures close to ooc (32°F).
Also, the refrigerant sucked into the compressor is
compressed inside the
cylinder to increase the
pressure and temperature to values such that the
refrigerant can easily liquefy at normal ambient
temperatures.
CONDENSATION
The refrigerant inside the condenser is cooled by the
outside air and changes from gas to liquid.
The high temperature, high pressure gas coming
from the compressor is cooled and liquefied by the
condenser with outside air and accumulated in the
receiver/drier. The heat radiated to the outside air by
the high temperature, high pressure gas in the
compressor is called heat of condensation. This is
the total quantity of heat (heat of vaporization) the
refrigerant removes
from the vehicle interior via the
evaporator and the work (calculated as the quantity
of heat) performed for compression.
'-' EXPANSION
The expansion valve lowers the pressure of the
refrigerant liquid so that it can easily vaporize.
AIR CONDITIONING 1 B -3
The process of lowering the pressure to encourage
vaporization before the
liquefied refrigerant is sent
to the evaporator is called expansion. In addition,
the expansion valve controls the flow rate of the
refrigerant liquid while decreasing the pressure.
That is, the quantity of refrigerant liquid vaporized
inside
the evaporator is determined by the quantity
of heat which must be removed at a prescribed
vaporization temperature.
It is important that the
quantity of refrigerant be controlled to exactly the
right value.
COMPRESSOR
It compressor performs two main functions:
It compresses low-pressure and low-temperature
refrigerant vapor from the evaporator into high
pressure and high-temperature
refrigerant vapor to
the condenser. And it pumps refrigerant and
refrigerant
oil through the air conditioning system.
This vehicle is equipped with five-vane rotary com
pressor.
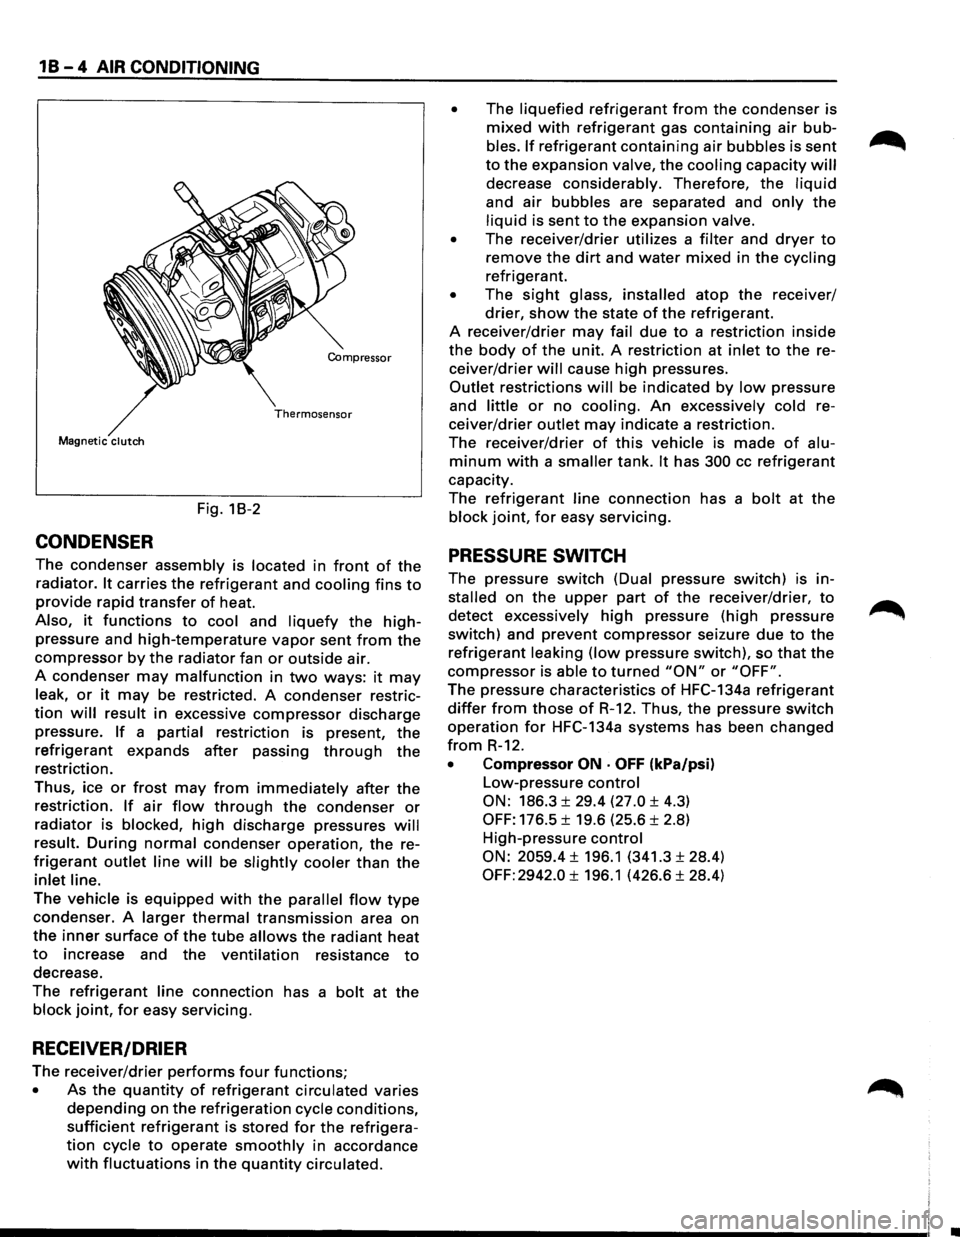
The
thermo sensor is installed to the front head of
the compressor to protect it by stopping its
operation when the refrigerant gas is insufficient or
when the temperature is abnormally high.
• OFF ...... 160 ±soc (320.0 ± 9.0°F)
• ON
...... 135 ±soc (27S.O ± 9.0°F)
The specified amount of the compressor oil is 1SOcc
(S.O fl.oz.).
The oil used in the HFC-134a system compressor
differs from that used in R-12 systems.
Also, compressor oil to be used varies according to
the compressor model. Be sure to avoid mixing two
or more different types of oil.
If the wrong oil is used, lubrication will be poor and
the compressor will seize or malfunction.
The magnetic clutch connector is a waterproof
type.
MAGNETIC CLUTCH
The compressor is driven by the drive belt from the
crank
pulley of the engine. If the compressor is ac
tivated each
time the engine is started, this causes
too much load to the engine. The magnetic clutch
transmits the power from the engine to the com
pressor and activates it when the air conditioning is
"ON". Also, it cuts off the power from the engine to
the compressor when the air conditioning is "OFF".
(Magnetic clutch repair procedure can be found in
Section 1 D.)
Page 58 of 1928
1 B - 4 AIR CONDITIONING
Compressor
Thermosensor
Magnetic clutch
Fig. 18-2
CONDENSER
The condenser assembly is located in front of the
radiator. It carries the refrigerant and cooling fins to
provide rapid transfer of heat.
Also, it functions to cool and liquefy the high
pressure and high-temperature vapor sent from the
compressor by the radiator fan or outside air.
A condenser
may malfunction in two ways: it may
leak, or it may be restricted. A condenser restric
tion will result in excessive compressor discharge
pressure.
If a partial restriction is present, the
refrigerant expands after passing through the
restriction.
Thus, ice
or frost may from immediately after the
restriction. If air flow through the condenser or
radiator is blocked, high discharge pressures will
result. During normal condenser operation, the re
frigerant outlet line will be slightly cooler than the
inlet line.
The vehicle is equipped with the parallel flow type
condenser. A larger thermal transmission area on
the inner surface of the tube allows the radiant heat
to increase and the ventilation resistance to
decrease.
The
refrigerant line connection has a bolt at the
block joint, for easy servicing.
RECEIVER/DRIER
The receiver/drier performs four functions;
• As the quantity of refrigerant circulated varies
depending on the refrigeration cycle conditions,
sufficient refrigerant is stored for the refrigera
tion cycle to operate smoothly in accordance
with fluctuations in the quantity circulated. •
The liquefied refrigerant from the condenser
is
mixed with refrigerant gas containing air bub
bles. If refrigerant containing air bubbles is sent
to the expansion valve, the cooling capacity will
decrease considerably. Therefore, the liquid
and air bubbles are separated and only the
liquid is sent to the expansion valve.
•
The receiver/drier utilizes a filter and dryer to
remove the dirt and water mixed in the cycling
refrigerant.
• The sight glass, installed atop the receiver/
drier, show the state of the refrigerant.
A receiver/drier may fail due to a restriction inside
the body of the unit. A restriction at inlet to the re
ceiver/drier
will cause high pressures.
Outlet restrictions will be indicated by low pressure
and
little or no cooling. An excessively cold re
ceiver/drier
outlet may indicate a restriction.
The receiver/drier
of this vehicle is made of alu
minum with a smaller tank. It has 300 cc refrigerant
capacity.
The
refrigerant line connection has a bolt at the
block joint, for easy servicing.
PRESSURE SWITCH
The pressure switch (Dual pressure switch) is in
stalled on the upper part of the receiver/drier, to
detect excessively high pressure (high pressure
switch) and prevent compressor seizure due to the
refrigerant leaking (low pressure switch), so that the
compressor is able to turned "ON" or "OFF".
The pressure characteristics of HFC-134a refrigerant
differ from those of R-12. Thus, the pressure switch
operation for HFC-134a systems has been changed
from R-12.
• Compressor ON · OFF (kPa/psi)
Low-pressure control
ON: 186.3 ± 29.4 (27.0 ± 4.3)
OFF: 176.5 ± 19.6 (25.6 ± 2.8)
High-pressure
control
ON: 2059.4 ± 196.1 (341.3 ± 28.4)
OFF: 2942.0 ± 196.1 (426.6 ± 28.4)