sensor ISUZU TROOPER 1995 Workshop Manual
[x] Cancel search | Manufacturer: ISUZU, Model Year: 1995, Model line: TROOPER, Model: ISUZU TROOPER 1995Pages: 1928
Page 14 of 1928
OA-10 GENERAL INFORMATION
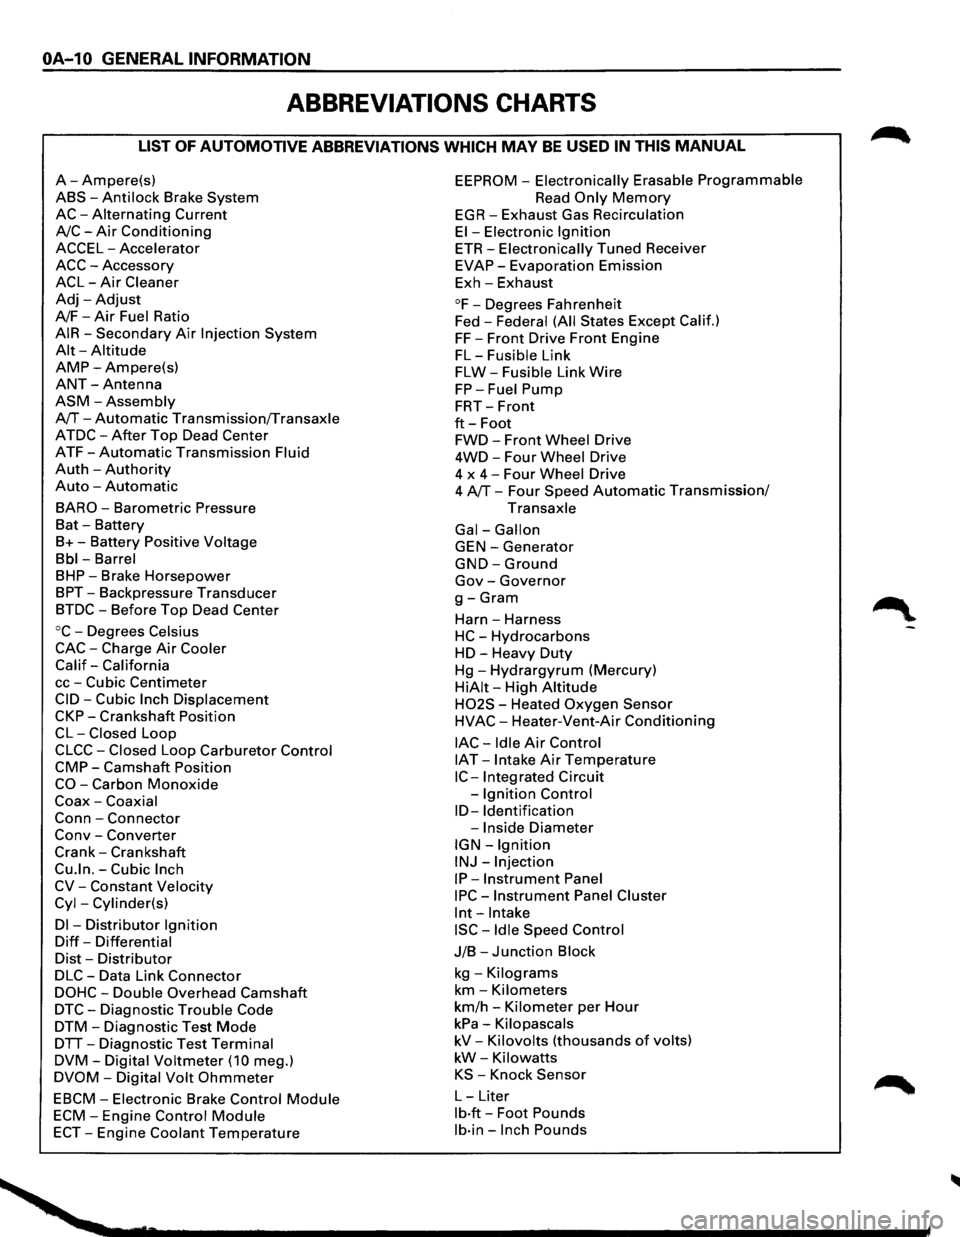
ABBREVIATIONS CHARTS
LIST OF AUTOMOTIVE ABBREVIATIONS WHICH MAY BE USED IN THIS MANUAL
A-Ampere(s)
ABS-Anti lock Brake System
AC-Alternating Current
A/C-Air Conditioning
ACCEL-Accelerator
ACC-Accessory
ACL-Air Cleaner
Adj-Adjust
A/F-Air Fuel Ratio
AIR-Secondary Air Injection System
Alt-Altitude
AMP-Ampere(s)
ANT-Antenna
ASM-Assembly
A/T-Automatic Transmission/Transaxle
ATDC-After Top Dead Center
ATF-Automatic Transmission Fluid
Auth -Authority
Auto -Automatic
BARO-Barometric Pressure
Bat -Battery
B+-Battery Positive Voltage
Bbl-Barrel
BHP-Brake Horsepower
BPT-Backpressure Transducer
BTDC-Before Top Dead Center
oc-Degrees Celsius
CAC-Charge Air Cooler
Calif-California
cc-Cubic Centimeter
CID-Cubic Inch Displacement
CKP-Crankshaft Position
CL-Closed Loop
CLCC-Closed Loop Carburetor Control
CMP-Camshaft Position
CO-Carbon Monoxide
Coax-Coaxial
Conn-Connector
Conv -Converter
Crank-Crankshaft
Cu.ln.-Cubic Inch
CV-Constant Velocity
Cyl-Cylinder(s)
Dl -Distributor Ignition
Diff-Differential
Dist-Distributor
DLC-Data Link Connector
DOHC-Double Overhead Camshaft
DTC-Diagnostic Trouble Code
DTM-Diagnostic Test Mode
DTT-Diagnostic Test Terminal
DVM-Digital Voltmeter (10 meg.)
DVOM-Digital Volt Ohmmeter
EBCM-Electronic Brake Control Module
ECM-Engine Control Module
ECT-Engine Coolant Temperature
EEPROM -Electronically Erasable Programmable
Read Only Memory
EGR-Exhaust Gas Recirculation
El-Electronic Ignition
ETR-Electronically Tuned Receiver
EVAP-Evaporation Emission
Exh-Exhaust
°F-Degrees Fahrenheit
Fed -
Federal (All States Except Calif.)
FF-Front Drive Front Engine
FL-Fusible Link
FLW-Fusible Link Wire
FP-Fuel Pump
FRT-Front
ft-Foot
FWD-Front Wheel Drive
4WD-Four Wheel Drive
4 x
4-Four Wheel Drive
4 A/T-Four Speed Automatic Transmission/
Transaxle
Gal-Gallon
GEN-Generator
GND-Ground
Gov-Governor
g-Gram
Harn -Harness
HC-Hydrocarbons
HD-Heavy Duty
Hg-Hydrargyrum (Mercury)
HiAit-High Altitude
H02S - Heated Oxygen Sensor
HVAC-Heater-Vent-Air Conditioning
lAC-Idle Air Control
IAT -Intake Air Temperature
IC-Integrated Circuit
-
Ignition Control
ID-Identification
-Inside Diameter
IGN-Ignition
INJ-Injection
IP-Instrument Panel
IPC-Instrument Panel Cluster
lnt-Intake
ISC-Idle Speed Control
J/B-Junction Block
kg -Kilograms
km-Kilometers
km/h -Kilometer per Hour
kPa-Kilopascals
kV-Kilovolts (thousands of volts)
kW-Kilowatts
KS -Knock Sensor
L-Liter
lb·ft-Foot Pounds
lb·in-Inch Pounds
Page 15 of 1928
LF -Left Front
LH -Left Hand
LR-Left Rear
LS-Left Side
LWB-Long Wheel Base
L-4-In-line Four Cylinder Engine
MAF-Mass Air Flow
MAN-Manual
MAP-Manifold Absolute Pressure
Max-Maximum
MC-Mixture Control
MFI-Multipart Fuel Injection
MIL-Malfunction Indicator Lamp
Min-Minimum
mm-Millimeter
MPG-Miles per Gallon
MPH-Miles per Hour
M!f-Manual Transmission!fransaxle
MV-Millivolt
NA-Natural Aspirated
NC-Normally Closed
N·m-Newton Meters
NO-Normally Open
NOx-Nitrogen, Oxides of
OBD-On-Board Diagnostic
OD-Outside Diameter
0/D-Over Drive
OHC-Overhead Camshaft
OL-Open Loop
02-Oxygen
02S -Oxygen Sensor
PAIR-Pulsed Secondary Air Injection System
P/B-Power Brakes
PCM-Powertrain Control Module
PCV-Positive Crankcase Ventilation
PRESS-Pressure
PROM-Programmable Read Only Memory
PNP-Park/Neutral Position
P/S-Power Steering
PSI-Pounds per Square Inch
PSP-Power Steering Pressure
Pt.-Pint
Pri -Primary
PWM-Pulse Width Modulate
Ot-Quart
REF-Reference
RF -Right Front
RFI-Radio Frequency Interference
RH-Right Hand
RPM-Revolutions per Minute
RPM Sensor-Engine Speed Sensor
RPO-Regular Production Option
RR-Right Rear
RS-Right Side
RTV-Room Temperature Vulcanizing
RWAL-Rear Wheel Anti lock Brake
RWD-Rear Wheel Drive
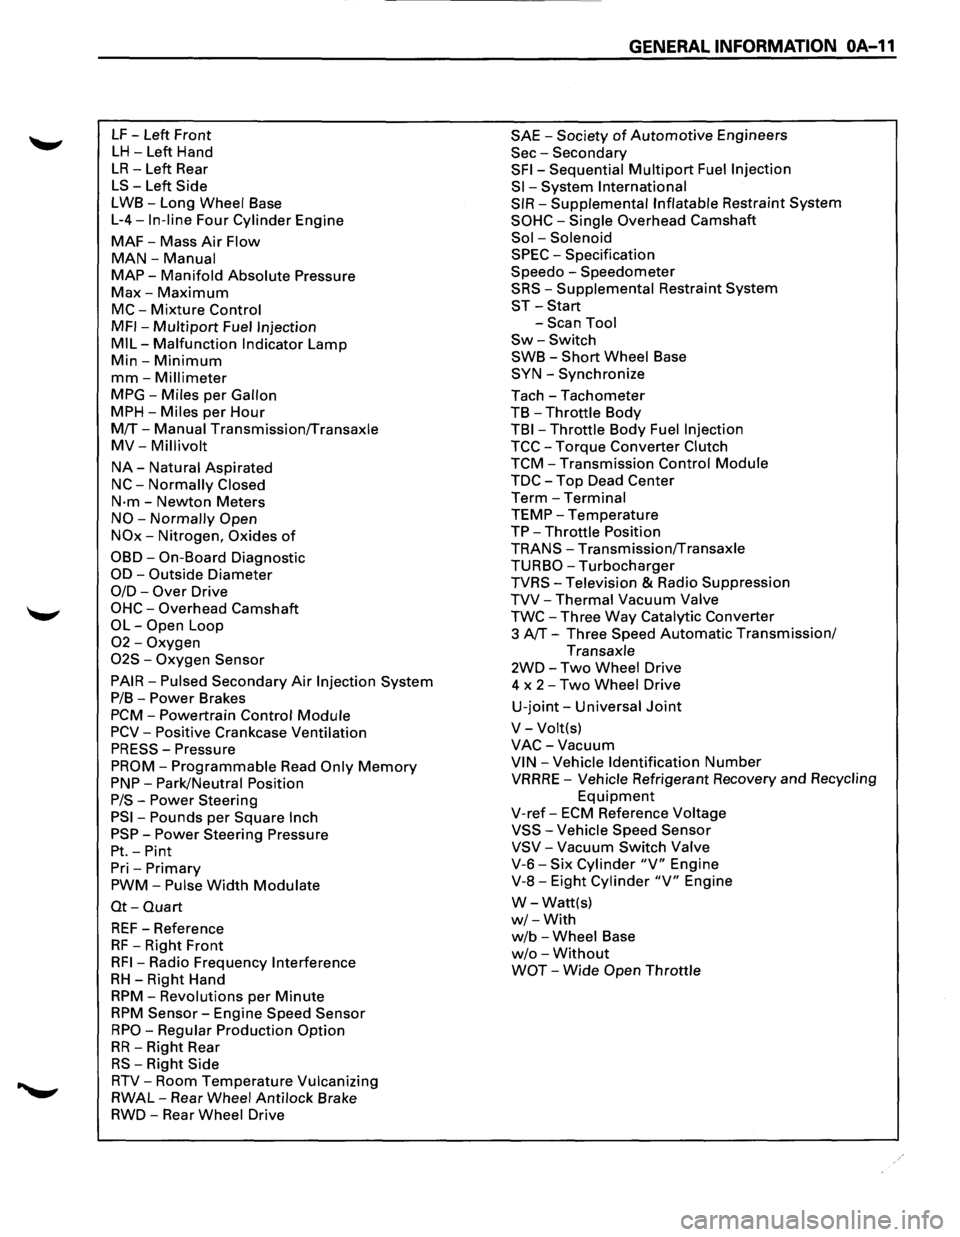
GENERAL INFORMATION OA-11
SAE -Society of Automotive Engineers
Sec-Secondary
SFI-Sequential Multipart Fuel Injection
Sl-System International
SIR-Supplemental Inflatable Restraint System
SOHC-Single Overhead Camshaft
Sol -Solenoid
SPEC -Specification
Speedo -Speedometer
SRS-Supplemental Restraint System
ST-Start
-Scan Tool
Sw-Switch
SWB-Short Wheel Base
SYN-Synchronize
Tach-Tachometer
TB
-Throttle Body
TBI-Throttle Body Fuel Injection
TCC-Torque Converter Clutch
TCM-Transmission Control Module
TDC-Top Dead Center
Term-Terminal
TEMP-Temperature
TP-Throttle Position
TRANS-Transmission!fransaxle
TURBO-Turbocharger
TVRS-Television & Radio Suppression
TVV-Thermal Vacuum Valve
TWC-Three Way Catalytic Converter
3
AfT-Three Speed Automatic Transmission/
Transaxle
2WD-Two Wheel Drive
4 x
2-Two Wheel Drive
U-joint-Universal Joint
V-Volt(s)
VAC-Vacuum
VIN-Vehicle Identification Number
VRRRE -Vehicle Refrigerant Recovery and Recycling
Equipment
V-ref-ECM Reference Voltage
VSS-Vehicle Speed Sensor
VSV-Vacuum Switch Valve
V-6-Six Cylinder "V" Engine
V-8-Eight Cylinder "V" Engine
W-Watt(s)
w/-With
w/b -Wheel Base
w/o -Without
WOT-Wide Open Throttle
Page 56 of 1928
1 B - 2 AIR CONDITIONING
GENERAL DESCRIPTION
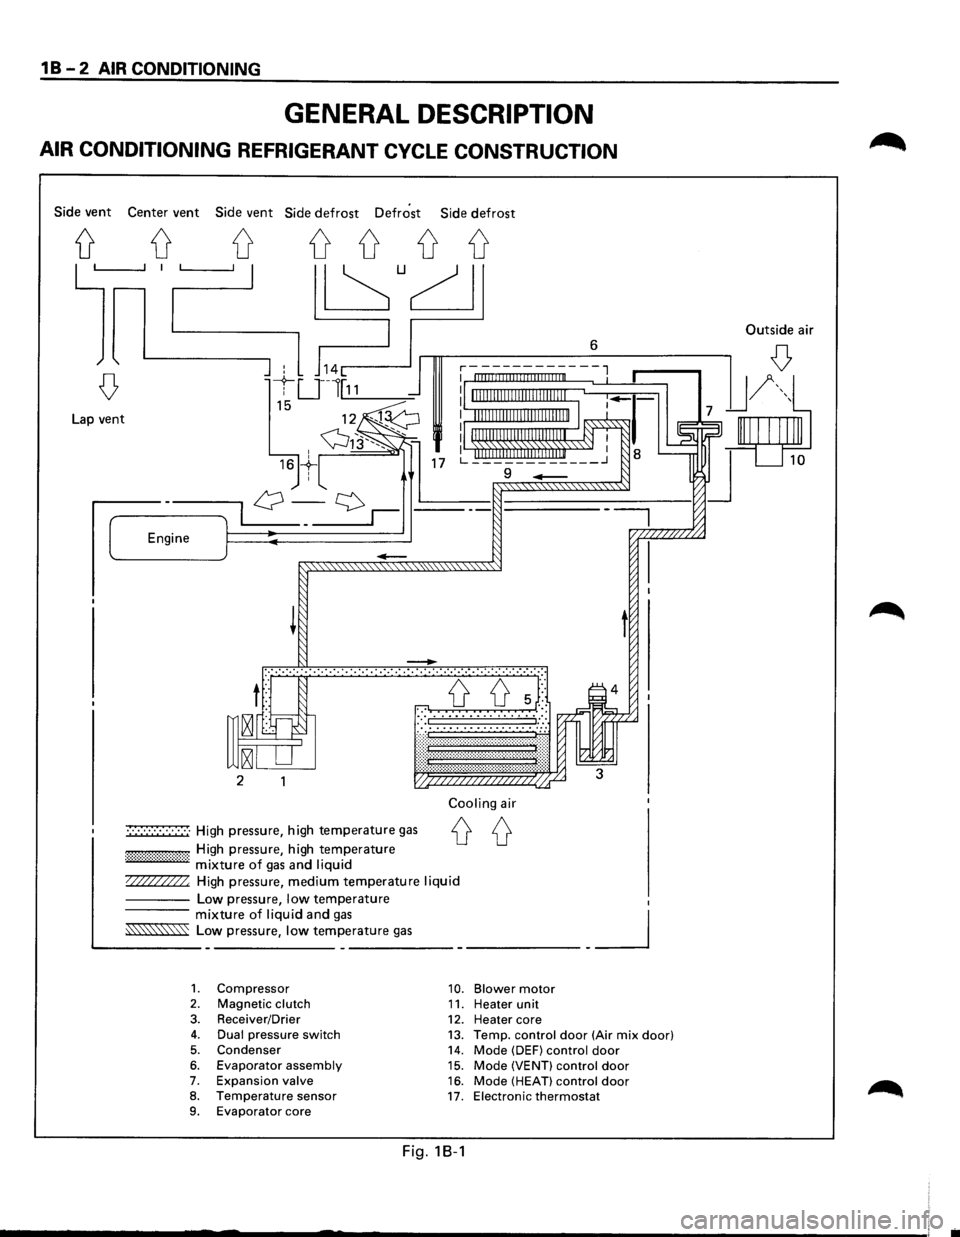
AIR CONDITIONING REFRIGERANT CYCLE CONSTRUCTION
Side vent Center vent Side vent Side defrost Defrost Side defrost
Lap vent
-
-
:-·-·.·.·.·.·.·.·.·.·.·.·.·.·.\
·.·.·.·.·.·.·.·.·.·.·.·.·.·.·\
.·.·.·.·.·.··:·
2
.,.,.,.,.,.,.,.,.,.,.,. High pressure, high temperature gas
................... High pressure, high temperature ,.,.,.,.,.,.,.,.,.,.,.,.,.,.,.,.,.,.,., mixture of gas and liquid
Cooling air
00
1/?//TJZZ High pressure, medium temperature liquid
----Low pressure, low temperature
6
t
mixture of liquid and gas ..,.,§.."\'"":\"':'0:"'":>'""\\":>"'~ Low pressure, low temperature gas __ _j
1. Compressor 10. Blower motor 2. Magnetic clutch 11. Heater unit 3. Receiver/Drier 12. Heater core 4. Dual pressure switch 13. Temp. control door (Air mix door)
5. Condenser
14. Mode (DEF) control door 6. Evaporator assembly 15. Mode (VENT) control door 7.
Expansion valve 16. Mode (HEAT) control door 8. Temperature sensor
17. Electronic thermostat
9. Evaporator core
Fig. 18-1
Outside air
Page 57 of 1928
The refrigeration cycle includes the following four
processes as the refrigerant changes repeatedly
from liquid to gas and back to liquid while circulat
ing.
EVAPORATION
The refrigerant is changed from a liquid to a gas in
side
the evaporator. The refrigerant mist that enters
the evaporator vaporizes readily. The liquid refrige
rant removes
the required quantity of heat (latent
heat of vaporization) from the air around the evap
orator core cooling fins and rapidly vaporizes.
Removing the heat cools the air, which is then
radiated
from the fins and lowers the temperature of
the air inside the vehicle.
The refrigerant liquid sent from the expansion valve
and the vaporized refrigerant gas are both present
inside the
evaporator and the liquid is converted to
gas.
With this change from liquid to gas, the pressure
inside
the evaporator must be kept low enough for
vaporization to occur at a lower temperature.
Because of that, the vaporized refrigerant is sucked
into the compressor.
COMPRESSION
The refrigerant is compressed by the compressor
until it is easily liquefied at normal temperature.
The vaporized
refrigerant in the evaporator is sucked
into the compressor. This action maintains the
refrigerant inside the evaporator at a low pressure
so
that it can easily vaporize, even at low tempera
tures close to ooc (32°F).
Also, the refrigerant sucked into the compressor is
compressed inside the
cylinder to increase the
pressure and temperature to values such that the
refrigerant can easily liquefy at normal ambient
temperatures.
CONDENSATION
The refrigerant inside the condenser is cooled by the
outside air and changes from gas to liquid.
The high temperature, high pressure gas coming
from the compressor is cooled and liquefied by the
condenser with outside air and accumulated in the
receiver/drier. The heat radiated to the outside air by
the high temperature, high pressure gas in the
compressor is called heat of condensation. This is
the total quantity of heat (heat of vaporization) the
refrigerant removes
from the vehicle interior via the
evaporator and the work (calculated as the quantity
of heat) performed for compression.
'-' EXPANSION
The expansion valve lowers the pressure of the
refrigerant liquid so that it can easily vaporize.
AIR CONDITIONING 1 B -3
The process of lowering the pressure to encourage
vaporization before the
liquefied refrigerant is sent
to the evaporator is called expansion. In addition,
the expansion valve controls the flow rate of the
refrigerant liquid while decreasing the pressure.
That is, the quantity of refrigerant liquid vaporized
inside
the evaporator is determined by the quantity
of heat which must be removed at a prescribed
vaporization temperature.
It is important that the
quantity of refrigerant be controlled to exactly the
right value.
COMPRESSOR
It compressor performs two main functions:
It compresses low-pressure and low-temperature
refrigerant vapor from the evaporator into high
pressure and high-temperature
refrigerant vapor to
the condenser. And it pumps refrigerant and
refrigerant
oil through the air conditioning system.
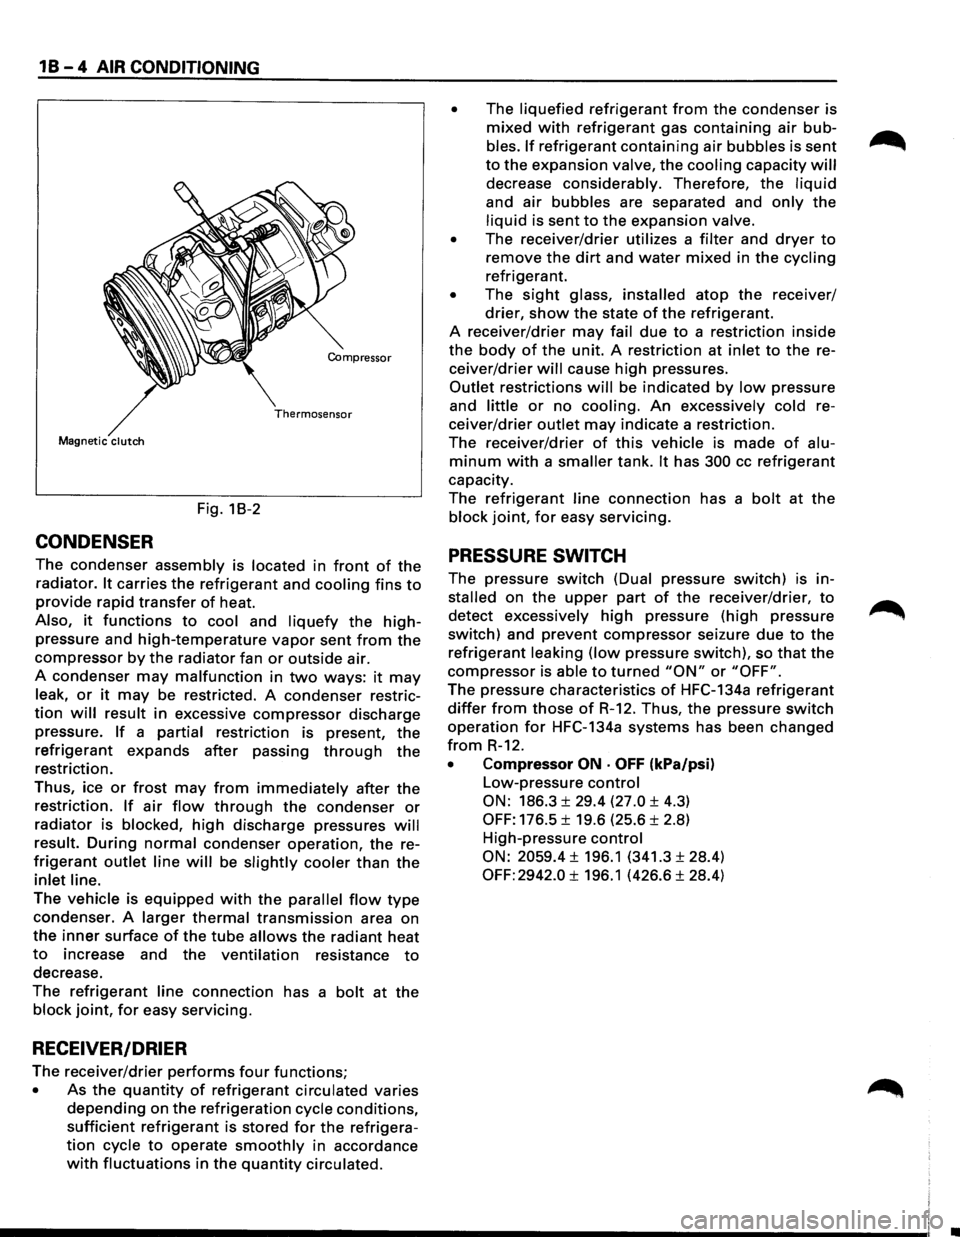
This vehicle is equipped with five-vane rotary com
pressor.
The
thermo sensor is installed to the front head of
the compressor to protect it by stopping its
operation when the refrigerant gas is insufficient or
when the temperature is abnormally high.
• OFF ...... 160 ±soc (320.0 ± 9.0°F)
• ON
...... 135 ±soc (27S.O ± 9.0°F)
The specified amount of the compressor oil is 1SOcc
(S.O fl.oz.).
The oil used in the HFC-134a system compressor
differs from that used in R-12 systems.
Also, compressor oil to be used varies according to
the compressor model. Be sure to avoid mixing two
or more different types of oil.
If the wrong oil is used, lubrication will be poor and
the compressor will seize or malfunction.
The magnetic clutch connector is a waterproof
type.
MAGNETIC CLUTCH
The compressor is driven by the drive belt from the
crank
pulley of the engine. If the compressor is ac
tivated each
time the engine is started, this causes
too much load to the engine. The magnetic clutch
transmits the power from the engine to the com
pressor and activates it when the air conditioning is
"ON". Also, it cuts off the power from the engine to
the compressor when the air conditioning is "OFF".
(Magnetic clutch repair procedure can be found in
Section 1 D.)
Page 58 of 1928
1 B - 4 AIR CONDITIONING
Compressor
Thermosensor
Magnetic clutch
Fig. 18-2
CONDENSER
The condenser assembly is located in front of the
radiator. It carries the refrigerant and cooling fins to
provide rapid transfer of heat.
Also, it functions to cool and liquefy the high
pressure and high-temperature vapor sent from the
compressor by the radiator fan or outside air.
A condenser
may malfunction in two ways: it may
leak, or it may be restricted. A condenser restric
tion will result in excessive compressor discharge
pressure.
If a partial restriction is present, the
refrigerant expands after passing through the
restriction.
Thus, ice
or frost may from immediately after the
restriction. If air flow through the condenser or
radiator is blocked, high discharge pressures will
result. During normal condenser operation, the re
frigerant outlet line will be slightly cooler than the
inlet line.
The vehicle is equipped with the parallel flow type
condenser. A larger thermal transmission area on
the inner surface of the tube allows the radiant heat
to increase and the ventilation resistance to
decrease.
The
refrigerant line connection has a bolt at the
block joint, for easy servicing.
RECEIVER/DRIER
The receiver/drier performs four functions;
• As the quantity of refrigerant circulated varies
depending on the refrigeration cycle conditions,
sufficient refrigerant is stored for the refrigera
tion cycle to operate smoothly in accordance
with fluctuations in the quantity circulated. •
The liquefied refrigerant from the condenser
is
mixed with refrigerant gas containing air bub
bles. If refrigerant containing air bubbles is sent
to the expansion valve, the cooling capacity will
decrease considerably. Therefore, the liquid
and air bubbles are separated and only the
liquid is sent to the expansion valve.
•
The receiver/drier utilizes a filter and dryer to
remove the dirt and water mixed in the cycling
refrigerant.
• The sight glass, installed atop the receiver/
drier, show the state of the refrigerant.
A receiver/drier may fail due to a restriction inside
the body of the unit. A restriction at inlet to the re
ceiver/drier
will cause high pressures.
Outlet restrictions will be indicated by low pressure
and
little or no cooling. An excessively cold re
ceiver/drier
outlet may indicate a restriction.
The receiver/drier
of this vehicle is made of alu
minum with a smaller tank. It has 300 cc refrigerant
capacity.
The
refrigerant line connection has a bolt at the
block joint, for easy servicing.
PRESSURE SWITCH
The pressure switch (Dual pressure switch) is in
stalled on the upper part of the receiver/drier, to
detect excessively high pressure (high pressure
switch) and prevent compressor seizure due to the
refrigerant leaking (low pressure switch), so that the
compressor is able to turned "ON" or "OFF".
The pressure characteristics of HFC-134a refrigerant
differ from those of R-12. Thus, the pressure switch
operation for HFC-134a systems has been changed
from R-12.
• Compressor ON · OFF (kPa/psi)
Low-pressure control
ON: 186.3 ± 29.4 (27.0 ± 4.3)
OFF: 176.5 ± 19.6 (25.6 ± 2.8)
High-pressure
control
ON: 2059.4 ± 196.1 (341.3 ± 28.4)
OFF: 2942.0 ± 196.1 (426.6 ± 28.4)
Page 59 of 1928
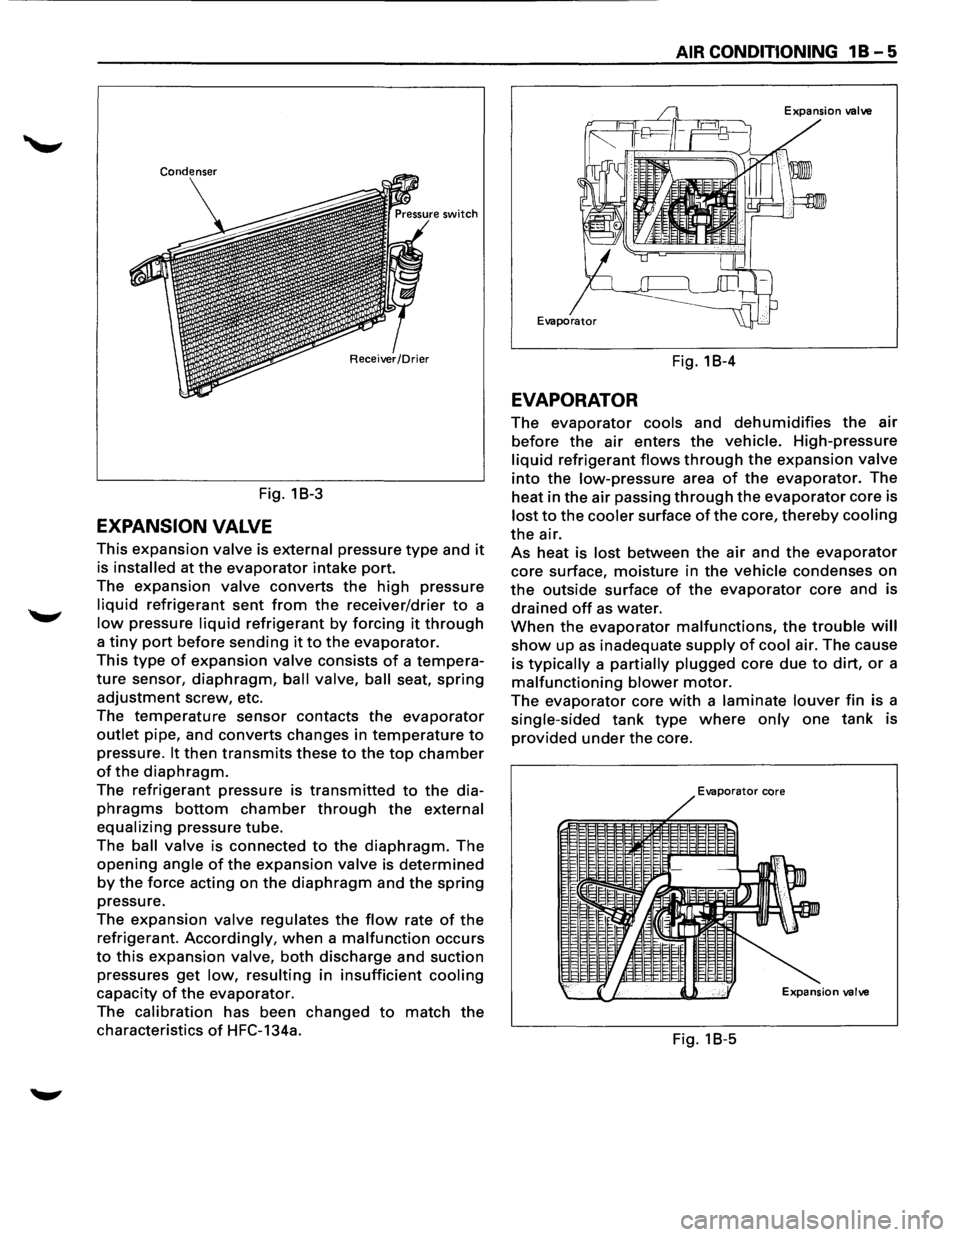
Fig. 18-3
EXPANSION VALVE
This expansion valve is external pressure type and it
is installed at the evaporator intake port.
The
expansion valve converts the high pressure
liquid refrigerant sent from the receiver/drier to a
low pressure liquid refrigerant by forcing it through
a tiny port before sending it to the evaporator.
This type of expansion valve consists of a tempera
ture sensor, diaphragm, ball valve, ball seat, spring
adjustment screw, etc.
The
temperature sensor contacts the evaporator
outlet pipe, and converts changes in temperature to
pressure. It then transmits these to the top chamber
of the diaphragm.
The refrigerant pressure is transmitted to the dia
phragms bottom chamber through the external
equalizing
pressure tube.
The
ball valve is connected to the diaphragm. The
opening angle of the expansion valve is determined
by the force acting on the diaphragm and the spring
pressure.
The
expansion valve regulates the flow rate of the
refrigerant. Accordingly, when a malfunction occurs
to this expansion valve, both discharge and suction
pressures
get low, resulting in insufficient cooling
capacity of the evaporator.
The
calibration has been changed to match the
characteristics of HFC-134a.
AIR CONDITIONING 1 B - 5
Fig. 18-4
EVAPORATOR
The evaporator cools and dehumidifies the air
before the air enters the vehicle. High-pressure
liquid refrigerant flows through the expansion valve
into the low-pressure area of the evaporator. The
heat in
the air passing through the evaporator core is
lost to the cooler surface of the core, thereby cooling
the air.
As heat is lost between the air and the evaporator
core surface, moisture in the vehicle condenses on
the outside surface of the evaporator core and is
drained off as water.
When the evaporator malfunctions, the trouble will
show up as inadequate supply of cool air. The cause
is
typically a partially plugged core due to dirt, or a
malfunctioning blower motor.
The evaporator core with a laminate louver fin is a
single-sided tank type where only one tank is
provided under the core.
Evaporator core
=
Fig. 18-5
Page 60 of 1928
1 B-6 AIR CONDITIONING
ELECTRONIC THERMOSTAT
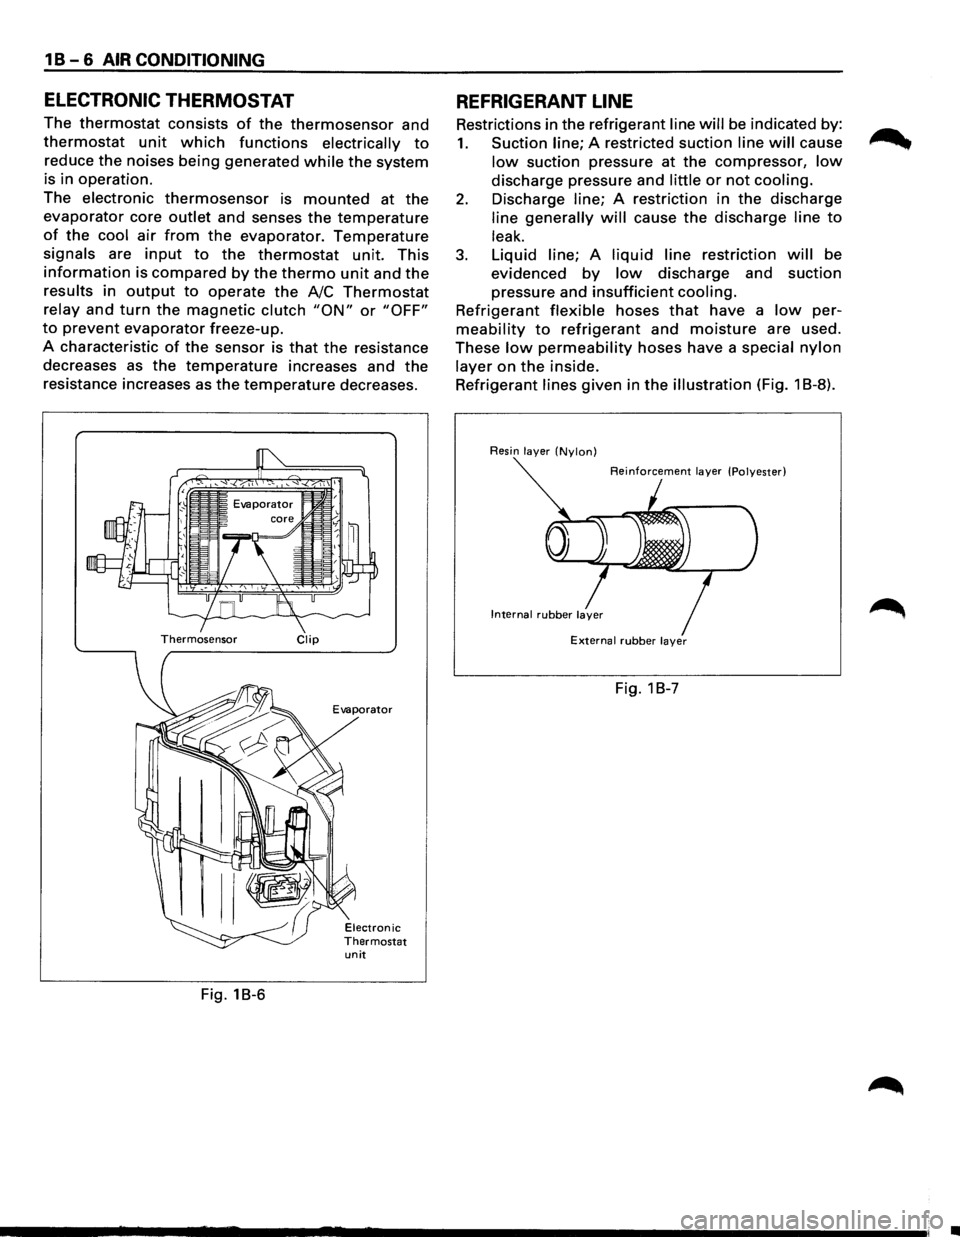
The thermostat consists of the thermosensor and
thermostat unit which functions electrically to
reduce the noises being generated while the system
is in operation.
The
electronic thermosensor is mounted at the
evaporator core outlet and senses the temperature
of the cool air from the evaporator. Temperature
signals are input to the thermostat unit. This
information is compared by the thermo unit and the
results in output to operate the A/C Thermostat
relay and turn the magnetic clutch "ON" or "OFF"
to prevent evaporator freeze-up.
A characteristic
of the sensor is that the resistance
decreases as the
temperature increases and the
resistance increases as
the temperature decreases.
Thermosensor Clip
Evaporator
unit
Fig. 18-6
REFRIGERANT LINE
Restrictions in the refrigerant line will be indicated by:
1. Suction line; A restricted suction line will cause
low suction pressure at the compressor, low
discharge pressure and little or not cooling.
2. Discharge line; A restriction in the discharge
line generally will cause the discharge line to
leak.
3. Liquid line; A liquid line restriction will be
evidenced
by low discharge and suction
pressure and
insufficient cooling.
Refrigerant flexible hoses that have a low per
meability to refrigerant and moisture are used.
These
low permeability hoses have a special nylon
layer on the inside.
Refrigerant
lines given in the illustration (Fig. 1 B-8).
Resin layer (Nylon)
Reinforcement layer (Polyester)
External rubber layer
Fig. 1 B-7
•
Page 66 of 1928
1 B -12 AIR CONDITIONING
RESULT CHECK POINT /SYMPTOM
TROUBLE CAUSE CORRECTION
Suction (low 1. Low pressure
gauge 1. Excessive refrigerant 1. Discharge and recover
Gauge) Pressure (Low pressure gauge
in system. refrigerant.
Recharge
Abnormally is lowered after to specified amount.
High condenser is cooled
by water).
2. Low pressure hose 2. • Unsatisfactory valve 2. Replace the expansion
temperature (Low operation due to valve.
pressure hose
defective
temperature around
temperature sensor
the compressor of expansion valve.
refrigerant line
• Expansion valve
connector is lower than opens too long.
around evaporator).
3. High and low pressure 3. Compressor gasket is 3. Repair or replace the
gauge balanced defective. compressor.
quickly (After turned
off A/C).
Suction (low 1. Insufficient cooling. 1. Insufficient refrigerant 1 .• Check for leaks.
Gauge) Pressure in system. • Discharge and
Abnormally Low recover refrigerant.
Recharge
to
specified amount.
2. Frost on the expansion 2. Expansion valve 2. Replace the expansion
valve inlet line.
clogged. valve.
3. Receiver/drier inlet and 3. Receiver/Drier clogged 3. Replace the
outlet refrigerant line receiver/drier.
temperature (A distinct
difference in
temperature
develops).
4. Expansion valve outlet 4. Expansion valve 4. Replace the expansion
refrigerant line (Not temperature sensor valve.
cold
and low pressure defective.
gauge indicates
vacuum).
5. When the refrigerant 5. Clogged or blocked 5. Replace refrigerant
line is clogged or refrigerant line. line.
blocked,
the low
pressure gauge
reading
will decrease,
or a vacuum reading
may be shown.
6. Evaporator core is 6. Thermo switch 6. Replace thermo
frozen.
defective. switch.
A/C-Air Conditioning
..
Page 83 of 1928
I••IINSTALLATION
To install, follow the removal steps in the reverse
order,
noting the following points:
1. To install a new evaporator assembly, add 50cc
(1.7 fl.oz.) of new compressor oil to a new core.
2. Tighten the refrigerant outlet line to the
specified torque.
~~~ Torque N·m (lb.ft) 25 (18)
AIR CONDITIONING 1 B-29
3. Tighten the refrigerant inlet line to the specified
torque.
~~~ Torque N·m (lb·ft) 15 (11)
4. 0-rings cannot be reused. Always replace with
new ones.
5. Be sure to apply new compressor oil to the 0-
rings when connecting lines.
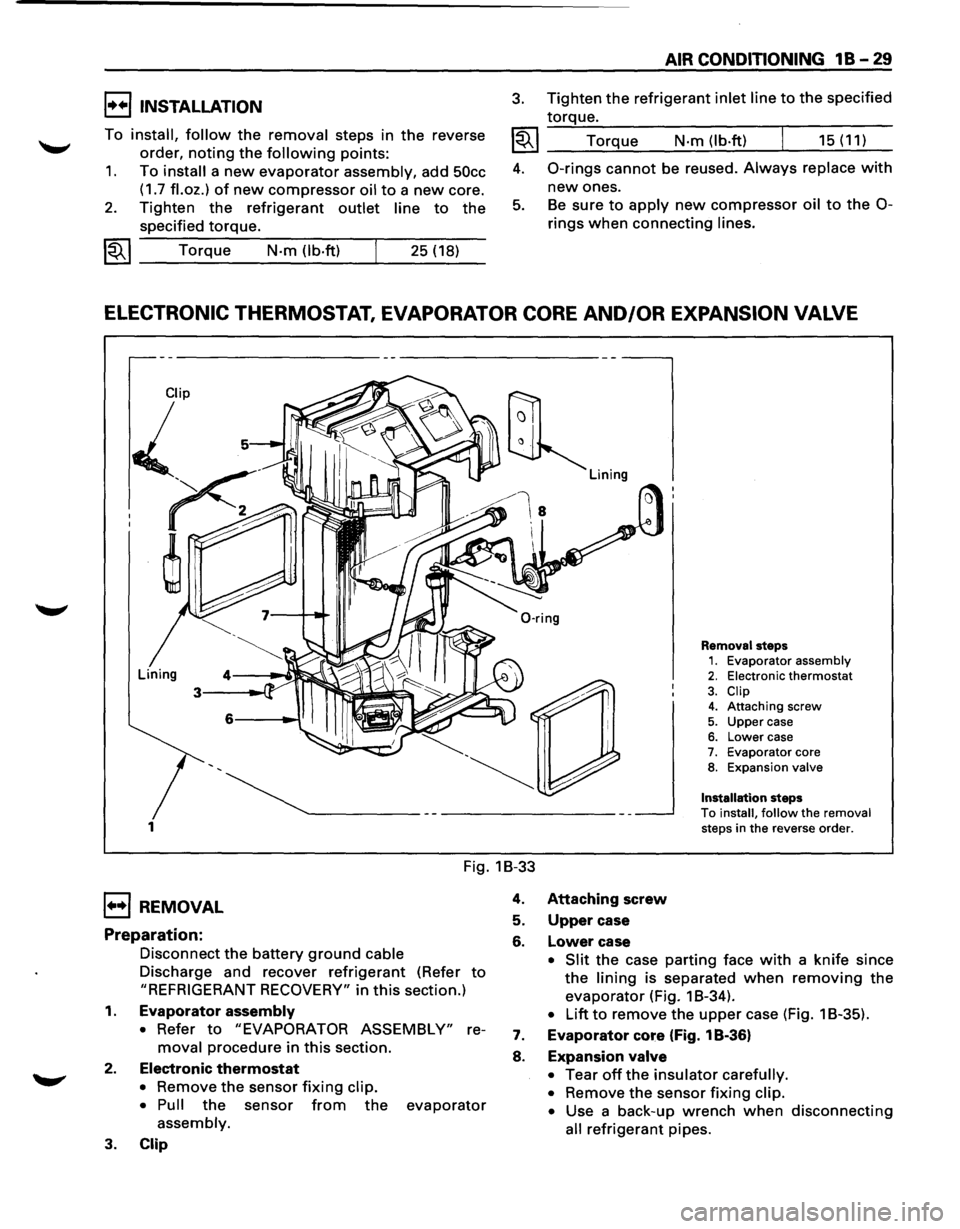
ELECTRONIC THERMOSTAT, EVAPORATOR CORE AND/OR EXPANSION VALVE
1
Removal steps 1. Evaporator assembly 2. Electronic thermostat
3. Clip 4. Attaching screw
5. Upper case 6. Lower case 7. Evaporator core 8. Expansion valve
Installation
steps
To install, follow the removal steps in the reverse order.
Fig. 1B-33
1••1 REMOVAL
Preparation:
Disconnect the battery ground cable
Discharge and recover refrigerant (Refer to
"REFRIGERANT RECOVERY" in this section.)
1. Evaporator assembly
• Refer to "EVAPORATOR ASSEMBLY" re
moval procedure in this section.
2. Electronic thermostat
• Remove the sensor fixing clip.
• Pull
the sensor from the evaporator
assembly.
3. Clip
4. Attaching screw
5. Upper case
6. Lower case
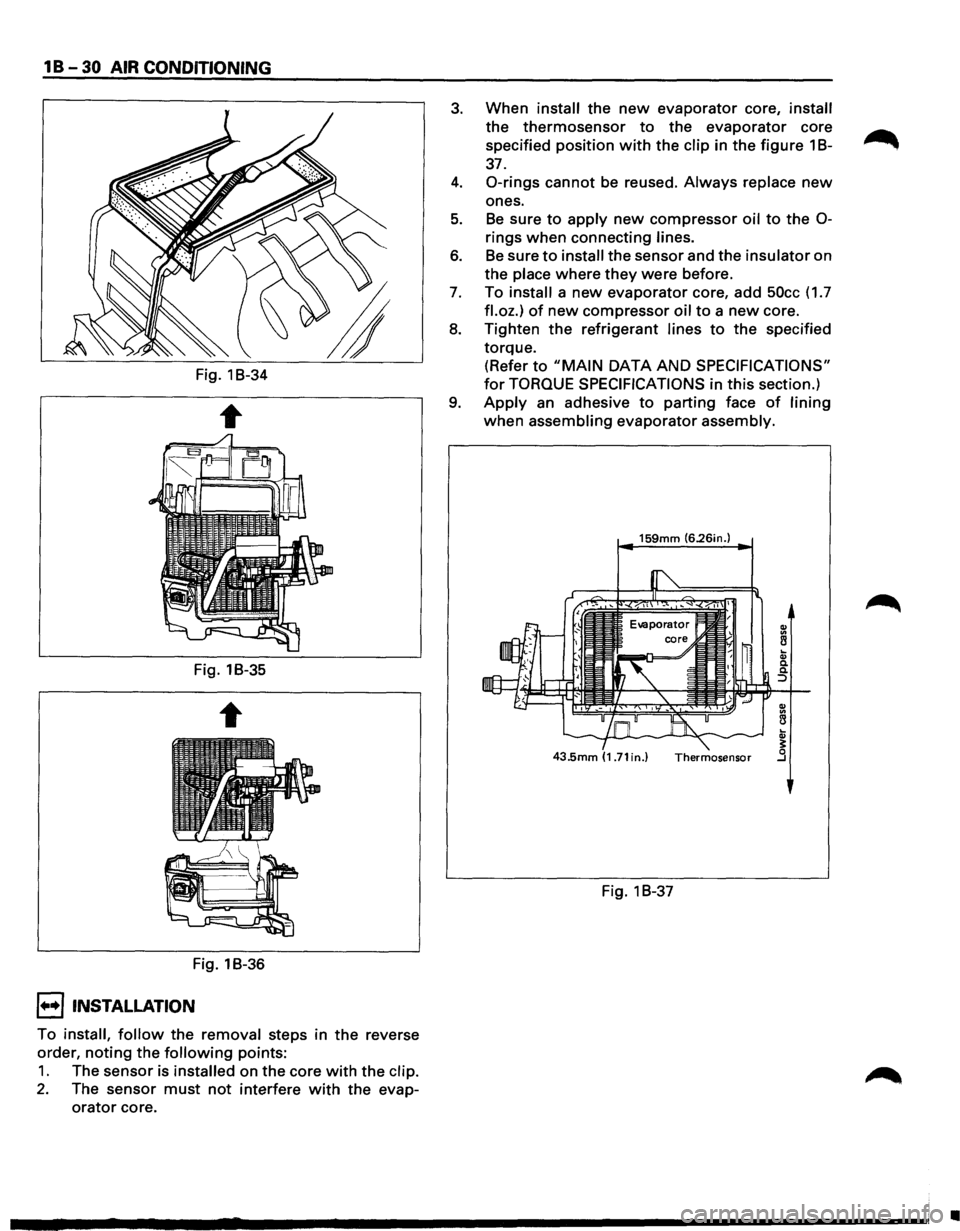
• Slit the case parting face with a knife since
the lining is separated when removing the
evaporator (Fig. 1 B-34).
• Lift to remove the upper case (Fig. 1 B-35).
7. Evaporator core (Fig. 1 B-36)
8. Expansion valve
•
Tear off the insulator carefully.
•
Remove the sensor fixing clip.
•
Use a back-up wrench when disconnecting
all refrigerant pipes.
Page 84 of 1928
1 B -30 AIR CONDITIONING
Fig. 1B-34
Fig. 1B-35
Fig. 1B-36
I••! INSTALLATION
To install, follow the removal steps in the reverse
order,
noting the following points:
1. The sensor is installed on the core with the clip.
2. The sensor must not interfere with the evap
orator core.
3. When install the new evaporator core, install
the thermosensor to the evaporator core
specified position
with the clip in the figure 1 B-~
37.
4. 0-rings cannot be reused. Always replace new
ones.
5. Be sure to apply new compressor oil to the 0-
rings when connecting lines.
6. Be sure to install the sensor and the insulator on
the place where
they were before.
7. To install a new evaporator core, add 50cc (1.7
fl.oz.) of new compressor oil to a new core.
8. Tighten the refrigerant lines to the specified
torque. (Refer
to "MAIN DATA AND SPECIFICATIONS"
for TORQUE SPECIFICATIONS in this section.)
9. Apply an adhesive to parting face of lining
when assembling evaporator assembly.
159mm (6.26in.)
Fig. 1 B-37
•