battery ISUZU TROOPER 1995 Workshop Manual
[x] Cancel search | Manufacturer: ISUZU, Model Year: 1995, Model line: TROOPER, Model: ISUZU TROOPER 1995Pages: 1928
Page 1869 of 1928
BODY 10-111
ROOF
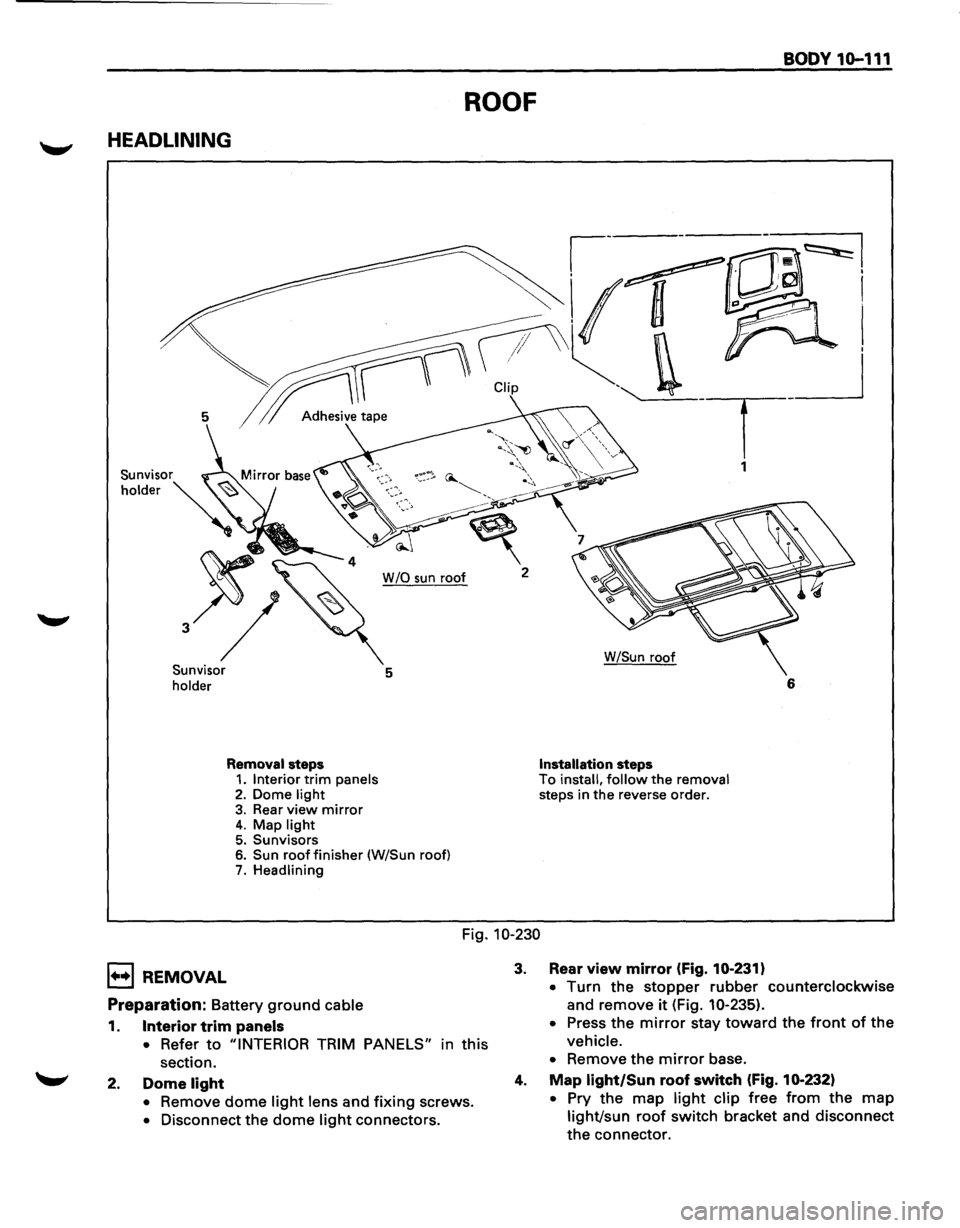
HEADLINING
~---~~I
~r CUp ''-. _ __j
5 1 Adh.,;,;, tap• . T
1
W /0 sun roof 2
Sunvisor
holder 5
Removal steps 1. Interior trim panels 2. Dome light 3. Rear view mirror 4. Map light 5. Sunvisors 6. Sun roof finisher (W/Sun roof) 7. Headlining W/Sun
roof
Installation steps To install, follow the removal steps
in the reverse order. 6
Fig. 10-230
1••1 REMOVAL
Preparation: Battery ground cable
1. Interior trim panels
•
Refer to "INTERIOR TRIM PANELS" in this
section.
2. Dome light
• Remove dome light lens and fixing screws.
• Disconnect the dome light connectors.
3. Rear view mirror (Fig. 10-231)
• Turn the stopper rubber counterclockwise
and remove
it (Fig. 10-235).
• Press the mirror stay toward the front of the
vehicle.
•
Remove the mirror base.
4. Map light/Sun roof switch (Fig. 10-232)
• Pry the map light clip free from the map
light/sun roof switch bracket and disconnect
the connector.
Page 1871 of 1928
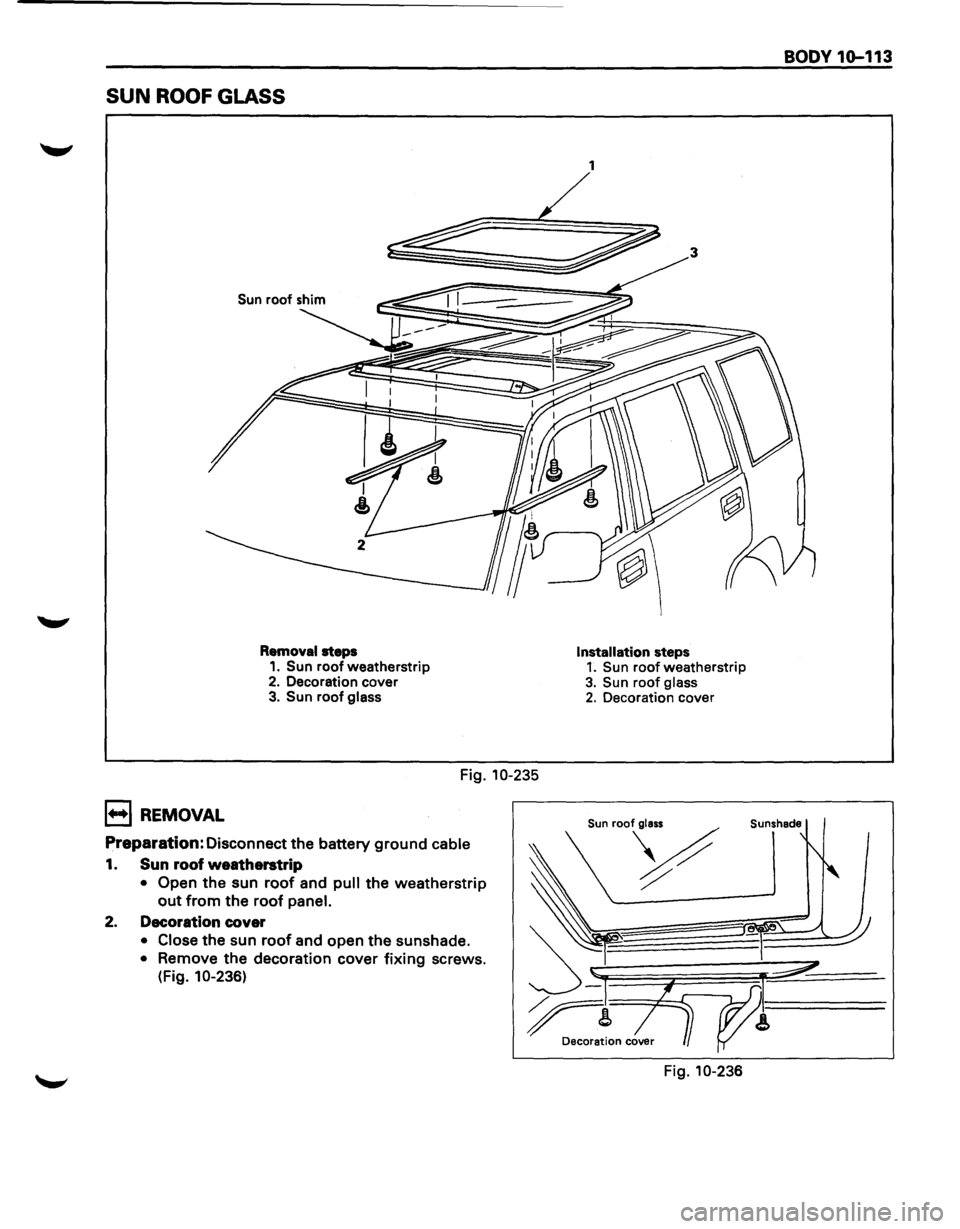
SUN ROOF GLASS
Sun roof shim
Removal steps 1. Sun roof weatherstrip 2. Decoration cover 3. Sun roof glass
Fig. 10-235
B REMOVAL
Preparation: Disconnect the battery ground cable
1. Sun roof weatherstrip
• Open the sun roof and pull the weatherstrip
out from the roof panel.
2. Decoration cover
• Close the sun roof and open the sunshade.
• Remove the decoration cover fixing screws.
(Fig. 10-236)
1
Installation steps 1. Sun roof weatherstrip
3. Sun roof glass 2. Decoration cover
Fig. 10-236
BODY 1Q-113
Page 1874 of 1928
10-116 BODY
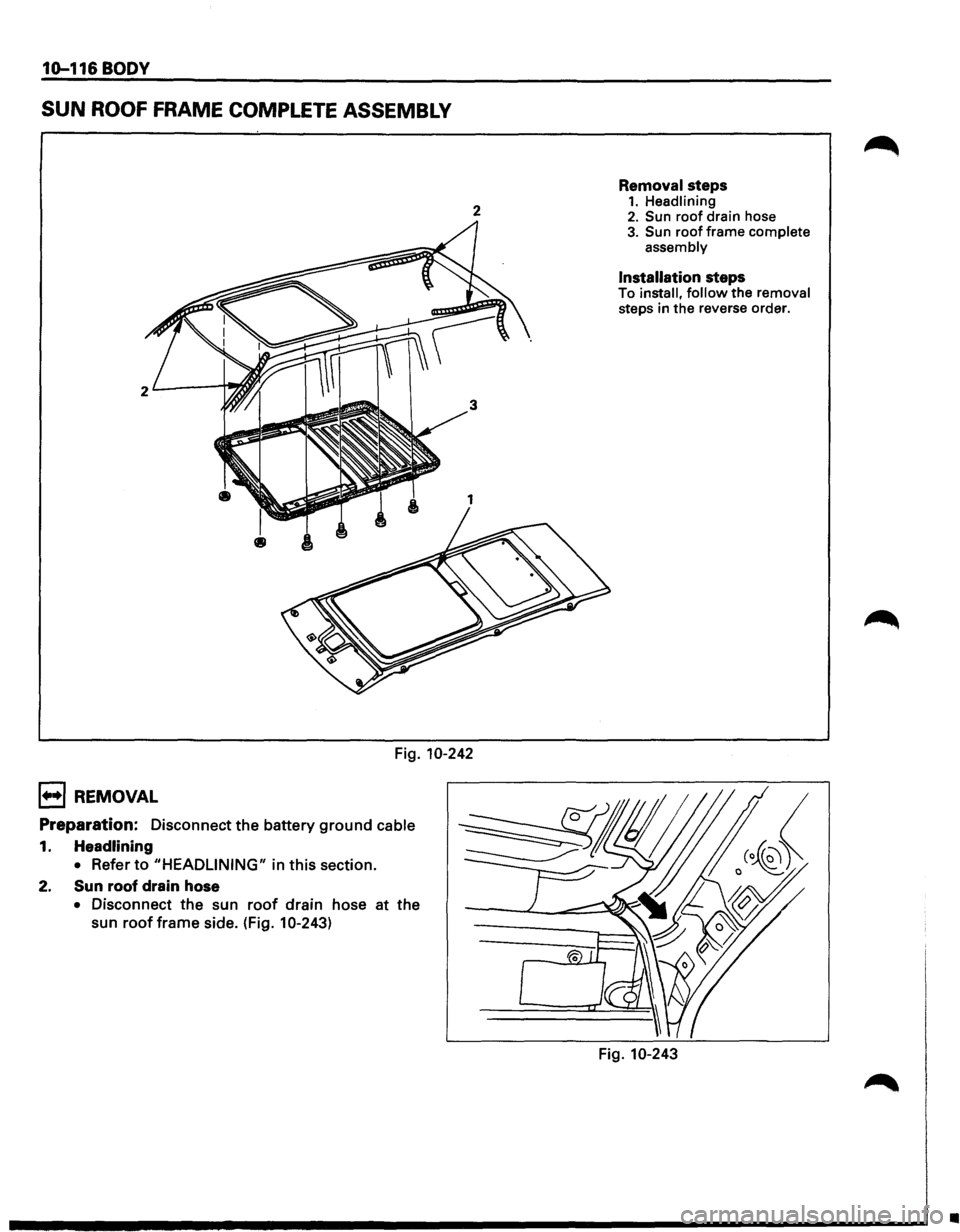
SUN ROOF FRAME COMPLETE ASSEMBLY
2
Fig. 10-242
1••1 REMOVAL
Preparation: Disconnect the battery ground cable
1. Headlining
• Refer to "HEADLINING" in this section.
2. Sun roof drain hose
• Disconnect the sun roof drain hose at the
sun
roof frame side. (Fig. 10-243)
Removal steps 1. Headlining 2. Sun roof drain hose 3. Sun roof frame complete
assembly
Installation steps To install, follow the removal steps in the reverse order.
Fig. 10-243
•
Page 1878 of 1928
10-120 BODY
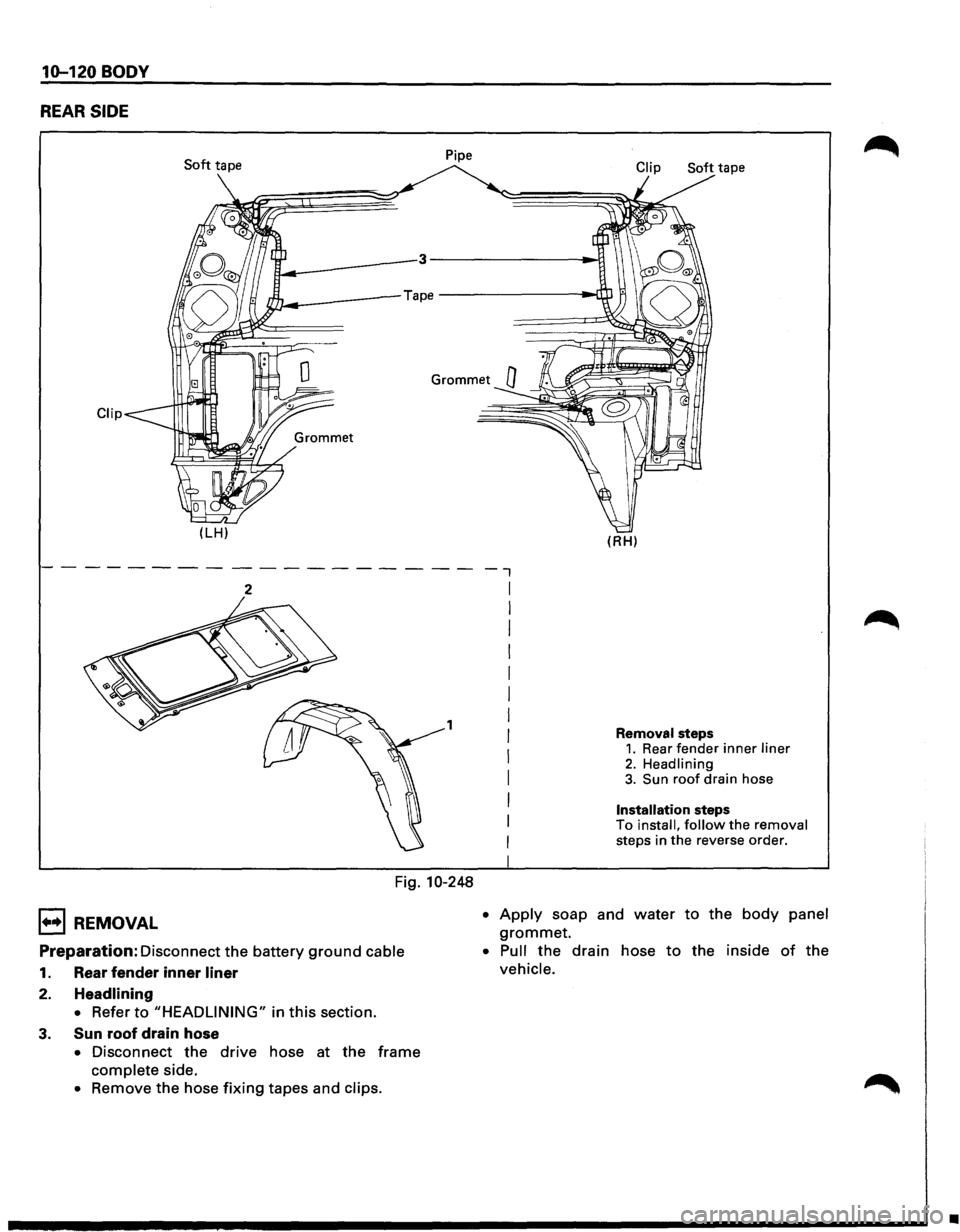
REAR SIDE
Soft tape Pipe
Clip
(LH)
2
1
Fig. 10-248
1••1 REMOVAL
Preparation: Disconnect
the battery ground cable
1. Rear fender inner liner
2. Headlining
•
Refer to "HEADLINING" in this section.
3. Sun roof drain hose
• Disconnect the drive hose at the frame
complete side.
• Remove the hose fixing tapes and clips.
--,
I
I
I
I
I
I
I
I
I
I
I
I
I
I
Soft tape
(RH)
Removal steps 1. Rear fender inner liner
2. Headlining 3. Sun roof drain hose
Installation steps To install, follow the removal steps in the reverse order.
• Apply soap and water to the body panel
grommet.
• Pull the drain hose to the inside of the
vehicle.
•
Page 1880 of 1928
10-122 BODY
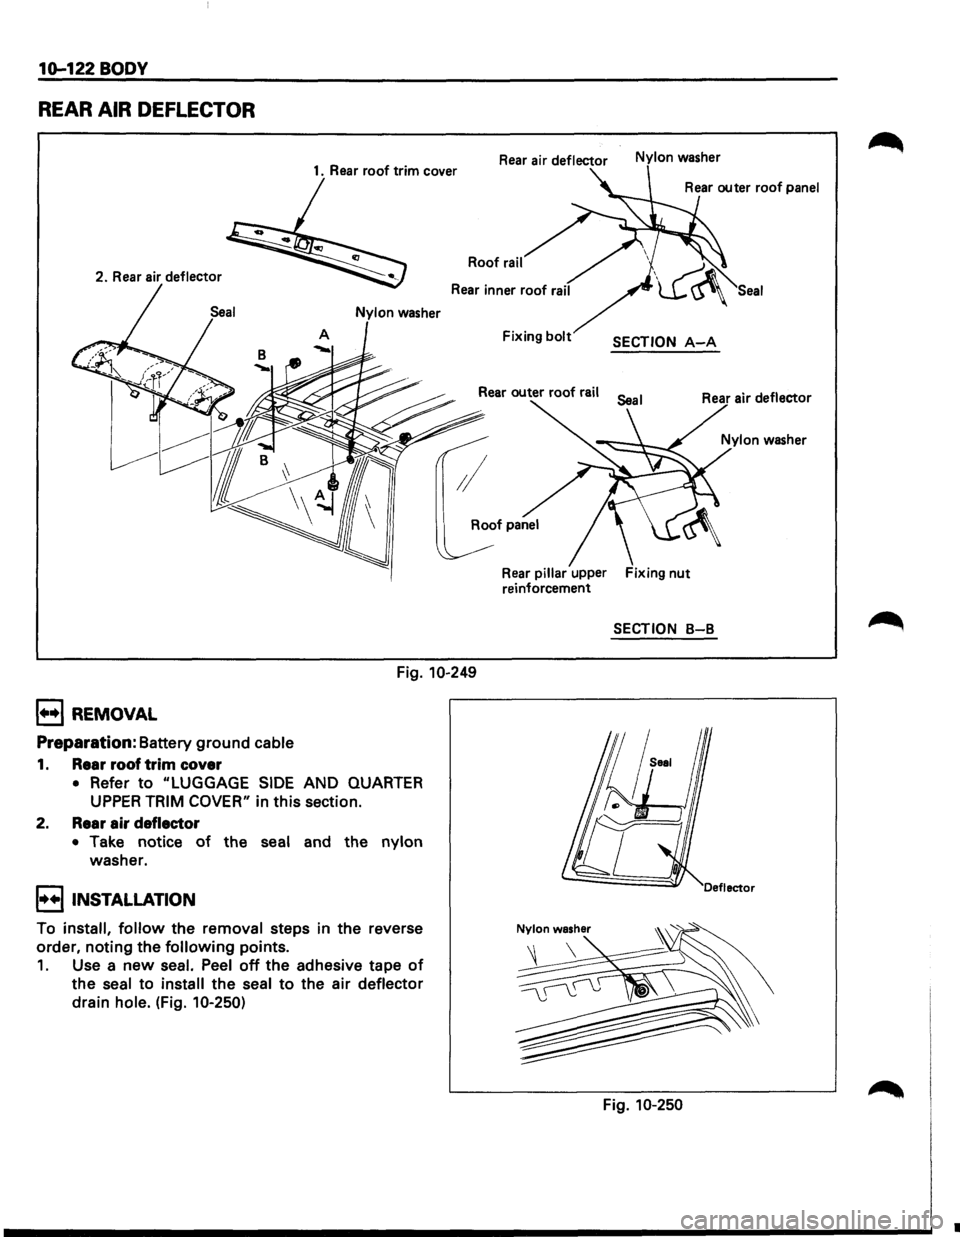
REAR AIR DEFLECTOR
1. Rear roof trim cover
2.
Rear air deflector
Rear air deflector Nylon washer
Roof rail
Fixing bolt SECTION A-A
Rear pillar upper Fixing nut reinforcement
SECTION B-B
Fig. 10-249
B REMOVAL
Preparation: Battery ground cable
1. Rear roof trim cover
• Refer to "LUGGAGE SIDE AND QUARTER
UPPER TRIM COVER" in this section.
2. Rear air deflector
• Take notice of the seal and the nylon
washer.
I••! INSTALLATION
To install, follow the removal steps in the reverse
order, noting the
following points.
1. Use a new seal. Peel off the adhesive tape of
the seal to install the seal to the air deflector
drain hole. (Fig.
10-250)
Fig. 10-250
Seal
•
Page 1883 of 1928
1••1 REMOVAL
Preparation: Battery ground cable
1. Roof moulding
2. Roof end moulding (L·W·B)
• Remove the sealing adhesive and adhesive
tape
of the moulding from the body panel
with a knife or scraper while peeling them
off.
3. Moulding roof clip
• Peel the adhesive tape and remove it.
I••! INSTALLATION
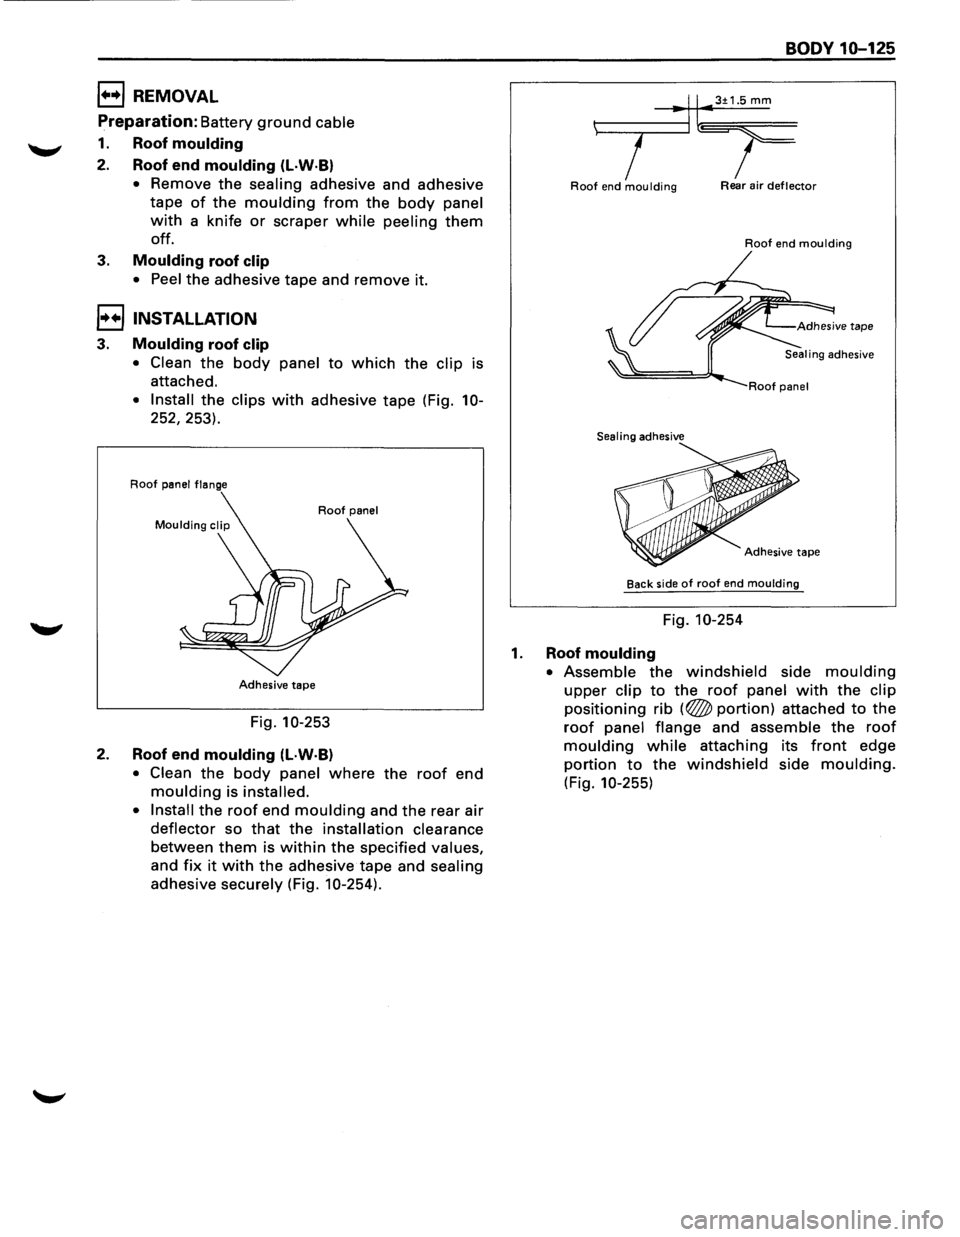
3. Moulding roof clip
• Clean the body panel to which the clip is
attached.
• Install the clips with adhesive tape (Fig. 10-
252, 253).
Roof panel flange
Roof panel
Adhesive tape
Fig. 10-253
2. Roof end moulding (l·W·B)
• Clean the body panel where the roof end
moulding is installed.
• Install
the roof end moulding and the rear air
deflector so that the installation clearance
between them is within the specified values,
and fix it with the adhesive tape and sealing
adhesive securely (Fig. 10-254).
BODY 10-125
t------.,.-lll•3±1.5 mm
7 I Roof end moulding Rear air deflector
Roof end moulding
Sealing adhesive
Adhesive
tape
Back side of roof end moulding
Fig. 10-254
1. Roof moulding
• Assemble the windshield side moulding
upper clip to the roof panel with the clip
positioning rib (~portion) attached to the
roof panel flange and assemble the roof
moulding while attaching its front edge
portion to the windshield side moulding.
(Fig. 10-255)
Page 1885 of 1928
BODY 10-127
STATIONARY GLASS
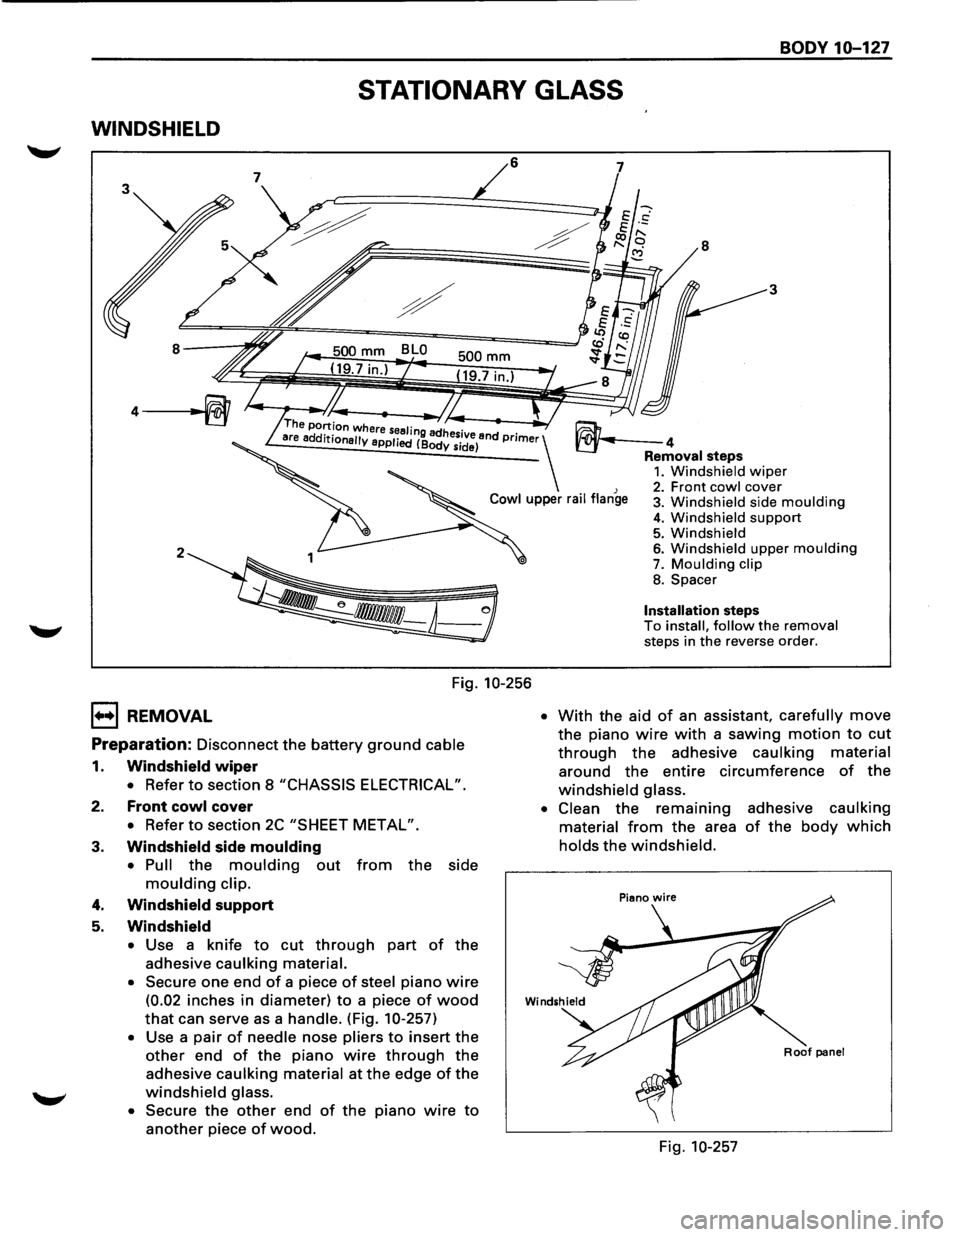
WINDSHIELD
6
2
Fig. 10-256
1••1 REMOVAL
Preparation: Disconnect the battery ground cable
1. Windshield wiper
• Refer to section 8 "CHASSIS ELECTRICAL".
2. Front cowl cover
• Refer to section 2C "SHEET METAL".
3. Windshield side moulding
• Pull the moulding out from the side
moulding clip.
4. Windshield support
5. Windshield
• Use a knife to cut through part of the
adhesive caulking material.
•
Secure one end of a piece of steel piano wire
(0.02 inches in diameter) to a piece of wood
that can serve as a handle. (Fig. 10-257)
• Use a pair of needle nose pliers to insert the
other end of the piano wire through the
adhesive caulking material at the edge of the
windshield glass.
•
Secure the other end of the piano wire to
another piece of wood.
7
8
3
~4 Removal steps 1. Windshield wiper 2. Front cowl cover 3. Windshield side moulding
4. Windshield support 5. Windshield 6. Windshield upper moulding 7. Moulding clip
8. Spacer
Installation steps To install, follow the removal steps in the reverse order.
• With the aid of an assistant, carefully move
the piano wire with a sawing motion to cut
through the adhesive caulking material
around the entire circumference of the
windshield glass.
• Clean
the remaining adhesive caulking
material
from the area of the body which
holds the windshield.
Roof panel
Fig. 10-257
Page 1888 of 1928
10-130 BODY
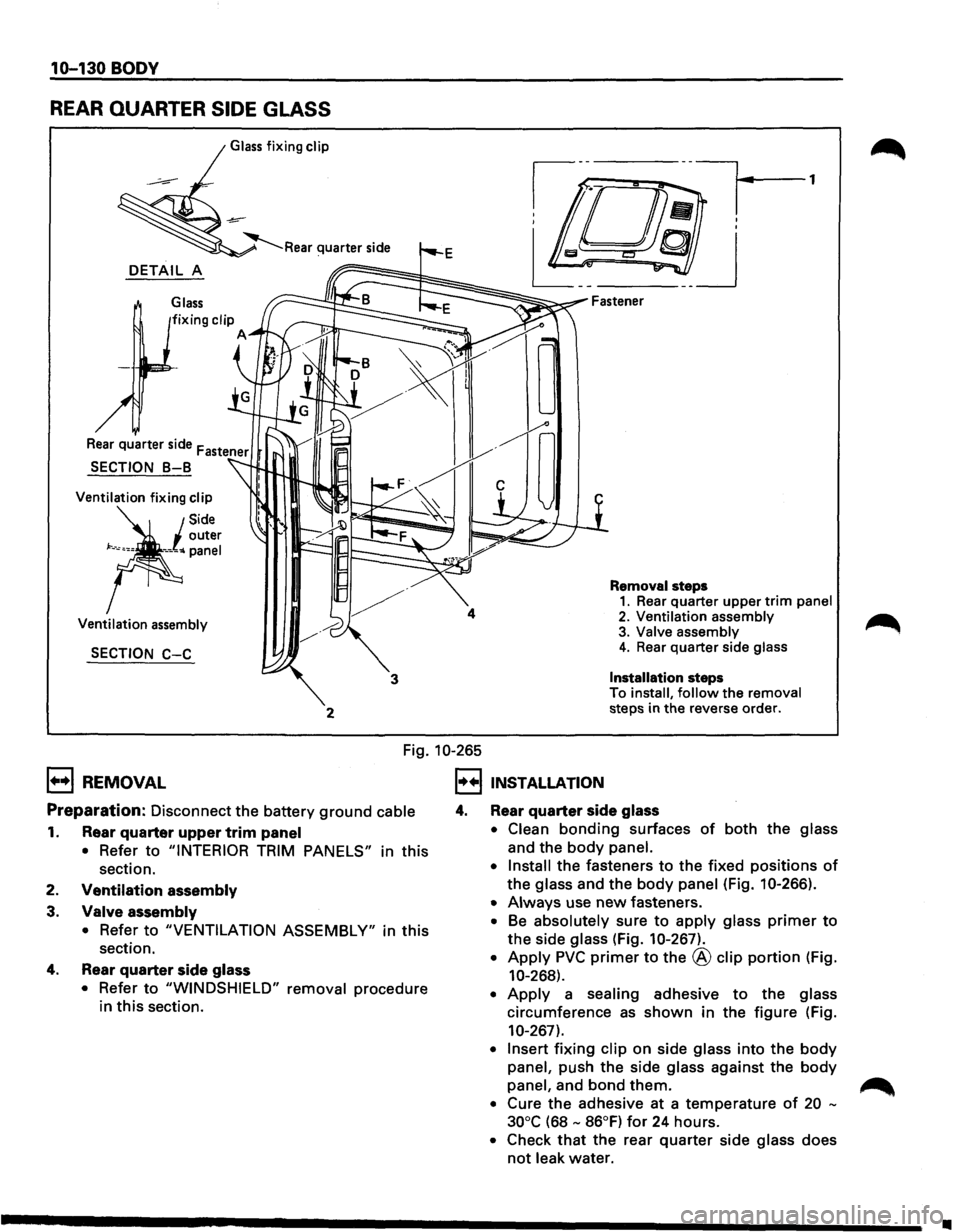
REAR QUARTER SIDE GLASS
Glass fixing clip
DETAIL A
Glass
Ventilation fixing clip
Ventilation assembly
SECTION C-C
2
4
3
Removal steps 1. Rear quarter upper trim panel
2. Ventilation assembly 3. Valve assembly 4. Rear quarter side glass
Installation
steps
To install, follow the removal steps in the reverse order.
Fig. 10-265
1+•1 REMOVAL
Preparation: Disconnect the battery ground cable
1. Rear quarter upper trim panel
• Refer to "INTERIOR TRIM PANELS" in this
section.
2.
Ventilation assembly
3.
Valve assembly
• Refer to "VENTILATION ASSEMBLY" in this
section.
4. Rear quarter side glass
• Refer to "WINDSHIELD" removal procedure
in this section.
I•+! INSTALLATION
4. Rear quarter side glass
• Clean bonding surfaces of both the glass
and the
body panel.
• Install
the fasteners to the fixed positions of
the glass and the body panel (Fig. 10-266).
• Always use new fasteners.
• Be absolutely sure to apply glass primer to
the side glass (Fig. 10-267).
• Apply PVC primer to the @ clip portion (Fig.
10-268).
• Apply a sealing adhesive to the glass
circumference
as shown in the figure (Fig.
10-267).
• Insert fixing clip on side glass into the body
panel, push the side glass against the body
panel, and bond them. ~
• Cure the adhesive at a temperature of 20 -
30°C
(68 - 86°F) for 24 hours.
• Check that the rear quarter side glass does
not leak water.
•
Page 1890 of 1928
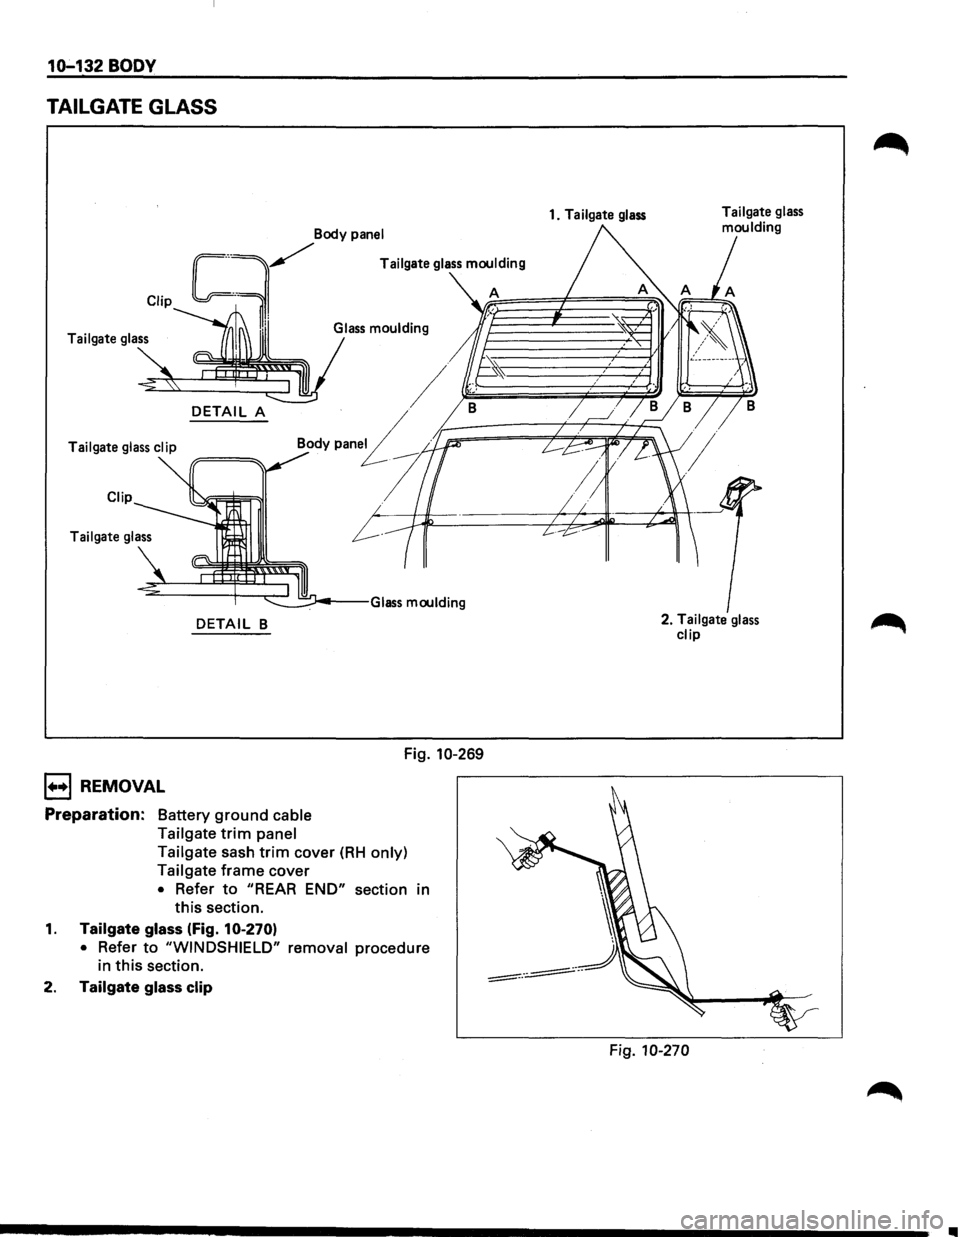
10-132 BODY
TAILGATE GLASS
Clip
~Body P"'el
Tailgate glass
DETAIL A
Body pen£ Tailgate glass clip
Clip
Tailgate glass
DETAIL B
1••1 REMOVAL
Preparation: Battery ground cable
Tailgate
trim panel Fig.
10-269
Tailgate sash
trim cover (RH only)
Tailgate
frame cover
• Refer to "REAR END" section in
this section.
1. Tailgate glass (Fig. 10-270)
• Refer to "WINDSHIELD" removal procedure
in
this section.
2. Tailgate glass clip
1. Tailgate glass
2. Tailgate glass
clip
Fig. 10-270
Ill