battery ISUZU TROOPER 1995 Workshop Manual
[x] Cancel search | Manufacturer: ISUZU, Model Year: 1995, Model line: TROOPER, Model: ISUZU TROOPER 1995Pages: 1928
Page 1813 of 1928
1••1 REMOVAL
Preparation: Battery ground cable
1. Rear door sill plate and luggage side lower
cover
2. Rear
door seal finisher
• Pull the finisher out from body panel. (Fig.
10-94)
I++IINSTALLATION
2. Rear door seal finisher
• Insert the finisher into the @ corner and
install the finisher in the arrow-marked
directions. (Fig.
10-95)
1. Rear door sill plate and luggage side lower
cover
• Be careful not to allow the sill plate and the
cover
to distort or twist the finisher.
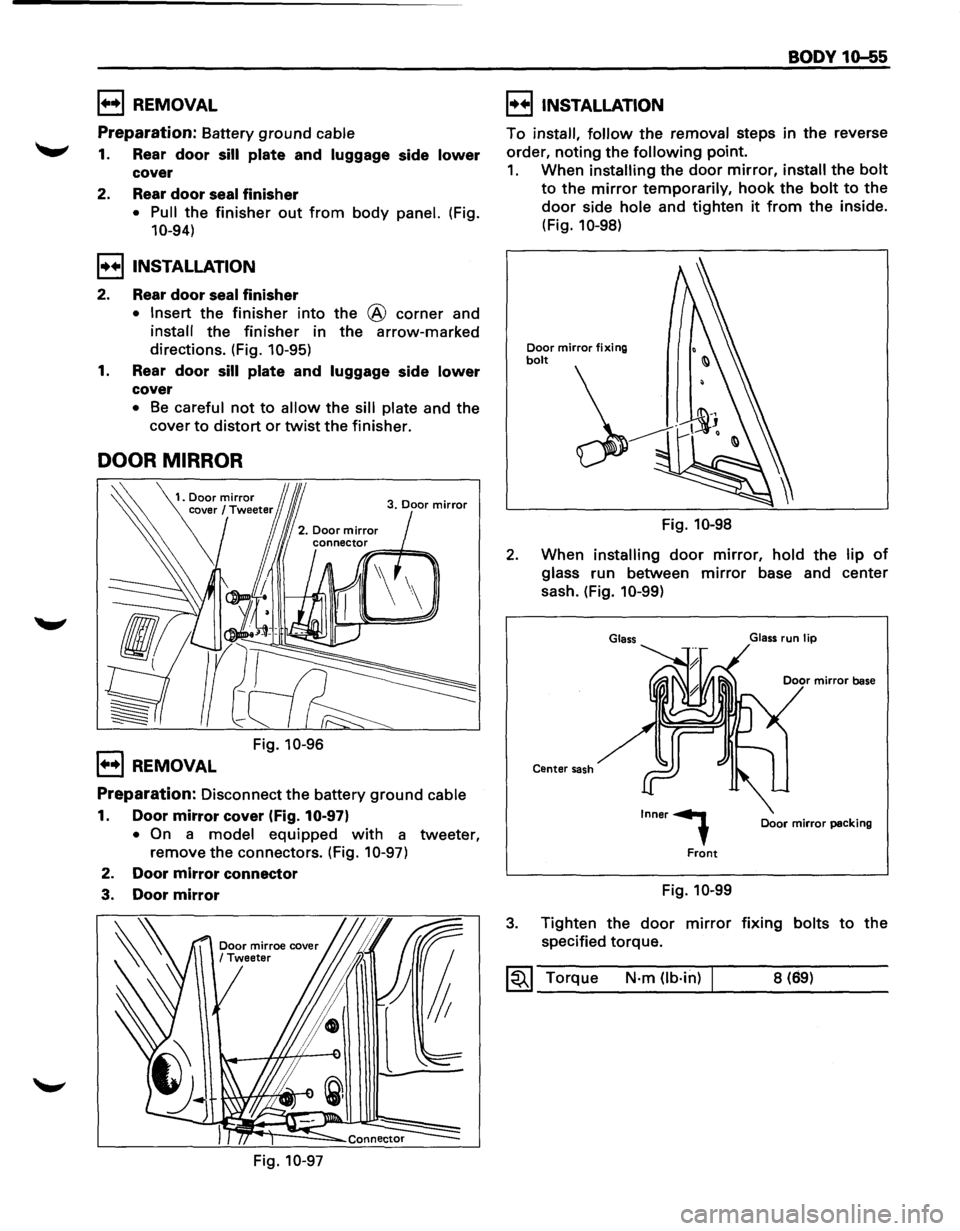
DOOR MIRROR
3. Door mirror
1+•1 REMOVAL
Fig. 10-96
Preparation: Disconnect the battery ground cable
1. Door mirror cover (Fig. 10-97)
• On a model equipped with a tweeter,
remove
the connectors. (Fig. 10-97)
2. Door mirror connector
3. Door mirror
Fig. 10-97
BODY 10-55
I++IINSTALLATION
To install, follow the removal steps in the reverse
order,
noting the following point.
1. When installing the door mirror, install the bolt
to the mirror temporarily, hook the bolt to the
door side hole and tighten it from the inside.
(Fig.
10-98)
Door mirror fixing bolt
Fig. 10-98
2. When installing door mirror, hold the lip of
glass run between mirror base and center
sash. (Fig.
10-99)
Glass
Center sash
Inner,
Front
Fig. 10-99
Glass run lip
Door mirror packing
3. Tighten the door mirror fixing bolts to the
specified torque.
~~~ Torque N·m Ob·hl) 8 (69)
Page 1814 of 1928
10-56 BODY
BODY SIDE
INTERIOR TRIM PANELS
LUGGAGE
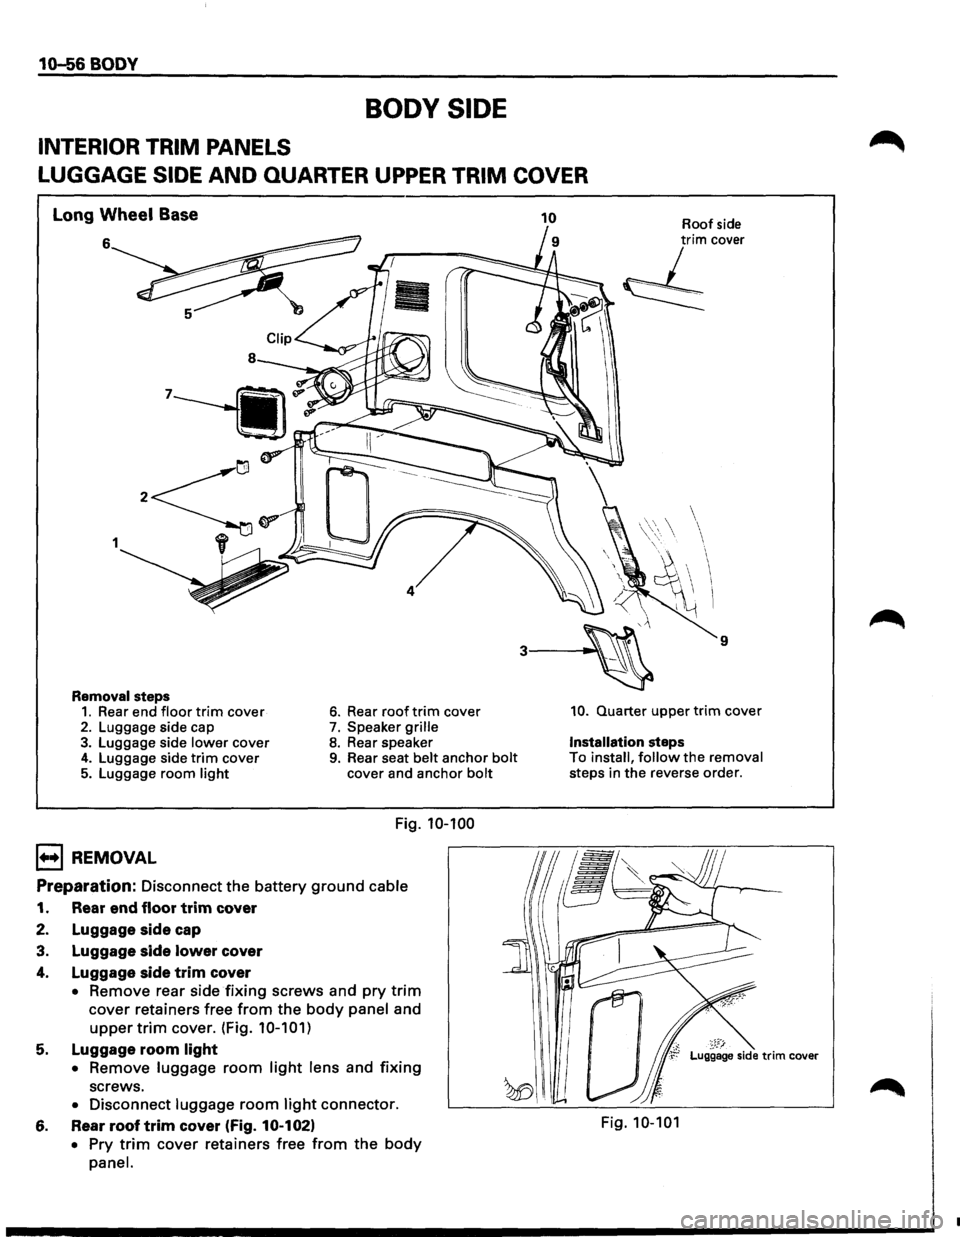
SIDE AND QUARTER UPPER TRIM COVER
Long Wheel Base
6
1
Removal steps 1. Rear end floor trim cover 2. Luggage side cap 3. Luggage side lower cover 4. Luggage side trim cover 5. Luggage room light
1+•1 REMOVAL
6. Rear roof trim cover
7. Speaker grille 8. Rear speaker 9. Rear seat belt anchor bolt cover and anchor bolt
Fig. 10-100
Preparation: Disconnect the battery ground cable
1. Rear end floor trim cover
2. Luggage side cap
3. Luggage side lower cover
4. Luggage side trim cover
• Remove rear side fixing screws and pry trim
cover retainers free from the body panel and
upper trim cover. (Fig. 10-101)
5. Luggage room light
• Remove luggage room light lens and fixing
screws.
• Disconnect luggage room light connector.
6. Rear roof trim cover (Fig. 10-102)
• Pry trim cover retainers free from the body
panel.
Roof side trim cover
, _ _.,,..~
~
9
10. Quarter upper trim cover
Installation steps
To install, follow the removal
steps in
the reverse order.
~~F:r Luggage side trim cover
Fig. 10-101
•
Page 1817 of 1928
1+•1 REMOVAL
Preparation: Disconnect the battery ground cable
1. Rear end floor trim cover
2. Luggage side cap
3. Luggage side lower cover
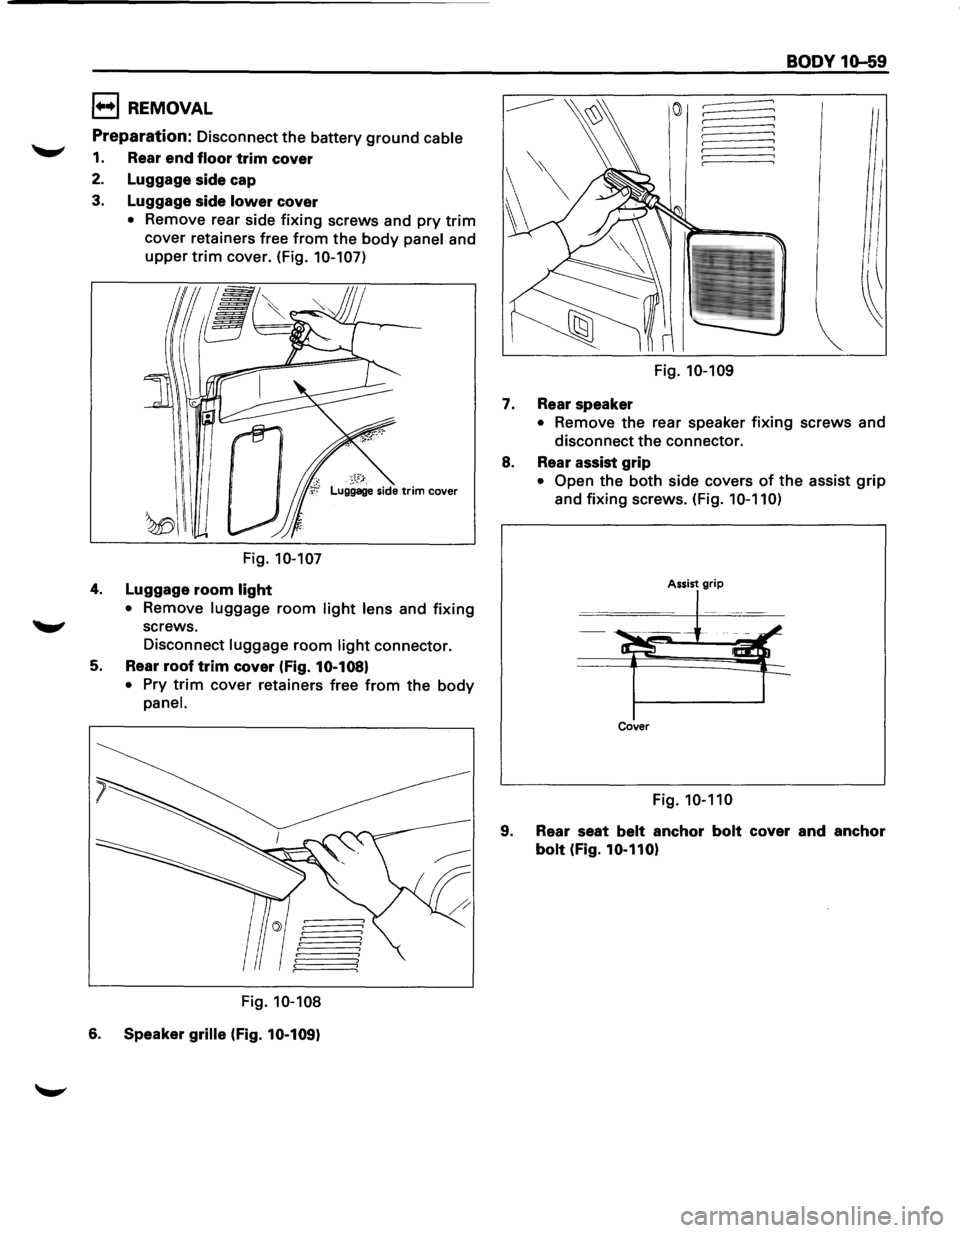
• Remove rear side fixing screws and pry trim
cover retainers free from the body panel and
upper trim cover. (Fig. 10-107)
I
w\\1
Fig. 10-107
4. Luggage room light
• Remove luggage room light lens and fixing
~ screws.
Disconnect
luggage room light connector.
5. Rear roof trim cover (Fig. 10-108)
•
Pry trim cover retainers free from the body
panel.
Fig. 10-108
6. Speaker grille (Fig. 10-109)
Fig. 10-109
7. Rear speaker
BODY 10-59
I
I I
~
• Remove the rear speaker fixing screws and
disconnect
the connector.
8. Rear assist grip
• Open the both side covers of the assist grip
and fixing screws. (Fig. 10-110)
Assist grip
Cover
Fig. 10-110
9. Rear seat belt anchor bolt cover and anchor
bolt (Fig. 10-110)
Page 1819 of 1928
BODY 10-61
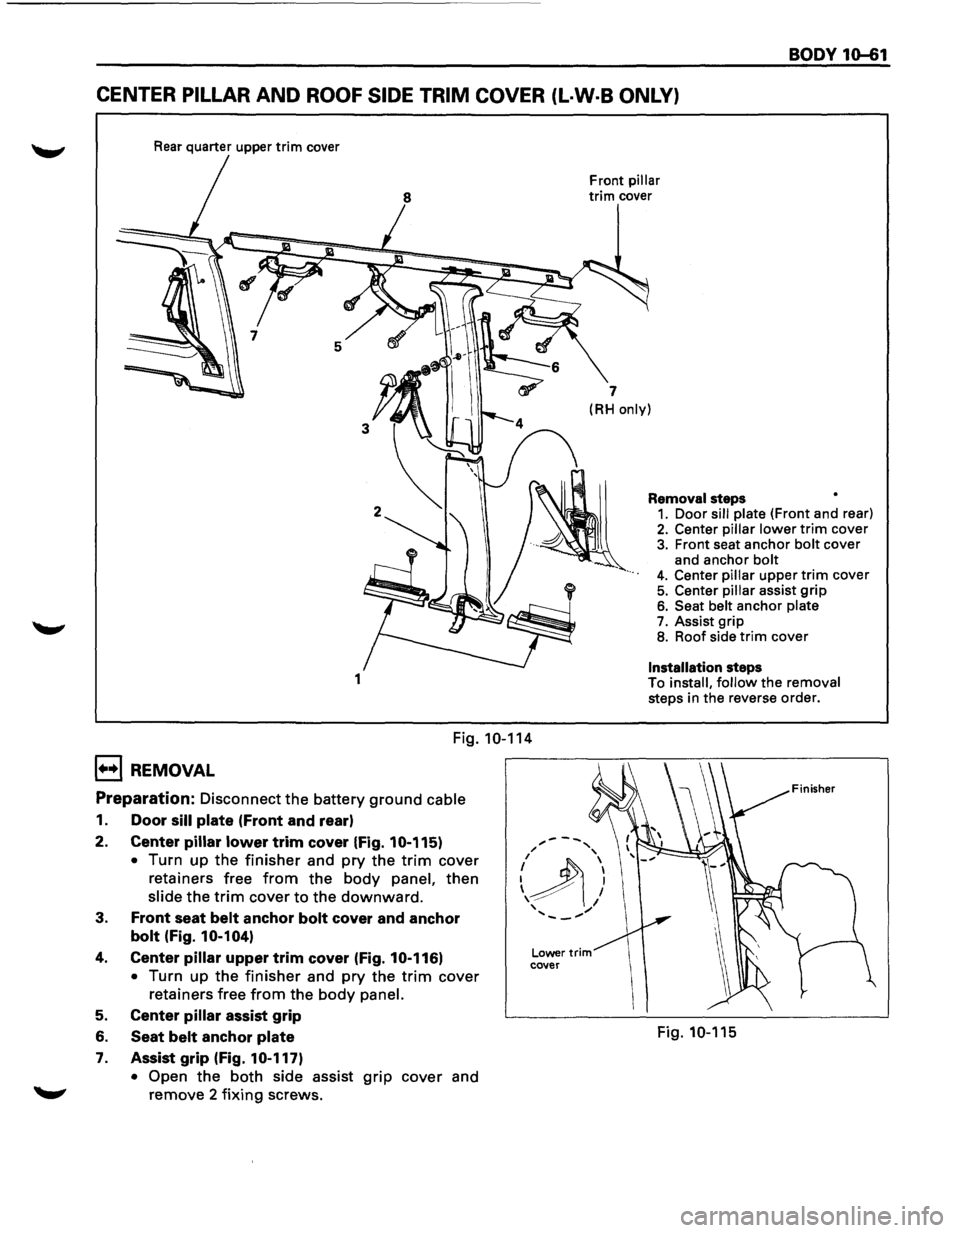
CENTER PILLAR AND ROOF SIDE TRIM COVER (L·W·B ONLY)
Rear quarter upper trim cover
5
1
Fig. 10-114
1+•1 REMOVAL
Preparation: Disconnect the battery ground cable
1. Door sill plate (Front and rear)
2. Center
pillar lower trim cover (Fig. 10-115)
•
Turn up the finisher and pry the trim cover
retainers free
from the body panel, then
slide the trim cover to the downward.
3. Front seat belt anchor bolt cover and anchor
bolt (Fig. 10-104)
4. Center pillar upper trim cover (Fig. 10-116)
•
Turn up the finisher and pry the trim cover
retainers free
from the body panel.
5. Center pillar assist grip
6. Seat belt anchor plate
7. Assist grip (Fig. 10-117)
• Open
the both side assist grip cover and
remove 2
fixing screws.
Front pillar
trim cover
7
(RH only)
Removal steps 1. Door sill plate (Front and rear) 2. Center pillar lower trim cover
3. Front seat anchor bolt cover
and anchor bolt 4. Center pillar upper trim cover 5. Center pillar assist grip
6. Seat belt anchor plate 7. Assist grip 8. Roof side trim cover
Installation steps To install, follow the removal
steps in the reverse order.
Fig. 10-115
Page 1822 of 1928
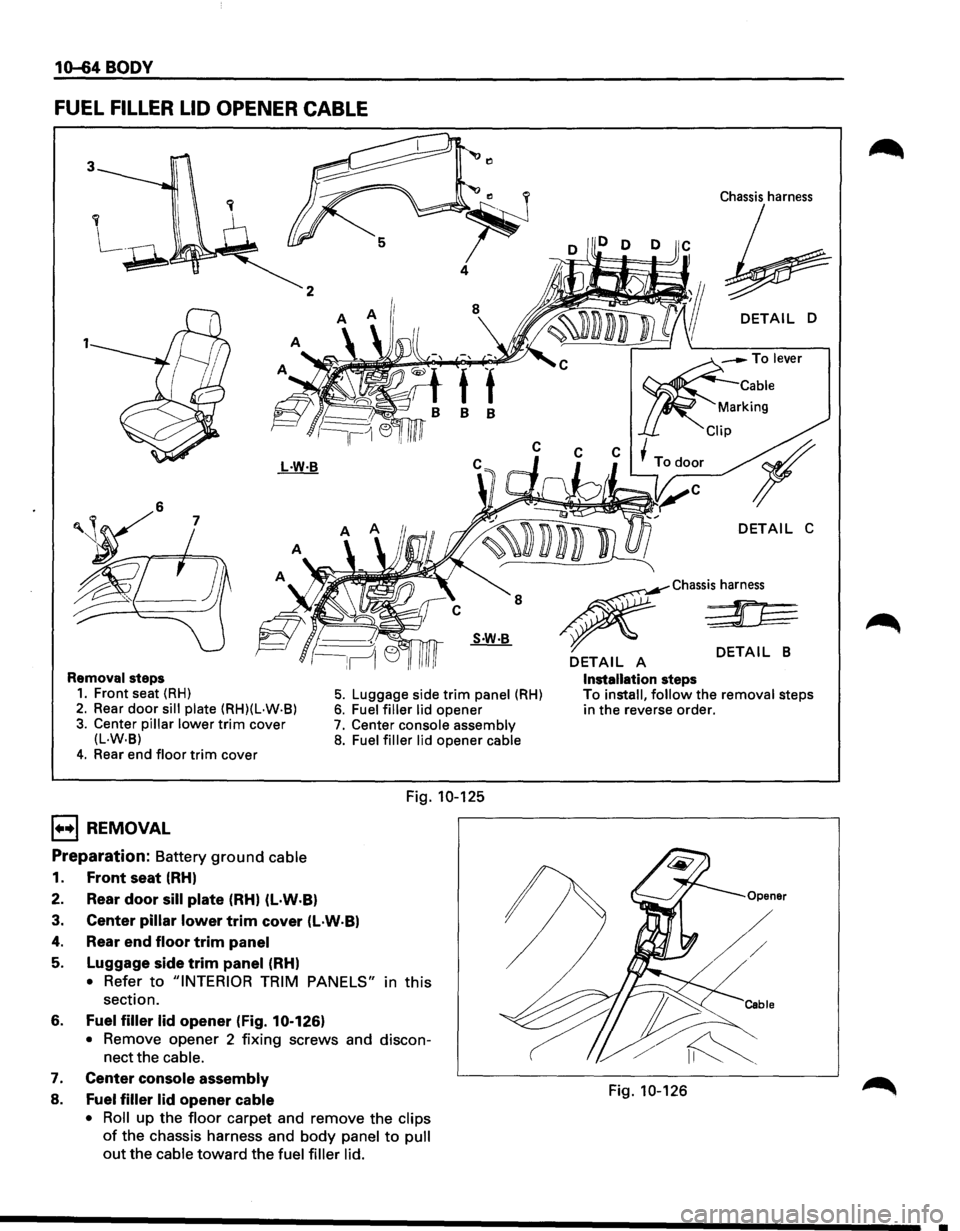
1(H;4 BODY
FUEL FILLER LID OPENER CABLE
2
1
8 8
Chassis harness
DETAIL D
-To lever
Cable
rking
p
~C~~C~~C~~Todooc r
Removal steps 1. Front seat (RH)
2. Rear door sill plate (RH)(L·W·B)
3. Center pillar lower trim cover (L·W.B)
4. Rear end floor trim cover
1••1 REMOVAL
Preparation: Battery ground cable
1. Front seat (RHl
2. Rear door sill plate (RH) (l·W·Bl
5. Luggage side trim panel (RH) 6. Fuel filler lid opener
7. Center console assembly 8. Fuel filler lid opener cable
Fig. 10-125
3. Center pillar lower trim cover (l·W·Bl
4. Rear end floor trim panel
5. Luggage side trim panel (RHl
• Refer to "INTERIOR TRIM PANELS" in this
section.
6.
Fuel filler lid opener (Fig. 10-126)
•
Remove opener 2 fixing screws and discon
nect the
cable.
7. Center console assembly
8. Fuel filler lid opener cable
• Roll
up the floor carpet and remove the clips
of the chassis harness and body panel to pull
out the cable toward the fuel filler lid.
DETAIL C
~Chassis harness
/~ ~
DETAIL A DETAIL B
Installation steps To install, follow the removal steps in the reverse order.
Fig. 10-126
Page 1830 of 1928
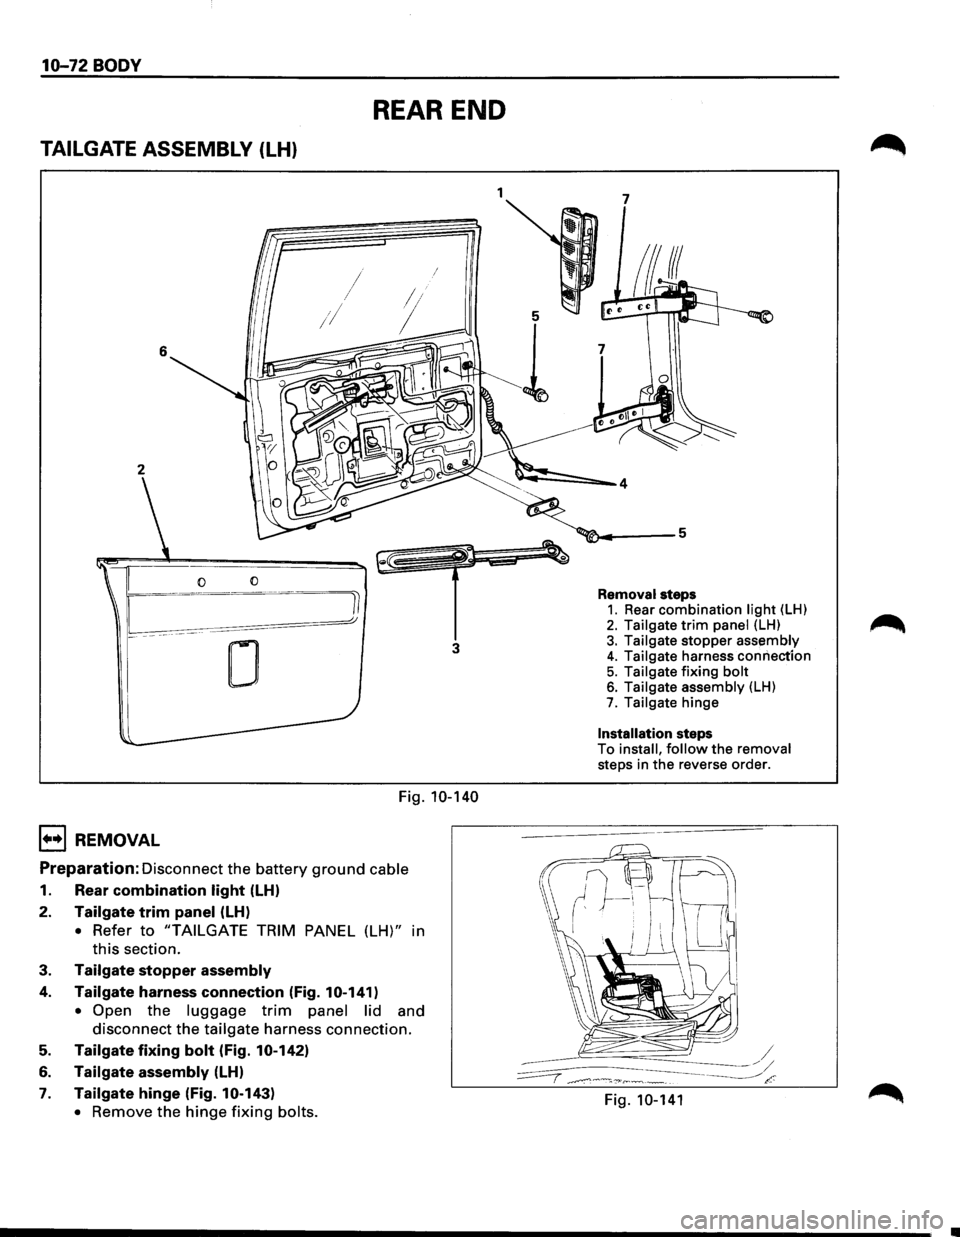
10-72 BODY
REAR END
TAILGATE ASSEMBLY (LH)
6
2
0
0
3
Fig. 10-140
1••1 REMOVAL
Preparation: Disconnect the battery ground cable
1. Rear combination light (LH)
2. Tailgate trim panel (LH)
• Refer to "TAILGATE TRIM PANEL (LH)" in
this section.
3. Tailgate stopper assembly
4. Tailgate harness connection (Fig. 10-141)
• Open
the luggage trim panel lid and
disconnect
the tailgate harness connection.
5. Tailgate fixing bolt (Fig. 10-142)
6. Tailgate assembly (LH)
7. Tailgate hinge (Fig. 10-143)
•
Remove the hinge fixing bolts.
1 7
Removal steps 1. Rear combination light (LH)
2. Tailgate trim panel (LH) 3. Tailgate stopper assembly
4. Tailgate harness connection 5. Tailgate fixing bolt 6. Tailgate assembly (LH) 7. Tailgate hinge
Installation steps
To
install, follow the removal steps in the reverse order.
Fig. 10-141
Page 1832 of 1928
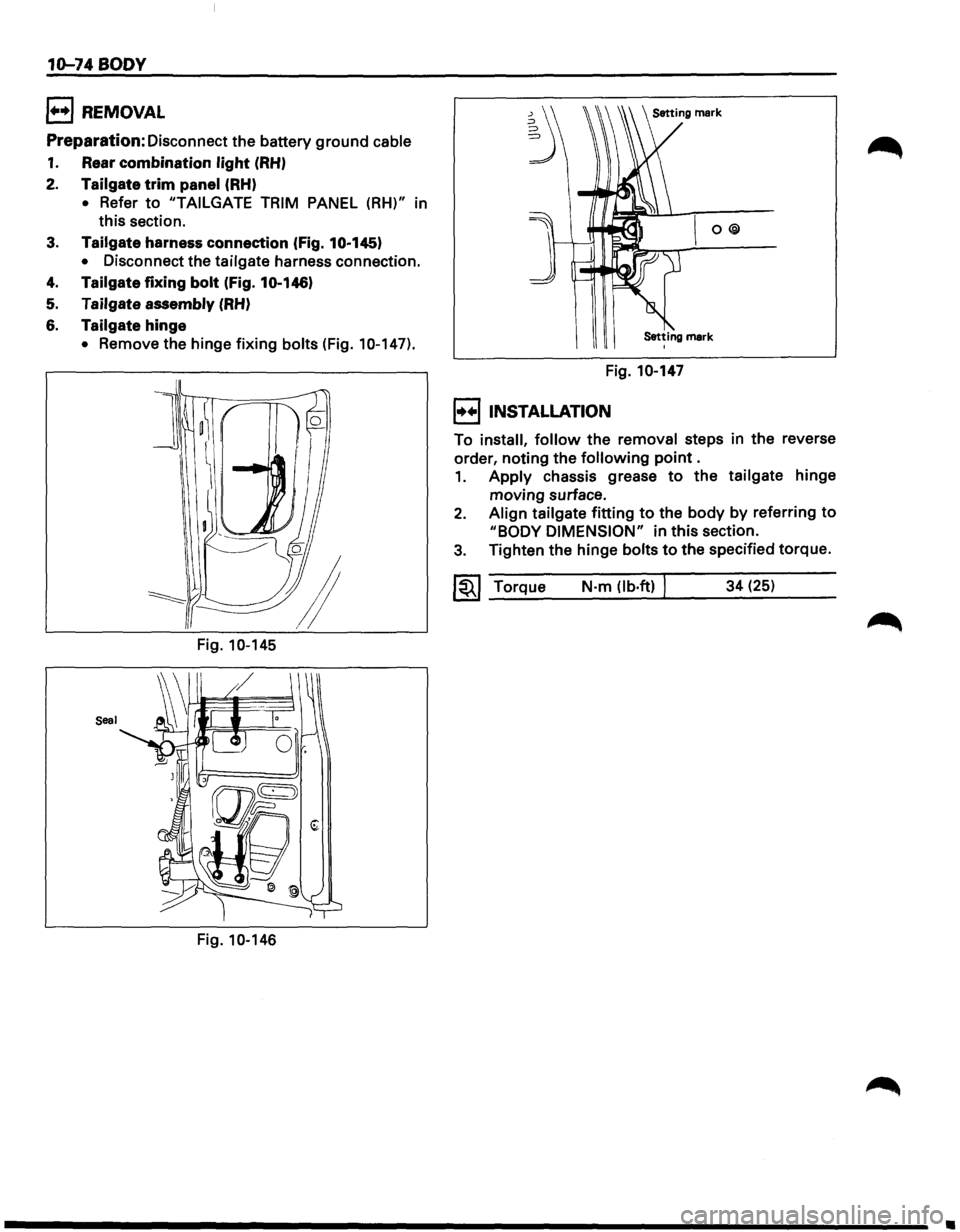
10-74 BODY
1++1 REMOVAL
Preparation: Disconnect the battery ground cable
1. Rear combination light (RH)
2. Tailgate trim panel (RH)
• Refer to "TAILGATE TRIM PANEL (RH)" in
this section.
3. Tailgate harness connection (Fig. 10·145)
• Disconnect the tailgate harness connection.
4. Tailgate fixing bolt (Fig. 10.146)
5. Tailgate assembly (RH)
6. Tailgate hinge
• Remove the hinge fixing bolts (Fig. 10-147).
Fig.
10-145
Seal
Fig. 10-146
~ O@
Setting mark I
Fig. 10-147
I••IINSTALLATION
To install, follow the removal steps in the reverse
order, noting the
following point .
1. Apply chassis grease to the tailgate hinge
moving surface.
2. Align tailgate fitting to the body by referring to
"BODY DIMENSION" in this section.
3. Tighten the hinge bolts to the specified torque.
~~~ Torque N·m (lb·ft) I 34 (25)
•
Page 1834 of 1928
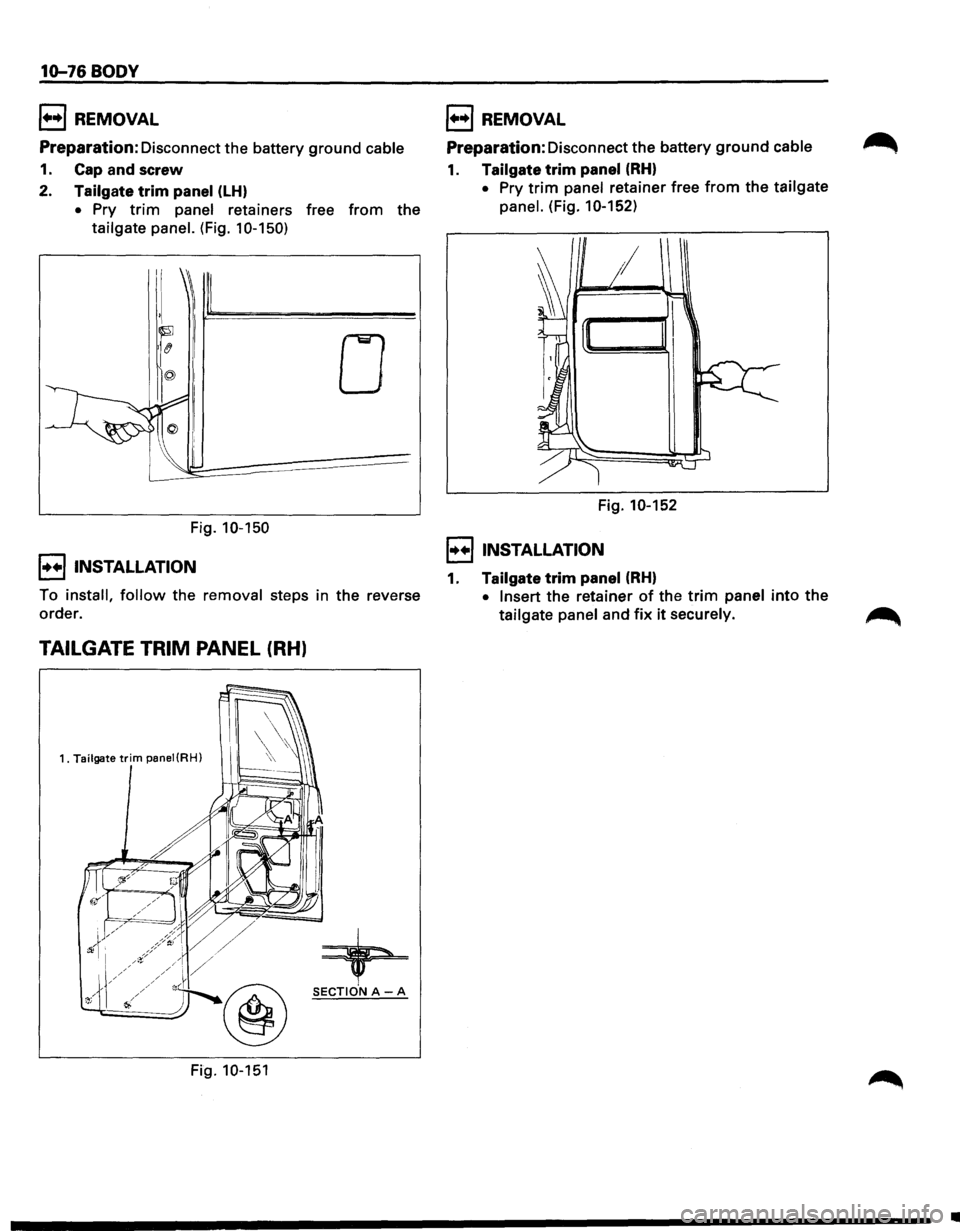
10-76 BODY
1+•1 REMOVAL
Preparation: Disconnect the battery ground cable
1. Cap and screw
2. Tailgate trim panel (LH)
• Pry trim panel retainers free from the
tailgate panel. (Fig. 1 0-150)
Fig. 10-150
!••I INSTALLATION
0
To install, follow the removal steps in the reverse
order.
TAILGATE TRIM PANEL (RH)
1. Tailgate trim panei(RH)
+ @ SECTIONA-A
Fig. 10-151
1++1 REMOVAL
Preparation: Disconnect the battery ground cable
1. Tailgate trim panel (RH)
• Pry trim panel retainer free from the tailgate
panel.
(Fig. 10-152)
Fig. 10-152
!••I INSTALLATION
1. Tailgate trim panel (RH)
• Insert the retainer of the trim panel into the
tailgate panel and fix it securely.
•
Page 1835 of 1928
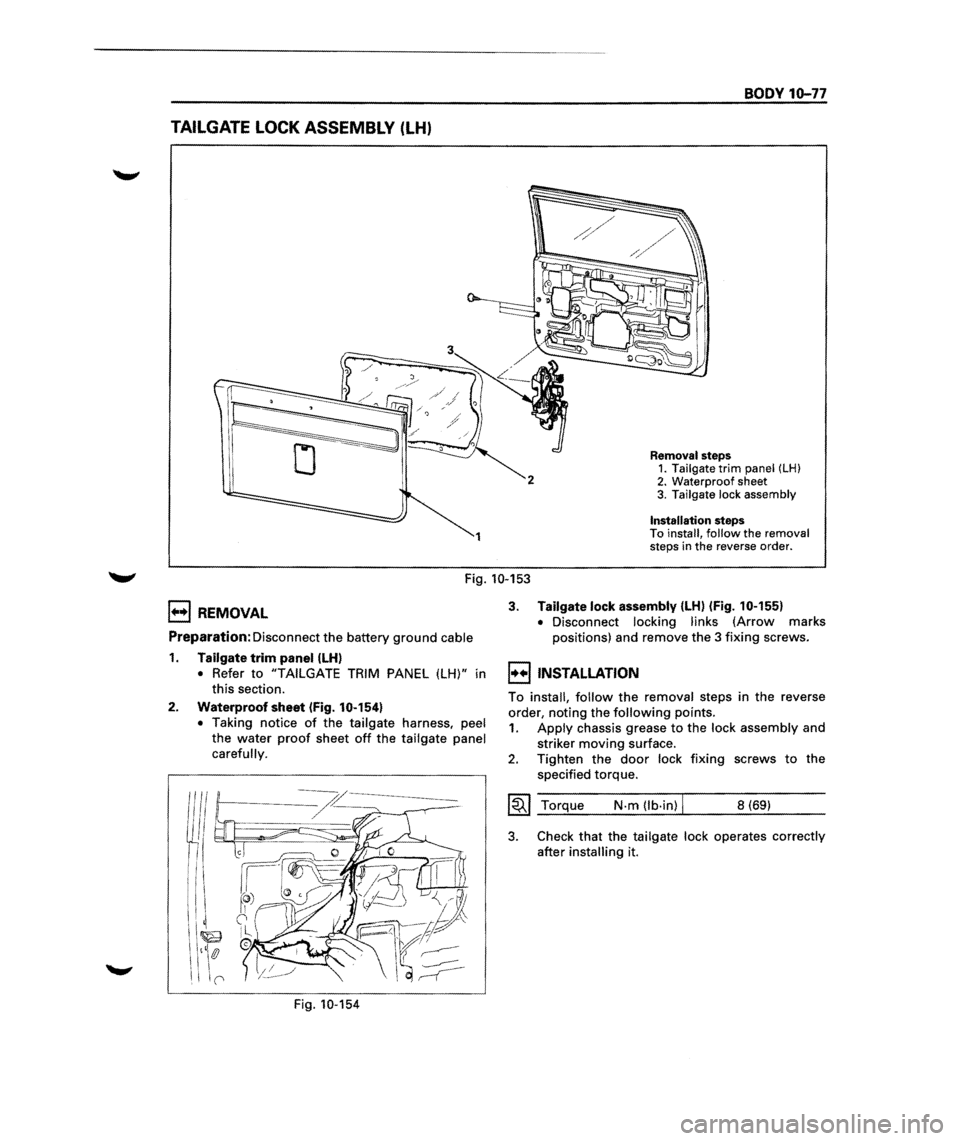
TAILGATE LOCK ASSEMBLY (LH)
1
BODY 10-77
Removal steps 1. Tailgate trim panel (LH) 2. Waterproof sheet
3. Tailgate lock assembly
Installation steps To install, follow the removal
steps in the reverse order.
Fig. 10-153
E) REMOVAL
Preparation: Disconnect the battery ground cable
1. Tailgate trim panel (LH)
• Refer to "TAILGATE TRIM PANEL (LH)" in
this section.
2. Waterproof sheet (Fig. 10-154)
•
Taking notice of the tailgate harness, peel
the water
proof sheet off the tailgate panel
carefully.
Fig. 10-154
3. Tailgate lock assembly {LH) (Fig. 10-155)
•
Disconnect locking links (Arrow marks
positions) and remove the
3 fixing screws.
l••liNSTALLATION
To install, follow the removal steps in the reverse
order, noting the
following points.
1. Apply chassis grease to the lock assembly and
striker
moving surface.
2. Tighten the door lock fixing screws to the
specified torque.
~~~ Torque N·m (lb·in) I 8 (69)
3. Check that the tailgate lock operates correctly
after
installing it.
j
j
j
j
j
j
j
j
j
j
j
j
j
j
j
j
j
j
j
j
j j
j
j
j
j
j
j
j
j
j
j
j
j
j
j
j
j
j
j
j
j
j
j
j j
j
j
j
j
j
j
j
j
j
j
j
j
j
j
j
j
j j
j
j j j
j
j
Page 1836 of 1928
10-78 BODY
To actuator
To inside lock knob I
l
Fig. 10-155
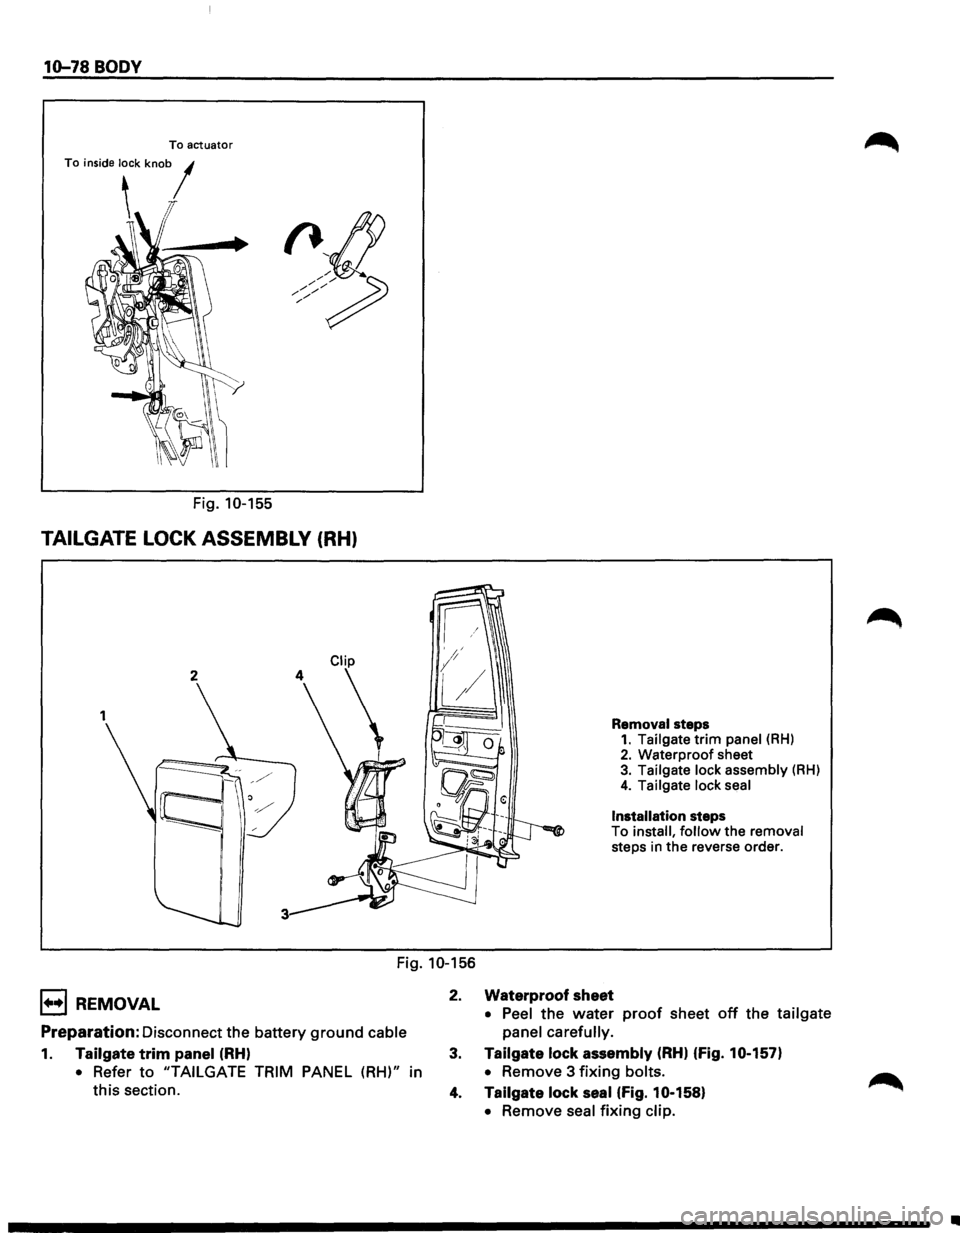
TAILGATE LOCK ASSEMBLY (RH)
2
Removal steps 1. Tailgate trim panel (RH) 2. Waterproof sheet 3. Tailgate lock assembly (RH)
4. Tailgate lock seal
Installation steps
To install, follow the removal
steps in
the reverse order.
Fig. 10-156
1••1 REMOVAL
Preparation: Disconnect the battery ground cable
1. Tailgate trim panel (RH)
• Refer to "TAILGATE TRIM PANEL (RH)" in
this section. 2.
Waterproof sheet
• Peel
the water proof sheet off the tailgate
panel carefully.
3. Tailgate lock assembly (RH) (fig. 10-157)
•
Remove 3 fixing bolts.
4. Tailgate lock seal (fig. 10-158)
•
Remove seal fixing clip.
•