battery ISUZU TROOPER 1995 Workshop Manual
[x] Cancel search | Manufacturer: ISUZU, Model Year: 1995, Model line: TROOPER, Model: ISUZU TROOPER 1995Pages: 1928
Page 1726 of 1928
9J-102 Supplemental Restraint System
DTC62
REDUNDANT SRS INDICATOR CIRCUIT FAIL RE
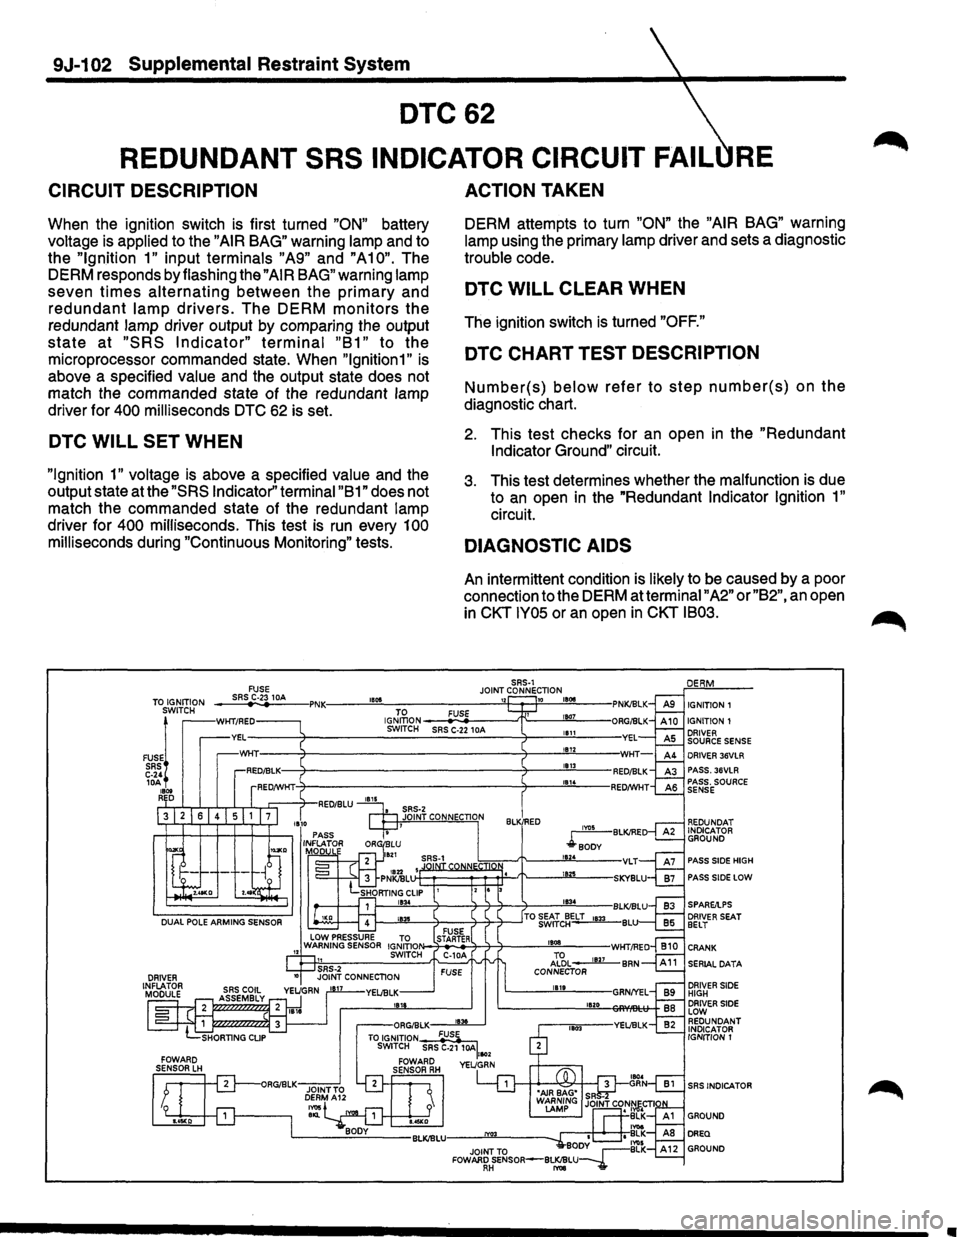
CIRCUIT DESCRIPTION
When the ignition switch is first turned "ON" battery
voltage is applied to the
"AIR BAG" warning lamp and to
the
"Ignition 1" input terminals "A9" and "A10". The
DERM responds by flashing the
"AIR BAG" warning lamp
seven
times alternating between the primary and
redundant lamp drivers. The DERM monitors the
redundant lamp driver output by comparing the output
state at "SRS Indicator" terminal "B1" to the
microprocessor commanded state. When
"lgnition1" is
above a specified value and the output state does not
match the commanded state of the redundant lamp
driver for
400 milliseconds DTC 62 is set.
DTC WILL SET WHEN
"Ignition 1" voltage is above a specified value and the
output state at the
"SRS Indicator'' terminal "B 1" does not
match the commanded state of the redundant lamp
driver for
400 milliseconds. This test is run every 100
milliseconds during "Continuous Monitoring" tests.
FUSE
ACTION TAKEN
DERM attempts to turn "ON" the "AIR BAG" warning
lamp using the primary lamp driver and sets a diagnostic
trouble code.
DTC WILL CLEAR WHEN
The ignition switch is turned "OFF."
DTC CHART TEST DESCRIPTION
Number(s) below refer to step number(s) on the
diagnostic chart.
2. This test checks for an open in the "Redundant
Indicator Ground"
circuit.
3. This test determines whether the malfunction is due
to
an open in the "Redundant Indicator Ignition 1"
circuit.
DIAGNOSTIC AIDS
An intermittent condition is likely to be caused by a poor
connection to the DERM at terminal
"A2" or "B2", an open
in
CKT IY05 or an open in CKT IB03.
SRS-1 JOINT CONNECTION ___ sR~SrC~·23~1_M ___ ,PNK:----~"~~------------~"~~~~18~~~--TO IGNITION SWITCH IGNITION 1
FUSE!
SRS C-24 lOA 1800 RED
WKT/RED IGJ~oN ---
PASS SIDE HIGH
PASS SIDE LOW
DRIVER SEAT BELT
CRANK
SERIAL DATA
DRIVER SIDE HIGH DRIVER SIDE LOW REDUNDANT INDICATOR
IGNITION 1
SRS INDICATOR
Page 1741 of 1928
Supplemental Restraint System 9J-117
SERVICE PRECAUTIONS
CAUTION: WHEN PERFORMING SERVICE ON OR
AROUND SRS COMPONENTS OR SRS WIRING,
FOLLOW
THE PROCEDURES LISTED BELOW TO
TEMPORARILY
DISABLE THE SRS. FAILURE TO
FOLLOW PROCEDURES COULD RESULT IN
POSSIBLE AIR BAG DEPLOYMENT, PERSONAL
INJURY OR OTHERWISE UNNEEDED SRS
REPAIRS.
The DERM in Driver-Passenger SRS can maintain
sufficient voltage to cause a deployment for up to 2
minutes after the ignition switch is turned to
"OFF," the
battery is disconnected, or the fuse powering the DERM
is removed.
Many of the service procedures require removal of the
"AIR BAG" fuse, and disconnection of the inflator
modules from the deployment loop to avoid an accidental
deployment.
If the inflator module is disconnected from
the deployment loop as noted in the "Disabling the
SRS"
procedure that follows, service can begin immediately
without waiting for the 2 minute time period to expire.
DISABLING THE SRS
REMOVAL
• Turn the steering wheel so that the vehicle's wheels
are pointing straight ahead.
• Turn the ignition switch to "OFF"
1. Remove SRS fuse C-21, C-22, C-23 and C-24 from
left dash side lower fuse block.
2. Disconnect yellow
3-way connector at the base of
the steering column.
3. Remove
liP compartment door assembly, Refer to
"Passenger inflator module replacemenf' in section
9J-135.
4. Disconnect yellow 4-way connector behind the liP
compartment door assembly.
NOTE
• With the" AIR BAG" fuse removed and ignition switch
"ON," the "AiR BAG" warning lamp will be "ON." This
is normal operation and does not indicate
an SRS
malfunction.
ENABLING THE SRS
INSTALLATION
Turn ignition switch to "LOCK" and remove key.
1. Connect yellow 4-way connector of passenger
inflator module.
2. Install liP compartment door assembly, Refer to
"Passenger inflator module replacement" in section
9J-3.
3. Connect yellow 3-way connector at the base of the
steering column.
4. Install" AIR BAG" fuse C-21, C-22, C-23 and C-24 to
left dash side lower fuse block.
Tum ignition switch to
"RUN" and verify that the "AIR
BAG"
warning lamp flashes seven times and then turns
"OFF" If it does not operate as described, perform the
"SRS Diagnostic System Check" in section 9J-32.
HANDLING/INSTALLATION/DIAGNOSIS
1. Inflator modules should not be subjected to
temperatures above 65°C(150°F).
2. Discriminating s~nsors, inflator modules, arming
sensors, or DERMs should not be used if they have
been dropped from a height of 1
00 centimeters (3.28
feet) or more.
3. When a discriminating sensor or arming sensor is
replaced, it MUST be oriented with the arrow
on the
sensor pointing toward the front of the vehicle.
It is
very important for the discriminating sensors and
arming sensor to be located flat on the mounting
surface, parallel to the vehicle datum line.
It is
important that the sensor mounting surface is free of
any dirt or other foreign material.
4. Do not apply power to the SRS unless all
components are connected or a diagnostic chart
requests it, as this
will set a diagnostic trouble code.
5. The
"SRS Diagnostic System Check'' must be the
starting point of any SRS diagnostics. The
"SRS
Diagnostic System Check" will verify proper "AIR
BAG" warning lamp operation and will lead you to the
correct chart to diagnose any SRS malfunctions.
Bypassing these procedures may result in extended
diagnostic time, incorrect diagnosis, and incorrect
parts replacements.
INSPECTIONS REQUIRED AFTER ACCI
DENT
CAUTION: CERTAIN SRS COMPONENTS MUST BE
REPLACED AFTER A FRONTAL
CRASH INVOLVING
AIR
BAG DEPLOYMENT.
In all types of accident regardless of "Air Bag"
deployment, visually inspect all the following
components and their points and replace as required:
- Passenger
Inflator Module
- Steering wheel
- SRS coil assembly
- Steering column
- Knee bolster and
Instrument panel mounting
Page 1781 of 1928
BODY 1Q-23
DASH SIDE TRIM PANEL
FRONT END
ASSIST GRIP
2. Dash side trim panel
Fig. 10-1
1++1 REMOVAL
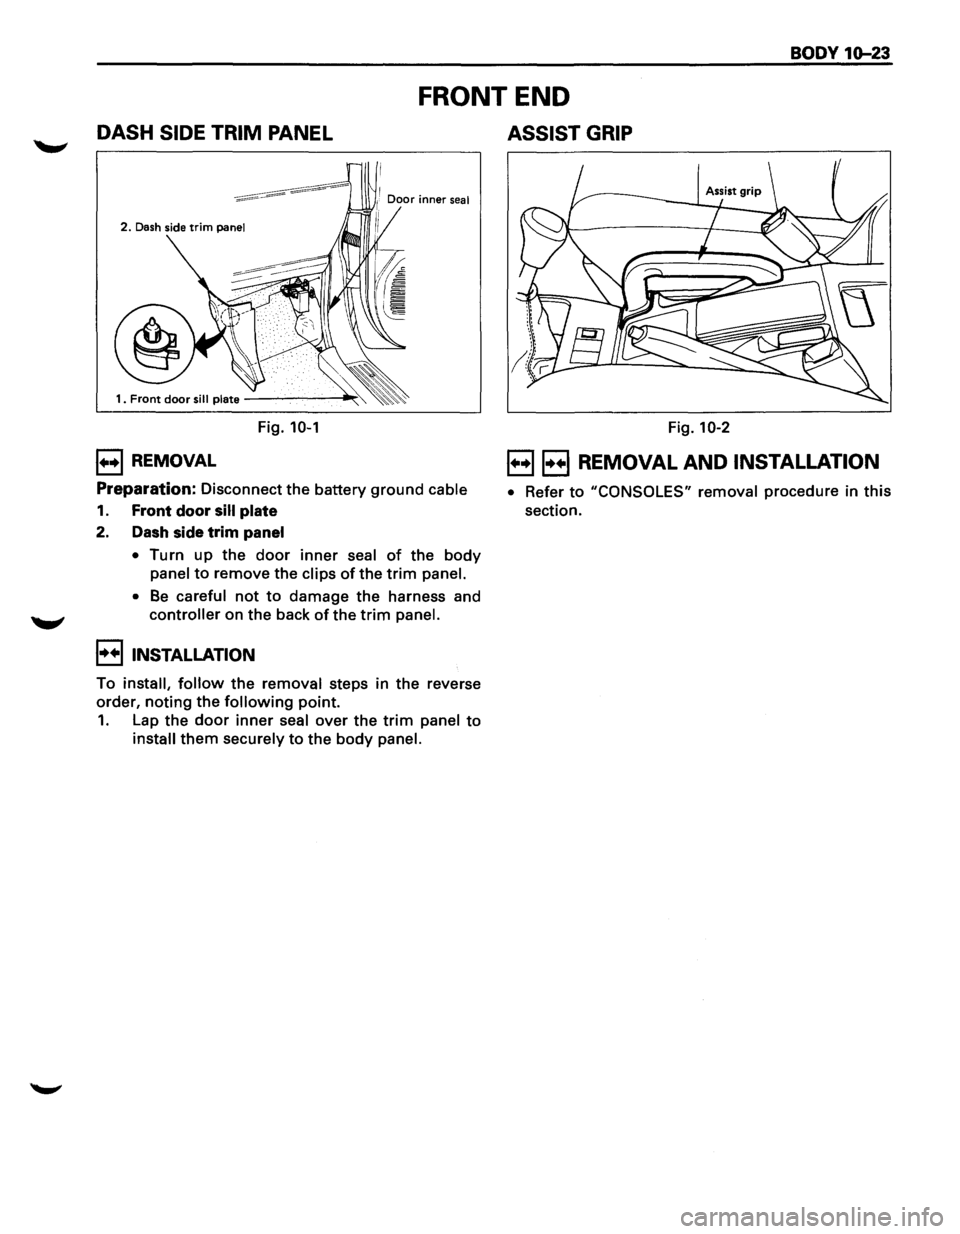
Preparation: Disconnect the battery ground cable
1. Front door sill plate
2. Dash side trim panel
• Turn up the door inner seal of the body
panel to remove the clips of the trim panel.
•
Be careful not to damage the harness and
controller on the back of the trim panel.
I••! INSTALLATION
To install, follow the removal steps in the reverse
order,
noting the following point.
1. Lap the door inner seal over the trim panel to
install them securely to the body panel.
Fig. 10-2
B 8 REMOVAL AND INSTALLATION
• Refer to "CONSOLES" removal procedure in this
section.
Page 1782 of 1928
10-24 BODY
CONSOLES
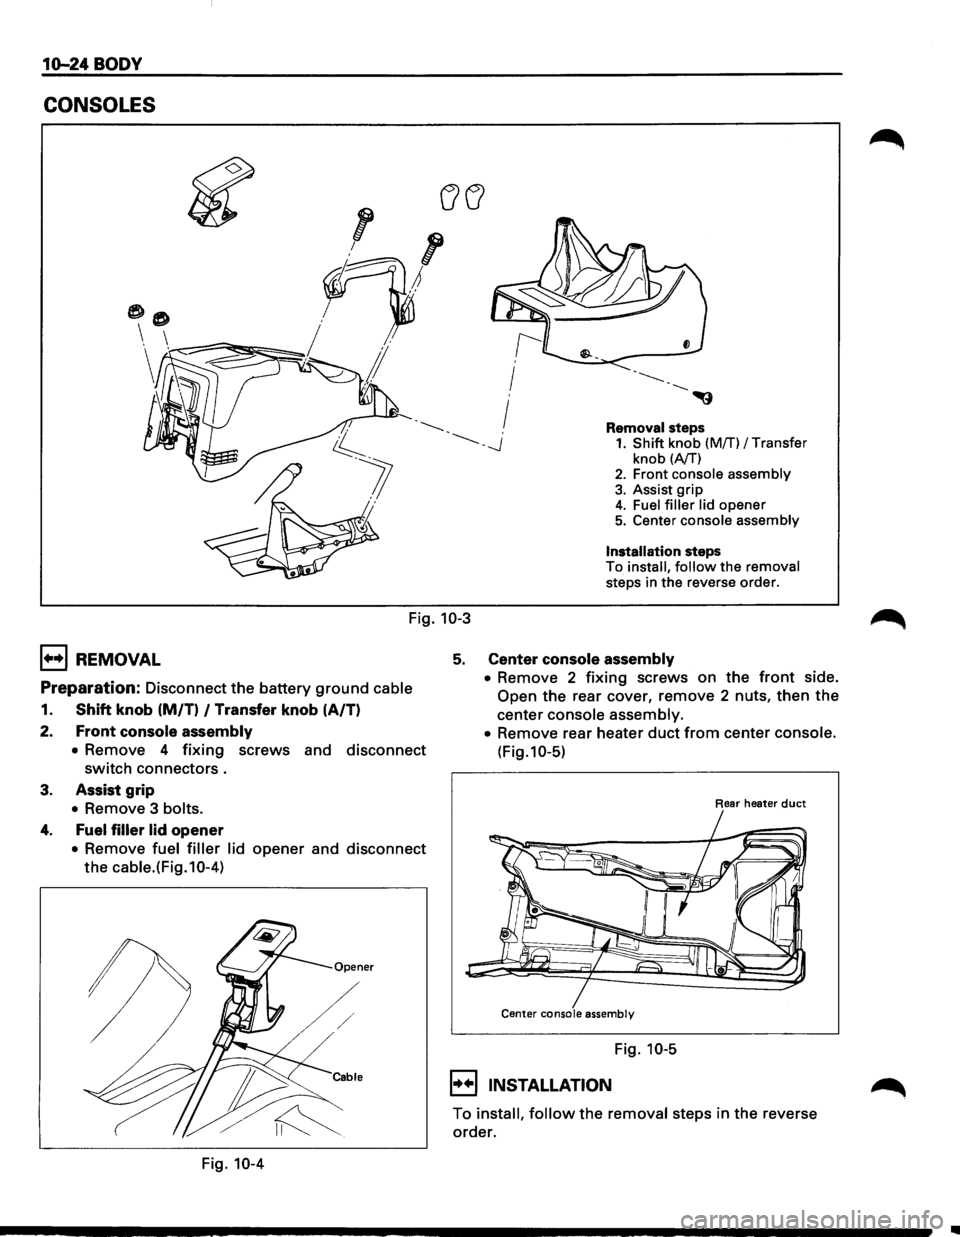
Removal steps 1. Shift knob (Mff) I Transfer
knob (A/T) 2. Front console assembly
3. Assist grip 4. Fuel filler lid opener 5. Center console assembly
Installation steps
To install, follow the removal
steps in the reverse order.
Fig. 10-3
1+•1 REMOVAL
Preparation: Disconnect the battery ground cable
1. Shift knob (M/T) I Transfer knob (A/T)
2.
Front console assembly
• Remove 4 fixing screws and disconnect
switch connectors.
3. Assist grip
• Remove 3 bolts.
4. Fuel filler lid opener
• Remove fuel filler lid opener and disconnect
the cable.(Fig.10-4)
Fig. 10-4
5. Center console assembly
• Remove 2 fixing screws on the front side.
Open the rear cover, remove 2 nuts, then the
center console assembly.
•
Remove rear heater duct from center console.
(Fig.10-5)
Rear heater duct
Center console assembly
Fig. 10-5
I••IINSTALLATION
To install, follow the removal steps in the reverse
order.
Page 1784 of 1928
10-26 BODY
l••l REMOVAL
Caution:
• For precautions on installation or removal of
SRS -air bag system, refer to section 9J
"Supplemental Restraint System (SRS) -AIR
BAG".
Preparation: Disconnect battery ground cable
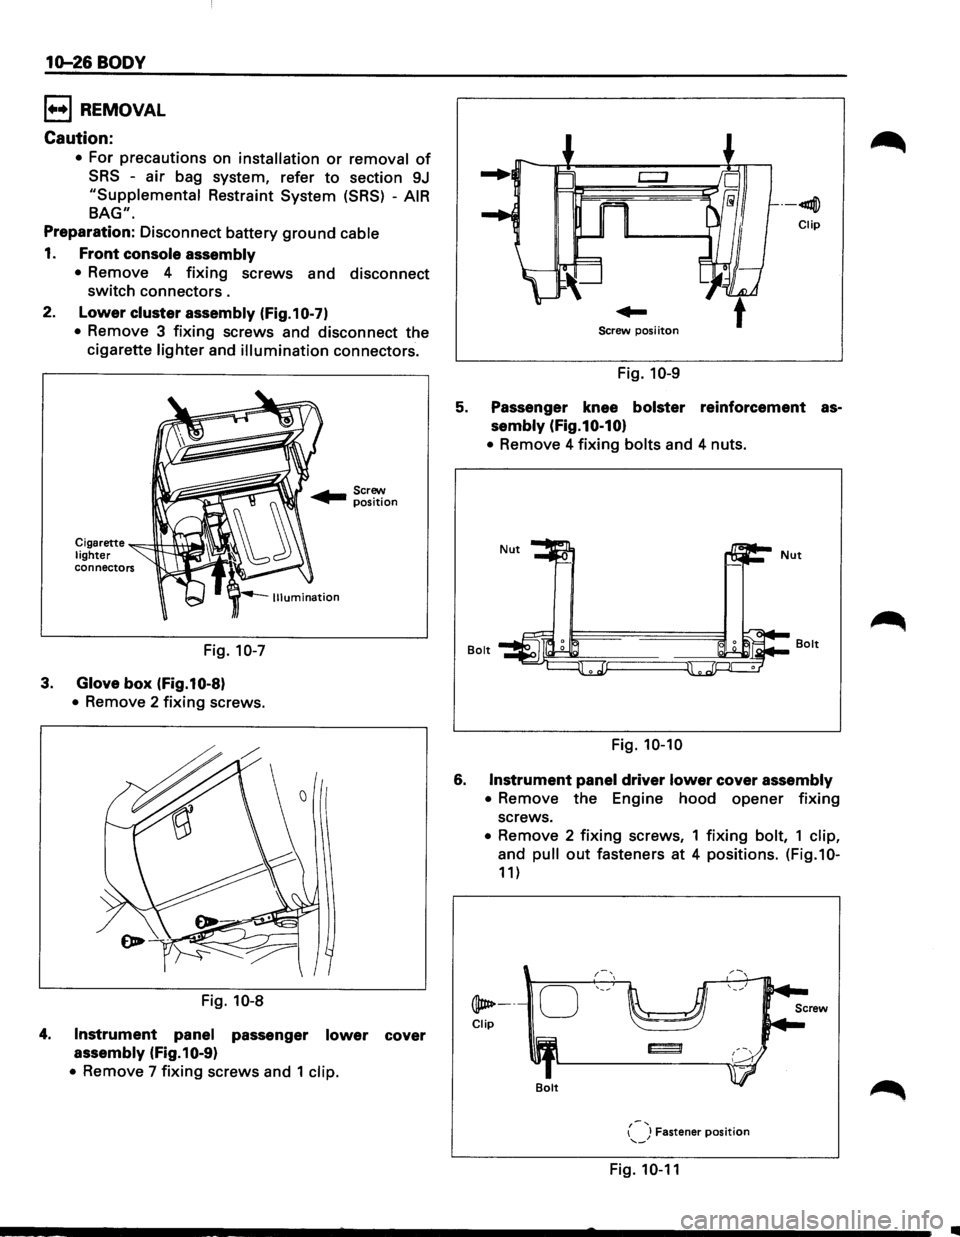
1. Front console assembly
•
Remove 4 fixing screws and disconnect
switch connectors .
2. Lower cluster assembly (Fig.10-7)
• Remove 3 fixing screws and disconnect the
cigarette
lighter and illumination connectors.
Cigarette ~c--!H---1\.+.....,. lighter connectors
Fig. 10-7
3. Glove box (Fig.10-8)
• Remove 2 fixing screws.
Fig.
10-8
4. Instrument panel passenger lower cover
assembly (Fig.10-9)
• Remove 7 fixing screws and 1 clip.
--41llj])
Clip
Screw posi iton
Fig. 10-9
5. Passenger knee bolster reinforcement as
sembly (Fig.10-10)
• Remove 4 fixing bolts and 4 nuts.
Bolt
Fig. 10-10
6. Instrument panel driver lower cover assembly
•
Remove the Engine hood opener fixing
screws.
• Remove 2 fixing screws, 1 fixing bolt, 1 clip,
and pull out fasteners at 4 positions. (Fig.10-
11)
@ate----
Clip
Bolt
{-J Fastener position '--
Fig. 10-11
..
Page 1788 of 1928
10-30 BODY
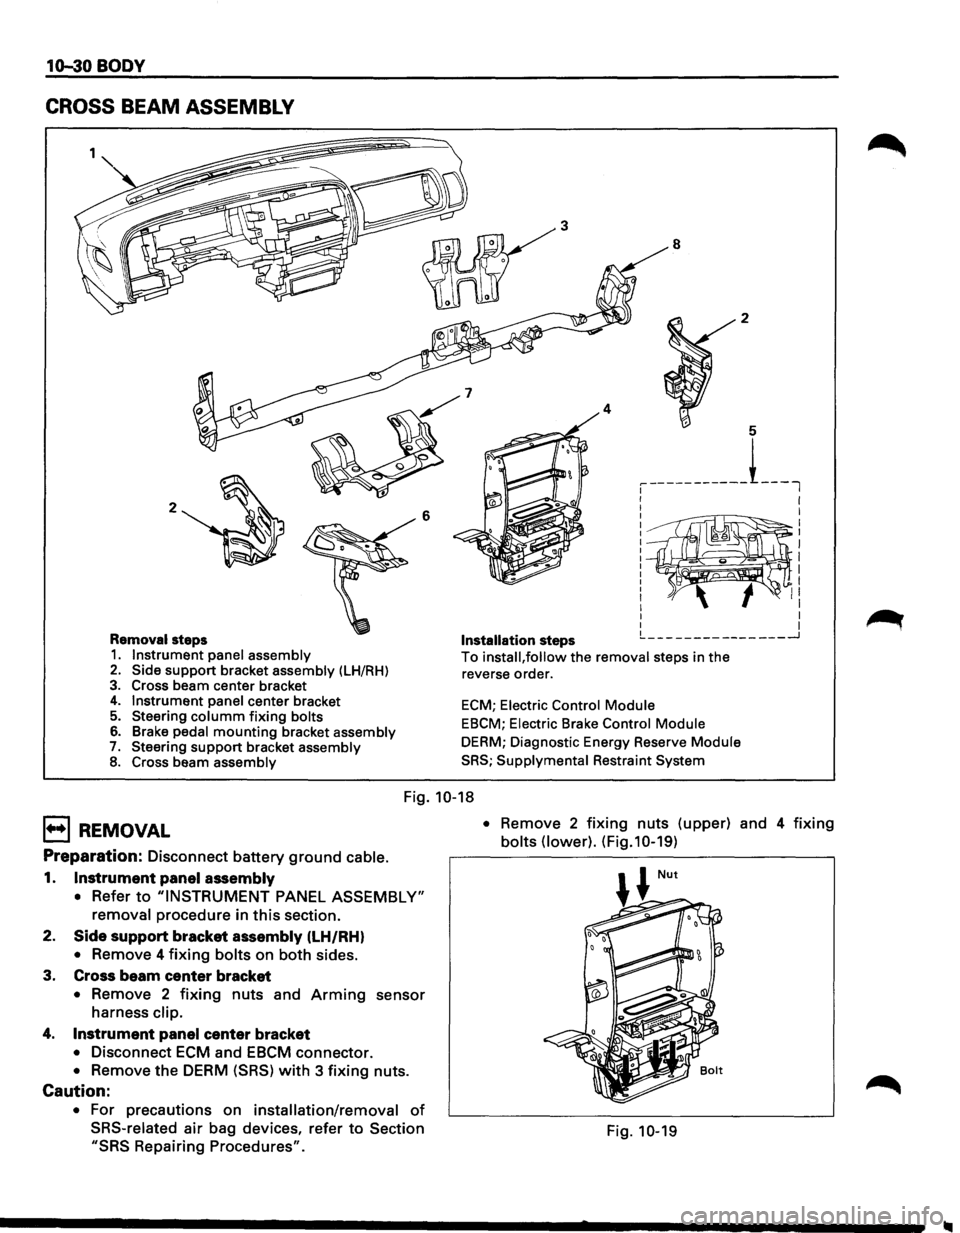
CROSS BEAM ASSEMBLY
2 6
Removal steps 1. Instrument panel assembly 2. Side support bracket assembly (LH/RH)
3. Cross beam center bracket 4. Instrument panel center bracket 5. Steering columm fixing bolts
6. Brake pedal mounting bracket assembly 7. Steering support bracket assembly 8. Cross beam assembly
3
4
Installation steps
8 2
5
, -----------L_l
I I
I
I I
~~~~~®~! II I I I I !._ ___ ---------___ _J
To install, follow the removal steps in the
reverse order.
ECM; Electric Control Module
EBCM; Electric Brake Control Module
DERM; Diagnostic Energy Reserve Module
SRS; Supplymental Restraint System
Fig. 10-18
E) REMOVAL
Preparation: Disconnect battery ground cable.
1. Instrument panel assembly
• Refer to "INSTRUMENT PANEL ASSEMBLY"
removal procedure in this section.
2.
Side support bracket assembly (LH/RH)
• Remove 4 fixing bolts on both sides.
3. Cross beam
center bracket
• Remove 2 fixing nuts and Arming sensor
harness clip.
4. Instrument panel center bracket
• Disconnect ECM and EBCM connector.
• Remove the DERM (SRS) with 3 fixing nuts.
Caution:
• For precautions on installation/removal of
SRS-related air bag devices, refer to Section
"SRS Repairing Procedures". •
Remove
2 fixing nuts (upper) and 4 fixing
bolts (lower). (Fig.10-19)
Fig. 10-19
Page 1790 of 1928
10-32 BODY
DOORS
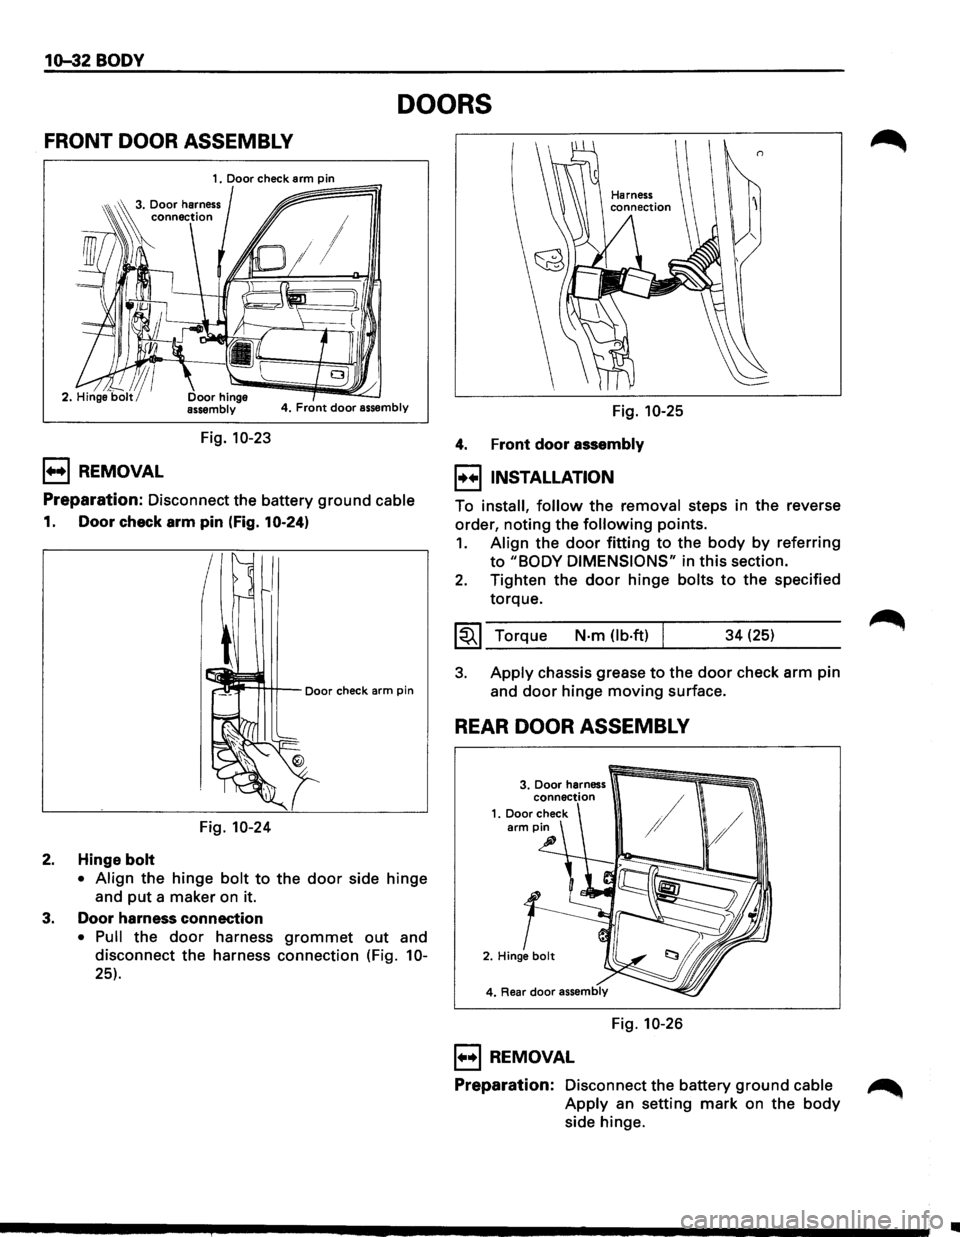
FRONT DOOR ASSEMBLY
4. Front door assembly
Fig. 10-23
1++1 REMOVAL
Preparation: Disconnect the battery ground cable
1. Door check arm pin (Fig. 10-24)
Fig.
10-24
2. Hinge bolt
• Align the hinge bolt to the door side hinge
and
put a maker on it.
3. Door harness connection
• Pull the door harness grommet out and
disconnect the harness connection (Fig.
10-
25). Fig.
10-25
4. Front
door assembly
I++IINSTALLATION
To install, follow the removal steps in the reverse
order,
noting the following points.
1. Align the door fitting to the body by referring
to "BODY DIMENSIONS" in this section.
2. Tighten the door hinge bolts to the specified
torque.
~~~ Torque N·m (lb·ftl I 34 (25)
3. Apply chassis grease to the door check arm pin
and
door hinge moving surface.
REAR DOOR ASSEMBLY
Fig. 10-26
1++1 REMOVAL
Preparation: Disconnect the battery ground cable ~
Apply an setting mark on the body
side hinge.
•
Page 1792 of 1928
1o-34 BODY
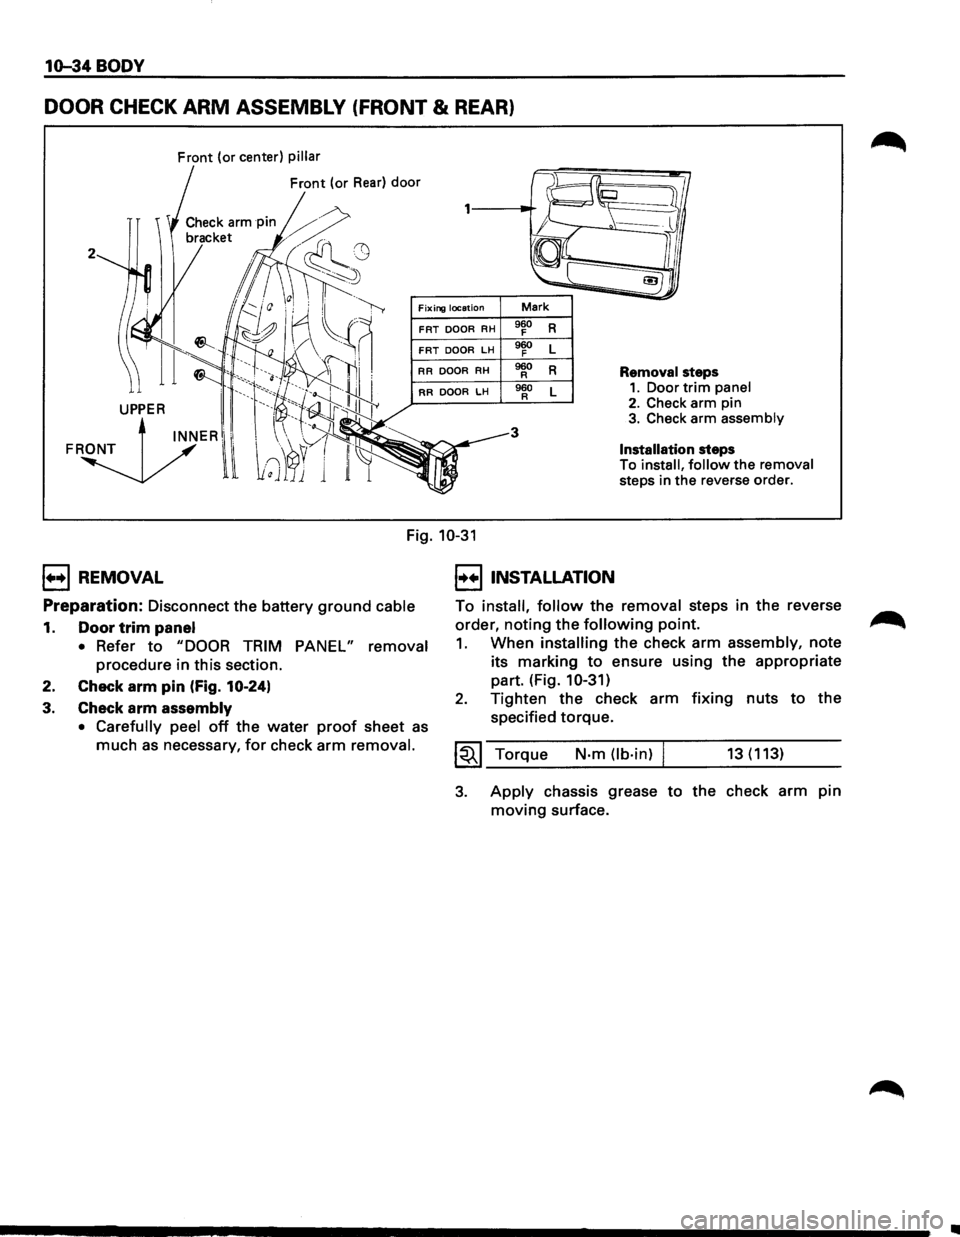
DOOR CHECK ARM ASSEMBLY (FRONT & REAR)
Front (or center) pillar
Front (or Rear) door
2
Fixing location Mark
FRT DOOR RH 960 R F
FRT DOOR LH 960 L F
RR
DOOR RH 960 R R Removal steps
RR DOOR LH 960 L R 1. Door trim panel
3
2. Check arm pin 3. Check arm assembly
Installation steps
To
install, follow the removal
steps in
the reverse order.
Fig. 10-31
1++1 REMOVAL
Preparation:
Disconnect the battery ground cable
1. Door trim panel
• Refer to "DOOR TRIM PANEL" removal
procedure in this section.
2. Check
arm pin (Fig. 10-24)
3. Check arm assembly
• Carefully peel off the water proof sheet as
much as necessary, for check arm removal.
I••IINSTALLATION
To install, follow the removal steps in the reverse
order,
noting the following point.
1. When installing the check arm assembly, note
its marking
to ensure using the appropriate
part. (Fig.
10-31)
2. Tighten the check arm fixing nuts to the
specified torque.
~~~ Torque N-m (lb·in) I 13(113)
3. Apply chassis grease to the check arm pin
moving surface.
..
Page 1793 of 1928
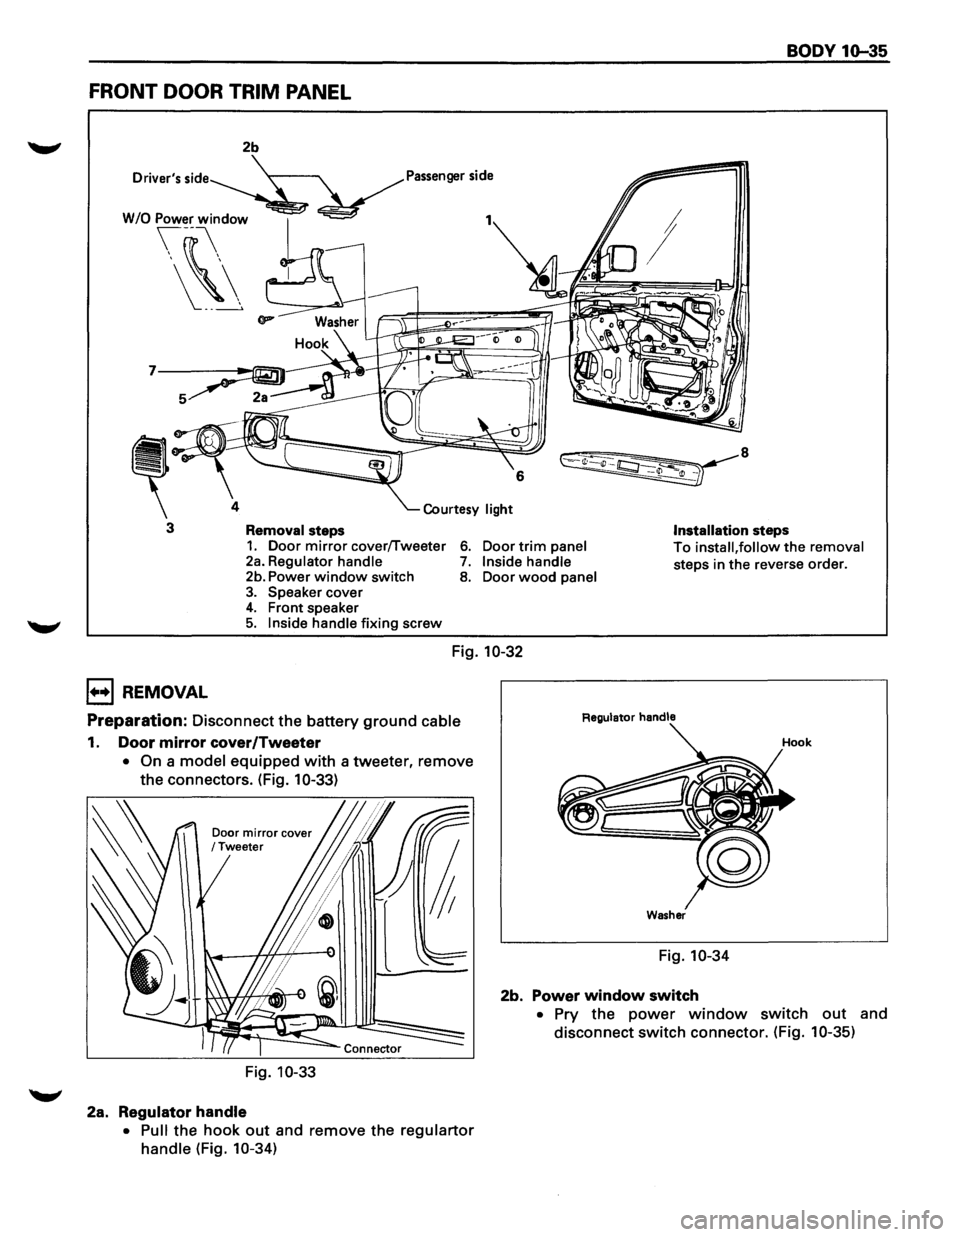
BODY 1Q-35
FRONT DOOR TRIM PANEL
2b
Driver's
side Passenger side
7
4
3 Removal steps Installation steps 1. Door mirror cover/Tweeter 2a. Regulator handle 6. Door trim panel To install, follow the removal
steps in the reverse order. 7. Inside handle 2b. Power window switch 8. Door wood panel 3. Speaker cover 4. Front speaker 5. Inside handle fixing screw
Fig. 10-32
l++l REMOVAL
Preparation: Disconnect the battery ground cable
1. Door mirror cover/Tweeter
• On a model equipped with a tweeter, remove
the connectors. (Fig.
10-33)
Door mirror cover /Tweeter
Fig. 10-33
2a. Regulator handle
• Pull the hook out and remove the regulartor
handle (Fig. 10-34)
Regulator handle
Washer
Fig. 10-34
2b. Power window switch
• Pry the power window switch out and
disconnect
switch connector. (Fig. 10-35)
Page 1796 of 1928
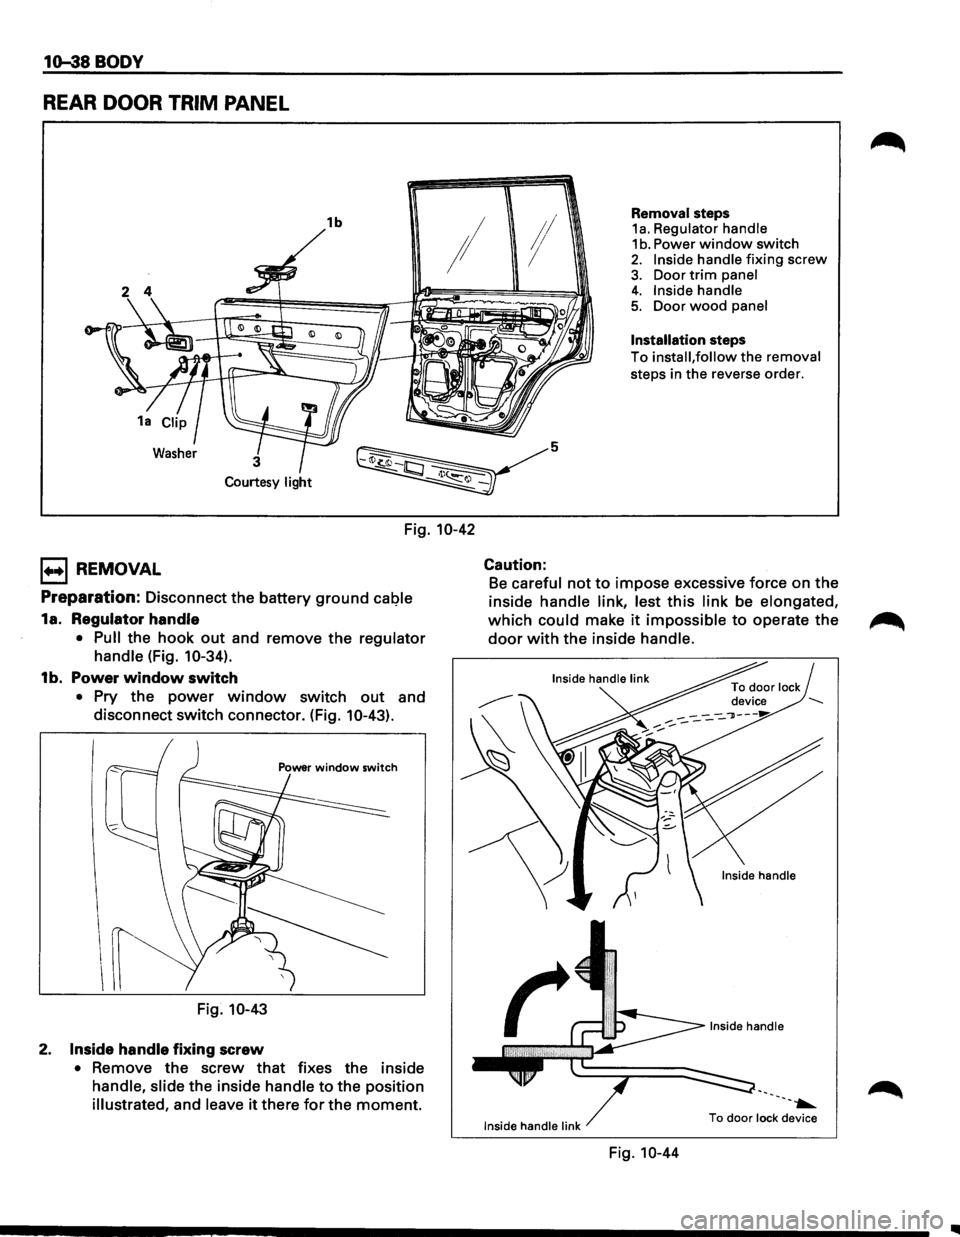
1o-38 BODY
REAR DOOR TRIM PANEL
1b
~
Removal steps 1a. Regulator handle 1 b. Power window switch 2. Inside handle fixing screw
3. Door trim panel
!I
I ;I
Courtesy light
Fig. 10-42
1+•1 REMOVAL
Preparation: Disconnect the battery ground caQie
1a. Regulator handle
• Pull the hook out and remove the regulator
handle
(Fig. 10-34).
1b. Power window switch
• Pry the power window switch out and
disconnect switch connector. (Fig.
10-43).
Fig. 10-43
2. Inside handle fixing screw
• Remove the screw that fixes the inside
handle, slide the inside handle to the position
illustrated, and leave it there for the moment.
5
Caution:
4. Inside handle 5. Door wood panel
Installation steps
To install, follow the removal
steps in the reverse order.
Be careful not to impose excessive force on the
inside
handle link, lest this link be elongated,
which could make it impossible to operate the
door with the inside handle.
Inside handle link
Fig. 10-44
---~
To door lock device