battery ISUZU TROOPER 1995 Workshop Manual
[x] Cancel search | Manufacturer: ISUZU, Model Year: 1995, Model line: TROOPER, Model: ISUZU TROOPER 1995Pages: 1928
Page 1837 of 1928
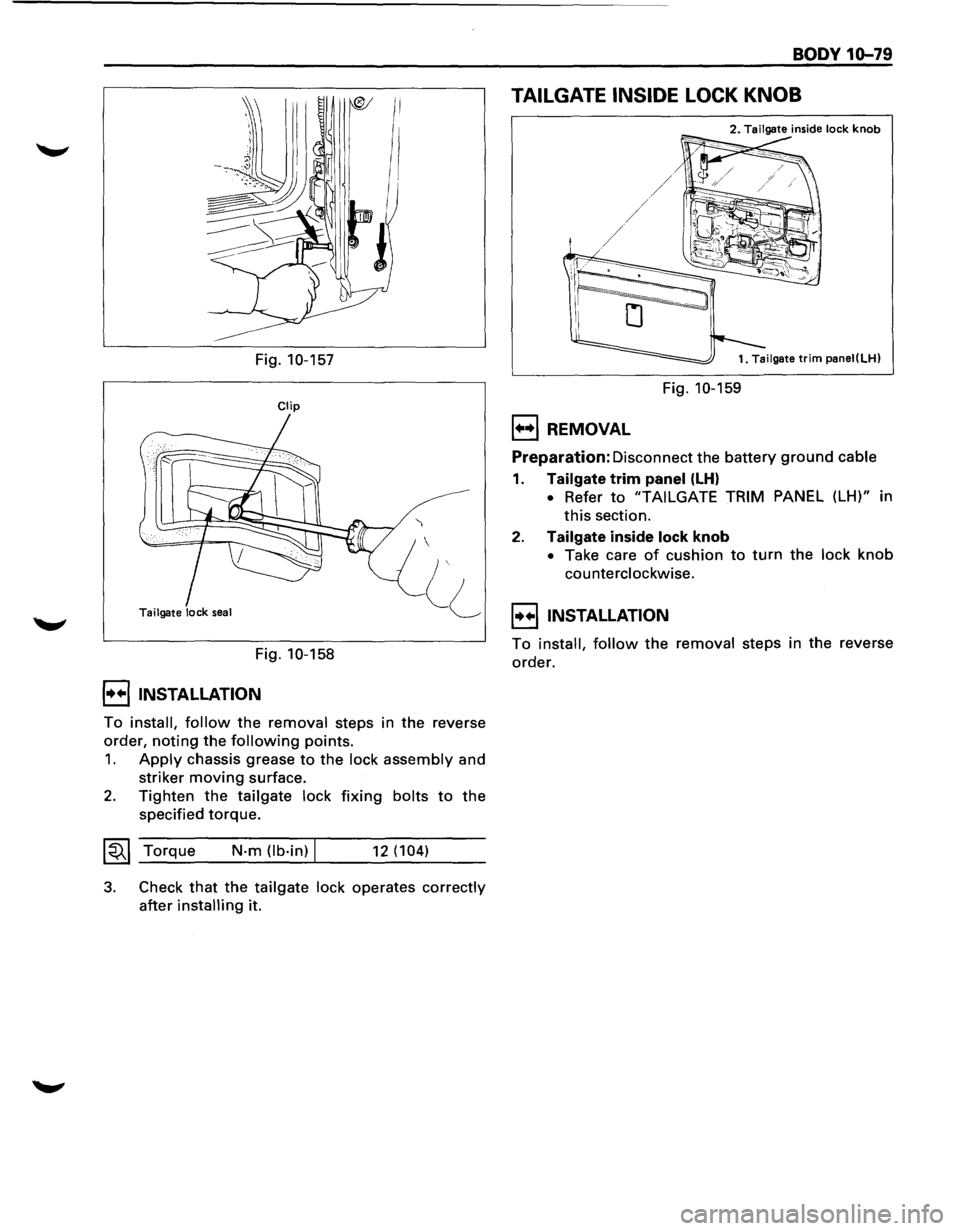
Fig. 10-157
Clip
Tailgate lock seal
Fig. 10-158
I••! INSTALLATION
')
To install, follow the removal steps in the reverse
order,
noting the following points.
1. Apply chassis grease to the lock assembly and
striker
moving surface.
2. Tighten the tailgate lock fixing bolts to the
specified torque.
~~~ Torque N·m (lb·in) I 12 (104)
3. Check that the tailgate lock operates correctly
after installing it.
BODY 10-79
TAILGATE INSIDE LOCK KNOB
2. Tailgate inside lock knob
Fig. 10-159
1•+1 REMOVAL
Preparation: Disconnect the battery ground cable
1. Tailgate trim panel (LH)
• Refer to "TAIL GATE TRIM PANEL (LH)" in
this section.
2. Tailgate inside lock knob
• Take care of cushion to turn the lock knob
counterclockwise.
I••IINSTALLATION
To install, follow the removal steps in the reverse
order.
Page 1838 of 1928
10-80 BODY
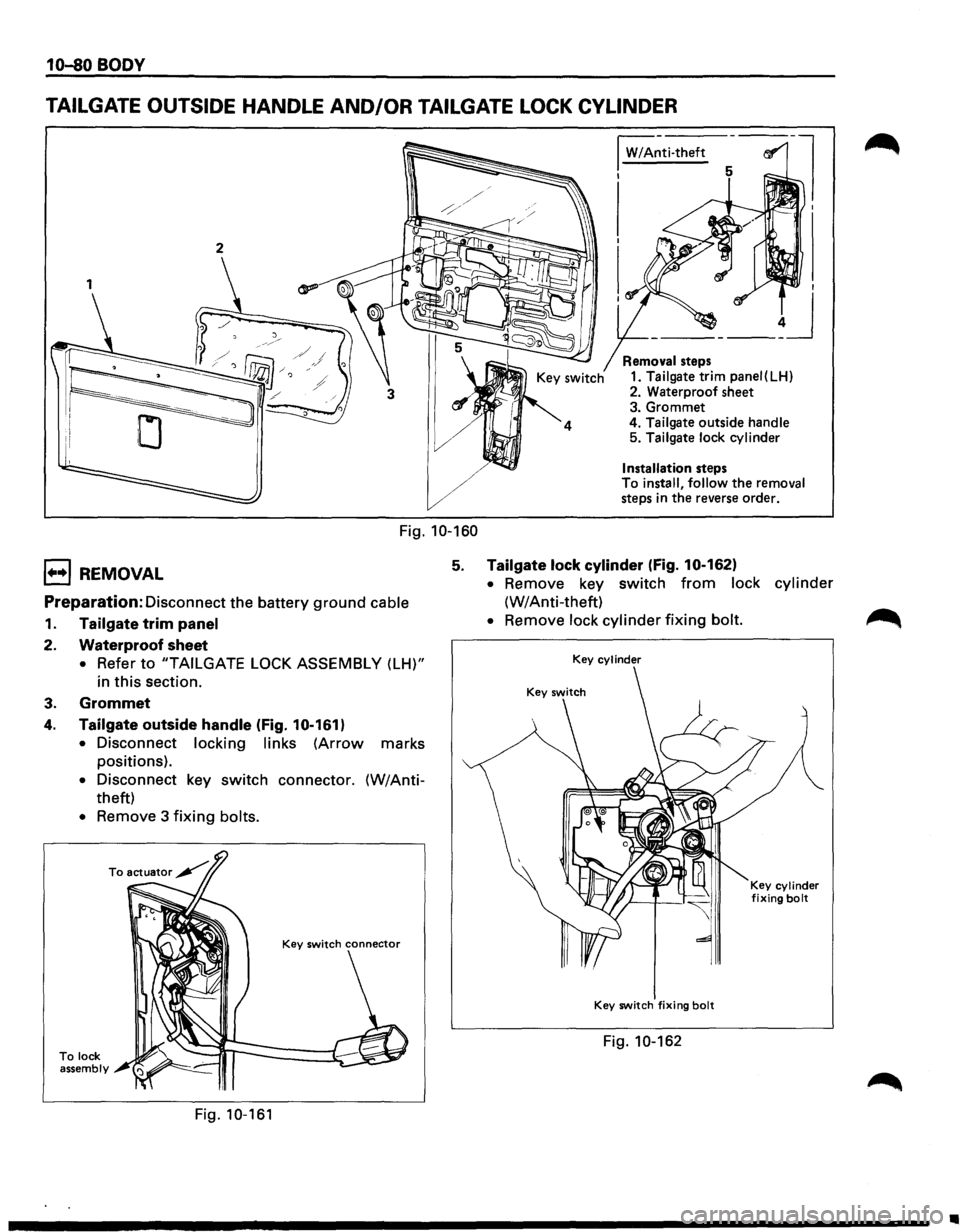
TAILGATE OUTSIDE HANDLE AND/OR TAILGATE LOCK CYLINDER
1
Fig. 10-160
I W/A~ti-theft
I
Removal steps
1. Tailgate trim panei(LH)
2. Waterproof sheet
3. Grommet
4.
Tailgate outside handle 5. Tailgate lock cylinder
Installation steps
To install, follow the removal
steps in the reverse order.
1••1 REMOVAL 5. Tailgate lock cylinder (fig. 10-162)
Preparation: Disconnect the battery ground cable
1. Tailgate trim panel
2. Waterproof sheet
• Refer to "TAILGATE LOCK ASSEMBLY (LH)"
in
this section.
3. Grommet
4. Tailgate outside handle (Fig. 10-161)
•
Disconnect locking links (Arrow marks
positions).
• Disconnect key switch connector. (W/Anti
theft)
• Remove 3 fixing bolts.
To lock assembly
Fig. 10-161
• Remove key switch from lock cylinder
(W/Anti-theft)
• Remove lock cylinder fixing bolt.
Key cylinder
Key switch fixing bolt
Fig. 10-162
Key cylinder fixing bolt
..
Page 1840 of 1928
10-82 BODY
TAILGATE DOVE-TAIL STRIKER
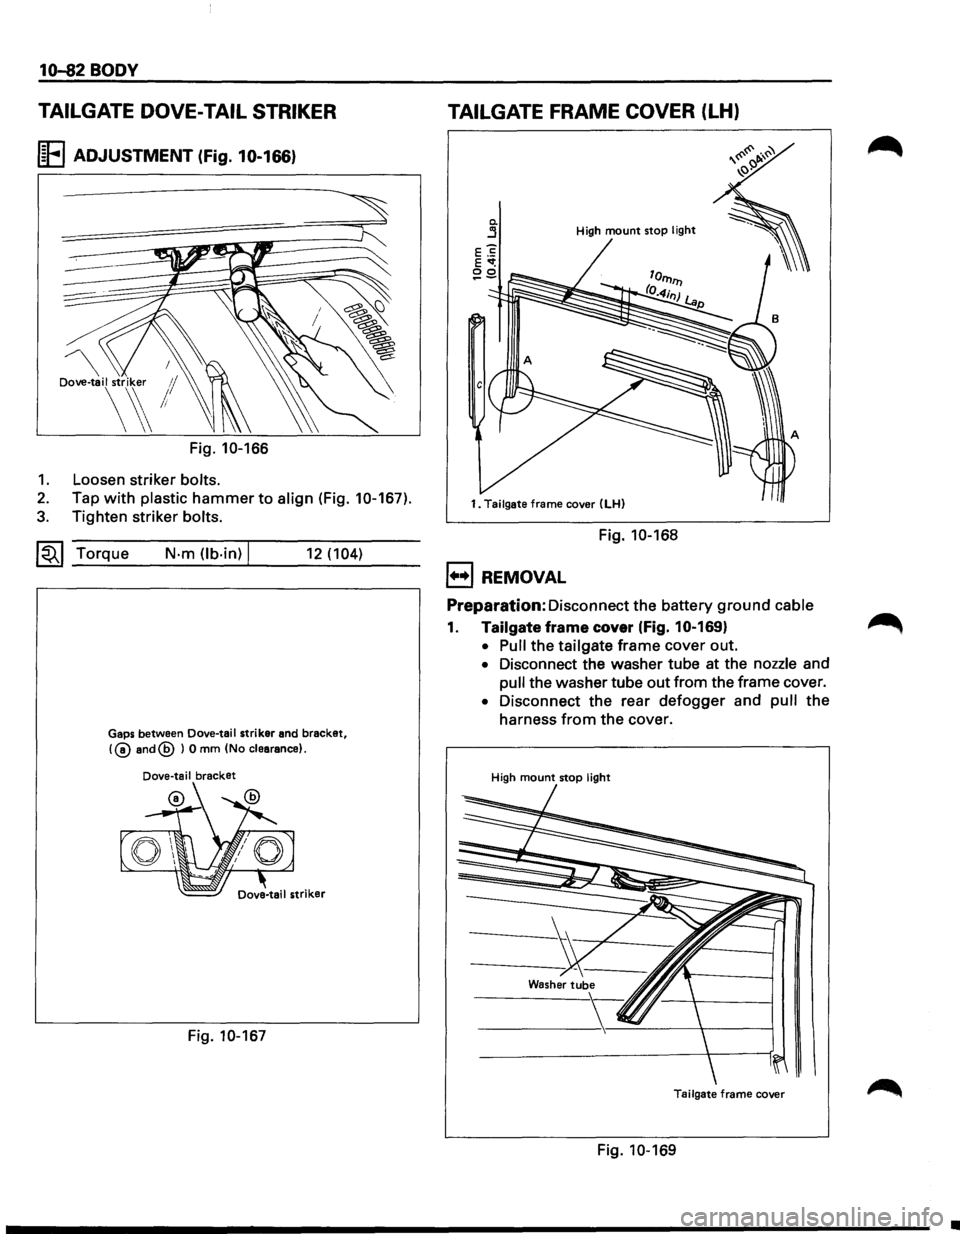
I~FI ADJUSTMENT (Fig. 10-166)
Dove-tail striker 1/
\~!
Fig. 10-166
1. Loosen striker bolts.
2. Tap with plastic hammer to align (Fig. 10-167).
3. Tighten striker bolts.
~~~ Torque N·m (lb.in) I 12 (104)
Gaps between Dove-tail striker and bracket,
!@and@ ) 0 mm (No clearance).
Dove-tail bracket
Fig. 10-167
TAILGATE FRAME COVER (LH)
0. j High mount stop light
1. Tailgate frame cover (LH)
Fig. 10-168
1+•1 REMOVAL
Preparation:
Disconnect the battery ground cable
1. Tailgate frame cover (Fig. 10-169}
• Pull the tailgate frame cover out.
• Disconnect the washer tube at the nozzle and
pull the washer tube out from the frame cover.
• Disconnect the rear defogger and pull the
harness
from the cover.
High mount stop light
Tailgate frame cover
Fig. 10-169
•
Page 1842 of 1928
1o-84 BODY
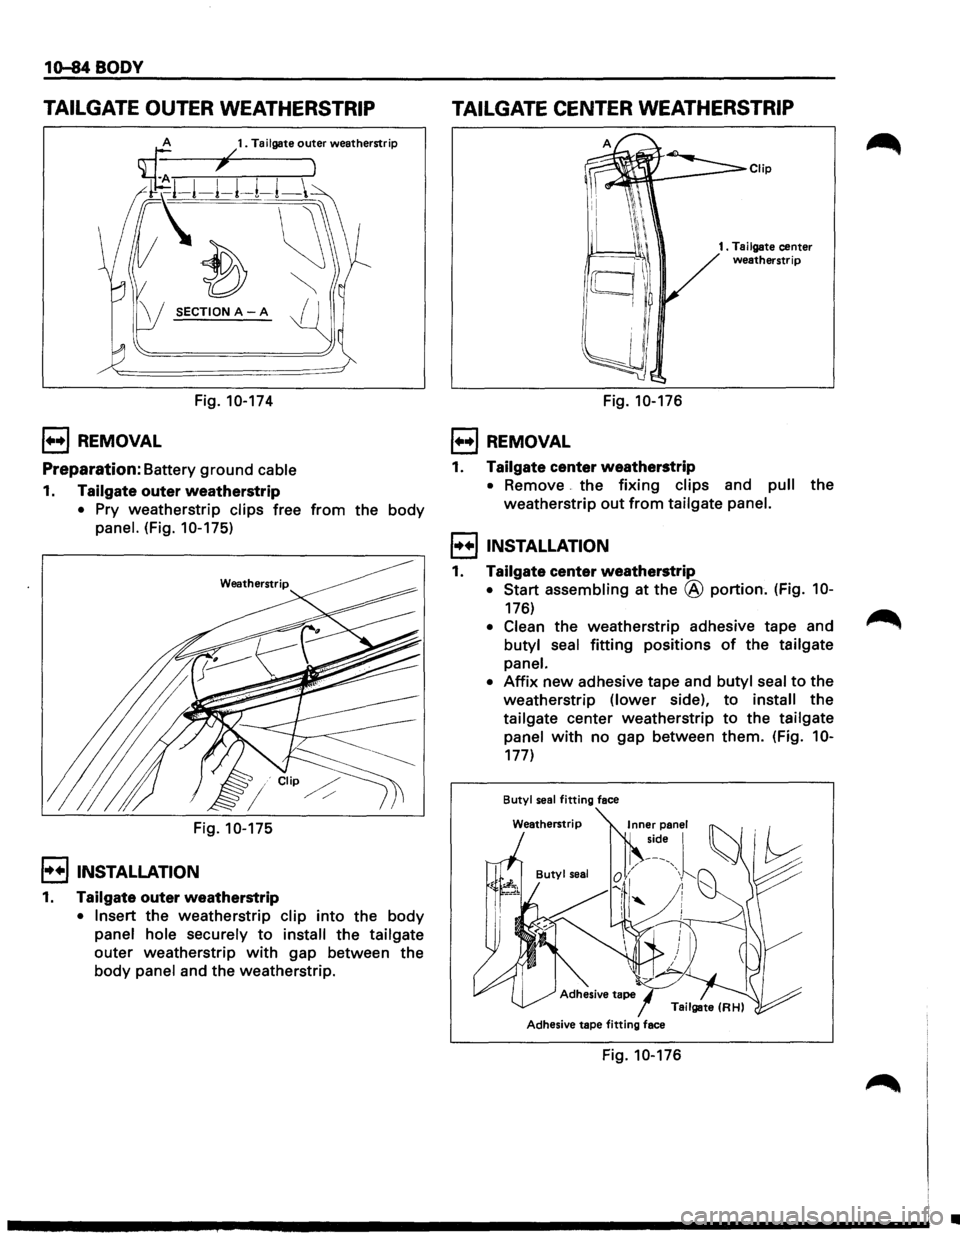
TAILGATE OUTER WEATHERSTRIP
SECTION A-A
Fig. 10-174
l••l REMOVAL
Preparation: Battery ground cable
1. Tailgate outer weatherstrip
• Pry weatherstrip clips free from the body
panel. (Fig. 10-175)
Fig. 10-175
l••IINSTALLATION
1. Tailgate outer weatherstrip
• Insert the weatherstrip clip into the body
panel hole securely to install the tailgate
outer weatherstrip with gap between the
body panel and the weatherstrip.
TAILGATE CENTER WEATHERSTRIP
Fig. 10-176
1••1 REMOVAL
1. Tailgate center weatherstrip
1 . Tailgate center weatherstrip
• Remove the fixing clips and pull the
weatherstrip
out from tailgate panel.
l•+IINSTALLATION
1. Tailgate center weatherstrip
• Start assembling at the @ portion. (Fig. 10-
176)
• Clean the weatherstrip adhesive tape and
butyl seal
fitting positions of the tailgate
panel.
•
Affix new adhesive tape and butyl seal to the
weatherstrip
(lower side), to install the
tailgate center weatherstrip
to the tailgate
panel
with no gap between them. (Fig. 10-
177)
Butyl seal fitting face
Adhesive
tape/ Tailgate (RH)
Adhesive
tape fitting face
Fig. 10-176
•
Page 1845 of 1928
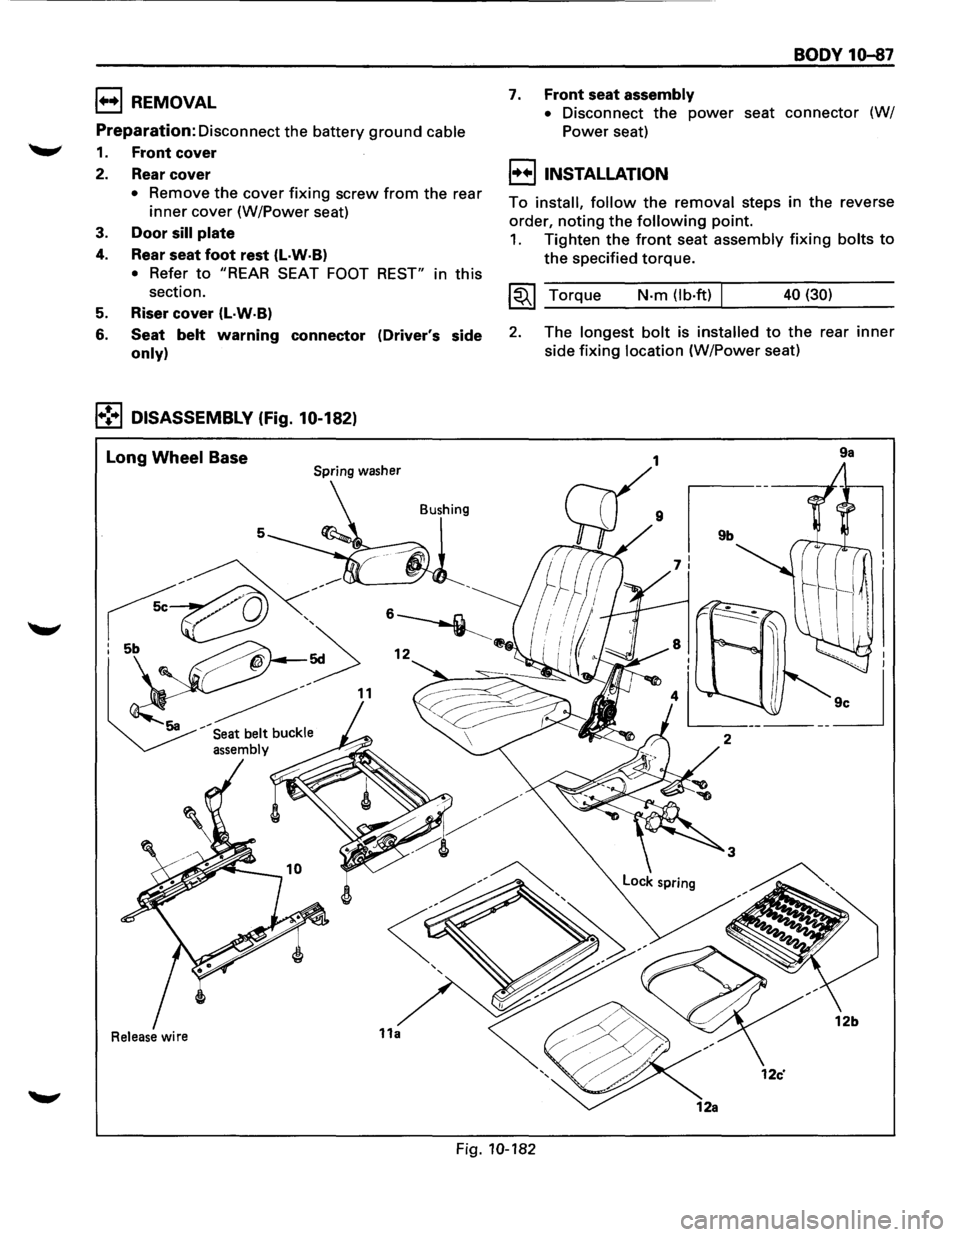
1++1 REMOVAL
Preparation:
Disconnect the battery ground cable
1. Front cover
2. Rear cover
• Remove the cover fixing screw from the rear
inner cover (W/Power seat)
3. Door sill plate
4. Rear seat foot rest (l·W·B)
• Refer to "REAR SEAT FOOT REST" in this
section.
5. Riser cover (L·W·B)
6. Seat belt warning connector (Driver's side
only)
1•!•1 DISASSEMBLY (Fig. 10-182)
Long Wheel Base Spring washer
Bushing
5
Release wire
BODY 10-87
7. Front seat assembly
•
Disconnect the power seat connector (W/
Power seat)
I++IINSTALLATION
To install, follow the removal steps in the reverse
order,
noting the following point.
1. Tighten the front seat assembly fixing bolts to
the specified torque.
~~~ Torque N-m (lb·ft) 40 (30)
2. The longest bolt is installed to the rear inner
side fixing location (W/Power seat)
9a
Fig. 10-182
Page 1861 of 1928
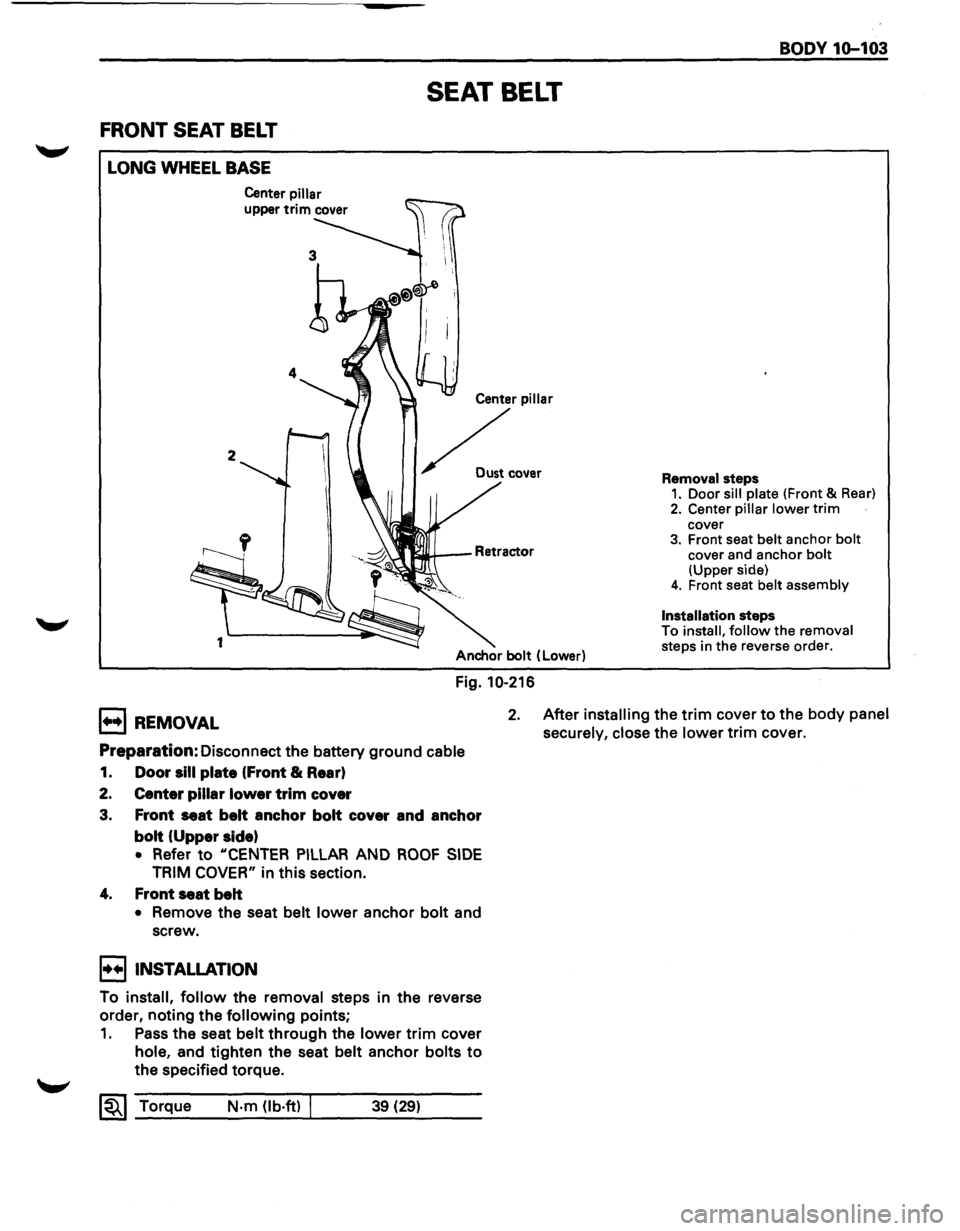
FRONT SEAT BELT
LONG WHEEL BASE
2
1
Center pillar
upper trim cover
SEAT BELT
Center pillar
~ .....
Anchor bolt (Lower)
Fig. 10-216
BODY 1Q-103
Removal steps 1. Door sill plate (Front & Rear)
2. Center pillar lower trim cover 3. Front seat belt anchor bolt cover and anchor bolt (Upper side) 4. Front seat belt assembly
Installation
steps
To install, follow the removal
steps in the reverse order.
B REMOVAL 2. After installing the trim cover to the body panel
securely, close
the lower trim cover.
Preparation: Disconnect the battery ground cable
1. Door sill plate (Front & Rear)
2. Center pillar lower trim cover
3. Front seat belt anchor bolt cover and anchor
bolt (Upper side)
• Refer to "CENTER PILLAR AND ROOF SIDE
TRIM COVER" in this section.
4. Front seat belt
• Remove the seat belt lower anchor bolt and
screw.
I••IINSTALLATION
To install, follow the removal steps in the reverse
order, noting the
following points;
1. Pass the seat belt through the lower trim cover
hole, and tighten the seat belt anchor bolts to
the specified torque.
~~~ Torque N·m (lb·ft) I 39 (29)
Page 1862 of 1928
----
10-104 BODY
SHORT
WHEEL BASE
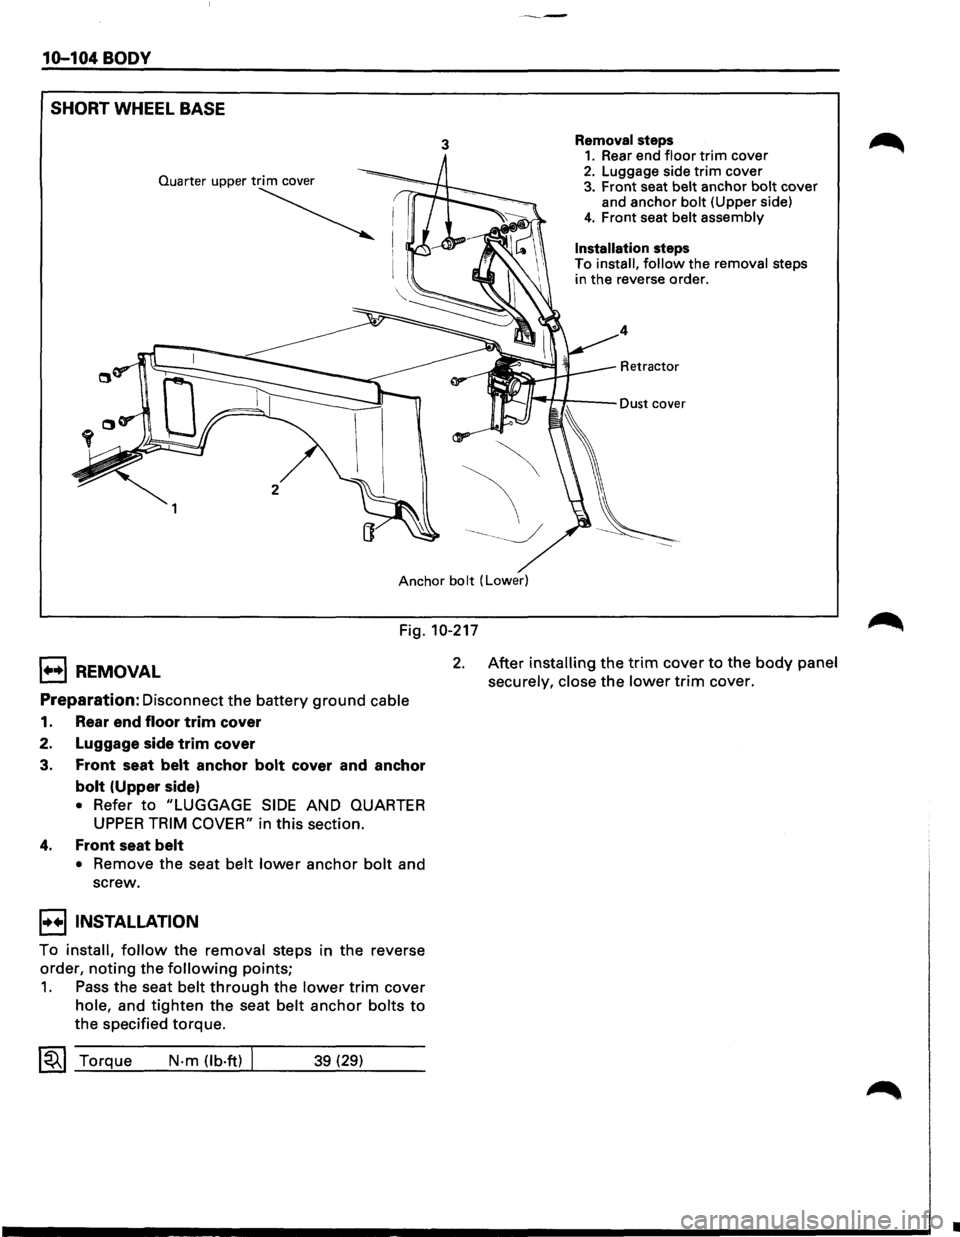
3 Removal steps 1. Rear end floor trim cover 2. Luggage side trim cover 3. Front seat belt anchor bolt cover
and anchor bolt (Upper side)
4. Front seat belt assembly
Installation steps
To install, follow the removal steps
in the reverse order.
4
Retractor
Anchor bolt (Lower)
Fig. 10-217
1++1 REMOVAL
Preparation: Disconnect the battery ground cable
1. Rear end floor trim cover
2. Luggage side
trim cover
3.
Front seat belt anchor bolt cover and anchor
bolt (Upper side)
• Refer to "LUGGAGE SIDE AND QUARTER
UPPER TRIM COVER" in this section.
4. Front seat belt
• Remove the seat belt lower anchor bolt and
screw.
I••IINSTALLATION
To install, follow the removal steps in the reverse
order,
noting the following points;
1. Pass the seat belt through the lower trim cover
hole, and tighten the seat belt anchor bolts to
the specified torque.
~~~ Torque N-m (lb·ft) 39 (29)
2. After installing the trim cover to the body panel
securely, close
the lower trim cover.
•
Page 1863 of 1928
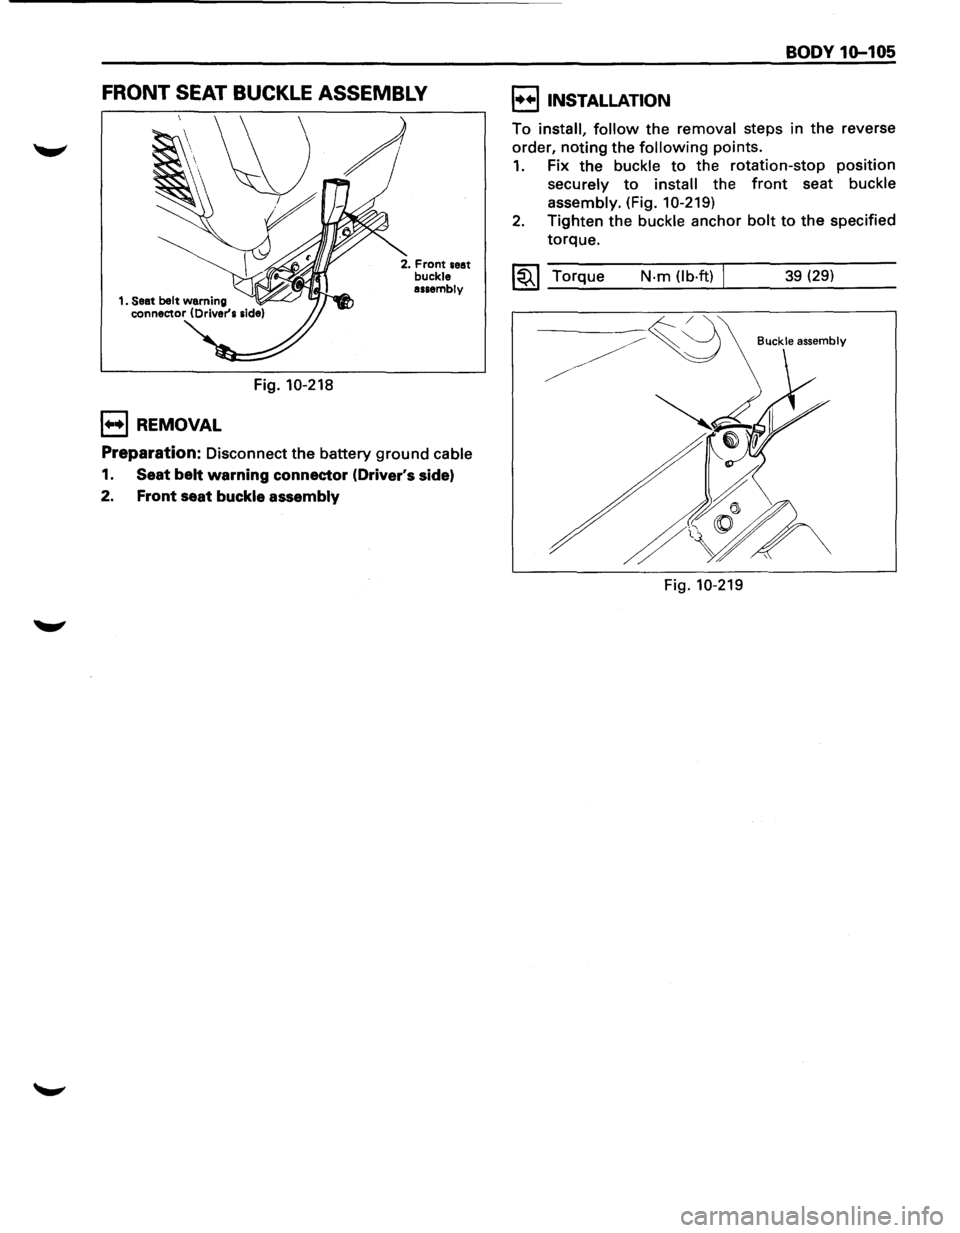
FRONT SEAT BUCKLE ASSEMBLY
Fig. 10-218
1++1 REMOVAL
2. Front seat buckle assembly
Preparation: Disconnect the battery ground cable
1. Seat belt warning connector (Driver's side)
2. Front seat buckle assembly
BODY 1Q-105
I••IINSTALLATION
To install, follow the removal steps in the reverse
order, noting the following points.
1. Fix the buckle to the rotation-stop position
securely to install the front seat buckle
assembly.
(Fig. 10-219)
2. Tighten the buckle anchor bolt to the specified
torque.
~~~ Torque N·m (lb·ft) I 39 (29)
Buckle assembly
Fig. 10-219
Page 1864 of 1928
10-106 BODY
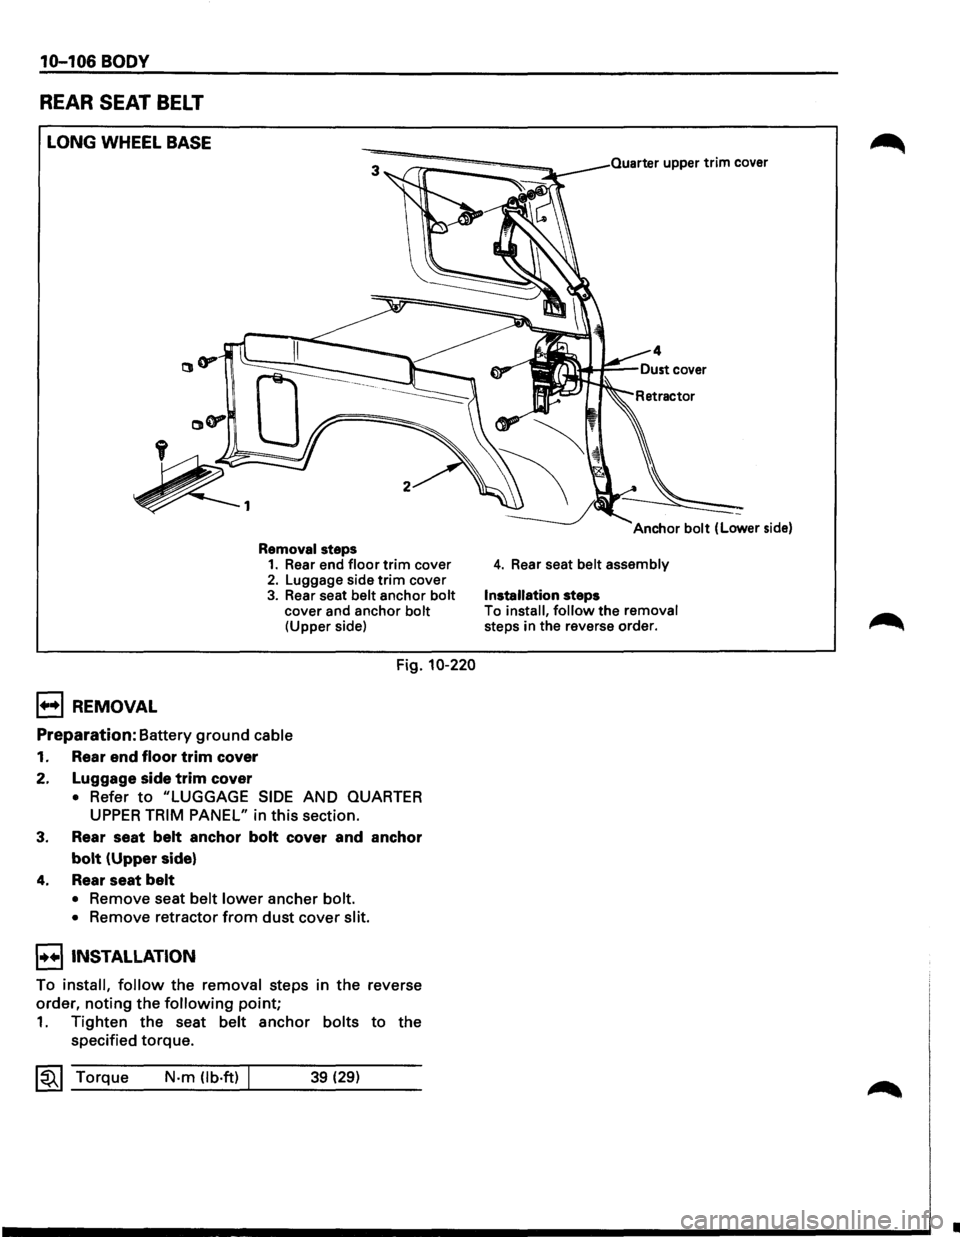
REAR SEAT BELT
LONG WHEEL BASE
B REMOVAL
Removal steps 1. Rear end floor trim cover 2. Luggage side trim cover
3. Rear seat belt anchor bolt cover and anchor bolt (Upper side)
Fig. 10-220
Preparation: Battery ground cable
1. Rear end floor trim cover
2. Luggage side
trim cover
• Refer to "LUGGAGE SIDE AND QUARTER
UPPER TRIM PANEL" in this section.
3. Rear seat belt anchor bolt cover and anchor
bolt (Upper side)
4. Rear seat belt
• Remove seat belt lower ancher bolt.
•
Remove retractor from dust cover slit.
I••IINSTALLATION
To install, follow the removal steps in the reverse
order,
noting the following point;
1. Tighten the seat belt anchor bolts to the
specified torque.
~~~ Torque N·m (lb.ft) 39 (29)
Quarter upper trim cover
4. Rear seat belt assembly
Installation steps
To install, follow the removal steps in the reverse order.
•
Page 1865 of 1928
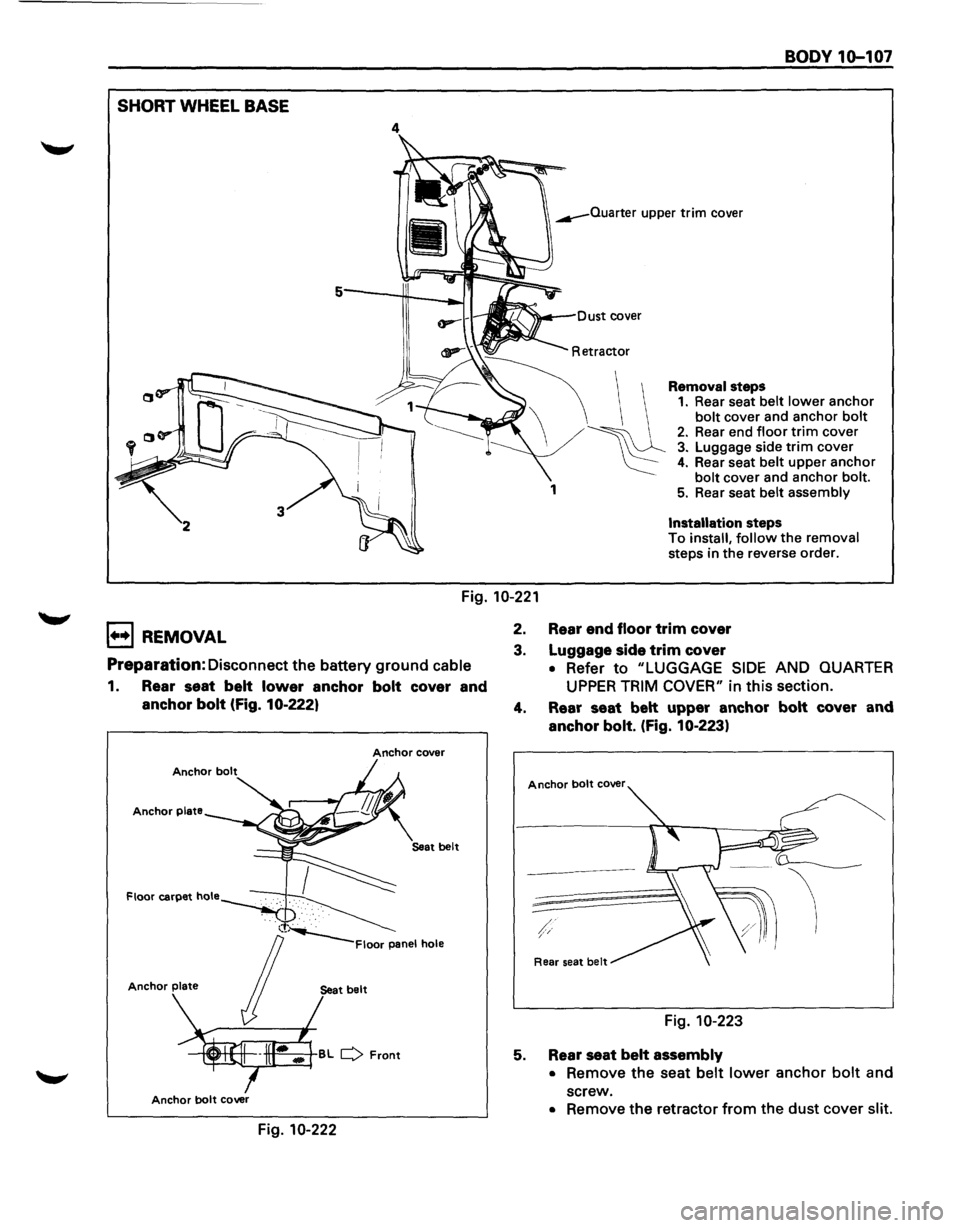
SHORT WHEEL BASE
4
1
BODY 1o-101
Installation steps
To install, follow the removal
steps in the reverse order.
Fig. 10-221
1+•1 REMOVAL
Preparation: Disconnect the battery ground cable
1. Rear seat belt lower anchor bolt cover and
anchor bolt (Fig. 10-222)
Anchor cover
Anchor plate
Anchor plate
Anchor bolt cover
Fig. 10-222
2. Rear end floor trim cover
3. Luggage side trim cover
• Refer to "LUGGAGE SIDE AND QUARTER
UPPER TRIM COVER" in this section.
4. Rear seat belt upper anchor bolt cover and
anchor bolt. (fig. 10-223)
5.
A ear seat be It
Fig. 10-223
Rear seat belt assembly
•
Remove the seat belt lower anchor bolt and
screw.
• Remove the retractor from the dust cover slit.