wheel torque ISUZU TROOPER 1995 Service Manual
[x] Cancel search | Manufacturer: ISUZU, Model Year: 1995, Model line: TROOPER, Model: ISUZU TROOPER 1995Pages: 1928
Page 354 of 1928
5A2-4 DISC BRAKES
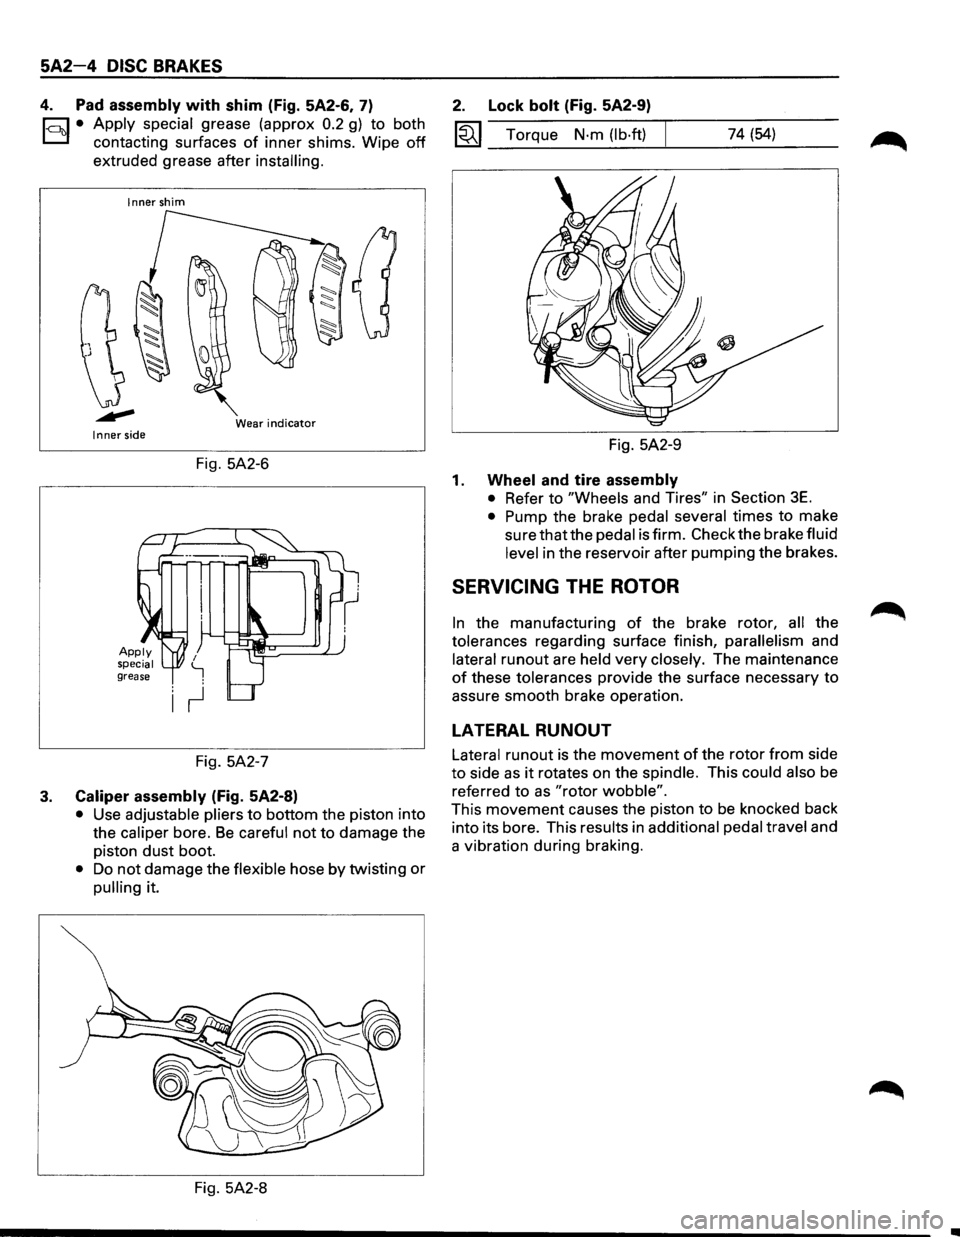
4. Pad assembly with shim (Fig. 5A2-6, 7)
1-c::~t:.l• Apply ~pecial grease (approx 0.2 g) to both
contactmg surfaces
of inner shims. Wipe off
extruded grease after installing.
Inner shim
Wear
indicator Inner side
Fig. 5A2-6
Fig. 5A2-7
3. Caliper assembly (Fig. 5A2-8)
• Use adjustable pliers to bottom the piston into
the
caliper bore. Be careful not to damage the
piston
dust boot.
• Do not damage the flexible hose by twisting or
pulling it.
Fig. 5A2-8
2. Lock bolt (Fig. 5A2-9)
1«1 Torque N·m (lb·ft) 74 (54)
Fig. 5A2-9
1. Wheel and tire assembly
• Refer to "Wheels and Tires" in Section 3E.
• Pump the brake pedal several times to make
sure that the pedal is firm. Check the brake fluid
level in the reservoir after pumping the brakes.
SERVICING THE ROTOR
In the manufacturing of the brake rotor, all the
tolerances regarding surface finish,
parallelism and
lateral
runout are held very closely. The maintenance
of these tolerances provide the surface necessary to
assure smooth brake operation.
LATERAL RUNOUT
Lateral runout is the movement of the rotor from side
to side as it rotates on the spindle. This could also be
referred
to as "rotor wobble".
This movement causes the piston to be knocked back
into its bore. This results in
additional pedal travel and
a vibration during braking.
Page 364 of 1928
5A2-16 DISC BRAKES
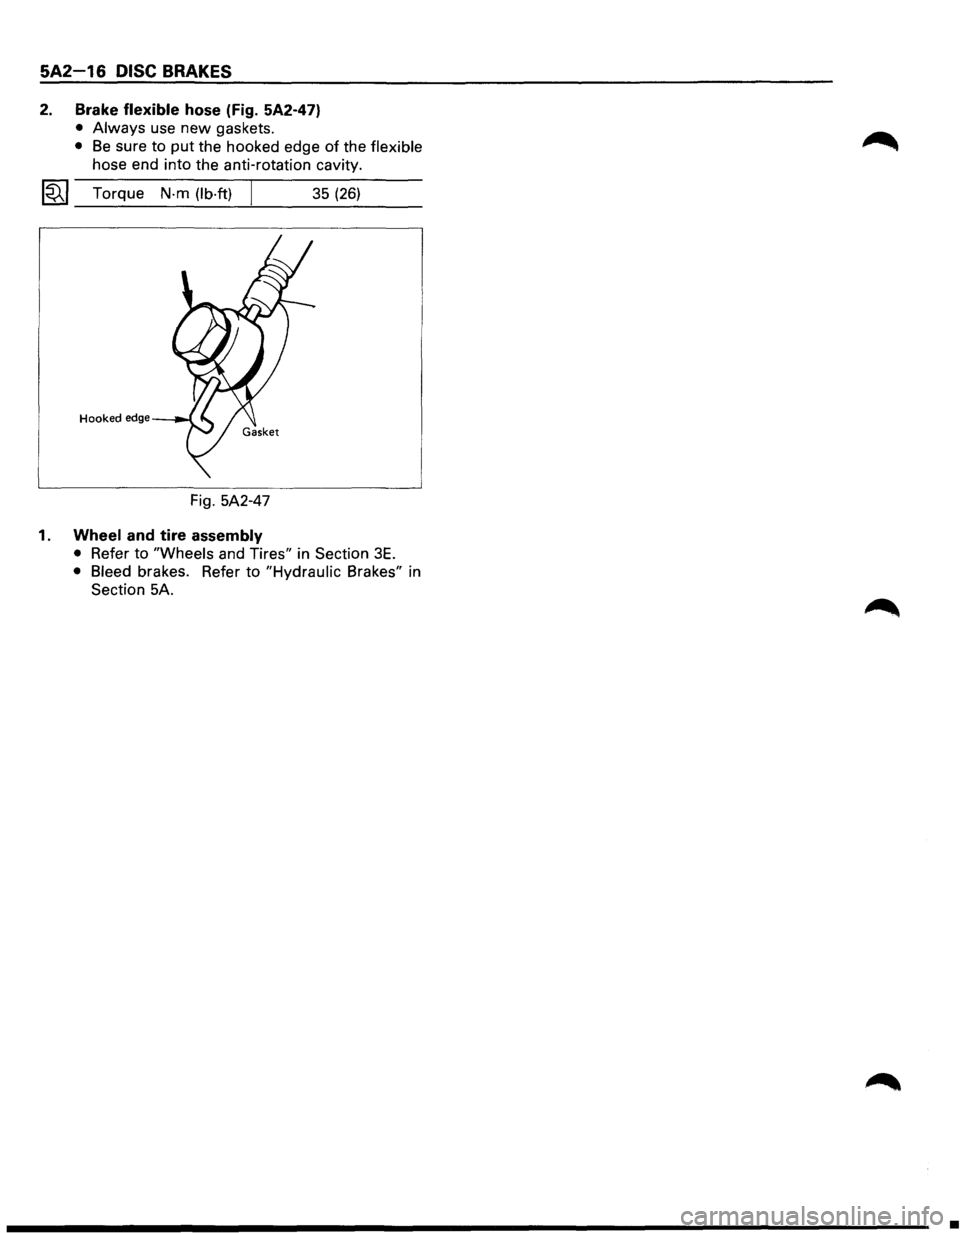
2. Brake flexible hose (Fig. 5A2-47)
• Always use new gaskets.
• Be sure to put the hooked edge of the flexible
hose end into the anti-rotation cavity.
~~~ Torque N-m (lb·ft) 35 (26)
Hooked edge
Fig. 5A2-47
1. Wheel and tire assembly
• Refer to "Wheels and Tires" in Section 3E.
• Bleed brakes. Refer to "Hydraulic Brakes" in
Section 5A.
•
Page 369 of 1928
REAR WHEEL ANTILOCK BRAKE SYSTEM 5A3-1
SECTION 5A3
REAR WHEEL ANTILOCK BRAKE SYSTEM
(RWAL}
w CAUTION:
• All brake attaching fasteners are an important attaching part in that they could affect performance of vital
parts and systems, and/or could result in major repair expense. They must be replaced with one of the same
part
number or with an equivalent part if replacement becomes necessary. Do not use replacement parts of
lesser quality or substitute design. Torque values must be used as specified during reassembly to assure
proper retention of these parts.
CONTENTS
Introduction . . . . . . . . . . . . . . . . . . . . . . . . . 5A3· 1
General Description . .
. . . . . . . . . . . . . . .
5A3· 1
Rear
Wheel Antilock (RWAL) Control
Parts Location . .
. . . . . . . . . . . . . . . . .
5A3· 5
System Diagram . .
. . . . . . . . . . . . . . . . . . . .
5A3· 6
Rear
Wheel Antilock (RWAL) System
Diagnostics . .
. . . . . . . . . . . . . . . . . . . . . .
5A3· 7
On-Vehicle Service . .
. . . . . . . . . . . . . . . . .
5A3·38
RWAL Electronic Brake Control
Module (EBCM) Replacement ....... 5A3-38
Antilock
(Isolation/Dump) Valve
Replacement ..................... 5A3-39
Speed Sensor Replacement
.......... 5A3-40
Main Data and Specifications ........... 5A3-41
Torque Specifications
............... 5A3-41
INTRODUCTION
This section deals with the complete diagnosis and
services
for vehicles equipped with rear wheel
antilock.
For service information regarding all other
components
of the brake system, refer to "Hydraulic
Brakes"
(Sec. SA), "Brake Booster System" (Sec. SA 1)
or "Disc Brakes" (Sec. SA2) of this Manual.
GENERAL DESCRIPTION
The rear wheel anti lock system (RWAL) is designed to
reduce rear wheel lock-up during a severe brake
application,
thus maintaining rear end stability. The
system functions
by regulating the rear hydraulic
brake line pressure. The pressure regulation is
accomplished
by an anti lock valve which is located on
the
front right side of engine room. The anti lock valve
is made up of two valves, a dump valve which releases
pressure into an accumulator and an isolation valve
which maintains rear brake pressure. The valve is
controlled
by a microcomputer which is part of the
Electronic Brake Control Module (EBCM). The
EBCM is mounted at the
front of the center
console. Under severe brake application, as pressure
is
applied to the brake pedal, the EBCM is designed to
permit the valve to do one of three functions or a
combination
of all three. The EBCM will allow the valve
to either maintain the same amount of hydraulic
pressure, release hydraulic pressure through the
dump valve into the accumulator or increase the
pressure by
pulsing the isolation valve.
The EBCM operates by receiving signals from the
speed sensor (which
is located in the differential
carrier), combination
valve and the brake light switch.
The RWAL system is connected
to the RWAL indicator
light located on the dash. An indication of the RWAL
operation and a
bulb check is performed each time the
ignition is turned
"ON". The indicator light will remain
on
for about two seconds. A RWAL system
malfunction is indicated if the RWAL indicator light
stays on, or comes on during driving. To determine the
specific
trouble, refer to "RWAL System Diagnostics"
in this section.
Page 406 of 1928
5A3-38 REAR WHEEL ANTILOCK BRAKE SYSTEM
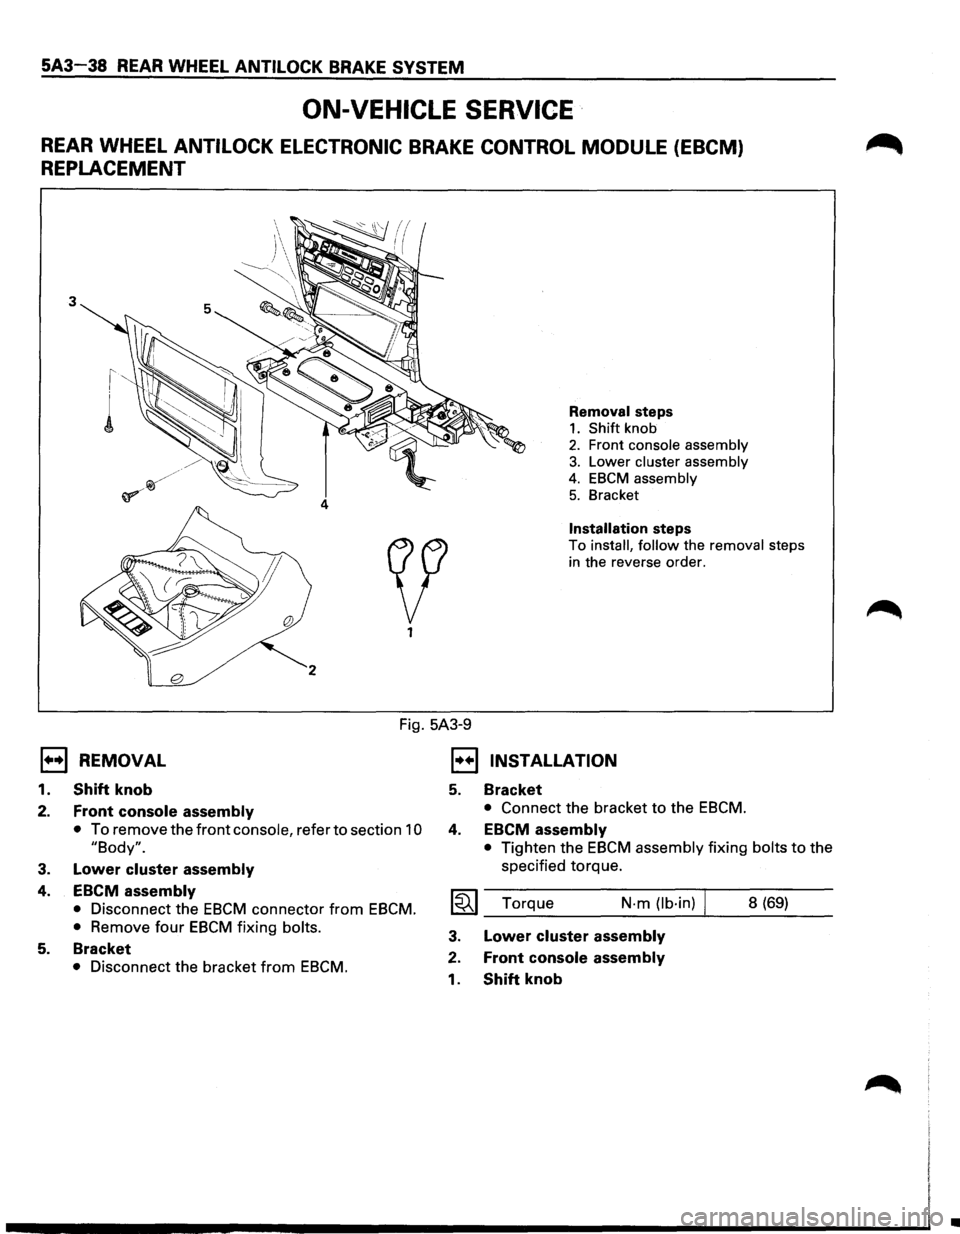
ON-VEHICLE SERVICE ·
REAR WHEEL ANTILOCK ELECTRONIC BRAKE CONTROL MODULE (EBCM)
REPLACEMENT
3
Removal steps
1. Shift knob
2. Front console assembly
3. Lower cluster assembly
4. EBCM assembly
5. Bracket
Installation steps
To install, follow the removal steps
in the reverse order.
Fig. 5A3-9
E) REMOVAL
1.
2.
3.
4.
5.
Shift knob
Front console assembly
• To remove the front console, refer to section 10
"Body".
Lower cluster assembly
EBCM assembly
• Disconnect the EBCM connector from EBCM.
•
Remove four EBCM fixing bolts.
Bracket
• Disconnect the bracket from EBCM.
1•+1 INSTALLATION
5.
4.
Bracket
• Connect the bracket to the EBCM.
EBCM assembly
• Tighten the EBCM assembly fixing bolts to the
specified torque.
I~I_T_o_rq_u_e ____ N·_m_(lb_·i_n_) ...... 1 __ 8_(6_9_) __
3.
2.
1.
Lower cluster assembly
Front console assembly
Shift knob
•
Page 407 of 1928
REAR WHEEL ANTILOCK BRAKE SYSTEM 5A3-39
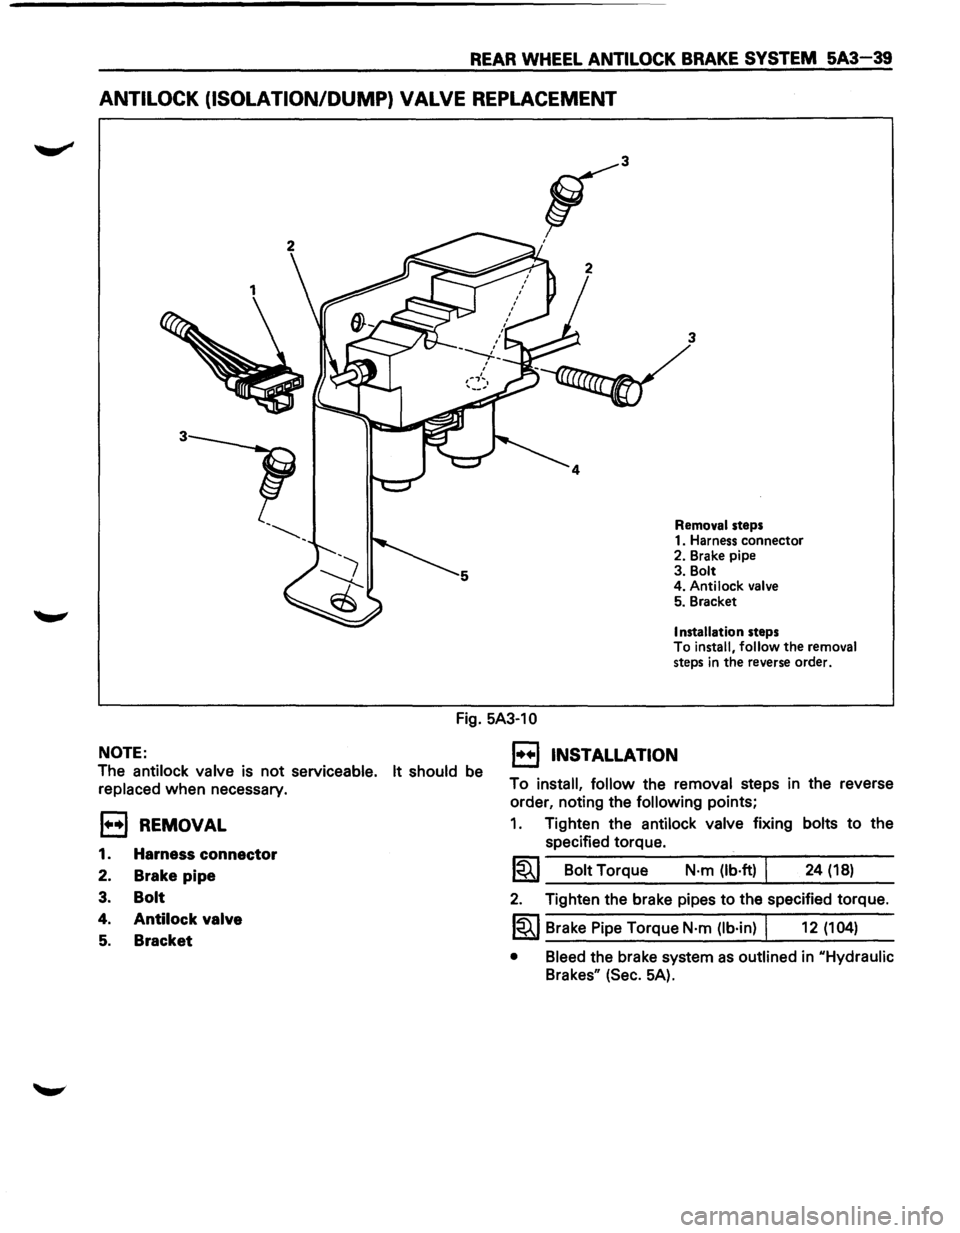
ANTILOCK (ISOLATION/DUMP) VALVE REPLACEMENT
3
Removal steps
1. Harness connector
2. Brake pipe
3. Bolt
4. Antilock
valve 5. Bracket
Installation steps
To install, follow the removal
steps in the reverse order.
Fig. 5A3-10
NOTE:
The antilock valve is not serviceable. It should be
replaced when necessary.
EJ REMOVAL
1. Harness connector
2. Brake pipe
3. Bolt
4. Antilock valve
5. Bracket
1••1 INSTALLATION
To install, follow the removal steps in the reverse
order, noting the
following points;
1. Tighten the antilock valve fixing bolts to the
specified torque.
1~1 Bolt Torque N·m (lb·ft) I 24 (18)
2. Tighten the brake pipes to the specified torque.
1~1 Brake Pipe Torque N·m (lb·in) I 12 (104)
• Bleed the brake system as outlined in uHydraulic
Brakesu (Sec. 5A).
Page 408 of 1928
5A3-40 REAR WHEEL ANTILOCK BRAKE SYSTEM
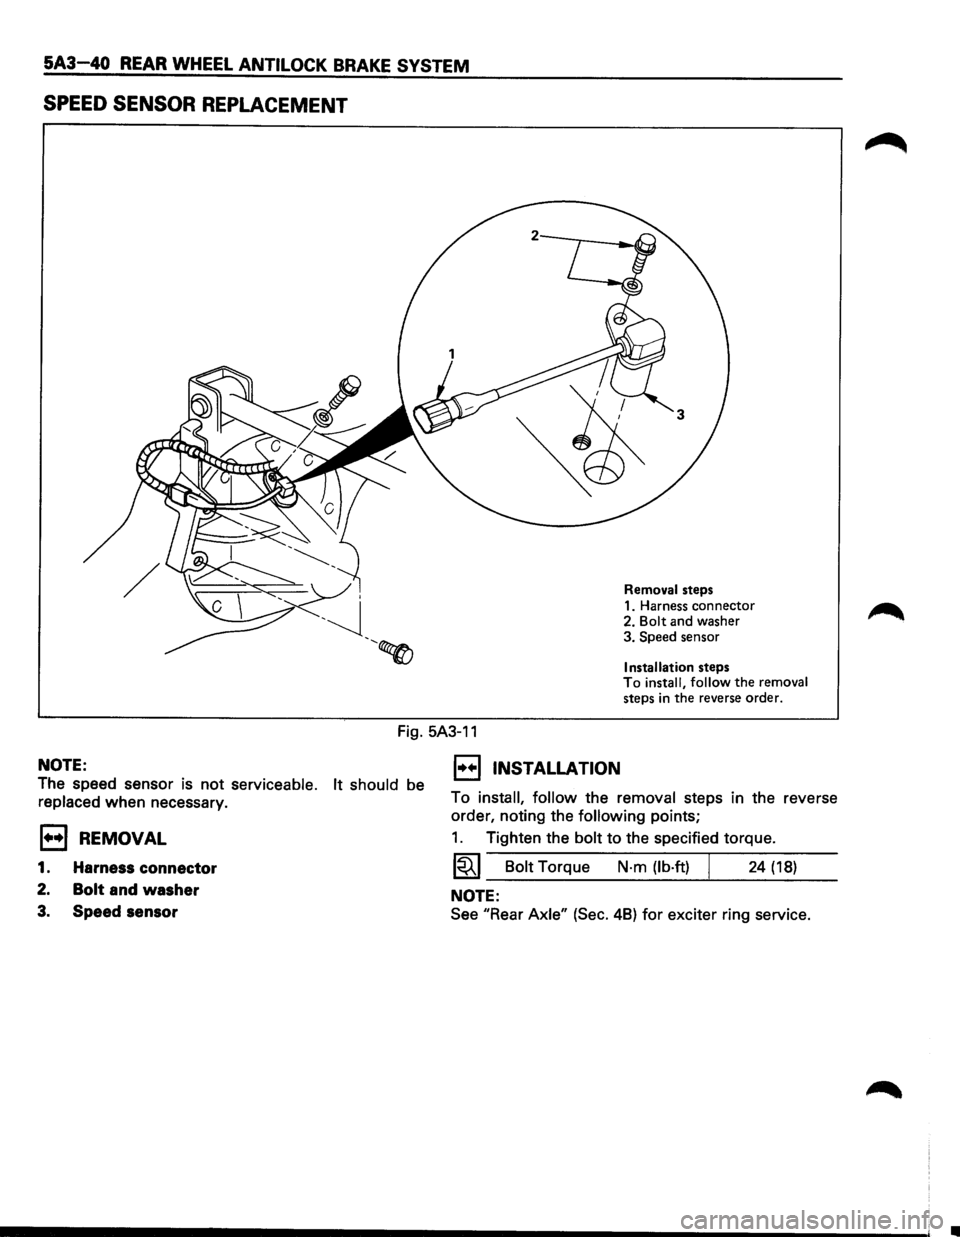
SPEED SENSOR REPLACEMENT
Removal steps
1. Harness connector
2.
Bolt and washer
3. Speed sensor
Installation steps To install, follow the removal
steps in the reverse order.
Fig. 5A3-11
NOTE:
The speed sensor is not serviceable. It should be
replaced when necessary.
E3 REMOVAL
1. Harness connector
2. Bolt and washer
3. Speed sensor
1••1 INSTALLATION
To install, follow the removal steps in the reverse
order, noting the
following points;
1. Tighten the bolt to the specified torque.
1~1 Bolt Torque N-m {lb·ft) I 24 {18)
NOTE:
See "Rear Axle" {Sec. 48) for exciter ring service.
Page 409 of 1928
REAR WHEEL ANTILOCK BRAKE SYSTEM 5A3-41
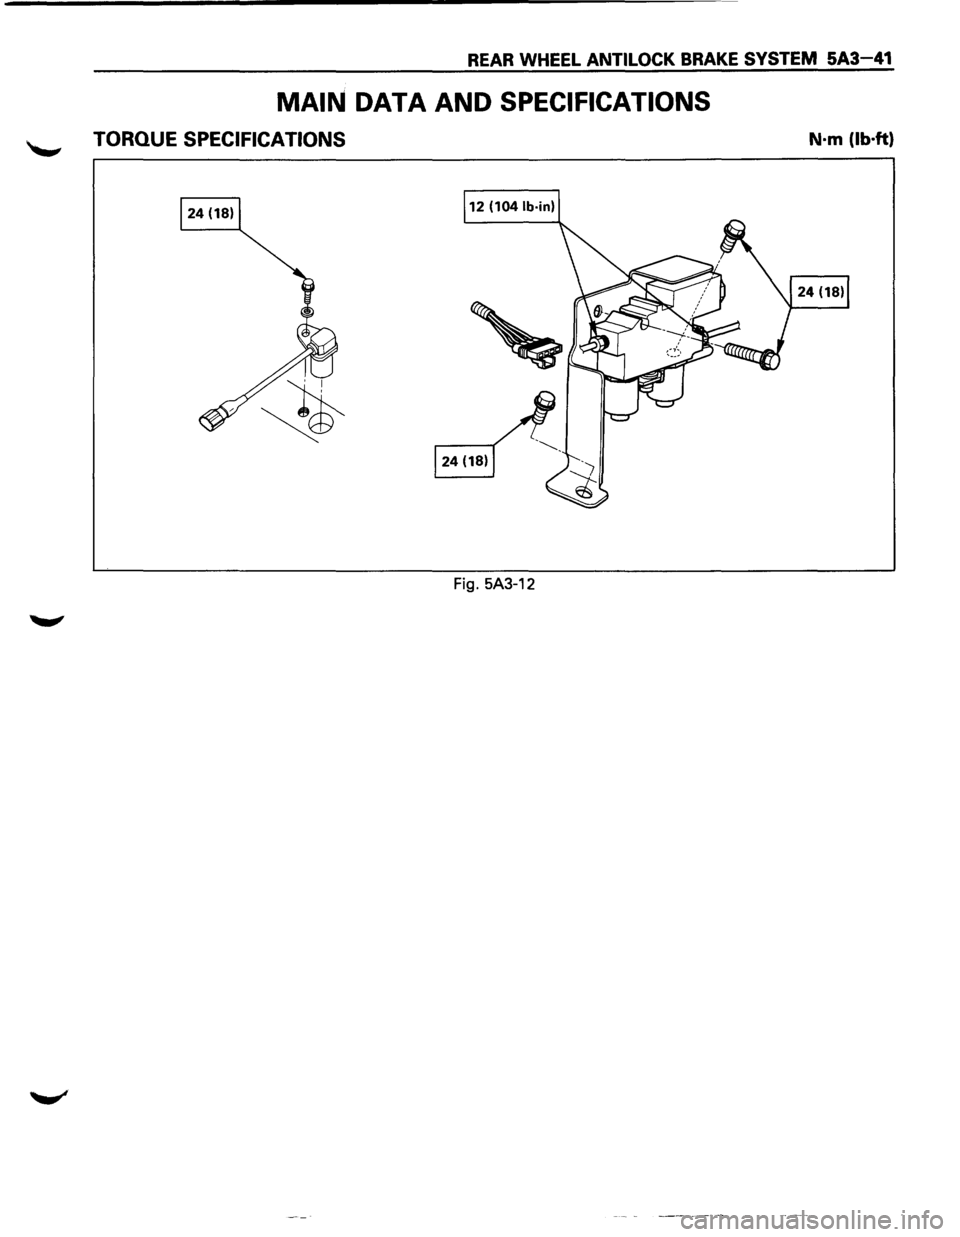
MAIN DATA AND SPECIFICATIONS
TORQUE SPECIFICATIONS N·m (lb·ft)
Fig. 5A3-12
Page 411 of 1928
4-WHEEL ANTILOCK BRAKE SYSTEM (ABS) 5A4-1
SECTION 5A4
'--' 4-WHEEL ANTILOCK BRAKE SYSTEM (ABS)
CAUTION
All
brake attaching fasteners are an important attaching part in that they could affect performance of
vital parts and systems, and/or could result in major repair expense. They must be replaced with one
of the same part number or with an equivalent part if replacement becomes necessary. Do not use
replacement parts
of lesser quality or substitute design. Torque values must be used as specified
during reassembly to assure proper retention of these parts.
CONTENTS
General Description .................... 5A4-3
System Components ................. 5A4-3
Electronic Brake
Control Module ·
(EBCM) .......................... 5A4-3
Hydraulic Unit ...................... 5A4-3
ABS Warning Light .................. 5A4-4
Wheel
Speed Sensor ................. 5A4-4
G-Sensor
........................... 5A4-4
Normal and Antilock Braking .......... 5A4-4
Brake Pedal Travel
................... 5A4-4
Abbreviation ........................ 5A4-4
Diagnosis
............................. 5A4-5
General
Information ................. 5A4-5
ABS
System Service Precautions ....... 5A4-5
Computer System Service
Precautions
....................... 5A4-5
General Service Precautions
........... 5A4-5
Note on lntermittents ................ 5A4-6
Test Driving ABS Complaint Vehicles ... 5A4-6
II ABS11 Warning Light ................ 5A4-6
Normal Operation ................... 5A4-6
Basic
Diagnostic Flow Chart ........... 5A4-7
Basic
Inspection Procedure ............ 5A4-8
TECH 1
TOOL. ......................... 5A4-10
1. What can be done with TECH 1 ...... 5A4-10
2. How to Use TECH 1 ................ 5A4-11
3. Explanation of Modes .............. 5A4-15
Mode FO: Data List ................... 5A4-16
Mode F2: Trouble Code ............... 5A4-18
Mode F3: Snapshot .................. 5A4-19
Mode F4: Clear Code ................. 5A4-20
Mode F5: Actuator Test ............... 5A4-21
Mode F6: Wheel Sensors ............. 5A4-31
Pin-Out Checks ........................ 5A4-33
Circuit Diagram ..................... 5A4-34
Part Location ....................... 5A4-37
Symptom Diagnosis .................... 5A4-38
CHART A-1 1) ABS Works Frequently
but Vehicle does not Decelerate ...... 5A4-39
CHART TA-1 1) ABS Works Frequently
but Vehicle does not Decelerate ...... 5A4-40
CHART A-2 2) Uneven Braking Occurs
while ABS Works .................. 5A4-41
CHART TA-2 2) Uneven Braking Occurs
while ABS Works .................. 5A4-42
CHART A-3, T A-3 3) The Wheels are
Locked
........................... 5A4-43
CHART A-4 4) Brake Pedal Feel is
Abnormal ........................ 5A4-44
CHART A-5 , T A-5 5) Braking Sound
(from Hydraulic Unit) is Heard while
not Braking ....................... 5A4-45
Diagnosis by 11 ABS11 Warning Light
Illumination Pattern .................. 5A4-46
Diagnostic Trouble Codes (DTCs) ....... 5A4-47
1. How to Display and Erase DTCs ... 5A4-47
2. Diagnostic Trouble Codes ........ 5A4-49
CHART B-1 With the Key in the ON
Position (before Starting the Engine),
Warning Light (W /L) is not
•
Actuated ........................ 5A4-50
CHART B-2 II ABSII Light Flashes
Twice with Key ON ................ 5A4-51
CHART B-3 EBCM Abnormality (Diagnostic
Trouble Code 14) .................. 5A4-52
CHART B-4 Power Voltage Drop (Diagnostic
Trouble Code 15) .................. 5A4-53
CHART B-5 G-Sensor Circuit (Diagnostic
Trouble Code 21) .................. 5A4-54
CHART B-6 Brake Switch Trouble
(Diagnostic Trouble Code 22) ........ 5A4-55
CHART B-7 Abnormal Transmission Input
(A/T Modei)(Diagnostic Trouble
Code 23) ......................... 5A4-56
CHART B-7 Abnormal Transmission Input
(M/T Modei)(Diagnostic Trouble
Code 23) ......................... 5A4-57
CHART B-8 Hydraulic Unit (HU) Pump
Motor and Motor Relay Circuit
(Diagnostic Trouble Code 32) ........ 5A4-58
CHART B-9 Solenoid Valve Abnormality
(Diagnostic Trouble Code 41, 42,
& 44) ............................ 5A4-59
CHART B-10 Valve Relay Abnormality
(Diagnostic Trouble Code 45) ........ 5A4-60
Page 483 of 1928
4-WHEEL ANTILOCK BRAKE SYSTEM (ABS) 5A4-73
ON-VEHICLE SERVICE
W CAUTION:
~ Replace all components included in repair kits used to service this system. Lubricate rubber parts with
clean, fresh brake fluid to ease assembly. Do not use shop air with in-line lubricators on brake parts,
as
damage to rubber components may result. If any hydraulic component is removed or brake line
disconnected,
it may be necessary to bleed part or all of the brake system.
NOTE:
The use of rubber hoses or parts other than those furnished specifically for the Anti lock Brake System may
lead to functional problems requiring major overhaul.
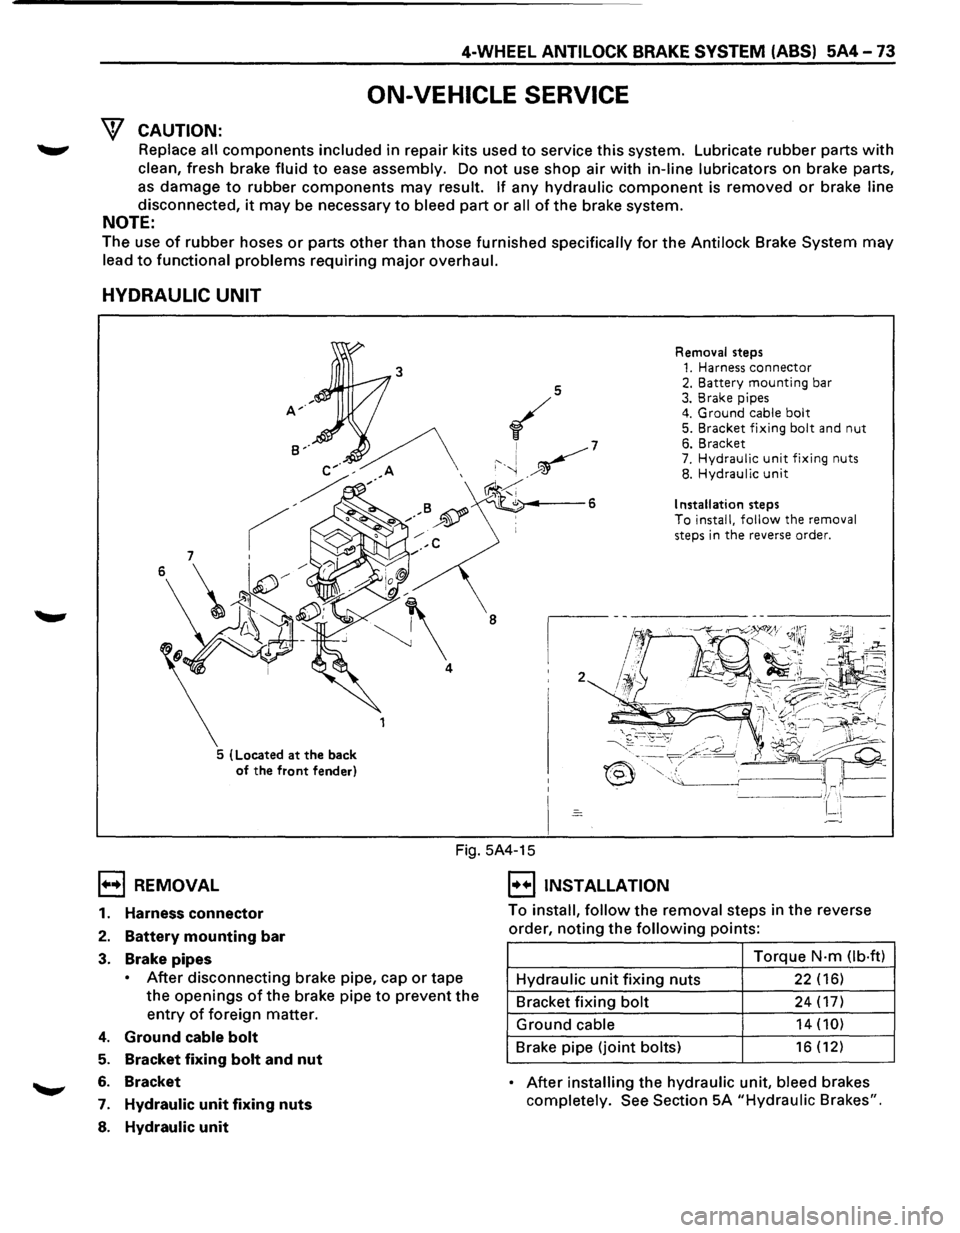
HYDRAULIC UNIT
5 (Located at the back
of the front fender) Removal
steps
1. Harness connector 2. Battery mounting bar 3. Brake pipes 4. Ground cable bolt 5. Bracket fixing bolt and nut 6. Bracket 7. Hydraulic unit fixing nuts 8. Hydraulic unit
Installation steps To install, follow the removal
steps in the reverse order.
1••1 REMOVAL
Fig. 5A4-15
I••IINSTALLATION
1. Harness connector
2. Battery mounting bar
3. Brake pipes
• After disconnecting brake pipe, cap or tape
the
openings of the brake pipe to prevent the
entry of foreign matter.
4. Ground cable bolt
5. Bracket fixing bolt and nut
6. Bracket
7. Hydraulic unit fixing nuts
8. Hydraulic unit
To install, follow the removal steps in the reverse
order,
noting the following points:
Torque
N·m Ob·ftl
Hydraulic unit fixing nuts 22 (16)
Bracket fixing bolt 24 (17)
Ground cable 14 (10)
Brake pipe (joint bolts) 16 (12)
• After installing the hydraulic unit, bleed brakes
completely.
See Section 5A "Hydraulic Brakes".
Page 484 of 1928
5A4-74 4-WHEEL ANTILOCK BRAKE SYSTEM (ABS)
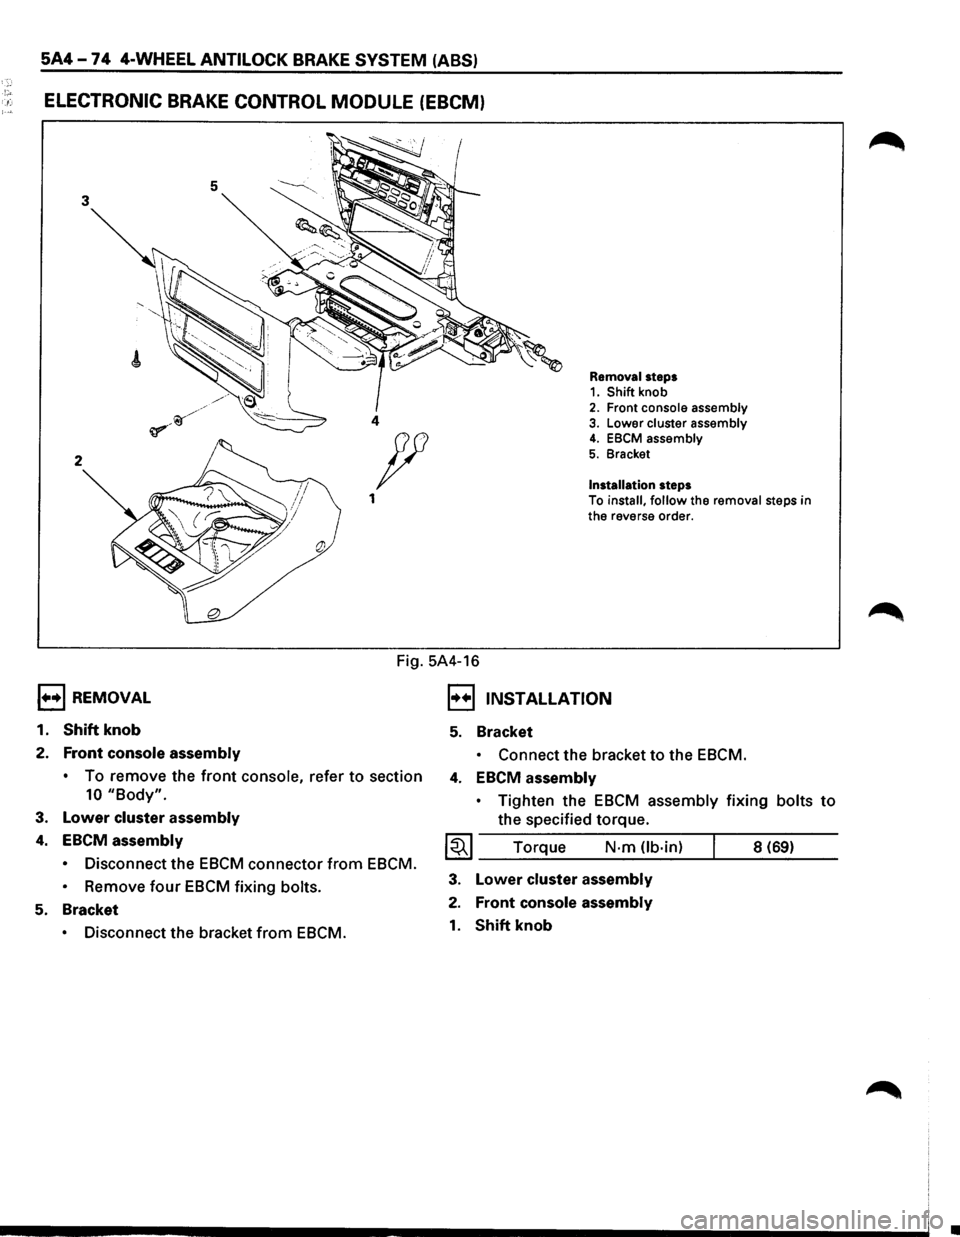
!"' . .: ELECTRONIC BRAKE CONTROL MODULE (EBCM)
5 3
2
1••1 REMOVAL
1.
Shift knob
2. Front console assembly
Removal steps 1. Shift knob 2. Front console assembly 4 3. Lower cluster assembly
Installation steps
4. EBCM assembly
5. Bracket p
1 To install, follow the removal steps in
the reverse order.
Fig. 5A4-16
I••IJNSTALLATION
5. Bracket
• Connect the bracket to the EBCM.
•
To remove the front console, refer to section 4. EBCM assembly
10 "Body".
3. Lower cluster assembly
4. EBCM assembly
• Disconnect the EBCM connector from EBCM.
•
Remove four EBCM fixing bolts.
5. Bracket
• Disconnect the bracket from EBCM. •
Tighten
the EBCM assembly fixing bolts to
the specified torque.
~~~ Torque N·m Ub·in) 8 (69)
3. Lower cluster assembly
2. Front console assembly
1. Shift knob
•